
Emily Henderson's Blog, page 174
April 9, 2021
Tour Creative Director And Founder of A1000XBETTER Kirsten Slavek’s Soulful, Vintage Filled Home
Once again, I have the distinct pleasure of walking you through a home that may as well have flown straight off my mood board and into my lap. It’s not every day you get to write about a dream home and for anyone who knows me and my style, it should come as no surprise that this is home of Kirsten Blazek, founder and creative director of A1000XBETTER. If you remember this home tour staged by AXB that I was head over heels for, you can probably guess I am a huge fan of them and everything they do. To say I am fangirling over featuring this home would be absolutely right, but what’s even more exciting is I got to pick Kirsten’s brain about her home, her inspiration, and her design processes. Of course I would never keep all that juicy knowledge to myself, so let’s get into it what makes this home so special:
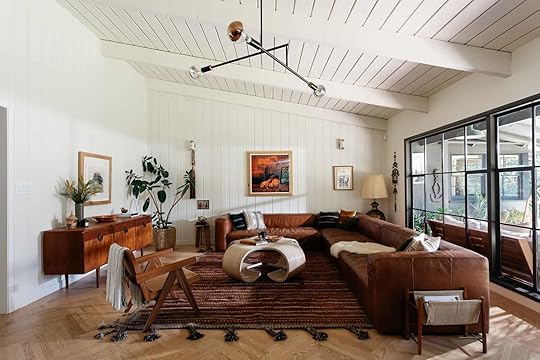
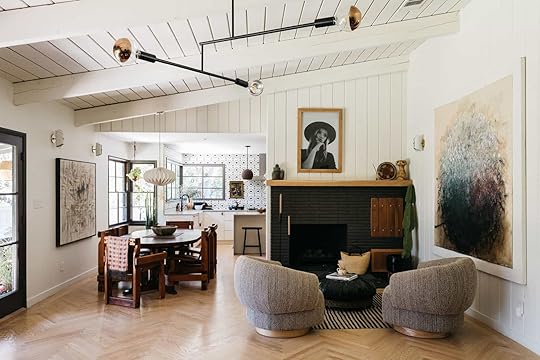
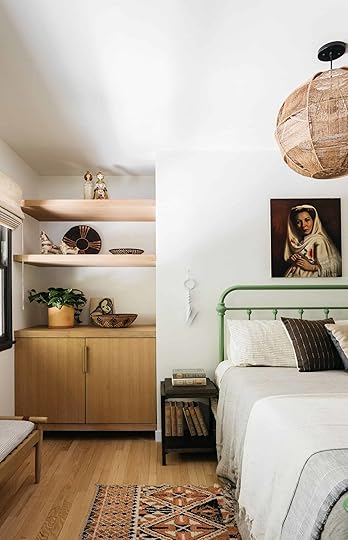
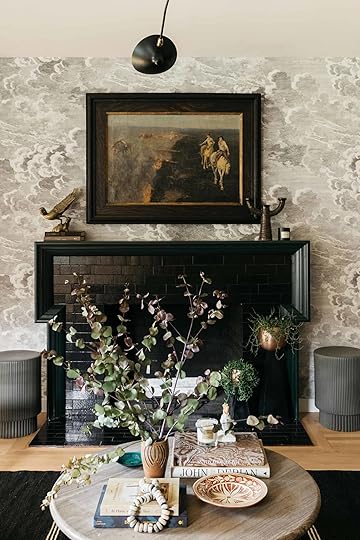
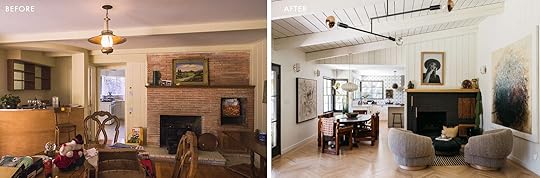
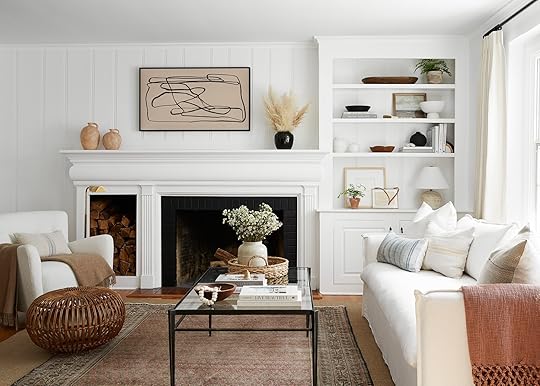
Starting with the family room which underwent the biggest transformation (make sure to read until the end to see the very shocking before and after), you can see how every shape, color, and texture speaks to Kirsten’s impeccable eye for curating vintage and soulful homes so I had to ask how she does it:
Clearly, you have an eye for mixing patterns and textures. What’s your advice or mantra on mixing the two?
I think it is all about the balance of blending something bold with something quiet and finding that happy spot where there isn’t too much of anything and just enough to add that extra layer of interesting. If you have a bold pattern like a wallpaper then think about what will go with that, maybe it is just a solid or something with less pattern that matches the color story in the room. If the room is more quiet then bring in some pattern in the layering items like throw pillows and other textiles.
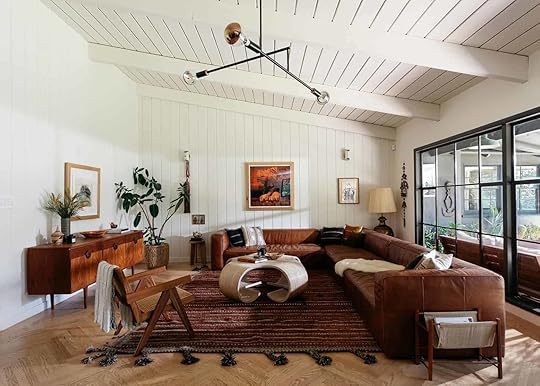
Sectional | Pendant | Cowboy & Western Framed Art
Can you tell us a little about the background of this home? When did you buy it? How long was the renovation process? What made you fall for it in the first place?
I bought the house with my ex partner. We bought the house right before Thanksgiving in 2017 but didn’t get access to the house until early Jan 2018. We had moved our family into temporary accommodation which was small and were in a big hurry to get out of it and into the house. We hired an experienced construction team, Bayside Builders, who had a large team and we were able to do a very large renovation in 5 months- including moving walls, re-working the floor plan, raising the ceiling in the family room, complete kitchen and all bathroom renovations, new plumbing, electric, etc. The reason I fell for the house was the untapped potential and the fact that it was in an amazing neighborhood (Linda Vista) with less than a block’s walk to the edge of the Arroyo overlooking the Rosebowl.
Merrick Swivel Chair | Large Abstract Art
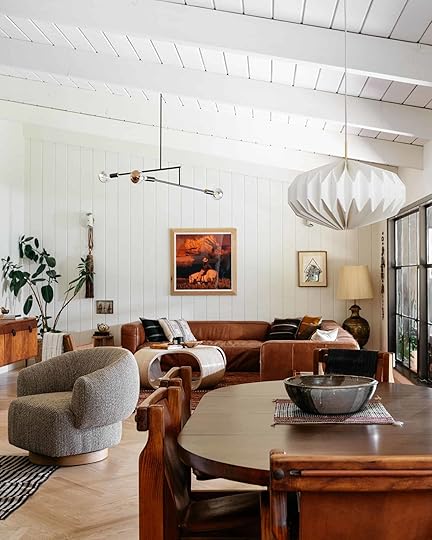
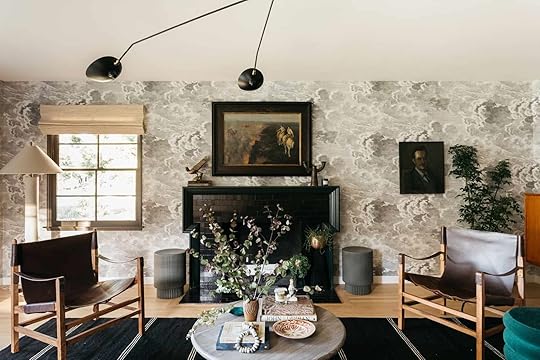
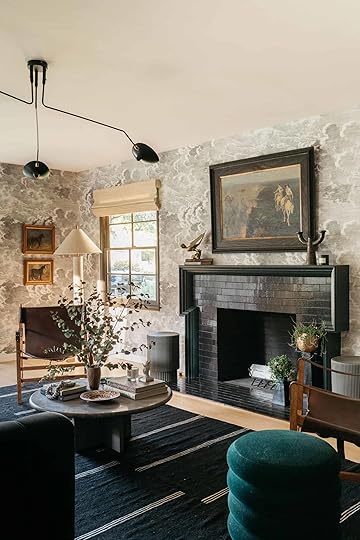
The open concept living/dining area looks like it might have been tough to layout with that corner fireplace! What was that process for you?
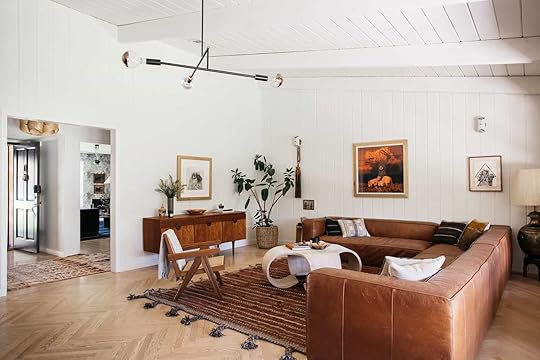
This room went under the largest transformation, the ceiling was flat, there was only a small opening into the kitchen adjacent to the fireplace and there was a 60s style corner bar . There was also an opening from the front bedroom (which was previously the dining room) into the kitchen. After looking in the attic we realized we could pitch the ceiling in there and that was a total game changer- we took the ceiling up to a height of 13ft and opened up the area completely between the fireplace and kitchen. Once the room was opened up then it became obvious that the fireplace area could be it’s own seating and that we would also have plenty room for a good sized dining table!
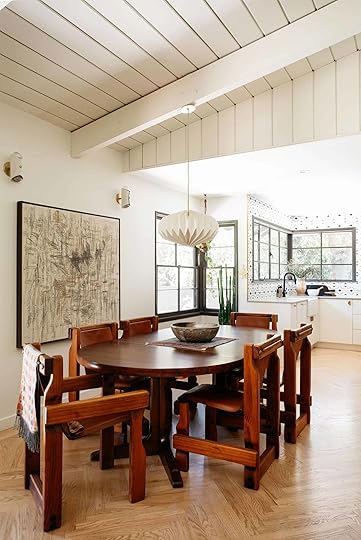

Dining Table via Midcentury LA | Pendant
Amongst many other things in this space, the fireplace is simply stunning. I love how she went with a black finish instead of going for a neutral color that would have blended into the background so I wanted to know what sparked this decision.
What inspired your decision to paint the fireplace black?
I painted the brick the same color as the window trim so that it would tie in with them and then capped the mantle with a lovely white oak so it would offset the dark paint.
You have some really wonderful unexpected art moments (like the ship painting over the side table in the living room). But you also hung a few pieces of art over tile like in your kitchen and bathroom. How did you secure those? Was it an adhesive or a good ole screw?
I love to hang art at unexpected heights and in what would typically be seen as odd locations. I use art to fill gaps in the wall or in the lines between furniture! When it comes to art hanging I don’t like to follow too many rules, just what feels right to me. With the art on top of the tile we used 3M hanging strips and they hold really well.
HOT TIP: If you are renting or don’t want to drill a ton of holes into your walls (especially if you are planning a gallery wall) adhesive hanging strips are a great alternative and some can hold up to 16 pounds!

What were the challenges while designing the home?
Time!! We did the whole remodel in less than 5 months so time was my biggest challenge. At the time my business was focused on staging so I would work all day then spend the evenings catching up on what product the contractors needed to keep moving. I had to make very quick decisions and not second guess anything!

How would you describe the style of your home? Have your years of staging houses influenced your own style or are you similar to Emily where you of course have style preferences but like to stick to the style of the home’s architecture?
The style of the house when we bought it was a traditional California Mid Century Ranch with board and batten, brick and stucco exterior. I have always loved Ojai and my vision for the house was to bring the house up to date but to enhance it’s California ranch style. The architecture of a home always influences the choices I make because I do believe that if you fight too much with what the house innately is then it can be an odd pairing, I believe has a soul and essence and it is best to pay attention to that.
All of the vintage pieces you have are so so special and likely you spent many years sourcing them. If you could give people one tip for vintage shopping what would that be?
My big tip for collecting vintage is travel when you can and when you do, never pass a thrift shop, It is amazing what you can find in every little town in California!! Also don’t forget the Rosebowl and the PCC flea market, it is impossible to leave either venue without vintage treasure.
Rug via Mehraban
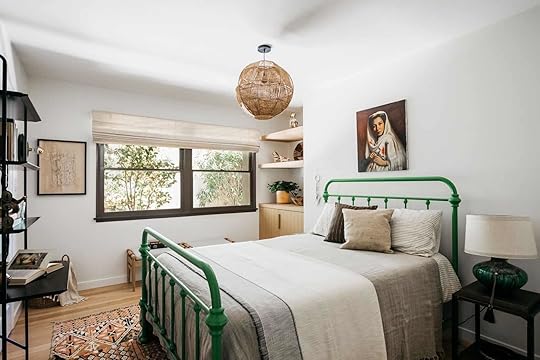
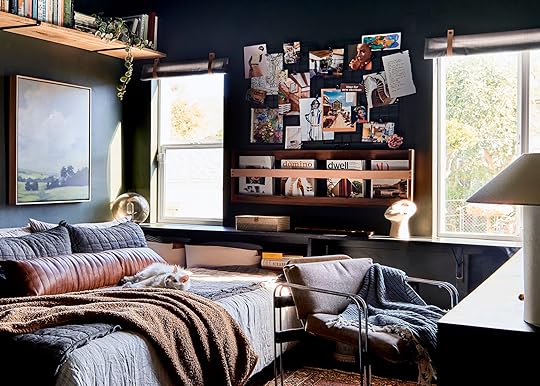
Don’t ask why, but I think this is my favorite room in the home. Maybe it’s the green bed frame that is totally unexpected yet works so well or the fact that this room is like the effortlessly cool person I want to be. Whatever it may be, this bedroom will remain on my mood board for life. Ah, but I digress…
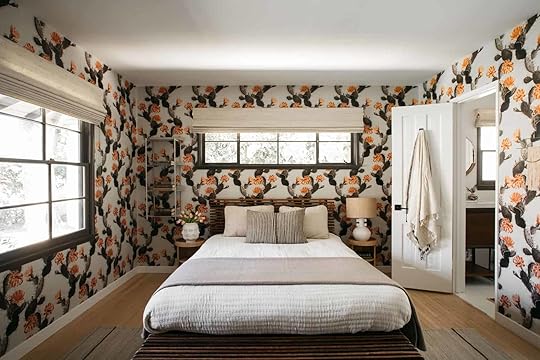
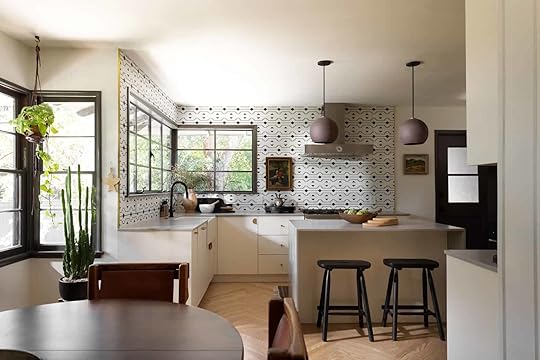
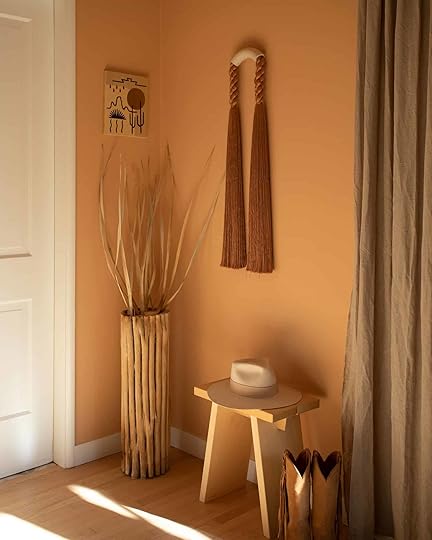
I am dying over all of the amazing wallpaper moments. How did you decide which rooms to wallpaper?
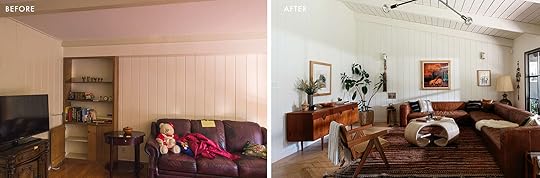
I have a love affair with wallpaper, I love the added depth and character to a room. I started with the formal living room which was a large but awkward room with an off center fireplace and all the windows at the end of the room. I choose the Cole and Son Fornasetti cloud paper for in there because I wanted a black and white paper that had pattern and movement and was a statement but isn’t overwhelming. In my daughter’s room I decided on the cactus wallpaper (from Milton and King). In the front bedroom, I wanted to add some character but scaled it back by just doing one wall! (Lulu and Georgia, Sarah Sherman Samuel) and in the powder room I was lucky enough to have remnants of a House of Hackney paper that we had used on a job so I decided to use it in the smallest room which was the powder. It was kind of an organic process on deciding and I just added it over the 3 years we were in the house when I wanted to add a little extra moment to the room!

She’s so right. The wallpaper (especially large-scale wallpaper) adds so much depth and character to a room that it allows the rest of the decor to remain minimal.

See, the decor is simple but impactful which compliments the busyness of the wallpaper.
Pendant | Rug via Mehraban | Rope Wall Hanging
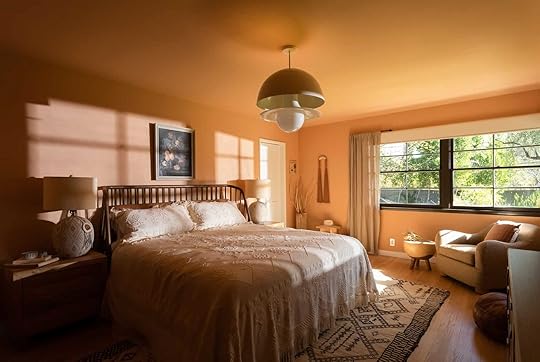
The principal bedroom is so dreamy and calming! Did the natural light come into play when you were choosing the paint color?
Yes for sure, the principal bedroom gets really beautiful light especially towards the end of the day and I wanted the bedroom to feel encompassing and warm, like a kiss from the sun. When I saw the new Kelly Wearstler collaboration with Farrow and Ball I decided that the Faded Terracota was perfect for the room. I also had warm toned art in there and knew it would highlight the tones in the art.
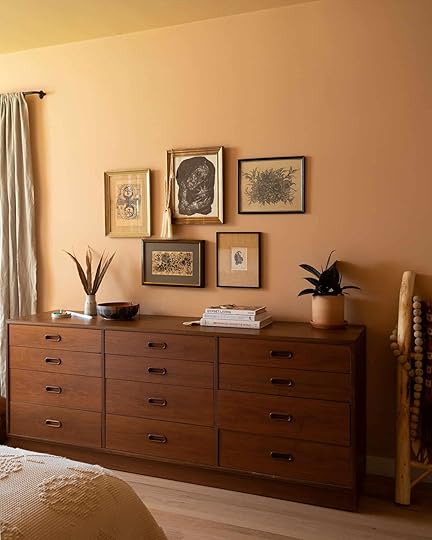
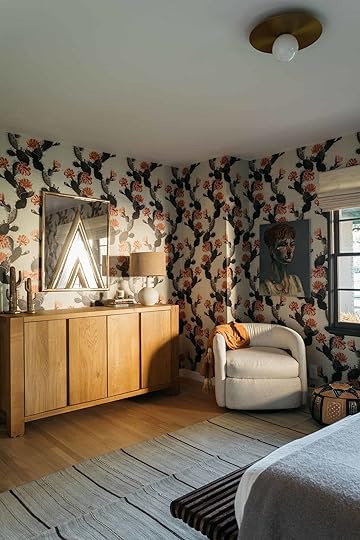
Do you have a philosophy of how to balance vintage and new pieces in a home? In your opinion how much vintage is too much before it actually feels dated instead of soulful?
I believe that vintage always should have a place in your home and brings a grounded element to the newer furniture. Like anything you don’t want to overdo anything so I like to use mainly new pieces for the big furniture items and then pop in key vintage items from different eras- I think blending vintage from different decades is the key to not making it too themed.
Wallpaper | Coffee Table | Floor Lamp
It’s also clear you love large scale wallpaper patterns (because they are awesome). Do you have a method of how to go bold with the pattern yet have it not feel overwhelming? i.e. how to pick colors, furniture pairings, etc.
I love black and white as a grounding color in all spaces and in the wallpaper I used this same theory, even if the pattern is large and potentially busy the black and white/ ivory provides a neutral backdrop for art and furniture in any color way. My daughter’s room was the most specific in color but I had selected Black Fox as the trim color for all the windows and new that even though it was bold it would make sense together.
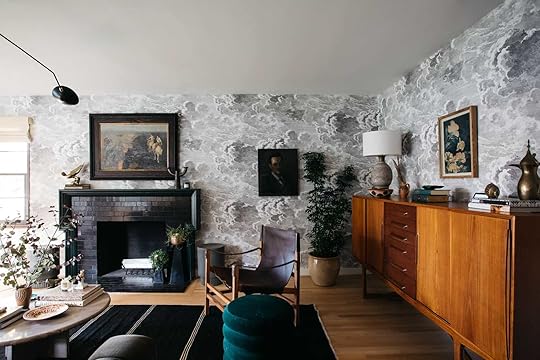
Can you tell us about this fireplace? What made you go with a black finish here?
Black was one of my through colors throughout the house. I wanted black tile to compliment the wallpaper and as grounding moment in the room. Not to mention black is such a great color to anchor a space.
I love how you mixed up the light fixtures throughout the home. What was your strategy for making them cohesive yet different and special?
Thank you! I love to mix up lighting in all my designs, for me it is the jewelry on a room and it is a place that you can afford to take a little bit more a risk. I like to select modern and 70s inspired fixtures as a juxtaposition to my more electic southwestern and bohemian leanings.

Wallpaper | Rug via Mehraban | Table Lamps | Pendant | Bench
Each room is so different but still maintains a similar style/feel. How did you plan out the designs for each room? Was it more one at a time or did you have an idea of what you wanted from each space?
Honestly I work very organically when designing a space, I listen to my gut of what feels right but something that is very important to me is a consistency in colors. I do think a lot about how colors make sense flowing from room to room and ultimately I use this as my guide. I will start in the most important spaces and let the colors and feel of the rooms flow from there. I love earth tones but my ex partner also had a very important piece of art that he inherited from his mother that was green based so I made sure to incorporate green into the formal living room because I knew it would hang there and then tie that in with pops of green in the family room since they were visible to each other.
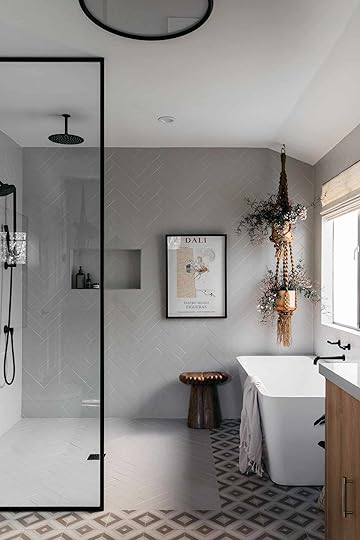
Dali Poster (similar)
Those bulb sconces are the coolest! What kind of light do they give off or are they meant for a moody bathroom ambiance?
I bought them from a seller on Etsy and wasn’t sure how much light they would cast but I wanted the option to take a bath (a favorite pastime of mine) without bright overhead light. They ended up being kind of perfect and gave off a really nice soft light that wasn’t too dim.

Your studio is so impressive! Any little pieces of advice for anyone wanting to create a studio of their own (electrical needs, soundproofing, etc.)
My ex partner is a musician and Cinematographer and needed a place to play drums and also have his edit bay. So we took the California basement (that was previously open to the underside of the house) and moved the water heater to the exterior and transformed this space with cedar cladding into a full finished studio. We didn’t sound proof but I would advise when possible if you are creating a space for music in your home. The wood cladding did however help to absorb sound and softened the whole room!
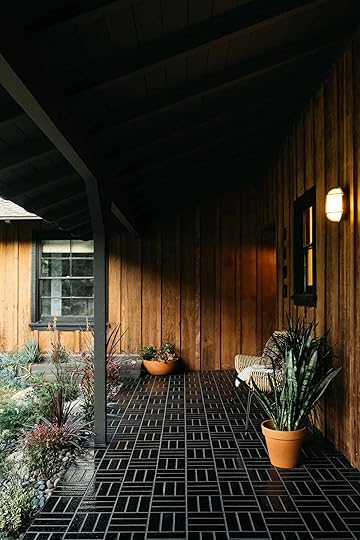
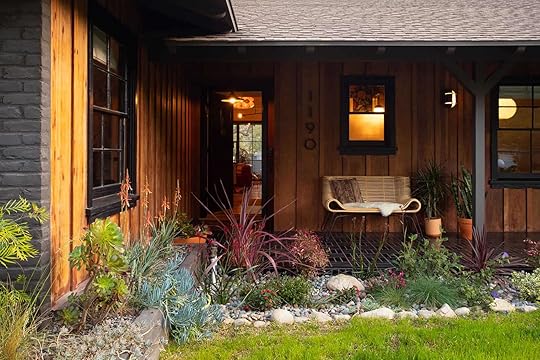
What was the process of choosing your exterior color like? It’s such a big and expensive decision that our readers would definitely love to hear about.
I am a long time fan of Black Fox by Sherwin-Williams, it is a perfect dark but not black paint with a brown base that reads differently in different lights. Even though it is dark, it is not harsh and I love that about it. It is always hard making a decision on exterior paint because it is such a big expense but I knew I wanted the house to be dark. It was previously and off white color. We also had all the paint stripped off the board and batten on the front porch which revealed a beautiful and original redwood which we had sealed with a colorless sealer to not alter the color at all- it is one of my favorite things about the house.
Lastly, Do you have a favorite room?
My favorite room is the family room, it is the room where we spent the most amount of time and I loved the pitched ceiling in there and the tongue and groove we had installed which added a lot of depth and character. I am also very glad we opened up the space but the fireplace created a natural division between the kitchen and family room so that it wasn’t too open, I am really not a fan of spaces that are too open- you need the dividing elements to make furniture easier to place!
Now for our favorite part. The almost unbelievable before and afters:
Huge thanks to Kirsten for allowing us to feature her home and for allowing me to bug her with a million questions:). Now, meet me in the comments if you want to fangirl over her home with me.
*Design by Kirsten Blazek
**Photos by Alex Zarour of Virtually Here Studios
The post Tour Creative Director And Founder of A1000XBETTER Kirsten Slavek’s Soulful, Vintage Filled Home appeared first on Emily Henderson.


April 8, 2021
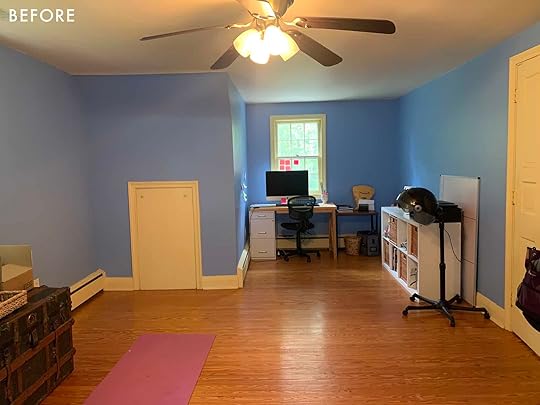
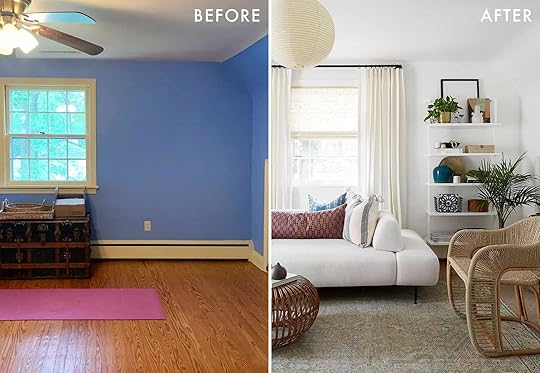
Blue Walls Be GONE! Key’s Totally Transformed Office Reveal – Maybe The Most Dramatic Before & After Ever (?)
Emily here – today’s post is really special, both because we get to see a great before/after full of great design and real raw humanness from Keyanna, but also as her mentor, we/I feel super happy that our partner on this job, KILZ, supported this and trusted that this was going to be a great opportunity for everyone involved. A room makeover on your own is so much work, I know that first hand. Not only doing the painting labor (thank goodness KILZ made priming and painting over the darker paint so easy) but concepting, pitching, shopping, pivoting when things don’t arrive, styling, shooting, editing, filming IGTVs and all the social, linking, crediting, writing and promoting. We all make it look easy, but IT’S A JOB. Creating high-quality content, beautiful photos, and engaging words when a big publisher (us) and a great partner (KILZ) are involved just takes real talent. Key, you nailed it – a powerhouse content creator. So without further ado, Keyanna’s first sponsored makeover with KILZ…
Hey guys, Key here! The day has come for the final FIRST reveal of my home office makeover! Yup, you read right, my first-final reveal. No, this isn’t some sneaky way for me to extend my mentorship with EHD…or perhaps it is (insert villain laugh), but rather, this is a lesson of style evolution and the patient discovery of one’s true design identity.
Let me explain…
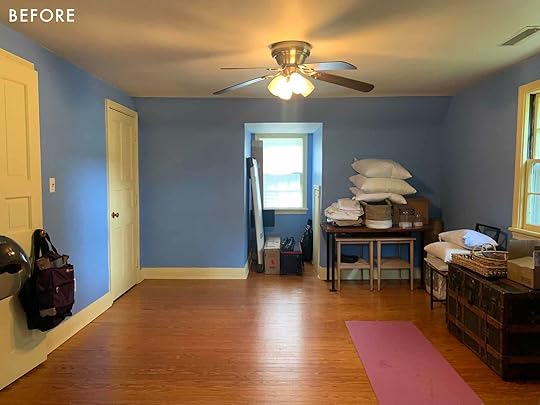
When I first announced my office makeover, I was bright-eyed and bushy-tailed and ready to turn this blue and yellow, oil-based painted nightmare of a room into a beautiful, multi-purpose space. Once everything was solidified with my gracious sponsor, KILZ, I had about 2 months to pull off this makeover. Had I ever designed a space from concept to completion in 60 days? Nope! But I was up for the challenge.
And oh what a challenge it turned out to be. Not in regards to external factors like out-of-stock products and furniture delays (although there were those), but rather an internal struggle of identity… design identity.
Again, let me explain…
THE PROCESS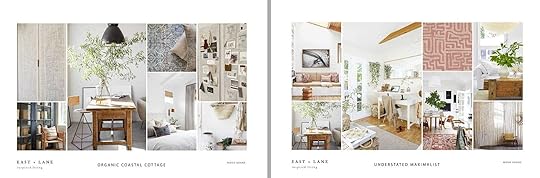
If you read my last post, then you know I’ve been having an identity crisis when it comes to my design style and recently came out as design-poly (ie. lover of multiple design styles). Finally embracing my love for both minimalist and maximalist, neutral and colorful aesthetics was liberating, and I set out on a creative journey to menage a trois these styles into one beautifully mixed design baby that I named “Understated Organic Coastal Maximalist Cottage”.

I’m the type of person who likes to sit in the room that I’m designing for a few hours and brainstorm ideas for the space. That was NOT the case for this room. I couldn’t see past the BLUE, and the agony of having to do all that prep work to paint over the oil-based trim was stopping my creative juices from flowing.

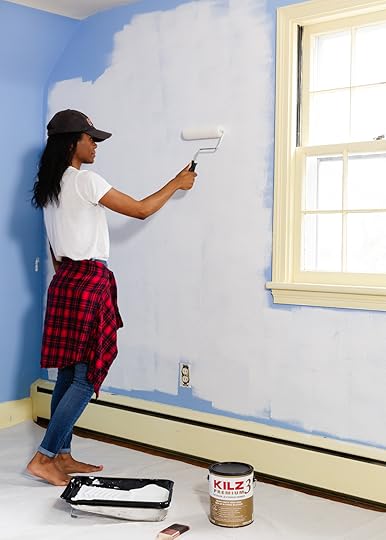
KILZ 3(R) Premium Primer was legit my saving grace. The quality and the coverage was so good that it cut my painting time in half. Which in turn saved my sanity. And perhaps even my marriage. Thank you KILZ!

Once the room was primed, I had a blank slate to work with. I sat on the floor with my sketch pad in hand and started drafting up ideas.
Designing this space was like concocting a recipe… except I don’t really consider myself a chef (read: designer). I’m more of a foodie (read: design enthusiast). But I threw all the ingredients into the bowl:
1 cup Leanne Ford (white foundation), 3 tbsp Justina blakey (boho vibes), 2 tsp Amber Lewis (collected feel), and a pinch of Em Henderson (layered styling). Does anyone even know how to accurately measure a “pinch”?
Mix. Mix. Mix.
Bake at 325 degrees.
And voila! Here she is! Understated Organic Coastal Maximalist Cottage. Let’s explore all her features…
THE REVEAL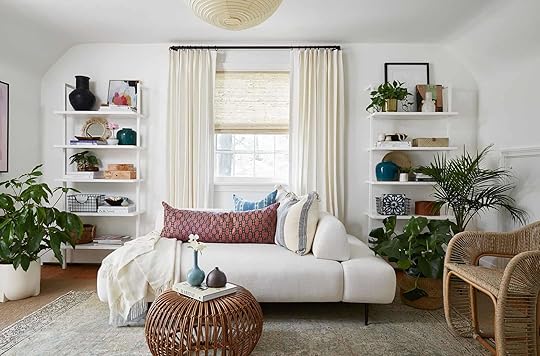
First, let’s talk about her most obvious and perhaps most controversial trait, her color. She’s white! Are you shocked? Surprised? Disappointed?
Initially, when it came to selecting a paint color, I was adamant about cladding the walls in color. I already have three white rooms in my house and I felt like it was time to step outside my comfort zone and try something different. Many of you agreed that color on the walls would make the room feel much more unique and interesting, and expressed sentiments that white rooms were “boring and generic”. However, after staring for hours and even days at the pretty, peachy-pink-hued swatches on the wall, something just didn’t feel right. I would close my eyes for five seconds and then quickly open them and see which swatch my eyes landed on, as if it was some instinctive way for my gut to lead me to the hue that was right for me. And still, I just couldn’t commit to a color.
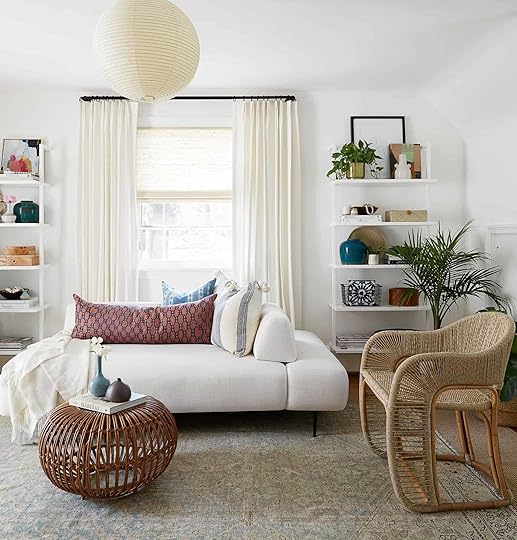
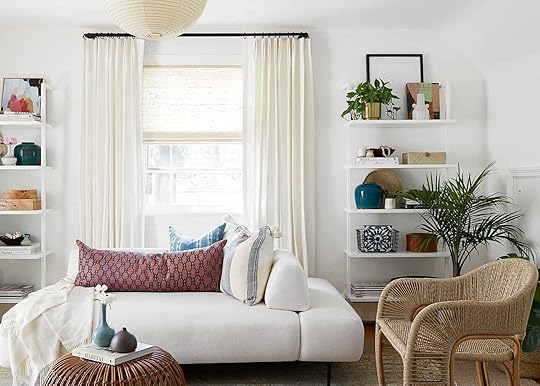
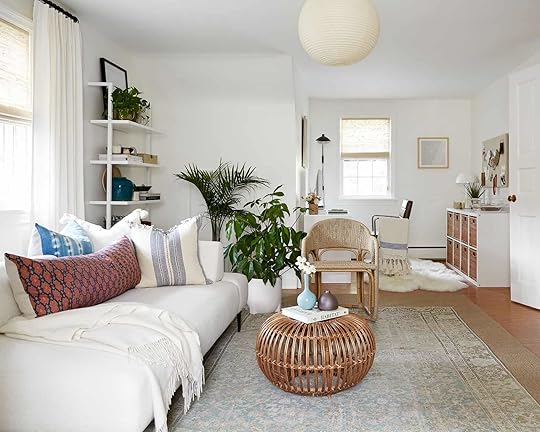
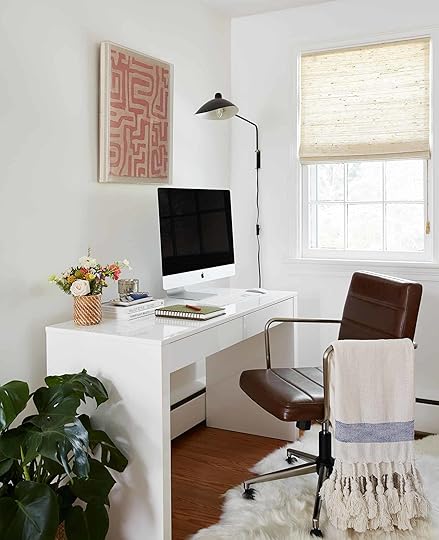
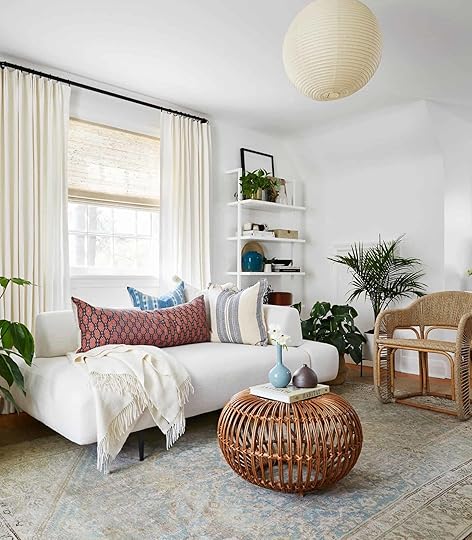
Lantern | Daybed | Lumbar Pillow | Throw Blanket (home sense) | Bookshelves | Drapes and Rod | Woven Shade | Ottoman (similar) | Blue Bud Vase | Chair | Vintage Rug | Wall Color
“Just do it! The EHD community will love that you listened to them. Your mom (a lover of color) would be so proud of you. PAINT THE WALLS PINK, KEYANNA!”, my inner voice yelled.
But if there’s one thing I’m learning in this season of style discovery, is that there is a difference between stepping outside your comfort zone, and forcing yourself to be something you’re not.
I was forcing it.
So I said, screw what everybody else thinks, I’m painting the walls white! And once I came to that discussion, I felt a sigh of relief. And that was when I learned a lesson in OWNING your (design) identity. Even if people think it’s “boring.”
Emily recently talked about her personal revelation with color palettes and embracing what makes you happy even if it’s predictable and basic (here). Sometimes there’s so much emphasis put on taking risks and stepping outside your comfort zone when it comes to design. But one of the points that Em makes is that what we actually need most in our homes these days is…comfort!
That’s the tough thing about being design-poly, when you embrace one style, you feel like you are cheating on the other. But even though my design love-child isn’t pink, her complexion is flawless!
The wall color is White Wing from KILZ. It’s a soft and creamy white. Not too stark. And because I primed the walls first, it only took two topcoats. I know for a fact it would have taken more coats if I didn’t use KILZ 3(R) Premium Primer. I recently painted our bedroom white (it was originally bright yellow) and I didn’t use a primer. It took 3 coats of paint to conceal and there are still a few areas where I can see the bright yellow subtly coming through, ugh! Again, thank you KILZ for saving me time, sanity, and marriage…and money!
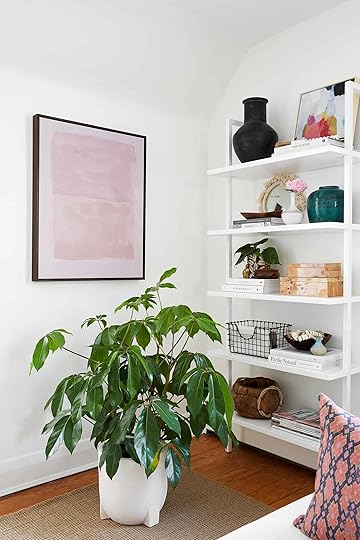
Black Vase (home goods) | White Planter (similar) | Bud Vases | Wire Bin | Burlwood Boxes | Art on Shelf | Woven Rug | Vintage Rug
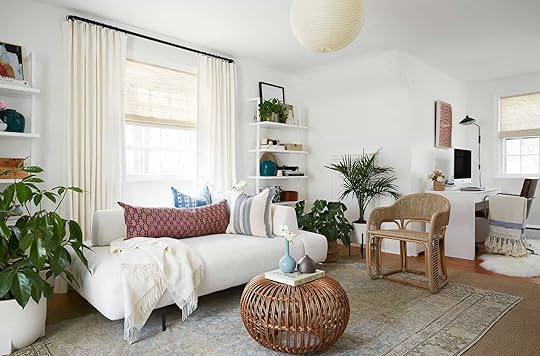
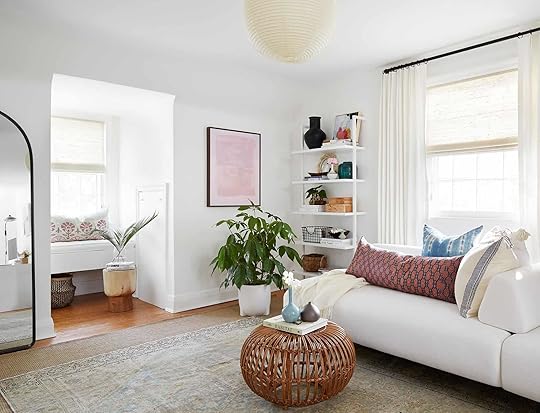
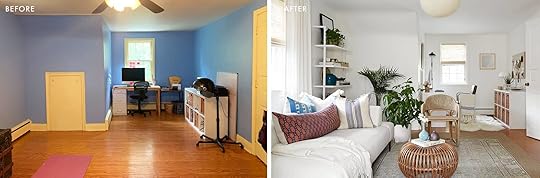
Overall, I’m happy with my decision to paint the walls white. It became the perfect backdrop for me to incorporate color with art and textiles, which I’ll get to later. But first, let’s talk about this daybed!


I knew from the start that I wanted a daybed for this space versus a pull-out sofa, but I really struggled with finding one that didn’t look too juvenile. Until I stumbled across this one from Article. Its sleek and modern silhouette feels mature and sophisticated. Honestly, I have never seen anything like it when it comes to daybed designs. The two backrests can be repositioned and/or removed, so you can set it up to function as a sofa, a chaise, or bed. It’s basically a 3-in-1! WIN-WIN-WIN!
Lumbar Pillow | Shibori Pillow (vintage but same shop) | Striped Tassel Pillow (same shop)
There were a few furniture delays, so this woven chair is currently on loan from my favorite local furniture store, Mitchell’s Interiors. But how cute is she! It adds so much texture and definitely brings in that coastal vibe that I love so much.
Since the room is mostly white, it was all about adding color and pattern with textiles and decor. I’ve always been a fan of St.Frank fabrics and this oversized lumbar is so beautiful. It adds a nice pop of pink and mixes in perfectly with the other vintage pillows I had.
Again, it was all about mixing in some color and pattern with textiles to add some visual interest to this all white space, without overwhelming me — I’m still leaning into my colorful side, so just a little bit of pop here and there will do for now.
Like most, I have a big obsession when it comes to vintage decor and that extends to vintage rugs. They add so much soul and character to a space. Passerine Home is my go-to shop for the most beautifully curated selection of vintage rugs. This beauty is the creme de la creme. It’s a 1920s antique washed Persian Malayer rug. I think anytime you have items in your home from a different culture it’s so important to know its history, meaning, how it’s made, etc, and to honor and respect it as more than just a pretty decor piece. Georgia, the owner of Passerine Home, is so knowledgeable about each and every rug she sells and is always giving educational tips on her Instagram. So if you’re a lover of vintage rugs, be sure to follow her.
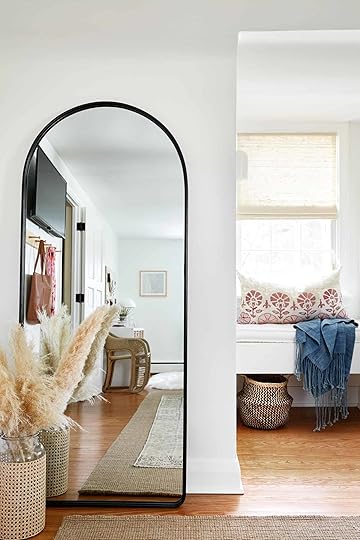
Cane Wrapped Vase | Floor Mirror
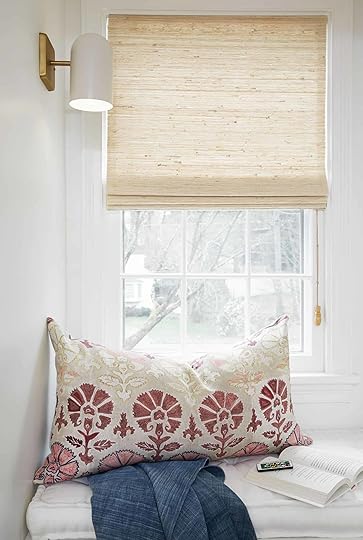
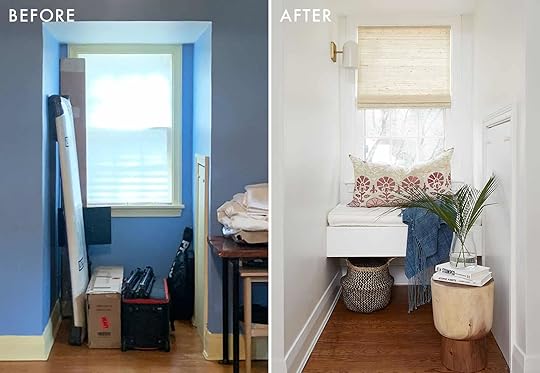
From the day we moved into this house I wanted to put a window seat in this dormer and now it finally has one! Needless to say, it’s my favorite spot in the house. Although I can’t take credit for building it (my dad built it for me), it’s very easy to make. Just 2x4s and plywood cut to size. And funny enough, my mom (who is a pro at sewing), made the french cushion. It’s nice to have a little touch of my parents in here. Mom and dad, I dedicate this nook to you. Without you, it wouldn’t have been possible!
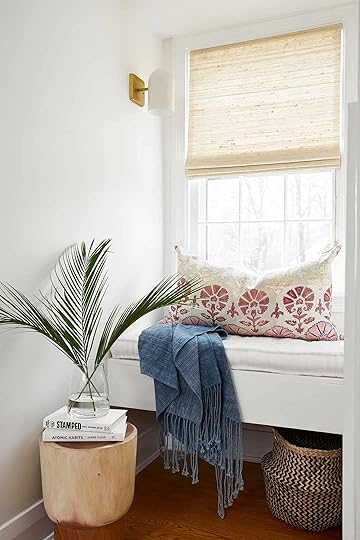
Woven Shade (in seashell) | Sconce | Pillow | Seat Cushion (custom by mom) | Throw | Basket | Stool | Vase (no longer available) | Stamped by Jason Reynolds and Ibram X Kendi | Atomic Habits by James Clear
The woven shades and the linen drapery are from Everhem. I partnered with them on my living room makeover and fell in love with the quality of their product and how easy they’ve made it for everyday people like you and me to order custom window coverings. I knew I wanted to work with them again on this project, and they were gracious enough to partner again. When I first started putting the room together, the walls/room felt very flat and lacked dimension. But once I added the window coverings it added so much more dimension and texture to the walls and was that the finishing touch/layer that it needed.
I added in some color and pattern with another St. Frank pillow and this beautiful indigo throw blanket from Jayson Home, and now it feels so cozy! And this wood stump side table from The Citizenry brings in a nice organic element and the perfect size for the space.

 see what great light the puck light gives off!
The window nook would not be complete without this sconce from Schoolhouse. But here’s a little secret, it’s not hardwired in! You all may have seen the hack circulating around the interwebs where you use a puck light in a sconce. It’s the perfect solution for renters. I got the kind that comes with a remote, so I can easily turn it on and off. Now I have a functioning sconce without having to hire an electrician/get permission from my landlord.

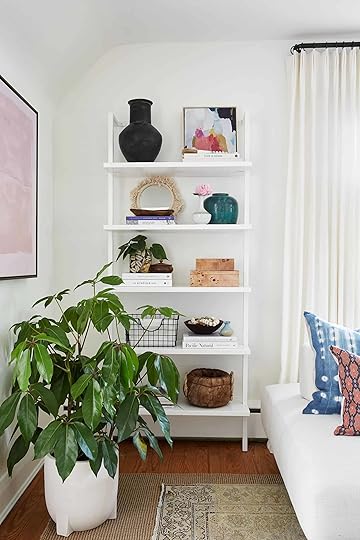
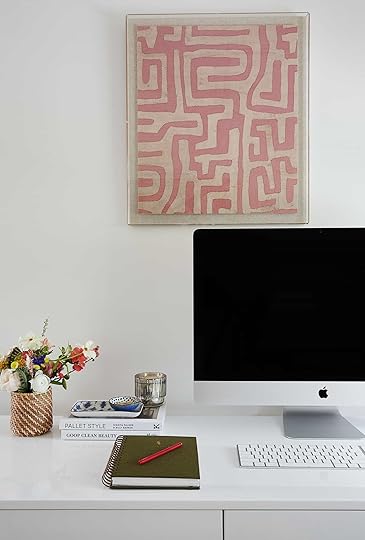
Another way I tried to incorporate more color into this space is with artwork. Although I didn’t paint the entire room pink, this big beautiful pink canvas from Minted satisfies that desire, for now. And the ocean print in my office nook is also from Minted.


One of the things I really needed in this room was more storage, and these bookshelves solved that problem. Most of these accessories are things I use for styling shoots and design projects. Before, I had all these items stored in an old trunk and it was so cumbersome to access. Now, I can easily see/access props and supplies.
A BIG part of maximalist design is lots and lots of accessorizing. To be honest, I still have a lot to learn (a whole lot more tchotchkes to buy) when it comes to styling in a more maximalist way. But these bookshelves are more about function over form, so I’m okay with them not being curated to perfection.

Also, do you notice the vintage wood ice bucket on the fourth shelf? A few years ago, before the EHD Design Blog School was even a thought in Em’s mind, she did a giveaway on her Instagram. I typically never enter giveaways, because I never win, but I just so happened to enter this one, and I ended up winning! This vintage wood ice bucket was my prize. Little did I know that a few years later I would become the first EHD mentee. Crazy, right?! It was only fitting that I incorporate the ice bucket into this makeover 

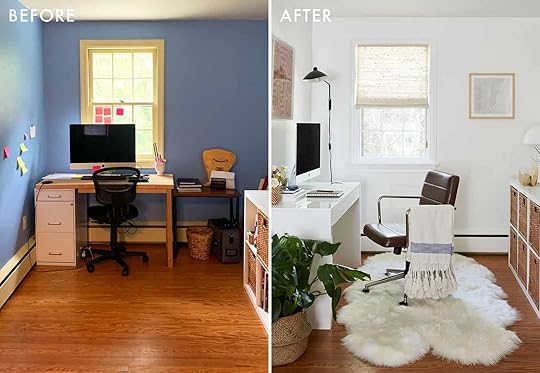
Desk | Sconce | Floor Basket | Rug | Chair | Throw | Kuba Cloth Art | Framed Ocean Art | Cabinet | Cabinet Baskets | Table Lamp | Lucite Boxes
Now, let’s head over to the office nook. Although I love that the room has wood floors, I hate their orangey color and they’re in pretty rough shape, so I wanted to conceal them as much as possible with pretty area rugs. This fur one from Article pairs nicely with the vintage, as well as adds another layer of texture to the space. And I already know what you guys are thinking… won’t the chair wheels get stuck in the fur? Nope! The chair rolls around just fine! Plus, I pretty much stay put in the same spot, so not much chair moving is needed
You may recall that I was considering making a DIY rope partition to give this area some privacy. I’m still thinking about doing that, but I want to live in the space for a little bit and see how it feels without one first.

Table Lamp | Brass Letter Holder (vintage)
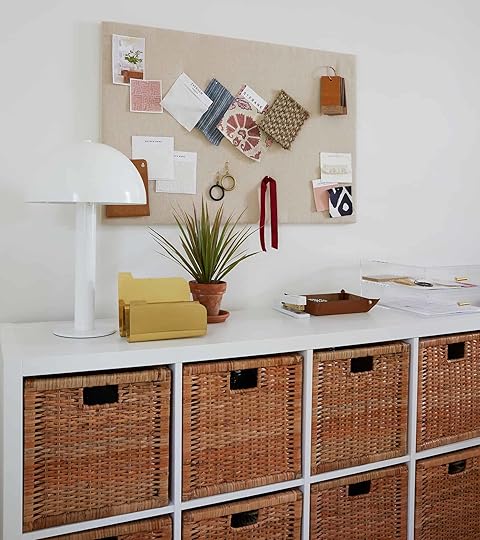
It’s amazing how just by adding a pinboard (that I wrapped in linen fabric) and a few office accessories makes this area function so much better. I also love these lucite storage boxes from Target and the mushroom-shaped lamp is another score from Schoolhouse.
Kuba Cloth Art | Indigo Dishes | Woven Vase (no longer available)
I finally have a real, grown-up desk and not a makeshift one! I like to keep my workstation as clean and clutter-free as possible, but I love the little pop of color and pattern (and function) these indigo dishes add. And if the textile artwork over the desk looks familiar it’s because I used it on my Understated Maximalist moodboard. I saw a room wallpapered in this pattern and it was a big reason why I fell in love with maximalist design. Although I’m not ready to deck out the whole room in patterned wallpaper, this framed St.Frank Kuba cloth is my nod to the inspiration that sparked this style evolution.
I also now have a real office chair. I sit at my computer for hours on end editing photos, so comfort was top priority when finding an office chair, but obviously, I also wanted it to be stylish. This desk chair from Lulu and Georgia checked both boxes. The sconce is also from Lulu and Georgia and plugs into the wall, so no puck light hack necessary.
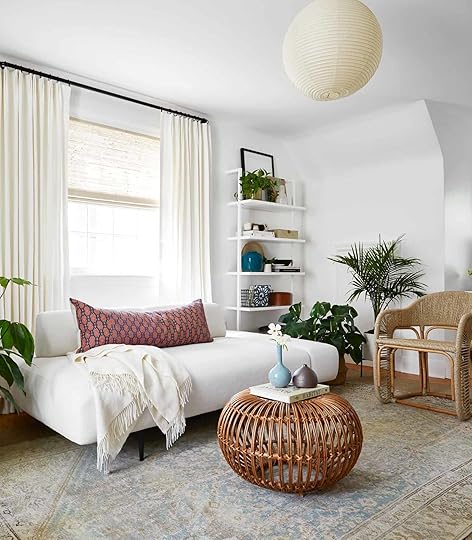
Speaking of lighting… I got my paper lantern, y’all! If you follow me on IG then you know how much I’ve been wanting one, even though some of you felt a ceiling fan would be better suited for the space (to keep me cool while working out). But, I went against the rules of design and chose form over function #SorryNotSorry. You guys CANNOT tell me this light isn’t better than a ceiling fan! She’s magical!
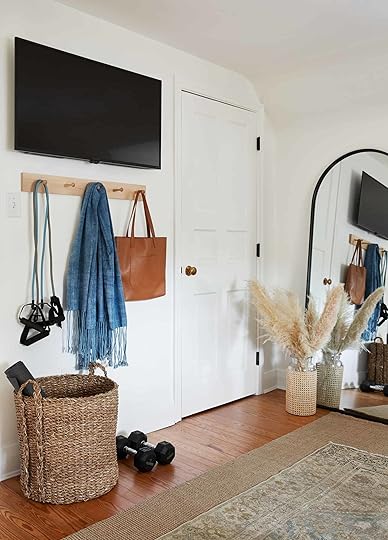
And last but not least, my little workout station. The goal was to not make this room feel like a gym, but have it function as one when needed. So I wanted stylish storage solutions that could serve the dual purpose of organizing my equipment, but also be pretty bedroom decor. I love using this peg rail to organize my exercise gear, but also be a place where guests can hang their coats, hats etc, when this space is being used as a guestroom. And this large woven basket from Jayson Home is perfect for holding my yoga mat and other equipment, while still looking like a beautiful decor piece.
And how awesome is this Lulu and Georgia floor mirror? Great for workouts. Great for fashion posts. Great for guests to use. And it reflects so much light that it makes the room feel bigger!
O and here are the before and afters because how could I not include them?!
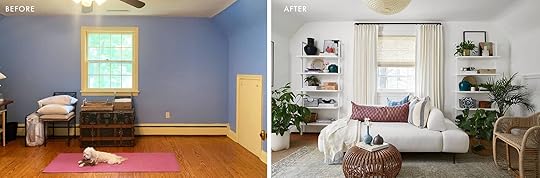
And that’s a wrap! I cannot tell you how good it feels to finally have a space that I enjoy being in and that serves all my many needs. And I love that this space has a completely different vibe than the rest of the house. It’s much more fun, and playful, and I can’t help but smile when I walk through the door– perfect for a creative space! But here’s the thing, remember when I said this is the “first-final” reveal? Well, this is just the first iteration of this space.
You see, when I was concocting that design love-child recipe, I forgot one key ingredient. I poured in Leanne, added some Justina seasoning, and garnished with a little bit of Emily, but I forgot to add the most important ingredient of them all… Keyanna Bowen. What I realized through this process, is how much my design identity is wrapped up in other people’s signature styles. But what is my “signature?” What is my unique style contribution that I can throw in the mix? I often wonder, if there was no Instagram, no Pinterest, no design tv to influence me, what would my design style be/look like? I truly believe that within all of us is a signature design DNA that will make a space feel unique to you. But sometimes we can become so influenced by mainstream design culture, that we fail to uncover our true design identity.
That is the journey I am currently on — finding my unique “voice” in the world of design. I know that I have so much more inside of me in terms of design and creativity waiting to be unleashed. And as I slowly discover what a “Keyanna Bowen” space looks like, my true design identity, this room will continue to evolve.
So although this technically concludes my office makeover for EHD, I will continue to document all future iterations over on my blog, so I hope you’ll continue to follow along on East & Lane. It’s been such a blast sharing this experience with you guys. Thank you so much for all your support, guidance, and even criticism  on this project. I still have a few more “semesters” left in EHD Blog School, so I’ll still be around
Of course, I cannot end this post without giving a HUGE thanks to KILZ again! Without you this makeover would not have been possible, and this room would still be blue and yellow. So thank you! Thank you! Thank you! And sincere thanks to all the partners who worked with me on this space.
I love you all so much!
Xx,
Key
It’s Emily again and there you have it – a room makeover that we’re so proud and honored to share with you. A million “thank yous” to KILZ for teaming up with us on this one – these people are gracious and kind and we’re so lucky to work with brands that we truly love, both for their functionality (such great coverage and a smooth base!) and for the folks working hard behind the scenes. If you’re painting…just don’t skip the primer. It’s worth it, we promise. And thank you again to Keyanna for taking the leap with us and for going above and beyond to bring this space to life without a staff on hand – she’s incredible, you guys. And lastly, thank you to you, our readers, for supporting the brands who support EHD and for joining us on this three-part saga. We wouldn’t be able to do it without you. Now – let’s congratulate Key on her first partnership and talk about this room! xx
**Design and Photos by Keyanna Bowen
The post Blue Walls Be GONE! Key’s Totally Transformed Office Reveal – Maybe The Most Dramatic Before & After Ever (?) appeared first on Emily Henderson.
April 7, 2021
Sara’s Kitchen – An Updated Sneak Peek (It’s Functional, But Still Not “Finished”…)
Like that fossilized fry you find under your car seat, I’m back. Did y’all forget about me? I did. But I promised you all a kitchen a reveal so I’m here to deliver…sort of. DON’T GET MAD, but I haven’t finished my kitchen yet. Turns out kitchens are tough, and getting a new refrigerator delivered during the time of COVID is even tougher.
BUT I’m here with an update. And I hope that it will hold you over until this kitchen is finished for real. (Real quick, if you’re new to me ((rude)) you can catch up on this whole kitchen debacle in chronological order here: Post 1, Post 2, Post 3)
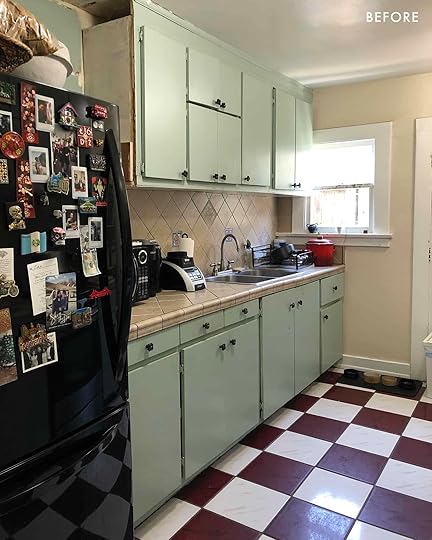
Here’s where we were on the left back in 2020, and here’s where we are now, almost a year later…
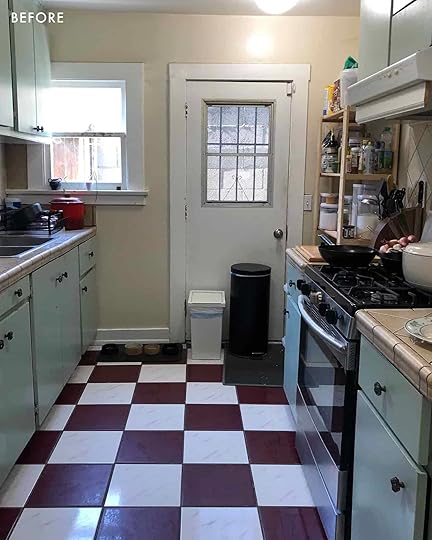
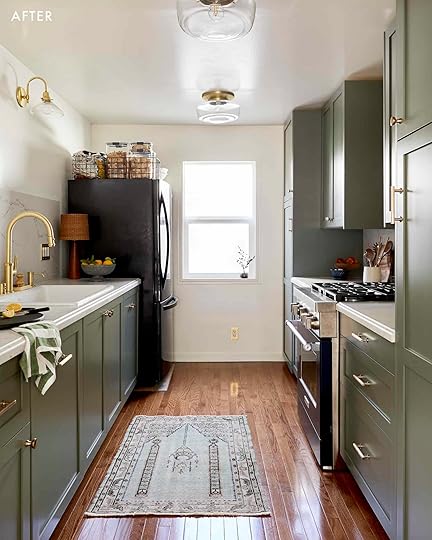
Are they even the same PERSON?!
Honestly, I’ve forgotten how to write blog posts, because I have no idea where to start. But since this is just an update post, I won’t get stuck too deep in any weeds.
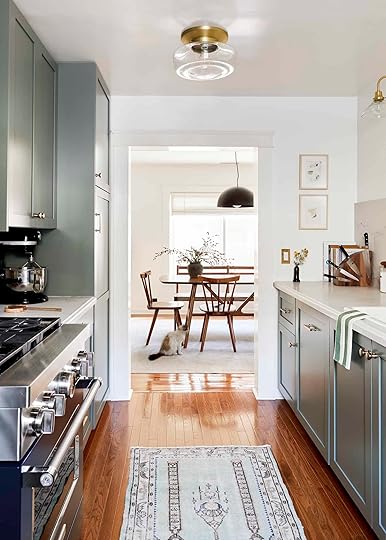
Like most of the rest of the house, we* demo’d everything out down to the studs, and rebuilt from the literal ground up. We took out the door and window that were a part of the back kitchen wall, and popped in a new, centered window that lets in a lot more light. The choice of flooring was made easy by the fact that we had leftover wood flooring from the rest of the house, so we could save a little $$$.
*If you’re new to me and my house, the royal “we” mostly refers to my dad and little brother. Neither of whom do this professionally, but are just very talented, hard-working humans who love me an insane amount. But Mac and I have put a lot of sweat, tears, and the occasional drop of blood into this house too.
Next, we re-ran all the electrical and installed cabinet boxes from Ikea. With the new walls, new electric, new flooring, and new cabinet boxes all in place we were finally ready to start adding in some really fun details – like custom cabinet fronts and pretty counters. And while we’re still missing the whole integrated fridge section, along with some other major details, this kitchen is now 100% fully functional.
Honestly, if someone told me today “that’s it, you can’t do anything else to this kitchen” I’d be totally fine. Maybe a little bummed, because I’m really excited for the finishing touches, but I really have nothing to complain about. Not only is our kitchen functional, it’s pretty. It doesn’t feel like the same kitchen, because it’s not. Thanks to my dad, some amazing partners, and a lot of hard work this tiny galley kitchen is now the beating heart of our home.
I spend a LOT of time in here, and as someone who needs to cook their own meals on a regular basis to feel like a sane person, I truly feel blessed by some super generous kitchen gods.
Let’s chat details, and then I can fill you in on what still needs to get done along the way…
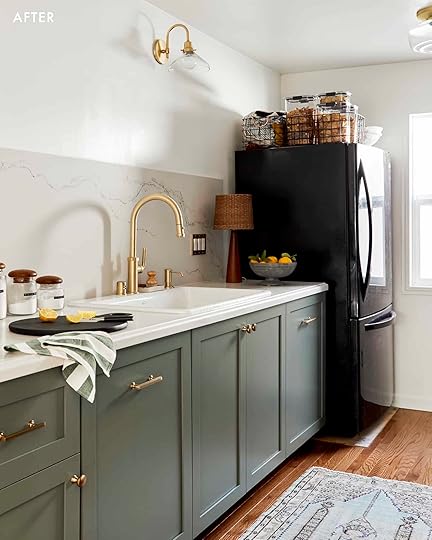
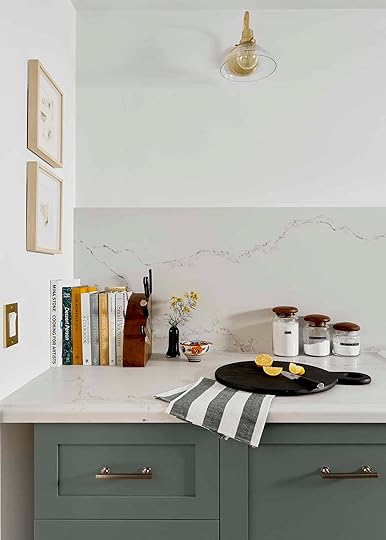
Since we were using Ikea base cabinets, I used the Ikea online software to design the layout for our kitchen. And then we partnered with Kokeena, a small custom cabinet front maker out of Portland, to have all the beautiful fronts and integrated panels made. We went with a style from the collaboration with Townsend Interiors – shaker style cabinet fronts in the mossy sage green of my dreams (aptly called “Moss”). They took my Ikea design and made the whole process so easy.
There are a lot of companies doing custom Ikea cabinet fronts these days, but Kokeena stuck out to me for two big reasons. First, their panels are all wood, not lacquered particle board. You can really feel the quality when you touch them–my dad was super impressed (and it’s hard to impress my dad). Secondly, they’ll paint your cabinets whatever color you want. I choose one of their pre-selected colors, but if you have a dream color in mind they’ll make you cabinet fronts in that color. Working with them has been nothing short of a pleasure, and it’s just really nice to work with small companies run by truly nice people.
We also ended up using their hardware, which is just really clean and beautiful.
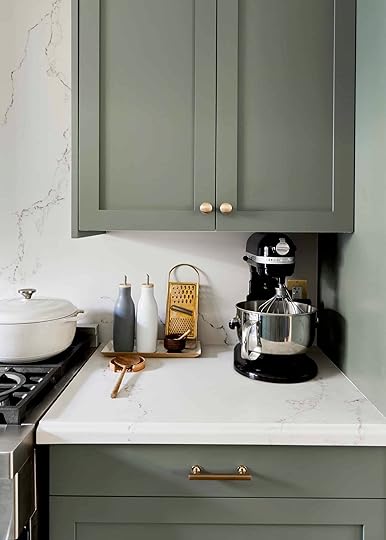
I wanted something really durable for the counters. I need them to last a long time, and I live in my kitchen, so they need to live right along with me. So we decided to go with Caesarstone quartz counters. I came to this decision by ordering a sample of the counter, and literally putting it through weeks of trial. I used it as a spoon rest, I cut up fruits and veggies on it, I left lemon and tomato sauce and wine on it for days at a time. And it cleaned up every time. So by the time we had to make a decision, I felt really confident.
Our Caesarstone counters are hands down one of the best decisions I’ve made in our house. We went with honed Statuario Nuvo, and they just look really elegant. To bring in a touch of timelessness I choose an ogee straight counter edge (we used Euro Stone in Pacoima for our fabrication, and they were amazing).

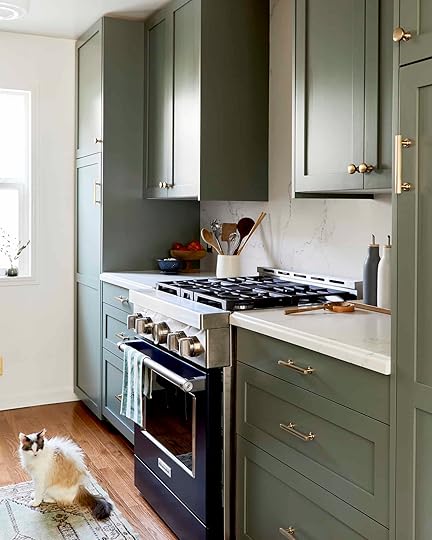
Since our new fridge has been backordered for a bit, we haven’t been able to install our integrated fridge corner. But we have been able to install our integrated KitchenAid dishwasher, and this beautiful thing, the thing that steals my heart time and time again, our new KitchenAid range. IT’S NAVY (they call it “Ink”). I love the touch of understated color it brings to the space. It’s the crown jewel of the kitchen–I can control it from my phone via bluetooth, it can bake, broil, proof, and has convection settings, and it’s just really sexy. It’s the Ian Somerhalder of ranges (Bowser and Veronica got me watching Vampire Diaries, which I missed the first time around, blame them for that one *eye roll*).
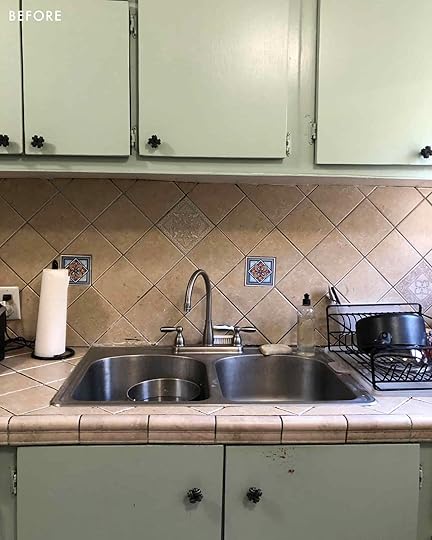
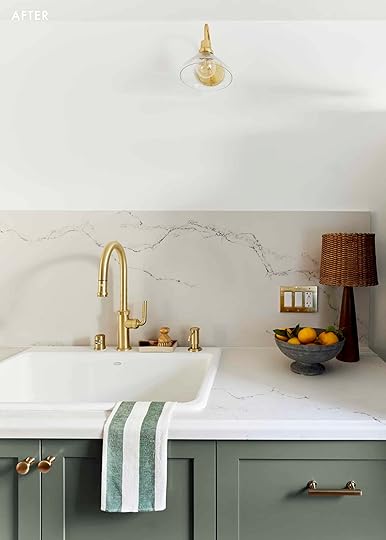
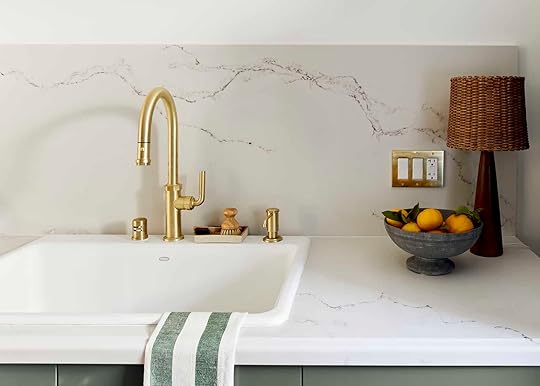
WILD difference, no? There’s so much happening in that one little picture on the right. I found that amazing Kohler cast iron sink on Craigslist, NEW for $300 (normally $600+). The beautiful faucet, outlet plate, and sconce are all from Rejuvenation – the literal gold standard for beautifully coordinated brass home accents. The sconces create a really beautiful soft light in the kitchen, perfect for late evenings or getting a glass of nighttime water.
Eventually, we’re going to get a single wood shelf to span the entire length of the counter over the sink, and install a brass rail system under it. The plan is to make it nice and deep, so it can hold all my cookbooks, some pretty dishes, and a piece of art or two (which would free up more counter and cabinet space).
Let’s talk a little bit about functionality, because I didn’t want a kitchen that was pretty but couldn’t actually work.
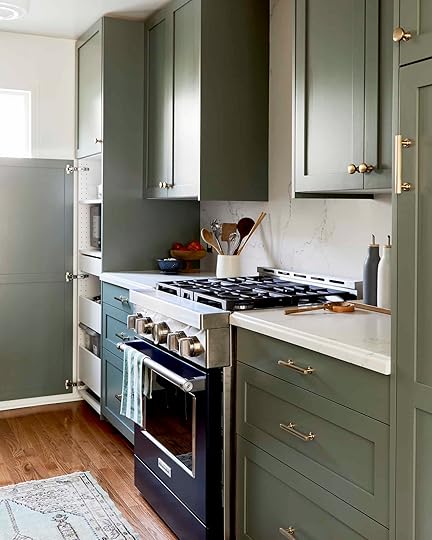
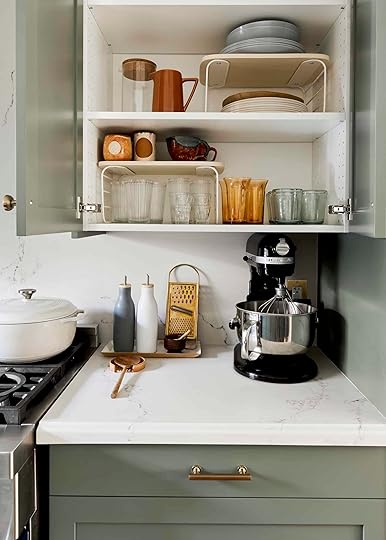
In the far cabinet, across from the fridge, we created a microwave shelf, and installed several deep drawers for things like cat food, mixing bowls, and reusable containers, and our everyday dishware is stored to the right of the stove. I used shelf risers from Open Spaces to make the space even more efficient. The rest of our non-everyday dishware lives out in the bar cabinet in the dining room. (Peep my super cute amber tumblers that I snagged off Erik’s new vintage Instagram store, Bric-A-Brac).
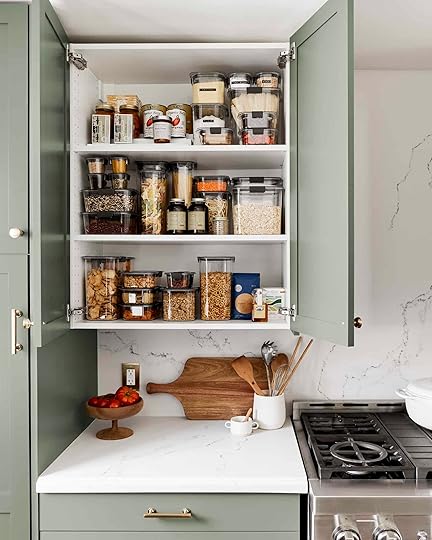

We didn’t have space for a walk-in pantry, so we had to get creative. The cabinets and drawers to the left of the stove are our pantry. Emily was working on some sponsored content with RubberMaid, so we got to fully organize my upper cabinet into a super functional pantry using their Brilliance collection. And then we’ve got our spice rack fully organized in the top drawers (not pictured), and the bottom drawer is deep enough that it’s my baking pantry where I store bulk flours, sugars, and the like. It’s really, truly functional and I love living my life in this kitchen every day.
So while our kitchen is fully functional, why aren’t I calling it finished? Because I have plaaaaans. I can’t wait to get our new fridge, so the whole space can be fully integrated (and we’ll get another set of cabinets above the fridge for appliance storage). We actually need to install our range hood (and by “we”, I mean hire someone who actually knows what they’re doing). I really want the open shelving above the sink, because I love my cookbooks and I want them to have a dedicated space. Plus, I think the brass hook and rail system will bring in a touch of vintage. And we need to add in tons of small details – like toe kicks, under cabinet lighting, a window treatment, and ACCESSORIES (maybe a rug that actually fits the space).

So there you have it, our kitchen as it is now. But slightly better, because Bowser came over and helped me style it like the angel she is.
When are we aiming to have it finished, finished? Fall of 2021, probably. Good things take time, hard work, and a little patience. That’s what this house has taught me. So we’re just enjoying the process. Because in a home this old, there will always be a new project (I’m looking at you, primary bathroom), and if we get too focused on getting things “done” we’re never gonna get to LIVE here.
*Photos by Sara Ligorria-Tramp
**Design by Sara Ligorria-Tramp and styling by Emily Bowser
The post Sara’s Kitchen – An Updated Sneak Peek (It’s Functional, But Still Not “Finished”…) appeared first on Emily Henderson.
April 6, 2021
Keeping The Good Of Last Year: New Family (And Kid-Only) Activities – Plus The Value Of “Me” Time
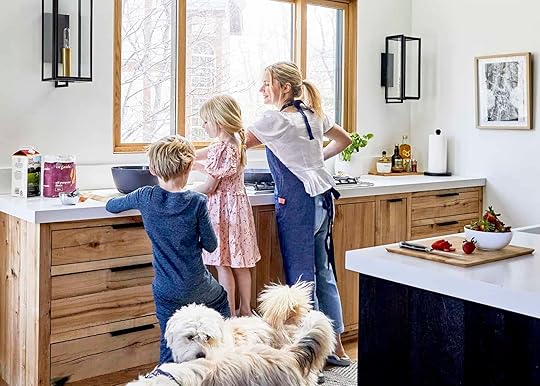
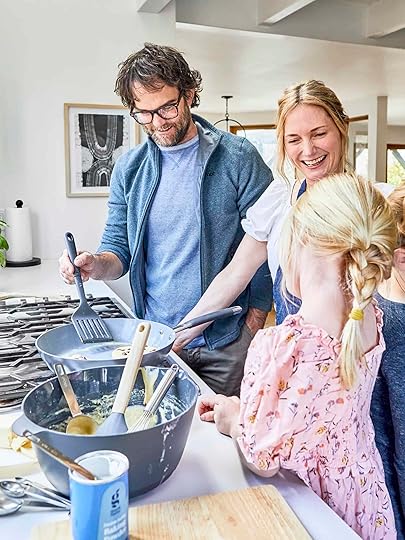
We’ve been living up here in the mountains, mostly quarantined for a full year… Just two grownups, 2 kids, and to add some drama, two naughty but adorable pups. Are we ready for the world to open up? YES. Will we look back with an odd nostalgia on the year where we got to spend 24 hours a day with our kids for months on end in nature? – strangely, yes. That doesn’t mean that it’s been easy, that we haven’t gotten sick of each other or our own cooking (we can’t wait for Portland restaurants). So today I’m sharing some ideas on small things that have helped make our lives a bit easier during isolation and things I want to continue. I’m talking cooking and serving essentials, fun activities with the kids (and for them to do without us), and what I do for “me time” (something I never had before and by gosh I’ve really come to LOVE and need it). It’s a Target collaboration and it’s all VERY good.
Affordable Kitchen Essentials That Make Our Life Easier (And Are Durable Enough For The Kids To Help Cook and Clean)When we first stocked and organized the inside of these cabinets I bought almost exclusively the Made By Design line from Target (it had just launched), thinking that since this was going to be a weekend house I wasn’t going to splurge on anything fancy, plus aesthetically I wanted everything super simple, matching and functional (no extra pretty cheese boards that we rarely use).
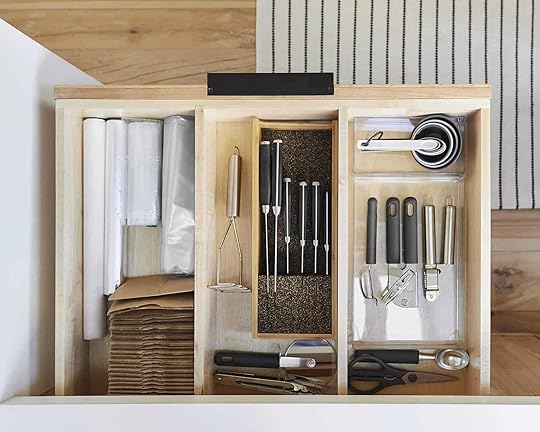 photo by sara ligorria tramp | from: inside all our (super organized) drawers & cabinets in the mountain house kitchen
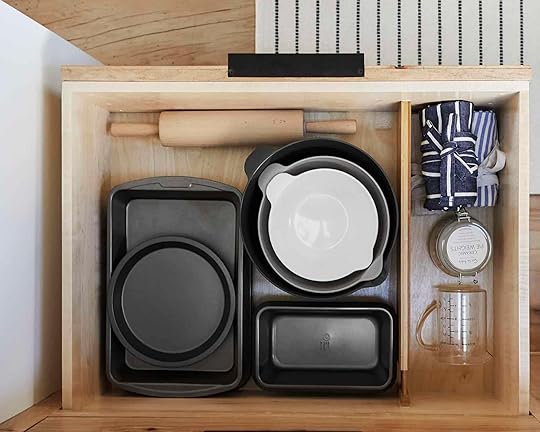 photo by sara ligorria tramp | from: inside all our (super organized) drawers & cabinets in the mountain house kitchen
Now after cooking here almost exclusively for a year I want to call out some of the pieces that I still have and love, as well as newer additions that are so practical and affordable (and needed).
Mixing Bowl Set with Lids | Plastic Mixing Bowl Set | Measuring Cups | Measuring Spoons | Whisk | Pastry Basting Brush | Kitchen Towels
While we’ve now splurged on a fancy knife or two and my apron collection has grown, those pieces (above) are consistent staples that I love and frankly never have to worry about breaking, dropping, melting, etc (so very kid-cook friendly).
The spout nesting bowls – Why are these so good? They are super lightweight, have an easy pour spout, they nest inside each other so they don’t take up too much room in your drawers (we propped the middle and little one up so you could see it), and the best part is that their bottom is silicone so it doesn’t slide on the counter. At all. It grips to the counter making all whisking and stirring easier.
The stainless measuring cups and spoons – I had the plastic ones before and these are just so much easier to clean, care for, and again they nest and take up such little space in your drawer. You can take them apart, but I don’t.
We use all the silicone cooking utensils frequently, not just those two. And while I love a classic wooden spoon or spatula, silicone is indeed easier.
Now the big nesting bowls are the newest addition that I bought for this shoot, not having any larger bowls with lids (and wanting to avoid plastic wrap at all costs). How great are THESE??? Just in time for potato salad and slaw season, marinating chicken, etc. And again, they nest (check stories to see them in action).
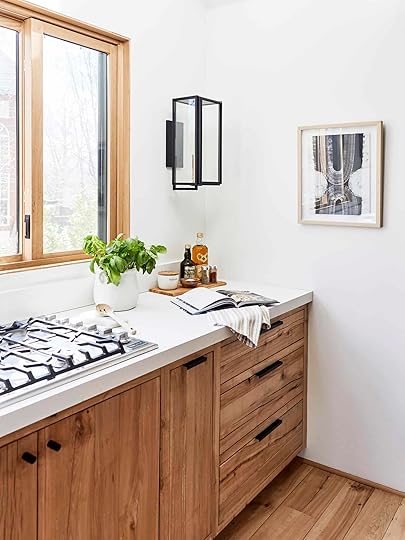
Planter | Wood Slotted Spoon | Olive Wood Serving Board | Sugar Cellar | Dip Bowl | Glass Spice Jar | Kitchen Towels | Racked Arc Framed Print
We switched out some of our kitchen decor pieces for this shoot from Target that I wanted to call them out because they are GOOD. Please note the very heavy, simple, black paper towel holder (below) and my new basil pot that is SO CUTE. The cute art (that we’ll keep for when we AirBnB the house next year, and our new kitchen rug (below). We even got all our scratch pancake ingredients from Target. It’s a real one-stop shop y’all

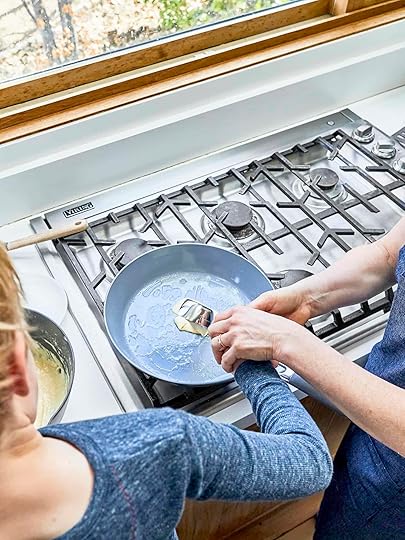
Paper Towel Rack | Cutting Board (on stove counter) | Ceramic-Coated Aluminum Skillet| Floor Runner | Cutting Board (on island)
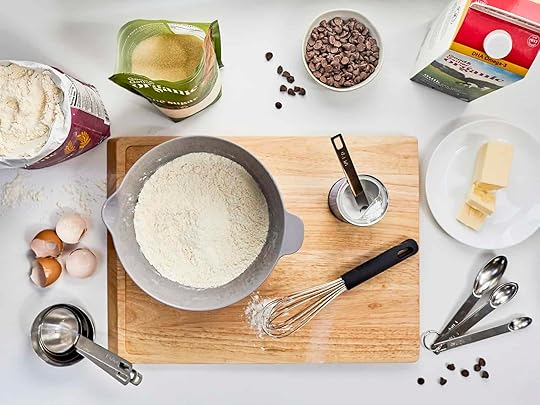
Organic Flour | Organic Cage-Free Eggs | Organic Sugar | Semi-Sweet Chocolate Chip | Organic Whole Milk | Unsalted Butter
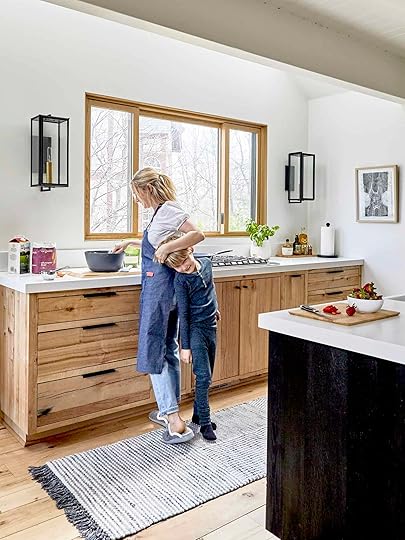
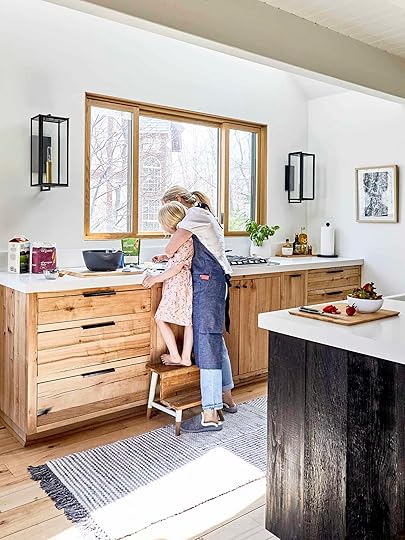
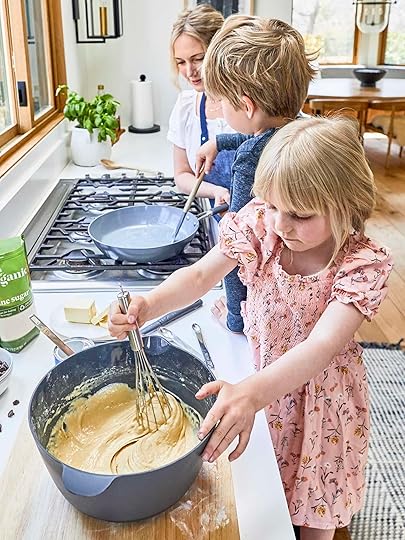
Our cooking rule right now is that they can make anything they want for lunch as long as they follow a recipe, read the steps, do the fractions, etc. (they don’t always opt for this, by the way – very often we slap together bread and meat). For shoot day, they chose pancakes, requesting whip cream and strawberries and we didn’t say “no”, not today.
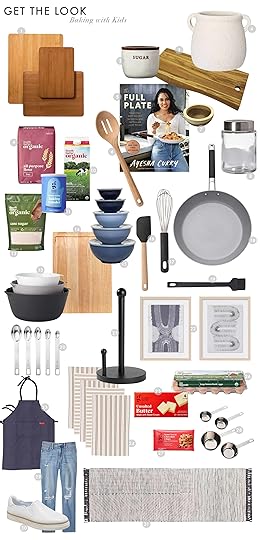
1. 3pc Bamboo Cutting Board Set | 2. Stoneware Sugar Cellar | 3. Olive Wood Serving Board | 4. Rustic Weathered Planter | 5. The Full Plate Cookbook | 6. Beech Wood Slotted Spoon | 7. Natural Acacia Dip Bowl | 8. Glass Spice Jar with Stainless Lid | 9. Organic Flour | 10. Organic Whole Milk |11. Double-Acting Baking Powder | 12. Organic Sugar | 13. Plastic Mixing Bowl Set | 14. Rubberwood Carving Board | 15. 5pc Plastic Mixing Bowl Set with Lids | 16. Large Beech Wood & Silicone Spatula | 17. 9″ Stainless Whisk with Soft Grip | 18. Ceramic-Coated Aluminum Skillet | 19. Silicone Pastry Basting Brush | 20. Stainless Steel Measuring Spoons | 21. Stainless Steel Paper Towel Holder | 22. Set of 2 Racked Arc Framed Prints | 23. Cotton Chambray Apron | 24. 5pk Cotton Kitchen Towels | 25. Unsalted Butter | 26. Organic Cage-Free Eggs | 27. Semi-Sweet Chocolate Chips | 28. Stainless Steel Measuring Cups | 29. High-Rise Distressed Straight Cropped Jeans | 30. Women’s Frankie Sneakers | 31. Heathered Area Rug
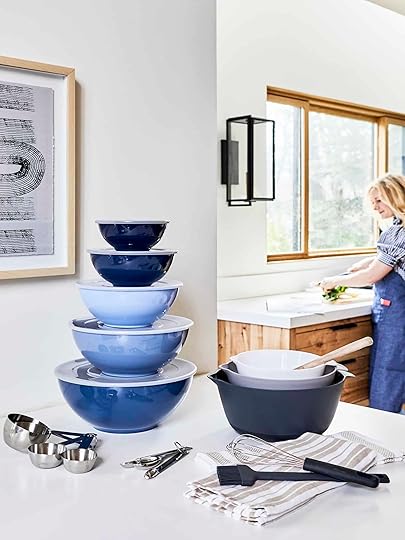
Our Everyday Dinner Plates, Serving Dishes And Flatware We Can’t Quit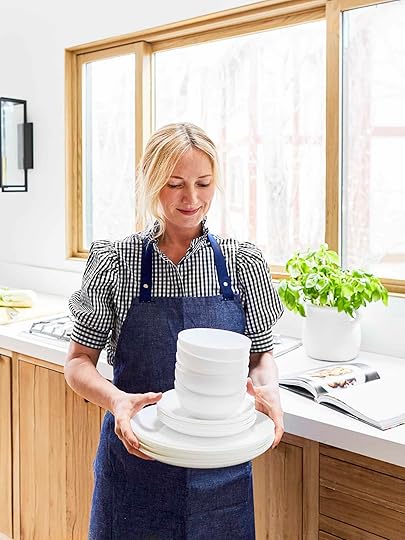
Bowl | Salad Plate | Entree Plate | Apron
Of course, I love a heavy hand thrown stoneware plate in theory (and for beautiful food shots), but once you use these Made by Design plates/bowls it’s VERY hard to opt for anything else on a daily basis.
WHY? Well, they are extremely lightweight so the kids can easily carry sets of 4 to set the table (or as I’m demonstrating I can carry all of them). It makes it easy for them to load and unload the dishwasher (they are super flat), help do the dishes without me worrying about them breaking but if they do break (none have yet in 2 years) we know that they are affordable and easily replaceable. I now get why families back in the day have everyday plates and “china” for special occasions. While the handmade plate is the 2021 version of china, for 3 meals a day with just the four of us, where two kids are required to help set and clean, these are honestly extremely, extremely perfect for our family.
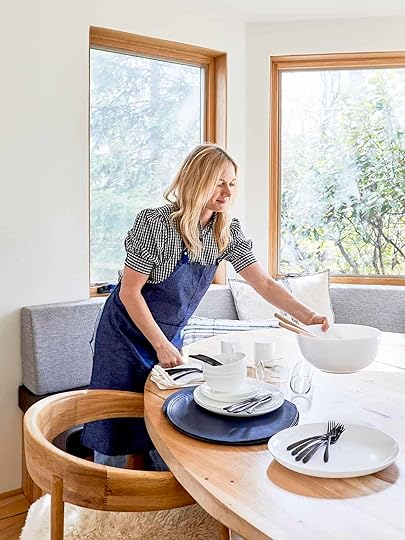
Faux Leather Blue Charger | Flatware | Serving Bowl | Wooden Spoons | Tall Tumblers | Short Tumblers | Mugs | Serving Platter | Cloth Napkin | Lumbar Pillow | Square Pillow | Faux Sheepskin
Not to mention they are flat, white, and totally simple – aka aesthetically they are GREAT. We also use the serving bowls and platters and love that they stack so easily in their drawer and again, so easy for the kids to wash, dry, and put away. Not shown is the pasta bowl (which I use daily for salads).
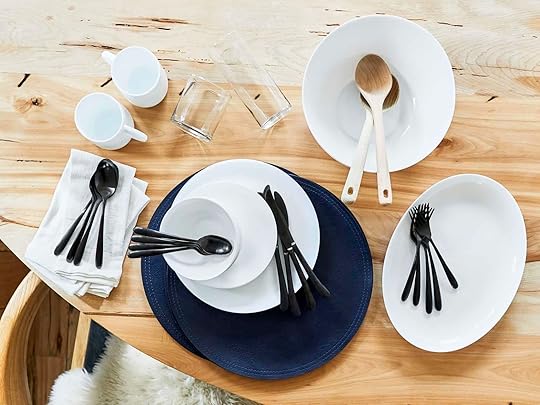
I had those faux leather placemats in brown/caramel which I liked, but Emily B. found the blue version in the store and I LOVE how they pop off our wood more (and so easy to wipe clean, stack, etc – guys I’m APPARENTLY VERY PASSIONATE ABOUT HOW WELL THINGS STACK AND HOW EASY IT IS FOR MY KIDS TO CLEAN EVERYTHING (this is also why if you are renovating your kitchen make sure to put in drawers for these, not upper cabinets for easy access).
The glasses and mugs are also so far indestructible while being so modern and thin. They come in sets of four and are very affordable – I LOVE these. they do not stack, but that’s because straight lines can’t and I accept that.
Flatware – We love these and have had them in every kitchen since they came out a few years ago. They have a great weight to them (these are the Threshold, not the Hearth and Hand ones that are a bit lighter), they don’t scuff easily and just have a nice proportion and they feel good in your hand.


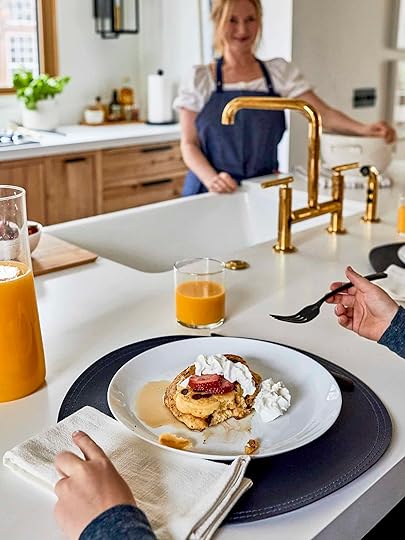
LUCKY KIDS. Whip cream and syrup styling by Charlie Henderson. So there you have it – the everyday kitchen essentials that we have genuinely used for years that work for us. It’s all about making it easy for the kids to cook, eat, serve, clean, wash and put away – while looking good and simple. Having kids old enough to actually clean up after themselves is the real game-changer here.
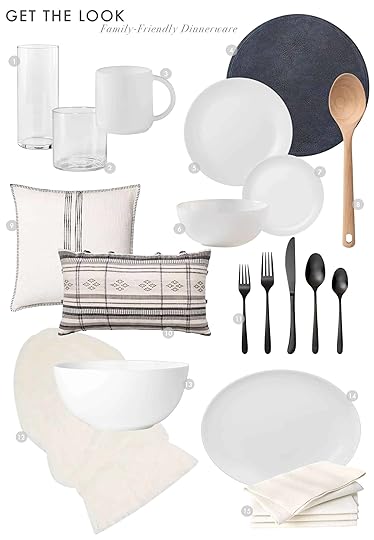
1. 4pk Glass Clarte Tumblers | 2. 4pk Glass Clarte Short Tumblers | 3. White Glass Stackable Mugs | 4. Faux Leather Decorative Charger | 5. White Glass Dinner Plate | 6. White Glass Bowl | 7. White Glass Salad Plate | 8. Beech Wood Solid Spoon | 9. Oversize Square Wooden Stripe Pillow | 10. Oversized Stripe Lumbar Throw Pillow | 11. 5pc Matte Black Stainless Steel Silverware | 12. Faux Solid Area Rug | 13. 64oz White Glass Serving Bowl | 14. White Glass Serving Platter | 15. 4pk Cotton Easy Care Napkins
New Stuff To Do!! Introducing Mondo Llama (Target’s New Crafting Line)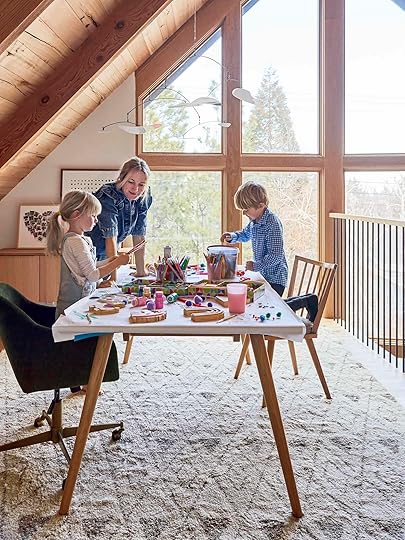
We are HUGE crafters here (and lately it’s been even more since watching Making it, Blown Away and DesignStar – these kids are inspired) but we had gone through almost all of the supplies since Covid started. There was not one googly eye or pipe cleaner left in the house. Enter the new Mondo Llama craft line that not only has some fun project kits but great art basics to help get you ready for any project.

For the sake of the shoot I turned my writing desk into a craft table for all of us to do the crafts together and showcase the product better. It stayed like this for 4 days and they spent hours up there until I kicked them back up to the attic.


The big hits for us in the more basics/ a la carte supplies were:
The Marker Set – These are SO GOOD with two-sided tips – both fine and thick tip and a ton of great colors. Cosmic Bucket of Crafts Set – We had a different version of this before and for whatever reason the kids really used everything and it really provoked their creativity (more than when we had everything in jars). The Paintable Wooden Shapes – So many fun options and the kids absolutely LOVED them. Seek & Find Coloring Poster (I wouldn’t say this is a “basic”, but my goodness it’s fun) – We now have it on the dining table and we all color it during breakfast (it’s big enough that you can spread it out) – and in case you haven’t got on board with adult coloring books yet, I love them (especially while the kids are crafting if I just want to zone out but have them feel like I’m engaged :))

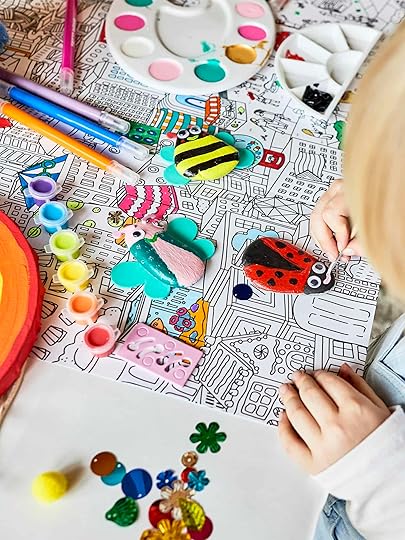
In addition to the basics, they sell these kits which I think are specifically great gifts or if you don’t already have a big craft and paint supply setup. For instance, the pet rock kits, rainbow paper mache, and kaleidoscope all came with everything you need to paint and decorate them, but there are also just paintable wooden shapes that are ready for anything you have at home to decorate. Since we have a ton of paints I preferred the non-kits to make less waste, but the kids of course loved them all.

While these wooden pieces don’t take too much time to paint, they are such cute gifts and decor. I also really love them raw wood – how cute is that rainbow????
The new Mondo Llama line is GREAT, it feels like there was a hole in the market for great crafts supplies, craft kits, and basic supplies that our kids love and now we are fully stocked.
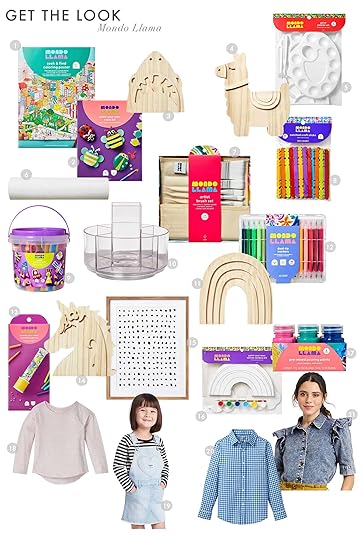
1. Seek & Find Coloring Poster | 2. Paint-Your-Own Rocks Kit Bugs | 3. Freestanding Wood Shark Face | 4. Freestanding Wood Llama | 5. 5pc Paint Palette Set | 6. Butcher Kraft Paper Roll | 7. 24pc Artist Paintbrush Set | 8. 100ct Notched Craft Sticks | 9. Cosmic Bucket of Crafts Set | 10. Small Beauty Organizer | 11. Freestanding Wood Rainbow | 12. 48ct Dual-Tip Brush Market Set in Plastic Case | 13. Create-Your-Own Kaleidoscope Kit | 14. Freestanding Wood Unicorn | 15. 24″x30″ Framed Dots | 16. Paint-Your-Own Canvas Rainbow Kit | 17. 6ct Pre-Mixed Pouring Paints | 18. Girls’ Striped Long Sleeve T-Shirt | 19. Girls’ Heart Pocket Skirtall | 20. Boys’ Woven Long Sleeve Button Down | 21. Women’s Puff Elbow Sleeve Shirt
How I Do”ME Time” Including All My Necessary Mood-Enhancing Elements And Eco-Beauty Products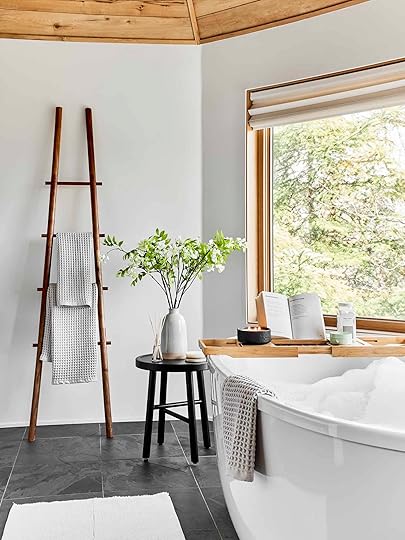
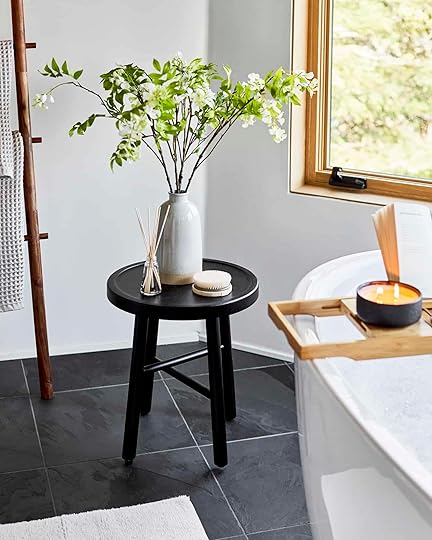
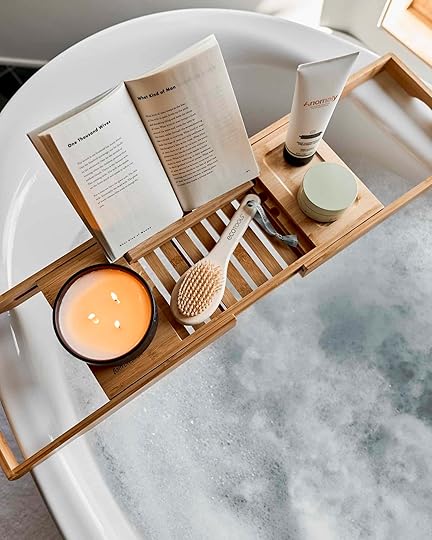
Ladder | Towels | Stool | Bath Rug | Vase | Oil Diffuser | Dry Brush | Bath Caddy | Candle | Book | Pixie BeautifEYE Cream | Joon x Moon Coconut Sugar Scrub
Parents have always lacked “me time” and this year made it even harder UNLESS you carved it out, and hot tip – they leave you alone in the bathroom. I’ve become quite the bather, 3-4 nights a week after I put the kids down and it’s a whole thing that I look forward to every single day. Granted I do have a pretty spa-like bathroom, but it’s really not the room that makes it so special – it’s how I create the ambiance, what I’m reading, and what products I use to pamper myself.
Ingredients for the perfect mood – you need a bath caddy, a lit candle (or 3), a page-turner to read (I use my kindle) or an addictive show to watch (I often put my laptop on top of the tray), and something to drink (herbal tea or wine, depending on my mood).
I then proceed to pamper myself head to toe – not all of these every night, but VERY frequently. Target has a lot of new green and eco beauty products that I’ve been trying and so far loving. Emily B. bought them all for the shoot so I got to try what we shot. I use this sugar cube scrub (it made my legs where I normally have dry bumps totally smooth), facial cleansing brush, hair mask, and hydrating milk (which is a moisturizing cleanser and toner).
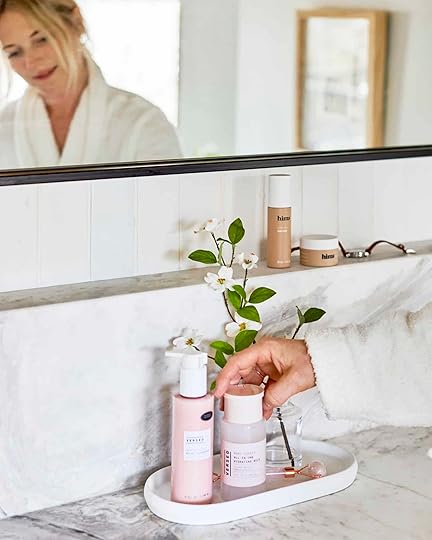
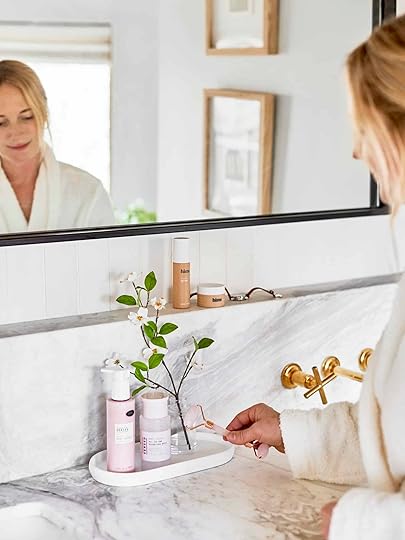
Gentle Cycle Milky Cleanser | All-in-One Hydrating Milk | Rose Quartz Roller | Faux Dogwood Flower Arrangement | Modern White Tray | Vitamin C Serum | Wrinkle Cream | Watch
The whole EHD team was very pleased to know that such a big retail store was investing so much in eco-beauty brands – Thank you, Target. And Brian even gets to benefit as I bought him some Hims serum and eye cream (after years of Dax talking about it and advertising on Armchair Expert).
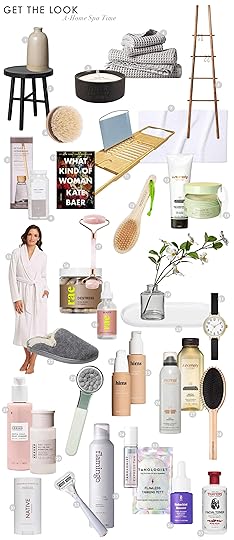
1. Gray Stoneware Vase | 2. Shaker Accent Table/Stool | 3. Oud Wood & Musk Candle | 4. Waffle Bath Towel | 5. Decorative Apple Picking Ladder | 6. EcoTools Dry Brush | 7. Looped Bath Rug | 8. Vetiver & Cedarwood Oil Diffuser | 9. Joon x Moon Coconut Sugar Scrub | 10. What Kind of Woman | 11. Bamboo Bath Caddy | 12. EcoTools Foot File | 13. Deep Conditioning Treatment Mask | 14. BeautifEYE Cream | 15. Cozy Chenille Robe | 16. Destress Dietary Supplement Capsules | 17. Rose Quartz Roller | 18. Rae Beauty Ingestible Drops | 19. Faux Dogwood Flower Arrangement | 20. Modern White Tray | 21. Women’s Full Arabic Strap Watch | 22. Women’s Deluxe Slippers | 23. Facial Cleansing Brush | 24. Everyday Moisturizer | 25. Vitamin C Serum | 26. Anomaly Dry Shampoo | 27. Anomaly Gentle Shampoo | 28. Medium Detangling Hair Brush | 29. Gentle Cycle Milky Cleanser | 30. All-in-One Hydrating Milk | 31. Coconut & Vanilla Deodorant | 32. Women’s 5-Blade Razor | 33. Women’s Foaming Shave Gel | 34. Tanologist Self Tan Mousse | 35. Tanologist Self-Tan Mitt | 36. Bakuchiol Booster Facial Treatment | 37. Thayers Witch Hazel Toner
So there you are – ways to help enjoy the family time, and a big encouragement to give yourself more ME time regardless if you have kids, jobs, or not. Even with kids going back to school soon these ideas are some that will STICK, hopefully forever for our family.
Thanks to Target for sponsoring this post! All the words and thoughts are my own
*Photos by Sara Ligorria-Tramp
**Art direction by me and styling by Emily Bowser
The post Keeping The Good Of Last Year: New Family (And Kid-Only) Activities – Plus The Value Of “Me” Time appeared first on Emily Henderson.
April 4, 2021
The Link Up: The $25 Mules Em Is Loving, The Gift Caitlin Want To Give EVERYONE In Her Life, And The Best Afforable Skincare Tool
Y’all it’s April. Yes, the fourth month of the year. It never ceases to amaze us how every year it just pops up outta nowhere! But it’s also Easter so happy Easter to those who celebrate. Let’s get into some links so we can get back to the festivities:)
This house tour is EXTREMELY special to us because it’s Key’s stunning living room reveal that she published this past week!! We of course expected nothing short of totally thoughtful and beautiful work but wow is it something different to actually see the final photos. We are ready to road trip to Maryland to see it with our own eyes. But maybe we’ll let her finish her office/lounge which is going to be revealed this coming week! We are keeping the day a secret so there’s still some suspense:) So until then GO SEE her living room transformation!
Did y’all see the Design Star: Next Gen Finale????? CARMEON HAMILTON IS GETTING HER OWN SHOW AND WE CAN’T WAIT TO WATCH IT!!! It was SUCH a great final episode, we all cried, and it was definitely hard to see Eli and Chris not win too. But only one can take first place and we will definitely be watching their careers. But for right now we just want to celebrate Carmeon and all of the wonderful things coming her way!
From Emily: Like I have over and over, I haven’t been buying new clothes (or very little and no “fashion-y” pieces). But in addition to the Target blouse Emily B. brought me for the Target shoot, these mules were (and are) another favorite. I love the shape and color (I have them in tan). Plus they are flats which I love since I will probably need a course in walking in any sort of heel after this past year. O and they are super affordable and also come in bone.
Also From Emily: I think it’s official – our family’s favorite current show – Making It, the crafting competition. I know it came out a couple of years ago and I watched a few episodes and liked it then, but watching with the kids and Brian is a whole other experience. It’s Amy Poehler and Nick Offerman from Parks and Rec and they are hilarious, supportive, and I think the perfect duo host ever. The crafters are CRAZY TALENTED. Such creativity and the end product is usually super impressive, and right up our kid’s alley. And the whole vibe of the show is so positive and supportive – they help each other, they root for each other, it just makes the entire family feel good. The only drawback is that if we watch it too close to bed (which we do) the kids get so inspired that they start crafting with them and then we have to drag them away from their project if they aren’t done in time (often ensuing a mini-battle). We raced through both seasons and are super excited for the 3rd.
From Ryann: It’s official. I am in love with my dry facial brush and I don’t care who knows it. As someone who has chronically dry skin, I am always looking for ways to exfoliate and hydrate my skin, but what I didn’t know I needed was to simply rid my skin of dry flakes and dead skin cells once a day. I use it after my cleanser and then follow with a gentle cleanser and my skin feels SO soft every day because of it.
From Mallory: I’m in the mood for a new suit for (almost) summer…anyone got any recs on brands??? I’m HIGHLY INTO Triangl (this sequin swimsuit was a real splurge for me but I wear it all the time and plan on wearing it all summer too). OPEN TO ANYTHING PLEASE SEND.
From Caitlin: I need to talk about how much I love my stair rolling cart, because I USE IT EVERY SINGLE DAY FOR EVERY SINGLE TASK. Sure, it’s great for carrying smalls at the flea market, or hauling my weighted comforter to the laundromat, or getting all the groceries up the stairs in one swoop (and y’all, the 3 wheels make it a smooth ride, eggs, and fragile glassware will be unscathed!), but my new favorite use-case is for RECYCLING. I’m no longer struggling to carry a billion different-sized, broken-down boxes/bags of cans/paper scraps down my terrifying back staircase every week – I can just zip around my apartment, throw them all in this guy, and bounce down the stairs. IT MAKES ME SO HAPPY. I splurged on the charcoal because I thought I’d use it more if I thought it was beautiful (this was a correct assumption) but honestly, the cheaper versions are just as good and just as pretty. This is like a top 3, can’t-live-without, ultra-essential product for me. IT’S THAT GOOD. I want to buy one for everyone I know. (Mom, do you want one of these for storing your beach supplies??? Or for hauling laundry upstairs? Or for your gardening supplies? Mother’s day is coming up…)
Also From Caitlin: OKAY, I’LL BITE. Are Printfresh pajamas actually good and comfortable? Has anyone tried them? They are SO cute and I see a lot of influencers wearing them, but like…any real opinions out there? Are fancy PJs worth the splurge?
Also Also From Caitlin: I’m pretty sure @fosteringpuppies was the first-ever link I submitted for the linkup back in 2019, but it’s still the best. Ashley, a service dog raiser, literally JUST got a new, floppy, chunky lab puppy named Zucchini and we’ll get to watch them grow together over the next few years as she gets him ready to work alongside someone in need. The stories are so cute now (and impressive and heartwarming later!) and it’s one of my favorite IG accounts. Highly recommended for those in need of some smiles:)
From Jess: I assume that a lot of you also follow the wonderful Joy Cho on Instagram (also please go watch her and her husband’s episode of Secrets From a Stylist because it’s so fun). But on a more serious note, she wrote a post about a great company called Hollaback! whose whole goal is to end harassment in every form. I know that it’s easy to feel helpless or not want to make a situation worse when you are witnessing a scary situation, but they have a free downloadable bystander intervention guide to empower all of us to know what to do when we see someone being harassed. We have to have each other’s backs and this is such a great place to start.
Also From Jess: I am clearly on a denim kick if you read last week’s link up but now it’s jeans…and they’re NOT a skinny! I just got this pair and I’m convinced it’s the perfect summer jean. They are a light wash (not something I ever normally go for), have a raw hem and an above-the-knee cut (casual for summer), and tapered leg opening (so gen-z will be off our backs for only wearing skinnies:)). Also, almost everyone in the reviews, myself included, recommends sizing down. So while I would love to be evolved enough to say that doesn’t matter to me because a good fit is what’s important…it still feels pretty damn good. O and I actually got them in petite which is great because then they are actually cropped on my almost 5’4″ frame. All in all, they are cool, comfortable, and kinda effortless which is exactly how I want to look/feel this summer.
From Julie: Hi all! It’s been a minute since I’ve had any links to share but today I am shamelessly promoting my sister and brother-in-law’s new business venture!
Anyone in the Bend, OR area looking for delicious breakfast burritos?? Well, you are extremely in luck because that’s exactly what Bend Breakfast Burrito is serving up! They also serve banana bread muffins which is a recipe that has been passed down from generation to generation in my family and of course they have freshly brewed coffee. The burritos are BIG and filled to the brim (evenly distributed I might add which is a plus in my book)! Plus, if you live in the following zip codes you can get FREE DELIVERY: 97701, 97702, & 97703. They also have some amazing items that they will be adding to the menu soon & plans to grow their team! So if you live in the Bend area go check them out and support a literal family-run business, here’s all the info! Hours of Operations: Tuesday-Saturday 7:30-11 am, place your online orders here: bendbreakfastburrito.com & check out their Instagram (love you Val & Trent, congrats on your new venture in a wonderful city!)
And thank you to those of you who support small businesses in general, I now get to see how much joy it brings to the owners through my sister when she sends me a text in the morning saying, “I just got a request for worksheets from my ebook from someone I don’t know!” It really does make all the difference!!
That’s it from us! Hope you have a beautiful rest of your Sunday and get ready for a pretty week on the blog:) xx
Opening Image Credits: Design and Photo by Keyanna Bowen
The post The Link Up: The $25 Mules Em Is Loving, The Gift Caitlin Want To Give EVERYONE In Her Life, And The Best Afforable Skincare Tool appeared first on Emily Henderson.
April 3, 2021
What Y’all Bought In March (So Many INTERESTING and GREAT Finds)
HELLO, BUDS! Since we’ve officially hit the month of April, I’ve spent the last 3 days poring over our data from March. Which posts hit? Which ones didn’t? And maybe most importantly…which of our product recommendations did YOU, our dear and sweet readers, actually add-to-cart? I looooove sharing this info with y’all every month because your tastes absolutely surprise me (in March, my jaw was dropped by your propensity and willingness to take home one big-ticket item in particular)…plus, sometimes this info influences the posts that I pitch – as you’ll see below – so it’s kind of fun to get a peek behind the curtain sometimes, right?
So on this Saturday, I present to you our BIG TEN. Out of the hundreds of thousands of links we shared this month (yes, seriously, 156,455 unique links earned clicks in March – many from the shop page, which is an awesome resource that we do not talk about enough/promise to update soon!!) and the tens of thousands of orders placed, these are the ten items that caught your eye and rose to the top. Our March creme de la creme, if you will. Shall we begin?!
10. Papier Maché Bowl
Oh my, we LOVE Bloomist for textured, organic, neutral, show-stopping finishing pieces. Sara actually gets the credit for introducing EHD to this brand – you may remember this marble chain from her living room reveal – but we’ve kept a super close eye on their site ever since, which is why Jess recommended these gorgeous papier mache bowls last week. They’re big (perfect for your shelf- or table-styling needs), sustainable, eco-friendly, and manufactured by a woman-owned company. I love seeing a great, thoughtful, independent retailer on this list. Nice pick, friends!!
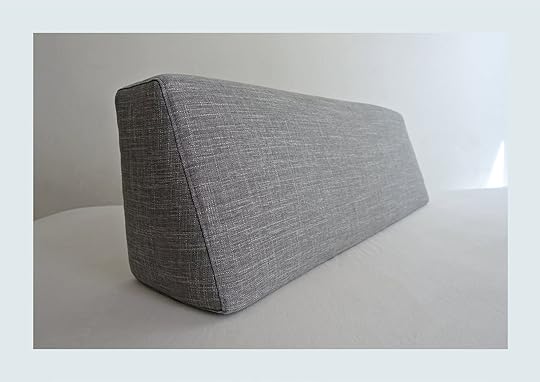
Ah, yes, the wedge bolster pillow as seen in Bowser’s gorgeous office/guest room/gym/multifunctional space (the opening photo!). This pillow was a surprise finisher for me because we ran that post in late February, which means that y’all took your time considering your options, measuring your space, and doing some planning before placing your orders in March. (We usually see the bulk of orders take place within 2-3 days.) In any case, Bowser is a gal who knows her way around Etsy – remember this light fixture from her living room reveal? – so I’m excited to see you bringing her indie-sourced, practicality-approved style into your homes, too.
8. Matte Hair Claws
I believe it was our very own Mal Gal who linked these and launched an EHD-internal obsession with the new wave of simple, clean, chic hair clips. If the weather’s heating up in your area (or if you haven’t had a haircut for uh, 6 months, or even a year), these are a great and affordable pick to sweep that hair off your neck. Anecdotally – and this may be a niche problem, since I’m rocking a five-head (read: enormous forehead), but I find that regular ponytails can be pretty stark and uh, not cute on me, so the way that these pull my hair back in a softer way is a total win. I feel like a cool, effortless French lady when I’m wearing mine. 10/10 and my personal favorite $7 purchase of the month. And it’s from Etsy too!

HELLO, SPRING! A few weeks ago, when we were cleaning out the EHD prop garage, I saw Jess trying on a few of Em’s hats…and I’m pretty sure it was there, in that exact moment, where I witnessed the birth of her turning into more of a hat-person, because she linked this packable straw one up pretty soon after. Hopefully, as the world begins to reopen this summer, you’ll be able to rock one of these outside on a well-deserved vacation. (Or, you know, maybe you bought it for gardening? Or maybe you just grabbed one to wear around your house? Whatever the impetus, good on you for getting some cute sun protection
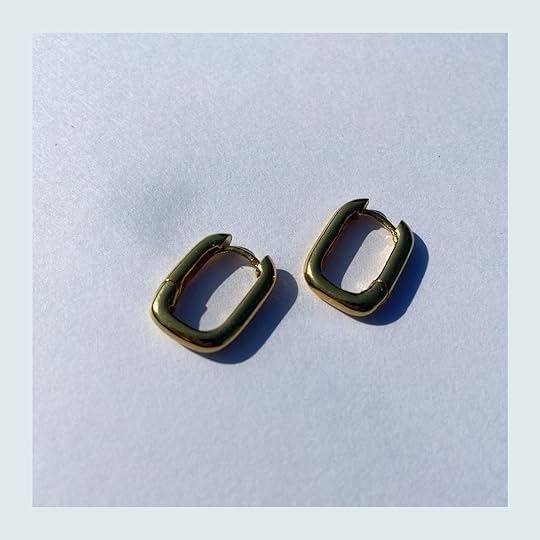
Another small business, hooray!!! These are such a fun, dynamic shape and they’re only $20 despite being handmade and looking like they should cost much, much more. (These chain hoop earrings are also so, so, so good.) Also Etsy! In any case – I’m loving these tiny, affordable accessories that y’all took home this month…maybe EHD should do a roundup post on the under-$50 accessory pieces we’ve tested and loved? You know, like, the bandanas and earrings and socks and hats that are making us feel fresh this spring? Does that sound interesting??? Am I reading the room correctly and doing my job right???
5. Oscarine Lucite Dining Table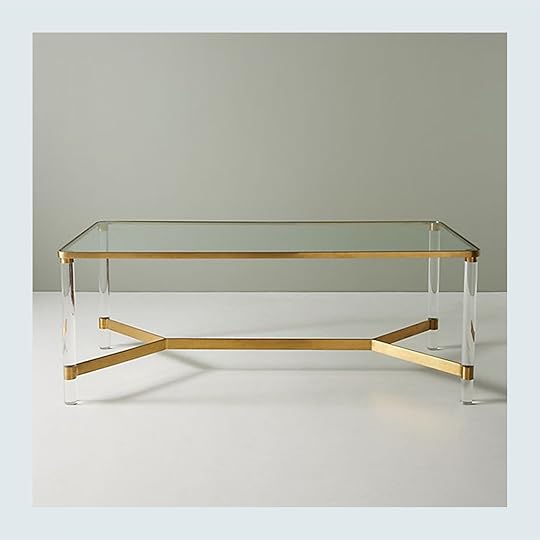
WHAT A SHOCKER, FOLKS. This kind of feels like the time that I linked up a Frame TV that was on sale, and then we ended up selling a ton of Frame TVs, and I was just STUNNED. I linked up this gorgeous guy after seeing that he was nearly 50% off at Anthropologie…and y’all knew it was a good deal, because you sold. it. out. But if you missed out (or if you just want to bring a little less lucite + brass into your home), never fear – the coffee table version is currently 50% off on Overstock.
4. Adirondack Short Overalls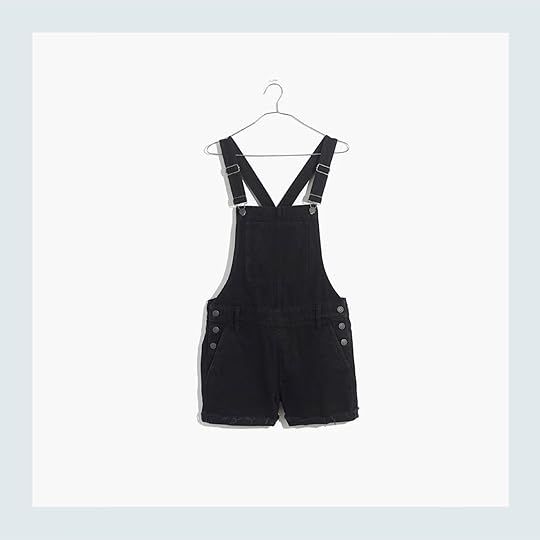
I know this is corny and maybe too earnest, but my Madewell overalls make me feel SO DARN COMFORTABLE IN MY OWN SKIN and I want to wear them 24/7. I wear my full-length versions all fall and winter (the team and my mom will attest!) so I picked these up for spring with the hope I’d love them just the same, and I ABSOLUTELY DO. I don’t need to worry about my butt showing when I bend over, they kind of feel like they’re sucking me in without being super compressive, and I get a lot of compliments on the way that they ~flatter~ my shape. I know overalls can be a minefield for those with larger, ahem, assets (36F with a butt and thighs, reporting for duty) but they just slide on like a dream. (If black isn’t your thing, they just dropped them in a denim wash, too – you know I’ve ordered it already and will report back :))
3. 5pk Nesting Easter Eggs
It’s not too late for curbside pickup! Emily grabbed these sweet nesting eggs for her kids’ easter egg hunt this year (you can see all of her other picks here – tons still available for your pickup today if you’re a procrastinator who wants to grab a gift for a crafty kid!). She bought three sets and is planning to use them for hunts and decor as the kids grow, but TBH they’re also just really cute displayed as decor – if you grabbed these, feel free to DM us a shot of how you styled them in your home. We’d love to see!!

Fun backstory: over the past two weeks, EHD had so many shoots – TONS of new and original content coming your way!!! – and Bowser, our stylist extraordinaire with exquisite taste (as we’ve already discussed), went shopping on her own and pulled this under-$30 Target top for Emily to wear in one of the shoots. Y’ALL, WE LOVED IT – IT’S GOOD. We only shared video of Em wearing it on stories but IMO, it actually seemed a lot more subdued, less-statement-y and more “everyday wearable” than this picture would suggest. (There’s a cute real-life photo of a customer wearing her shirt on the page if you want to see for yourself.) Additional bonuses: it comes in two color-ways AND it’s being offered from XS to 4XL, so even more of us can be a little #emfluenced Well done, Target.

I mean….there was NO competition this month. And there shouldn’t be, because this ottoman has NO BUSINESS only being $99 while looking THAT BEAUTIFUL AND LUXE. Like, pals, as someone who spends at least two solid days per week doing nothing but looking at furniture, this guy would go for 10x that price in ANY boutique or indie shop out here in LA. If oatmeal isn’t your thing, there are 2 more cushion colors that look just as good. The size and scale is perfect, it’s forever-multifunctional (tiny entryway bench? Pair of these in front of the fireplace? Just a footrest? Fancy cat perch? The world is your oyster!!!), and the shape/lines/textures/finishes are just ::CHEF’S KISS::. I am so happy to see this piece at number 1 this month – it’s the perfect mix of high-end-meets-affordable and I’m just so glad so many of y’all got to bring such an awesome piece into your homes!!!
AND THERE YOU HAVE IT. March’s true winners. This month, I was so excited to see y’all welcoming more sustainable retailers and tiny, independent businesses into your own homes, while stocking up on some absolute slam-dunk deals from the brands we know and love. In any case, let’s chat about (a.) my affordable fashion update idea, (b.) if you scored any of these pieces, (c.) the weather and that it’s now somehow April despite also still feeling like 2020, or (d.) really, anything at all – I’m wide open all day today and would love to gab. LET’S CHAT! xx
Opening Image Credits: Design by Emily Bowser | Photo by Sara Ligorria-Tramp | From: Emily Bowser’s BEAUTIFUL Hardworking, Multipurpose Room Reveal (+ Get Ready For Her DIYS)
The post What Y’all Bought In March (So Many INTERESTING and GREAT Finds) appeared first on Emily Henderson.
April 2, 2021
Need Some At-Home Easter Brunch Inspo?? Our Never Before Seen Easter Shoot From Last Year Has You Covered

Two Decembers ago (that’s right 2019) we shot this Easter story on our patio, then right when we were going publish it (March 2020) the world had a different plan and we decided not to post it (even though gathering with your immediate family was fine, it still just tonally felt wrong). So as we were brainstorming this year I lamented that we didn’t have any easter inspiration (because I need it myself) when my team reminded me that we have this WHOLE story sitting in a draft. Now, most of the product isn’t available, but the ideas sure are While myself and my family might have another low-key, no-fuss Easter up in the mountains it doesn’t mean that even I couldn’t use some inspiration on how to make it a little bit more festive (especially for the kids who are acting like it CHRISTMAS I think because they are desperate to look forward to something).
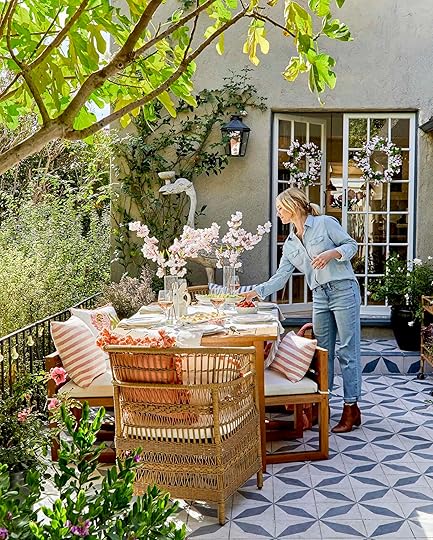
So here are a few tips and mostly visual inspo for this Sunday if you are celebrating.
Start Base with Spring Colors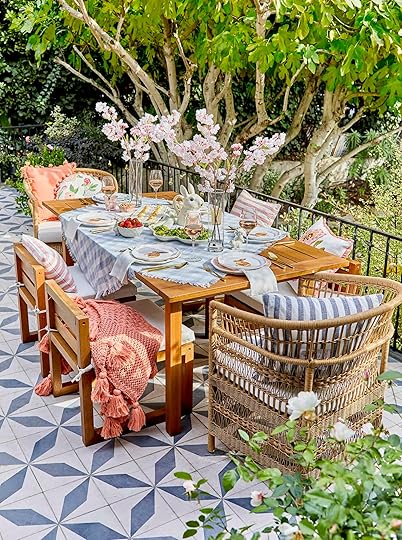
I have a lot of vintage plaids and florals that I’ll be using, but feel free to bring out of the pastels and layer them as much as possible. Pastels, florals, plaids – I want all the springy patterns for this lunch (but sadly have none here!!!). I’ll pull something together, but sure wish it was this (which got ample styling help from Emily B. and Velinda).
Just Add Some (quiet) Bunny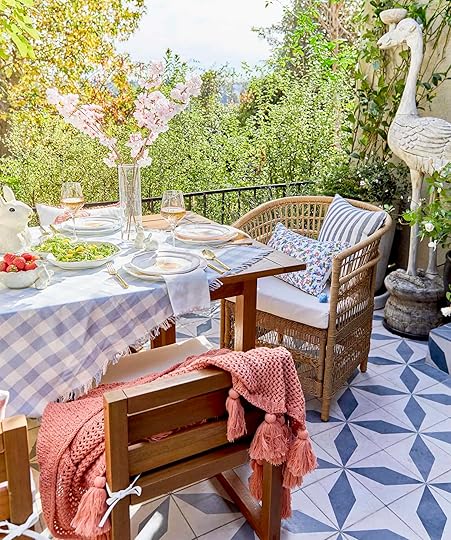
We plan to lean into all the bunny themes possible because this 5 and 7-year-old joyfully scream when they see anything that implies “Easter bunny”. When we shot this it was December and these were all samples for photography, but I would do anything to have this set up right now. The bunny pitcher, the bunny plates, the gingham tablecloth. Sure this is perfectly curated and shot on my favorite patio ever (oh how I will forever miss it) but there is still time to buy or DIY some bunny and spring-themed table decor.
 Keep It Low Maintenance/Low Pressure and Affordable
IF you are eating outside a lot with kids then melamine might be your friend this spring and summer. Just make sure to need them and can keep for years to make good use. For flowers (which my kids are obsessed with) go pick what you can outside first – we have a ton of daffodils that literally pop up a week or so before easter – it’s like it knows We’ll clip them for our table that day and hopefully, they’ll last a few weeks. Use your inside flatware and glassware outside if you are eating outdoors – it’s just a quick trip to the sink
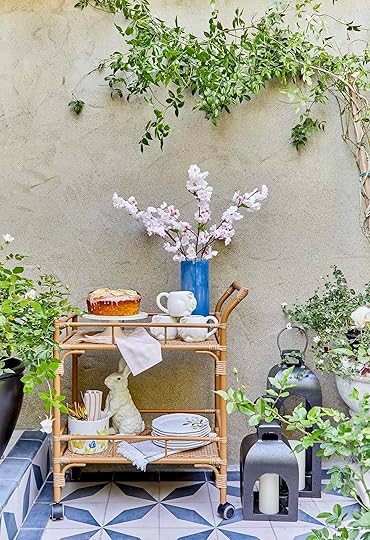
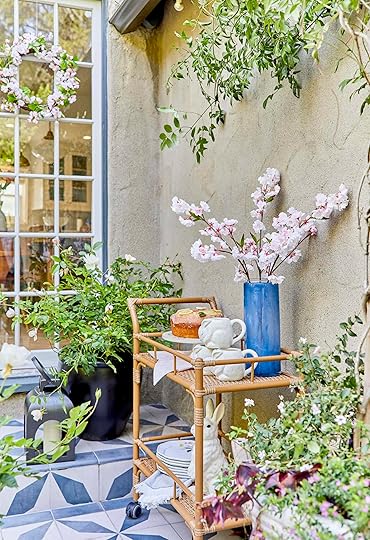
GAH. I love this shoot so much. Of course it’s editorial and meant to look aspiration a (not necessarily what everyone can do) but those bunny mugs would bring my children a LOT of joy (I bought them vintage bunny mugs for their baskets) and that bunny figurine would have gotten a lot of play at my house. If you have a bar cart feel free to turn it into a coffee station.

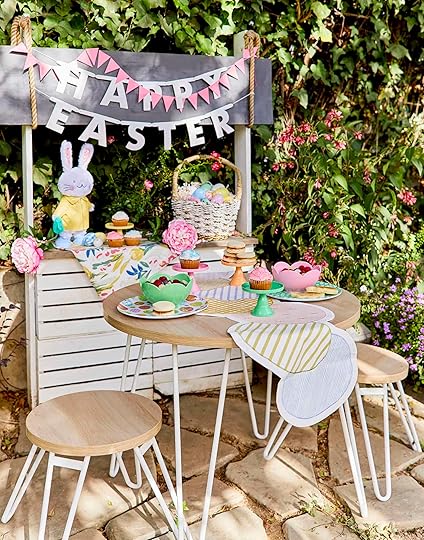
While this isn’t NECESSARY boy is it sure cute for the kids and they obviously freaked out when we shot this (in December 2019 :))

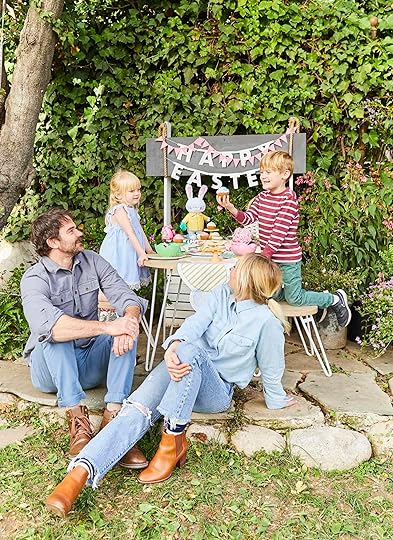
Happy Easter, folks. Whether you are going all out or keeping it low-key. May this be the last Easter without friends and family!!!! xx
*Photos by Sara Ligorria-Tramp
**Styled by Emily Bowser and Velinda Hellen
The post Need Some At-Home Easter Brunch Inspo?? Our Never Before Seen Easter Shoot From Last Year Has You Covered appeared first on Emily Henderson.
April 1, 2021
Is Your Bedroom In Need Of A Pick Me Up? It Might Be Time For A Bedding Refresh (+ 36 Affordable Picks)
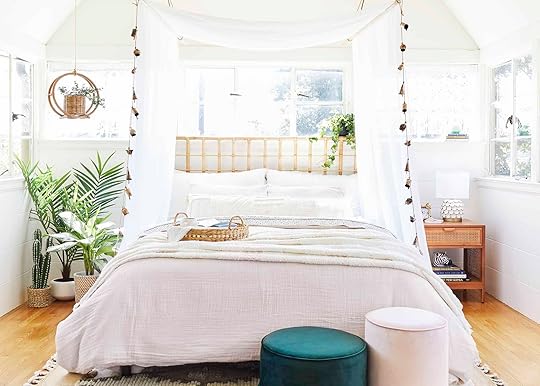
I recently bought new sheets and it stirred something in me that I didn’t know I was missing. For the past year I have been focusing on my living room design, so my bedroom has been grossly neglected. It’s actually a bit depressing to have one part of your home coming together beautifully and another part just utterly dull and uninspiring but so it goes when you only have the budget (and let’s be honest–the attention span) for one room at a time.
To be completely transparent, I only bought new sheets because our old ones had actual holes in them. Yep, that’s how little I’ve been taking care of my bedding and bedroom in general. So it was time for new sheets, clearly, and without really thinking about it I just bought these from Target. WELL, let me tell you, once I made the bed with my new sheets I felt like a new woman. The floral pattern paired with our plain white duvet and vintage Kantha quilt actually looked very cool together and I realized I needed this to give my bedroom life again. It felt nice to have nice bedding so I went ahead and replaced our old duvet and put together a bedding combo I enjoy looking at. The best part? I want to make my bed every day and give my bedroom in general more love because I can finally take pride in it again.
It turns out buying bedding is akin to turning a new leaf, so if you are trying to shed the remnants of the past year (who isn’t) then this is a fun, simple, and affordable way to do so. Here are our picks to get you started:

1. Twyla Ditsy Floral Sham Set | 2. Linen Bedsheet Set | 3. Printed Pattern Percale Sheet Set | 4. Soft Washed Organic Sheets | 5. Printed Jersey Sheet Set | 6. Organic Cotton Sheet Set Sour Cream/Railroad Gray | 7. Cloud Brushed Organic Flannel Sheets | 8. Cozy Slub Tie Sham Set | 9. Washed Cotton Tassel Sham Set | 10. Microfiber Printed Pillowcases | 11. 400 Thread Count Printed Performance Sheet Set | 12. Ditsy Daisy Sheet Set | 13. Leo Grey Flannel Sheet Sets | 14. Goldie Floral Sham Set | 15. Pinstripe Sheet Set | 16. Cotton Sheet Set | 17. Tattersall Sheet Set | 18. Cozy Slub Sham Set
If you want to spice up your bedding, patterned sheets are a great place to start. You can maintain whatever color palette you want, but by adding a small or large-scale pattern your bedding will feel new and exciting. We love a small pinstripe or large-scale windowpane pattern for neutral bedding combos or solid color sheets if you want to bring in pattern with throw pillows or blankets.
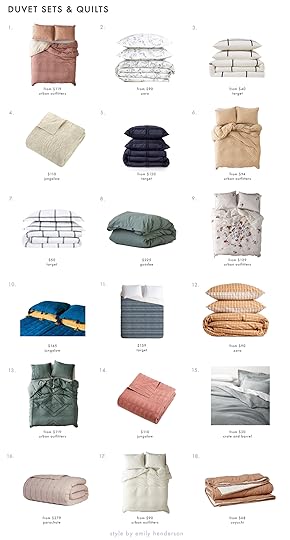
1. Twyla Ditsy Floral Duvet Cover | 2. Gray Floral Print Duvet Set | 3. Truly Soft Everyday Kurt Windowpane Duvet Cover Set | 4. Natural Hamsa Quilt Set by Jungalow | 5. Martha Stewart Skylar Chenille Duvet Set | 6. Tufted Geo Duvet Cover | 7. Truly Soft Printed Windowpane Duvet Set | 8. Duvet Cover – Olive Green | 9. Blossom Embroidered Duvet Cover | 10. Sol Quilt in Deep Ocean by Like a Lion | 11. Holli Zollinger Agean Stripe Duvet Set | 12. Plaid Seersucker Duvet Set | 13. Eliaf Tufted Duvet Cover | 14. Kahelo Quilt Set by Jungalow | 15. Kiyomi Grey Striped Duvet Covers and Pillow Shams | 16. Linen Loft Quilt | 17. Palmer Linen Blend Duvet Cover | 18. Manzanita Organic Handstitched Quilt
Maybe your bedding needs a full makeover and if that’s the case, you can’t go wrong with a duvet and pillow swap. It’s the easiest way to transform the feel of a bedroom and bring new life to your space. Or, you can start small by layering a colorful or patterned quilt or coverlet. Either way, if you need a bedroom refresh these picks will get you there.
Before you go, don’t forget to reference our guide to picking out the best bedding combos (it’s easier than you think!):
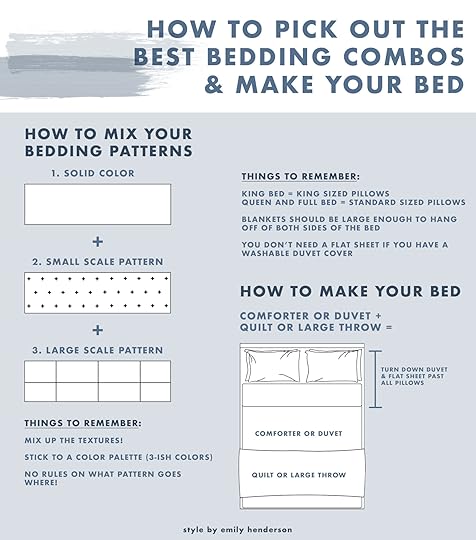
Alright friends, that’s all for now. See you next time and let me know what other affordable roundups you’d like to see from us. xx
Opener Image Credit: Photo by Sara Ligorria-Tramp | From: How to Pull Off “Quiet Maximalism” With Target’s New Opalhouse Spring Line
The post Is Your Bedroom In Need Of A Pick Me Up? It Might Be Time For A Bedding Refresh (+ 36 Affordable Picks) appeared first on Emily Henderson.
The One Feature Jess Is Ripping Out Of Her Apartment… JK APRIL FOOLS (But A Facelift IS Happening)

This little rule follower would never rip out an architectural feature without permission. Plus I have the best landlord maybe in the whole world so Joan if you are reading this please don’t worry:) BUT I do have some pretty exciting MOTO news. Well, first off I have a few of the major pieces locked down so we are in actual motion, people. However, that’s not the news because that would make for a pretty boring and short blog post. “Hey, guess what? I got some stuff coming in a few months, BYE!” So while no demo will be taking place, the fireplace is still getting a MAJOR facelift. Like, go to a foreign country to heal and come back looking like a brand new person kinda major.
Here’s the deal. While the place of the fireplace may be original in location, the materials are not. Actually, it’s got a not-great faux antique tile on the exterior that REALLY bums me out. Plus the color depresses me. Remember my “accidentally goth” Christmas mantel??
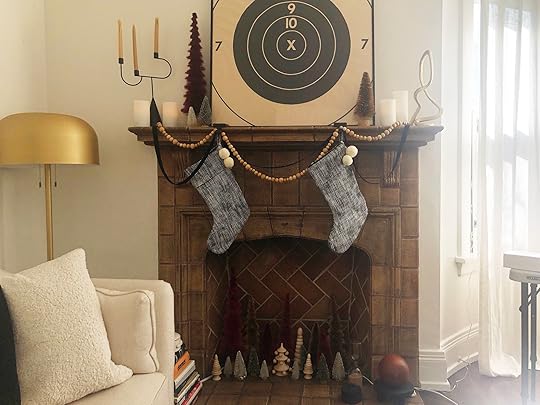 are you also sad looking at this thing?
If everything was the same but it was, say white? Or an awesome real aged tile? Then all would be great. But this thing is throwing off my whole design and after talking to Em and mentioning that I was thinking about covering it, a resounding, “yes!” blurted out of her mouth… so guess who I called??? DIY DAD, of course. I talked him through my plan and like the sweet, pain-in-the-butt angel he is, he said, “No problem, Bungo.” Bungo is a family nickname:) “Yo, Bungo!” was regularly shouted in our home and anyone within earshot would yell back, “WHAT?” Not weird at all. Also, maybe I’ve told that little anecdote before? IDK. Ok back to the fireplace.
This is going to be a 100% no damage total fireplace cover that is if it turns out how I plan, will totally elevate the space and make it really unique to me! I should mention this is NOT a working fireplace. If that were the case then well, that would be a problem. I pitched a “Faux Fireplace” post last year that never happened…obviously. So now is my chance! Here’s the plan. I’m going to show you the rough idea of my design, a couple of color options, and then get into some other great faux mantel surround ideas if you are looking to create a really awesome focal point in your space. Something for everyone.
Ok, here is the mantel/fireplace again sans Christmas Goth but also please ignore this styling:)
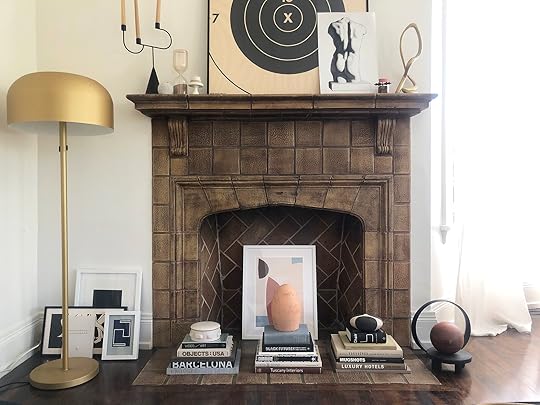
See what a bummer the color and finish are??? I don’t know why but it just makes me have low energy whenever I look at it. I know that sounds dramatic but since I have a plan I think I can totally remedy this.
So first let’s go back to the inspiration (but the updated version):
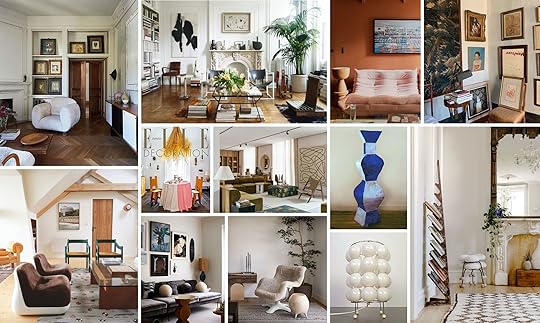
As you can see, I want special shapes, a good dose of brown with pops of color, and an overall European vintage feel. I’m real weird about showing mood boards too soon because I personally love surprises and want my living room to be a surprise to all of you! This fireplace idea “reveal” might be as close as I get to reveal what my plans are…
Here is my inspiration shot:
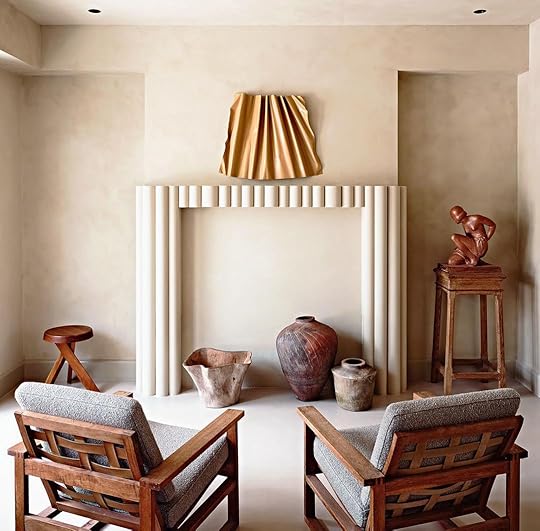 design by ecru studio | photo by suiyu studio
Not sure what that material is that Ercu Studio used but I think with some PVC pipes and limewash paint I could totally get the same look. So this example is just a great focal piece on a flat wall. I have an actual fireplace to cover both over and inside. So this is my VERY rough plan. It looks like it may be ugly but I think it’s going to be sick.

I told you it was rough. But my dad has already cut the pieces of wood that are going to go inside of the fireplace and over the hearth so they can be tiled whenever. I want to be able to light real candles and tile seems like the safest way to go. I think I’m going to hire someone to do that part but who knows, maybe I’ll take a stab! When my dad gets here in a couple of weeks we’ll buy and cut the PVC pipes. I’ll likely paint alone because Les Bunge has already tapped out of the part of the project. This Bungo is on her own.
My only question is am I going too safe with the off-white tile? Should I do a color? Does this feel like PTSD from my vanity mirror post in which you think it won’t actually happen? I guarantee this one WILL get done because I want to make me, you, and the generous sponsors of my decor happy. Here are two other options:

I don’t know why the pink tile looks so strange in photoshop but I think regardless the blue is kinda sexy and unexpected. Do you agree? Do you prefer the off-white?? I know you don’t know the design plan but know that browns, pinks, and blues are big players.
So that’s my update and I hope it maybe got you more excited about my living room and not at all horrified:)
But that’s not it! Remember that I promised you more?? My love for faux mantel surrounds goes back to my days in Brooklyn when I was convinced we needed a mantel surround to create a focal point in our living room. But then time, energy, money, and bed bugs got in the way. Normal stuff. So for those faux mantel surround dreamers like me who are looking for a focal point in their living room and want some more looks, I’ve got you…
Let’s start with the modern option from the insanely talented Franchesca of Fall for DIY.
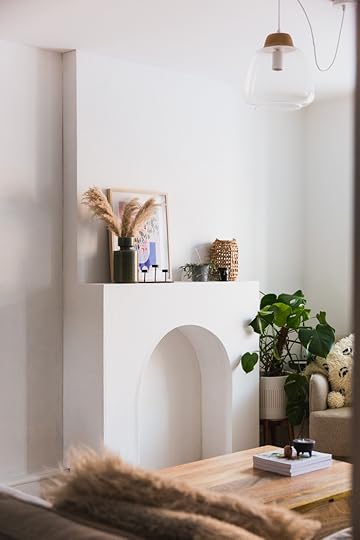
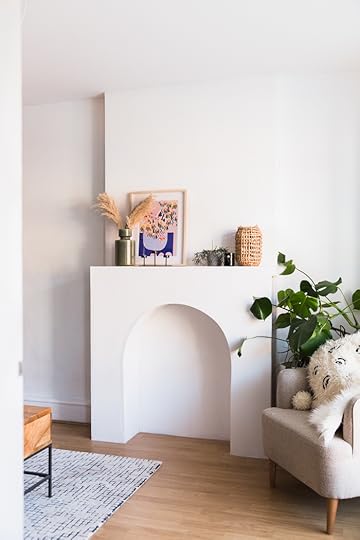 via fall for diy
I mean for the right home this is AWESOME! It’s modern, chic, bold yet quiet, and the best part is that she gives you a total step-by-step guide on her blog. Had I seen this post back in the BK, I would have totally done this.
Now let’s get a little more classic with this modern rustic beauty by Caitlin and Manda of The Merrythought.
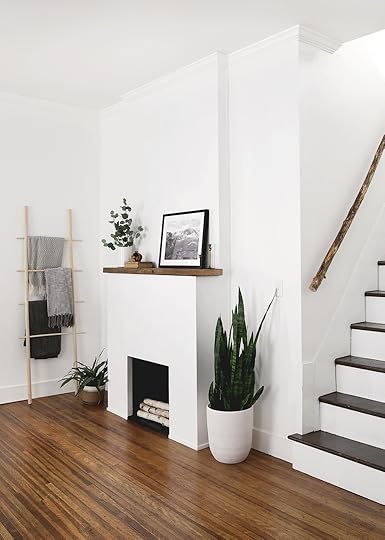
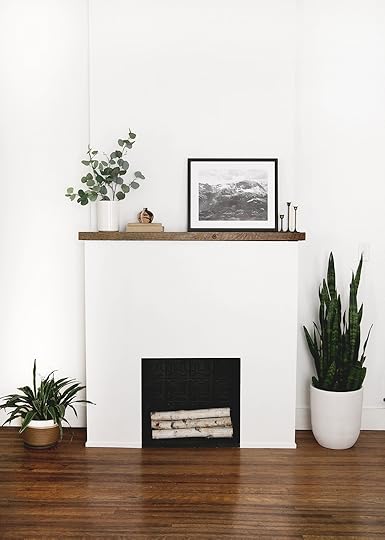 via the merrythought
So not only is this one a bit more classic but it is also set up to be an actual working electric fireplace. How are some people so talented?? I love the clean lines but also the special painted tine ceiling tiles. Such a great option and they also have a step-by-step guide.
Last we have the least laborious and most vintage option. Hooray!
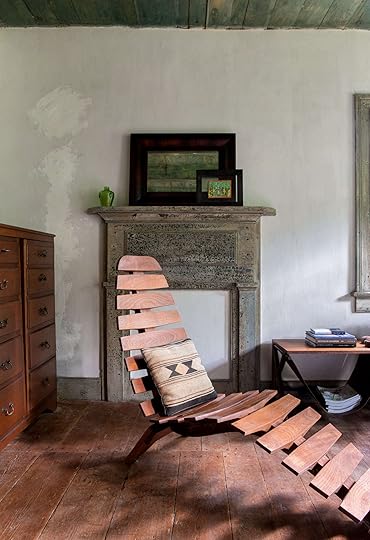 photo by sarah elliot | via remodelista
First off, I love this shot so much and it’s from Sarah Elliott and Lisa Przystup‘s book, Upstate: Living Spaces with Space to Live. I know both Em and Sara have it and LOVE IT. I need to get on the cool kid train and get myself a copy. Second, look how awesome that mantel looks. It’s perfectly aged and looks seamless in this home’s design aesthetic. The trick with vintage mantel surrounds is that your home also needs to have a lot of vintage character for it not to feel out of place. That’s just my personal PSA. But if you happen to have a beautiful old home in need of a focal point then this may be your answer! Here are some I found on Etsy:
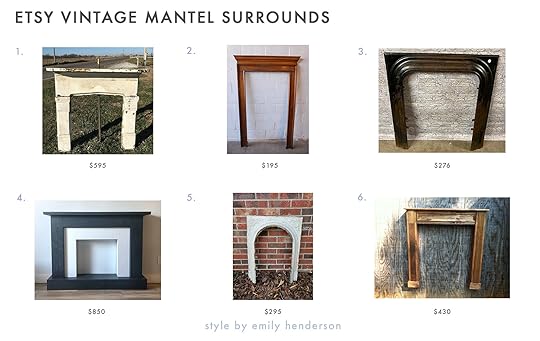
1. Antique Wood Fireplace Mantel Surround | 2. 1890’s Antique Trim Surround | 3. Vintage Cast Iron Fireplace Mantel Surround | 4. Faux Fireplace & Mantel | 5. Antique Cast Iron Fireplace Surround | 6. Farmhouse Fireplace Faux Mantel Surround
I think any of these would look great in the right style home. Full disclosure #2 is a window trim but could totally work for a small space! And #4 is clearly not vintage BUT if you aren’t a DIYer and love this idea here is your answer.
Ok y’all, what do you think? What’s your tile color preference? Are you into this look as a focal point solution? Also, sorry about the prank. Hopefully, I didn’t make you too mad:)
Love you, mean it.
The post The One Feature Jess Is Ripping Out Of Her Apartment… JK APRIL FOOLS (But A Facelift IS Happening) appeared first on Emily Henderson.
The One Feature Jess Is Ripping Out Of Her Apartment (And Likely Without Permission…)
See that fireplace tile that’s fronting as “original”??? Well, I’ve had it because it’s faux aged, makes me sad when I look at, and is killing my vision for my living MOTO (Makeover Takeover). SO with that said I’m just going to demo/retile. I know it’s very risky, but I will stay true to the architecture of the building so my landlord will (with all my fingers crossed) LOVE IT. Let’s get into my plan because I promise you will love it too even if you think I clearly have zero design boundaries…
ignore the styling!APRIL FOOLS! This little rule follower would never rip out an architectural feature without permission. Plus I have the best landlord maybe in the whole world so Joan if you are reading this please don’t worry:) BUT I do have some pretty exciting MOTO news. Well, first off I have a few of the major pieces locked down so we are in actual motion, people. However, that’s not the news because that would make for a pretty boring and short blog post. “Hey, guess what? I got some stuff coming in a few months, BYE!” So while no demo will be taking place, the fireplace is still getting a MAJOR facelift. Like, go to a foreign country to heal and come back looking like a brand new person kinda major.
Here’s the deal. While the place of the fireplace may be original in location, the materials are not. Actually, it’s got a not-great faux antique tile on the exterior that REALLY bums me out (that part of the beginning wasn’t a joke). Plus the color depresses me. Remember my “accidentally goth” Christmas mantel??
are you also sad looking at this thing?If everything was the same but it was, say white? Or an awesome real aged tile? Then all would be great. But this thing is throwing off my whole design and after talking to Em and mentioning that I was thinking about covering it, a resounding, “yes!” blurted out of her mouth… so guess who I called??? DIY DAD, of course. I talked him through my plan and like the sweet, pain-in-the-butt angel he is, he said, “No problem, Bungo.” Bungo is a family nickname:) “Yo, Bungo!” was regularly shouted in our home and anyone within earshot would yell back, “WHAT?” Not weird at all. Also, maybe I’ve told that little anecdote before? IDK. Ok back to the fireplace.
This is going to be a 100% no damage total fireplace cover that is if it turns out how I plan, will totally elevate the space and make it really unique to me! I should mention this is NOT a working fireplace. If that were the case then well, that would be a problem. I pitched a “Faux Fireplace” post last year that never happened…obviously. So now is my chance! Here’s the plan. I’m going to show you the rough idea of my design, a couple of color options, and then get into some other great faux mantel surround ideas if you are looking to create a really awesome focal point in your space. Something for everyone.
Ok, here is the mantel/fireplace again sans Christmas Goth but also please ignore this styling:)
See what a bummer the color and finish are??? I don’t know why but it just makes me have low energy whenever I look at it. I know that sounds dramatic but since I have a plan I think I can totally remedy this.
So first let’s go back to the inspiration (but the updated version):
As you can see, I want special shapes, a good dose of brown with pops of color, and an overall European vintage feel. I’m real weird about showing mood boards too soon because I personally love surprises and want my living room to be a surprise to all of you! This fireplace idea “reveal” might be as close as I get to reveal what my plans are…
Here is my inspiration shot:
design by ecru studio | photo by suiyu studioNot sure what that material is that Ercu Studio used but I think with some PVC pipes and limewash paint I could totally get the same look. So this example is just a great focal piece on a flat wall. I have an actual fireplace to cover both over and inside. So this is my VERY rough plan. It looks like it may be ugly but I think it’s going to be sick.
I told you it was rough. But my dad has already cut the pieces of wood that are going to go inside of the fireplace and over the hearth so they can be tiled whenever. I want to be able to light real candles and tile seems like the safest way to go. I think I’m going to hire someone to do that part but who knows, maybe I’ll take a stab! When my dad gets here in a couple of weeks we’ll buy and cut the PVC pipes. I’ll likely paint alone because Les Bunge has already tapped out of the part of the project. This Bungo is on her own.
My only question is am I going too safe with the off-white tile? Should I do a color? Does this feel like PTSD from my vanity mirror post in which you think it won’t actually happen? I guarantee this one WILL get done because I want to make me, you, and the generous sponsors of my decor happy. Here are two other options:
I don’t know why the pink tile looks so strange in photoshop but I think regardless the blue is kinda sexy and unexpected. Do you agree? Do you prefer the off-white?? I know you don’t know the design plan but know that browns, pinks, and blues are big players.
So that’s my update and I hope it maybe got you more excited about my living room and not at all horrified:)
But that’s not it! Remember that I promised you more?? My love for faux mantel surrounds goes back to my days in Brooklyn when I was convinced we needed a mantel surround to create a focal point in our living room. But then time, energy, money, and bed bugs got in the way. Normal stuff. So for those faux mantel surround dreamers like me who are looking for a focal point in their living room and want some more looks, I’ve got you…
Let’s start with the modern option from the insanely talented Franchesca of Fall for DIY.
via fall for diyI mean for the right home this is AWESOME! It’s modern, chic, bold yet quiet, and the best part is that she gives you a total step-by-step guide on her blog. Had I seen this post back in the BK, I would have totally done this.
Now let’s get a little more classic with this modern rustic beauty by Caitlin and Manda of The Merrythought.
via the merrythoughtSo not only is this one a bit more classic but it is also set up to be an actual working electric fireplace. How are some people so talented?? I love the clean lines but also the special painted tine ceiling tiles. Such a great option and they also have a step-by-step guide.
Last we have the least laborious and most vintage option. Hooray!
photo by sarah elliot | via remodelistaFirst off, I love this shot so much and it’s from Sarah Elliott and Lisa Przystup‘s book, Upstate: Living Spaces with Space to Live. I know both Em and Sara have it and LOVE IT. I need to get on the cool kid train and get myself a copy. Second, look how awesome that mantel looks. It’s perfectly aged and looks seamless in this home’s design aesthetic. The trick with vintage mantel surrounds is that your home also needs to have a lot of vintage character for it not to feel out of place. That’s just my personal PSA. But if you happen to have a beautiful old home in need of a focal point then this may be your answer! Here are some I found on Etsy:
1. Antique Wood Fireplace Mantel Surround | 2. 1890’s Antique Trim Surround | 3. Vintage Cast Iron Fireplace Mantel Surround | 4. Faux Fireplace & Mantel | 5. Antique Cast Iron Fireplace Surround | 6. Farmhouse Fireplace Faux Mantel Surround
I think any of these would look great in the right style home. Full disclosure #2 is a window trim but could totally work for a small space! And #4 is clearly not vintage BUT if you aren’t a DIYer and love this idea here is your answer.
Ok y’all, what do you think? What’s your tile color preference? Are you into this look as a focal point solution? Also, sorry about the prank. Hopefully, I didn’t make you too mad:)
Love you, mean it.
The post The One Feature Jess Is Ripping Out Of Her Apartment (And Likely Without Permission…) appeared first on Emily Henderson.
Emily Henderson's Blog

- Emily Henderson's profile
- 10 followers

