
Emily Henderson's Blog, page 17
May 11, 2025
The Link Up: The Gift Emily Bought Brian For Father’s Day, Mal’s $50 Compliment-Magnet Denim Set, And Maybe The Most Special Collaboration We’ve Seen
First things first…HAPPY MOTHER’S DAY to all who celebrate!!! Being a parent or a parental figure is so much of the time, a thankless job. But we hope that today you are filled with so much love and deep appreciation. And if this day is hard for you for whatever reason, we are here for you too, and sending you lots of love. Now, let’s get into these links so you all can continue to enjoy your Sunday>3
This week’s house tour is a historical San Francisco Victorian that is bursting with color and pattern, honoring the homeowners’ Indian and Italian cultures! Designed by Noz Nozawa, this home is joyful and beautiful, and a total feast for the eyes.
From Emily: I am accidentally way ahead this year with Father’s Day gifts for Brian, mostly because we have this outdoor kitchen that we needed to buy tools/supplies for. So here’s what I bought for both Brian and me (that would make a fantastic Father’s Day gift). The Franklin BBQ Cookbook Collection – These are meant to be the best BBQ recipe books out there, which I heard from multiple people (dubbed the BBQ bible). When Brian found it (via snooping), he was like “Oh, I was going to buy this book,” which was very exciting. Additionally, I had this apron customized for him via Etsy for Father’s Day because he keeps ruining his clothes with rogue oil splashes.
From Marlee: I am not a huge jewelry person, but I recently received a gift card to Gorjana and spent it on this super simple necklace that I’ve been loving. It’s super thin and dainty, and the little pops of color are fun without standing out too much. It’s also one of the most affordable pieces of jewelry on their site (I wanted to max out my gift card without spending too much of my own $). Mine is the normal size, but it also comes in a shorter version
From Gretchen: I stopped into Ulta the other day because I’ve just about run out of my shampoo. Usually, I use the Monday shampoo and conditioner, but because I’m really trying to lean into my “wavy hair routine,” I picked up a few new products from Not Your Mother’s Curl Talk line. I’m most excited about this Bond Building shampoo because my hair definitely needs some repair. I haven’t used it yet, so I’ll have to report back, but that’s not even my link for you this week! While there, I also re-upped on my favorite hair ties of all time, because unfortunately, they have a habit of disappearing on me. These are my tried and true favorites because they’re not too thick like an actual scrunchie, but the material is soft and gentle on your hair, and at least for me, doesn’t leave a gnarly indent when you take them out. They’re easy to wear on your wrist because they’re much thinner, like a regular hair tie, but they bunch up nicely in your hair to give you more of that exaggerated pony vibe. And the colors are just too cute!
From Mallory: It’s rare to find a cute (and comfy) outfit you’ll wear over and over again for $50…BUT I FOUND IT. Marketing worked on me because I saw this unbelievably cute set on Instagram and immediately snagged it when I found out the top was $24 and the bottoms were $26. The simple railroad stripe made my heart flutter, and the little gold buttons make it look so expensive. I wore it a few different times this past week and received so many compliments, and every time, people were shocked to learn it was from Walmart (as was I, lol). The pants come cuffed, but I just cut the stitching to make them longer. Also note the top runs true to size, but the bottoms run a bit big!
From Arlyn: New design Substack to follow alert!! I’ve run in similar career circles with Leonora Epstein, who started her Substack, Schmatta, last year after being let go from her long-time job as Editor in Chief of Hunker. It’s one of the few Substacks I’m subscribed to that I actually open and read because it’s short, quippy, smart, and I always discover something new. If you like whit dryer than a rice cake, you’re going to love Schmatta. Leonora recently got bad news about her job yet again, this time due in part to the imposed tariffs, so let’s support this hard-working woman, shall we?!? You can sign up for free or become a paid subscriber for $7 a month.
Also From Alryn: One of the wonderful online art galleries I mentioned in my recent piece about my desire to buy “real” art is having a sale! Until this coming Tuesday, May 13, 20×200 is offering 30% off their Vintage + Space Editions with code ICONIC (you won’t see the sale price on the product pages until they’re added to cart with the code, FYI). I just picked up this one by Florine Stettheimer as a Mother’s Day gift to myself, and I love that I’m able to read the artist statement and an explanation from 20×200 of why they love the piece and why it’s important. If you’re looking for very well-priced art prints that just so happen to be limited edition, make sure to check out the sale!
From Jess: I’m sure you’ve heard Arlyn rave about her stunning East Fork Pottery plates and bowls a couple of times here in The Link Up and I can also attest to how beautiful and high quality they are, as I have gotten to use them when I go over to her house, usually for dinner:) But unbeknownst to most people, the founder, Alex, recently revealed he is the grandson of Henri Matisse. YES, THAT MATISSE. Unstandably, Alex wanted to make a name for himself without using his family’s famous name, and that he did. The work East Fork produces is heirloom quality, and from everything we’ve ever known and read about them, they really seem to care about the work as much as the people they employ. But back to family legacy, they recently launched The Matisse Collection — a celebration and collaboration of his grandfather’s art and his pottery. While there have, of course, been other collaborations with Matisse’s art, none like this. This one is special. Almost like you are getting a piece of art history. You bet I’m saving up for these plates We were fans before we knew, and this fun new piece of information only adds a cool new layer.
From Caitlin: I am bullish on some of the advancements in AI – I’m stunned by the medical applications; I’m floored by some of the research capabilities; I’m even a paying customer of ChatGPT, Claude, and Cursor! – But I am REALLY wary of advancements in chatbots. Case in point: some conversations are driving people to the brink of delusion, as reported in this gripping Rolling Stone piece. AI can be really dangerous when it’s this sycophantic and enabling – if you’re a parent, I’d urge you to get familiar with these tools so you can explain them to your kids. They’re far more susceptible to taking these tools at face value, which can (and has) come at a grave cost. It’s becoming increasingly clear that we need to build our in-person communities – a monetized chatbot is a far cry from a real friend, no matter what Zuck says.
Thank you for stopping by, as always, have a beautiful Mother’s Day to all of the moms, and see you tomorrow for the outdoor kitchen reveal!!! xx
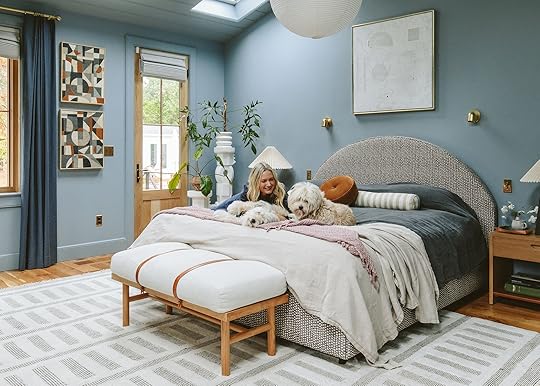
Opening Image Credits: Photo by Kaitlin Green | From: Farmhouse Primary Bedroom
The post The Link Up: The Gift Emily Bought Brian For Father’s Day, Mal’s $50 Compliment-Magnet Denim Set, And Maybe The Most Special Collaboration We’ve Seen appeared first on Emily Henderson.


May 10, 2025
My Overstuffed Closet Caused An Identity Crisis – Here’s How I Got Through It

It’s Saturday. We’re being earnest. Buckle in.
There was a time in my life – we’ll call it the business casual era – when I owned thirteen blazers but not a single pair of pants I actually liked. I had work blazers (essential), dinner blazers (aspirational), date blazers (optimistic), and the emergency funeral blazer (because one must always remain prepared for stylish grief, I guess). I had one blazer that only worked with a single top, and one top that only worked with a specific bra, which had to be hand-washed, which meant that outfit was basically cursed.
My closet wasn’t just a clothing repository: it was a museum of my life choices. Party dresses I rarely wore to parties, jeans too uncomfortable to sit down in (a minor detail), a pair of boots I adored even though they made me walk like a marionette, and an alarming number of clothes I’d purchased for a version of myself that had only rarely shown up to claim them. I bought clothes the way some people buy self-help books: aspirationally, and in a panic. My closet was bursting, but my daily pronouncement remained: I have nothing to wear.
It took an embarrassingly long time (and probably a few too many existential crises in front of an open wardrobe) to understand the real issue. My problem wasn’t a totally catastrophic lack of taste (though I’m sure some of you might offer a counterpoint) – the problem was that I wanted to outfit each aspect of my personality. Put simply: I was picking pieces for too many different versions of myself.

 these weren’t even taken a long time apart! who is this?!?!
It wasn’t just that I didn’t like my options. I had built uniforms for disparate lives – I had outfits for crust punk basement shows and for summer on the Cape; for bougie branded parties and for the local DSA meeting; for ice skating competitions and for blending in at the recording studio when my boss told me to throw out any other woman’s résumé, as they likely only wanted to sleep with the band. (Being a woman is super fun, right?!)
But it wasn’t just that I was playing dress up. I was, as it turned out, costuming (and not in the fun, let’s go to a masquerade ball kind of way). No – this was the insidious, slow-creep kind of costuming where you wake up one morning, stare into the abyss of your closet, and realize that every single garment was acquired as a uniform for a specific performance – like it’s for someone else, or some version of you that isn’t the one currently staring back.
The moment that finally cracked me wasn’t a high-stakes occasion. It was a Friday night, and I was trying to find something, anything, to wear for dinner with my best friends – friends who have known me forever; who neither require, nor expect, a polished version of me. And still, I was stuck. Staring into my closet, I was confronted by a veritable sea of options, and somehow, none of them felt right for a night of shared appetizers and gossip with this group of friends. The thought struck me: I don’t know how to be myself here.
I had attire for dates, for international flights, for funerals (see: emergency blazer, above). But for pasta, or errands, or love/hate-watching And Just Like That? Nothing.

 a serious startup boss uniform | i have worn this to brand parties more than once
Now, let’s be clear: it wasn’t that my clothes were languishing with tags on. They weren’t monuments to my aspirational shopping. Au contraire: these pieces were operational. They weren’t just for imagined futures – they were my daily-wear costumes for a very real, very scheduled life. I had outfits for tour buses, for awkward backstage photos, for investor pitches where I tried to look like I understood spreadsheets. Outfits for dive bars (a different kind of pitch), for brand dinners (smile, nod, don’t spill), for handing over a P&L statement with a brave face.
Each look had a function, and each function came with a slightly different me that needed to be appropriately outfitted. The problem wasn’t that the clothes weren’t useful. The problem was that I had compartmentalized myself into so many different women that I could no longer find any discernible overlap. My closets were an archive of who I’d been in specific, calendared moments, but offered zero guidance for who I was when the calendar was blissfully, terrifyingly empty. (I’m sure you can guess what happened next.)

 dressed like adam sandler for christmas with my west coast friends | dressed like a fox news personality for christmas with my east coast friends
Then the world hit pause, and my meticulously curated calendar went with it. No shows, no shoots, no strategy dinners, no meetings that could have been emails. Just me, my increasingly judgmental closet, and a rotating cast of sweatpants. For a while, I convinced myself it was temporary. That at any moment, I might be called to dress for something, anything. (And at one point, I was – a Zoom wedding. I watched as their outdoor ceremony was crashed by an NYPD police boat.) But the months unspooled, and the clothes just hung there, smug and silent.
So again, I cracked. Not because the clothes were useless, but because they were suddenly, profoundly unemployed. No meetings to navigate, no flights to catch, no crowds to stand in. Just me, at home, day after day, month after month, staring down a closet meticulously built for a schedule of events that no longer existed.
I still remember when it happened: I started pulling pieces out of my closet with the manic clarity of a woman bleaching her kitchen grout at 3 AM. (Ask me how I know.) Blazers, blouses, and the chain-covered boots that had complemented my once-purple/green/blue hair – out they went. I didn’t weep. (And I certainly didn’t hold each one and thank it for its service like some organizational guru might suggest, despite my sentimental nature.) I bagged them. I moved on. The truly absurd part wasn’t the volume of what I owned, but how perfectly each item had once fit into a part of my life that no longer needed costuming.

 a uniform for nights with music colleagues | a uniform for nights with ehd’s finest
After the Great Wardrobe Eviction, I assumed Style would reveal itself. That’s the promise, isn’t it? Pare things down and your True Self, fashionably clad, will emerge like Venus from the clamshell. You’ll make a Pinterest board. You’ll define your five essential adjectives. You’ll effortlessly build a capsule wardrobe in soothing shades of camel, oat, and existential despair. Supposedly, your closet becomes a temple. You become the kind of woman who wears linen jumpsuits to run errands and owns exactly three sweaters, all named.
I didn’t believe all of it, but I wanted to believe some of it.
Yet nothing arrived. No style epiphany, no sartorial lightning bolt. Just a significantly emptier wardrobe and the creeping, deeply unsettling realization that I had absolutely no clue what I actually felt comfortable in. I knew what had worked for various roles, but me, unscripted? Blank canvas. I didn’t necessarily want a capsule wardrobe, with all its implied monastic chic. I just wanted to get dressed and feel like myself. Instead, I felt like an actor waiting for a casting director to hand me a new character. I’d cut the noise, but the signal, it turned out, had packed its bags and left with the blazers. It was just…quiet. (And not the good, meditative, Gwyneth-on-a-silent-retreat way. More the bleak, is this all there is? kind of quiet.)

 my (seemingly literal) apple uniform | my (far less literal) ehd uniform
Eventually, I gave up on “finding a look” – which always sounds like you’re searching for a fugitive – and started looking for a standard. If I couldn’t dress for a specific context, maybe I could dress for some core values. Rules were made (because when in doubt, make rules). Natural fibers, exclusively, because a 2024 trip to pristine Antarctica had instilled in me a deep, lingering climate guilt. Fewer things, but better things – things that might actually survive more than three dates with my laundromat’s 8-load machine. No more shoes I couldn’t walk a respectable city mile in, no more patterns that were impossible to match, no more tops that were held hostage by that one specific bra.
What came next wasn’t some cinematic reveal: it was just Tuesday. No makeover montage, no triumphant strut. I just got dressed. Badly, at first. And then slightly less badly. Some days, I looked goofy. Other days I looked like myself, or at least someone I’d be friends with.
It’s a weird, slow, deeply unglamorous process, this excavation of what you wear when you’re not specifically anywhere – no event, no deliverables, no audience. Just Tuesday. Just you. It turns out, when you’ve spent a lifetime building wardrobes for very distinct, very real contexts – studios, offices, cities, farms – you can accidentally skip the fundamental step of figuring out what you throw on to buy milk. Or to go to dinner. Or, crucially, to sit alone on your own couch and feel like yourself.

 i do feel like i’m finally finding a cohesive middle ground – clothes i can wear in front of everyone i know
There’s a very fine, often line between personal style and collective bargaining with your self-esteem. For me, it wasn’t about insecurity – not really. I think it was more about range – I was so worried about dressing to fit in that I somehow forgot to ask what I’d wear if no one else was there. I think that if you really want to know who someone is, don’t look at what they wear – ask what they keep and never don, just in case. I kept a lot. I did wear almost all of it, at some point. But when I was finally alone, I realized I didn’t know what any of it meant. Not about the world, but about me.
These days, when I get dressed, the outfit isn’t the answer. It’s the question. And at least now, I have a much better idea of who I’m asking.
How To StartSo, your closet? Does it feel less like a curated collection and more like a holding pen for a witness protection program of various past selves? Are you staring at a bewildering array of “stuff” and thinking, Surely, one of these things must feel like…me? And have you, like me, Googled for help only to be met with blindingly obvious advice that makes you want to scream into the nearest sensible scarf? (Wow: Buy what makes you feel good? Oh man! Insightful! What wise chestnut is next? Avoid hitting yourself on the head with a hammer?)
I’ve been there. It sucks. Here’s what I’ve found helpful when it comes to clearing the clutter and making room for Style, whenever it decides to show up (any day now, I’d hope).
As it turns out, I suffer from a peculiar affliction: I cannot, for the life of me, conjure images in my mind. When people talk about their “mind’s eye” or “imagining the audience in their underwear” – well, I always thought that was a literary device. Metaphorical. Implied, not literal. A charming turn of phrase! It was only recently I learned that most people can, quite literally, see things in their heads. (Given a natural inclination towards distraction, perhaps this is a mercy. I would likely spend my days conjuring pastries.)
But this posed a silent, daily problem for my wardrobe. I knew the facts: I owned black linen pants. There were tank tops, somewhere, in that drawer. My favorite dress was red, with zodiac signs. But I couldn’t see them. Couldn’t picture combinations. Getting dressed was a daily archaeological dig involving pulling everything out and sighing dramatically.
Enter: Indyx. (Link Up readers, you may be familiar.) Cataloging my clothes felt absurd at first, but it was – and I’m not being overdramatic – transformative. I can actually scroll through my clothes like an ultra-specific personal shopping app. I can play mix-and-match before creating Mount Laundry on my floor. I can see what I actually wear (and, more importantly, what I consistently ignore). It’s a process, not a miracle cure. You could do the same thing with a photo album on your phone, but Indyx is prettier.
Live Out of A Carry-OnThis one has been the most helpful, I think. I’ve spent 4 of the last 5 months living out of a carry-on suitcase. I’m not even suggesting that you have to travel to do this – you could also try it at home! – but there’s something liberating about pulling only what fits in a carry-on suitcase and learning how to mix-and-match from a refined, edited collection of only essentials.
Suddenly, faced with a severely limited selection, I was forced to actually style things. That button-up? Can I tie it? Can I tuck it differently? That dress? Can it be a skirt? Can it be layered? It stripped away the paralysis of too many options and forced creativity. It also gave me a clear metric for success: when I felt genuinely bummed out that something was in the laundry hamper because I wanted to wear it again, I knew I’d found a winner. These were the pieces that felt like me, even in miniature form.
And Rent, For Some VarietyPRAISE BE TO THE NUULY FOUNDERS. I’m still on the hunt for my Style – it feels like a mythical creature, sometimes – and opening my subscription is my low-stakes safari. Six pieces a month means I can try cuts, colors, and general aesthetics I wouldn’t commit to buying (or, honestly, even trying on in person). It’s a lifesaver during the brutal LA “winter” (read: jacket season) and the holiday party circuit (no more staring mournfully at unworn sequin dresses!). It’s experimentation without the commitment – perfect for this phase of life, while i figure out who I am. (I guess I’m just starting that mid-life crisis a few years early, huh?)
What say you? Any thoughts? Tips? Advice? I can’t be the only woman whose path to self-discovery involved staring blankly into a closet, can I? Has this happened to you? CAN WE TALK ABOUT IT? xx
Opening Image Credits: Photo by Kaitlin Green | From: The Expertly-Planned River House Primary Closet Reveal
The post My Overstuffed Closet Caused An Identity Crisis – Here’s How I Got Through It appeared first on Emily Henderson.
May 9, 2025
The Versatility Of The Pedestal Table In My Friend’s Home (And My Search For Finding More Traditional Versions)
We are deep diving today on what I think is one of the most versatile and timeless pieces of furniture, EVER – the pedestal table. Now pedestal tables have been around for a few hundred years (which really isn’t that long if you think about it), but they were mostly with carved wood bases, rather chunky with legs (think a 1940s wooden kitchen table in a nook). And while that has its time and place, it often feels more “country” than a lot of us want. And then, of course, in 1958, Saarinen broke the internet (LOL) with the tulip table – an undeniably modern shape with just one white swoop from floor to tabletop. Luckily, this created a movement that saves us so much space and can add a modern element in any traditional context (without screaming mod). While designing my best friend’s house, I apparently leaned hard into pedestal tables because I brought three into her house. But TBH it was hard to find any that felt like they had some sort of traditional bent to them (I didn’t want the hyper-mod white tulip table base). So today I’ll show you what I did find, why they work, and we’ll round up more that might work in your house (in a variety of sizes).
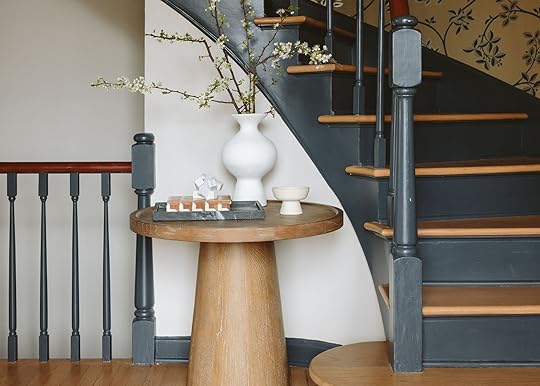
The Smaller Entry Table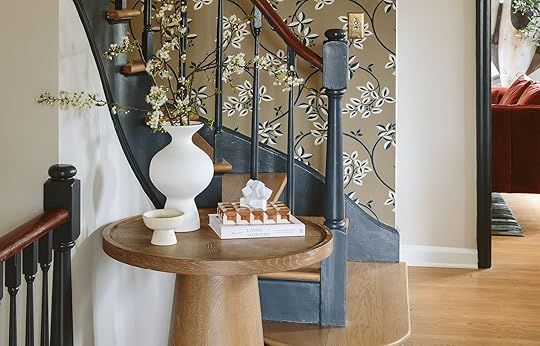
Wallpaper | Trim Paint | Table | Vase | Pedestal Catchall (similar) | Box (similar) | White Object (similar) | Book
I also wanted to show off this pretty entry that didn’t make it into any of the reveals The reason pedestal tables are so popular in entries (and why they work here) is that round is inherently good for flow (less hip bumping) and the simple base shape complements all the lines of more traditional stair railings. Imagine if this table were square or had three or four legs? GASP! The streamlined silhouette contrasts perfectly in this busy space (even without that lovely wallpaper).
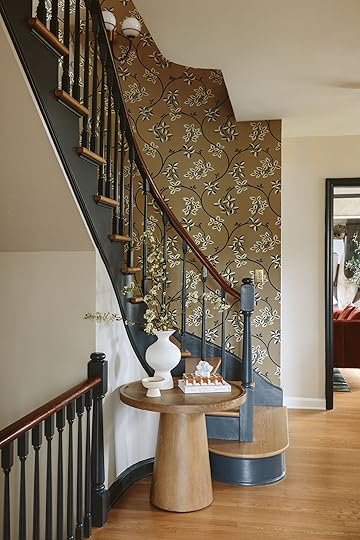

Even if it was a much larger entry that allowed the table to float, you still want a round entry table, and the simpler base helps it feel more like a pedestal, rather than a dining table that feels naked without chairs.

This one was actually bought for another job, but it works so perfectly in here, and the warmth of the wood helps it work well in this traditional space, not feeling too cold.
Dining Niche Pedestal Dining Table from: colorful modern traditional breakfast nook reveal
Now, this table was a lot harder to find. It had to be round due to the shape of the room, it had to be pedestal (or a single base holding up the top) so that the chairs could be moved easily, but again, I didn’t want the classic DWR marble tulip table. We needed 54″ (48″ and 60″ were more standard), but for this home, we wanted it to feel classic and traditional, not too contemporary. I ended up finding this at Frontgate (and it was an investment), but the marble on top is dramatic and cool, while the base still has some traditional carved elements.
It ended up being pretty darn perfect if you ask me, and while we did find more options for you, I still think there is a hole in the market for more traditional style pedestal tables.
Drop Zone Vignette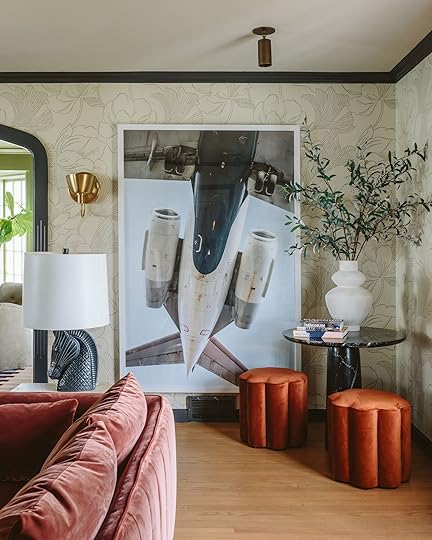
 from: colorful modern traditional living room reveal
We also used this one in the corner, offsetting the huge masculine rectangular modern art with a simple shape in a traditional material (dark veiny stone). I still think that this photo is intense for this room (which I told my friends my opinion), and I wanted to do a huge amorphous mirror here. I think that the table really softens the art, while edging up the room still (they don’t like hyper traditional, carved wood pieces). I also love that with pedestal tables, you can sneak in little benches like this that not only add another design element, color, and texture but are such great stools to pull out for guests.
So that’s my TED talk on “The Versatility Of The Pedestal Table”. My hope is that more companies will continue to make the single-center-based table in more styles and materials. While we did find a lot, however, finding good traditional ones wasn’t easy. So these are the ones we really loved overall, are in different styles, and in three different sizes:)
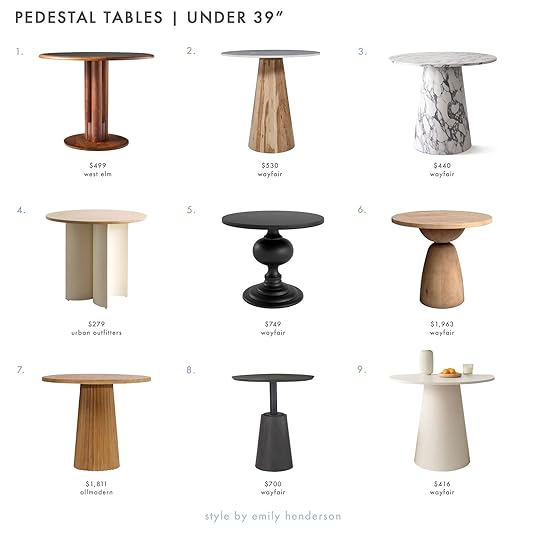
1. Alfred Bistro Table | 2. Round Marble And Wood Pedestal Table | 3. Faux Marble Small Round Pedestal Dining Table | 4. Miles Half-Moon Sculptural Dining Table | 5. Giaimo Dining Table | 6. Saria Pine Round Solid Wood Dining Table | 7. Wynn Solid Wood Bistro Table | 8. Round Solid Wood Dining Table | 9. Bradlyn Round Dining Table
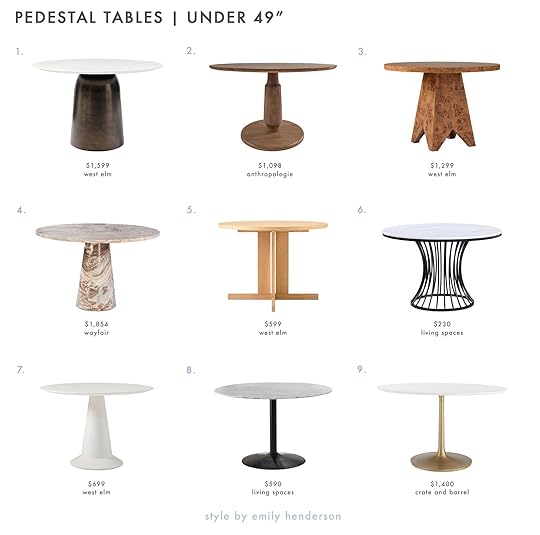
1. Olina Marble Round Dining Table | 2. Clark Round Wood Dining Table | 3. Pierce & Ward Burl Wood Round Bistro Table | 4. Malaz Round Dining Table | 5. Rowe Drop Leaf Bistro Table | 6. Haisley Black + White Faux Marble Round Dining Table | 7. Billy Cotton Simple Dining Table | 8. Muir White Black Round Faux Marble Pedestal Dining Table | 9. Nero Round White Marble Dining Table
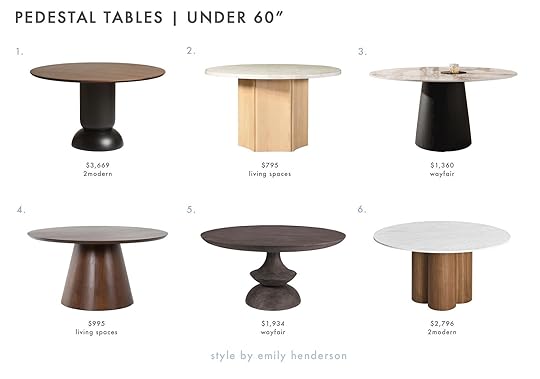
1. Ludo Dining Table | 2. Rwin Marble Top + Oak Finish Round Dining Table | 3. Modern Round Dining Table With Solid Wood Pedestal | 4. Dorothea Round Solid Wood Dining Table | 5. Draper Walnut Mid-Century Modern Round Pedestal Dining Table | 6. 4/4 Round Dining Table
Hope these help! xx
*Photos by Kaitlin Green
The post The Versatility Of The Pedestal Table In My Friend’s Home (And My Search For Finding More Traditional Versions) appeared first on Emily Henderson.
May 8, 2025
10 Very Good Design Ideas We’re Mentally Bookmarking From The Pasadena Showcase House (+ A Fun Fact You Probably Didn’t Know)
Raise your hand if you spent your weekends as an adolescent being towed around town from model home community to model home community by your parents? ::raises both hands:: I’d be lying if I said I didn’t like it. While your family pastime might have been something like playing sports together, going on long bike rides, or having family movie nights, mine was hunting down the Parade of Homes, or at the very least, the newest Pulte or Lennar Homes development.
For my parents, I’d guess they were able to imagine a life of tidy kitchens and rooms built for conversation, even if just for 20 minutes; but for me, I was in awe of the *design*. This is where I learned that walls could be colors other than white, and curtains could match bedspreads. It was my Architectural Digest before I ever cracked open a magazine.
Well, design showhouses are like a bouquet of model homes all together under one roof, where each room is dreamed up by a proper interior designer. It’s a place where designers get to really dream; where they don’t have a client telling them to turn down the dial on the drama. It’s a true showcase of their vision and taste, and boy, is it fun to see as a spectator. Like living the dream of touring that open house for the fanciest house in the fanciest neighborhood of where you live. Looky-loos, unite!
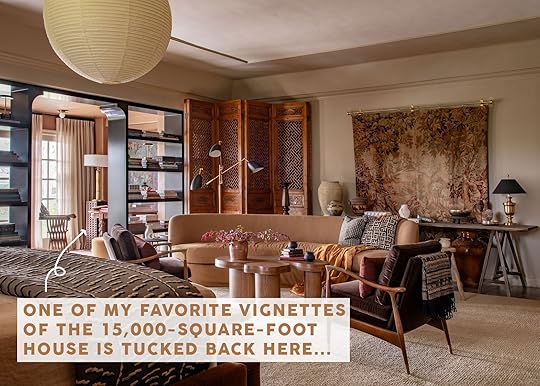
This past weekend, Jess and I visited the Pasadena Showcase House for the Arts (which benefits many music programs and grants locally), and if you’re in the area, it’s definitely worth a visit—be sure to catch it before it ends on May 18. Our inner design voyeurs loved roaming through the expansive house; I remember the number 15,000 coming before “square feet” when a volunteer was scanning our tickets. We saw over 20 rooms by two dozen designers, but in the dizzying smorgasbord of ideas, there were definitely a few that stood out to me. Whether as reminders of tricks of the trade I often forget about, or totally new-to-me concepts I had to share.
Come along with me as I break down the best 10 ideas I’m saving in my mental bank (plus a bonus little detail that made both me and Jess go “how cute!”).
#1: Wood Paneling > Beadboard In A Kitchen?
Room: Carriage House Kitchen | Designer: A1000xBetter
We’ve been big fans of Kirsten Blazek from A1000xBetter, so we were thrilled to be able to chat with her at the Showhouse and see her project. She designed the entire carriage house, which was a standalone building outside of the main home. My eye was instantly drawn to the heavily grained wood paneling that she carried through the compact kitchen space. So often, I see white beadboard, stone or tile used in the space, and it was really refreshing to see another material for a change.
I always love studying a masterful designer’s work because I find they would do things I wouldn’t think of doing: in this case, matching that heavy grain with a showcase marble like the one here. Surely, they’d steal each other’s thunder, but nope, they just worked so well together. It was warm, interesting and a pleasant departure from the tired all-white kitchen.
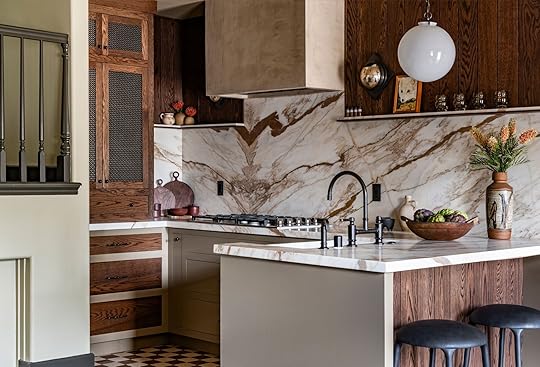
Room: Carriage House Kitchen | Designer: A1000xBetter
Here’s another angle of the space, and you can see she took the material and brought it into the hutch and drawer fronts of the left side (almost like a built-in furniture piece), as well as behind the peninsula.
#2: Highlight A Truly Special Space With A Truly Special Trim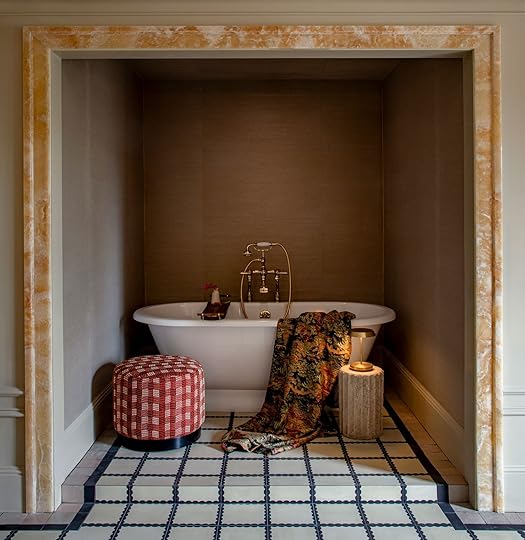
Room: Primary Suite Bathroom | Designer: Plaster & Patina
Plaster & Patina pulled off probably my favorite area of the whole house. You’ll see more of the primary suite in a bit (it was killer IRL), but let’s start with the bathroom. Sadly, I didn’t take any photos of the room, assuming there were more images available of it, but alas, this is the only one. Regardless, it does show off what I wanted to point out: Breaking from the mold (ha) of your molding to highlight something like this tub nook. Designer Alex Azat opted for this luxe honey onyx as a frame for the freestanding tub, which you brought into other moments of the high-end bathroom. You can’t see it here sadly, but that same onyx showed up on the shower bench, on the double vanity surface, and even in the lighting fixtures that graced the ceiling.
While most of us probably don’t have a home that would make much sense for something like backlit onyx, I could see a riff on this technique with paint, or even marble.
#3: Don’t Forget That You Can Use A Casual Natural Fiber Rug To Bring A Formal Rug Or Room Down To Earth
Room: Library | Designer: Julia Chasman Design
I have written a handful of articles in my time about this very trick that is especially helpful for vintage rugs that come in funky sizes or can be a touch too small, but it’s an easy one to overlook. Always remember that the simple act of laying down a larger natural fiber rug (think sisal or seagrass) under a more organte or vintage rug accomplishes two things: It gives you more rug to work with to better ground your furniture and rooms, and it also looses the tight grip that a formal floorcovering can have.
HOT TIP: Try to keep the overhang between six inches to no more than a foot, or else things might start looking a bit wonky. I zoomed in to the spot in the library photo so you can better see it:

Room: Library | Designer: Julia Chasman Design
Then I saw that technique again in the very fancy formal dining room:

Room: Formal Dining Room | Designer: The Art of Room Design
More rug also protects your hard flooring better, of course, without giving “wall-to-wall carpeting” vibes as long as you’re using a flat, neutral rug. No shags, okay??
Tip #4: No Budget For Tile? Do Wallpaper, Instead
Room: Bauer Lounge | Designer: Denise Bosley Interiors
The Bauer Lounge was the first room we walked through, and it’s clear they shot it before it was styled out or likely finished, as there were no images available for the rest of the space (which was so lovely). Anyhow, I really liked the use of wallpaper behind the bar shelves instead of a more expected tile. In a small area like this, it could be a very fun way to bring in a paper you really love that might be too costly to cover a room in. That, or if a showy tile isn’t in the budget, less than 10 square feet of wallpaper is a cost hack no one will think was some kind of savings plan.
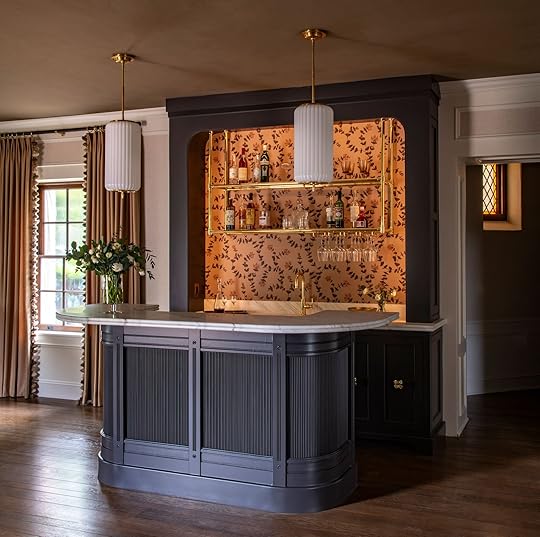
Room: Bauer Lounge | Designer: Denise Bosley Interiors
Also in the lounge, I spotted a moment of quiet luxury. Again, you can’t see it well here (I’m sorry!), but inside, most of the picture frame molding was a slightly darker/richer cream in a grasscloth rather than paint. The result was textural, subtle, and serene. The ceiling added to this, being a deeper milk chocolate applied in a velvety plaster (a lime wash would also suffice). These shifts in color and shade worked so well in person to feel like there was tons of interest without the visual assault some people feel when layers or brighter colors.
Tip #6: Pull Your Bed WAY Off Your Window For A Grand Primary Suite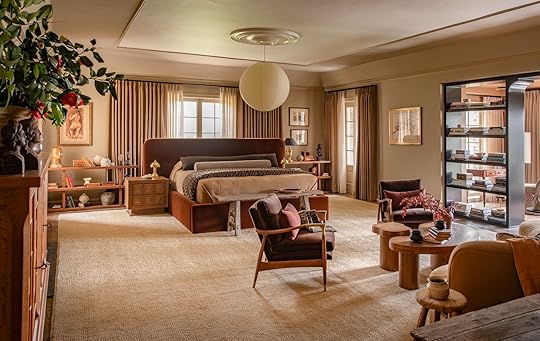
Room: Primary Suite | Designer: Plaster & Patina
You’ll have to trust me that this was one of those rooms you walked into and you felt this buzz of excitement because it felt so *right*. The first thing I did was gasp in Jess’ direction about the placement of the bed. It was pulled away from the bank of windows (that I later realized were French doors) about three feet. Welcome to another moment of “I’d never think to do this.” Float a sofa? Sure. Float a bed? Harder to pull off. The key, according to the designer who chatted with us for a moment about it, was a headboard that was grand enough, like this one. “And storage layers,” I added. The open shelving on their own plane behind the plane of the bed and nightstands made it all make sense when you were standing in the room. Here’s a snapshot I captured on my phone from a different angle:

Room: Primary Suite | Designer: Plaster & Patina
There was enough space to walk between, though it looks tight in my image. You could easily access the French doors to open behind the bed if you needed. No, most of us will not have this scenario in our non-manor homes, but it could be cool to do something similar in a large room and earmark the space behind the bed (in front of a window) for a desk, for instance. Or a pretty bench for a little secluded reading spot. I mean…there are so many options once you pull a bed off the wall that I didn’t know existed!
Tip #7: Got A Corner To Fill? Skip The Usual Armchair For A Round Table, Instead
Room: Primary Suite | Designer: Plaster & Patina
Behind the pass-through shelving in the primary suite was this area that included what we’re seeing above on the right side, and a vanity table on the left. The round table was styled with a smattering of books, though in theory it could be used as a desk, as a spot for a collection of family photos, or even just to hold a giant, leafy plant. I think it would have been easy to put a gorgeous lounge chair or traditional desk here in this corner, but the round entryway table adds an unexpected moment that I really enjoyed.
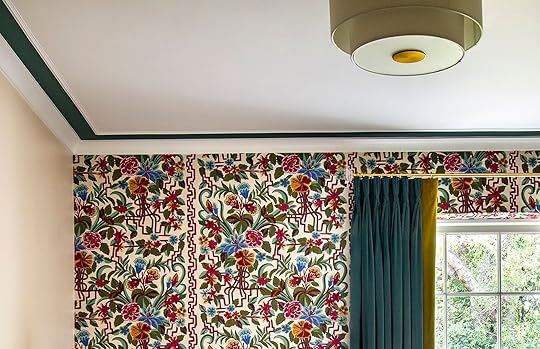
Tip #8: Molding + Wallpaper = Subtle Ceiling Drama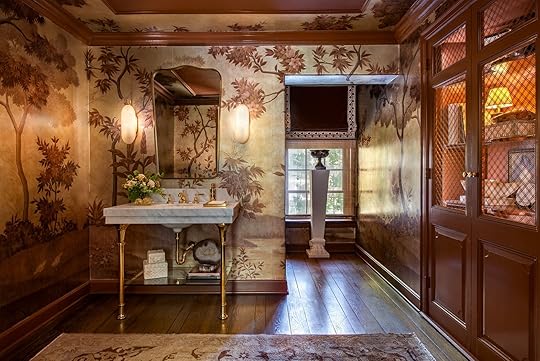
Room: Ladies’ Powder Room | Designer: Jennifer Bevan Interiors
One thing a showhouse is going to give you is some bold ceilings. It never fails (and I’ve seen many). Look, I love the idea of a wallpapered ceiling, but if I’m being honest, it can often feel suffocating to me unless it’s a paper-drenching thing happening. Here, I love how Jennifer Bevan brought the wallpaper past the molding about 12 inches or so, and capped it off with a simple base cap molding. It really makes a statement without being overwhelming.
Tip #9: A Thin Line Of Paint And Molding Ups The Ante On Your Ceiling
Room: Guest Suite | Designer: Billman Designs
Similarly, you can use paint to create some interest on the ceiling, like in the Guest Suite by Billman Designs. Here, she added a three or four-inch border with a base cap molding, too, and it really draws the eye up. It could be cool to incorporate a color-blocking technique with something like this for something more maximalist if that’s your flavor. Imagine the walls and ceiling in one shade of a color—say blue—the baseboard and crown in a darker shade of blue, and the inset border in something in between. It would add so much dimension!
Room: Guest Suite | Designer: Billman Designs
Just giving you a little closer look. 
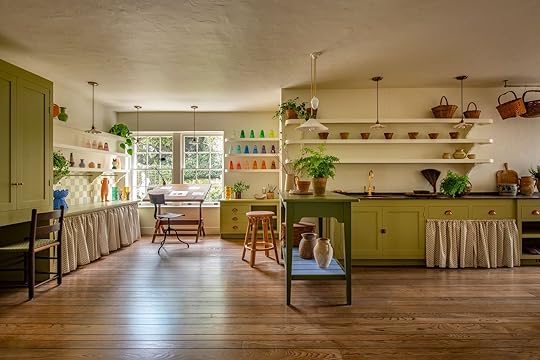
Room: Garden Studio & Washroom | Designer: Beatriz Rose Design
This garden studio was so cute and I loved the warmer, more yellow-toned shades of green throughout as a departure from soft, sagey greens we see everywhere. The shelf details were so lovely, the light fixtures were darling, but what I took from me was that—DUH!—you can put rail bars on the ceiling to hang things like baskets, pots and pans, or basically anything you’re okay keeping overhead. They’re so often just put on the wall that I forget you can break from the norm and do something different.
Here, Beatriz Rose used them for baskets, which frankly wouldn’t work hanging from the same rail on the wall—not enough projection space. It’s a beautiful storage solution that feels like a design moment.

Room: Garden Studio & Washroom | Designer: Beatriz Rose Design
And here’s where our fun fact comes into play, although we, surprise, surprise, do not have a photo. Off of this garden studio was a washroom outfitted in vintage-inspired (or possibly just very well restored) fixtures by Thomas Crapper & Co. The British company was the first to popularize the flush toilet in the 1800s. The word “Crapper” was commonly fairly prominent on the toilet tanks, as it was in this Showhouse washroom, hence the moniker crapper being used to refer to both toilets and bathrooms in general. It’s crass now, but hey, most things start in the luxury world and work their way down, right?
Bonus Tip #11: Put A Lamp And Drinks Table In Your Toilet Stall
Room: Ladies’ Powder Room | Designer: Jennifer Bevan Interiors
Speaking of crappers (sorry, had to do it), I loved this little cocktail table and petite lamp so much that I grabbed a photo of it on my phone. I know table lamps are far more popular these days in kitchens and bathrooms, but a proper drinks table next to the toilet? Now I’ve seen it all (I say that in a good way because I love it). It’s romantic and a bit ridiculous, and, even as someone who doesn’t hate the #thebiglight, I know it’s small-light people approved.
—
Thanks again to the Pasadena Showcase House for hosting us on our visit. I encourage anyone who might be in the area to visit or look out for anything similar to this in your own cities, because they truly are a marvel to see and a treasure trove of good ideas to bring back to your own homes and projects. Like a design magazine brought to life. Let me know if you spot any other takeaways from the images shared, and be sure to check out all the details of the house and explore the designers yourself here.
Until next time…
*All Room Photography (except my iPhone photo): Nolasco Studios, Courtesy of Pasadena Showcase House for the Arts
**Opening Image Credits: Design by Plaster & Patina | Photo by Nolasco Studios
The post 10 Very Good Design Ideas We’re Mentally Bookmarking From The Pasadena Showcase House (+ A Fun Fact You Probably Didn’t Know) appeared first on Emily Henderson.
May 7, 2025
How We Built Our Outdoor Kitchen With RTA (Assembled In One Day, Folks)


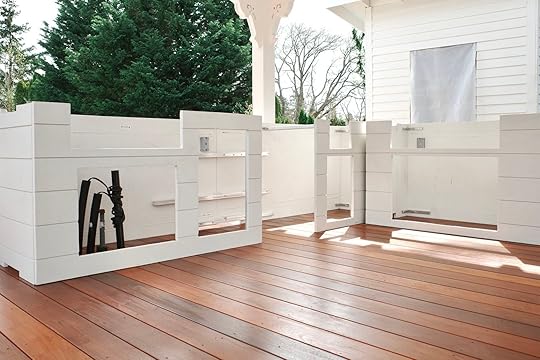
We are wrapping up phase two of the backyard (which is admittedly a pretty large phase) and I wanted to give you an update, show you the plans, and give you a sneak peek into the new RTA outdoor kitchen (which went from a little “grill area” to full blown kitchen really fast – it’s incredible). I couldn’t be more grateful to all the contractors and partners on this one – it went seamlessly, dare I say “stress free”, and everyone not only did a fantastic job, they even met our deadline – a big backyard community event. Last weekend, we had 150 of our neighbors from school over. That was about 50 families for a fundraiser playdate. Getting to see them all over the property, enjoying it all with kids and music, and pizza/beer was just incredible, and I felt so full of gratitude. The pickleball court wasn’t finished (our scheduling snafu not helped by some rain), and we didn’t exactly grill for them all (we just ordered pizza), but it was a great test run to see the potential of this property. Everyone came up to me (many I had never met) and told me how awesome it was to be able to gather outside of school with all the neighbors. I was incredibly special, and I’m really really excited to show you the full reveal soon (we shot last week, so stay tuned). It’s ultimately a frat house for families

We lived here for two summers before deciding where the kitchen should go, and felt really confident that it should be where the shed is. It was a central location, and near the big shade tree we love to eat under – essentially it’s where we all tend to gather (not crazy far from the house, but also not another structure in the middle of our pretty views out to the pasture or pool). The shed was falling down and not worth salvaging (probably 80 years old, the entire foundation crumbling), but the location was firm. You can also see here how big the cement pad is for the future sports court – it was just huge and looked like a parking lot.
But Where Do We BBQ? And Why Didn’t We Do It During Phase 1?This was the big question. We were drained financially and emotionally, so we always knew that we’d want a proper BBQ area, but we wanted to wait a couple of years to be SURE of where it would go (and save up for it). So last summer, Brian just wheeled around a basic grill onto the sports court, and it became clear that near this tree, at the edge of the court, was the spot.
The Plan Via Dennis 7Dees
We hired Dennis’ 7 Dees to help lay it all out, within some pretty strict confines, and then to replant where the old/bigger sports court is. When we first bought the property, the tennis court extended all the way past where the Soake pool is now, then we reduced it in 1/2, but after living with it for almost two years, we knew that it was still too big. So while we were doing construction back here, building the outdoor kitchen, we hired a crew to redo this area (yes, it’s painful to “redo” anything, but at this point it’s a sunk cost).
Removing A Section Of The Future Sports Court
Eric from Dennis’ 7 Dees (a famously great local fantastic landscape design, garden center, and maintenance company) was the designer to lead the job, and we couldn’t be happier with everything they did. I wanted a real pro on this one because it dealt with a lot of hardscape and irrigation work, which is obviously not something we could DIY. In addition to fixing the cement (before we resurfaced it), we wanted it to be turned into a more park-like vibe with picnic tables and lots of greenery.
Buh Bye Cute But Broken Shed!
Then I hired my brother’s company, Afore Construction, to demo out the shed and build a covered gazebo for the kitchen. The foundation was crumbling, and it was all rotted, so my dreams of turning it into the kitchen stopped making sense. As you can see, we had limitations on the width of the future kitchen – the tree on the left and the well house on the right (yes, it has our newly recommissioned well that serves as water to all our irrigation and pasture animals). So the width of the new structure really couldn’t be more than 12′ wide (which was the size of the old shed’s roof, btw).

The whole project took off in Jan/Feb and frankly went really fast. Ken’s crew demoed out the shed while 7 Dees prepped to demo the sports court and replant.

It was a whirlwind of activity, and our yard was a mudpit again, but it was going so fast and they thought we’d be done by spring (we were!).

This view is so different now – full of layered greenery and a beautiful new kitchen, but I wanted to give you the sense of space. It’s pretty big, open, and flat, which is fantastic because it’s just so usable.


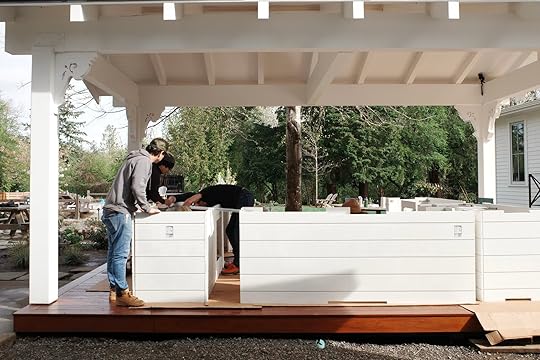
The deck and gazebo went up quickly, although y’all, a lot more prep goes into building these than they look Lots of planning, leveling, and thinking about where the future mechanics would live (electrical, plumbing, gas, etc). It’s a whole thing, and Ken and Nick did an awesome job staying on top of it and predicting everything they could.

If you are wondering why the gazebo is half on the future sports court, that’s an awkwardness that is fully on me, and it’s going to be fine. We thought about cutting cement exactly where the gazebo ended, but it would have been too small for a pickleball court (plus cutting it at a cement “section” was less of a chance of it all cracking/breaking, I think). Point is – sometimes things are awkward and you do the best you can to mask that awkwardness through other elements (i.e. trees, greenery, etc – you’ll see!). We couldn’t have moved it more left without taking out the tree, and again, the shed on the right is our well house and has a lot of crazy mechanics in it (and below it). Of course, we could have made it a lot smaller, but we wanted more function from our kitchen than a small space would allow, so we really went for it.

The structure itself was built big enough to accommodate the size of the kitchen (with counter seating) that we wanted, but inside the limited footprint that we had (between the tree and the little well house/shed). We also didn’t want to move the irrigation mechanical box on the left of the gazebo or have to redo all the flagstone, so we were definitely shoving this covered deck into a small footprint.
The Kitchen Plan
In the fall, I was approached by RTA (Ready To Assemble) to partner on the kitchen. I didn’t know much about them, but after a lot of research and reading reviews, I became really excited (and now I’m a massive fan. It’s a pretty unique and specific company where they design, manufacture, and ship your semi-custom outdoor kitchen in a matter of weeks. I basically gave them the appliances/function that we wanted, within the 12′ footprint, and they laid it all out with their expertise on what is best to go where. I chose the materials – a leathered granite, and I was torn between the white brick or the white plank (brick shown in plans), but there are a lot of options. They really did the rest (shout out to my designer, Daniel – THANK YOU!). Of course, we had to tackle things like where we were pulling the plumbing, electrical, gas, etc, but between Ken and RTA, it was troubleshooted without me (which is best).
RTA Kitchen Install Day
Our goal with this one was to create a full kitchen so that I didn’t have to run laps to the kitchen, back and forth, since it’s not very close. Brian’s priorities were the grill, griddle, and kegerator and my priorities were a sink (dishes out here so we don’t mess up inside!), refrigerator (salad prep and all condiments already ready to go), and the burners (I’m always in charge of corn and baked beans, and then historically stuck inside while everyone is hanging outside). These are not real problems, but the volume of BBQs and people we feed is so huge that we wanted to design this kitchen for long-term solid function and to keep everyone outside, avoiding messing up the house with endless running to the fridge for ketchup or looking for a serving platter.

We ordered the RTA kitchen in late February, and it arrived a few weeks later along with the appliances (they partner with Coyote, which is a fantastic outdoor appliance brand that I’ll get into later). That’s us ready for the ONE DAY install of the kitchen (not including hooking up all the mechanical, BTW). Now we had someone from RTA (Pete!) come since this was for a marketing partnership, and I wanted it to go smoothly, so if we didn’t have that, it likely would have taken a bit longer. But regardless, we were all shocked at how easy it was to assemble.

The bases are molded concrete made to look like white siding (or brick, there are other options), which means that they are they are solid, won’t rot or rust, and are honestly just really simple and basic in the best of ways. They come boxed by the cabinet and with a few hands, they are simply drilled together with brackets.
The Kitchen Cabinet Bases
I wanted to show you this so you can see how simple the inside is, which means not a lot of places for water intrusion or rot – there aren’t a lot of bells and whistles intentionally to withstand all the elements. They test these kitchens in hurricane weather, and they even put a car on top of one to test the strength – they are SOLID. They are drilled together with brackets and screws – so simple.
This might be boring information, but those of you in the market might wonder how to get the electrical and gas to the appliances. We stubbed up in one location and then the cabinet boxes are big enough that you can run all your stuff inside of the cabinets – i.e. you don’t have to know exactly where each thing is going to go, you just need to make sure your initial holes are inside a cabinet box (we chose under the sink).

There she is – I really did help a lot on this one, it was easy and fun and extremely rewarding.

The cabinets are attached together with steel braces, and they are not attached to the deck – they are simply that heavy. So you could put them on a stone patio or a deck, as long as it’s level (or use shims), it’s not going anywhere (again, they are concrete and crazy heavy).
We built one cabinet box at a time, five total, and they simply sit next to each other with the stone on top. There will be cement pieces that cover the seams.

Next came all the Coyote appliances and stainless steel storage, which I modeled here I’m going to give you the full rundown in its own separate post, but they are so beautiful and high quality.

There were a few countertop stones to choose from. I ordered samples and chose this leathered granite almost immediately (loving the color variation and texture – it’s extremely forgiving). I didn’t want something that would show a lot of staining, as I knew that there would be many nights that we didn’t clean up well until morning, so this felt really safe and smart to me (and is super pretty).

Many hands make light work Now, our kitchen is big with a lot of bells and whistles, so it took us 1 day with 5 people to assemble. Should you be interested in this and want a simpler kitchen, it would be smaller and even faster to assemble.

Here it was a the end of day 1 – just incredible. The trim pieces were being glued on, the electrical/plumbing or gas wasn’t hooked up yet, and some of the drawers weren’t fully installed (so we could remove them to finalize the above), but I couldn’t believe that this all happened in one day. Over the next couple of weeks, we dialed in the landscaping, put a door on that well house, repaired all the flagstone around the kitchen, and planted a ton. While it’s not completely plug and play, you do need to plan, prep, and hire out some of the mechanical, RTA makes such a simple and high-quality product that really works, and most importantly, will last decades. It’s still an investment; it’s not like it’s a cheap kitchen, but I’m so thrilled by the simplicity and longevity of this product. The fully styled out reveal is coming next week We seriously could not be happier with how our family (and like 150 of our friends) have been able to enjoy it – AND IT’S ONLY MAY!!!!!!
Kitchen by RTA
General contractor – Afore Construction and Consulting (my brother’s company with Nick!)
Appliances – Coyote
Landscape Design – Dennis’ 7 Dees
*Photos by Kaitlin Green
The post How We Built Our Outdoor Kitchen With RTA (Assembled In One Day, Folks) appeared first on Emily Henderson.
May 6, 2025
This Style Of Lighting Works In Any Home (And Will Make It Look Even Better) + Affordable Options You’ll Love

Whether or not your home’s style is “modern traditional,” modern traditional lighting is incredibly versatile, with so many really simple but very cool options. I’d say it’s the primary lighting style Emily uses in her projects, at least the hardwired fixtures. You could categorize “modern traditional lighting” as fixtures with clean lines, traditional shapes, in simple neutral colors and materials. Think matte black, linen shades, brass, simple curves, etc. But like most things, buying lighting adds up quick! So today I am showing you a ton of really wonderful, budget-friendly options in almost every main category — table lamps, floor lamps, pendants, chandeliers, semi/flush mounts, and picture lights.
But to make this post more useful, I grabbed all of our lighting tips, tricks, and rules, and put them all here:
 photo by sara ligorria-tramp | from: 14 rules for how we style the perfect bedroom + 3 revealsOverall Lighting RulesOverhead lighting is not sufficient for a room – every room should have at least two (if not three sources of lighting).What are the different types of lighting? The main types of lighting are: Overhead – which includes can-lights, chandeliers, and pendants; Directional – which would include metal shaded lights or spotlights; Ambient – which would include fabric shaded lights that put out an ambient even glow, and last but not least, Accent – which is mostly decorative.You should have light coming from at least two different heights to help evenly disperse the light throughout the room.Living Room RulesMake sure the shade of your floor lamp covers the bulb when you are sitting down (unless the bulb is opaque and if possible, dimmable).For a lamp sitting on a side table, the bottom of the lamp shade should always be at about eye level.For determining ceiling light width: Multiply your ceiling height by 2.5 – 3 to get the recommended measurement in inches. So if you have a 10 ft ceiling, you would multiply it by 2.5, giving you 25″. That should be your approximate hanging ceiling light width.In an open space where people are walking, 7 feet is the minimum distance the bottom of a hanging light fixture should be from the floor. But for ceilings over 8 feet, just add 3 inches of hanging height per foot. So if your ceilings are 10 feet tall, the light fixture should be about 8.5 feet from the floor.Sconce RulesPlace wall sconces between 5′ to 6′ up from the floor. If using multiple sconces in a dining room (or any room), space them ideally 48″ apart but at least 24″-36″.There should be 3 – 6″ between a wall sconce and the edge of a mirror or piece of art it’s next to.Dining Room RulesPick a chandelier about half the width of your dining table. You can also add the room’s length and width in feet. That number in inches suggests an approx. size for the diameter of your chandelier. So if you have a 10′ x 12′ room, your chandelier should be about 22″ in diameter.Hang your light fixture so the bottom is 30″-36″ above the table. This way, no one’s vision is blocked and everyone can see each other:)For rectangular chandeliers, give at least 6″ from the edge of the table to the chandelier on both sides.For multiple pendants above a dining table, we recommend hanging them about 26 to 28 inches apart.Bedroom RulesMeasure your room’s length and width in feet. Adding those two measurements together will determine what size diameter you will need for your chandelier. For example, a 10′ x12′ bedroom requires a 22″ diameter chandelier (sound familiar? :)).To get the ideal bedside sconce height, sit in the bed upright and then have someone measure the height from the floor to just above your shoulder. Another way to find the right height is to measure 50″-60″ from the floor to the top of the fixture.This rule depends on the height of your nightstand, but make sure the bottom of the shade is around chin level when sitting upright in bed to avoid the harsh bulb light in your eyes.Your bedside table lamp should be around 1/3 of the surface size of the nightstand.
Now that we have the rules down, shall we do a little window (or real) shopping? I think it’s time.
Table Lamp
 photos by kaitlin green | left from: river house guest room reveal | right from: farmhouse family room reveal
We start with the apple of my eye…table lamps. Since the lines/detailing of modern traditional lamps are simple, that’s where size/proportions and shape make them really shine.

1. Ceramic Table Lamp with Off-White Tapered Fabric Shade | 2. Lilou Natural Rattan and Metal Table Lamp | 3. Dimmable Touch Control Modern Black Lamp (Set of 2) | 4. Louis Table Lamp | 5. Caney Metal Table Lamp | 6. Fiona Table Lamp | 7. Rorrie Table Lamp | 8. Isla Table Lamp | 9. Artisan Ceramic Table Lamp
In this first roundup section (yes, there are two), the color palette here is very natural and neutral. But each of them gives a little drama in their own way. #4 has a slightly oversized and very cool pleated lamp shade. What makes it feel a bit more modern is the super clean knife pleat style and the organic ceramic textured base. So the traditional elements are there in terms of color and general style, but it has just those couple of elements that make it feel fresher, but again, still classic. The same goes for #5. The black metal is very classic, but the thicker base, simple lines, and cone shade make it feel perfectly modern.
 photo by sara ligorria-tramp | from: portland project office reveal
I call this next section of table lamps — classics with a twist:)
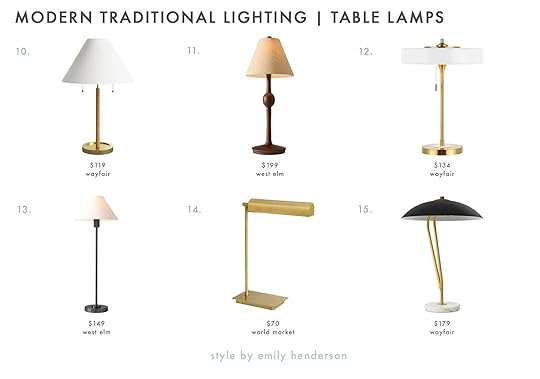
10. Iron Accent Lamp | 11. Pierce & Ward Ribbed Wood Table Lamp | 12. Settimo Metal Table Lamp | 13. Beatrix Table Lamp | 14. Remi Antique Brass Task Table Lamp | 15. Kenta Novelty Lamp
When I think of a classic table lamp, I think of heavy metal bases with an outdated shape or ornate detail. Well, these options above are (in my opinion) an upgrade from that! Take #13. It’s so simple, but the extra-tall, thin base with the small tapered shade makes it feel so chic. I love it when designers play with proportions. Or #10! A classic shape, but the leather (?) wrapped accent is so fun and adds texture. Same goes for #14. I feel like we’ve seen the thick version of that lamp in every grandparent’s house we’ve ever stepped into. This thinner silhouette honors the original but feels more elevated.
Floor Lamps
 photos by sara ligorria-tramp | left from: mountain house family room reveal | right from: portland project media room reveal
Modern traditional floor lamps are basically sculptures in a room. Chic and powerful. In general, floor lamps help with height variation, bringing your eye up.
 photo by sara ligorria-tramp | from: los feliz guest/office reveal
All the same rules apply, in terms of materials, but I’d say there’s a little less proportional play when it comes to base vs shade.
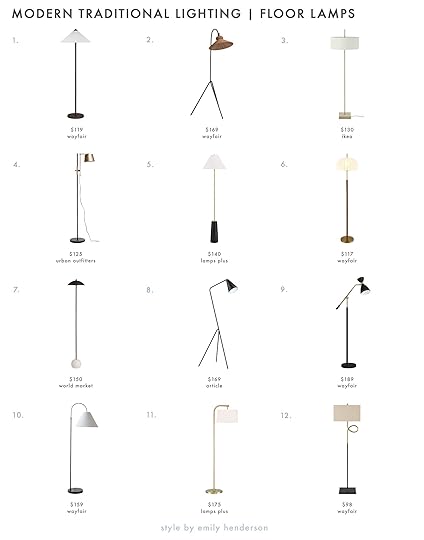
1. Bronzed Traditional Floor Lamp | 2. Arched Floor Lamp | 3. STOCKHOLM 2025 | 4. Irwin Industrial Floor Lamp | 5. High Black and Brass Modern Floor Lamp | 6. Madrona Floor Lamp | 7. Evie Marble and Blackened Bronze Floor Lamp | 8. Gira Floor Lamp | 9. Task Floor Lamp | 10. Matte Arched Floor Lamp | 11. Chairside Arc Offset Arm Floor Lamp | 12. Lynna Floor Lamp
As not to show you the same floor lamp too many times, #2 is another really incredible version of this one Emily bought and loved for a shoot. I love the added doughnut-like detail at the top of the shade. This lamp is elegant and cool but not stuffy. A little trendy, but in a way that it’s a modern classic. I’m also pretty in love with #5. It’s giving Rejuvenation but at a much more affordable price. And while proportion play isn’t a main player in the modern traditional floor lamp department, I love the miniature vibe of #7.
Pendants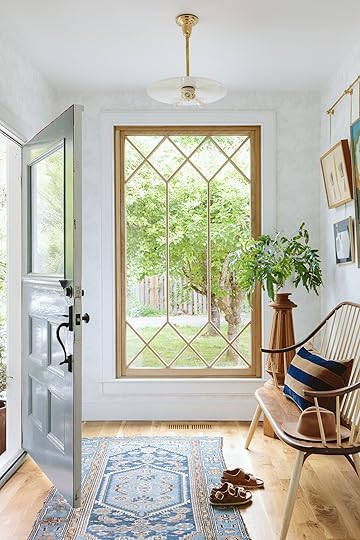
 photos by kaitlin green | left from: farmhouse entry reveal | right from: farmhouse sunroom reveal
Now, let’s move on to the ceiling. With pendant lighting, of course, you want to be mindful of how many you are using (meaning one or multiple over something like an island or dining table), in order to choose the right style and vibe. If you only need one, then you can really choose any style you want. But if you need multiple, you’ll want to consider the visual weight of them all together. You might not want for example, multiple large dark pendants in an otherwise light-toned room. However, if you have really tall ceilings, a little more visual weight could be good. It’s really up to you and your home, but those are things I would definitely take into consideration.
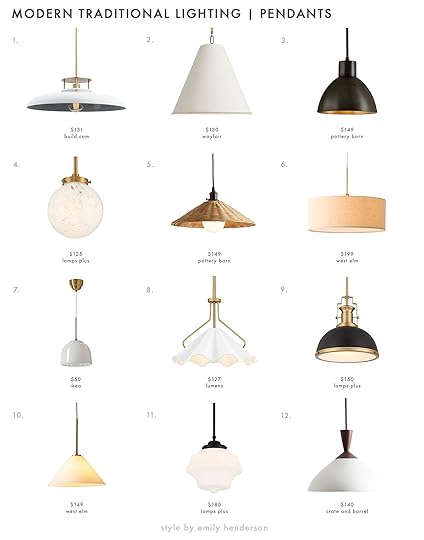
1. Delilah Wide Pendant | 2. Camariae Single Pendant | 3. Bridget Metal Pendant | 4. Wide Gold and Crackle Glass Globe Mini-Pendant | 5. Flared Woven Cord Pendant | 6. Short Drum Pendant | 7. MUDDERVERK | 8. Mejia Pendant | 9. Wide Black and Gold Dome Pendant Light | 10. Sculptural Cone Pendant | 11. Wide Black and Opal Schoolhouse Pendant Light | 12. Wilson Mid-Century White Metal Pendant Light
I love the simplicity of #2. It’s going to give off beautiful ambient light, and you could easily put a few next to each other without any worry of them being “too heavy” together. What is also awesome about them is that they have an adjustable metal rod that hangs from the canopy, meaning no visible chain. Very sleek and pretty. You really can’t beat the price and style of #7 if you want a more vintage look. But if you want a slightly more MCM vibe, #12 is perfect for you. That wood accent adds so much style but isn’t too loud. I think that’s also the thing about “modern traditional” lighting, a lot of it has little nods to mid-century modern style. #12 is definitely the most obvious version though:)
Chandeliers photo by sara ligorria-tramp | from: portland project primary bedroom reveal
 photo by kaitlin green | from: farmhouse living room reveal
 photo by steven mcdonald | from: green and pink kitchen reveal
You won’t find any crystal chandeliers in this little roundup (even though I love those too, but they just don’t belong in this specific style). I’d say these lights also lean a little mid-century, but also feel extremely classic with so much style longevity. Let me just show you…
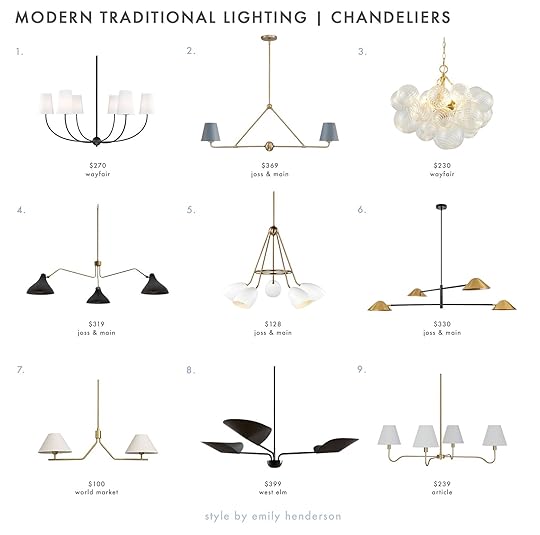
1. Caral Dimmable Classic / Traditional Chandelier | 2. Kinston Metal Dimmable Linear Chandelier | 3. Yav Dimmable Modern Glass Chandelier | 4. Elyse Metal Dimmable Spider Chandelier | 5. Harlan Metal Dimmable Shaded / Spider Chandelier | 6. Clearmont Metal Dimmable Sputnik Chandelier | 7. Posie Antique Brass Metal Empire Shade Chandelier | 8. Laughton Chandelier | 9. Lombard Chandelier
For me, when I think “modern traditional chandelier,” #1 and #9 are what immediately pop into my head, and for good reason. They look the most like a traditional chandelier with those sweet little lampshades. The more dramatic curve of arms on #1 and the more intentional small curve on the arms of #9 equally look so great. But if you want a shade with a little something different, I really love the blue shades of #2. It would be perfect for over a dining table, kitchen island, or just in a long, narrow room. #3 is both classic-feeling and on-trend, and I can’t get over how chic yet affordable #5 is.
Flush + Semi-Flush Mounts
 left photo by sara ligorria-tramp, from: los feliz kids’ shared room reveal | right photo by tessa neustadt, from: charlie’s los feliz bedroom reveal
 photo by kaitlin green | from: farmhouse kitchen reveal
Flush and semi-flush mounts come in so many different sizes (though we need wider, more affordable ones for bigger rooms with short ceilings). Today, mostly due to pricing and what people most commonly use them for, we are focusing on ones that are more medium sized (like the boob shaped ones:)) I actually did another full post dedicated to replacing boob lights. If you’re interested, head here! As with any light, you really need to know how bright you will need this light to produce. Will your flushmount need to light up a whole room? Or is a more dim, moody vibe for somewhere like a hallway what you are looking for? Just some food for thought.
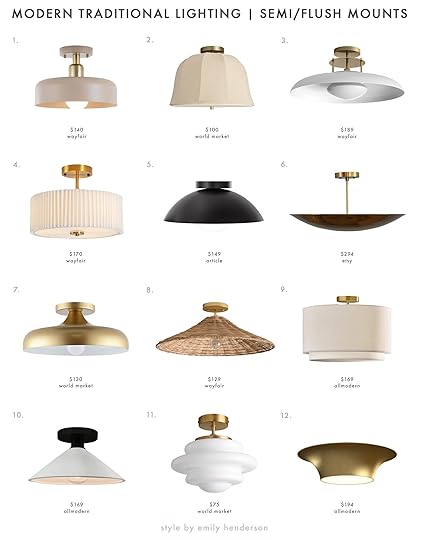
1. Contemporary Semi Flush Mount Ceiling Light Fixture | 2. Natural Jute and Linen Bell Semi Flush Mount Ceiling Light | 3. Jude Glass Semi Flush Mount | 4. Ceiling Mount Cream White With Pleated Fabric Shade | 5. Gemma Flushmount Ceiling Light | 6. Mid Century Modern Raw Brass Sputnik Semi Flush Mount Light Fixture | 7. Alessia Gold And White Metal Semi Flush Mount Ceiling Light | 8. Lilliana Rattan Semi Flush Mount | 9. Finley Single Light Poly-Blend Semi Flush Mount | 10. Dottie Single Light Ceramic Semi Flush Mount | 11. White Milk Glass Wavy Semi Flush Mount Ceiling Light | 12. Alexia Glass Flush Mount
I adore the look of #2, but from the reviews, it’s going to give off a dim light. #1 is going to give you much more light, and I love that beige color! It also comes in a light cream if that’s more your look. Just remember the importance of an opaque light bulb. It will make the experience of it so much better since it’s so exposed. Now, if you want a softer light in a more classic look, #9 is perfect for that. And while it would likely give you more moody than bright light, I’m obsessed with the style of #6.
Sconces photo by sara ligorria-tramp | from: portland project living room reveal
 photos by sara ligorria-tramp | left from: mountain house living room reveal | right from: arlyn’s primary bedroom reveal
I feel that the most common place for a modern traditional lighting moment is the wall sconce. They are very often hardwired, which tends to mean people want them to look timeless. Makes sense, right? Not the biggest area for risk, but that doesn’t mean they don’t need to be boring. Let me show you.
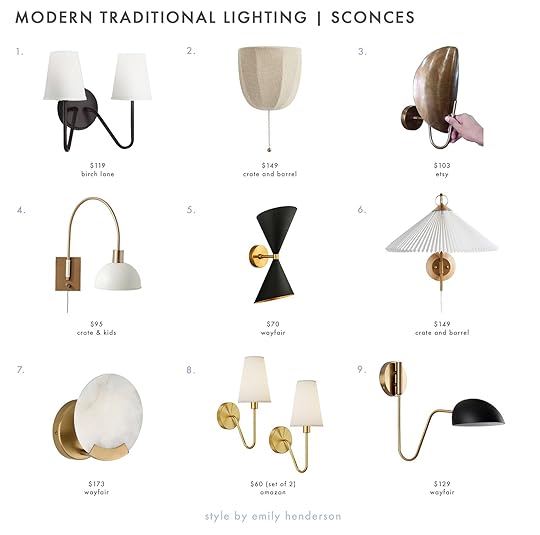
1. Roan Dimmable Armed Sconce | 2. Allegra Wall Sconce | 3. Curved Shades Handmade Vintage Wall Sconce | 4. Wall Mounted Adjustable Light | 5. Tonino Wrought Iron Wallchiere | 6. Flores Plug-In Wall Sconce Light | 7. Natural Alabaster Stone Sconce | 8. Single Head Classic Wall Sconce | 9. Judson Steel Armed Sconce
While we will forever sing the praises of Rejueventation’s unmatched quality and beauty, price-wise, they aren’t possible for everyone. So if you love the look of Emily’s most-used sconce, #1 and #8 are pretty solid, affordable options. Personally, #3 really speaks to me, but I know it’s a little specific:) Oh, but if you are looking for a great plug-in, Kailtin used #6 in her bedroom reveal and loves it!
Picture Lights photo by kaitlin green | from: farmhouse family room reveal
I wanted to add this category since I feel like people are using them more and more, and they are also very tied to traditional lighting. Plus, they are a stylish and pretty easy way to add more dimension (and actual light) to things like bookshelves and art. They are all over Emily’s farmhouse:)
Picture Lights
1. Remi Antique Brass Gallery Wall Sconce | 2. Wide Plated Graphite LED Picture Light | 3. Elle Picture Light | 4. Black and Gold Wall Mounted Picture Light | 5. Gold Wall Mounted Picture Light | 6. Concept 11 Wide Black Cordless-Remote LED Picture Light
The simplicity of #1 is pretty perfect, and the price is good! But if you want a little more flair, then I’d go for #3 or #4. But there’s a decently good chance that unless you renovated your home and planned junction boxes for your picture lights, you’ll need a less hardwired option. Enter #5, which is a plug-in, and #6, which is cordless and has a remote to turn on and off the light.
Find any to add to your wishlist? Were the rules helpful (always remember you can break them, if you do it intentionally:))? Does anyone have any real-life reviews of any of these lights? Let’s chat!
Love you, mean it.
Opening Photo Credits: Photo by Kaitlin Green | From: My Best Friend Robyn’s Living Room Reveal – We Added So Much Color, Charm, Coziness (And A Lot Of Heirloom Quality Pieces)
The post This Style Of Lighting Works In Any Home (And Will Make It Look Even Better) + Affordable Options You’ll Love appeared first on Emily Henderson.
May 5, 2025
Revisiting A 2013 Project, DesignLoveFest’s Apartment (+ What I Think About It Now)
In our grown-up pursuit of “timelessness” (which gets more intense as we get older), it sure is fun to see a time capsule of our youth. The year was clearly 2013, and two “internet famous” bloggers collabbed on what now feels like OG vintage influencer content. When I stumbled on Bri Emery’s apartment from 2013, I gasped and then wanted to gossip about it with you. So much to talk about. It still pops so hard and is full of pieces that I love, while also just screaming “2010’s blogger time capsule”. It’s a real lesson in where to bring in trends as well as demonstrating the power of vintage and color. This was my last “blogger collab,” where I designed/styled famous blogger’s homes (who would be called influencers now) to cross promote, garner press, more followers, etc (I decorated Cup of Jo’s apartment, Oh Joy’s (multiple times), Nicolette Mason and then Bri Emery, aka DesignLoveFest, Green Wedding Shoes nursery, and many more). Bri redesigned our website (which has since been redesigned and is DESPERATE for a new redesign – coming soon, I hope), and I designed/styled her living and dining room. If you want to read the original post, check it out -it’s a funny read.

That’s Bri, aka DesignLoveFest, and if you haven’t seen her new kitchen in upstate New York, you MUST. She, like most OG design/style bloggers, made a lot of life shifts, and after taking a long creative/personal sabbatical from social media, she is posting again and collaborating with other old friends (which is so fun to watch on stories). She has always been wildly creative and such a visionary, so I’ll follow her forever. I dream of doing a “Bloggers: Where Are They Now” series because most of the OG crew that really took off in the 2010s, have changed careers and are thriving in such different and interesting ways (I think like 10 of us are still here, spoiler – social media caused burn out really fast). That’s a whole other story, but today let’s look at Bri’s 2013 apartment transformation:
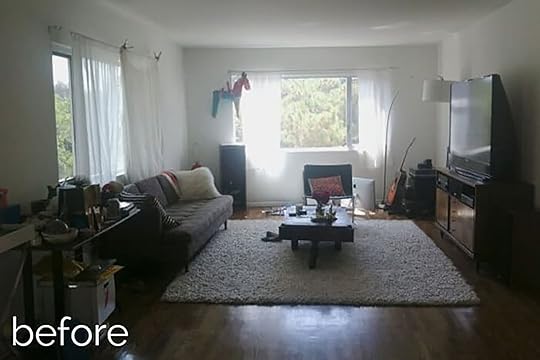
I swear we didn’t try to take low-light befores back then… But here’s the super bright after! LOL
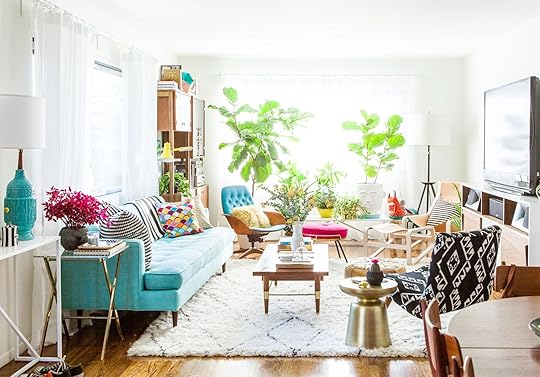
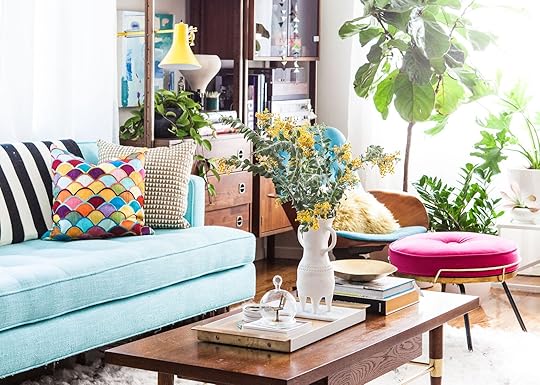
My first gut reaction: this room is undeniably still so fun. If I walked into this apartment now, I would think this person has so much style and creativity, an eclectic, even eccentric, point of view, and we are about to have fun. And then, of course, I’d want to edit it a bit, tweak it for 2025. So let’s talk through the main trends that were big then:
2013 Trend #1: Bright White With Pops Of Bright ColorsI was so guilty of this, doing it over and over in that decade (and still am!). The formula: all white walls, big pops of color, drenched in natural light. And the thing is, this still really works in Southern California. Of course, now we’d do a warmer neutral, and employ darker, more subtle greens and lots of muted pinks. Heck, my brother and SIL wanted a version of that in their bedroom (see here). I think for the most part it works, it’s just some of the colors here that make it feel a bit 2013. I would definitely get rid of that scalloped pillow on the sofa and reduce the amount of hot pink (the vintage ottoman could be more of a neutral).
2013 Trend #2: Fig Trees And Whimsical Plants Galore (In Whimsical Pots!)Again, I still like fig trees, but my goodness, they were EVERYWHERE in the 2010s (mostly because of me, I think – remember DesignStar?), so I really don’t think we needed two here. And while having plants galore is more popular than ever, I don’t think doing it like this is working. I think it’s just a bit messy, the pots are a bit eclectic, and it feels generally over the top. If I could do it again, I’d do one big fig tree and a smaller green plant on the coffee table. Also, not sure we need a decorative piñata…
2013 Trend #3 Palm Springs Style Mid-Century Vintage Everything In Bright ColorsAgain, I don’t mind this trend!! Mid-century is never out, and I don’t think that there is too much of it here. It’s just combined with the big saturated colors and the Moroccan rug and brass that make all the pieces feel 2013. But yes, in the 2010s, before any of us had a budget to buy investment pieces from adult stores, we bought anything from the Rose Bowl flea market, which was full of midcentury vintage from Palm Springs. None of these are dated; it’s just within the context of so much stuff and bright colors that it screams 2013.
 What’s Not Working?? What Would I Get Rid Of?
That’s pretty easy – the black chair with the more Navajo-inspired woven pattern feels like we were trying hard to dip into that next trend (I’m not sure what to call it, I apologize if I’m not accurate here). At the time were really seeing the rise of African mudcloth and Aztec-style prints, and now we know better and to never buy them in a mass-produced fashion. Purchasing from the actual people whose culture these textiles belong to should always be a priority, like with my Boro fabrics. I do like the idea of the pattern, but it belongs somewhere with less bright, saturated colors or trendy pieces. I’d also nix the gold drum table (very 2013), and I’d reduce the amount of stuff by 1/3rd AT LEAST. And I really, really don’t like that colorful pillow on the sofa.

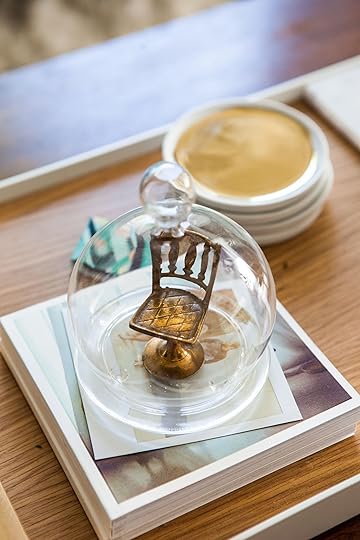
I think this was during my “miniatures” phase that I’ve never really grown out of, TBH, but I don’t force it on my friends as much now. Those flowers are WAY too big and busy in here, IMHO.

I still love those vintage lamps and would use them in the right project now. The art was from the flea market, and the Blu Dot table is so simple that it’s hard to call it in or out, but the collective vignette just feels very 2013 due to the color palette. Now I’d change the drum shades to be more tapered or pleated (or a color).


Nothing really dated here except all my EHD vintage whimsy, which I still love, but it’s a younger version of me. That lamp is still pretty darn cute.
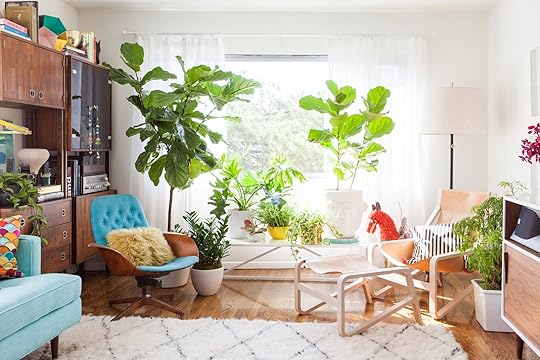
The midcentury shelving unit is rad still, just needs to be styled with less stuff and with more grounding colors (i.e. less teal and yellow). So many plants shoved in this shot!!!
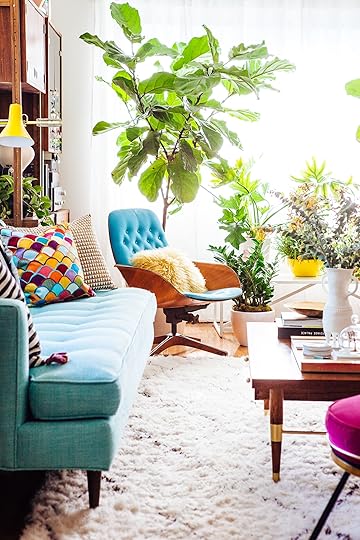
I really think the culprit here is mostly just the accessories and the styling, both of which were obviously 100% on me. And in a lot of ways, that is refreshing because those are the things that are less of an investment and easier to change.
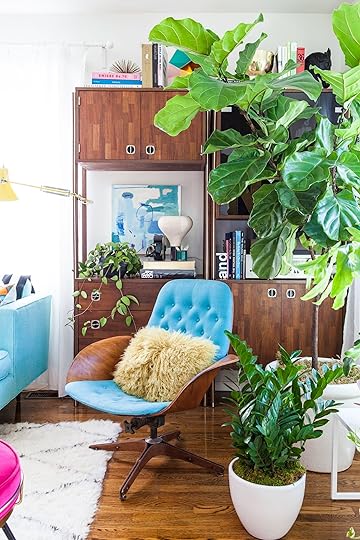

I still really like this!!! It’s just a bit too much, too many small trends that inevitably read as 2013, and too much “stuff”. But those are almost all in the smaller pieces and would be so easy to tweak to make them work.


It’s visually so fun and stimulating,g so while it seems like I’m tearing my own work apart, it’s actually really easy to see that with a few tweaks it could feel 2025 really easily.
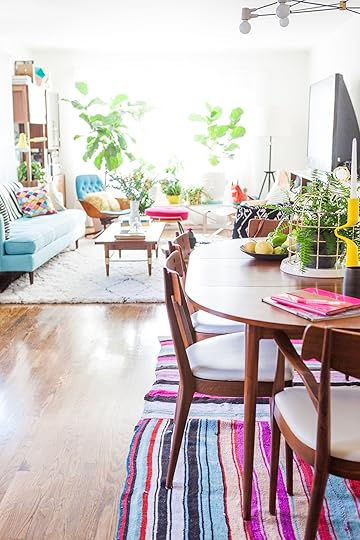
We kept with the same styles and colors in the dining room – that vintage dining set is still so rad, and Mid-century teak is having a big comeback right now, so do NOT sell your stuff, people.

Besides me holding the plant hostage in that cage, I think most of this works, but maybe just too much altogether.

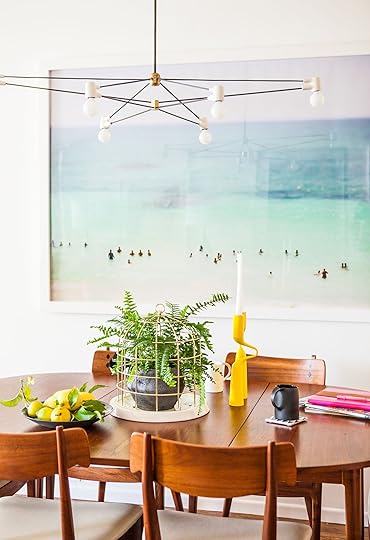
The Brendan Ravennhill light fixture had just launched, and Max Wanger’s photography was so popular (they both pioneered a LOT of copycats).
 hi, bri!
While I wouldn’t go back to 2013 Emily, I think this room actually has a lot of timelessness.
The Lessons In Trends And Timelessness:You will not be able to avoid leaning into some trendy design elements if you are super into design (no one is immune to the zeitgeist), but if you want to avoid looking dated, buy the high quality version of it or just do it in accessories that aren’t as much of an investment to change out. I think the squiggle or amorphous shapes are great current examples – bring them in in limited amounts to avoid looking dated real fast. Bright colors will always be more likely to be “dated”, but that doesn’t mean we should avoid what we love right now. Will they call 2022 the year of dark moody green everything? Yep! But I don’t know how you avoid any color trends without just being so boring. Will warm pinks, browns, and burgundies also be less exciting in 10 years? Probably, but again, there is no such thing as timeless colors, and for the most part, there is a way to make them still work with styling. A well-designed room with high-quality materials done in a balanced way will likely still be very pretty in 20 years. Sure, there are some navy blue tones that feel fresher than others, but for the most part, blues, greens, and neutrals are timeless (coming from someone who has and will always love blues and greens, so I’m very biased). Although if you live in Texas or Arizona it’s likely warmer tones that feel timeless there. It’s so nuanced, folks. Good luck! LOL.Too much stuff can really overwhelm a room (and in this case, make it feel dated). I think this can be blamed on youth, especially when we are younger and we can’t afford the more expensive design elements, but we love to shop, we are drawn to smaller things that we love, because it’s what we can buy. Nothing wrong with this, but just know that displaying it all, on every surface, especially when they are all super eclectic, can just look a bit cuckoo. I had to learn this lesson over and over and over.Authentic Vintage will always be in style – it’s just context, styling, and color combinations that can make the pieces look dated to the specific era that it “came back” in.For the most part, I think that this room could be tweaked so fast to make it feel “in” right now – the main “dated” culprits are in the accessorizing, which feels pretty harmless to me. Thoughts????
**Design by Emily Henderson (me!)
*Photos by Laure Joliet
The post Revisiting A 2013 Project, DesignLoveFest’s Apartment (+ What I Think About It Now) appeared first on Emily Henderson.
May 4, 2025
The Link Up: Emily’s All-Time Favorite Outdoor String Lights, Arlyn’s Affordable Fancy Event Dress, And A Great Glowy Contour Set

Happy Sunday, everyone! Hope it was a good one. We don’t have too much to report aside from that we needed to get a few more shots of the new outdoor grill area (we really can’t wait to show you), and hope you saw the exciting progress with the farmhouse garages. Oh, and did you catch Em’s post about the REAL story of her famous giant ficus tree? Go read that here if you haven’t. Alright, let’s talk links…
This week’s house tour is the most serene Grecian home you could imagine. But what is even more beautiful about it is that it was designed by a mother-daughter team and built with local artisans. While this home is a new build, it was meticulously designed to mirror “the restored 19th-century residence”. The windows, the beams, the shutters, and the piece of art in the kitchen will take your heart. Oh, and the view will take your breath. Check it out here!

 photos by kaitlin green | left from: outdoor living room | right from: back porch reveal
From Emily: My Favorite LED string lights for the perfect outdoor vibe (both shatterproof and a nice warm glow). The “too bright light” is a real mood killer, and yet it’s pervasive mostly because you might not know until you’ve hung them up that they are too bright (the typical problem). So I have two solid recommendations for you based on the color of cord you might want. 1. For those who want a darker cord (which blends in much better in nature, near trees at night than a white one), I have and love these that I bought from Lowe’s last year. They check all the boxes; they are LED (low energy, last forever), the bulbs are shatter-resistant (not glass), and the bulbs on this one are 1 foot apart, meaning that they are pretty close together. They aren’t the ones that “hang down” but rather just string across. We have them along our split rail fence around our pool, and I LOVE the vibe of them. I leave them on most nights as property lights (we didn’t overlight our yard on purpose), and they are just so charming. But for our painted porch and our new gazebo, both white, we wanted a white cord option. So for this, I chose these, which are also very warm and glowy, white cord, come in really long lengths (50′), and are closer to 24″ apart. These are specifically good for the back-and-forth vibe inside a porch because you don’t want them to be too bright, which more bulbs could do. Again, it’s all about the right level of warmth and amount of bulbs and I have found that 2′ apart is great for the bistro back and forth vibe under a porch (but you might want your bulbs 1′ apart for out in your yard where the light is less contained by a roof structure. As you can see, I’ve thought about this a lot, thus the strong recommendation. Skip the glass bulbs, skip the incandescent – these two string lights are my favorites.
From Caitlin: This week, I polished off a great book from my local library about a topic near and dear to my heart: HOUSING. (Am I a broken record yet? Another week, another exploration of housing policy in America.) ANYWAY – it’s called The Houses That Sears Built, and it’s a fantastic read that details the rise, fall, and impact of the business that made homeownership available to thousands of Americans for the first time. I love Rose Thornton’s voice – she’s friendly and familiar, so it reads more like a blog or a beach read than a dry, fact-based retelling – and it made me strangely emotional at points! Sears was the Amazon of its day, and they unlocked homeownership for poor farmers, single women, immigrants, and more by offering well-priced, world-class materials and decent, fair mortgages to all. (Get this: the only question on their mortgage application was “What is your vocation?“) In any case – it’s a fun one. Read it! PS. Sadly, this one’s not available via Bookshop.org, but you can likely check out a copy for free from your local library with Libby! 99% Invisible also did a great episode with Rose, if you prefer audio.
From Jess: Last weekend, I happened upon a sample sale downtown (which isn’t something I ever even near to “happen upon” normally lol), but I got the cutest bag! I love my Clare V Gran Fanny so much, but it’s black, so especially as the warm weather approaches and my clothing color palette gets a little lighter, I also want another bag option. When I saw this one, I loved it immediately. It’s not huge but large enough to actually put stuff in, the shape is fun but not too wild, and I really love the ball details. I hadn’t heard about this brand, but really love the options (like this larger one or this pleated one), and they are all made with vegan leather.
Also From Jess: Well, that same day, I also had the joy of getting two pairs of shoes from one of my absolute favorite brands, Intentionally Blank. Emily has known the owner, Ty McBride, since the beginning of him opening his doors. With these truly damaging tariffs (to put it very lightly), we are at risk of losing really special brands like this one, which also has an owner who cares about supplying his staff with health insurance and 401ks. As we sadly know, not every business owner has that mentality. Thankfully, we also have an incredible boss who shares those beliefs. But back to the beginning issues with these tariffs, you can watch this video Ty recorded about it. Of course, most brands are currently going through the exact same thing, but if you have the means and could use a truly great pair of shoes, please consider looking here and soon (their tariff bill of over $100k is due by the 5th). In addition to the two I bought at the sample sale, I just rebought these mules (I’ve had my first pair for a decade) because they are my absolute favorite. But also, these incredible maroon boots! Or looking for a cool sandal? Maybe these? Need shoes for a wedding? They have so many great options! More than ever, it’s so important to put our money into brands like Ty’s.
From Arlyn: Last month, my husband and I attended a “parent prom” for my daughter’s school (it was a fundraiser). I swore I had a dress I could wear and knew, in theory, exactly where it was. Well, I found out the Wednesday before the Saturday that I was, in fact, wrong about that. The dress had gone missing and I was left gownless. I considered renting something but in a great moment of serendipity, I got an email from Old Navy about their new line called The Occasion of formal wear. I ordered a few styles but landed on this dress, and it’s wonderful!! The satin is bias cut, which means it drapes so beautifully. It’s not lined but the fabric is thick and wears nicely. I got the warm taupe color as a departure from the standard black, and I’m very happy with it. It’s a $65 dress that seriously looks and feels like a $300 dress. Be sure to check out the whole line if you have any “occasions” coming up this summer!
Also From Arlyn: Fix It Friday Time!! Having trouble nailing down that one big important thing in your room? Here’s your chance to get some professional design advice for those areas in your home that need a little help. Maybe you’ve been going back and forth between 3 rugs to ground your sofa. Your dining room all set except for the right curtains (or even chairs)? I’ve got you covered. Send in bright, clean photos (smartphone snaps are fine) of any room or area of your home where you’re stuck on selecting one big thing to either finish it up or move it forward, and I’ll pull some selects for you. Please email me at arlyn@emilyhendersondesign.com by end of day Monday, May 5th for a chance to be included in my article and get my feedback.
From Mallory: So I tried out a new makeup brand recently and I’m VERY impressed with 2 products in particular: this face wash gets makeup off SO easily (I usually struggle to get my mascara and everything fully off and this guy really gets the job done) and also this contour set glides on and is SO PRETTY (and also would make a great mothers day gift btw!) Also, Em has been using the contour set for YEARS and loves them – so I’ve officially been emfluenced!
Also From Mallory: I made Gwyneth Paltrow’s banana pancakes, and I gotta be real – they were BOMB. I used regular flour and also added in a scoop of vanilla protein powder (cause I’m trying to get that protein in) and MAN they were delish. Highly recommend!
From: Gretchen: Last week, we were helping Em sort through some old rug samples at the Farmhouse and I came across a Rowena rug in the perfect size for my living room. She let me take it home and now it’s down and looking great, but feels like it’s missing something… a rug pad! The rug itself is super soft and fairly fluffy, but thin in areas, and feels like it would benefit from some extra cushion and a little grip. Thankfully, I JUST wrote a review post where we tested out 11 different rug pads to find our favorite, so I didn’t hesitate in purchasing this Cloud Comfort Memory Foam pad to throw underneath. Yes, it’s a little spendy, but because I know it’s a good one and I secured the rug for free (thanks, Em!) I felt it was a worthy splurge!
From Marlee: The best affordable sweatshirt is this vintagesoft hoodie from Gap. I bought one for my BF a few years ago, and shortly after bought another for myself. It’s one of my all-time favorites that I always go back to. Gap’s vintagesoft line is so so good and is somehow always on sale? It’s incredibly plush even after a ton of washes (we got them at least 2.5 years ago) – and comes in so many colors. Size up for an oversized look!
Thanks for hanging out with us today and see you tomorrow. xx
Opening Image Credits: Photo by Mike Garten for Good Housekeeping magazine | From: My House Tour From Good Housekeeping
The post The Link Up: Emily’s All-Time Favorite Outdoor String Lights, Arlyn’s Affordable Fancy Event Dress, And A Great Glowy Contour Set appeared first on Emily Henderson.
May 3, 2025
Why Going To A Flea Market With Trusted Friends Is THE Move (+ All Jess’ And Friends Finds From Downtown Modernism)

If I could only go to one flea market for the rest of my life, I would say, “Sorry, Rose Bowl, you are OUT!” Downtown Modernism, you have my heart… and now all of my money. And look, that’s not to say this is everyone’s dream market. It lends itself primarily to a very mid-century modern style, which, of course, may not be for you. It was really sad the Cailtin and Mal couldn’t join (Caitlin is on the east coast and Mal was sick) but my beloved friend Emily (I actually refer to her as “Friend Emily” and Emily Henderson as “Boss Emily” when talking to people) and my incredible cousin Becca, her husband Jason, and their perfect baby, Sunny (you’ve actually met them before but I’ll get to that later) came along for our 7:30 call time. Becca and Jason are equally as obsessed with this flea, but it was Emily’s first time. All of them were looking for art, but I didn’t have a real list of needs, which is ummm…dangerous. So while I’m never not on the lookout for special treasures, I went more as a friend consultant:) Don’t worry, I was still able to find things I “needed” as well as consult my loved ones. A very fulfilling morning:)

Sorry, these aren’t great shots, but they do give you the general vibe in case this is your first time hearing/reading about it. This was Caitlin and my post from the fall if you want to take a look at that too! Also, it’s only twice a year—spring and fall. Anyway, I always end up feeling like an awkward flea market paparazzi photographer when I’m there, never totally sure how “okay” it is to snap away. However, I know I am one of MANY. But also, how cool is that bassinet?

Speaking of babies, Becca and I are very committed to making sure Sunny has a firm education (and great taste) in vintage decor. Since having kids may or may not happen for me, I need to see which of the family’s younger generation will inherit my ever-growing collection someday! Will it be Sunny?? Well, that’s up to him if he can prove his design appreciation to me. I’m only half joking:) My niece is three months younger than Sunny and has some flea market catching up to do if she also wants in.


As the lamp-loving gal I am, the first photo I took was this one. It’s a 1937 Kurt Versen copper table lamp, and I fell for it immediately. The seller promptly said to ignore the price because her roommate “must have been high” when they priced it, ha. Couldn’t totally tell if she was joking. But actually, if you go on 1stDibs, this designer’s lamps are $$$$. $2,495 might be a little high, but this was clearly a gem.

The task lamp on the left was so good and I wanted it!! It’s a tragedy I don’t have more space to collect more lamps, although likely for the best:) I believe this cutie was priced at $250. I also wanted that white and black lamp in the foreground of the photo on the right (and Emily wanted the one behind it). They were selling for $250 and $350. For the life of me, I can’t remember what the seller said about them beyond the prices, but when I googled them, I think they may be beehive lamps? Neither of us made the purchase, but they will live in our hearts forever.


I just really loved these chairs and thought I’d share them here. But that extra-wide chaise is truly incredible, and I wish I had the space for it. Sorry, I didn’t ask for the prices since I knew I couldn’t get them. Why add salt to the wound, you know?

Another MCM gem that needed a blog moment! Does it look super comfortable? Not really. But is it so beautiful and on wheels? YES!

Ceramics are another one of my, I guess, many forms of decor kryptonite. That plate/tray was just cool and unique. The colors and texture were also so good. I didn’t end up asking the price because it was another one I knew I didn’t have a place for. Then the piece on the right says it’s a sound amplifier? Whether that’s its actual use or not, I think it would be so cool on a shelf or display surface. All the little details are so fun. If I had a place for it, I might have offered $50 from the $65 price tag and seen what happened.
We ended up all on the hunt for art, but per usual, it’s tricky. No one grabbed these, but I just liked them, so I grabbed a picture:) Great colors, great shapes, but very classic MCM, which I don’t think any of us were really looking for.
Becca And Jason’s Finds
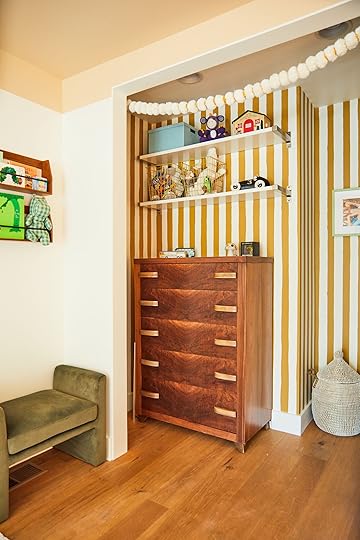
Does this nursery look familiar?? In case you missed it back in September, it’s Sunny’s! But the real star of this space is my cousin Becca, who DIY’d most of this magical room (yes, those stripes were individually hand-painted!).

Just thought you should know that not only is Becca an EHD alum, she’s extremely talented with impeccable taste. On the regular, we are texting back and forth if the other one likes a design idea we have, or are asking our opinion if we like a piece we might want to buy. It’s a dream and I feel so lucky! I’m pretty confident she feels the same…especially since she’s told me:) The other fun part is that her husband Jason is also very cool and has great style (my Libra brother!)…which, when you are shopping for home decor for a shared space, it can be ummm a little challenging when your partner doesn’t always agree. That’s actually when, at times, I’m also ushered in. It’s either “Hey, Jess! What do you think, we can’t decide” or “Hey Jess, Jason doesn’t like this but I think he’s wrong, what do you think?” lol. She’s half kidding and half working the designer/cousin tie breaker in her favor. Look, I respect the game, but do give my honest opinion. It often goes Becca’s way, but I have been known to agree with Jason, too. The good thing is that whatever happens, their home is going to be beautiful. It’s a win-win regardless.

They are such a beautiful family, it’s sickening! And look, Sunny is already obsessed with their Richard Burkett vessel! They have a large wooden, cubby-style shelving unit in their living room (up and away so Sunny can’t get near it), so they were looking for fun and special sculptural pieces to continue to fill it with. They asked if I thought they should get this piece, and I said, “YES!”

She was a pretty penny but a piece they’ll love forever. The vendor they got it from was one of my favorites! They were called The Mexican MOCA, and I wish I could remember the woman’s name who ran it. The booth was filled with the coolest pieces (more on that in my section:)) and she was so warm and sweet. Their Instagram is private, but it looks like they have a more permanent booth in Kurtz Street Vintage Marketplace in San Diego. Next time I’m in SD, I may have to pay it a visit.

Becca and Jason have a wall or two that still need love in their house, so like I said, art was a priority for them. At one point, Becca grabbed me and asked what I thought of this fabric as an art piece.


I said that I thought it was great. High impact and such a perfect size. I love oversized art because it almost always looks so cool and comes off really intentional. Now it’s a classic Marimekko print, and I loved that you could see the fabric info on the side. It was $250. Becca wanted to know how I thought they should hang it, and I suggested a wooden rug hanger. That way, it still looks cool, thoughtfully designed, and won’t cost a million dollars. She went home and found this one on Etsy!


This was the magical booth of artist and vintage seller, Melinda Forster. Boss Emily gets all the credit for introducing me (and all of you who have been reading since 2018) to Melinda’s work. This was Em’s first post about this flea market back then when she talked about her! She’s as talented as she is kind (as well as her partner). And in full disclosure, this booth was more magical looking before our group got our little paws all over it. These photos were some of the aftermath, ha.


These were the two pieces that Becca and Jason picked up! They are both by Melinda, and I’m very happy I get to visit them whenever I want. They each will get their very own cubby (as you can kinda see in the photo on the left) and make their home even more special than it already is. Together, these were $300. I mean, for two original pieces, where you also get to meet the artist? Not too bad if you ask me.
Their total for the day came to $745. Now onto Friend Emily!
EmilyBecause I’m sure you are itching to know, I met Emily through a friend, working at the same restaurant in NYC back in 2014. When I left and moved to Australia, she happened to also be moving back to LA. Then, a mere nine months later, after I moved back to California (due to my breakup), I asked her if she wanted to grab lunch after my dream job interview with Emily Henderson. Needless to say, lunch went great and I eventually got the dream job:) We’ve been besties basically ever since.
Now, Emily’s style is a mix of 70s and Italian grandma (as she has a lot of Italian blood running through those beautiful veins). As she has been decorating her apartment, we coined her style as “Soft 70s”. Think a healthy balance of feminine and masculine lines, pastel greens, clays, and pinks, with varying wood tones and light neutrals. Art was her biggest wish for this flea market, and let’s just say she made a good dent in that department…


These two ladies were the first purchases of the day. We first saw the lady on the left and adored the texture of the oil paint and color palette. Then the gal on the right also really spoke to Em, so she needed to come home with her, too. Emily said when she got home and put them in her bedroom they were THE PERFECT color match so she freaking nailed it. The mix of mediums looks so great together and I can’t wait to see them all framed, in their rightful place:) The oil lady was $40 and and pastel one was $30.

Unlike me, Emily is great with plants and really fell for this little copper watering can (also from Melinda’s booth). I happened to be talking to Arvin Olano (It was our first time meeting, and he was so wonderful. If you don’t follow him on Instagram, you must!) when Em came up to us and asked what we thought. Like Em, we both loved the patina and thought it was so sweet. This was a little more of that Italian grandma vibe, which was perfect. A great little $40 find.

Then, as we did our last lap, we stopped by a booth with really great jewelry. This market is mostly decor, but there’s always a little jewelry, and it’s always good stuff. My 70s-loving friend saw that three metal ring and knew it was hers (the one with the stone was her mom’s, also from the 70s:)). That one came to $70.
Emily’s total for the day was $180. Ok, now for me:)
JessI am officially out of decor surface space after this weekend. So while a part of me is a bit sad (?), I really went out with a bang and I’m about to show you with what:)


Here was my first (of two purchases), and it was a pretty instant yes…which is unlike me, given that I tend to overthink everything, and it was not cheap. I’m pissed I didn’t get a photo of all of them but this table had about seven of these one-of-a-kind stash boxes by artist, Joel Stearn. The seller was very adamant that he never makes the same one twice. I’m a real sucker for stuff like that:) Plus, I loved how graphic it was and the little piece at the top. Oh, and it’s 16.5″!! It’s not always easy finding tall decor peices I love (and can afford).

Here you can see it all taken apart and all of my new places to hide my tiny treasures:) It was $200, so yes, I absolutely hesitated, but I knew I’d be heartbroken if I came back and it was gone. So I just did it. NO REGRETS. And then…

This was a no-brainer for me, and if you can’t tell, it’s by Melinda. She called it a shadow plate, and I immediately fell for the design, the texture, and size. It’s almost 15″ tall! I have a little mini sculpture of hers and knew that I wanted something larger eventually. Well, “eventually” was last Sunday, and I’m so grateful it’s mine. Currently, it’s sitting on my desk, but she may move. Who knows? Regardless, it will be in a spot where it can be properly admired. I paid $140, which I felt was more than fair. I love having art from all over, but getting to have contact with the artist really adds an extra sweetness.
My total came out to $340.
I’d say it was another very successful Downtown Modernism, and while I’ll likely go in the fall, I may have to leave any forms of payment at home (oof, iPhone included, I guess?) and simply be a helpful consultant to the friends I’m with. Only time will tell if that will happen:) Has anyone found any cool flea finds recently?
Love you, mean it.
The post Why Going To A Flea Market With Trusted Friends Is THE Move (+ All Jess’ And Friends Finds From Downtown Modernism) appeared first on Emily Henderson.
May 2, 2025
Pet Hair Problems? We Put 6 Gadgets To The Test To See Which Picks It Up The Best

Many of us (myself included) are pro-pets-on-the-couch, but I’m positive that NONE of us are too happy about the hair they tend to leave behind. So when we were coming up with useful product categories to test, pet hair removers were at the top. So today, we’re testing six of some of the highest-rated pet hair removal gadgets and gizmos on the market to see if they really will keep your sofa clean and picture-perfect.


Thankfully, we have the perfect test subject–Harvey, Em’s brother’s sweet Lab, whose two main jobs are barking at predators (mailmen) and maintaining his spot on the couch. He’s the kind of dog who will shed if you even look at him funny, so we weren’t surprised to see their sofa was covered in a solid layer of pet fur when we rolled up. Thanks, Harvey!

To give these tools a fair trial, we sectioned off the couch, one gadget per zone, and spread out the dog hair as evenly across them as we could. We tested a variety of tools–some meant to work like a squeegee, some with little teeth, and some rollers. Our winner pick is revealed at the end if you’d like to skip through our findings, but here’s how each one stood up:
Uproot Cleaner Pro VS Gonzo Pet Hair Lifter
Uproot Cleaner Pro | Gonzo Pet Hair Lifter
The Uproot Cleaner Pro (seen here on the left, the one that looks and works like a rake) worked “just okay”. It grabbed the hair as I pulled it along the sofa and did a fairly good job of collecting it into a pile, like a broom might. The tool has little teeth that cling to the hair but don’t hold onto it or lift it up. You have to go over the same spot a few times to really make it spotless and collect the hair pile with your hands or brush it toward yourself so it just falls to the ground. Not ideal. We tried this one on their rug too and found that the teeth worked a little better to really pull up the hairs (and loose rug fibers). Overall, 2/5 on the effective scale.


The Gonzo Pet Hair Lifter did no such thing. You can’t really tell in this photo, but this spongy contraption left tons of little yellow crumbs behind as it dragged across the fabric. We were NOT fans of this tool. Not only did it add to the problem by shedding some itself, but it was too squishy to properly grab any fur. The hair doesn’t stick to the sponge, it just gets sort of spread around. This one did not work at all. Wiping the dog hair with our hands was more effective. 0/5!
FurDozer VS Analan Mini Pet Hair Remover
FurDozer | Analan Mini Pet Hair Remover
These were two of our “squeegee” contenders. They each claim to have three “modes”. The FurDozer has a side with six short rubber ridges and a side with three tall ridges, including a fourth, taller squeegee edge. The Analan has three rubber sides with small, medium, and large teeth.

First up is the FurDozer and it gathered the hair very well! Online, it says to use the three-squeegee side for a more plush material like this couch, but we found that the six-ridge side worked best to collect the hair into a clump. This tool works by holding it flat to the sofa, pushing down hard, and pulling the fur toward you. It takes a good amount of work to gather all the hair, and while it did work pretty well for the surface hair on this sofa, I think this tool is more intended for stubborn, embedded hair. Plus, you still have to pick up your hair clump piles by hand. 3.5/5

The Analan Pet Hair Remover was easy to grip, more ergonomic, but worked pretty similarly to the FurDozer. In our tests here, we found the small toothed side performed the best to collect the hair into a pile. The larger sides didn’t pull the hair as well. Overall, this tool also felt more designed for embedded fur (like the kind trapped in a fuzzy car mat or carpet). Our biggest complaint was that on the velvet sofa, the teeth marks left behind a rake pattern. Nothing permanent, but we had to swipe them out by hand. The triangular shape did get into the cushion crevices nicely, but still required a good amount of work to make it all disappear. 3/5
Chom Chom Roller VS Black + Decker Pet Hair Remover
Chom Chom Roller | Black + Decker Pet Hair Remover
These two rollers seem nearly identical: the Chom Chom and the Black + Decker. Both were designed with the sort of classic lint brush fabric on a rolling mechanism, with a squeegee splitting it down the middle. With both rollers, you’re supposed to move in shorter front-to-back motions.


With each roll back and forth, the hair actually gets picked up more like a vacuum, and deposited inside, cleaning the lint rolling fabric each time. The Chom Chom worked like a charm charm! This side-by-side really shows that. There were maybe only one or two straggling pet hairs that disappeared with another quick swipe.

The best part? No need to scoop up a little hair pile with your hands! All of the fur clings to the roller and deposits itself inside the gadget as you clean. Then, when you’re all done, you pop open the back window and grab the fur ball from there to throw away. We thought for sure this one would be our winner at a 4.5/5 rating…

But then we tried the Black + Decker version and it worked just as well! Using the same small back-and-forth motion, all of Harvey’s hair effortlessly collected onto and into the roller in just a few passes.


The roller fabric picked up about the same as the Chom Chom, and there was a big chunk of collected fur waiting in the chamber after a few passes. We tested both of these rollers out on the rug, too, and were equally impressed. One thing we liked about this one was that you could see what it was gathering through the little purple window before opening it, which couldn’t be said of the Chom Chom.

But before we could dish out our final verdict and rating, we called Harvey over and had his help re-hairing a section of the couch so we could put these rollers head to head and see if, in one fell swipe, we could tell a difference in pick-up quality.

And we could not! Each roller swiped smoothly and snagged all of the new Harvey hairs in its path with just one pass. With this information, we rated the Black + Decker our winner at 4.7/5.
But then we did a price check… and at just under $13, not only does the B + D roller work the best, with a clear window to see what you’re picking up, but it’s more inexpensive than ALL OF THE GADGETS WE TRIED and literally half the price of it’s Chom Chom competitor, taking this rating to a full 5/5!

Now Harvey can maintain the dent he’s been carving out in the couch, and mom and dad can swoop in in-between dog naps to keep their sofa clean with the Black + Decker roller. It’s fun, fast and easy to use, collects the hair so you don’t have to, and doesn’t break the bank!
*Photos by Kailtin Green
The post Pet Hair Problems? We Put 6 Gadgets To The Test To See Which Picks It Up The Best appeared first on Emily Henderson.
Emily Henderson's Blog

- Emily Henderson's profile
- 10 followers

