
Sourabhh Sethii's Blog, page 3
April 26, 2020
Core Java Interview Questions
As an Full Stack professional, it is essential to know the Core Java, learn the right technologies and prepare the right answers to commonly asked Core Java Interview Questions. Here’s a definitive list of top 50 Core Java Interview Questions.
 Javahttps://medium.com/media/5097d4aa47d17319d9006126196ee7ee/href
Question 1.) What are wrapper classes in Java?
Question 2.) What are constructors in Java?
Question 3.) What is Multi-threading?
Question 4.) What is Synchronization?
Question 5.) What are access modifiers in Java?
Question 6.) What is singleton class in Java and how can we make a class singleton
Question 7.) What are the main concepts of OOPs in Java?
Question 8.) What is the difference between Array list and vector in Java?
Question 9.) What are the differences between Heap and Stack Memory in Java?
Question 10.) What is the difference between a local variable and an instance variable?
Question 11.) What is a package in Java? List down various advantages of packages.
Question 12.) Why pointers are not used in Java?
Question 13.) What is final keyword in Java?
Question 14.) Difference between String, StringBuilder, and StringBuffer.
Question 15.) What is the difference between this() and super() in Java?
Question 16.) What is a classloader in Java?
Question 17.) What is the difference between an array and an array list?
Question 18.) What is collection class in Java? List down its methods and interfaces.
Question 19.) What are the different methods of session management in servlets?
Question 20.) Why is multiple inheritance not supported in java?
Question 21.) Difference between method Overloading and Overriding.
Question 22.) What is the static block?
Question 23.) Can we execute a program without main() method?
Question 24.)What is the difference between abstract classes and interfaces?
Question 25.) Can you override a private or static method in Java?
Question 26.) What is Java String Pool?
Question 27.) Differentiate between static and non-static methods in Java.
Question 28.) What is an object in Java and how is it created?
Question 29.) What is Object Oriented Programming?
Question 30.) How does Java enable high performance?
Question 31.) Explain different types of typecasting?
Question 31.) What are the default values for local variables?
Question 33.) What is multiple inheritance? Does Java support multiple inheritance? If not, how can it be achieved?
Question 34.) How do you make a thread in Java? Give examples.
Question 35.) Why do we use the yield() method?
Question 36.) Can you explain the thread lifecycle in Java?
Question 37.) Please draw a comparison between notify() and notifyAll() methods.
Question 38.) How will you distinguish processes from threads?
Question 39.) Could you explain various types of Exceptions in Java? Also, tell us about the different ways of handling them.
Question 40.) Write suitable code examples to demonstrate the use of final, final, and finalize.
Question 41.) Let us know the Java Exception Hierarchy?
Question 42.) Could you demonstrate how to delete a cookie in Servlet with a code example
Question 43.) Which methods are used during the Serialization and Deserialization process?
Question 44.) Can an interface implement or extend another interface?
Question 45.) What is Marker interface?
Question 46.) What is inner class in java?
Question 47.) What is ternary operator in java?
Question 48.) What is Garbage Collection?
Question 49.) What is the use of System class?
Question 50.) What is object cloning?
I hope these set of questions would help you to prepare for Core Java Interview.

Core Java Interview Questions was originally published in DXSYS on Medium, where people are continuing the conversation by highlighting and responding to this story.


April 12, 2020
HTML/CSS Interview Questions
As an Full Stack professional, it is essential to know the HTML & CSS as well and prepare the right answers to commonly asked HTML & CSS Interview Questions.

I have seen people with UI/UX advance development who have mind set of UX designer approach but for full stack professional, it is essential to know basic HTML as well so that UI can be developed and UI related issues can be handled so let’s look into some basic HTML questions which can be asked in the interview.
Here’s a definitive list of top 30 HTML/CSS Questions.
Question 1.) What are Tags?
Question 2.) What is the use of an iframe tag?
Question 3.) What are empty elements?
Question 4.) What is a style sheet?
Question 5.) Explain the layout of HTML?
Question 6.) What is semantic HTML?
Question 7.) What is the difference between DIV and SPAN in HTML?
Question 8.) How to create a new HTML element?
Question 9.) What are the limits of the text field size?
Question 10.) What are the different new form element types in HTML 5?
Question 11.) How to create a nested webpage in HTML?
Question 12.) What are the new types for form validation in HTML5?
Question 13.) Why is the external style sheet useful?
Question 14.) How do we make a rounded corner by using CSS?
Question 15.) What are gradients in CSS?
Question 16.) Differentiate between the ID and class.
Question 17.) What is CSS flexbox?
Question 18.) How to align image vertically in a division that spans vertically on the whole webpage?
Question 19.) What is the difference between padding and margin?
Question 20.) What is the use of the Box Model in CSS?
Question 21.) What is a CSS pseudo-class?
Question 22.) Explain the concept of pseudo-elements in CSS.
Question 23.) What is CSS opacity?
Question 24.) What all the position states used in CSS.
Question 25.) What are the differences between relative and absolute in CSS?
Question 26.) Define ‘important’ declarations used in CSS.
Question 27.) How is the concept of inheritance applied in CSS?
Question 28.) What is Descendant Selector?
Question 29.) What is a child selector?
Question 30.) What is Cell Spacing and Cell Padding?
Question 31.) How can you apply JavaScript to a web page?
I hope these set of questions would help you to prepare for HTML/CSS FOR full-stack developer Interview.

HTML/CSS Interview Questions was originally published in DXSYS on Medium, where people are continuing the conversation by highlighting and responding to this story.
March 31, 2020
Microservices Interview Questions
As an Full Stack professional, it is essential to know the Microservices, learn the right technologies and prepare the right answers to commonly asked Microservices Interview Questions. Here’s a definitive list of top 25 Microservices Interview Questions.

Microservices Basic
Question 1.) What Is Spring Boot?
Question 2.) Which Embedded Containers Are Supported by Spring Boot?
Question 3.) Explain microservices architecture
Question 4.) What are the advantages of microservices?
Question 5.) What are main differences between Microservices and Monolithic Architecture?
Question 6.) What do you know about Microservices?
Question 7.) What are the characteristics of Microservices?
Question 8.) What is the use of Docker?
Question 9.) What are the best practices to design Microservices?
Question 10.)What is Domain Driven Design?
Question 11.) What is an actuator in Spring boot?
Microservices Analytical
Question 12.) Why Would You Opt for Microservices Architecture?
Question 13.) What problems are solved by Spring Cloud?
Question 14.) What Do You Mean by End-To-End Testing of Microservices?
Question 15.) Why Would You Need Reports and Dashboards in Microservices?
Question 16.) What Are the Fundamentals of Microservices Design?
Microservices Advance
Question 17.) How Can You Set Up Service Discovery?
Question 18.) How Is Spring Security Implemented In a Spring Boot Application?
Question 19.) How to Configure Spring Boot Application Logging?
Question 20.) Why Do We Need Containers for Microservices?
Question 21.) What Are the Ways to Access RESTful Microservices?
Question 22.) Common Mistakes Made While Transitioning to Microservices
Question 23.) How independent micro-services communicate with each other?
Question 24.) What is the use of PACT in Microservices architecture?
Question 25.)What are Client certificates?
I hope these set of questions would help you to prepare for Microservices interview.

March 26, 2020
Javascript interview questions
As an Angular professional, it is essential to know the javascript, learn the right technologies and prepare the right answers to commonly asked Javascript Interview Questions. Here’s a definitive list of top 40 Javascript Interview Questions.
Javascript interview questions

Basic Javascript Questions
Question 1. What are JavaScript Data Types?
Question 2. What is the use of isNaN function?
Question 3. What are undeclared and undefined variables?
Question 4. Write the code for adding new elements dynamically?
Question 5. What is ‘this’ keyword in JavaScript?
Question 6. What is === operator?
Question 7. Explain how can you submit a form using JavaScript?
Question 8. Does JavaScript support automatic type conversion?
Question 9. Explain the difference between “==” and “===”?
Question 10. What would be the result of 6+2+”1"?
Question 11.Explain how to detect the operating system on the client machine?
Question 12. What do mean by NULL in Javascript?
Question 13. What is the function of delete operator?
Question 14. What is an undefined value in JavaScript?
Question 15. What are JavaScript Cookies?
Question 16. Explain what is pop()method in JavaScript?
Question 17. What is the use of Push method in JavaScript?
Question 18. What is unshift method in JavaScript?
Question 19. Mention what is the disadvantage of using innerHTML in JavaScript?
Question 20. Which keywords are used to handle exceptions?
Question 21. What are the different types of errors in JavaScript?
Question 22. What is the ‘Strict’ mode in JavaScript and how can it be enabled?
Question 23. Explain window.onload and onDocumentReady?
Question 24. What is the difference between .call() and .apply()?
Question 25. Describe the properties of an anonymous function in JavaScript?
Question 26. Define event bubbling?
Question 27. What is the method for reading and writing a file in JavaScript?
Question 28. How are DOM utilized in JavaScript?
Medium Javascript Questions
Question 29. What is a “closure” in JavaScript? Provide an example.
Question 30. Difference between “var” and “let” Keywords?
Question 31. What is prototypal Inheritance?
Question 33. What is SetTimeout()?
Question 34. What is Scope?
Question 35. What is ECMAScript?
Question 36. What are Template Literals?
Question 37. What are Promises?
Question 38. What is AJAX? And explain it with usage?
Question 39. What’s the difference between the in operator and the hasOwnProperty method in objects?
Question 40. What are the ways to deal with Asynchronous Code in JavasScript?
Question 41. How to evaluate multiple expressions in one line?
I hope these set of questions would help you to prepare for Javascript interview.

Javascript interview questions was originally published in DXSYS on Medium, where people are continuing the conversation by highlighting and responding to this story.
February 28, 2020
Angular Interview Questions
As an Angular professional, it is essential to know the right buzzwords, learn the right technologies and prepare the right answers to commonly asked Angular Interview Questions. Here’s a definitive list of top 20 Angular Interview Questions.

Question 1: Please explain the various features of Angular.
Question 2: Name the building blocks of Angular.
Question 3: Demonstrate navigating between different routes in an Angular application.
Question 4: Could you explain services in Angular?
Question 5: Let us know advantages and disadvantages of using Angular over React and Vue?
Question 6: What is interpolation in Angular?
Question 7: Explain Angular Authentication and Authorization.
Question 8: How do Observable differ from Promises?
Question 9: Please explain the difference between Angular and AngularJS?
Question 10: Explain the difference between an Annotation and a Decorator in Angular?
Question 11: What are directives in Angular?
Question 12: What is AOT (Ahead-Of-Time) Compilation?
Question 14: What is the use of @Input and @Output?
Question 14: What is RouterOutlet?
Question 14:What is the purpose of a filter in Angular?
Question 15:What is an AsyncPipe in Angular?
Question 16:Differentiate between ng-Class and ng-Style.
Question 17:In how many ways the Data Binding can be done?
Advance Angular Questions
Question 18: What is Data Binding? How many ways it can be done?
Question 19: Can you draw a comparison between the service() and the factory() functions?
Question 20: What are Angular Global APIs?
Angular ArchitectureQuestion21: Can you give us an overview of Angular architecture?
Angular Architecture in detail: https://angular.io/guide/architecture


December 14, 2019
Q&A on the Book Building Digital Experience Platforms
#InfoQ and Ben Linders interviewed us on our book “Building Digital Experince Platform” about the solutions that digital experience platforms support, the main differences between developing software with a DXP versus using a “traditional” approach, how to combine a DXP with technological solutions like microservices, internet of things, blockchain, designing intuitive and interactive user interfaces with a DXP, integrating a DXP with other systems, handling the quality attributes of a DXP, the main technological and business process trends in digital banking and how a DXP can support them, and the benefits for organizations that have developed systems using a DXP.
Check out the Link — INFOQ
https://www.infoq.com/articles/book-review-digital-experience-platforms/


Q&A on the Book Building Digital Experience Platforms was originally published in DXSYS on Medium, where people are continuing the conversation by highlighting and responding to this story.
August 11, 2019
Principles behind the Agile Manifesto
1.) Our highest priority is to satisfy the customer
through early and continuous delivery
of valuable software — CI/CD (Continuous Integration and Continuous Delivery) Pipelines helps us achieve this. One can use multiple
2.) Welcome changing requirements, even late in
development. Agile processes harness change for
the customer’s competitive advantage. — Team, Scrum Master, Product Owner and Client should closely work with each other so that client can intimate the changes as soon as possible and (Team, Scrum Master) can adopt the changes quickly.
3.) Deliver working software frequently, from a
couple of weeks to a couple of months, with a
preference to the shorter timescale — Integration and Deliver Pipelines should be effective enough so that customer can see the interactive and integrate version frequently.
4.) Business people and developers must work
together daily throughout the project — Team, Scrum Master, Product Owner and Client should closely work with each other so that Client can intimate the changes as soon as possible and (Team, Scrum Master) can adopt the changes quickly.
5.) Build projects around motivated individuals.
Give them the environment and support they need,
and trust them to get the job done — Team should comprise of Enthusiastic person so that they pro actively develop the application and Scrum Master, Product Owner and Client should support the team to get necessary tools, frameworks which can increase the productivity and efficiency of the team.
6.) The most efficient and effective method of
conveying information to and within a development
team is face-to-face conversation — Workshops , Interviews, Daily Scrum Calls and Video Chats between Team, Scrum Master, Product Owner and Client helps us understand the product and it’s outcome better.
7.) Working software is the primary measure of progress — Measurement unit is considered to be delivered user stories to the client with acceptance criteria.
8.) Agile processes promote sustainable development.
The sponsors, developers, and users should be able
to maintain a constant pace indefinitely.
9.) Continuous attention to technical excellence of the Team, Scrum Master, Product Owner and good design enhances agility.
10.) Simplicity — the art of maximizing the amount
of work not done — is essential.
11.) Self-organizing teams — The best architectures, requirements, and designs emerge from self-organizing teams.
12.) At regular intervals, the team reflects on how
to become more effective, then tunes and adjusts
its behavior accordingly.
Individuals and interactions over processes and tools
Working software over comprehensive documentation
Customer collaboration over contract negotiation
Responding to change over following a plan

Principles behind the Agile Manifesto was originally published in DXSYS on Medium, where people are continuing the conversation by highlighting and responding to this story.
June 11, 2019
Build the twelve factor Application with Docker
In this article we will go thought the concepts of twelve factor application and we would learn how to setup full software development process as well as dockerize the application. The website 12factor.net explains the concepts of the twelve-factor app.
Website (12factor.net) explains the concepts of the 12-Factor App.
Article will take you thought the revision control system and managing the config and dependencies of your application and teach you the DevOps of your application with Nginx and Docker.
Objectives
Setup proper version control techniques.Managing configuring within the environment.Setting up proper build/deploy/run processes.Docker best practices.Scale the dockerize application.Let’s start with GIT flow as a Reliable Version Control Model, you can read this article from here.
Manage Configuration Values with Environment VariablesIn this section, let’s create a simple Node.js script that connects to a locally running MongoDB instance. We’ll install the MongoDB module with Yarn, and then start our script with Node. We will see that we can successfully connect to our MongoDB instance.
configuration doesn’t allow for the connection string to be changed on the fly. Moving configuration values into environment variables has many benefits. Environment variables are referenced by process.env, followed by the name of our environment variable in caps. In this case, we’ll name it Mongo_URI.
https://medium.com/media/ad69e74aa26e37207591687aff5954de/hrefProxy Requests for Local and Remote Service ParityIn this section we will setup a reverse proxy that directs image path requests and routes them through a defined server URL. By doing so, we decouple server requests for images which allows for easy switching from locally-served image assets to a CDN by simply updating an environment variable.
We have an Express app that serves up a simple request of an image of Docker+Node. Let’s set up a proxy for our /images path. Route requests through a content delivery network dependent on a specified URL.
BASE_IMAGE_URL=https://d262ilb51hltx0.cloudfront.net/max/1600/1*_MtS4HqN2srTcrSyet61DQ.jpeg
https://medium.com/media/8a96762a758e35cfd331ff238e5afbb8/hrefBuild, Release and Run Containers with Docker ComposeIn this section we will cover proper version tagging when building Docker images, creating a docker-compose.yml file for proper release management, and running the tagged release by using Docker Compose to launch app resources as Docker containers.
Once you have written the Docker file, you can create an executable bundle of your app with the docker build command. This will pull in your app dependencies, and compile binaries and assets into a process that can later be ran as a tagged release.
Type docker build, then a -t. which follows is the repo name for the build, which is typically the vendor name, followed by a slash, then the app name. That said, it can also be an arbitrary value. After the repo name is a colon, followed by the tag reversion number. (e.g repo/application:1.0)
docker build -t repo/application:1.0.
It may take a few moments to run the build process, depending on the size of your base image, install time of dependencies, and asset size and number files being copied to the bundle. After the bundle has been built, we will use docker compose to run our build.
docker-compose up -d app
Create a file named docker-compose.yaml. This will contain your release configuration. Here’s a simple config for our Node.js app. The most important takeaway here is the image property, which should reference the specific tag of the image we just built.
This config file, when combined with our tag build, creates our release. Note that we can also define other aspects relating to this release in our config file, such as setting environment variables. After saving this file, we should use version control to commit this release.
Before committing, ensure you have both .dockerignore and .gitignore that are set to ignore the .env file in the Node modules directory. Let’s add all the files to Git, then commit the release.
We can confirm the containers are running by typing docker ps, and follow the log output by running docker logs -f foo_app_1. Upon opening a web browser to the URL localhost:8080.
docker psRun Stateless Docker Containers
docker logs -f buildreleaseandruncontainerswithdockercompose_app_1
Before starting with new images we will kill the previous container.
1.) Check the running containers
docker ps
2.) Kill the docker images
docker kill
.3.) We will remove the previous containers
docker-compose rm -f
Docker containers should be designed to be stateless, meaning that they can survive system reboots and container terminations gracefully, and without the loss of data. Designing with stateless containers in mind will also help your app grow and make future horizontal scaling trivial.
we will review an app that saves uploaded files to the filesystem. Then we will learn how to setup a persistent volume for the uploaded files so they can survive Docker container halts, restarts, stops and respawns.
The Docker file for this app is simple. We are simply setting up our current working directory, copying over assets, making an uploads directory, running Yarn to install prerequisites, exposing port 8080, and then starting our web server.
https://medium.com/media/edcb4652135d36eafced55da47c32fcb/hrefWe are using Docker compose to run our containers. For our main app service, we will simply build our app from the local directory’s Docker file, and also bind port 8080 from the app to the host. We will start our app up with docker-compose up. Let’s test out the file upload functionality by uploading an image.
We can see that Image is successfully uploaded to the uploads folder, but we have a small problem here. Let’s stop our app, remove our containers, and start our app back up. Then let’s refresh our browser window.
Uploaded Images did in fact die when our container died. This shows that Docker’s file system is ephemeral, and that we need to design systems that can persist container terminations.
Let’s name this App Data. Make sure to suffix the name with a colon. Next, let’s go into our app servers and add a volumes property. Since there can be many volumes set up, we prefix our volumes entries with a dash.
Then we specify the name of the volume we want to use, in this case, App Data. Let’s precede that with a colon, and then specify a folder to be persistent, in this case, /serv/uploads. When the container starts, this volume path will be mounted from our volume into the container at this directory.
https://medium.com/media/75c3a307f56b792acfcd3be0b656f063/hrefThis is enough to persist data between container deletions and respawns. Let’s remove our current app containers to ensure we are running from a clean state, then start our app again with compose.
Scale Docker Horizontally with Nginx Load BalancingNode.js apps built with Docker cannot scale horizontally by themselves. In this lesson we will spawn out multiple Node.js processes/containers, and move the incoming request handler to an Nginx proxy to load balance and properly scale our Node.js app.
Let’s make a directory called nodejs that contains our app files. Within that, we will create a simple Node.js app that responds, “Hello world from server,” followed by the name of our server, which will define from an environment variable.
Let’s then create a Docker file that simply kicks off our Node.js process. Then we will build our app image with “docker build -t app-nodejs .”. Let’s start two Node.js processes. We’ll start the first server with a server name of foo, and a name we can reference later, foo.
docker run -d -e “SERVER_NAME=foo” — name=foo app-nodejs
We’ll do something similar with our second server, but with the name bar for both. Note that Nginx will be handling our external requests, so we do not need to bind any ports of the app containers back to the host.
docker run -d -e “SERVER_NAME=bar” — name=bar app-nodejs

Our containers will only be accessible from other Docker containers. Since these containers will not be directly accessible by a public network, this will also add an additional level of security to our app. Let’s create a new Nginx directory in the root of our project and enter it.
In this directory, we will create a new file to contain our Nginx configuration, named Nginx.conf. The purpose of our Nginx process is to load balance requests to our Node.js processes. Let’s create a server block with a location block underneath, preceded with a slash.
Within this block, define a proxy_pass directive, followed by http://, followed by any arbitrary value. We’ll use app here, followed by a semicolon. What we’re telling Nginx to do here is to listen at the root path of our web server, and pass all requests through a proxy named app.
Let’s go ahead and define that proxy. Create a new upstream block, followed by the name of our proxy, app. Next, we will follow it with a line started with server, followed by the name of our first server, foo, and the default port, 8000.
We will repeat the line again, but this time with the bar server. The upstream block we define here tells Nginx which server to proxy requests to. We can define as many lines here as we want. Nginx will treat requests defined within this group with a round robin balancing method. You can even define weights on the servers with the weight option.
Next, let’s create an Nginx Docker image that just copies over our nginx.com file to the default configuration file location. Let’s build this image, and name it app-nginx. The final step is to start our Nginx container, and map port 8080 on the host to port 80 on the container.
https://medium.com/media/b7c719aa37fe677fc632daac14463662/hrefdocker build -t app-nginx .
docker run -d -p 8080:80 — link foo — link bar app-nginx

We will then use the link directive to link our foo and bar servers, making them accessible within the container. If we use curl to hit our Nginx server on port 8080, we will see that Nginx is properly routing requests to our foo and bar Node.js servers in a round robin fashion.

 Ensure Containers Run with High-Availability
A properly scaled Docker architecture should be able to kill off random containers at any time, and continue to run by implementing a crash-only design methodology. We will learn how to setup our architecture to auto-spawn new Docker containers when other containers are deemed unhealthy or in a terminated state. We will also learn how to scale containers easily with Compose in the event we need to quickly scale horizontally.
Best way to ensure high availability with your containers is to use docker-compose.
Create a docker-compose YAML file, and we will define a simple configuration for our Hello, World! App. Make sure to add a restart flag with the value of Always to your configuration. Next, we can easily scale this app with docker-compose up followed by the scale flag. Let’s tell compose to start Hello, World! With three instances. We will see that there are still three containers available and always restarting.
https://medium.com/media/458ee1f1f540dd5196fff79134d08013/hrefdocker-compose up --scale helloword=3Pipe Log Output to STDOUT with Docker
Since Docker filesystems are ephemeral, it’s important to take into account anything that writes or appends to disk, such as log files. It is standard practice when running Docker containers to pipe log file output to the console, to allow for simple diagnostic and to avoid append-only files from consuming disk space.
In this section, we’ll show you how to append output to STDOUT, and how to view log output from your running containers. In this case, we will write all calls to console.log to a file named debug.log. If we run this script for a few moments and then check the output of debug.log, we will see that the script is running and correctly writing to debug.log.
https://medium.com/media/b53cbfb1a687b3b941b63c464f11261c/hrefWhat we will do here is use ln -sf to create a symlink to /dev/standardout from our debug.log file. This simple line will take whatever would normally be written to our debug.log file and pipe it right to standard out.
https://medium.com/media/eb7398e70adbcd92456e055271e7eced/hrefBuild image
docker build -t logapp .
Run image in Daemon mode.
docker run -d — name=logapp logapp
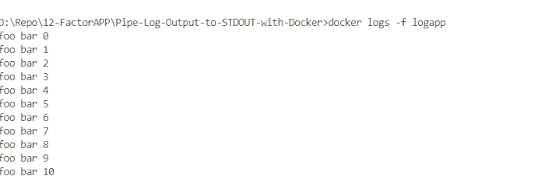
docker exec -it logapp cat /debug.logConclusion
And that’s a wrap on 12 Factor application. I hope you found this useful. I’ll hopefully post a series of Docker articles that provide deep dives into some of these components.
Thanks for reading. Did this article help you in any way? If it did, I hope you consider sharing it. You might help someone out. Thank you!

Build the twelve factor Application with Docker was originally published in DXSYS on Medium, where people are continuing the conversation by highlighting and responding to this story.
May 8, 2019
Git — Git Flow a efficient and productive way of version control
Git flow is a branching model for Git, well suited for scaling a development team. One can go-though GitHub flow pattern as well. let’s get started with gitflow.
Main BranchesMaster branch contains the latest production code that has been deployed, and versioned with appropriate tags for each release.
Develop (develope) branch that gets branched off master and contains the latest code for the next feature that is being developed. For each new feature there might be lots of feature branches (always branched off the “develop” branch).
Beside the main branches, there are supporting branches also.
 Supporting Branches
Feature branches contain the development state for a single feature of the overall product (i.e. a user story). They are merged off the develop branch.we will merge feature back to develop when we definitely want to add the new feature to the upcoming release, if the feature is unstable or incomplete do not merge feature in to develop branch.we will delete feature branches when they are finished.
Release branch is a branch for preparing the next release. No new features will be developed on this branch but rather it contains some last fixes (also bugfixes) and adjustments for going into production.we should merged release branch into master.we should delete release branch after merging.
Hotfix branches are branches for quick and severe bugfixes. they are usually branched off the master branch, fixed in the hotfix branch and then merged back in master and develop as well.Do bug fixing in hotfix branch, bug fixes may be continuously merged back into the develop branch to origin/master.If release branch exists then, we should merge the hotfix to release branch, first.Production branch
let’s see production oriented branching strategy
master branch which contains the actual development code (corresponds to the “develop” branch in the git-flow model)
production branch contains the deployed code.Decentralized but centralized
Each developer pulls and pushes to origin but besides the centralized push-pull relationships, each developer may also pull changes from other peers to form sub teams. For example, this might be useful to work together with two or more developers on a big new feature, before pushing the work in progress to origin. There are subteams of Sourabh and Rohit, Sourabh and Gaurav, and Maria and Gaurav. Technically, this means nothing more than that Sourabh has defined a Git remote, named Rohit, pointing to Rohit’s repository, and vice versa.
Let’s start with creating new repository with a master branch and no commits by default. We would create new readme.md file, add it to a repo, and commit it. We would also add a remote origin from GitHub and push our initial commit upstream.
git init init
initgit config — global user.email “sourabhhsethii@linux.com”ADD README to Repository and Commit
git config — global user.name “Sourabh Sethi”
D:\Repo\github\README>type nul > README.MD
git add README
git commit -m “Initial commit”
 git commit -m “Initial commit”
We would add a remote origin from GitHub and push our initial commit upstream.
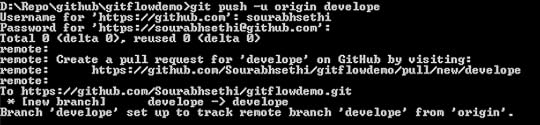
git remote add origin https://github.com/Sourabhsethi/gitfl...
git push -u origin master
 push to masterCreate the Develope branch
Now we will create the develope branch always contains completed features and fixes. Therefore, it is considered the working tree for our source repository.
git checkout -b develope
 create develope branch
git push -u origin develope
 push develope branch
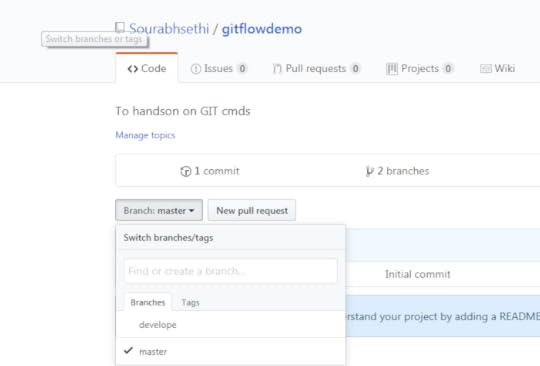 develpe branchCreated the feature branch — feature/gitflowdemo
Now all new development is built within a feature branch. Feature branches are always branched off of the develope branch and prefixed with a feature slash. All work within this feature is now completed within the feature/gitflowdemo branch.
git checkout -b feature/gitflowdemo develope
git push -u origin feature/gitflowdemo

Lets add feature.js in feature/gitflowdemo branch
type nul > feature.js
git add feature.js
git commit -m “New feature file added to feature branch”
 Created the another feature branch-feature/gitflowdemoUI
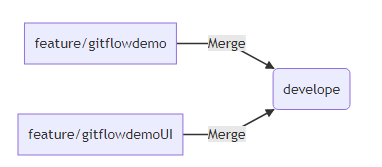
Let’s create another feature, this time named feature/gitflowdemoUI. Keeping feature branches separate keeps all commits related to a specific task or feature isolated. When you’re complete with your feature, it is merged back into the develop branch. This is usually accomplished with a pull request so it can pass through a proper code review by another peer, but for now, we will just merge this feature back into the develop manually. It is a good idea to do a Git pull on the develop branch often to refresh your local working tree from the remote origin.
git checkout -b feature/gitflowdemoUI develope
git push -u origin feature/gitflowdemoUI
Lets add featureUI.js in feature/gitflowdemoUI branch
type nul > featureUI.js
git add featureUI.js
git commit -m “New featureUI.js file added to feature/gitflowdemoUI branch”

You will want to rebase your branch from develop if you believe updates from a remote origin could potentially cause conflicts with your changes or if you just wanted to pull down the latest updates from develop.
If you check the log of the feature/gitflowdemoUI branch, you will see that this branch has just the new featureUI.js file. Let’s rebase from develop. This will rewind your feature/gitflowdemo branch, apply the updates from develop, and then replay your commits on top of the last commit. We can verify this by checking the logs again and see that the new feature.js file has been placed before our new featureUI.js file commit.
Let’s go ahead and merge our feature/gitflowdemoUI branch into develop and then push it upstream. It looks like our code is now ready for release, so we will create a new release branch.
 merge feature branches to develope
git merge feature/gitflowdemoUI
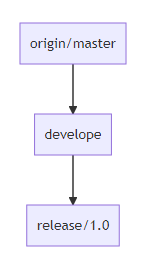
Every release branch contains the release version, in this case, 1.0 Since the release is in its own branch, we don’t have to worry about updates from develop conflicting with a specific release. We can now push this upstream and deploy the code to a staging environment for testing.
 Merge feature branches to develope
git checkout -b release/1.0 develope
git push -u release/1.0
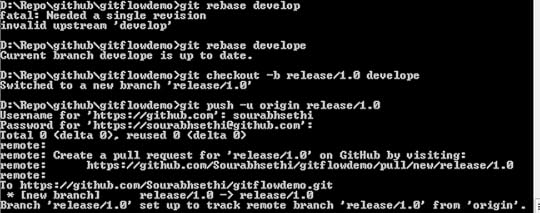 release/1.0
We’ll push the release repository upstream and repeat the process until our release branch has passed into a testing phase on staging and is ready to be released to production. When the updates to this release will complete, the release branch is merged back into develop as we want to make sure any updates or bug fixes that were applied in our release testing are merged back into the working tree.
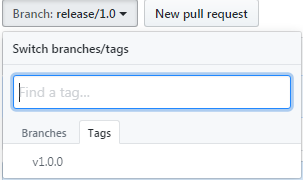
Merge release to origin/master and Tag the releaseSince the code in the release branch is fully tested and ready to be released to production, we also want to merge it into our master branch which should only ever contain production ready code. Then we tag the release. We can then push the tag upstream and then use that tag to deploy our code to production.
 merge release branch into master and tag it after production release
git checkout master
git merge release/1.0
git tag v1.0.0
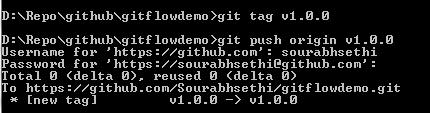 git push origin v1.0.0
git push origin v1.0.0
 Hot fixes branches
Hot fixes are intended only for emergency fixes and follow a similar format to feature branches, prefixed with a hot fix slash. we would create hotfix branch from master. We then merge the hot fix back in the master. Then tag and push our new release. We also want the hot fix to be applied back into our develop branch so it’s not lost with the future updates.
The master branch tracks released code only. The only commits to master are merges from release branches and hotfix branches.

git checkout -b hotfix/fix master
git checkout master
git merge hotfix/fix
git tag v1.0.1
git push origin v1.0.1
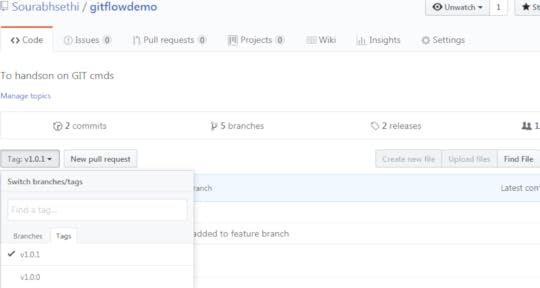 TAG v1.0.1
When releases are complete, it’s usually good practice to delete all previously merged in branches. If we’re following a pull request model, you can remove these at the time of the merger pull request acceptance. Otherwise, you can just manually remove these branches locally and remotely.
git branch -d feature/gitflowdemo
git branch -d feature/gitflowdemoUIGit Cheatsheet is avaliable here Conclusion: I hope this article would help you to understand gitflow model.
Happy coding!

April 1, 2019
Angular Elements
In this lesson we’re going to transform an Angular component into an Angular Element and we would dynamically insert it into the HTML by using the innerHTML property of a DOM element.

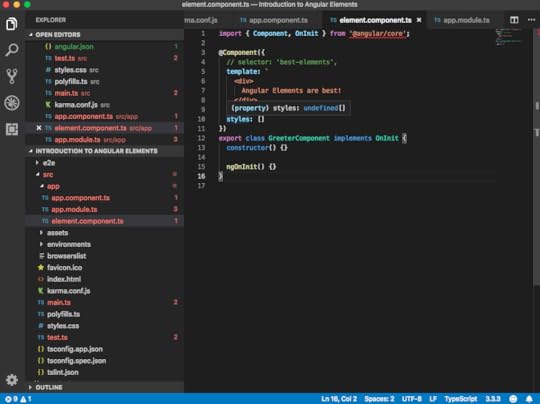
we have a simple greeter component which does nothing else than printing out, “Angular Elements are best!” I then reference this one here in my app component, as you can see here, by using the best-elements tag. That’s why we see here in our browser “Angular Elements are best!” printed out.
element.component.ts
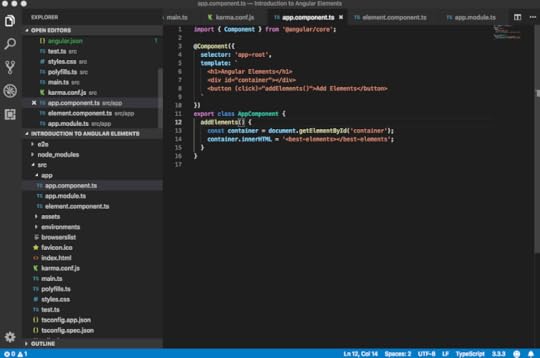
app.component.ts
Assume we want to insert this tag in a much more dynamic fashion. Let’s create here a simple container, which is nothing else than a div. Let’s also create a button. Whenever I click that button, I want to insert that best element tag. Let’s create here a method, addElements(), inside our app component.
Here, we simulate that dynamic insertion by simply leveraging some browser APIs. I am having here an instance of my container by using the document.getElementById. On that container, I am using the innerHTML. I’m inserting here my best-elements tag.
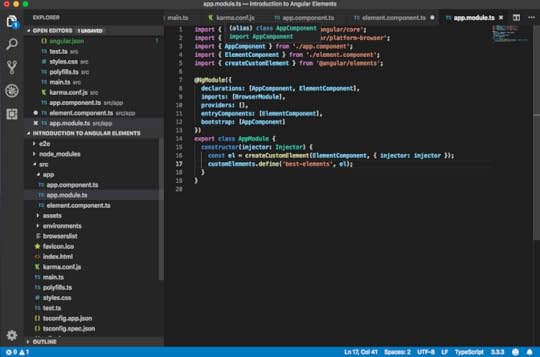
app.module.ts
Let’s see how to leverage Angular Elements to achieve just that. First of all, we need to install the Angular Elements. We can do that by the ng add command.
Once the installation is done, we can go to the package.json and inspect what has been inserted by the Angular add command. Here, we see the Angular Elements library, which has been added to our package.json. You might have different versions here, depending on the Angular version you are currently using. Also inserted here a document-register-element polyfill.
In the constructor of our app module, we create here an element. Then we import the createCustomElement function from the Angular Elements package we just installed. Now, we can directly use that below here.
Make sure ElementComponent is added in declarations and entryComponents.
@NgModule({
declarations: [AppComponent, ElementComponent],
imports: [BrowserModule],
providers: [],
entryComponents: [ElementComponent],
bootstrap: [AppComponent]
})
export class AppModule {
constructor(injector: Injector) {
const el = createCustomElement(ElementComponent, { injector: injector });
customElements.define(‘best-elements’, el);
}
}
We pass here the type of our element component, as well as we have to give it the injector which it will use internally for resolving the dependencies via the dependencies injector. In order to be able to pass it in, we need to also get it here in our constructor. We can say something like “injector = injector.” We auto-import that here from angular/core. We can just pass it along like this.
 Conclusion
One can look the code from here, This enables us to write re-usable Angular components & widgets which we can use inside React, Vue, Preact or even with vanilla JS apps. The Angular Elements will blend in every framework.
Code available on GitHub!


