Sourabhh Sethii's Blog, page 2
June 21, 2020
H2 — Angular HTTP in Depth : Retry Failed, Set Http Headers
We welcome you all to the second article of this series Angular HTTP in Depth. Here we will be looking in Retry Failed HTTP Cases along with setting and reading custom HTTP Headers using HttpClientModule.

When the connection with the backend fails, before giving the user a negative response, it might be worth trying to automatically recover from the error. In some cases, that can be as simple as retrying to issue the request again.
The Angular HttpClient works well with RxJS we can apply some of its operators to make this happen, such as retry, retryWhen and delay.
So here we have a simple app component, which internally gets account service injected. Here we have a sendAccountDetailsPostParamsHandled function, which gets triggered whenever someone clicks that button here which then invokes on the account service that fetch people function. Internally here, we can see that an HTTP call gets made with that HTTP client, which comes from the Angular common HTTP package.
As you can see here, I on purpose commanded out here a working URL and replaced it with one which fails. So whenever I click the button, we can see we get a 404 status code and some error message gets printed out here.
Lets look into the example given below
sendAccountDetailsPostParamsHandled(): Observable {const newAccount = {name: 'Sourabh'};return this.http.post('/assets/data/account.json?', newAccount)// tslint:disable-next-line: align.pipe(retryWhen(err => {let retires = 3;return err.pipe(delay(1000))// tslint:disable-next-line: no-shadowed-variable.pipe(mergeMap((err: any) => {if ( retires-- > 0){return of(err);// tslint:disable-next-line: align} else {return throwError(err);}}));}));}So what we could try instead is to simply introduce a delay, so only retry it after you’ve maybe an incrementing amount of time. Instead of the retry operator, we could use the retry when operator which gives us here a parameter. Then here we can specify the number of retries, which let’s say is three, and then return here the observable to not interrupt the chain.
We introduce here a delay, let’s say one second just to make it more visible. Then we again get here merge Map and say whenever that retries when its minus is bigger than zero, we return the observable of that value. So we simply continue basically that chain, the repetitions. We’re never below our retries. So when retries are finished, we say observable.throw of that value, because we want to throw the error and interrupt that repetition chain.
Now we need to add some imports here for RXJS.
import { retryWhen, delay } from ‘rxjs/operators’;
import { of, throwError } from ‘rxjs’;
import {mergeMap} from ‘rxjs/operators’;Set Metadata in HTTP Headers with Angular HttpHeaders
In this section we learn how to leverage Angular’s HttpClient to set such headers.
Now in many cases, we also need to send some HTTP header. For instance, if we inspect here the call that gets made, we can see that there is a header section. Basically here, we have the general effect where the URL is displayed. Then we have the response headers which come back from the server.
We are especially interested here in the request headers, which get sent to the server. One simple example could be to submit, for instance, the current language of the user. With the new HTTP client, which here it resides in the Angular common HTTP package, this is quite easy.
We can simply here pass a second parameter. Now we need to import here the HTTP header type, and then on the object here, we can specify the headers property, instantiate here a new HTTP headers object, and set the header which we want.
import { HttpClient, HttpParams, HttpHeaders, HttpResponse } from '@angular/common/http';For instance, let’s call this app language. As a value, I pass simply a string, which is in this case is Anguar.
Now if this header is something you want to send for each request that is being executed against the server, you might think of moving this part here into an interceptor.
fetchAccount(): Observable {return this.http.get('/assets/data/account.json', {headers : new HttpHeaders().set('Language', 'Angular')});}Read Custom HTTP Headers Sent by the Server in AngularWhat if we are interested in actually some custom headers which our response gives us back? For instance, in this example here, in the response headers here after we request, you can see there is the my custom header. I would like to read that header out.
In order to do so, I have to change basically the call here because the account itself only contains the raw data coming from the response body. I’m interested also in the header values in this case. To do so, we can specify here so-called observe value.
sendAccountDetails(): Observable> {return this.http.get('/assets/data/account.json?queryparamTest=123',{ observe : 'response'});}The observe value specifies what we are currently interested in observing and therefore also changes here the response type of our HTTP request. We could have here different kind of values, for instance, events when you are interested in HTTP events. We would get here an observable of an HTTP event.
In our case, we are interested in the response specifically. According to here we get now an HTTP response of type account . We need to import that from the common HTTP package. We can now go to our app component here. Let’s Console log what comes back from data.
If I execute request, you can see now we have a series of properties here which is our response object actually that gets printed here out on our UI. Now, to retrieve our custom header, what we can do here is to access the header property. Then we use the get method and specify here my custom header which is the header name I specified on the server side.
Again, executing here the request and then looking here in response headers, I can see that my custom header gets back again. Here also now on the Console, we get Angular rocks printed out which is actually the value of that my custom header.
sendDetails(){this.accounts = this.accoutService.sendAccountDetails().subscribe((data) => {console.log(data);this.response = data;this.accounts = data.body;this.message = '';});}Reference Code is available below.
Sourabhhsethii/Angular-HTTP-In-Depth

H2 — Angular HTTP in Depth : Retry Failed, Set Http Headers was originally published in DXSYS on Medium, where people are continuing the conversation by highlighting and responding to this story.


May 25, 2020
H1 — Angular HTTP in Depth : Fetch-Data, Send-Data, Handle-Http-Error
Let us start with new article series Angular HTTP in Depth. Here we will be looking Http in detail such as fetching data, sending data, handle http errors, failed request, set http request, read custom http headers, fetch non json data, applying http checking, listen to progress events, interceptor and mocking http request etc.
We will look below topics in this article.
1.) Fetch data from an API using the HttpClient
2.) Send data via HTTP
3.) Handling HTTP Error.
 Angular-HTTP-In-Depth
Create Project — You can create angular project or to know more about it, you can check the Angular Article Series. Click Here.
Create Component — To know more about it. Click Here.
Create Services — To know more about it. Click Here.
Repository For this Article Series Available at below locationClick Here Redirect to GitHub Repository.
So I have here a very simple application.You can clone above repository on you machine and run the application.
Fetch data from an API using the HttpClientFrom > 4.3.1 angular/common library , HttpClientModule is available.
Step 1.) import HttpClientModule
Import this module in import array of the AppModule as shown below.
https://medium.com/media/1b7e5d100cb5c1583eac67267bd72137/hrefimport {HttpClientModule} from ‘@angular/common/http’;imports: [ BrowserModule, AppRoutingModule, HttpClientModule ],Step 2.) Create a services for Account.
I am taking the example of accounts here so I have create the service for Account. As Shown below e.g. AccountService.
https://medium.com/media/f9ce72eb2d74a8cbbc4de863812b582e/hrefFetch Account method will be resopsible to get data from ‘/assets/data/account.json’ as shown below. we have used HttpClient as injected in constructor as http private object of HttpClient and used this http object with get method to do a service call to ‘/assets/data/account.json’
‘/assets/data/account.json’ — Mock JSON File available in project folder.fetchAccount(): Observable {return this.http.get(‘/assets/data/account.json’);}
Step 3.) Access Account services in AppComponent.
We will create a function to access the fetchAccount Service available in AccountService before that we need to inject AccoutService in constructor accessed by accoutService private object. With this accoutService object we can access and subscribe the functions available in Account Service.
fetchAccount(){this.accoutService.fetchAccount().subscribe((data) => {this.accounts = data;this.message = ‘’;});}After fetching data, we can give it to account variable , which will be further accessed in template as shown below.
{{account.Name}} — {{account.Account}}Finally, we learned how to fetch data and do a simple service call using services.In next section we will look into sending data using POST Request.
Send Data via HTTPWe can do POST request and send the data with HttpClient by accessing POST method as shown below. I have added POST param { ‘name’ : ‘Sourabh’ } and accessing the dummy path ’ /assets/data/account.json?’ .
POST method have two parameters, first will contain the URL path and second will contain the POST Parameter object.
sendAccountDetailsPostParamsHandled(): Observable {const newAccount = {name: ‘Sourabh’};return this.http.post(‘/assets/data/account.json?’, newAccount);}Access this services into app component using service object ‘this.accoutService.sendAccountDetailsPostParamsHandled’;
While subscribing service, So when the first parameter here is being invoked in the case of success, the second parameter gets invoked whenever an error happens.
sendDetailsPostParams(){this.accounts = this.accoutService.sendAccountDetailsPostParamsHandled().subscribe((data) => {this.accounts = data;},(error: HttpErrorResponse) => {if (error instanceof Error){this.message = `An error Occured ${error.error.message}`;} else {this.message = `Backend Returend Error code ${error.status}, body was : ${error.message}`;}});}Handle HTTP ErrorWe can do handle error handing using HttpErrorResponse. Here we get an HTTP error response which we should here import from the Angular common HTTP package. Then we implement here that callback. Here we can say whenever basically that error is an instance of error, the error object, then this is a client side error.
We obviously want to display something to the user. Let’s say we have a local variable message. Here we basically say, “An error occurred.” We can also include some more information from that error object which we can access here via that error.error object and the message property.
If we open up the network panel here of Chrome, we obviously can see how the requests gets executed to the server, and the server returns us a 404 status code which means not found.
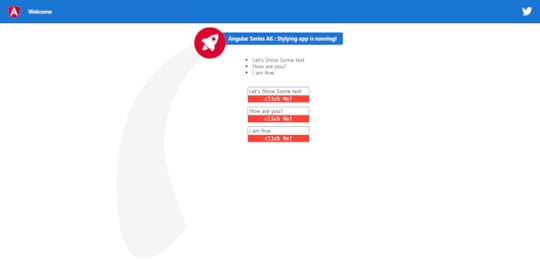
Output ScreenYou can click on buttons and open the network window and check the service calls as highlighted in yellow.
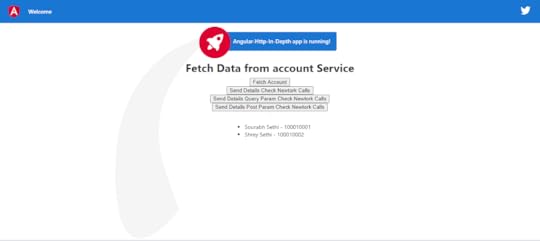 Click On Buttons
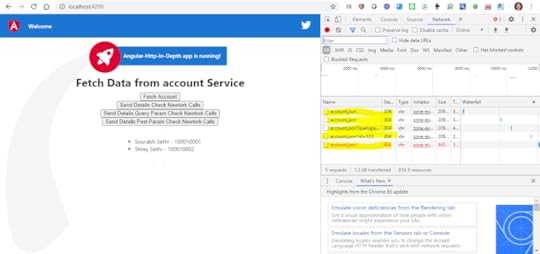
Conclusion :
We have learned to use HttpClient using HttpClientModule to do HTTP calls to fetch data and send data with error handling.

H1 — Angular HTTP in Depth : Fetch-Data, Send-Data, Handle-Http-Error was originally published in DXSYS on Medium, where people are continuing the conversation by highlighting and responding to this story.
May 22, 2020
A7 — Angular-Series: Angular Building Blocks
DXSYS, welcome you all to the last article of this series. We have till now have gone thought all basic and major concepts of this Angular Series. Let’s look into some essential topic which will help us to understand Angular Building Blocks.
we will look into below topics in this article
1) Angular Building Blocks
2) Angular Bootstrapping
3) Component Meta Data
4) Change Detection

So Finally , I will disclose in this article, I like Angular more than any other web development framework because of it’s endless capabilities. I hope you all liked and enjoyed this article series as I did when I am writing this series.
Angular Building BlockNgModules: Declares a compilation context for a set of components that is dedicated to an application domain, a workflow, or a related set of capabilities as shown in below code example.
Components: Defines a class that contains application data and logic and works with an HTML template that defines a view.
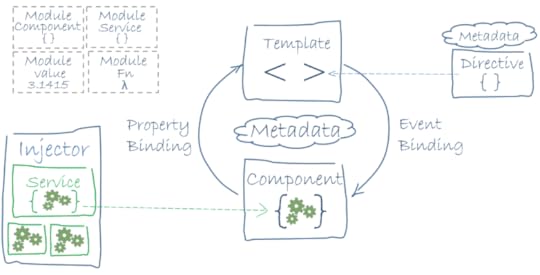
Template: Combines HTML with Angular markup that can modify HTML elements before they’re displayed.
Directive: Attaches custom behavior to elements in the DOM.
Two-way data binding: Coordinates the parts of a template with the parts of a component.
Services: Typically, a class used to increase modularity and reusability with a narrow and well-defined purpose.
Dependency injection: Provides components with needed services and gives access to a service class.
Routing: Defines a navigation path among the different application states lets you view application hierarchies. I will be coming with articles series on Angular Routing in depth.
NGMODULES
You’ll find that that the NgModule , since it’s a class that is marked by the @NgModule decorator.This decorator had the information on how to compile a component’s template and how to create an injector at runtime, all within a metadata object. @NgModule serves to identify and bridge the gap between both its own directives, components, and pipes, and external components. @NgModule also adds services providers to the application dependency injectors, foundation-ally making the application more adaptable.
https://medium.com/media/c34f134f5f262bf15b87078c8e29b818/hrefAngular Bootstrapping
NgModule describes how an application’s parts are to work and fit together, it makes sense that every Angular application has at least one Angular module. This core module functions as the “root” module for the application, and the one that you would bootstrap to launch the application.
DECLARATIONS ARRAY
Components used in an NgModule need to be added to the declarations array as a way to tell Angular that these specific components belong to this specific module. Declarations array, you’ll find that the array will be populated with various components, directives, and pipes.
IMPORTS ARRAY
The Imports array contains all dependent modules as shown in above example.
PROVIDERS ARRAY
The Providers array contains all Services dependencies as shown in above example.
Components
In Angular applications, A component consists of the following parts:
1. A TypeScript class called the Component class
2. An HTML file called the template of the component
3. An optional CSS file for the styling of the component
A component is a type of directive with its own template. Whatever you see in an Angular application is a component.
Components Metadata
The @Component decorator decorates a class as a component. It is a function that takes an object as a parameter. In the @Component decorator, we can set the values of different properties to set the behavior of the component. The most used properties are as follows:
• template
• templateUrl
• Providers
• styles
• styleUrls
• selector
• encapsulation
• changeDetection
• animations
• viewProviders
TEMPLATE AND TEMPLATEURL
A template is the part of the component that gets rendered on the page. We can create a template in two ways:
1. Inline template: template property
2. Template in an external file: templateUrl property
To create an inline template. A single-line inline template can be created using either single quotes or double quotes. For the inline template, set the value of template property.
SELECTOR
A component can be used using the selector. In the above example, the selector property is set to . We can use the component on the template of other components using its selector.
STYLES AND STYLEURLS
A component can have its own styles or it can refer to various other external style sheets. To work with styles, @Component metadata has styles and styleUrls properties. We can create inline styles by setting the value of the styles property. We can set external style using styleUrls property.
PROVIDERS
To inject a service in a component, you pass that to the providers array. Component metadata has an array type property called the provider. In the providers, we pass a list of services being injected in the component. We will cover this in detail in further sections.
CHANGE DETECTION
This property determines how the change detector will work for the component. We set the ChangeDetectionStrategy of the component in the property. There are two possible values:
1. Default
2. onPush
Change Detection means updating the DOM whenever data is changed. Angular provides two strategies for Change Detection.
In its default strategy, whenever any data is mutated or changed, Angular will run the change detector to update the DOM. In the onPush strategy, Angular will only run the change detector when a new reference is passed to @Input() data.To update the DOM with updated data, Angular provides its own change detector to each component, which is responsible for detecting change and updating the DOM. I will write another article on this in detail and in depth.
I would like to thank you all and congratulate on completing these Angular article series where we have covered basic concepts. I hope this series will help you to take another level of your career.
We will be starting with new articles series on Angular in depth. Stay Tuned!
Stay Happy! Stay Healthy!Keep in touch with me on SourabhhSethii.com, You can write comments and let me know what you like about the Angular Articles Series. It would help me to come up with better approach of writing technical articles.

A7 — Angular-Series: Angular Building Blocks was originally published in DXSYS on Medium, where people are continuing the conversation by highlighting and responding to this story.
May 21, 2020
A6 — Angular Series : Angular Component Communication, CSS-Styling
DXSYS(Digital Experiences & Systems), welcome you all to the Sixth article of angular series. Let’s recap all the concepts we have gone so far.
A1.) Create A Project — You can check article on creating the project. Click Here.
A2.) Create A Component — You can check the article on creating a component . Click Here.
A3.) Manage-Events — You can check the article on managing basic events such as click. Click Here.
A4.) Handle Events, Share Services, Dependency-Injection — You can check the article on DI, Share Services. Click Here.
A5) Dependency Injection, Input, Output, Two-way-binding — You can go through the article on DI, Two Way Binding, Input and Output field decorator.Click Here.
We will look into below topics in detail
1.) Communication between Components
2.) Writing CSS Inside Components
3.) Apply CSS Conditionally With ngclass
4.) Use Global CSS Inside
 Communication between Components
In Angular, components communication to each other to share data such as string, number, array, HTML or object. We need to understand relationship between components, first.
) Case First — when two components are not related to each other, they communicate through an Angular service. Use Services — When Two Components are not related to each other.
2. ) Case Second — When you use a component inside another component, you create a component hierarchy. The component being used inside another component is known as the child component and the enclosing component is known as the parent component.
 Use Input/Output Decorators — When there is parent child relationship between components
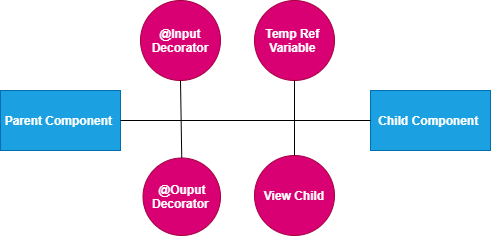
Parent and child components can communicate to each other in following ways:
• @Input()
• @Output()
• Temp Ref Variable
• ViewChild
• ContentChild
When components are not related to each other, they communicate using services. Otherwise, they communicate using one of the various options depending on the communication criteria.
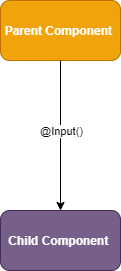 @Input Decorator
You can pass data from a parent component to a child component using the @Input decorator. Data could be of any form such as the primitive type’s string, number, object, array, etc.To understand use of @Input, let’s create a component SampleFormComponent:
https://medium.com/media/ed0e8950051a0af74b9b996706b29c53/hrefUse the SampleFormComponent component inside AppComponent.
https://medium.com/media/d952a472f20934f41cf6226e552f0a40/href [message]="message.text" (update)="onUpdate(message.id, $event.text)" >AppComponent is using SampleFormComponent, so AppComponent is the parent component and SampleFormComponent is the child component. To pass data, the @Input decorator uses the child component properties. Here, we are passing [message] property to SampleFormComponent using @Input.
Sourabhhsethii/Let-Us-Start-With-Angular
@OUTPUT
You can emit the event from the child component to the parent component using the @Output decorator.Angular is based on a one-directional data flow and does not have two-way data binding. So, we use @Output in a component to emit an event to another component. Let’s See SampleFormComponent in above example
@Output() update = new EventEmitter();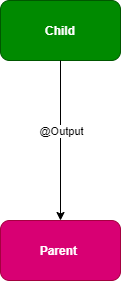
In template, onclick update is emitted which will further trigger the onUpdate function in AppComponet (Parent Component).
(click)="update.emit({text:message})"DIRECTIVES
Directives create DOM elements and change their structure orbehavior in an Angular application. There are three types of directives in Angular:
1.) Components: Directives with templates.
2.) Attribute directives: Change appearance and behavior of an
element, component, or other directive.
3.) Structural directives: Change DOM layout by adding or
removing elements.
The basic difference between a component and a directive is that a component has a template, whereas an attribute or structural directive does not have a template. Angular has provided us many inbuilt structural and attribute directives. Inbuilt structural directives are *ngFor and *ngIf. Attribute directives are NgStyle and NgModel. We will look these in depth in our next article series on Deep Dive in Angular Directives Series.
Styling Basic Angular application
Let us now look into basic styling in angular. To understand how to style in angular , you have to understand how the DOM is set up. When we write an app-sample-form-component component, in the DOM you'll see app-sample-form-component and then nested inside of it you'll see a div and then inside of that div you'll see an input and a button.
Although you might be used to writing div inside of frameworks when you build a component to represent the outer element of that component, you actually don't need to do that because this input and button will be wrapped inside of this app-sample-form-component. We can add styles here, so we'll say styles. This is an array of strings available in metadata in @Component decorator. Then I can add a style to app-sample-form-component.
styles:[ margin-bottom: 10px; ]When I do this, you won’t see anything change over here. There’s no margin-bottom applied to it. That's because our component doesn't have any display to find. Meaning that on our app-sample-form-component, which we can reference in here through :host, we need to define a display such as block or I'm going to choose flex.Once I choose a display for my component, the type of display I want it to have, now it can represent that margin-bottom and it will know how to apply it based on this display. I also want this input and the button to be on top of each other, so I'm going to choose flex-direction: column. Now these are on top of each other. you can see that inside of our component a :host will refer to our component, which in the DOM is represented by this app-sample-form-component. Outside of the component, app-sample-form-component can be selected by using the element selector of it or by giving it a class or any other traditional method of selecting it.
The other piece here I need to show is that if I want to select everything, every selector inside of my component and I wanted everything to have a font-family of monospace. In a traditional page this would select every element inside and outside of this component. It would select it across your entire app.
ngClass
While CSS has focus, active, and other things that would handle most of the Events on the dom, there are some more complex scenarios. We're going to handle those with ngClass, to conditionally apply Classes. The syntax for that is ngClass, wrapped into square brackets because we're going to evaluate the right side of this.
Remember if you don’t put the square brackets in, it just treats this as a string. We’re going to evaluate this side. We’re going to pass in an object, where the key is a name of a Class. We’re going to call this Class mouseclickedClass, and on mouseClick we're going to set the border: 3px solid yellow.
styles: [ ` :host{display : flex; flex-direction : column; } input:focus{ font-weight: bold; outline: none; } .mouseclickedClass{ border : 3px solid yellow; } button{ border: none;
} ` ]
In our ngClass, that the left-hand side or key of this is going to be called mousedown, because this Class relates to this. The right-hand side of this, so the value of this object, is going to be a true or false statement based on whether or not we want to apply this Class.
[ngClass] = “{mouseclickedClass:ismouseclicked}”Global Styles
Global CSS and stylesheets are also available to Angular Components even though the styles you define inline will remain isolated to the Component itself. You can customize this behavior using ViewEncapsulation if you need to keep global styles out of your Components.
Angular components can be styled via global CSS the same as any other element in your application. Simply drop a `` element on your page (typically in index.html) and you’re good to go! However, Angular additional gives developers more options for scoping your styles.
encapsulation: ViewEncapsulation.Emulated,selector: 'app-sample-form-component',
By default in Angular, when you attach CSS directly to a component, we scope that css exclusively to that component. This scoping isolates it from the rest of your application. This additional capability means that there are two ways to use CSS with Angular.
Modes of Component Encapsulation
1[Emulated Mode] Developers who use component-scoped CSS in Angular will default to emulated mode for this encapsulation. In emulated mode, we generate and attach random attributes to each instantiated component, and then create styles that use those generated attributes as selectors.
2[NativeMode] We also support Native mode, which will use Shadow DOM to create additional contexts and prevent cross-component leakage of styles. This will work in any browsers with support for Shadow DOM v1. Native mode creates a shadow root under each component, which will isolate the component completely, even from styles defined globally (global styles DOM pierce components with emulated view encapsulation).
3[None Mode] The third and last encapsulation you can choose is None, which means that all of your CSS ends up being globally applied. You can use this if you want to opt-out of Angular’s style encapsulation completely.
We will look styling in detail in Angular Styling Series.
Output Screen :
Code Repository will be available at below location :
Sourabhhsethii/Let-Us-Start-With-Angular
Interview Questions
Question 1.) What is angular directives?
Question 2.) How Communication Happens between Components?
Question 3.) How to Style Angular application?
Question 4.) Different Modes of Angular Component Encapsulation?

A6 — Angular Series : Angular Component Communication, CSS-Styling was originally published in DXSYS on Medium, where people are continuing the conversation by highlighting and responding to this story.
May 19, 2020
A5 — Angular Series : Dependency Injection, Input, Output, two-way-binding
DXSYS(Digital Experiences & Systems), welcome you all to Fifth article of angular series. Let’s recap all the concepts we have gone so far.
A1.) Create A Project — You can check article on creating the project. Click Here.
A2.) Create A Component — You can check the article on creating a component . Click Here.
A3.) Manage-Events — You can check the article on managing basic events such as click. Click Here.
A4.) Handle Events, Share Services, Dependency-Injection — You can check the article on DI, Share Services. Click Here.
We will look into below topics in detail
1) Dependency Injection
2) Pass Values Into Components With Input
3) [(ngModel)] Two-way Binding
4) Pass Events Components With Output
 Dependency Injection
In last article of this series, I have already introduced you with DI(Dependency Injection), Here we will look this topic more in detail. Dependency injection (DI), is an important application design pattern.
For any dependency that you need in your app, you must register a provider with the app’s injector, so that the injector can use the provider to create new instances. For a service, the provider is typically the service class itself.
@NgModule({
declarations: [ AppComponent, SampleFormComponentComponent ], imports: [ BrowserModule, AppRoutingModule, FormsModule ],
providers: [{ provide : ‘sharedservices’, useClass: SharedServiceService}, {provide: ‘sharevalue’, useValue : ‘Shared text!’}], bootstrap: [AppComponent]})
export class AppModule { }
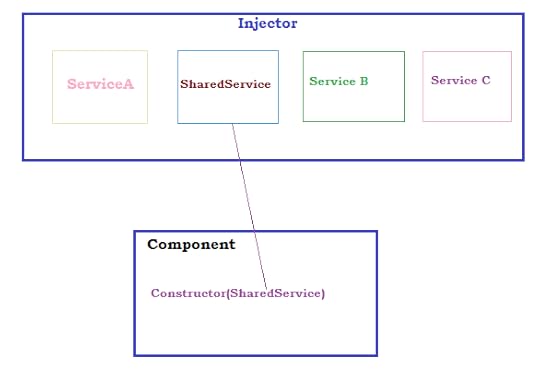
When Angular creates a new instance of a component class, it determines which services or other dependencies that component needs by looking at the constructor parameter types. For example, the constructor of SampleFormComponentComponent needs SharedServiceService as shown in below sample code.
import { Component, OnInit, Inject, Input, Output, EventEmitter, NgModule } from ‘@angular/core’;
@Component(
{ selector: ‘app-sample-form-component’, template: `{{sharedservices.message}}
{{sharevalue}} {{message}} click Me! `, styles: [ ]
})
export class SampleFormComponentComponent implements OnInit
{
@Input() message = ‘’;
@Output() update = new EventEmitter();/* the constructor of SampleFormComponentComponent needs SharedServiceService*/
constructor( @Inject(‘sharedservices’) public sharedservices, @Inject(‘sharevalue’) public sharevalue) { } ngOnInit(): void { }
}
Registering Services in Provider
The provider can be part of the service’s own metadata, making that service available everywhere, or you can register providers with specific modules or components. Three Way to register the services are as follows:
1.) You register providers in the metadata of the service (in the @Injectable() decorator),
2.) @NgModule()
3.) @Component() metadata
By default, the Angular CLI command ng generate service registers a provider with the root injector for your service by including provider metadata in the @Injectable() decorator. The tutorial uses this method to register the provider of HeroService class definition.
@Injectable({ providedIn: ‘root’, })
Registering the provider in the @Injectable() metadata also allows Angular to optimize an app by removing the service from the compiled app if it isn't used
When you register a provider with a specific module, the same instance of a service is available to all components in that NgModule. To register at this level, use the providers property of the @NgModule() decorator,
@NgModule({
declarations: [ AppComponent, SampleFormComponentComponent ], imports: [ BrowserModule, AppRoutingModule, FormsModule ],
providers: [{ provide : ‘sharedservices’, useClass: SharedServiceService}, {provide: ‘sharevalue’, useValue : ‘Shared text!’}], bootstrap: [AppComponent]})
export class AppModule { }
When you register a provider at the component level, you get a new instance of the service with each new instance of that component. At the component level, register a service provider in the providers property of the @Component() metadata.
@Component(
{ selector: ‘app-sample-form-component’,
templateUrl: ‘./app-sample-form-component.html’,
providers: [ SharedServices]
})
Services are singletons within the scope of an injector. That is, there is at most one instance of a service in a given injector.
There is only one root injector for an app. Providing UserService at the root or AppModule level means it is registered with the root injector. There is just one UserService instance in the entire app and every class that injects UserService gets this service instance unless you configure another provider with a child injector.
You learned the basics of Angular dependency injection in this article. You can register various kinds of providers, and you know how to ask for an injected object (such as a service) by adding a parameter to a constructor.
Two way bindingWe will also look two way binding in detail in this article but before that we need to understand the data binding.
DATA BINDING
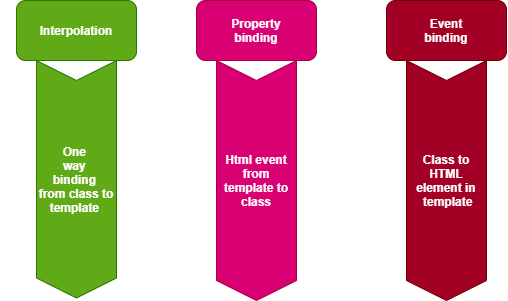
In Angular, data binding determines how data will flow in between the component class and component template.Angular provides us three types of data bindings:
1. Interpolation
2. Property binding
3. Event binding
 Data Binding
INTERPOLATION
Angular interpolation is one-way data binding. It is used to passdata from the component class to the template. The syntax of interpolation is {{propertyname}}.
In below example sharevalue and message object are binded Using interpolation, data is passed from the component class to the template. Ideally, whenever the value of the objects is changed, the template will be updated with the updated value of the object. Therefore, if you want to display data in Angular, you should use interpolation data binding.
Template: -
{{sharevalue}}
{{message}}
Component Class :-
export class SampleFormComponentComponent implements OnInit {
@Input() message = ‘’;
@Output() update = new EventEmitter();
constructor(
@Inject(‘sharedservices’) public sharedservices,
@Inject(‘sharevalue’) public sharevalue) { }
ngOnInit(): void {
}
}
PROPERTY BINDING
Angular provides you with a second type of binding called property binding. The syntax of property binding is the square bracket: []. It allows for setting the property of HTML elements on a template with the property from the component class.So, let’s say that you have a component class like the one below:
@Component({
selector: ‘app-root’,
templateUrl: ‘./app.component.html’,
styleUrls: [‘./app.component.css’]
})
export class AppComponent {
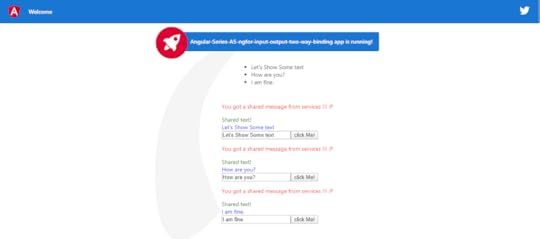
title = ‘Angular-Series-A5-ngfor-input-output-two-way-binding’;
@Output() update = new EventEmitter();
constructor(
@Inject(‘sharedservices’) public sharedservices){
}
onUpdate(id, text){
this.sharedservices.update(id, text);
}
}
Angular property binding is used to set the property of HTML elements with the properties of the component class as shown below.message.text is binded with [message].Whenever the property’s value in the component class changes, the HTML element property will be updated in the property binding.
<app-sample-form-component *ngFor=”let message of sharedservices.messageObject”
[message]=”message.text” (update)=”onUpdate(message.id, $event.text)” ></app-sample-form-component>
EVENT BINDING
Angular provides you with a third type of binding to capture events raised on templates in a component class. For instance, there’s a button on the component template that allows you to call a function in the component class. You can do this using event binding. The syntax behind event binding is (eventname). For Example above example (update). We want to call onUpdate(message.id, $event.text) function on the click of a button on the template. You can do this using event binding:
(update)=”onUpdate(message.id, $event.text)
Angular provides you these three bindings. In event binding, data flows from template to class and in property binding and interpolation, data flows from class to template.
 Bindings
Angular does not have built-in two-way data binding; however, by combining property binding and event binding, you can achieve two way data binding.Angular provides us a directive, ngModel, to achieve two-way data binding, and it’s very easy to use. First, import FormsModule, and then you can create two-way data binding:
 Two Way Binding
As you see, we are using [(ngModel)] to create two-way data binding between input control and name property. Whenever a user changes the value of the input box, the name property will be updated and vice versa.
COMPONENT COMMUNICATION
We will look into brief on component communication as well, In Angular, components communicate to each other to share data such as object, string, number, array, or HTML.
To understand component communication, first, we need to understand relationship between components. For example, when two components are not related to each other, they communicate through an Angular service.
When you use a component inside another component, you create a component hierarchy. The component being used inside another component is known as the child component and the enclosing component is known as the parent component. As shown in the image below, in context of AppComponent, app-child is a child component and AppComponent is a parent component. Parent and child components can communicate to each other infollowing ways:
• @Input()
• @Output()
• Temp Ref Variable
• ViewChild
• ContentChild
@INPUT
You can pass data from a parent component to a child component using the @Input decorator. Data could be of any form such as the primitive type’s string, number, object, array, etc.
@OUTPUT
You can emit the event from the child component to the parent component using the @Output decorator.
We will look into @INPUT and @OUTPUT in detail in next article. Stay tuned.
You can also refer Angular Documentation :
https://angular.io/guide/architecture-services
https://angular.io/guide/dependency-injection
https://angular.io/guide/template-syntax
Repository : You can clone below repository and run the application to check the demo.
Output Screen:
Interview Questions :
Question 1.) What Is DI?
Question 2.) What is Injector?
Question 3.) How services are Injected and provided to Components?
Question 4.) What is Two Way Binding and How it is achieved in angular 2 and above?
Question 5.)What is Event Binding?
Question 6.)What is Property Binding?
Question 7.)List different type of binding?
Question 8.)How communication happens between the components?

A5 — Angular Series : Dependency Injection, Input, Output, two-way-binding was originally published in DXSYS on Medium, where people are continuing the conversation by highlighting and responding to this story.
May 18, 2020
A4 -Angular Series : Handle Events, Share Services, Dependency-Injection
We welcome you all to fourth article on Angular Series, before moving forward, lets recap all the concepts we have gone thorough.
A1.) Create A Project — You can check article on creating the project. Click Here.
A2.) Create A Component — You can check the article on creating a component . Click Here.
A3.) Manage-Events — You can check the article on managing basic events such as click. Click Here.
We will look into below concepts
1.) Create angular project -> ng new Angular-Series-A4-Handle Events-Share-Services-Dependency Injection
2.) Create component in angular project -> ng generate component sample-form-component — inline-template — inline-style
3.) Create services in project -> ng g s shared-service
4.) Handle Events
5.) Structural Directives :-> *ngFor

Create Services in Project
Run Below cmd to create service.
ng g s shared-service
g = generate
s = service
shared-service = your custom service name

You can look the service file at below location:
Angular Documentation : https://angular.io/guide/architecture-services
What are services and How it is different from Components?
Services is a classes used to manage specific logic's . It should do something specific and do it well. Angular distinguishes components from services to increase modularity and reusability. By separating a component’s view-related functionality from other kinds of processing, you can make your component classes lean and efficient.
A component can delegate certain tasks to services,
such as fetching data from the server,
validating user input,
or logging directly to the console.
By defining such processing tasks in an injectable service class, you make those tasks available to any component. we can make those services available to components through dependency injection. These services can be shared with multiple components which make inter-component communication possible.
What is dependency Injection?
DI is wired into the Angular framework and used everywhere to provide new components with the services or other things they need. Components consume services; that is, you can inject a service into a component, giving the component access to that service class.
To define a class as a service in Angular, use the @Injectable() decorator to provide the metadata that allows Angular to inject it into a component as a dependency.
@Injectable({
providedIn: ‘root’
})
export class SharedServiceService {
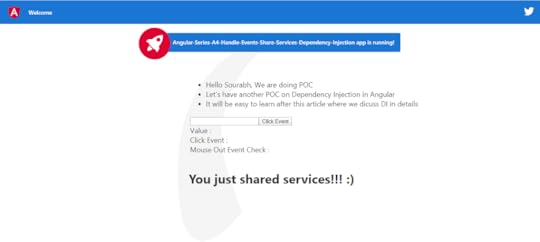
message = ‘You just shared services!!! :)’;
messageObject = [
‘Hello Sourabh, We are doing POC’,
‘Let\’s have another POC on Dependency Injection in Angular’,
‘It will be easy to learn after this article where we discuss DI in details’
];
constructor() { }
}
Use the @Injectable() decorator to indicate that a component or other class (such as another service, a pipe, or an NgModule) has a dependency.
The injector is the main mechanism. Angular creates an application-wide injector for you during the bootstrap process, and additional injectors as needed. You don’t have to create injectors.An injector creates dependencies, and maintains a container of dependency instances that it reuses if possible.A provider is an object that tells an injector how to obtain or create a dependency.For any dependency that you need in your app, you must register a provider with the app’s injector, so that the injector can use the provider to create new instances. For a service, the provider is typically the service class itself.
export class SampleFormComponentComponent implements OnInit {
constructor(private sharedServiceService: SharedServiceService) {
}
}
With the help of DI (Dependency Injector), we can share multiple services with component. We will look DI in detail in next article. These shared services can be accessed in the component as shown in above example. You can inject it in constructor and use the object of that that service to access the method and variables of the class. As shown in example, sharedServiceService object is used to access the messageObject array available available in SharedServiceService Service.
sharedServiceService.messageObject” >
{{objectinArray}}
Manage Event
Events can be managed as shown in below example (#textInput) by using # reference variable.This reference variable’s value can be accessed as textInput.value and can pass into function which will be further invoked by click event such as onClick. You can call any inbuilt event function such, mouseout, mouseleave, mouseenter etc. You can clone the repository to run below demo.
#textInput type=”text”>
textInput.value);”> Click Event
Directives
Directives create DOM elements and change their structure or behavior in an Angular application. There are three types of directives in Angular:
1.) Components: Directives with templates.
2.) Attribute directives: Change appearance and behavior of anelement, component, or other directive.
3.) Structural directives: Change DOM layout by adding or removing elements.
The basic difference between a component and a directive is thata component has a template, whereas an attribute or structural directive does not have a template. Angular has provided us many inbuilt structural and attribute directives. Inbuilt structural directives are *ngFor and *ngIf. Attribute directives are NgStyle and NgModel.
*ngFor is a structure directive used as for loop on DOM elements .Consider the below example. In this, the *ngFor directive will add messageObject.length time li elements with it’s value.
{{objectinArray}}
Angular Documentation : https://angular.io/guide/architecture-components#directives
Repository : You can clone below repository and run the application to check the demo.
Output Screen:
Interview Questions :
Question 1.) How to handle events?
Question 2.) Explain Services and Dependency Injection in brief?
Question 3.) what are the directives?
Question 4.) What are the types of directives?
Question 5.) What are difference between components and services ?

A4 -Angular Series : Handle Events, Share Services, Dependency-Injection was originally published in DXSYS on Medium, where people are continuing the conversation by highlighting and responding to this story.
May 16, 2020
A3 Angular Series : Mange-Events
Welcome you all to the third article on the Angular Article Series, we will discuss following topics
1) How to Manage Events in Angular
2) How to reference the value in Angular
3) Example @ GitHub

Create A Project — You can check article on creating the project. Click Here.
Create A Component — You can check the article on creating a component . Click Here.
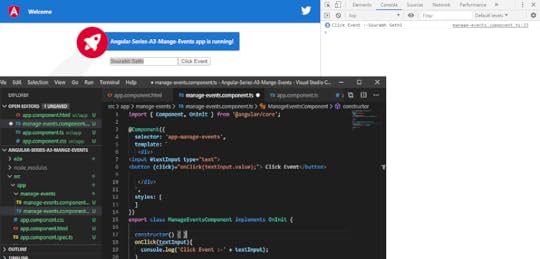
Mange EventsIn Component Decorator, we have mentioned inline html and inline style along with selector name, you can use this angular selector name in the another components where you want to use this components.
@Component(
{ selector: ‘app-manage-events’,
template: ` #textInput type=”text”>textInput.value);”> Click Event `,
styles: [ ]}
)
Click event on button will take the the input and call onClick Function; Click Event
Reference the valueYou can reference the value of input by using reference operator (#).And providing the reference variable to it such as in below example #textInput.
#textInput type=”text”>
value of reference variable can be access in click event by using .value as shown in example (textInput.value passing in onClick function).
Classexport class ManageEventsComponent implements OnInit {
constructor() { } ngOnInit():
void { } onClick(textInput){ console.log(‘Click Event :-’ + textInput); }
}
You can check mentioned example in below file.
Output Screen
You can check in below output screen the sample code, application with text input and click button, Console. On click of button onClick(textInput) function is called and it is printing value of textInput in console.
Repository : You can clone below repository and run the application to check the demo.
Interview Questions :
Question 1) What is reference operator ?
Question 2) How to handle click event ?
Question 3) How to pass reference value in click event?

A3 Angular Series : Mange-Events was originally published in DXSYS on Medium, where people are continuing the conversation by highlighting and responding to this story.
May 15, 2020
A2 -Angular Series : Component
We will be looking into below concepts in this article :
1.) Create component
2.) Short cut command to create component
3.) Component Decorator
4.) Angular Documentation
5.) Example Code @ Github
 Prerequisite : NPM and Node Should be Installed.
 For creating Angular Project : Check previous Article on Let’s Start With Angular Series .Create component
Run below cmd
ng genrate component sample-form-component — inline-template — inline-style
Angular CLI will create the component and add it in your angular project.
 Project StructureShort cut cmd
ng g c sample-form-component -it -is
g = genrate
c= component
sample-form-component = project name
inline-template = -it
inline-style = is
inline-template and inline-style states that we don’t need to create the separate html and css file a component.
https://gist.github.com/Sourabhhsethii/8aea69534db0634d50040d52b058d044
Component Decorator
Decorator that marks a class as an Angular component and provides configuration metadata that determines how the component should be processed, instantiated, and used at runtime.
The outside function is called as decorator factory and the inside one is called as the decorator. The decorator factory takes some configuration values and returns a decorator at shown in below example.
Decorator allow us to tell Angular that a particular class is a component, or module. And the decorator allows us to define this intent without having to actually put any code inside the class.
@Component(
{ selector: ‘app-sample-form-component’,
template: `
sample-form-component works!
`,styles: [ ]}
)
Angular Documentation : https://angular.io/api/core/Component
Start the Server with below cmd
npm start

Hit below Url
http://localhost:4200/
Output Screen
 Repo is avaliable at below location
https://github.com/Sourabhhsethii/Let-Us-Start-With-Angular/tree/master/Angular-Series-A2-Component
Interview Questions :
Question 1: What is component decorators in Angular?
Question 2: How to create angular component?
Question 3: What is decorator pattern?

A2 -Angular Series : Component was originally published in DXSYS on Medium, where people are continuing the conversation by highlighting and responding to this story.
May 14, 2020
Let’s Start With Angular
I am introducing byte sized articles series on angular basic concepts.This article series will help you to create a simple angular application starting with the Angular CLI. Angular is basically a collection of Components. Tools such as angular CLI, allow you to easily create Components.
Lets see how components in angular interact with each other through Services, Inputs, and Let us also understand the basics of styling components and how CSS.
 Angular Series A1 : Lets-start-with-angular
We will be looking into below concepts in this article :
1.) Install Angular -> npm install -g angular-cliPrerequisite : NPM and Node Should be Installed.
2.) create angular project ->ng new project-name
3.) Start Server with cmd -> ng serve.
4.) Angular Life Cycle. -> Angular lifecycle hooks
5.) Check the prefix in angular.json
 Install Angular : npm install -g angular-cli
 Create Angular Project :
 Start Server : ng serve or npm start
npm start cmd will run the application on will start the server on localhost Port 4200 (Default). http://localhost:4200/Angular lifecycle hooks
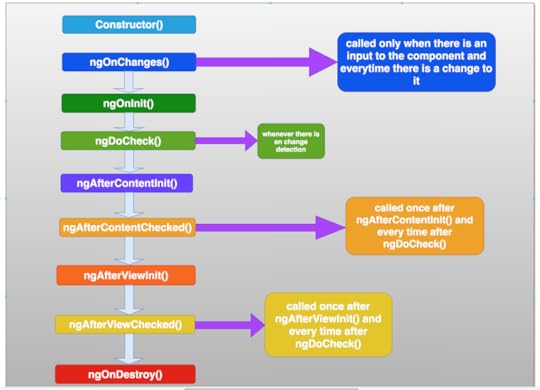
Life Cycle hooks are the points where we can control the angular application. There are 8 life cycle hooks namely ngOnChanges, ngOnInit, ngDoCheck, ngAfterContentInit, ngAfterContentChecked, ngAfterViewInit ,ngAfterViewChecked, ngOnDestroy.
ngOnChanges() — Called before ngOnInit() and whenever one or more data-bound input properties change.
ngOnInit() — Called once, after the first ngOnChanges().
ngDoCheck() — Called immediately after ngOnChanges() on every change detection run, and immediately after ngOnInit() on the first run.
ngAfterContentInit() — Called once after the first ngDoCheck().
ngAfterContentChecked() — Called after ngAfterContentInit() and every subsequent ngDoCheck().
ngAfterViewInit() — Called once after the first ngAfterContentChecked().
ngAfterViewChecked() — Called after the ngAfterViewInit() and every subsequent ngAfterContentChecked().
ngOnDestroy() — Called immediately before Angular destroys the directive or component.
Angular has beautiful Guide : https://angular.io/guide/lifecycle-hooks
Angular Life Cycle Example
Sourabhhsethii/Let-Us-Start-With-Angular
Output Screen
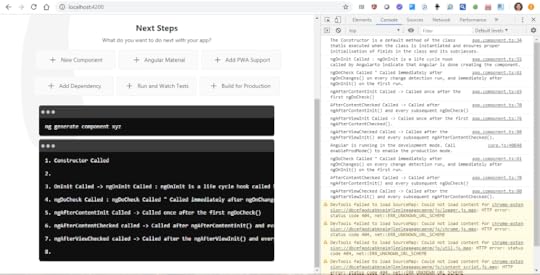
You can clone below repository on your machine and run the demo on your local machine.
Repository : https://github.com/Sourabhhsethii/Let-Us-Start-With-Angular/tree/master/Angular-Series-A1-Lets-start-with-angularCheck the prefix
In the angular.json file just modify the attribute prefix: It will prefix the name of project before every file in angular application which helps in project segregation.
"app": [...
"prefix": "app",
...
Interview Question
Question 1.) What is the possible order of lifecycle hooks?
Question 2.) When will ngOnInit be called?
Question 3.) How would you make use of onNgInit()?
Question 4.) What is the difference between constructor and onNgInit()?
Question 5.) Out of onNgInit and ngOnChanges, which one will be called first when there is no input?
Congratulations! You have created the basic structure of the angular project and I hope these byte size article series will help you to learn and understand Angular.

Let’s Start With Angular was originally published in DXSYS on Medium, where people are continuing the conversation by highlighting and responding to this story.
May 12, 2020
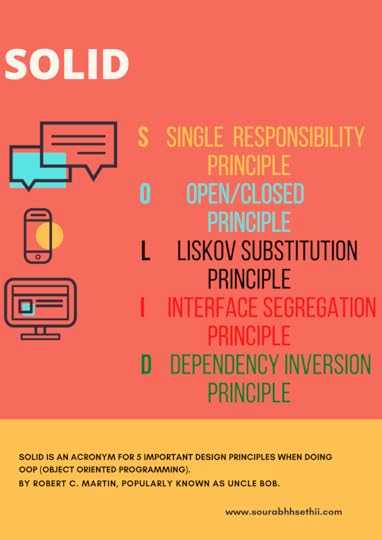
SOLID Principle
SOLID is an acronym for 5 important design principles when doing OOP (Object Oriented Programming) by Robert C. Martin, popularly known as Uncle Bob.
These principles, when combined together, make it easy for a programmer to develop software that are easy to maintain and extend. it seems complicated, but they are pretty simple to grasp. Lets Look into it.
S — Single responsibility principle
O — Open/closed principle
L — Liskov substitution principle
I — Interface segregation principle
D — Dependency inversion principle
S — Single responsibility principle
Do one thing and do it well.Responsibility as a ‘reason to change’, and concludes that a class or module should have one, and only one, reason to be changed.
or
We can say A class should have one and only one reason to change, meaning that a class should have only one job.
Let’s do an example of how to write a piece of code that violates this principle.
Single Responsibility Violation : Here in below example we can see that AddPost method has too much responsibility, AddPost method is added post, as well as loggin error in db and file.
package com.example.SingleResponsibility;import java.util.ArrayList;import java.util.List;public class SingleResponsibilityViolation {
void AddPost(List db, String postMessage)
{
try
{
db.add(postMessage);
}
catch (Exception ex)
{
db.add("An error occured: Log error in DB " + ex.toString()); // Log error in DB.
db.add("An error occured: Log error in File " + ex.toString()); // Log error in File.
}
System.out.println(db.get(0));
}
public static void main(String []args){
System.out.println("Hello World");
SingleResponsibilityViolation srv = new SingleResponsibilityViolation();
List arrlist =new ArrayList();
srv.AddPost(arrlist,"String");
}}
This violates the single responsibility principle. Let’s correct it in below example
By abstracting the functionality that handles the error logging, we no longer violate the single responsibility principle.
Now we have two classes that each has one responsibility; to create a post and to log an error, respectively.
package com.example.SingleResponsibility;import java.util.ArrayList;import java.util.List;public class SingleResponsibilityCorrection { private ErrorLogger errorLogger = new ErrorLogger(); void AddPost(List db, String postMessage)
{
try
{
db.add(postMessage);
}
catch (Exception ex)
{
errorLogger.log( db,ex.toString());
}
}
public static void main(String []args){
System.out.println("Hello World");
SingleResponsibilityViolation srv = new SingleResponsibilityViolation();
List arrlist =new ArrayList();
srv.AddPost(arrlist,"String");
}
} class ErrorLogger
{
void log(List db, String ex)
{
db.add("An error occured: Log error in DB " + ex.toString()); // Log error in DB.
db.add("An error occured: Log error in File " + ex.toString()); // Log error in File.
}
}
The single responsibility principle is one of the most commonly used design principles in object-oriented programming. You can apply it to classes, software components, and microservices.
O — Open(Extension)/closed(Modification) principle
States that software entities (classes, modules, functions, etc.) should be open for extensions, but closed for modification.We can make sure that our code is compliant with the open/closed principle by utilizing inheritance and/or implementing interfaces that enable classes to polymorphic-ally substitute for each other.
Let’s do an example of how to write a piece of code that violates this principle.
package com.exmaple.openclose;import java.util.ArrayList;import java.util.List;public class OpenCloseViolation {
void AddPost(List db, String postMessage)
{
if (postMessage.startsWith("#"))
{
db.add(postMessage);
}
else
{
db.add(postMessage);
}
System.out.println(db.toString());
}
public static void main(String []args){
System.out.println("Hello World");
OpenCloseViolation ocv = new OpenCloseViolation();
List arrlist =new ArrayList();
ocv.AddPost(arrlist,"#String");
}
}/* OutPut
Hello World
[#String] */
In this code snippet we need to do something specific whenever a post starts with the character ‘#’.
In the above implementation violates the open/closed principle in the way this code differs the behavior on the starting letter.
If we later wanted to also include mentions starting with ‘@’, we’d have to modify the class with an extra ‘else if’ in the AddPost()method.
Let’s try to make this code compliant with the open/closed principle by simply using inheritance.
package com.exmaple.openclose;import java.util.ArrayList;import java.util.List;public class OpenCloseCorrection {
void AddPost(List db, String postMessage)
{
db.add(postMessage);
System.out.println("OpenCloseCorrection" + db.toString());
}
public static void main(String []args){
System.out.println("Hello World");
LetsExtendOpenClose leoc = new LetsExtendOpenClose();
List arrlist =new ArrayList();
leoc.CreatePost(arrlist,"String LetsExtendOpenClose");
OpenCloseCorrection occ = new OpenCloseCorrection();
occ.AddPost(arrlist,"String OpenCloseCorrection");
}
}class LetsExtendOpenClose extends OpenCloseCorrection
{
void AddPost(List db, String postMessage)
{
db.add(postMessage);
System.out.println( "LetsExtendOpenClose " + db.toString());
}
}
By using inheritance, it is now much easier to create extended behavior to the OpenCloseCorrection object by overriding the AddPost()method. we can change the code there, without affecting any of these underlying pieces of behavior.
L — Liskov substitution principle
In programming, the Liskov substitution principle states that if A is a subtype of B, then objects of type B may be replaced (or substituted) with objects of type A. As per the LSP, functions that use references to base classes must be able to use objects of the derived class without knowing it. The LSP is popularly explained using the square and rectangle example. Let’s assume we try to establish an ISA relationship between Square and Rectangle. Thus, we call “Square is a Rectangle.”
package com.exmaple.LiskovSubstitution;import java.util.List;/** @author Sourabh Sethi
*/
public class LiskovSubstitutionPrinciple {
/**
* In case, we try to establish ISA relationship between Square and Rectangle such that we call "Square is a Rectangle",
* below code would start behaving unexpectedly if an instance of Square is passed
* Assertion error will be thrown in case of check for area and check for breadth, although the program will terminate as
* the assertion error is thrown due to failure of Area check.
*
* @param r Instance of Rectangle
*/
public void calculateArea(Rectangle r) {
r.setBreadth(2);
r.setLength(3);
//
// Assert Area
//
// From the code, the expected behavior is that
// the area of the rectangle is equal to 6
//
assert r.getArea() == 6 : printError("area", r);
//
// Assert Length & Breadth
//
// From the code, the expected behavior is that
// the length should always be equal to 3 and
// the breadth should always be equal to 2
//
assert r.getLength() == 3 : printError("length", r);
assert r.getBreadth() == 2 : printError("breadth", r);
}
private String printError(String errorIdentifer, Rectangle r) {
return "Unexpected value of " + errorIdentifer + " for instance of " + r.getClass().getName();
}
public static void main(String[] args) {
LiskovSubstitutionPrinciple lsp = new LiskovSubstitutionPrinciple();
//
// An instance of Rectangle is passed
//
lsp.calculateArea(new Rectangle());
//
// An instance of Square is passed
//
lsp.calculateArea(new Square());
}
}/*
* Square class; Square inherits from Rectangle;
* Represents ISA relationship - Rectangle is base class
* @author Sourabh Sethi
*/
class Rectangle {
private int length;
private int breadth;
public int getLength() {
return length;
}
public void setLength(int length) {
this.length = length;
}
public int getBreadth() {
return breadth;
}
public void setBreadth(int breadth) {
this.breadth = breadth;
}
public int getArea() {
return this.length * this.breadth;
}
}/*
* Square class; Square inherits from Rectangle;
* Represents ISA relationship - Square is a Rectangle
* @author Sourabh Sethi
*/
class Square extends Rectangle {
@Override
public void setBreadth(int breadth) {
super.setBreadth(breadth);
super.setLength(breadth);
}
@Override
public void setLength(int length) {
super.setLength(length);
super.setBreadth(length);
}
}
This is but one simple example of how to correct a violation of this principle.
We try to establish ISA relationship between Square and Rectangle such that we call “Square is a Rectangle”, Code would start behaving unexpectedly if an instance of Square is passed Assertion error will be thrown in case of check for area and check for breadth, although the program will terminate as the assertion error is thrown due to failure of Area check.
I — Interface segregation principle
In programming, the interface segregation principle states that no client should be forced to depend on methods it does not use.if you’re used to using interfaces, chances are that you’re already applying this principle.
Do not add additional functionality to an existing interface by adding new methods.Instead, create a new interface and let your class implement multiple interfaces if needed.
Let’s look at an example of how to violate the interface segregation principle.
package com.example.violation;public interface Number {void add();
}interface NumberAddRemove
{
void add();
void remove();
}
In above example, let’s pretend that I first have an NumberAddRemove interface with the signature of a add()method.
Later on, I modify this interface by adding a new method remove(), so it becomes like the NumberAddRemove interface.
Let’s try to make this code compliant with Interface segregation principle.
package com.example.correction;interface NumberAdd
{
void add();
}interface NumberRemove
{
void remove();
}
This is where we violate the interface segregation principle. Instead, simply create a new interface. If any class might need both the add()method and the remove()method, it will implement both interfaces.
D — Dependency inversion principle
The dependency inversion principle is a way to decouple software modules. This principle states that 1.) High-level modules should not depend on low-level modules. Both should depend on abstractions. 2.) Abstractions should not depend on details. Details should depend on abstractions.
Let’s look at an example.
package com.example.voilation;import java.util.*;public class ListUpdateViolationDependencyInversionPrinciple {
static ListAdd listAdd = new ListAdd();
static ListDelete listDelete = new ListDelete();
public static void main(String []args){
System.out.println("Hello World");
List arrlist = new ArrayList();
listAdd.add(arrlist,1);
listAdd.add(arrlist,2);
listDelete.delete(arrlist,1);
}}class ListAdd {
void add(List list , int number ) {
list.add(number);
System.out.println("add to list" + list.toString());
}}class ListDelete {
void delete(List list , int number ) {
for(int i = 0; i < list.size(); i++) {
if (list.get(i) == number) {
list.remove(i);
}
}
System.out.println("delete " + number + " from list" + list.toString());
}}
Observe how we create the ListAdd, ListDelete instance from within the ListUpdateViolationDependencyInversionPrinciple class.
This is a violation of the dependency inversion principle.
If we wanted to use a different kind of ListAdd, ListDelete , we would have to modify the ListUpdateViolationDependencyInversionPrinciple class.
Let’s fix this by using dependency injection.
Let’s look into design pattern known as a dependency inversion pattern, implemented by using dependency injection. Typically, dependency injection is used simply by ‘injecting’ any dependencies of a class through the class’ constructor as an input parameter.
package com.example.correction;import java.util.ArrayList;import java.util.List;
public class ListUpdateCorrectionDependencyInversionPrinciple { private ListAdd addlist;
private ListDelete deleteList;
public ListUpdateCorrectionDependencyInversionPrinciple(){ } public ListUpdateCorrectionDependencyInversionPrinciple(ListAdd addlist,
ListDelete deleteList){
this.addlist = addlist;
this.deleteList = deleteList;
} void LetsMakeACall() {
List arrlist = new ArrayList();
arrlist.add(1);
addlist.add(arrlist,1);
addlist.add(arrlist,2);
deleteList.delete(arrlist,1);
}}class ListAdd { void add(List list , int number ) {
list.add(number);
System.out.println("add to list" + list.toString()); }}class ListDelete { void delete(List list , int number ) {
for(int i = 0; i < list.size(); i++) {
if (list.get(i) == number) {
list.remove(i);
}
}
System.out.println("delete " + number + " from list" + list.toString());
}}
By using dependency injection we no longer rely on the ListUpdateCorrectionDependencyInversionPrinciple class to define the specific type of logger.
Conclusion:
Applying these principle will help us to develop a reusable, maintainable, scalable and easy testable codebase. If you want to make SOLID application using SOLID Principles.
Code Repo : https://github.com/Sourabhhsethii/SOLID
Refernces :
http://butunclebob.com/ArticleS.UncleBob.PrinciplesOfOod

SOLID Principle was originally published in DXSYS on Medium, where people are continuing the conversation by highlighting and responding to this story.