Sharon Wray's Blog, page 61
December 10, 2021
The Hungry {Romance) Writer: Sugar Cookies
As I continue my quest for a DIY Christmas (and other holidays), I’m struggling to find cost-effective and useful gifts that people will actually use. But I finally decided that homemade treats are often the most appreciated presents.

So many people I know are decluttering, selling things on FB Marketplace, and thrifting things they no longer want, I realized that no one wants random things they will never use. Last week I chose my favorite Gingersnap Cookies and this week I decided to make my favorite Sugar Cookies. I prefer these cookies plain, without frosting, but they can easily be frosted with a homemade or store-bought frosting and your favorite decorations. Just like last week, I’m going to use vintage (and very clean) holiday tins that I found at my favorite thrift shop. Once the tins are lined with parchment and filled with cookies, they will make a lovely DIY gift that my friends and family can serve to their guests throughout the holiday season.
Sharon Wray
Yields 60 cookies
Serves 2 cookies per serving
The Hungry {Romance) Writer: Sugar CookiesI love this recipe that I got from Sully Plantation because you can make traditional round sugar cookies or chill the dough and roll it out to use cookie cutters. This recipe is a combination of two historic recipes found in Martha Washington's 1799 "Book of Cookery". Martha flavored her "sugar cakes" with almond, lemon, or rosewater. But the version below uses pure vanilla extract.
30 minPrep Time
1 hrCook Time
1 hr, 30 Total Time
 Save Recipe Print Recipe var print_b = document.getElementById('mpp_print_button'); var save_b = document.getElementById('mpp_saverecipe_button'); print_b.onclick = function(){ zlrPrint( "mpprecipe-container-195", "https://sharonwray.com/wp-content/plu...", "mpprecipe-design22", "1", "#" ) }; save_b.onclick = function(){ window.open('https://sharonwray.mealplannerpro.com...' + window.location.href); return false; };
  My Recipes My Lists My Calendar
 Ingredients
1/2 pound unsalted butter1 cup sugar1 egg2 cups flour1/2 teaspoon baking soda1/2 teaspoon cream of tartar2 teaspoons pure vanilla extractPinch of saltInstructions
Preheat oven to 350 degrees F and move rack to the center of the oven. Line baking sheets with parchment paper.In the large bowl of a stand mixer, cream together the butter and sugar. Add the egg but beat until just mixed in.In a large bowl, sift together the flour, baking soda, and cream of tartar.Slowly, spoonful by spoonful, add the flour to the butter/sugar mixture until the dough is blended and fluffy.Beat in the pure vanilla extract.Drop dough balls, the size of walnuts, onto the cookie sheets. Keep them three inches apart so they have room to spread.Bake one sheet at a time, 6-8 minutes or until cookies are a light brown around the edges.Alternatively, chill the dough for 30 minutes. Lightly flour a counter and roll out the cookies until the dough is 1/4" thick. Use your favorite cookie cutter shapes to cut out the cookies. Transfer to the baking sheets, decorate with colored sugar if desired, and bake for 6-8 minutes. If you prefer, you can decorate the cooled cookies with royal icing.Makes about 60 cookies.7.8.1.2195https://sharonwray.com/the-hungry-writer/the-hungry-romance-writer-sugar-cookies/ { "@context": "http://schema.org/", "url": [ "https:\/\/sharonwray.com\/the-hungry-writer\/the-hungry-romance-writer-sugar-cookies\/" ],"name" : "The Hungry {Romance) Writer: Sugar Cookies","description" : "I love this recipe that I got from Sully Plantation because you can make traditional round sugar cookies or chill the dough and roll it out to use cookie cutters. This recipe is a combination of two historic recipes found in Martha Washington's 1799 \"Book of Cookery\". Martha flavored her \"sugar cakes\" with almond, lemon, or rosewater. But the version below uses pure vanilla extract. ","prepTime" : "PT30M","cookTime" : "PT1H","recipeYield" : "60 cookies","datePublished" : "2021-10-14 13:56:32","recipeInstructions":[ { "@type": "HowToStep", "text": "Preheat oven to 350 degrees F and move rack to the center of the oven. Line baking sheets with parchment paper." }, { "@type": "HowToStep", "text": "In the large bowl of a stand mixer, cream together the butter and sugar. Add the egg but beat until just mixed in. " }, { "@type": "HowToStep", "text": "In a large bowl, sift together the flour, baking soda, and cream of tartar." }, { "@type": "HowToStep", "text": "Slowly, spoonful by spoonful, add the flour to the butter\/sugar mixture until the dough is blended and fluffy." }, { "@type": "HowToStep", "text": "Beat in the pure vanilla extract." }, { "@type": "HowToStep", "text": "Drop dough balls, the size of walnuts, onto the cookie sheets. Keep them three inches apart so they have room to spread. " }, { "@type": "HowToStep", "text": "Bake one sheet at a time, 6-8 minutes or until cookies are a light brown around the edges." }, { "@type": "HowToStep", "text": "Alternatively, chill the dough for 30 minutes. Lightly flour a counter and roll out the cookies until the dough is 1\/4\" thick. Use your favorite cookie cutter shapes to cut out the cookies. Transfer to the baking sheets, decorate with colored sugar if desired, and bake for 6-8 minutes. If you prefer, you can decorate the cooled cookies with royal icing." }, { "@type": "HowToStep", "text": "Makes about 60 cookies." }],"keywords" : "The Hungry {Romance) Writer: Sugar Cookies","recipeIngredient" : ["1\/2 pound unsalted butter","1 cup sugar","1 egg","2 cups flour","1\/2 teaspoon baking soda","1\/2 teaspoon cream of tartar","2 teaspoons pure vanilla extract","Pinch of salt"], "image": { "@type": "ImageObject", "url": "https:\/\/sharonwray.com\/wp-content\/uploads\/2021\/10\/December-Blog-Post-Images-6.png" }, "author": { "@type": "Person", "name": "Sharon Wray" }, "nutrition": { "@type": "NutritionInformation", "servingsize": "2 serving"},"@type": "Recipe"} Subscribe to the blog
 Email Address
Subscribe


December 9, 2021
Prep & Plan: Week Nine
The holidays are coming up fast, and may even be here for some, so I’m going to keep this post short and sweet. Today we’re talking about keeping track of our budget. We haven’t gotten to the budget part of this series yet, but even if you don’t keep a household budget (or don’t know how), I’m going to give you an easy tip on how to keep track of your spending this season to help us prepare for next year.

Now this is in no way a recommendation on how to spend money or save money. Money is a deeply personal thing, and I would never presume to suggest how anyone spends or doesn’t spend. All I want to do is help you keep track, especially if you’ve never done it before. There are a few reasons for this, such as using this data later on when we learn to build budgets, but my main reason is because of mindset. There’s something powerful about keeping track of your spending. Although it may be difficult, and you may not even want to know until that credit card statement shows up in January, managing money is crucial when it comes to building a prepping and planning mindset.
here is your homework for the next two weeks:Take all of your receipts for everything you spend on the holidays this month and shove them into an envelope. Any kind of envelope, even a used envelope that held a holiday card will do. It doesn’t matter what it looks like, just that it is large enough to hold all the receipts.
That’s this week’s homework, for now. Once the holidays are over and you’ve returned, exchanged, and received any rebates on your gifts, we will tape the receipts into your Family Holiday Notebook that we set up last week. And that will help us budget for next year.
A few weeks ago, I posted an article that listed some of the best websites that offered holiday coupons and kept track of store deals. So if you still have shopping to do (like me!), you may want to check out some of these sites.
The days are getting shorter, and we’re all so busy, but those with a prepping and planning mindset never forget the ultimate goal: to be emotionally and financially independent of the world around us so we can make the best choices for our families. I hope you all have a great week!
Subscribe to the blog Email Address
Subscribe
December 8, 2021
How Rudolph Prevailed
Most people in the western world know the story of Rudolph the Red-Nosed Reindeer, mostly thanks the the animated TV show that featured the music of Johnny Marks and sung by Gene Autry.

But Rudolph wasn’t always the famous reindeer who guides Santa’s sleigh that we know today. In fact, Rudolph has a sad backstory marked by tragedy and discouragement. It all started during the holiday season of 1938 in Chicago, IL with a 34-year-old ad writer for the Montgomery Ward catalog named Robert May. (For those who don’t remember, Montgomery Ward was a precursor to Sears and other big department stores that started out as a category store). Anyway, in 1938, Bob’s wife Evelyn was dying of cancer and that meant Bob had to care for their four-year-old daughter Barbara on his own.
The story goes that one night Barbara asked her father why her mommy was sick while other mommies were healthy. Bob, like any adult, had a tough time answering his daughter and the question brought up trauma from his own childhood. He’d been a sickly boy who was bullied throughout his childhood. But instead of dwelling on the past, he told her that being “different” was nothing to be ashamed of. Of course, as a precocious four-year-old, she didn’t believe him. So he made up a story about a reindeer who had a shiny red nose and didn’t fit in. Yet, in spite of his difference, he became one of the most important reindeer on Santa’s sleigh team.
This story enchanted the little girl and she insisted he tell her the story every night. As Bob continued to tell the story, it filled out with other characters and side stories. That Christmas in 1938, because he couldn’t afford to buy his daughter a present (ad copy writers made no money!), he began to turn the story of Rudolph the Red Nosed Reindeer into a homemade picture book.
Then, in early December, Bob’s wife died. Although devastated, Bob continued working on the book for his daughter’s present. When he attended the Montgomery Ward Christmas party, his co-workers asked him to read aloud the story he was writing for his daughter. Of course the room loved the story and he received a standing ovation. Soon after, Montgomery Ward bought the rights to the story, saving Bob from bankruptcy. Starting in 1939, and for the next six years during the holidays, Montgomery Ward gave away over 6 million copies of the story, in the form of a coloring book, to shoppers. Then the big NY publishers offered to buy the rights. For some reason, Montgomery Ward reverted the rights to the story back to Bob and he sold the story to a major publisher. Four years later, Bob was a millionaire.
Bob eventually remarried and had more children. But he never forgot to thank God for his blessings. At the same time his new brother-in-law was becoming a famous songwriter. His name was Johnny Marks and he set the story of Rudolph to music. Although the story and song was pitched to several famous singers, including Bing Crosby, Gene Autry’s wife insisted that her husband sing the song. Gene Autry had already sung “Here Comes Santa Claus”, making it one of the most famous Christmas songs at the time and wasn’t that impressed with the Rudolph song. But Gene Autry’s wife loved the story of the sad reindeer and nagged Gene until he agreed to record it.
A few years later, it became the second best-selling Christmas song behind “White Christmas”, and the story has been transformed into movies, games, greeting cards, toys, etc. In 2014, the U.S. Postal Service even designed a series of postage stamps in honor of Rudolph. But it was in 1964 that the story of Rudolph became enshrined in a famous stop-action animated TV show that has been shown annually ever since. Rudolph the Red-Nosed Reindeer has become one of the most beloved Christmas stories of all time. The red-nosed reindeer who prevailed despite being different, is now one of the most powerful symbols of the holiday season. It’s a story of acceptance, love, and forgiveness. It’s a timeless classic. And the last line of the song was so much more prescient than anyone could have guessed. Because Rudolph, indeed, will “go down in history”.
As the season begins, let’s toast to the indomitable red-nosed reindeer with a Rudolph Spritz cocktail!
Sharon Wray
Yields 4 servings
The Hungry {Romance} Writer: Rudolph SpritzI received this recipe from a hostess at a Christmas party in Charleston, SC many years ago. I have since lowered the amount of vodka and added more Prosecco. But this cocktail is easy to adjust depending on your taste. And don't forget the sugared cranberries! They add flavor and help keep the cocktail cold after the ice melts.
5 minPrep Time
5 minTotal Time
Save Recipe Print Recipe var print_b = document.getElementById('mpp_print_button'); var save_b = document.getElementById('mpp_saverecipe_button'); print_b.onclick = function(){ zlrPrint( "mpprecipe-container-204", "https://sharonwray.com/wp-content/plu...", "mpprecipe-design22", "1", "#" ) }; save_b.onclick = function(){ window.open('https://sharonwray.mealplannerpro.com...' + window.location.href); return false; };  My Recipes My Lists My Calendar
 Ingredients
3/4 cup cranberries, frozen1 Tablespoon sugarCrushed ice2 cups cranberry juice1 cup freshly-squeezed orange juice1 cup vodka1 cup ProseccoInstructions
In a small glass bowl, stir together the frozen cranberries and sugar. Set aside.Fill four glasses with crushed ice.In a large measuring cup, mix together the cranberry juice, orange juice, and vodka.Divide the cranberry juice mixture evenly between all four glasses.Add 1/4 cup of Prosecco to each glass.Garnish with the sugared cranberries.Serve immediately.7.8.1.2204https://sharonwray.com/the-hungry-writer/how-rudolph-prevailed/ { "@context": "http://schema.org/", "url": [ "https:\/\/sharonwray.com\/the-hungry-writer\/how-rudolph-prevailed\/" ],"name" : "The Hungry {Romance} Writer: Rudolph Spritz","description" : "I received this recipe from a hostess at a Christmas party in Charleston, SC many years ago. I have since lowered the amount of vodka and added more Prosecco. But this cocktail is easy to adjust depending on your taste. And don't forget the sugared cranberries! They add flavor and help keep the cocktail cold after the ice melts. ","prepTime" : "PT5M","recipeYield" : "4 servings","datePublished" : "2021-11-22 09:59:57","recipeInstructions":[ { "@type": "HowToStep", "text": "In a small glass bowl, stir together the frozen cranberries and sugar. Set aside." }, { "@type": "HowToStep", "text": "Fill four glasses with crushed ice." }, { "@type": "HowToStep", "text": "In a large measuring cup, mix together the cranberry juice, orange juice, and vodka." }, { "@type": "HowToStep", "text": "Divide the cranberry juice mixture evenly between all four glasses. " }, { "@type": "HowToStep", "text": "Add 1\/4 cup of Prosecco to each glass. " }, { "@type": "HowToStep", "text": "Garnish with the sugared cranberries. " }, { "@type": "HowToStep", "text": "Serve immediately. " }],"keywords" : "The Hungry {Romance} Writer: Rudolph Spritz","recipeIngredient" : ["3\/4 cup cranberries, frozen ","1 Tablespoon sugar ","Crushed ice ","2 cups cranberry juice ","1 cup freshly-squeezed orange juice ","1 cup vodka ","1 cup Prosecco "], "image": { "@type": "ImageObject", "url": "https:\/\/sharonwray.com\/wp-content\/uploads\/2021\/11\/louis-hansel-S3E8Y_SRPUw-unsplash-scaled.jpg" }, "author": { "@type": "Person", "name": "Sharon Wray" }, "nutrition": { "@type": "NutritionInformation", "servingsize": "1 serving"},"@type": "Recipe"}Subscribe to the blog Email Address
Subscribe
December 7, 2021
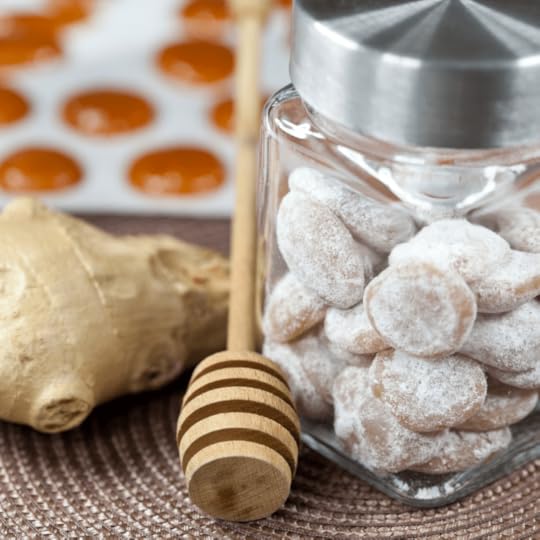
Sarah Munro’s Honey Lemon Ginger Cough Drops
T’is the season…. for colds and coughs. And one of my favorite herbal remedies is homemade Honey Lemon Ginger Cough Drops. They are easy to make and soothe every kind of sore throat. Best of all, they only use three ingredients!

Sarah Munro, the heroine of ONE DARK WISH (book 2 in the Deadly Force Series), and I, adapted this recipe from a few we found on apothecary sites on the internet. All three ingredients were available during the 17th and 18th centuries and Sarah had a similar recipe in her collection of colonial-era herbal remedies. Honey is a natural anti-bacterial, fresh lemons are loaded with Vitamin C and are a natural antiseptic, and fresh ginger is an anti-inflammatory agent. So together, all three make a great, homemade cough drop that has no other added flavorings or colors or sugars.
This is essentially a candy recipe so you need to watch the mixture to make sure it doesn’t boil and a candy thermometer makes it easier to check the temperature. And if the mixture foams while it is boiling, lower the heat and/or remove the pan from the stove for a minute. Then bring back to a boil under a lower temp. I prefer to use a candy mold, but you can also make these on a parchment-lined or silicone-lined baking sheet. If you are going to store them for later use, dust them with a bit of powdered sugar or cornstarch so they don’t stick together.
 Sarah Munro’s Honey Lemon Ginger Cough DropsINGREDIENTS:
1/2 cup honey
2 Tablespoons fresh lemon juice
1 teaspoon finely-grated fresh ginger
Powdered (confectioner’s) sugar or cornstarch for coating
DIRECTIONS:Peel the ginger root and finely grate using a microplane or the small holes on a hand grater. In a heavy saucepan, use a wooden spoon to stir together the honey, lemon juice, and freshly-grated ginger.
Slowly, heat the mixture over a medium-low heat until it gently boils. Stir constantly to prevent scorching or burning.
There are two ways to test if the sugar has reached the candy hard crack stage. The easiest is by testing the mixture with a candy thermometer–heat the ingredients until they hit 300-310 degrees F (148-154 degrees C). If you don’t have a candy thermometer, test the mixture by dropping a tiny amount into a a bowl of VERY cold water. If it hardens, it’s done. If the mixture begins to form a foam around the edges, lower the heat. You may even have to remove the pan for a minute until the foam subsides. Then put back on the burner and cook until it reaches the hard crack stage. Keep the heat lowered, though, to prevent the honey from burning.
Once the mixture hits the hard crack stage, remove the pan from the heat. Cool for a few minutes and the mixture with thicken slightly. Then pour the mixture into small candy molds or drop by teaspoons onto a baking sheet lined with parchment paper or a silicon baking sheet. Cool the cough drops until they are hard and firm and cool to touch. After the cough drops are fully cooled, dust with powdered sugar or cornstarch (or cinnamon for more flavor). This prevents the drops from sticking together.
Store the cough drops in a glass container with a tight fitted lid and store in a cool, dry cabinet.
IMPORTANT DISCLAIMER ABOUT WILD PLANTS, FORAGING , AND MAKING HERBAL REMEDIES:I am not a medical professional and nothing written on this blog is medical advice. None of my statements have been evaluated by the FDA (I am legally required to give you this disclaimer).
It is important to do your due diligence before foraging, harvesting, and/or consuming any type of medicinal plant.
If you are taking any medications, talk to your doctor about any potential drug interactions.If you are allergic to anything, make sure whatever you are foraging is not in the same family. Example: While dandelions are typically considered safe, those who are allergic to ragweed, latex, daisies, or any other plants in the same or similar families, may not be able to consume dandelion.Always research potential side effects, dosage recommendations, and how to properly prepare and consume each medicinal plant.
Always make sure you are foraging what you believe to be. Fully prepare and study the anatomy before harvesting wild plants.
Always make sure your kitchen/work area is clean and that all materials are sterilized.
Do not forage plants from areas that have been sprayed within the past 2 years at the very least.
I am not legally or morally responsible for the health of any of my readers. Please do your own research!
Subscribe to the blog Email Address
Subscribe
December 6, 2021
Tales of St. Nicholas
Today, December 6, is the day we celebrate the Feast of St. Nicholas. This is the day that the famous saint, also known as Santa Claus, died in 343 AD. Although we’ve all seen the commercialized images of Santa Claus, the real man was actually a hardcore, badass bishop who single-handedly fought against something called the Arian heresy.

During the 4th century, a persuasive priest named Arius stated that Christ was not fully divine, but instead Christ was a creature created by the Father. Arius tried to prove his point by pointing out a simple spelling issue that had occurred in earlier manuscripts regarding church teachings. The word “homoousios” means “same substance” whereas the word “homoiousios” means “similar substance”. Both had been found in these early writings, but “homoiousios” had been designated a typo. Yet, because of this spelling difference, Arius said that Christ was not of the same substance as the Father, but was simply “similar”. Arius pushed this idea despite the fact the Council of Nicea had recently affirmed that the Father, Son, and Holy Ghost are of the homoousious (same substance).
Although an obscure argument, Arius’ heresy threatened to schism the early church. So in 325 AD, the First Council of Nicea set up a meeting to debate the issue. Arius arrived to defend his position. While he was speaking, Bishop Nikolaos of Myra (in present-day Turkey) showed up. Nikolaos was so angry at Arius’ heretical argument that he slammed his fist into Arius’ face. Of course everyone was shocked, and Nikolaos was was stripped of his Bishop rank. During that time, the two things identified a man as a bishop: His pallium (a stole) and his personal copy of the Gospels. In those days, the book was a big deal because every copy of the Gospels had to be written by hand on vellum, which also had to be made by hand. Owning a copy of the Gospels offered a man prestige and power. But, after throwing his punch, Nikolaos had to hand over his pallium and his book. Then he was tossed into a dark ages prison aka dungeon.
While in prison, a miracle occurred. Nikolaos received a visit from Christ and the Virgin Mary.
Our Lord asked Nikolaos, “Why are you here?”
Nikolaos replied, “Because I love You, my Lord and my God.”
After he answered, Jesus returned to Nikolaos his copy of the Gospels. Then Mary put his pallium back on. Both of these acts restored Nikolaos to his rank of bishop. Then, the next day, the guards saw Nikolaos sitting in his cell wearing his pallium and reading his Gospels. The same book that the other bishops had hidden far, far away from his cell. Realizing that a miracle had occurred, the bishops released Nikolaos, and he rejoined the Council. With Nikolaos leading the way, the Arian heresy was struck down and reaffirmed in the Nicene Creed which is still recited today. But Nikolaos was forever known as the badass bishop who’d get into a fist fight to defend his faith, and for years after his prison sentence, miracles abounded wherever he preached.
It wasn’t until a few years later that his Santa persona would appear due to the many, many stories of St. Nikolaos’ generosity and compassion. The most popular story is about a man with three daughters couldn’t come up with dowries for them. In those days, no doweries meant the girls were doomed to be sold into slavery. Yet, mysteriously, on three different nights, bags of gold were thrown into the man’s house through an open window thereby saving the girls from a desperate fate. Nikolaos denied any involvement, but everyone knew he was the gift-giver. Today, oranges represent the bags of gold and are often found in more traditional Christmas decor.
Then there was the time, after his death, when the town of Myra (his hometown in Turkey) was celebrating his saint day and Arab pirates from Crete appeared. They sacked the Church of St. Nicholas (the spelling of his name changed). The pirates stole a young boy name Basilios and made him a slave. Basilios became the cup bearer for the emir but was always afraid and lonely since he couldn’t speak the language. The next year, on the feast of St. Nicholas, Basilios’ parents were praying for Basilios’ safety despite not knowing if he was even alive. Meanwhile Basilios, who was far away, serving the emir, was suddenly whisked away by the spirit of St. Nicholas. St. Nicholas blessed Basilios and told him not to be afraid and brought him back to his parents in Myra. His parents were overjoyed and shared the story with everyone who would listen. This is one of many stories where St. Nicholas protected children. He was also known for helping people during pandemics and for saving travelers from roadside villains, both during his life and afterwards.
Today, there are almost a thousand churches throughout the world named for St. Nicholas, and his tomb in Myra is a hugely popular pilgrimage site for people of all religions. Stories of his generosity and love of children abound and it’s no wonder that Santa Claus (the dutch name for St. Nicholas) is now the patron saint of gift-giving and compassion during this time of year. But, despite his role as Santa Claus, I love the fact that beneath the red suit and the jolly laugh is a hardcore MMA fighter willing to go to the mat to protect the God he loved.
In some parts of the world, children leave their shoes out on the night of December 6 and St. Nicholas (who rides a donkey) fills them with candy and oranges. And because St. Nicholas loves adults as well, he may leave them some Bischopswijn aka Dutch Mulled Wine. This is the Dutch version of gluhwein that is served in the Christmas markets in Germany and Austria. I’ve adapted a recipe that a friend of mine gave me years ago while living in Amsterdam. Because it is the season of giving, and in honor of St. Nicholas, I’ve included the recipe below. I hope you all have a wonderful St. Nicholas Day!
Sharon Wray
Yields 8
The Hungry {Romance} Writer: Dutch Mulled WineThis recipe came from a dear friend who'd once lived in Amsterdam. I've made a few changes like adding less sugar and more cinnamon, but it's just as good! I also don't use the most expensive wine (gasp!). Because there's so many additional ingredients, you can get away with a moderately-priced red wine. I've used everything from a shiraz to a pinot noir and I honestly can't tell the difference. But then I'm not a wine connoisseur.
20 minPrep Time
3 hrCook Time
3 hr, 20 Total Time
Save Recipe Print Recipe var print_b = document.getElementById('mpp_print_button'); var save_b = document.getElementById('mpp_saverecipe_button'); print_b.onclick = function(){ zlrPrint( "mpprecipe-container-203", "https://sharonwray.com/wp-content/plu...", "mpprecipe-design22", "1", "#" ) }; save_b.onclick = function(){ window.open('https://sharonwray.mealplannerpro.com...' + window.location.href); return false; };  My Recipes My Lists My Calendar
 Ingredients
1 1/2 bottles of Cabernet Sauvignon or other red wine2 oranges1 lemon15 cloves4 cinnamon sticks1/2 cup white sugarInstructions
Pour the wine into a large, thick-bottomed stock pot. Place the pot on the stove and turn to low heat.Using the cloves, spike the oranges and lemon. Drop them into the wine.Add the cinnamon sticks to the wine and turn the heat up a tiny bit.Cook slowly, on low heat, for three hours. Do not boil the liquid as the alcohol will evaporate.After 2 1/2 hours of cooking, slowly stir in the sugar. Stir until it all dissolves.Remove the fruit and cinnamon stick and serve immediately.7.8.1.2203https://sharonwray.com/the-hungry-writer/tales-of-st-nicholas/ { "@context": "http://schema.org/", "url": [ "https:\/\/sharonwray.com\/the-hungry-writer\/tales-of-st-nicholas\/" ],"name" : "The Hungry {Romance} Writer: Dutch Mulled Wine","description" : "This recipe came from a dear friend who'd once lived in Amsterdam. I've made a few changes like adding less sugar and more cinnamon, but it's just as good! I also don't use the most expensive wine (gasp!). Because there's so many additional ingredients, you can get away with a moderately-priced red wine. I've used everything from a shiraz to a pinot noir and I honestly can't tell the difference. But then I'm not a wine connoisseur.","prepTime" : "PT20M","cookTime" : "PT3H","recipeYield" : "8","datePublished" : "2021-11-17 17:44:36","recipeInstructions":[ { "@type": "HowToStep", "text": "Pour the wine into a large, thick-bottomed stock pot. Place the pot on the stove and turn to low heat." }, { "@type": "HowToStep", "text": "Using the cloves, spike the oranges and lemon. Drop them into the wine." }, { "@type": "HowToStep", "text": "Add the cinnamon sticks to the wine and turn the heat up a tiny bit. " }, { "@type": "HowToStep", "text": "Cook slowly, on low heat, for three hours. Do not boil the liquid as the alcohol will evaporate." }, { "@type": "HowToStep", "text": "After 2 1\/2 hours of cooking, slowly stir in the sugar. Stir until it all dissolves." }, { "@type": "HowToStep", "text": "Remove the fruit and cinnamon stick and serve immediately. " }],"keywords" : "The Hungry {Romance} Writer: Dutch Mulled Wine","recipeIngredient" : ["1 1\/2 bottles of Cabernet Sauvignon or other red wine","2 oranges","1 lemon","15 cloves","4 cinnamon sticks","1\/2 cup white sugar"], "image": { "@type": "ImageObject", "url": "https:\/\/sharonwray.com\/wp-content\/uploads\/2021\/11\/edward-howell-wFuaWIYhFCI-unsplash.jpg" }, "author": { "@type": "Person", "name": "Sharon Wray" }, "nutrition": { "@type": "NutritionInformation", "servingsize": "1 serving"},"@type": "Recipe"}Subscribe to the blog Email Address
Subscribe
December 3, 2021
The Hungry {Romance} Writer: Gingersnaps
This year I’m focusing on a DIY Christmas. Between supply chain issues, the rising costs of everything, and trying to complete two manuscripts, I’m keeping Christmas simple and fun. That means I’ll be making many of my gifts, or thrifting my gifts, the entire month of December. And many of my friends are doing the same things for the holidays they celebrate between November and January.

My goal in the next few weeks is to make as many of my gifts as possible. While these gingersnap cookies can’t be baked more than two weeks ahead, I’m posting this one first because some of the ingredients are now hard to come by. You could also make the dough and freeze it until you’re ready to bake the cookies. Just defrost the dough for a few hours before you’re ready to bake. I’ve also been able to thrift a bunch of Christmas tins which I’ve cleaned up. They’re still in great shape and some of them are decorated with vintage Christmas and winter scenes. Once the cookies are cooled, packed into the tins, and wrapped with bows, they’ll make a perfect gift for hostesses, neighbors, teachers, and friends. This year the fact that we can all spend time together is the real present, and these cookies are just an added bonus.
Sharon Wray
Yields 100 cookies
Serves 2 cookies per serving
The Hungry {Romance} Writer: GingersnapsThe total cook time on this recipe is because each baking sheet filled with uncooked cookies has to be baked separately. Depending on the size of your oven and baking sheets, you could end up doing 8 rounds to make 100 cookies. This recipe has been adapted from an old recipe I received at Sully Plantation in Virginia, based on an older recipe for "Molasses Gingerbread Cakes" from Amelia Simmons' American Cookery cookbook published in 1796.
30 minPrep Time
2 hrCook Time
2 hr, 30 Total Time
Save Recipe Print Recipe var print_b = document.getElementById('mpp_print_button'); var save_b = document.getElementById('mpp_saverecipe_button'); print_b.onclick = function(){ zlrPrint( "mpprecipe-container-194", "https://sharonwray.com/wp-content/plu...", "mpprecipe-design22", "1", "#" ) }; save_b.onclick = function(){ window.open('https://sharonwray.mealplannerpro.com...' + window.location.href); return false; };  My Recipes My Lists My Calendar
 Ingredients
3/4 cup unsalted butter, room temperature3/4 cup shortening2 3/4 cups sugar, divided2 eggs1/2 cup molasses4 cups flour2 teaspoons baking soda2 teaspoons cinnamon2 teaspoons cloves2 teaspoons gingerInstructions
Preheat oven to 375 degrees F. Move the rack to the center of the oven.Line two cookie sheets with parchment paper and set aside.In a large bowl of a stand mixer, cream together the butter and shortening.Add two cups of sugar slowly, spoonful by spoonful, until blended. Cream all three ingredients until fluffy.Add eggs and molasses and mix until blended.In a large bowl, sift together the flour, baking soda, cinnamon, cloves, and ginger.Slowly, spoonful by spoonful, add the flour to the butter/sugar mixture. Beat until blended and the batter will be soft, not stiff.Place the remaining 3/4 cup sugar in a small bowl.Make 1 inch balls from the dough and roll each ball in the sugar until it is well coated.Place the balls on the baking sheets, keeping them three inches apart so they can spread. When the baking sheet is full, place them in the oven one at a time. (this very important. Don't bake more than one sheet at a time!)Bake for 12-15 minutes, watching carefully so they don't overbake.Remove sheet from oven (and put the next sheet in) and place on a baking rack. Let sit on the rack for 10 minutes. Remove cookies to another baking rack and then start the process all over again.Let cookies cool completely before serving. Can be stored in an airtight container for up to one week.7.8.1.2194https://sharonwray.com/the-hungry-writer/the-hungry-romance-writer-gingersnaps/ { "@context": "http://schema.org/", "url": [ "https:\/\/sharonwray.com\/the-hungry-writer\/the-hungry-romance-writer-gingersnaps\/" ],"name" : "The Hungry {Romance} Writer: Gingersnaps","description" : "The total cook time on this recipe is because each baking sheet filled with uncooked cookies has to be baked separately. Depending on the size of your oven and baking sheets, you could end up doing 8 rounds to make 100 cookies. This recipe has been adapted from an old recipe I received at Sully Plantation in Virginia, based on an older recipe for \"Molasses Gingerbread Cakes\" from Amelia Simmons' American Cookery cookbook published in 1796.","prepTime" : "PT30M","cookTime" : "PT2H","recipeYield" : "100 cookies","datePublished" : "2021-10-14 12:44:36","recipeInstructions":[ { "@type": "HowToStep", "text": "Preheat oven to 375 degrees F. Move the rack to the center of the oven." }, { "@type": "HowToStep", "text": "Line two cookie sheets with parchment paper and set aside." }, { "@type": "HowToStep", "text": "In a large bowl of a stand mixer, cream together the butter and shortening. " }, { "@type": "HowToStep", "text": "Add two cups of sugar slowly, spoonful by spoonful, until blended. Cream all three ingredients until fluffy." }, { "@type": "HowToStep", "text": "Add eggs and molasses and mix until blended." }, { "@type": "HowToStep", "text": "In a large bowl, sift together the flour, baking soda, cinnamon, cloves, and ginger." }, { "@type": "HowToStep", "text": "Slowly, spoonful by spoonful, add the flour to the butter\/sugar mixture. Beat until blended and the batter will be soft, not stiff." }, { "@type": "HowToStep", "text": "Place the remaining 3\/4 cup sugar in a small bowl." }, { "@type": "HowToStep", "text": "Make 1 inch balls from the dough and roll each ball in the sugar until it is well coated. " }, { "@type": "HowToStep", "text": "Place the balls on the baking sheets, keeping them three inches apart so they can spread. When the baking sheet is full, place them in the oven one at a time. (this very important. Don't bake more than one sheet at a time!)" }, { "@type": "HowToStep", "text": "Bake for 12-15 minutes, watching carefully so they don't overbake. " }, { "@type": "HowToStep", "text": "Remove sheet from oven (and put the next sheet in) and place on a baking rack. Let sit on the rack for 10 minutes. Remove cookies to another baking rack and then start the process all over again." }, { "@type": "HowToStep", "text": "Let cookies cool completely before serving. Can be stored in an airtight container for up to one week." }],"keywords" : "The Hungry {Romance} Writer: Gingersnaps","recipeIngredient" : ["3\/4 cup unsalted butter, room temperature","3\/4 cup shortening","2 3\/4 cups sugar, divided","2 eggs","1\/2 cup molasses","4 cups flour","2 teaspoons baking soda","2 teaspoons cinnamon","2 teaspoons cloves","2 teaspoons ginger"], "image": { "@type": "ImageObject", "url": "https:\/\/sharonwray.com\/wp-content\/uploads\/2021\/10\/December-Blog-Post-Images-5.png" }, "author": { "@type": "Person", "name": "Sharon Wray" }, "nutrition": { "@type": "NutritionInformation", "servingsize": "2 serving"},"@type": "Recipe"}Subscribe to the blog Email Address
Subscribe
December 2, 2021
Prep & Plan: Week Eight
I don’t know why, but the week after Thanksgiving always feels like a short one. Maybe because I’m so tired of cooking and cleaning. Maybe because I see the calendar counting down to Christmas (and all the cooking and cleaning and shopping and wrapping and decorating that has to be done). So this week and month, since we’re knee-deep into the holidays, we’re focusing more on planning than prepping.
One of my favorite annual habits that I perform every year, the week after Thanksgiving, fits in with our Prep & Plan schedule. I call this my “Regroup Week”. What does this mean? A regroup week is when I stop doing any major Prep & Plan chores, like organizing closets, counting cans in the pantry, worrying about drinking water, etc. This is a week where I carve out time to sit down with a cup of tea and a notebook. I know we’ve been using our legal pads, but for this event I use a notebook that I pull out throughout the year after every major holiday or family event. It’s a cheap notebook I got at Dollar Tree. So there’s no reason to run out and by an expensive notebook with a matching pen and washi tape (yes, I’ve done that). I’ve even used notebooks that my kids used at school but didn’t finish–I just pulled out the used pages and started fresh. Or you can keep this in your notes app on your phone, on Trello, or any other place where you keep track of things you want to remember next year.
This notebook (either in print or electronic) will be for an annual review of holidays and other large family events. And, you’ll need a piece of paper for a shopping list. I am currently using the back of a bill envelope to write down the things I need at the grocery store this week. In this notebook, I mark a new page with the title Thanksgiving 2021. Below that, I begin listing things that worked and things that didn’t. I’m talking about food, cleaning, guests, etc–anything that you had to do or deal with on the day or through the weekend. In my case, I made dinner for 12 people and had company all weekend. I use this list as a total brain dump. As I drink my tea, and eat a piece of leftover pumpkin pie, I write down anything I can think of that went right, went wrong, and what I would do differently next year that I know I’ll forget if I don’t write it down now. I also note anything I need to buy for the next round of company/guests, or for next year’s Thanksgiving. If I need it for next year’s feast, I can start looking for post-Thanksgiving sales (yes, they’re a thing!) or shop for it throughout the year. As I work in this notebook, I use the separate shopping list to write down anything I ran out of and need to pick up before Christmas. (This year I ran out of dried orange peel, black pepper, dried dill, and tissues)
Here’s an example of what I wrote in my notebook:Buy two new pillows for the guest roomOrder a water goblet in my crystal pattern (somehow, one went missing)Reduce the vegetable dishes by one or two dishes. We had too many leftovers and no one eats leftover veggies.Send my Thanksgiving linens to the dry cleaner.Hem two guest room towels (or buy two new ones if they can’t be fixed)Order new table pads for the dining room table.Get some more Thanksgiving cocktail napkins, if I can find them on sale.Only buy 3 bottles of sparkling cider for next yearReduce the appetizers by two dishesNo need for the turkey cake, although it was beautiful and I’m grateful to my step-father for bringing it.The gewürztraminer wine my step-father brought was perfect with the turkey. Buy 4 bottles (for 12 adults) instead of 3.Buy half as many crackers and veggies for the appetizers.Make sure to have more lunch options for the men while the women shop on the Friday and Saturday after Thanksgiving.Don’t bother with the breakfast casserole for Friday and Saturday mornings. Everyone ate pie instead. We went through far more aperol and Prosecco this weekend than I thought we would. Next year buy 4 bottles of both.Soften more butter for the table next year-we went through 1 and 1/2 sticks.Double the gravy recipe.No need for dinner rolls if I serve cranberry bread. Maybe make 2 cranberry breads next year. Next year, buy extra ice in a bag and keep it in the outside freezer or a cooler on the patio. We went through ice faster than my ice maker could make it.The fresh flowers were beautiful but I don’t know if they were worth the money.Running a load of dishes during the dinner worked great. It made clean up easier. I love Ina Garten’s do ahead turkey recipe. It was fabulous, and I am definitely doing that again next year. I had a 24 pound turkey this year for 12 people. I wouldn’t go any smaller than 22 pounds. It was almost all gone and I didn’t have enough leftovers for lunch while the women shopped on Friday and Saturday. While I have enough bones and leg meat for soup, I still like to add in white meat. This week, check the price of leftover turkeys at the grocery store. If I can find one at 19 cents a pound or less, I may grab one and throw it in the deep freezer. We ate at 3:30 pm, the earliest we’ve ever eaten. I would definitely do that again. We has some older guests who wanted to get on the road before it got too dark.So you get the idea…. it’s a list of all the things in your head that you’ll be grateful you kept note of when you begin preparing for next year’s holiday.
Tracking the budge:Once I finish my list, and leave some room on the next page for things I’ll think of next week, I take the next few blank pages and tape in the receipts for everything I bought for the weekend. From laundry detergent, to the turkey, to the tickets for the tea the women in my family attended on Friday afternoon. Yes, I keep all those receipts–but I didn’t always do that. Years ago, the habit was recommended by a Certified Financial Planner I know and it’s been eye-opening. Because I use one notebook for about five years worth of family events (I keep track of Thanksgiving, Christmas, Easter, Fourth of July, Family Reunions, and birthday parties), it’s easy to see what I’ve spent over the years and track the inflation. While prices were definitely higher this year, I paid less for some non-perishables than I did two years ago. As I plan for next year’s events, being able to see what I paid makes it easy to budget ahead. Yes, keeping receipts is kind of “extra”, but it does help me when I do the household budget for next year. (which we’ll talk about in January). It also helps me keep track of the “emotional” last minute purchases. I didn’t need the flowers. They were beautiful, but we ended up having to move them to the kitchen to make room on the table. Although they do look lovely on my desk as I write this post.
So that’s the homework for this week. Start a Family Holiday Notebook and, if you still have them, add the receipts. From that work, begin a shopping list of things you need to replenish in your pantry for the week, for the upcoming holidays, and next year’s celebration. You can do this exercise in less than 30 minutes, and you’ve set yourself up for an even better prepared Thanksgiving 2022.
Next week we’ll return to upcoming holiday planning, and I’ve included some links below. The link to Prep & Plan: Week 7 has a list at the bottom of the post of all the homework assignments up to this week, if you want to review them. The other two links are for a 2021 Holiday Planner and a Portion Planner. Although it says Thanksgiving Portion Planner, it can be used for any event and any kind of food. Portions are based on weight and volume, not by individual recipes. I hope you all recover from the Thanksgiving food hangovers, and I’ll see you next week!
Click on the links below to read Prep & Plan Week 7 and catch up on homework:
Click on the links below to download the planners:
Subscribe to the blog Email Address
Subscribe
December 1, 2021
End of the Year Rituals
I am a quiet end-of-the-year kind of woman. I don’t love huge New Year’s celebrations because I’m tired from Christmas (all the cooking, cleaning, traveling, and company). While I love seeing my family, I prefer to spend New Year’s Eve and Day at home either in Virginia or Charleston. It’s a time for me to set up my planners and journals for the next year and to redo my vision board.

One of the things I’ve done the past few years is a more in-depth review of my year. Not just business stuff, but some personal stuff as well. The problem is that I often run out of time. So a few years ago I began doing my End of Year Review in mid-December. That way it’s done and out of the way before the holidays. And now that I have an LLC, I am supposed to have an annual meeting with notes to reflect on my entrepreneurial businesses and plan for the next year. So I do both at the same time.
If I can, I take an entire day (or sometimes a day and a night), and I go someplace quiet with my husband. Sometimes it’s our favorite pub in the Shendandoah Mountains, sometimes it’s a long hike with a homemade picnic dinner at the end, and during the pandemic I did it at home. In 2020 I made all of my favorite meals the day before and spent the day in front of my fire pit outside with a makeshift desk. It doesn’t matter how or where you do this. It’s just the act of doing it that can clear your mind, put the past to rest, and reset yourself for the upcoming year.
So what do I mean by End of the Year Ritual? It’s essentially a time set aside where you can think deeply and honestly about things. For some people, they need lots of noise and music to help them focus. They even go on a retreat with friends. Other people need complete solitude. Some others need an in-between space like working on their own in a crowded cafe. Then, once you’re settled in a comfortable space, you begin to ask yourself questions. (see below) They can be answered in a journal (my preference), or spoken aloud into a recorder, or not captured at all. Maybe you just want to think through your answers and will remember them as you plan for next year.
The primary point of this exercise is three-fold. First, to celebrate all you got done last year. Second, to put to rest those goals that didn’t get finished. Set them aside and forgive yourself, if necessary. It’s okay. You’re right where you need to be. Third, it’s to choose your goals and projects for next year. Maybe even the next five or ten years. So let’s get started:
 Set the mood
Decide where you’re going to review your goals. If you stay home, you could light your favorite candle and drink your favorite tea. You could check into a small inn and work in the sitting room. Or you could take a hike and journal along the way. It doesn’t matter. Do what works best for you.
Reflect on the last yearThis can be as simple as mentally reviewing your memories. Or you could journal about the year. Whichever you do, make sure to include the things you accomplished as well as those you didn’t. We have a tendency to focus on our failures instead of our successes, but in this exercise we want to focus on both. For work, review your business income, sales, and other specific goals. For personal, think about your relationships and other situations you worked on or are concerned about. This is a time to tie up loose ends, reflect on what went well, and feel good without putting pressure on yourself. One of the keys to success with this exercise is to tamp down the inner critic. Sometimes I bribe her (me) with a treat after the ritual is done like lunch with a friend or going to my favorite thrift shop.
Here are some questions to get you started:
What went well this year in business and in life?What moments in my life do I want to remember from this year?What lessons did I learn this year that I can carry into next year?What do I want to see change in the next year?What do I want to keep from the last year?What am I grateful for right now? What will I be grateful for this time next year?What were some of the highlights of the past year?What were some of the challenges from the past year?What things did I have no control over? (I’m looking at you, pandemic!)Write a future letter to yourselfI used to think this was a silly idea… until I started doing it. Now I realize it’s a powerful tool for positive self-reflection. If you wrote a letter to yourself last year, now is the time to read and reflect on it. Then write yourself a letter for next year. In this letter, I like to write down my dreams and hopes and visions for the year ahead. I also write down my intentions, as if I’m writing them into future existence. I end my letter with gratitude, usually a list of all I’m grateful for. Then I seal it in an envelope and put it away until next year’s ritual day.
Set intentionsInstead of resolutions, I prefer to set intentions. Intentions are purposeful. Intentions are about alignment with my future vision and goals as well as about discipline. I spend time in prayer and meditation in order to intuit the intentions I set for the next year. They are very personal and yours will look nothing like anyone else’s. In fact, I suggest you not share them with others. Keep them in your journal so you can review them throughout the year. I like to set one intention for each area of my life, and I write them in my journal. These are the areas I tend to focus on, but you can add your own and change mine. I like to have at least one intention per area, but sometimes I’ll have more in an area I need to work on.
Here is a list I use, in no particular order, to set my intentions.
Career/BusinessLove Life/MarriageFinances/WealthFamilyFriendsPhysical EnvironmentFun/RecreationHealth & FitnessPersonal DevelopmentSpiritual DevelopmentTravelVision BoardI love working on my vision board throughout the year, but I especially love rebuilding it at the end of each year. While my bigger dreams still seem so far away, I’m always amazed at what smaller dreams did come true. Even those that came true in a different way than I expected. I used to build my vision board on poster board with magazine cutouts and tons of glue sticks, but now I choose and edit my photos on Canva and build myself a vision board presentation with PowerPoint. That way I can have different slides, one for each area of my life listed above. Working with a vision board helps align your intentions. And don’t be surprised if you change your intentions after doing vision board work. Sometime what you think you want or need is different than what you truly want or need. (I hope that makes sense!) When I sit down to do this, the first thing I do is review the past year’s board and journal about it. Then I build the next year’s board, also journaling about my choices. That way, as the years pass, I can read about and remember my previous intentions, and hopes, and dreams. It’s a great exercise in being flexible. While so many things on my boards have happened, many have not–and that’s okay. Building a vision board helps you visualize your future but also helps you let go of the things in your past that weren’t working for you. And it’s all okay!
Clean House & contact loved onesMy grandmother used to say that how you end the old year and begin a new year sets the tone for all the months in between. (Maybe it stems from the ancient Scottish New Year’s tradition of Hogmanay and First Footing. In Scotland, on New Year’s Day, people clean their houses to ward off bad luck. At midnight, people stand outside their homes in a circle, holding hands, and sing Auld Lang Syne. Then, after midnight, they invite neighbors to enter their clean home. The First Footer is the person who enters the home first on New Years Day who is supposed to be harbinger of good fortune.) Anyway, one of the things I was taught is to clean your house around the New Year. I know it’s hard with all the holidays (decorations, company, cooking, etc) but I love to spend the days between Christmas and New Year’s Eve cleaning up as much as I can (although I leave my Christmas decorations up until the Epiphany). Then, come New Year’s Day, I feel like I’m starting the year with clean house and clearer head. Once the house is clean, I light a candle and say a blessing over our home. The other thing I include in this section is making sure I connect with those I love. This is a good time of year to revise your contact lists birthday calendars and, if you send cards out, to buy them in advance. In January, I will set aside a day to purchase and address cards I know I’m going to send out all year long. Then, a week before the event, I’ll write out the card and mail it. (Yes, I still love to mail and receive cards!). I may also make a note in my planner of when I’m going to call certain people, or make lunch dates with my friends. If it’s on my calendar, I’m much more likely to remember.
End of the Year Rituals set you up for success.They give you permission to set aside time to help you reflect on the past, offer gratitude for the present, and dream about the future. And I don’t know of any better way to both end one year and begin a new one. But the most important thing to remember is that your ritual is private and personal and you can make it all your own. The above suggestions are just that–ideas to help you build your own rituals so you can meet your own goals and fulfill your own, beautiful dreams. I wish you all a healthy and happy New Year.
Subscribe to the blog Email Address
Subscribe
November 30, 2021
NaNoWriMo Final Check-in
I’m not going to ask you if you won NaNo. Honestly, it doesn’t matter. NaNoWriMo is a great event to help spur your creativity and offers community in order to encourage writers to get their words down. And as a professional writer, I know how hard the fight is to get new words on the page.

But NaNo isn’t simply a month-long writing party. It’s a way to change the mindset, for the better, of writers who struggle. All writers including those who write for a living and those who write as a hobby. It also helps those who scratch words in the dark to keep themselves sane.
What I love about NaNo is the preparatory work in October that helps me focus on a new story or a story I’m currently working on. I also love the camaraderie in sprint groups on Facebook and Discord servers. I have won NaNo in the past and there have been some years that I’ve been editing a book and I didn’t add a single word. Yet the word count doesn’t matter. The most important thing that NaNo does is that it validates the act of writing itself. NaNo reminds us that writers can change how people think about the world around them. NaNo reminds us that writers can change the world. But there’s a caveat–NaNo reminds us that writers can only do those things if they actually commit the words to paper.
As for my check-in, I wrote 20,000 words on a new manuscript and spent weeks revising a current manuscript. While I have no idea how many words I changed, cut, edited, and rewrote on that manuscript, I was able to solve a troubling logic issue with the plot. And in the long run, that’s more important than word count. So, I didn’t win NaNo. And that’s okay. Because I worked and wrote and edited. For the month of November, I reminded myself that my words count and the stories in my head will one day sit in the hands of readers. For the month of November, I reminded myself that writing is what I’m meant to do with my life. For the month of November, I reminded myself that, despite the difficulty in getting words down, I am not alone.
NaNoWriMo ends today but the act of writing down words continues because our words matter. Our words can affect lives. Our words can change the world.
Subscribe to the blog Email Address
Subscribe
November 29, 2021
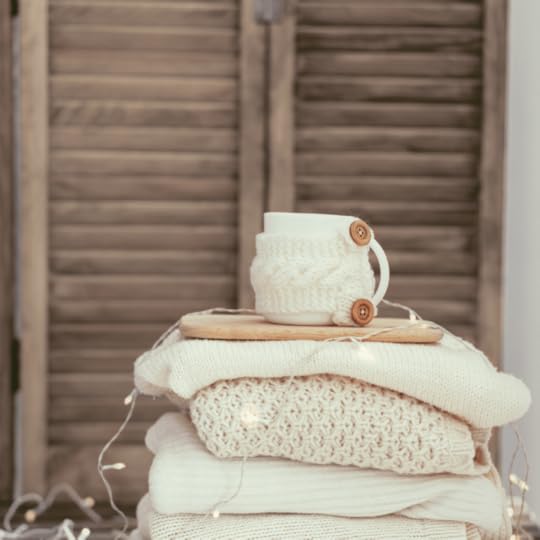
Sweater Care for Cold Weather
The colder weather has arrived and I’m pulling our family’s sweaters out of storage. We’ve had many of our wool and cotton sweaters for years, and a few of them were rescued from thrift shops.
One of the things I learned about during my clothing design internship in Paris, and when I was a student at FIT, was about how to care for sweaters. Although my specialty was wedding gown design, I still had to suffer through long lectures on the care of woolens and knits. Now that I’m older, I appreciate all the wisdom I acquired in those classes. But just in case you never learned how, here’s a quick primer on how to care for sweaters. Many of these steps should be done before they’re put away for the summer, but sometimes the cleaning comes in the fall. And that’s okay too.
1. Remove Pills ImmediatelyI hate seeing pills on my sweaters but they happen all the time. They’re caused by the threads rubbing against each other or other objects, and you tend to find them around the elbows, under the arms, and along the waistlines and sleeves. Regardless of where they are, they need to be removed immediately or the threads will begin to snag and the situation worsens from there.
To remove pills, lay the sweater flat and, with one hand holding a straight razor or pill remover, gently slice off the pills one at at time. Do not pull them. Things will get only worse if you do.
2. Fix Noticeable SnagsSnags, those little loops of thread when a stitch is unwoven, are dangerous. If the snag gets caught on something, the sweater will begin to unravel and form an unsightly hole. While snags can’t always be fixed, they can be ameliorated. Turn the sweater inside out. Then place a small crochet hook into the same stitch as the snag, and pull the loose thread through to the inside. A safety pin, or even a turkey skewer, will work in an emergency. The snag won’t be as noticeable and it won’t get caught on anything and make the hole bigger. If it’s a large loop of thread, I may use a fine hand needle and cotton thread in the same/close color to sew the loop together and attach it to another nearby thread. This takes practice, but if you do it right it’s hard to tell from the right side and will prevent any further damage.
3. Remove Dandruff, Hair, and LintKnitted or woven sweaters are usually made of soft wool, cotton, or cashmere but those natural fibers attract dust, lint, dog hairs (!!!), dandruff, and stray hairs that make sweaters, especially darker colors, look worn and used. To remove the debris, use a tape roller or a lint brush or a small, soft tooth brush. Make sure to brush along the fibers in one direction, very gently, to prevent damaging the fibers and cause pilling. If you brush in one direction, any damage will be less noticeable. Lint brushes have arrows on them so you know which way to brush. A good way to keep sweaters looking fresh is to do a quick, gentle brush every time you take them off and before you put them away.
4. How & When to WashWashing your sweaters shouldn’t be scary! First of all, check the label to see if it should be dry cleaned. While not everything in your closet needs to be dry cleaned, certain things do depending on the fibers, weave, and any ornamentation. If there are fancy buttons or fur colors are sequins, etc, the sweaters must go to a professional cleaners. But most everyday sweaters can be hand washed to get the longest life out of them. To hand wash, fill a sink or tub with cool water and mix in a few drops of a gentle laundry detergent. While the tub/sink fills, make a note of any particular stains on the sweater that need to be worked on.
Gently submerge the sweater into the water and let it soak for 30 minutes. Then, with a soft washcloth or a small, very soft toothbrush, very gently rub at the stain until it is gone. Do not rub too hard. Some stains fade enough you can’t see them, but if you damage the fibers that will be even more noticeable. When you are done, gently rinse in cool water. To dry, gently squeeze out the water (do not wring!!) and lay the wet sweater on a towel. Then roll the towel up like a sleeping bag to remove the extra water. Unroll and lay the sweater flat on a clean, dry towel or on a drying rack.
Note about stains: Even if a sweater can be hand washed, some stains (markers, pen ink, and oil/grease) need to be handled by a professional. Also, if you have a dark stain like coffee on a light-colored/white/cream sweater, that may need to go to the cleaners as well to make sure the edges of the stain are removed. The darkest part of a stain is always around the edges where the contaminant pools. And if the sweater smells like smoke (cigarettes, bonfires, etc), then consider it stained. You may not see the smoke particles but they are there and they weaken the fibers.
Note about fibers: Cotton and cashmere need the most attention and should be washed after every three wearings (unless they get stained, dirty, etc). Wool and polyester can usually handle five-six wearing. ALWAYS follow the directions on the label. And, if possible, spot clean small stains in between washings but please don’t wash more often than necessary. And dry clean only labels are serious–DRY CLEAN ONLY!
5. Wear a T-shirtOne way to cut down on washing sweaters is to wear a T-shirt beneath it. The T-shirt works as a barrier between sweater and skin and will soak up sweat, deodorant, and body oils. Wearing a T-shirt can extend the life of you sweaters because it eliminates the need for more frequent washings–as long as you don’t dump your coffee all over the front!
6. Save an Itchy SweaterSometimes, after many washings, the fibers of a sweater loosen or break and make a soft, cozy sweater super itchy. One way to save an itchy sweater is to fill a sink or tub with cold water and add a cap-full of liquid fabric softener (find one without any dyes or fragrance, if possible). If you don’t have fabric softener, you can use a 1/2 cup of hair conditioner (without fragrance or dyes). Do not use a shampoo/conditioner combination or a heavy super-conditioner as they have too many thickening ingredients that can damage the fibers. Let the sweater sit in the water for 30 minutes and then rinse with cold water and dry the sweater according to the directions above. You may need to do this a few times before the sweater feels soft and cozy again.
7. Save a Stretched Sweater
To save a stretched out sweater, fill a tube or sink with cold water and submerge the water. Gently roll out the extra water (like described above) and put it into the dryer on a sweater/sneaker shelf if you dryer has that feature. (if it doesn’t just toss it into the dryer). Set the temperature to High Heat and let the dryer run until it is dry. This will shrink the sweater. I you only need a bit of shrinkage, take the sweater out of the dryer early and let air dry.
Note on shrinking: The amount of water in the sweater will determine the amount of shrinkage. The wetter the sweater is, the more it will shrink. If you just need a bit of adjustment, mist it the sweater with a water bottle until just damp and throw it into the dryer. Also, not all fibers will work well with this shrinkage technique. Cashmere and silk blends may shrink way too much while polyester hardly shrinks at all. But if you can no longer wear the sweater, then you have nothing to lose by trying to shrink it the best you can.
8. Folding SweatersNever, ever, ever hang sweaters! Hanging sweaters will cause them to stretch out and will add “peaks” to the shoulders. The best way to store sweaters–once they are clean–is to fold them or roll them and store them in drawers or on shelves. To fold properly, lay them face-down on a bed or a flat surface. Fold each arm from the sleeve seam diagonally across the back and crisscrossing the sleeves. Fold the sweater either horizontally or vertically in half from the bottom hem to the collar. Fold again, if necessary, to fit in a drawer or a shelf. If storing sweaters on top of each other, place a piece of white tissue paper or squares of an old, clean white sheet you’ve cut up between the sweaters. Do not use colored tissue paper as, over time, the dye can leach into the sweaters. Add a few cedar blocks or chips or lavender sachets to the shelves and drawers to keep away any critters like moths, etc.
If you have to hang a sweater, fold it over a hanger with a piece of white tissue paper between the hangar and the sweater to prevent creases. And never, ever, ever store sweaters in dry cleaning bags/plastic bags. Natural fibers need to breathe and they need circulating air to keep away critters and prevent mildew.
9. Packing Away SweatersWhen sweater season is over (sob!!), don’t just toss them into drawers. First, make sure they are cleaned and dried, either by hand or at the cleaners. Then fold them (directions above) and place them in a drawer or shelf. If you need to put them in boxes, use only canvas or cotton bins. Add in lavender or cedar sachets/bricks, and store in a a cool, dry closet. DO NOT store in plastic bags as it can trap moisture and cause yellowing or mildew. DO NOT store sweater bins in attics. DO NOT store sweater bins in basements unless they are climate-controlled.
Bugs hate the scents of cedar and lavender so you can’t have too much of either stored with your sweaters. This might be a lot of work, but when you pull out your sweaters next year, you’ll thank me.
10. Saving Sweater DecorationsIf the sweater has decorative elements like fur collars or fancy buttons, or sequins, etc., make sure to use a piece of muslin or cut-up cotton sheet in between the sweaters when storing them on a shelf, drawer, or bin. Fancy buttons and sequins can cause pilling and snags on the sweater stored on top. If a fur collar is removable, do so in between wearings and before storing and gently lay the collar on top of the sweater. This will prevent the button holes that hold the collar onto the sweater from stretching and will prevent creases in the fur. And if fancy buttons are heavy, check to make sure they are still attached to the sweater securely. With heavy buttons, you may have to re-sew the buttons on with heavy button thread to make sure you don’t lose them. Standard buttons can be replaced, but fancy decorative buttons are hard to find and replace and you’ll be sorry to lose them.
Subscribe to the blog Email Address
Subscribe