Sharon Wray's Blog, page 60
December 24, 2021
The Hungry {Romance} Writer: Sugar Ginger Pecans
It’s week four of my DIY Christmas and today I’m making Sugar Ginger Pecans. My husband’s family is from Charleston, SC and this recipe (from my SIL) is a staple of every holiday cocktail party we attend when we’re in town.

These nuts are easy to make but they do taste better the second day so I try to make them a few days before I give them away. The problem with these nuts, though, is that you have to eat them alone otherwise people will look at you strangely as you shove fistfuls into your mouth while you hide in the corner of the dining room. They are that good! But that’s also what makes them a perfect holiday gift. They can be packaged in colorful cellophane, glass jars, or vintage cookie tins. And if you’re giving them as a gift, I suggest you slip a recipe card inside because the giftee will definitely be asking for the recipe later!
Sharon Wray
Yields 5 cups of nuts
Serves 20 servings
The Hungry {Romance} Writer: Sugar Ginger PecansThis recipe came from my sister-in-law in Charleston, SC where these nuts are served during the cocktail hour or on the appetizer table. They are easy to make, but I recommend making them a day ahead so the flavors have a chance to blend together and mellow. They also make a great hostess gift and will last up to two weeks in an airtight container.
20 minPrep Time
15 minCook Time
35 minTotal Time
 Save Recipe Print Recipe var print_b = document.getElementById('mpp_print_button'); var save_b = document.getElementById('mpp_saverecipe_button'); print_b.onclick = function(){ zlrPrint( "mpprecipe-container-200", "https://sharonwray.com/wp-content/plu...", "mpprecipe-design22", "1", "#" ) }; save_b.onclick = function(){ window.open('https://sharonwray.mealplannerpro.com...' + window.location.href); return false; };
 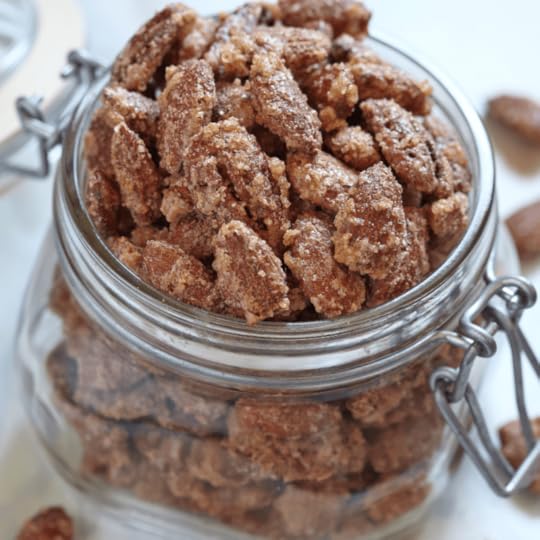 My Recipes My Lists My Calendar
 Ingredients
5 cups pecan halves1/2 cup granulated sugar2 teaspoons Kosher salt1 teaspoon ground ginger2 Tablespoons honey2 Tablespoons filtered water2 teaspoons extra virgin olive oilInstructions
Heat the oven to 325 degrees F. Line a rimmed baking sheet with parchment paper.Place the pecans in one layer on the baking sheet. Bake for 10-15 minutes to lightly toast the pecans. Do not over bake or let the nuts burn.In a large glass bowl, combine the sugar, salt, and ginger. Set aside.In a sauté pan over high heat, stir together the honey, water, and olive oil until mixed. reduce heat to medium and stir in the pecans. Cook for 2-3 minutes until all the liquid has evaporated and nuts are fully coated.While the nuts are in the sauté pan, put a clean piece of parchment on the baking sheet.Immediately stir the nuts into the glass bowl with the sugar mixture and toss well.Turn nuts onto the baking sheet and separate them as much as you can. Let nuts dry on the baking sheet on the counter for at least 1 hour.While they can be eaten warm, or just after they've cooled, they taste better the next day once the flavors have melded together.Store in an airtight glass container or a cookie tin lined with wax paper of parchment paper. Will keep up to 2 weeks.7.8.1.2200https://sharonwray.com/the-hungry-writer/the-hungry-romance-writer-sugar-ginger-pecans/ { "@context": "http://schema.org/", "url": [ "https:\/\/sharonwray.com\/the-hungry-writer\/the-hungry-romance-writer-sugar-ginger-pecans\/" ],"name" : "The Hungry {Romance} Writer: Sugar Ginger Pecans","description" : "This recipe came from my sister-in-law in Charleston, SC where these nuts are served during the cocktail hour or on the appetizer table. They are easy to make, but I recommend making them a day ahead so the flavors have a chance to blend together and mellow. They also make a great hostess gift and will last up to two weeks in an airtight container. ","prepTime" : "PT20M","cookTime" : "PT15M","recipeYield" : "5 cups of nuts","datePublished" : "2021-11-16 07:02:05","recipeInstructions":[ { "@type": "HowToStep", "text": "Heat the oven to 325 degrees F. Line a rimmed baking sheet with parchment paper. " }, { "@type": "HowToStep", "text": "Place the pecans in one layer on the baking sheet. Bake for 10-15 minutes to lightly toast the pecans. Do not over bake or let the nuts burn." }, { "@type": "HowToStep", "text": "In a large glass bowl, combine the sugar, salt, and ginger. Set aside." }, { "@type": "HowToStep", "text": "In a saut\u00e9 pan over high heat, stir together the honey, water, and olive oil until mixed. reduce heat to medium and stir in the pecans. Cook for 2-3 minutes until all the liquid has evaporated and nuts are fully coated. " }, { "@type": "HowToStep", "text": "While the nuts are in the saut\u00e9 pan, put a clean piece of parchment on the baking sheet." }, { "@type": "HowToStep", "text": "Immediately stir the nuts into the glass bowl with the sugar mixture and toss well." }, { "@type": "HowToStep", "text": "Turn nuts onto the baking sheet and separate them as much as you can. Let nuts dry on the baking sheet on the counter for at least 1 hour." }, { "@type": "HowToStep", "text": "While they can be eaten warm, or just after they've cooled, they taste better the next day once the flavors have melded together. " }, { "@type": "HowToStep", "text": "Store in an airtight glass container or a cookie tin lined with wax paper of parchment paper. Will keep up to 2 weeks." }],"keywords" : "The Hungry {Romance} Writer: Sugar Ginger Pecans","recipeIngredient" : ["5 cups pecan halves","1\/2 cup granulated sugar","2 teaspoons Kosher salt","1 teaspoon ground ginger","2 Tablespoons honey","2 Tablespoons filtered water","2 teaspoons extra virgin olive oil"], "image": { "@type": "ImageObject", "url": "https:\/\/sharonwray.com\/wp-content\/uploads\/2021\/11\/28.png" }, "author": { "@type": "Person", "name": "Sharon Wray" }, "nutrition": { "@type": "NutritionInformation", "servingsize": "20 serving"},"@type": "Recipe"}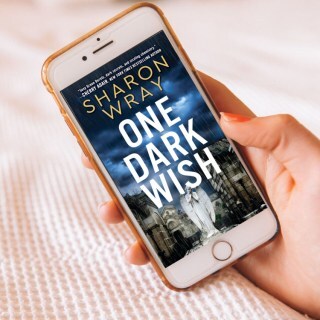 Subscribe to the blog
 Email Address
Subscribe


December 23, 2021
Twas the Night Before Christmas
No one was more surprised than Dr. Clement C. Moore at the success of a poem he wrote on December 23, 1823 as a Christmas gift for his children. Although he loved kids and writing poetry, he was a scholar who’d assumed that he’d be remembered for a famous Hebrew dictionary that he’d written in 1809 titled the Hebrew and English Lexicon. He was very wrong.

Clement Clarke Moore was born near Chelsea Square in New York City in 1779, and he lived there his entire life. It was a huge house with lots of fireplaces which was good thing because after he married his wife Catherine Elizabeth Taylor, they had nine children. Clement came from a prominent and wealthy NY family and graduated from Columbia College with his B.A. and M.A. He was a theologian and author and professor of ancient languages who had his hand in local politics.
After visiting his cousin in Constable, NY, he wrote this poem as a Christmas gift to his children. Unbeknownst to Moore, a friend anonymously sent the poem to a local paper and it was published on December 23, 1823 in the Troy (NY) Sentinal under the title “A Visit from Saint Nicholas”. The poem gained popularity and it was eventually published in a collection of poems in 1837 with the title “Twas the Night Before Christmas”. At first Moore declined to admit he was the author since he was afraid it would harm his reputation as a scholar. But eventually the story got out and Moore admitted he was the author.
This poem has since been published in most languages around the world, and it has been made into movies and set to music. It also had a profound effect on the way we conceptualize Santa Claus and spear-headed the more modern idea of holiday gift giving (and shopping!). The poem is now in the public domain, and I’ve posted it below for you to enjoy. I hope you all have a Merry Christmas and a happy holiday season!
Twas the Night Before Christmas by Clement C. Moore‘Twas the night before Christmas, when all through the house
Not a creature was stirring, not even a mouse;
The stockings were hung by the chimney with care
In hopes that St. Nicholas soon would be there;
The children were nestled all snug in their beds,
While visions of sugar-plums danced in their heads;
And mamma in her kerchief, and I in my cap,
Had just settled our brains for a long winter’s nap,
When out on the lawn there arose such a clatter,
I sprang from the bed to see what was the matter.
Away to the window I flew like a flash,
Tore open the shutters and threw up the sash.
The moon on the breast of the new-fallen snow
Gave the lustre of mid-day to objects below,
When, what to my wondering eyes should appear,
But a miniature sleigh, and eight tiny reindeer,
With a little old driver, so lively and quick,
I knew in a moment it must be St. Nick.
More rapid than eagles his coursers they came,
And he whistled, and shouted, and called them by name:
“Now, Dasher! now, Dancer! now, Prancer and Vixen!
On, Comet! on, Cupid! on, Donder and Blitzen!
To the top of the porch! to the top of the wall!
Now dash away! dash away! dash away all!”
As dry leaves that before the wild hurricane fly,
When they meet with an obstacle, mount to the sky;
So up to the house-top the coursers they flew,
With the sleigh full of Toys, and St. Nicholas too.
And then, in a twinkling, I heard on the roof
The prancing and pawing of each little hoof.
As I drew in my head, and was turning around,
Down the chimney St. Nicholas came with a bound.
He was dressed all in fur, from his head to his foot,
And his clothes were all tarnished with ashes and soot;
A bundle of Toys he had flung on his back,
And he looked like a peddler just opening his pack.
His eyes–how they twinkled! his dimples how merry!
His cheeks were like roses, his nose like a cherry!
His droll little mouth was drawn up like a bow,
And the beard of his chin was as white as the snow;
The stump of a pipe he held tight in his teeth,
And the smoke it encircled his head like a wreath;
He had a broad face and a little round belly,
That shook when he laughed, like a bowlful of jelly.
He was chubby and plump, a right jolly old elf,
And I laughed when I saw him, in spite of myself;
A wink of his eye and a twist of his head,
Soon gave me to know I had nothing to dread;
He spoke not a word, but went straight to his work,
And filled all the stockings; then turned with a jerk,
And laying his finger aside of his nose,
And giving a nod, up the chimney he rose;
He sprang to his sleigh, to his team gave a whistle,
And away they all flew like the down of a thistle.
But I heard him exclaim, ere he drove out of sight,
“Happy Christmas to all, and to all a good-night.”
Subscribe to the blog Email Address
Subscribe
December 22, 2021
St. Brigid’s Blue Cloak
“There is nothing so secular that it cannot be sacred, and that is one of the deepest messages of the Incarnation.” Madeleine L’Engle
St. Brigid is one of Ireland’s three patron saints, and she is only female among them. The two others are St. Patrick and St. Colmcille. Brigid was born fifteen centuries ago in ancient Ireland, during the transition from the druid (Celtic pagan) practices to christianity. She was a fascinating woman, especially for the times in which she was born, and there are many stories and miracles associated with her life. But one of my favorite stories is an old Irish folktale about the night Brigid and her blue cloak were transported back in time to the scene of the Nativity.

Brigid was born a slave child to a pagan Irish King and a Christian slave woman on a cold, dark winter’s night. On the night of her birth, an ancient Druid priest visited the Christian mother. He carried a lantern that supposedly had been lit by the stars themselves. Since the Druids were known to tell the future, and the priests were still revered by the Irish, the mother allowed him in. He told all the women in the room that Brigid would one day become the mother of Ireland and he laid a blue cloak over her crib.
As Brigid grew and learned to care for sheep, she always wore her blue cloak, always wondering about the Druid’s strange words. As a very poor girl, her blue cloak was her most treasured possession despite the fact that the cloak’s color faded and it looked more and more worn with every passing year. As she cared for her sheep, month after month, she contemplated the Nativity, often thinking about what it had been like for Mary to give birth in a stable on a cold, dark night.
Then one Christmas Eve night, as Brigid locked up her sheep, all the stars in the sky began twinkling. She closed her eyes against the bright lights, but when she opened them she discovered she wasn’t home. She was in a desert town with low buildings. It was cold, and dark, and she was entirely alone. Suddenly, a man appeared and ordered her back into an inn to keep serving dinner. Unsure of what was going on, she went into the inn and helped serve the visitors. The inn was full and she soon realized that she was in Bethlehem and that all the beds in the small village were filled.
Suddenly, a knock came on the inn door. Brigid heard the inn keeper tell a man that there was no room in the inn, and she suddenly understood what was going on. She ran outside and followed the man. When she reached the man, she grabbed his robes and said, “There’s no room at the inn, but there is a stable.”
Quickly, she helped Joseph get Mary settled in the barn. Then she ran back and forth from the inn, looking for water and anything that would help ease Mary’s situation. She covered the hay with Joseph’s cloak and then put her own blue cloak around Mary’s shoulders since she was shivering. When Brigid returned with more water, Mary gave Brigid the baby Jesus to hold. Brigid held the baby, her heart bursting with love, and then gently placed him in the manger so she could help get Mary settled. Suddenly, Brigid heard beautiful music filling the air, as if the world was singing in joy.
Mary then said to Brigid, “Thank you, child of the west, for your generosity,” and handed the blue cloak to Joseph. Joseph placed the cloak around Brigid’s shoulders and suddenly everything went black. After blinking a few times, she discovered she was in her own stable surrounded by her animals. Her mother appeared, worried about where Brigid had been, and started scolding her daughter–until her mother noticed Brigid’s cloak.
Brigid’s cloak was now a deep blue and shimmered, like it was covered in tiny silver stars. Brigid’s cloak, which shows up in many of her later miracles, was so revered that it appears in Scottish and Irish nursery rhymes. St. Sauveur Cathedral in Bruges, Belgium has a relic–a blue cloak–that they believe to be the cloak of St. Brigid. There is even a charming children’s picture book that tells the story in even more detail and with beautiful illustrations. It’s called Brigid’s Cloak: An Ancient Irish Story by Bryce Milligan and Helen Cann. Although this is an old Irish folktale, it’s a charming story of faith, hope, and love that I hope you love as much as I do.
Subscribe to the blog Email Address
Subscribe
December 21, 2021
Sarah Munro’s Mugwort Vinegar
I love flavored vinegars. And if the flavored vinegar contains extra Vitamin C, calcium, and magnesium from a locally-source herb, all the better! Flavored vinegars have been around for centuries, and Sarah Munro, the heroine of ONE DARK WISH (book 2 in the Deadly Force series), has collected and updated a bunch of 17th and 18th century recipes that are still used today.
So what is mugwort? To be honest, it’s a weed called Artemisia vulgaris. The kind of weed you find on the side of the road and in abandoned fields. It can grow taller than a man, and has leaves with a silvery underside. It also has a strong, pungent smell when crushed. Artemisia is an herb traditionally used as a digestive aid. Since it’s a bitter herb, it stimulates the production of stomach acid and bile. It tastes wonderful when infused with apple cider vinegar, and I drizzle it over salads and steamed veggies. It’s easy to make and is loaded with vitamin C which makes it a perfect addition to the winter kitchen.
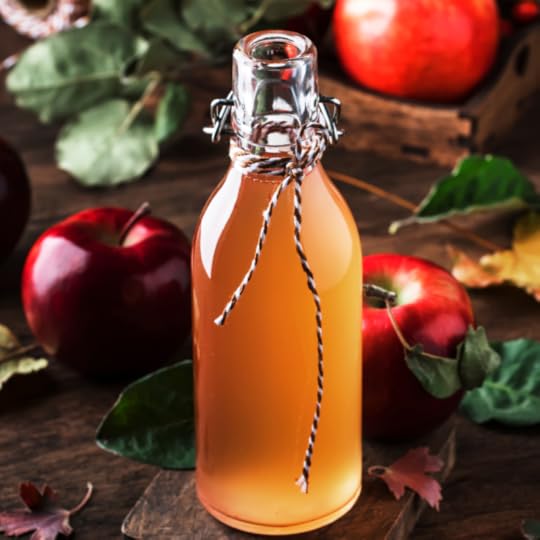 Sarah Munro’s Mugwort VinegarINGREDIENTS:1 pint-sized glass jar with a tight-fitting lid, sterilized1 1/2 cups fresh mugwort leaves, washed & dried (if using dry leaves, use 3/4 cup)Unfiltered Apple Cider Vinegar (with mother)Wax paper to cover the top of the jar1 pint-sized dark-colored glass jar with a tight-fitting lidDIRECTIONS:
Place the mugwort leaves into the glass jar. Fill the jar to with 1/4 inch of the brim with apple cider vinegar. Stir with a wooden spoon handle to get rid of any air bubbles. Cover the jar with the wax paper and place the lid on and twist tightly. The was paper prevents the lid from corroding. Store in a dark cabinet for up to six weeks. Strain the vinegar through a fine sieve or even cheesecloth into a measuring cup and, if necessary, strain again. Pour the vinegar into a clean dark-colored glass jar and twist the lid on tightly. Label the bottle and store at room temperature for 2 months. Store in the refrigerator for a longer shelf life, up to 6 months.
IMPORTANT DISCLAIMER ABOUT WILD PLANTS, FORAGING , AND MAKING HERBAL REMEDIES:I am not a medical professional and nothing written on this blog is medical advice. None of my statements have been evaluated by the FDA (I am legally required to give you this disclaimer).
It is important to do your due diligence before foraging, harvesting, and/or consuming any type of medicinal plant.
If you are taking any medications, talk to your doctor about any potential drug interactions.If you are allergic to anything, make sure whatever you are foraging is not in the same family. Example: While dandelions are typically considered safe, those who are allergic to ragweed, latex, daisies, or any other plants in the same or similar families, may not be able to consume dandelion.Always research potential side effects, dosage recommendations, and how to properly prepare and consume each medicinal plant.
Always make sure you are foraging what you believe to be. Fully prepare and study the anatomy before harvesting wild plants.
Always make sure your kitchen/work area is clean and that all materials are sterilized.
Do not forage plants from areas that have been sprayed within the past 2 years at the very least.
I am not legally or morally responsible for the health of any of my readers. Please do your own research!
Subscribe to the blog Email Address
Subscribe
December 20, 2021
Winter Solstice & Pot Pies
That old saying about everything being darkest before the dawn comes from an event that takes place every year on December 21. The word “Solstice” is derived from an ancient Latin word “solstitium” meaning “sun” (sol) + “stitium” meaning “to stand still”. The Winter Solstice refers to the day when the earth’s orbit is tilted the farthest away from the sun, and the sun travels the shortest path across the sky. Unlike the Fall and Spring equinoxes where the days and nights are the same length, the Winter Solstice is gives us the shortest day and the longest night of the year. It also ushers in the colder winter weather. Luckily for us, with each passing day, the earth begins to tilt towards the sun again bringing longer days and shorter nights.

Every place in the world has its own folklore and stories about the Winter Solstice, some dating back to neolithic times. In Pakistan, the Kalash people celebrate the Festival of Chaomos where they perform ritual baths as part of a purification process before attending a huge bonfire with feasting and dancing. In China, and other East Asian countries, they celebrate the Dongzhi Festival. This tradition derives from the concept of Yin and Yang philosophy of balance and harmony on the earth and in they sky. During this festival, families gather and eat tangyuan (balls of rice) that symbolize reunion. In northern territories, they eat dumplings to keep themselves warm.
In Scandinavia, it’s the time of the Yuul celebration. It used to be a pagan celebration when Yuul logs were burned and bonfires were lit to symbolize heat and honor the sun. They believed that the Yuul (now called Yule) log had a magical effect on making the sun burn longer and more brightly, and the embers frightened away evil spirits. They celebrated with mead (fermented honey) while minstrels sang of the ancient legends and gods. Today this festival is imbued with christian beliefs and leads into Christmas holidays.
In India, there is a huge festival known as Makar Sankranti, a time of gift giving and special prayers. Then there is the Jewish festival of Hanukkah whose Festival of Lights is seen to be a metaphor for the hopeful return of the sun and lengthening of days. Even the Romans celebrated this time of year with their festival of Saturnalia. It was a huge (some historians say debauched) party dedicated to Saturn, the god of agriculture, whose favor they hoped to garner when the spring planting time came around.
One of the most famous celebrations still takes place at Stonehenge, an extraordinary stone monument built by Neolithic people in Wiltshire, England. It may be at least 5,000 years old, and its massive stones are perfectly aligned with the sun’s rays on the Winter Solstice and the Summer Solstice. Archaeological evidence shows that the Druids (a group of Celtic pagans) held huge feasts, with dancing, eating, bonfires, and sacrifices around the monument while they waited for the sunset to be visible through the center of the stone circle.
In christian traditions, St. Lucy’s Day (December 13) and three Ember Days lead up to the winter solstice during this season called Advent. This year, the Ember Days are December 15, 17, and 18th and they are a time of prayer and fasting in gratitude. Gratitude for the previous harvest. Gratitude for making it through the winter so far. And gratitude for the coming spring when the world is renewed.
I love holidays that involve food and luckily, because this day is celebrated by cultures around the world, there are tons of recipes that represent the day. So regardless of how you celebrate the Winter Solstice, and even if you don’t, here’s a recipe for my homemade Beef Pot Pies. They’re super easy to make and a great way to keep warm on the longest night of the year.
 PrintThe Hungry {Romance} Writer: Beef Pot PiesI received this recipe years ago from one of my sister-in-laws and then adapted it for my own family. I added the carrots and took out the mushrooms, and I added more tomato sauce because I thought it needed more liquid. The filling can be made the day ahead and then assembled the next night for dinner. The pastry dough needs at least 20 minutes to defrost before it's pliable enough to roll out. But if it defrosts for too long, the pastry won't puff. Course Main CoursePrep Time 35 minutesCook Time 20 minutesTotal Time 55 minutesServings 4 peopleIngredients1 pound ground beef1 Tablespoon extra virgin olive oil1 small Vidalia onion finely chopped1 teaspoon minced garlic1 Tablespoon dried parsley1 teaspoon dried oregano8.5 ounce can of no-salt added peas drained8.5 ounce can of carrots drained8 ounce can tomato sauceKosher salt & ground pepper to taste1 cup shredded cheddar cheese1 sheet Pepperidge Farm frozen puff pastryInstructionsPreheat oven to 350 degrees F.Take out 1 sheet of puff pastry and place on the counter to defrost.Line a baking sheet with tin foil and place 4 1-cup ramekins on the sheet. Set aside.In a large skillet, brown the ground beef. When the beef is cooked, use a slotted spoon to move the meat to a bowl. Set aside.Pour out most of the pan drippings. Add in 1 Tablespoon of olive oil and heat.Saute onions until lightly browned, about 10 minutes.While the onions are cooking, drain the peas and carrots. If the carrot pieces are larger than 1/2″, then chop the carrots. Set the peas and carrots aside.When the onion is beginning to caramelize, add the garlic and sauté for 3 minutes.Add in the peas and carrots. Then stir in the beef and tomato sauce.Stir in the oregano, parsley, salt, and pepper.Bring mixture to a boil and reduce to a simmer for 15 minutes to let the flavors blend. Adjust seasonings as necessary.While the mixture is simmering, roll out the pastry dough on a lightly dusted counter. Roll it into a 14″ x 14″ square. Cut into four equal pieces. Cut a small vent hole into the center of each pastry square.Evenly divide the meat mixture and spoon into the ramekins.Divide the cheese and sprinkle over each ramekin.Place a square of pastry dough on each ramekin and press around the edges to seal. Make sure you have a small vent hole in the center.Bake for 15-20 Minutes, until the mixture is bubbly and the dough is lightly browned and puffy.Serve immediately.Subscribe to the blog
 Email Address
Subscribe
December 17, 2021
The Hungry {Romance} Writer: Sugared Cranberries
For my third week of DIY holiday gifts, I’m making Sugared Cranberries. This recipe for Sugared Cranberries dates back to the early 1700s but has been updated with superfine sugar. Which, basically, is sugar that has been thrown in the food processor for a minute. For extra flavor, you could add a few Tablespoons of orange juice or pomegranate juice to the simple syrup.

These treats will keep in a glass jar or a cookie tin for up to two weeks. They make a great appetizer or after dinner dessert. They’re both sweet and tart and, as a bonus, are pretty to look at. When I give these as a gift, I prefer to store them in glass jars so the colors shine through. But they can also be stored in a cookie tin lined with wax paper. They are easy to make but take time so I always need to plan ahead. I just love how pretty they are!
Sharon Wray
Yields 10
The Hungry {Romance} Writer: Sugared CranberriesThese berries are easy to prepare and work well on an appetizer table or as a garnish for a holiday dessert. This recipe has been adapted from a Cooking Light magazine I found in a doctor's office in 2002. If you can't find superfine sugar, make your own by processing the sugar in a food processor for no more than a minute. For more flavor, you can always add 2 Tablespoons of orange juice or pomegranate juice to the water. These berries make a great holiday hostess gift.
10 minPrep Time
8 hr, 15 Cook Time
8 hr, 25 Total Time
Save Recipe Print Recipe var print_b = document.getElementById('mpp_print_button'); var save_b = document.getElementById('mpp_saverecipe_button'); print_b.onclick = function(){ zlrPrint( "mpprecipe-container-199", "https://sharonwray.com/wp-content/plu...", "mpprecipe-design22", "1", "#" ) }; save_b.onclick = function(){ window.open('https://sharonwray.mealplannerpro.com...' + window.location.href); return false; };  My Recipes My Lists My Calendar
 Ingredients
2 cups granulated sugar2 cups water2 cups fresh cranberries, picked over and rinsed3/4 cup superfine sugarInstructions
In a medium saucepan, combine the granulated sugar and the water. Turn heat on low.Stir the sugar and water until all of the sugar dissolves. Bring to a simmer and remove from heat. (Do not boil or berries will pop)Gently stir in the berries and pour the entire mixture into a large bowl. Cover and refrigerate at least 8 hours or overnight.Line a large, rimmed baking sheet with wax paper or parchment paper.over another large bowl, use a colander to drain the cranberries. Reserve the liquid.Place the superfine sugar in a baking dish or a large plate with a lip. Gently add the cranberries, rolling them around to make sure they are all coated.Turn the berries onto the baking sheet, making sure they don't touch each other. Let the berries dry on the counter for at least 2 hours. Once they are. completely dry, store them in a glass container with a tight-fitting lid. Will last up to two weeks.7.8.1.2199https://sharonwray.com/the-hungry-writer/the-hungry-romance-writer-sugared-cranberries/ { "@context": "http://schema.org/", "url": [ "https:\/\/sharonwray.com\/the-hungry-writer\/the-hungry-romance-writer-sugared-cranberries\/" ],"name" : "The Hungry {Romance} Writer: Sugared Cranberries","description" : "These berries are easy to prepare and work well on an appetizer table or as a garnish for a holiday dessert. This recipe has been adapted from a Cooking Light magazine I found in a doctor's office in 2002. If you can't find superfine sugar, make your own by processing the sugar in a food processor for no more than a minute. For more flavor, you can always add 2 Tablespoons of orange juice or pomegranate juice to the water. These berries make a great holiday hostess gift.","prepTime" : "PT10M","cookTime" : "PT8H15M","recipeYield" : "10","datePublished" : "2021-11-16 06:32:14","recipeInstructions":[ { "@type": "HowToStep", "text": "In a medium saucepan, combine the granulated sugar and the water. Turn heat on low." }, { "@type": "HowToStep", "text": "Stir the sugar and water until all of the sugar dissolves. Bring to a simmer and remove from heat. (Do not boil or berries will pop)" }, { "@type": "HowToStep", "text": "Gently stir in the berries and pour the entire mixture into a large bowl. Cover and refrigerate at least 8 hours or overnight." }, { "@type": "HowToStep", "text": "Line a large, rimmed baking sheet with wax paper or parchment paper. " }, { "@type": "HowToStep", "text": "over another large bowl, use a colander to drain the cranberries. Reserve the liquid." }, { "@type": "HowToStep", "text": "Place the superfine sugar in a baking dish or a large plate with a lip. Gently add the cranberries, rolling them around to make sure they are all coated. " }, { "@type": "HowToStep", "text": "Turn the berries onto the baking sheet, making sure they don't touch each other. Let the berries dry on the counter for at least 2 hours. Once they are. completely dry, store them in a glass container with a tight-fitting lid. Will last up to two weeks." }],"keywords" : "The Hungry {Romance} Writer: Sugared Cranberries","recipeIngredient" : ["2 cups granulated sugar","2 cups water","2 cups fresh cranberries, picked over and rinsed","3\/4 cup superfine sugar"], "image": { "@type": "ImageObject", "url": "https:\/\/sharonwray.com\/wp-content\/uploads\/2021\/11\/11-1.png" }, "author": { "@type": "Person", "name": "Sharon Wray" }, "nutrition": { "@type": "NutritionInformation", "servingsize": "1 serving"},"@type": "Recipe"}Subscribe to the blog Email Address
Subscribe
December 16, 2021
Prep & Plan: Week Ten
December is flying by, and I can’t believe that within two weeks I have to wrap way too many presents. So today’s post is another short article about a simple thing we can do this season to help set us up for future events that require wrapped gifts. Today we’re going to talk about organizing our wrapping paper and ribbons, tags, and other ephemera.

By now, you’ve probably wrapped your gifts or are getting ready to do so. You may even be thinking about what wrapping supplies you have, what you need, and what you could toss because you’ll never use. So it’s time to get this all organized. Especially if you plan on purchasing more wrapping supplies when they are 50% off the day after Christmas!
Let’s inventory wrapping supplies:Using the household legal pad (see Prep & Plan: Week 1), use one of the pages (it doesn’t matter if it’s in order since we can make washi tape tabs later) and as you wrap your gifts, write down how many rolls of paper you have left over. If you can, also write down how many rolls you used. While this might not be a great way to estimate future holiday wrapping needs, it will give you an idea–especially if you keep track year-to-year.
If you keep all of your year-round wrapping paper together with your holiday paper, take the time to inventory that as well. It won’t take long. As you do this, if you find any paper you hate or will never use, toss it or donate it. I know that my Goodwill center loves to collect unused wrapping paper, even if it’s open.
Once you know how many rolls you have (and have noted if any are of unusual widths that are hard to store–I’m looking at you Hallmark!), begin to sort through the bags, ribbons, note cards, etc. Because we get so many packages delivered during this season, I save some of the packing boxes for this job. I sort everything by type, tossing/donating things as I go. When you’re done, you may have a number of boxes filled with different types of wrapping items. That is good! Write it all down on your ledger, and then visually inspect what you’re keeping. This will help you with the next two assignments.
Let’s Organize wrapping supplies:Now that you can review what you have, make a list of what you need for future events, even next holiday season. (Tape? Tissue paper? Etc.) That way you can hit the stores in late December and fill your holes with sale items.
Then decide how you want to store everything. Luckily for us, January is “storage supply sale” month. Storage supplies are never cheaper than they are in January, although April comes close due to spring cleaning. Anyway, once you decide if you want to use plastic storage bins, or canvas carriers, or any of the other million options online, you can start looking forward to those January sales. Yes, in the meantime it’s kind of a pain to have everything stacked in packing boxes and shoved under the bed or in the closet. But if you can deal with the temporary clutter, it will make it easier to store everything neatly when you can buy what you need. I know that taking time out to do this chore may be the last thing you need to do right now. But I promise that the extra 15-30 minutes it takes to organize and sort will be worth it in January when we start our pre-spring cleaning plan!
Subscribe to the blog Email Address
Subscribe
December 15, 2021
A Romance Writer’s Favorite Classic B&W Holiday Movies
Every year, after Thanksgiving dinner is over and the kitchen is clean, my family sits down to watch a holiday movie. While I’ve written before about some of my favorite holiday movies and favorite holiday TV movies, today I’d like to focus on older, classic holiday movies. Many of which were filmed in black and white (although a few were filmed with early color technology or were colorized in the early 1990s).

What makes a classic movie? For me, a classic movie is one that I can’t wait to watch every year, a movie that has been remade multiple times, and a movie that I remember watching as a kid–even though I thought these movies were ancient even then! While there’s a serious lack of modern technology, fancy CGI graphics, and even diversity in casting, these movies all have a similar theme: This holiday season is one filled with hope, compassion, and love. Three things the world always needs more of.
I’ve included the trailers for each movie. For a full description, including ratings, click here for the IMDB website. (I’m not posting the individual reviews due to copyright issues)
I hope you enjoy them!Subscribe to the blog Email Address
Subscribe
December 14, 2021
Sarah Munro’s Eucalyptus Vapor Rub
As we all know by now, winter is here. While it might not be December 21 yet, the cold weather has arrived along with the sniffles and congestion.

Because I don’t love cold products loaded with strange chemicals, I’m always looking for natural remedies. Luckily Sarah Munro, the heroine of ONE DARK WISH (book 2 in the Deadly Force Series), has been collecting herbal remedies from the 17th and 18th centuries. And this recipe for a Vapor Rub is an updated version of a recipe used during the Revolutionary War.
This recipe is perfect for those nights when you’re congested and can’t sleep. The essential oils offer soothing aromas, and the coconut oil and cocoa butter moisturize and add nutrients to the skin. This vapor rub works regardless if the congestion is from a cold or allergies or stress. The healing vapors from the essential oils help soothe your irritated sinuses and throat. All of the ingredients below can be purchased from Amazon or other online health stores. While some brands of essential oils are better than others, you don’t need to buy the most expensive. I use the Aura Cacia brand myself because I can buy it at my local grocery store. The main thing is to look for essential oils without synthetics, parabens, GMOs, or other artificial substances.
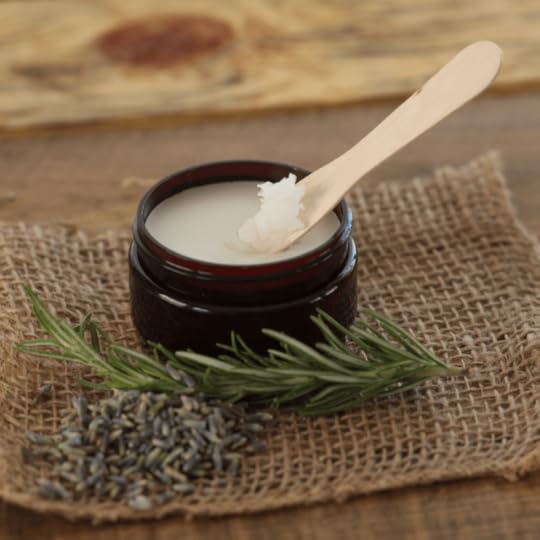 Sarah Munro’s Eucalyptus Vapor RubINGREDIENTS:1/3 c. Coconut Oil*2 tbsp. Cocoa Butter*1 1/2 tbsp. Beeswax Pastilles*20 drops Eucalyptus Essential Oil**5 drops each Lavender, Peppermint, Rosemary, and Tea Tree Oil Essential Oils**DIRECTIONS:
In the top of a double boiler, melt the coconut oil and butter together. Turn the heat onto medium and once it’s all melted and smooth, add the beeswax pastilles. Gently, in a smooth motion, stir the mixture until the wax is melted.
Remove the double boiler from the heat and let the mixture sit for five minutes. Then, with a wooden spoon, stir in all of the essential oils. Keep stirring until everything is well blended. Pour the vapor rub into a sterilized glass jar or a food-grade tin. Once the vapor rub is cool, cover and let it sit for an hour until it’s solidified. Store in a cool, dry cabinet and use when needed. This recipe will keep for 4-6 weeks.
*The coconut oil, cocoa butter, and beeswax are all available on Amazon or in most natural food stores.
**This recipe is not suitable for children under ten as eucalyptus oil, peppermint oil, and rosemary oil can affect their respiration. All of the oils are also available online (Amazon, etc) and in health food stores.
IMPORTANT DISCLAIMER ABOUT WILD PLANTS, FORAGING , AND MAKING HERBAL REMEDIES:I am not a medical professional and nothing written on this blog is medical advice. None of my statements have been evaluated by the FDA (I am legally required to give you this disclaimer).
It is important to do your due diligence before foraging, harvesting, and/or consuming any type of medicinal plant.
If you are taking any medications, talk to your doctor about any potential drug interactions.If you are allergic to anything, make sure whatever you are foraging is not in the same family. Example: While dandelions are typically considered safe, those who are allergic to ragweed, latex, daisies, or any other plants in the same or similar families, may not be able to consume dandelion.Always research potential side effects, dosage recommendations, and how to properly prepare and consume each medicinal plant.
Always make sure you are foraging what you believe to be. Fully prepare and study the anatomy before harvesting wild plants.
Always make sure your kitchen/work area is clean and that all materials are sterilized.
Do not forage plants from areas that have been sprayed within the past 2 years at the very least.
I am not legally or morally responsible for the health of any of my readers. Please do your own research!
Subscribe to the blog Email Address
Subscribe
December 13, 2021
St. Lucy’s Festival of Lights
Today, December 13, is St. Lucy’s Day. In Sweden and areas of Finland, it’s also called the Festival of Lights. St. Lucy was an early Christian martyr who was killed in 304 AD by Roman soldiers.
There are many stories about St. Lucy, but the most prevalent one goes like this. Lucy was a young girl who lived in Syracuse, Sicily and decided to live her life in service to God. Her mother, who was quite sick with a blood disease and worried about her daughter’s future, had different ideas and tried to marry Lucy to a pagan. (apparently her father had already died). Lucy needed a plan to sway her mother and prayed to St. Agatha, another early Christian saint. St. Agatha appeared to Lucy in a dream and told her that God would cure her mother’s illness. After her mother was cured, Lucy convinced her mother to ditch the marriage plans and donate the dowry to the poor. Then Lucy devoted her life to serving God by serving others.
Except the reject bridegroom was angry. He betrayed Lucy to the governor Paschasius. Paschasius tried to force Lucy into a brothel so she would be defiled. But the guards who tried to take her away were unable to move her. They even hitched her to a team of oxen, but still she wouldn’t move. Now Paschasius and the bridegroom both enraged. Paschasius had his guards heap bundles of wood around her and set it on fire. But they wouldn’t burn. So they used their swords, and she perished. But Lucy’s fame continued after death. A few hours after her death, Lucy warned Paschasius in a dream that he would be punished. He was scared and angry and ordered the guards to go dig out her eyes from her corpse before burial. But then, when they went to bury her, her eyes had been restored.
Lucy’s name means “light” or “lucid” and she is the patron saint of the blind and of virgins. She is often depicted in Christian art holding her eyes on a golden plate in one hand, and holding a palm branch in her other. Palm branches are a symbol of victory over evil.
By 400 AD, St. Lucy was being venerated all over Europe. But it was around 1100 AD, when the first monks reached Sweden, that the Swedish devotion to St. Lucy began. One story that is told is that during the Middle Ages, a terrible famine hit Sweden. During the Winter Solstice (the darkest and longest night of year), a ship sailed into Lake Vannern with a woman at the helm. She was surround by an unearthly light. When the boat came into port, this ethereal woman handed out bags of wheat that lasted all winter and saved thousands.
Another story says that that night, to free her hands to carry more bags of wheat, she placed a wreath of candles on her head to light her way.
Today in Sweden, during St. Lucy’s Festival of Lights, the oldest daughter in every family dresses as St. Lucy. She wears a white robe with a red sash and a crown of holly and ivy on her head, sometimes with lit candles. (Now they are battery operated). She serves coffee and saffron buns (with raisins representing St. Lucy’s eyes) to her family. Many churches in Sweden and Finland (and many Swedish communities in the U.S.) still have St. Lucy processions where a chosen girl is dressed as the saint and leads a candlelight procession of young boys and girls. Once at the church, these children lead the congregation in singing Christmas carols. This festival of light, which falls near the Winter Solstice, begins the Christmas season and is a symbol of light during the darkest nights of the year. Because early pagans used bonfires during to ward of evil during the Winter Solstice, the earliest St. Lucy festivals were celebrated by both christians and pagans. Now St. Lucy is venerated by Catholics, Orthodox Christians, Lutherans and Anglicans.
Because I love holidays that have their own treats, I’ve included my favorite St. Lucy Rolls recipe below. I hope you all have a wonderful St. Lucy Day!
Sharon Wray
Yields 12-14 rolls
The Hungry {Romance} Writer: St. Lucy Saffron BunsThese St. Lucy buns are also called Swedish Saffron bun or lussekatter. There are a ton of recipes on the internet for these buns, some include cinnamon and some include cardamom. While cardamom is harder to work with, I prefer the flavor of the cardamom. This recipe is an adaptation of one I found on the Simply Recipes website and one I have from a Greenbriar West Elementary School Third Grade Cook book.
2 hr, 30 Prep Time
11 minCook Time
2 hr, 41 Total Time
Save Recipe Print Recipe var print_b = document.getElementById('mpp_print_button'); var save_b = document.getElementById('mpp_saverecipe_button'); print_b.onclick = function(){ zlrPrint( "mpprecipe-container-205", "https://sharonwray.com/wp-content/plu...", "mpprecipe-design22", "1", "#" ) }; save_b.onclick = function(){ window.open('https://sharonwray.mealplannerpro.com...' + window.location.href); return false; };  My Recipes My Lists My Calendar
 Ingredients
Buns3/4 cup whole milk1/2 teaspoon saffron threads1 teaspoon plus 1/4 cup white granulated sugarOne 1/4-ounce packet active dry yeast3 1/2 to 4 cups flour1/2 teaspoon kosher saltThe seeds from 3 cardamom pods, ground (optional)1/4 cup unsalted butter, softened1/4 cup sour cream2 large eggsRaisinsGlaze1 large egg, beatenInstructions
In a small saucepan, stir together the whole milk, saffron, and 1 teaspoon of sugar. Slowly heat on low temperature until the milk begins to steam. Do not let the milk boil!Remove the saucepan from the heat and stir to dissolve the sugar. Let the milk cook until it reaches 115°F. Use a candy thermometer. It should be warm to the touch, but not hot.Sprinkle the yeast over the warm saffron-infused milk in the saucepan. Let the milk and yeast sit for 5 to 10 minutes until foamy. (If it doesn't foam, the yeast is bad and you must begin again)In the bowl of a standing mixer, whisk together 3 1/2 cups of flour, the remaining 1/4 cup of sugar, salt, and ground cardamom.Make a well in the center of the flour mixture. Pour into the well the yeast-milk-saffron mixture, 2 large eggs, butter, and sour cream. Whisk together until all the ingredients are well mixed.Switch to the mixer's dough hook (or turn out onto the counter and knead by hand)On low speed, knead the dough. Slowly, one Tablespoon at a time, add the remaining flour. Knead after each addition of flour. Continue until the dough is sticky to touch but doesn't stick to your hands.Shape the dough into a ball and place in a large lightly-greased bowl. Cover with plastic wrap and then a clean dish towel. (at this point, you can make the dough ahead and refrigerate overnight)Let the bowl of dough sit in a warm location in the kitchen for 1 to 2 hours, or until the dough has doubled in size. If you stick a finger in the dough, it the indentation should take time to refill.Line a baking sheet with parchment paperWhen the dough has doubled in size, gently press it down and knead it a couple of times in the bowl.Break off a piece of dough that will form a ball 2" in diameter. On a lightly-floured surface, toll the ball out into a snake, about 12-14 inches long.Form the snake into a "S" shape, forming spirals at either end. Place the spiral bun on the lined baking sheet. Continue making buns and this recipe will make 12-14 buns.Once all the buns are on the baking sheet, cover the buns with plastic wrap and place in a warm spot until the dough shapes double in size. This will take anywhere from 30 minutes to an hour, depending on the warmth of your kitchen.With a pastry brush, lightly brush beaten egg over the tops and sides of the uncooked buns. Place the raisins in the centers of the "S" spirals, two per bun.Adjust the oven rack to the middle of the oven and preheat the oven to 400 degrees F.Bake the buns for 10-11 minutes, making sure to turn the baking sheet halfway through the cooking time to ensure browning. Bake until the buns are golden brown.Cook for 5 minutes before eating.7.8.1.2205https://sharonwray.com/the-hungry-writer/st-lucys-festival-of-lights/ { "@context": "http://schema.org/", "url": [ "https:\/\/sharonwray.com\/the-hungry-writer\/st-lucys-festival-of-lights\/" ],"name" : "The Hungry {Romance} Writer: St. Lucy Saffron Buns","description" : "These St. Lucy buns are also called Swedish Saffron bun or lussekatter. There are a ton of recipes on the internet for these buns, some include cinnamon and some include cardamom. While cardamom is harder to work with, I prefer the flavor of the cardamom. This recipe is an adaptation of one I found on the Simply Recipes website and one I have from a Greenbriar West Elementary School Third Grade Cook book. ","prepTime" : "PT2H30M","cookTime" : "PT11M","recipeYield" : "12-14 rolls","datePublished" : "2021-11-22 14:40:30","recipeInstructions":[ { "@type": "HowToStep", "text": "In a small saucepan, stir together the whole milk, saffron, and 1 teaspoon of sugar. Slowly heat on low temperature until the milk begins to steam. Do not let the milk boil!" }, { "@type": "HowToStep", "text": "Remove the saucepan from the heat and stir to dissolve the sugar. Let the milk cook until it reaches 115\u00b0F. Use a candy thermometer. It should be warm to the touch, but not hot." }, { "@type": "HowToStep", "text": "Sprinkle the yeast over the warm saffron-infused milk in the saucepan. Let the milk and yeast sit for 5 to 10 minutes until foamy. (If it doesn't foam, the yeast is bad and you must begin again)" }, { "@type": "HowToStep", "text": "In the bowl of a standing mixer, whisk together 3 1\/2 cups of flour, the remaining 1\/4 cup of sugar, salt, and ground cardamom." }, { "@type": "HowToStep", "text": "Make a well in the center of the flour mixture. Pour into the well the yeast-milk-saffron mixture, 2 large eggs, butter, and sour cream. Whisk together until all the ingredients are well mixed. " }, { "@type": "HowToStep", "text": "Switch to the mixer's dough hook (or turn out onto the counter and knead by hand)" }, { "@type": "HowToStep", "text": "On low speed, knead the dough. Slowly, one Tablespoon at a time, add the remaining flour. Knead after each addition of flour. Continue until the dough is sticky to touch but doesn't stick to your hands." }, { "@type": "HowToStep", "text": "Shape the dough into a ball and place in a large lightly-greased bowl. Cover with plastic wrap and then a clean dish towel. (at this point, you can make the dough ahead and refrigerate overnight)" }, { "@type": "HowToStep", "text": "Let the bowl of dough sit in a warm location in the kitchen for 1 to 2 hours, or until the dough has doubled in size. If you stick a finger in the dough, it the indentation should take time to refill. " }, { "@type": "HowToStep", "text": "Line a baking sheet with parchment paper" }, { "@type": "HowToStep", "text": "When the dough has doubled in size, gently press it down and knead it a couple of times in the bowl. " }, { "@type": "HowToStep", "text": "Break off a piece of dough that will form a ball 2\" in diameter. On a lightly-floured surface, toll the ball out into a snake, about 12-14 inches long. " }, { "@type": "HowToStep", "text": "Form the snake into a \"S\" shape, forming spirals at either end. Place the spiral bun on the lined baking sheet. Continue making buns and this recipe will make 12-14 buns." }, { "@type": "HowToStep", "text": "Once all the buns are on the baking sheet, cover the buns with plastic wrap and place in a warm spot until the dough shapes double in size. This will take anywhere from 30 minutes to an hour, depending on the warmth of your kitchen." }, { "@type": "HowToStep", "text": "With a pastry brush, lightly brush beaten egg over the tops and sides of the uncooked buns. Place the raisins in the centers of the \"S\" spirals, two per bun." }, { "@type": "HowToStep", "text": "Adjust the oven rack to the middle of the oven and preheat the oven to 400 degrees F. " }, { "@type": "HowToStep", "text": "Bake the buns for 10-11 minutes, making sure to turn the baking sheet halfway through the cooking time to ensure browning. Bake until the buns are golden brown." }, { "@type": "HowToStep", "text": "Cook for 5 minutes before eating. " }],"keywords" : "The Hungry {Romance} Writer: St. Lucy Saffron Buns","recipeIngredient" : ["3\/4 cup whole milk ","1\/2 teaspoon saffron threads","1 teaspoon plus 1\/4 cup white granulated sugar","One 1\/4-ounce packet active dry yeast","3 1\/2 to 4 cups flour","1\/2 teaspoon kosher salt","The seeds from 3 cardamom pods, ground (optional)","1\/4 cup unsalted butter, softened","1\/4 cup sour cream","2 large eggs","Raisins","1 large egg, beaten"], "image": { "@type": "ImageObject", "url": "https:\/\/sharonwray.com\/wp-content\/uploads\/2021\/11\/December-Blog-Post-Images-18.png" }, "author": { "@type": "Person", "name": "Sharon Wray" }, "nutrition": { "@type": "NutritionInformation", "servingsize": "1 serving"},"@type": "Recipe"}Subscribe to the blog Email Address
Subscribe