David Clinton's Blog, page 4
March 4, 2020
How to use Amazon Simple Email Service (SES) to replace your server-based email server
One fine day, for no discernible reason, my Ubuntu 18.04 business server stopped forwarding mail to my Gmail address.
Just the day before, the .forward files I’d created in the home directories of the local server accounts I use for email – like /home/office/.forward – were cheerfully redirecting all the mail aimed at my business addresses to my daily-use Gmail account. And then they suddenly stopped.
When I noticed something was wrong, I immediately consulted my server logs. /var/log/mail.err was spitting out charming messages that included things like:
status=deferred (delivery temporarily suspended: connect to alt2.gmail-smtp-in.l.google.com[219.8.202.27]:25: Connection timed out)
Checking the server mailboxes told me that mail was coming in, but that Postfix couldn’t establish a connection to Gmail to forward messages to my address.
Naturally I restarted Postfix, but that didn’t help.
sudo systemctl restart postfix
I confirmed that there was nothing blocking outgoing messages from leaving my server on port 25 (SMTP). Then I checked to make sure my domain hadn’t somehow been blacklisted (there are numerous online tools that’ll do that for you), and peeked at the state of my MX records by running dig from the command line:
dig MX bootstrap-it.com
Nothing doing. Everything seemed to check out.
After a few frustrating troubleshooting sessions I gave up and figured I’d try something completely different.
Being an AWS solutions architect and having co-authored two books for Wiley/Sybex on AWS (one a guide to the Cloud Practitioners exam and one for the Solutions Architect Associate exam), shouldn’t I be willing and able to build my own stack of AWS tools that’ll handle my email server needs in the cloud?
Well it turns out that I was both willing and – after some serious research and trial and error – able. Getting it done would require:
Creating an S3 bucket where incoming emails will be stored.Creating a Simple Notification Service (SNS) topic to email me a notice every time a new email arrives.Configuring Amazon’s Simple Email Service (SES) to take over my email domain (bootstrap-it.com) and handle incoming mail. That involves adding an MX record to Route 53 (where my domains are managed) and pointing SES to my domain; adding and verifying each email address I want SES to control; and then telling SES to send new messages to my S3 bucket while also triggering an alert for the SNS topic.Assuming you will also want to send email messages through the service, it’s also a good idea to configure SES to sign your outgoing messages using DomainKeys Identified Mail (DKIM).
I’m not going to describe all those steps in detail here. There’s plenty of excellent documentation available for that. But I will briefly mention some pain points you might encounter.
You’ll have to add an MX record to your DNS hosted zone for each domain you’re using. Even if your domains are managed within Amazon’s Route 53, you’ll need to provide a value for your record.
What you use for that value will depend on the AWS region where your SES resource is located. In my case, it looked like this:
10 inbound-smtp.us-east-1.amazonaws.com
The SNS notifications will arrive in a single long string of text containing just a couple of short morsels of useful but hard-to-read information. That’ll be enough to identify spam, but you’ll usually need more information than what you’ll find here. I use the notifications as a heads-up telling me that there’s new mail in my S3 bucket.
Viewing the emails themselves within your S3 bucket via the AWS Management Console isn’t the end of the world if it only happens once or twice a month. But if they’re coming in faster than that, you’ll need to find a better way to access and read your messages.
However, creating a protocol for automating that process is really a local operating system problem that requires an entirely different set of tools. I solved the problem for myself using the AWS CLI and a cool Bash script. If you’d like to see how I did that, click through to this article.
There’s much more administration goodness in the form of books, courses, and articles available at my bootstrap-it.com.


February 4, 2020
How to use a Bash script to manage downloading and viewing files from an AWS S3 bucket
As you can read in this article, I recently had some trouble with my email server and decided to outsource email administration to Amazon’s Simple Email Service (SES).
The problem with that solution was that I had SES save new messages to an S3 bucket, and using the AWS Management Console to read files within S3 buckets gets stale really fast.
So I decided to write a Bash script to automate the process of downloading, properly storing, and viewing new messages.
While I wrote this script for use on my Ubuntu Linux desktop, it wouldn’t require too much fiddling to make it work on a macOS or Windows 10 system through Windows SubSystem for Linux.
Here’s the complete script all in one piece. After you take a few moments to look it over, I’ll walk you through it one step at a time.
#!/bin/bash
# Retrieve new messages from S3 and save to tmpemails/ directory:
aws s3 cp \
--recursive \
s3://bucket-name/ \
/home/david/s3-emails/tmpemails/ \
--profile myaccount
# Set location variables:
tmp_file_location=/home/david/s3-emails/tmpemails/*
base_location=/home/david/s3-emails/emails/
# Create new directory to store today's messages:
today=$(date "%m_%d_%Y")
[[ -d ${base_location}/"$today" ]] || mkdir ${base_location}/"$today"
# Give the message files readable names:
for FILE in $tmp_file_location
do
mv $FILE ${base_location}/${today}/email$(rand)
done
# Open new files in Gedit:
for NEWFILE in ${base_location}/${today}/*
do
gedit $NEWFILE
done
The complete Bash script
We’ll begin with the single command to download any messages currently residing in my S3 bucket (by the way, I’ve changed the names of the bucket and other filesystem and authentication details to protect my privacy).
aws s3 cp \
--recursive \
s3://bucket-name/ \
/home/david/s3-emails/tmpemails/ \
--profile myaccount
Of course, this will only work if you’ve already installed and configured the AWS CLI for your local system. Now’s the time to do that if you haven’t already.
The cp command stands for “copy,” –recursive tells the CLI to apply the operation even to multiple objects, s3://bucket-name points to my bucket (your bucket name will obviously be different), the /home/david… line is the absolute filesystem address to which I’d like the messages copied, and the –profile argument tells the CLI which of my multiple AWS accounts I’m referring to.
The next section sets two variables that will make it much easier for me to specify filesystem locations through the rest of the script.
tmp_file_location=/home/david/s3-emails/tmpemails/*
base_location=/home/david/s3-emails/emails/
Note how the value of the tmp_file_location variable ends with an asterisk. That’s because I want to refer to the files within that directory, rather than the directory itself.
I’ll create a new permanent directory within the …/emails/ hierarchy to make it easier for me to find messages later. The name of this new directory will be the current date.
today=$(date "%m_%d_%Y")
[[ -d ${base_location}/"$today" ]] || mkdir ${base_location}/"$today"
I first create a new shell variable named today that will be populated by the output of the date ”%m_%d_%Y” command. date itself outputs the full date/timestamp, but what follows (“%m_%d_%Y”) edits that output to a simpler and more readable format.
I then test for the existence of a directly using that name – which would indicate that I’ve already received emails on that day and, therefore, there’s no need to recreate the directory. If such a directory does not exist (||), then mkdir will create it for me. If you don’t run this test, your command could return annoying error messages.
Since Amazon SES gives ugly and unreadable names to each of the messages it drops into my S3 bucket, I’ll now dynamically rename them while, at the same time, moving them over to their new home (in the dated directory I just created).
for FILE in $tmp_file_location
do
mv $FILE ${base_location}/${today}/email$(rand)
done
The for…do…done loop will read each of the files in the directory represented by the $tmp_file_location variable and then move it to the directory I just created (represented by the $base_location variable in addition to the current value of $today).
As part of the same operation, I’ll give it its new name, the string “email” followed by a random number generated by the rand command. You may need to install a random number generator: that’ll be apt install rand on Ubuntu.
An earlier version of the script created names differentiated by shorter, sequential numbers that were incremented using a count=1…count=$((count 1)) logic within the for loop. That worked fine as long as I didn’t happen to receive more than one batch of messages on the same day. If I did, then the new messages would overwrite older files in that day’s directory.
I guess it’s mathematically possible that my rand command could assign overlapping numbers to two files but, given that the default range rand uses is between 1 and 32,576, that’s a risk I’m willing to take.
At this point, there should be files in the new directory with names like email3039, email25343, etc. for each of the new messages I was sent.
Running the tree command on my own system shows me that five messages were saved to my 02_27_2020 directory, and one more to 02_28_2020 (these files were generated using the older version of my script, so they’re numbered sequentially).
There are currently no files in tmpemails – that’s because the mv command moves files to their new location, leaving nothing behind.
$ tree
.
├── emails
│ ├── 02_27_2020
│ │ ├── email1
│ │ ├── email2
│ │ ├── email3
│ │ ├── email4
│ │ ├── email5
│ └── 02_28_2020
│ └── email1
└── tmpemails
The final section of the script opens each new message in my favorite desktop text editor (Gedit). It uses a similar for…do…done loop, this time reading the names of each file in the new directory (referenced using the “today” command) and then opening the file in Gedit. Note the asterisk I added to the end of the directory location.
for NEWFILE in ${base_location}/${today}/*
do
gedit $NEWFILE
done
There’s still one more thing to do. If I don’t clean out my S3 bucket, it’ll download all the accumulated messages each time I run the script. That’ll make it progressively harder to manage.
So, after successfully downloading my new messages, I run this short script to delete all the files in the bucket:
#!/bin/bash
# Delete all existing emails
aws s3 rm --recursive s3://bucket-name/ --profile myaccount
January 20, 2020
How to Use Ansible to Manage Your AWS Resources
Wouldn’t you love to be able to simply wave a wand and layers of resources in your AWS account would suddenly – and magically – spring to perfectly configured life, ready to meet your complex infrastructure needs?
If you already have experience with AWS, then you know how much of a pain it can be to work through web page after web page in the Amazon management console as you manually provision services. And even the AWS CLI – which is a huge step up – can add its own complexity and effort to the mix.
That’s not to say that AWS itself doesn’t address the problem with their own class of powerful orchestration tools, including CloudFormation and their Elastic Kubernetes Service (something I address at length in my “Using Docker on AWS” course at Pluralsight). But neither of those options lives quite so close to your existing infrastructure – or uses as familiar a way of operating – as Ansible.
If you’re already using Ansible for your on-premises operations, plugging it into your AWS account can sometimes be the quickest and most painless way to migrate operations to the cloud.
Understanding the Ansible/AWS Advantage
My book “Manage AWS Resources Using Ansible” – from which this article is excerpted – is designed to quickly introduce you to applying Ansible’s declarative approach to working with AWS resources. Being able to “declare” the precise configuration results you want and then produce them by getting Ansible to read a playbook is Ansible’s magic wand. When properly planned, it’s amazing how simple it can be to execute complex, layered AWS deployments.
Before we launch a simple “Hello World” Ansible playbook, let’s first make sure you’ve got a properly-configured working environment through which Ansible can communicate with all its new friends in your AWS account.
Preparing a Local Environment
As you probably already know, Ansible is an orchestration tool that lets you write plain-text playbook files that declare the software profile and ideal state you’d like applied to a target server. Those servers – known as hosts – can be provisioned for just about any digital workload you can imagine, using just about any combination of application software, and running on just about any platform.
In the good old days, when a playbook was run against a physical server, Ansible would employ an existing SSH connection to securely login to the remote host and go about building your application. But that won’t work for AWS workloads. You see, because the EC2 instances and other infrastructure you want to launch don’t yet exist, there can be no “existing” SSH connections. Instead, Ansible will use Boto 3 – the software development kit (or SDK) used by AWS that allows Python code to communicate with the AWS API.
Using the AWS CLI to Connect Ansible
You don’t have to know how all that works, but it has to be there so it can work. For that reason you’re going to install the AWS command line interface (CLI). We won’t be using the CLI itself for anything important, but installing it will give us all the dependencies we’ll need. You can find out how to make this work on the latest version of whatever OS you’re using from the AWS documentation page.
Working with the Python package manager, PIP, is a popular way to get all this done. Here’s how you would install PIP itself and then the AWS CLI on an Ubuntu machine:
sudo apt update
sudo apt install python3-pip
pip3 install awscli
I should note that, as I write this, Python 2 is still alive…but only just. So there might sometimes still be separate Python 2 and Python 3 versions installed on your system. Since Python 2 will soon be fully deprecated, you probably won’t have to worry about specifying python3 or pip3 with your commands: that should be automatic.
Once the CLI is installed, run aws configure and enter your AWS access key ID and secret access key.
aws configure
cat .aws/credentials
You can get keys from the Your Security Credentials page in the AWS Management Console. Here’s how those keys will look (don’t get any naughty ideas, these aren’t valid):
AccessKeyId: AKIALNZTQW6H3EFBRLHQ
SecretAccessKey: f26B8touguUBELGpdyCyc9o0ZDzP2MEUWNC0JNwA
Just remember that a pair of keys issued to the root user of your AWS account provides full access to your entire AWS account. Anyone in possession of those credentials would be quickly able to run up six and even seven figure services charges, so be very careful how you use and store them. Ideally, you would be better off limiting your risk exposure by creating an admin user in the AWS Identify and Access Management (IAM) service with limited powers and using a key issued to that user.
At any rate, why am I doing this? The value of populating my AWS credentials file is that Ansible is smart enough to look for it and, if no other authentication keys are available in the system environment, it’ll use these. You’ll soon see how mighty convenient that will be. However, you should be aware of other ways to manage authentication for Ansible playbooks, like using ansible-vault or by creating and then invoking an aws_keys.yml file. But one thing you should definitely NOT do is hardcode the keys in your playbook files – especially if you plan to push them to an online repository like GitHub. I’ll quickly test the CLI to make sure we can properly connect to AWS. This simple command will list any S3 buckets I happen to have within this account.
aws s3 ls
We’re now ready to install ansible. I’ll go with pip3 for that. I could use the regular Ubuntu apt repository just as easily, but it will most likely install a slightly older version. Depending on your network connection, that’ll take a minute or two, but I’ll skip most of that.
$ pip3 install ansible
I’ll confirm that it’s properly installed by running ansible –version. This shows us the version that was built, that configured Ansible modules will, by default, be saved in either one of these two locations in the file system, that other modules would be available here and – most importantly – that the Ansible executable is located within the /local/bin/ directory beneath my user’s home directory. My user here, by the way, is called ubuntu. You can also see that we’re using a nice, up-to-date version of Python 3.
$ ansible --version
ansible 2.8.5
config file = None
configured module search path =
['/home/ubuntu/.ansible/plugins/modules',
'/usr/share/ansible/plugins/modules']
ansible python module location =
/home/ubuntu/.local/lib/python3.6/site-packages/ansible
executable location = /home/ubuntu/.local/bin/ansible
python version = 3.6.8 (default, Aug 20 2019, 17:12:48) [GCC 8.3.0]
One more step. As I mentioned earlier, Ansible will connect to AWS using the boto SDK. So we’ll need to install the boto and boto 3 packages. I’ll go with PIP for this one, too.
$ pip3 install boto boto3
Once that one has been brought on board, we’ll be ready to get some real stuff done. That’ll begin in the next section.
Testing Ansible with a Simple Playbook
This is going to be very simple proof of concept demo. I’ll create a couple of files, walk you through the syntax, and then fire it up. First off, I’ll use any plain text editor to create a hosts file. Normally, the hosts file tells Ansible where it can find the remote servers you want to provision. But since, in the case of AWS, the resources that will be our hosts don’t yet exist, we’ll simply point Ansible to localhost and boto will handle connections behind the scenes. Here’s what the contents of that file will look like:
[local]
localhost
Next, I’ll create a playbook file that I’ll call test-ansible.yml. The yml extension, of course, indicates that this file must be formatted using YAML markup language syntax. As you can see from the file text I’ve pasted just below, that’ll begin with three dashes marking the start of the file and then an indented dash introducing a set of definitions. The value of “hosts” could be one or more remote computers but, as I’ve said, we’ll leave that up to the local system to figure out. The same goes for our connection.
The next section includes the tasks we want Ansible to perform. This one will use the aws_s3 module to create a new bucket on Amazon’s S3 Simple Storage Service in the us-east-1 region. I have to give it this ugly name because S3 buckets require globally unique names – if a name you choose clashes with any one of the countless millions of names already out there, the operation will fail.
---
- name: Test s3
hosts: local
connection: local
tasks:
- name: Create new bucket
aws_s3:
bucket: testme817275b
mode: create
region: us-east-1
I run the playbook by calling the ansible-playbook command using -i to specify the hosts file, and then pointing to the test.yml file. Ansible should give us some feedback in just a moment or two. If we’re successful, you’ll see “0” as the value of “failed” and at least “1” as the value of “ok”.
$ ansible-playbook -i hosts test-ansible.yml
PLAY [Test s3] ******************************************************
TASK [Create new bucket] ********************************************
changed: [localhost]
PLAY RECAP **********************************************************
localhost: ok=1 changed=1 unreachable=0 failed=0 skipped=0
rescued=0 ignored=0
If I check my list of buckets once more, I should – and do – see the new one:
$ aws s3 ls
2018-12-30 15:19:24 elasticbeanstalk-us-east-1-297972716276
2018-10-12 04:09:37 mysite548.com
2019-09-24 15:53:26 testme817275b
That’s a very brief intro to setting up an Ansible environment. We saw how using Ansible with Amazon’s automatically provisioned resources is going to work differently than it would with traditional Ansible hosts. You’re going to require a different set of authentication and inventory control tools. We walked through the process of setting up an Ansible environment and connecting it to AWS, and then running a simple playbook. Short and sweet.
This article comes from my book “Manage AWS Resources Using Ansible“. There’s more technology goodness – in the form of books, courses, and articles – available on my website, bootstrap-it.com.
A Simple Introduction to Kubernetes Container Orchestration
In the beginning there was the FreeBSD – and later Linux – chroot jail. Chroot was a way to bring an unmounted file system to life so you could execute commands as though it was actually running on its own host. Then came the Linux Containers project (LXC and LXD) that added network and storage configurations to run jails (now more commonly called containers) within appropriately isolated and optimized environments.
And then there was Docker. Docker containers streamlined container operations so that software resources used by multiple containers could be efficiently shared. They also added online public repositories populated by vast collections of software tools. But the real value of Docker was in how easy it made deploying reliably predictable application environments.
What Kubernetes Brings to the Table
Then, out of the mists of time appeared Kubernetes. While originally developed within Google, Kubernetes has since been released as open source software under the control of the Cloud Native Computing Foundation.
At its heart, Kubernetes manages containers just the way Docker does. But Kubernetes adds a vast ecosystem of scaling, load balancing, network proxying, and multi-node administration tools to the mix. Dockerâs own Swarm comes with a comparable suite of tools, but Kubernetes has, so far at least, proven far more popular.
Kubernetes is much more of a native enterprise-scale tool than Docker Swarm. It’s not that Docker Swarm can’t be used in the enterprise – it certainly can – it’s that Kubernetes isn’t necessarily such a great fit for a quick and dirty local development environment. The main reason is that, at this point at any rate, you need an existing cluster before you can get anything to happen, and creating a local cluster requires a running hypervisor of one flavor or another. So having a public cloud like AWS where you can freely provision all the bits and pieces that go into a cluster without having to worry about infrastructure, matters more for Kubernetes than it does for Docker in general.
Kubernetes’ larger resource footprint and steeper learning curve can be offset by some impressive integration: working with persistent storage volumes is straightforward. And robust deployment monitoring solutions are easily available.
A Quick Look at the Kubernetes Cluster
Here – based on content from my Pluralsight course, âUsing Docker on AWSâ – is how Kubernetes works. A cluster is made up of the networking, storage, and compute resources that your workloads will use. The cluster’s physical or virtual computers – called nodes – serve as either masters or slaves. A master runs the services that manage all cluster operations. The master itself is managed through the kube-apiserver service which responds to instructions you send to it using the kubectl client software. The master also hosts:
⢠A database of cluster configuration known as etcd
⢠kube-controller-manager, that measures the current state of a cluster
against its desired state
⢠kube-scheduler, which balances configuration specifications against avail-
able resources
⢠The cloud-controller-manager that provides critical integration with public
cloud providers like AWS
Nodes are controlled by software agents called kubelets and maintain reliable and secure network connectivity through the kube-proxy service. Important stuff – your actual application workload – happens on the nodes within pods, which are organizing structures within which the application containers themselves run. Multiple containers can run on a pod, all sharing a single IP address and compute resources – providing a single instance of your application.
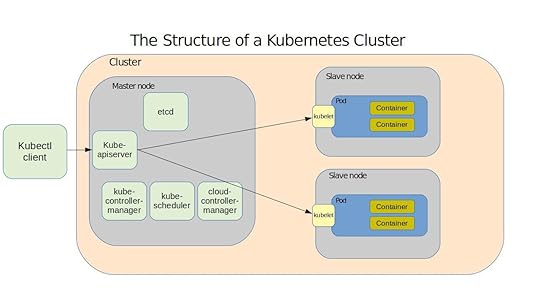 The components of a typical Kubernetes environment
The good news is that the kubectl software is smart enough to simply read your YAML configuration document and use it to bring all the details to life without your help. If you want to become a successful Kubernetes admin you really should understand all these details. But you can be forgiven for being a bit relaxed about it all in the meantime: most of the action takes place invisibly, hidden by the relatively simple command set we’ll soon see.
A Quick Kubernetes Installation
Just so you can’t say I didn’t show you anything practical here, let’s install the lightweight Kubernetes version, MicroK8s, on a Linux machine. All you’ll need for this in-and-out exercise is a working copy of the Snaps package manager. This single command will install all the core services, libraries, and binaries necessary for small, proof-of-concept demos.
snap install microk8s --classic
Just to prove that the installation succeeded, ask the service to list all the nodes
that are currently running. Of course, there wonât be any of those yet.
$ sudo microk8s.kubectl get nodes
No resources found.
There will, however, be a single service with a private IP address associated with
it:
$ sudo microk8s.kubectl get services
NAME TYPE CLUSTER-IP EXTERNAL-IP PORT(S) AGE
kubernetes ClusterIP 10.152.183.1 443/TCP 80s
Finally, you can enable the browser-based Kubernetes administration dashboard using this microk8s.enable command. The output you’ll get will include extra instructions for displaying and using the authentication token you’ll need to connect.
$ sudo microk8s.enable dns dashboard
Enabling DNS
Applying manifest
serviceaccount/coredns created
configmap/coredns created
[...]
If RBAC is not enabled access the dashboard using the default token retrieved with:
token=$(microk8s.kubectl -n kube-system get secret | grep default-token | cut -d " " -f1)
microk8s.kubectl -n kube-system describe secret $token
In an RBAC enabled setup (microk8s.enable RBAC) you need to create a user with restricted permissions as shown in https://github.com/kubernetes/dashboard/wiki/Creating-sample-user
This article is based on content in my Pluralsight course, “Using Docker on AWS.” There’s much more administration goodness in the form of books, courses, and articles available at bootstrap-it.com.
How to Run Commands on Multiple Linux Hosts Using PSSH
I’m sure you’ve heard that all the cool kids are playing with orchestration automation these days. But do you know why? Well first, the resources consumed by modern microservices workloads are becoming much more complex and deploy to far more instances than ever before. And second, more and more of those resources are virtual rather than physical – so many of them will only exist for minutes or even seconds.
All of which means that even if you wanted to go around logging into each of your many servers, it just wouldn’t make sense. In most cases in fact, it wouldn’t even be possible. Instead, you’re going to be running a lot of clever scripts. And the tools you use to run those kinds of scripts are generally called orchestrators.
I’m sure you’ve encountered at least one or two members of the orchestration club. Besides Ansible, there’s Terraform, Chef, Puppet and others. But there are also lower-level tools that work as add-ons to core Linux tools like SSH. Although, seeing how it’ll run natively on Windows and, of course, macOS, I’m not sure it’s quite correct to call SSH a “Linux” tool any more.
One of those SSH add-ons is a tool set called pssh – which stands for Parallel SSH. That’s what we’re going to be learning about in this article – which is excerpted from my new Pluralsight course, Linux System Optimization.
For now, though, I’m going to tell you a bit about the lab I’m using so that you can more easily reproduce it and follow along at home. I’ve got three Ubuntu LXD containers running. The base for all of our operations will be the one with an IP address of 10.0.3.140, while the two host nodes we’ll be remotely provisioning will use 10.0.3.93 and 10.0.3.43.
Everything we’ll do assumes that we’ve got passwordless SSH access from my base container to each of the two nodes. If you’re not sure how to do that, you can view the SSH module of my Protocol Deep Dive: SSH and Telnet course on Pluralsight. If you’re in a hurry, this Red Hat tutorial will get you to the same place.
Installing pssh on Ubuntu is simple and quick: sudo apt install pssh. It doesn’t get any harder on CentOS.
I created a simple host inventory file called sshhosts.txt that contains nothing more than the IP addresses of my two nodes:
$ less sshhosts.txt
10.0.3.93
10.0.3.43
Now I’m going to run the pssh parallel-ssh command to execute a single command on my hosts.
$ parallel-ssh -i -h sshhosts.txt df -ht ext4
-i tells the program to run as interactive – otherwise we wouldn’t be shown any command output. -h points to the hosts file that I called sshhosts.txt. And the command itself will be the old Unix utility df. That’ll return a list of drives attached to the system along with their mount points and usage information. The -h here will display disk space in human readable units and the t will restrict access to only drives formatted as ext4.
Why do I care about that ext4 business? Because Ubuntu uses the snap package manager and each snap creates its own virtual device. So what? Well, I don’t want to have to comb through a dozen or so virtual devices reporting 0 free space just to get to the real drives reporting actual usage.
$ parallel-ssh -i -h sshhosts.txt df -ht ext4
[1] 22:02:00 [SUCCESS] 10.0.3.43
Filesystem Size Used Avail Use% Mounted on
/dev/sda2 457G 131G 304G 30% /
[2] 22:02:00 [SUCCESS] 10.0.3.93
Filesystem Size Used Avail Use% Mounted on
/dev/sda2 457G 131G 304G 30% /
And there you go! Full disk space information about both of my nodes. I’m sure you noticed that the information is identical. That’s because these are both containers running on my workstation, so as far as they know, they both have full access to my own drive.
For my next trick, I’ll collect the /etc/group files from each of my nodes. This is the kind of operation that could be useful to quickly monitor the security status of your nodes. You could add a script that parses the incoming data and alerts you if there are any anomalies.
Before I begin, I’ll create a directory locally called host-files. Then I’ll use the parallel-slurp command – whose name wonderfully describes its function. Again, -h points to the hosts file. The -L sets the host-files directory as the target location for writing the data we’re going to generate, /etc/group is the remote file we want to slurp up, and group is the name we’d like to assign the data locally.
mkdir host-files
parallel-slurp -h sshhosts.txt -L host-files/ /etc/group group
When it’s done, your host-files directory will contain sub-directories named after the IP address of each of your nodes. As you can see, there’s a file called “group” that contains the /etc/group data from each node.
$ tree host-files/
host-files/
âââ 10.0.3.43
â  âââ group
âââ 10.0.3.93
âââ group
Does pssh come with any other treats? Yup. And running apropos gives you the whole list.
$ apropos parallel
parallel-nuke (1) - parallel process kill program
parallel-rsync (1) - parallel process kill program
parallel-scp (1) - parallel process kill program
parallel-slurp (1) - parallel process kill program
parallel-ssh (1) - parallel ssh program
This article is based on content in my Pluralsight course, “Linux System Optimization.” There’s much more administration goodness in the form of books, courses, and articles available at bootstrap-it.com.
December 29, 2017
Beating the technology learning curve monster
Doing what I do for a living, which these days mostly involves creating technology books and courseware, I’m constantly learning new technologies. In a way, my new tech adventures are not much different than the ones most IT pros face, except that mine probably hit more often. Because there’s so much depending on my understanding the new platform or process — and so many other newer platforms and processes waiting for my attention once I’m done with this one — my primary goal is to get in and out as fast as possible.
Trying to organize the layers of complexity and design metaphors inherent in a technology while struggling to figure out if it’ll even do exactly what I want can sometimes be downright intimidating. Without a good plan of attack, I’m dead in the water.
Before I share a couple of the tools that I’ve used successfully in my own learning, it’s worth discussing a real-world (relatively) new technology.
Last April, the operations management monitoring company ScienceLogic conducted a survey of more than a thousand enterprise and IT professionals, seeking their thoughts on cloud adoption. While it’s clear that more and more of the IT workload is shifting to cloud providers (with Amazon Web Services leading the way by every metric), there’s deep and widespread concern over what the impact of the change might be.
31% of respondents felt they lacked the skills to confidently lead a cloud deployment, 50% claimed they lacked the tools to properly manage infrastructure in the cloud, and 28% worried that the shift to the cloud could endanger their current jobs.
Sound familiar? The faster and more disruptive the change, the more we all worry about how — or if — we’ll keep up. And if you think Joe IT Professional stays up nights wondering how he’ll figure it all out, show some sympathy for his manager who’s responsible for dragging an entire department into the cloud.
AWS in particular is on my mind right now because my Manning book “Learn Amazon Web Services in a Month of Lunches” just came out. AWS was a technology I first struggled to understand more than a decade ago when I needed to build my own public-facing web conferencing system (using BigBlueButton). It was a long journey between that first EC2 server and the comfort level and deep experience I reached before attempting the book, but the things I got right — and wrong — while taking those first steps went a long way to shape how I now teach IT topics.
Sequential vs scan-and-run
How you’ll learn a skill partly depends on what you’re planning to learn. If you’re looking for an introduction that will take you from zero to functional on a full-stack, multi-tier environment like AWS, then you might be safer going sequential. Starting at the beginning can help you avoid missing critical details — like the way billing or security work on AWS. Trust me: if you don’t like the idea of surprise four-digit monthly service charges or compromised infrastructure, then you don’t want to skip the billing and security basics.
But if it’s a standalone software package (like a virtualization technology or a new IDE) that you can safely test a few times in your own network before actually deploying for real, then fasterer is gooderer. For this kind of project I will often fire up a clean Linux container using LXC (which, for exploring new software, I find far preferable to Docker) or, when the application I’m working with requires host kernel access (like SELinux), a Linux virtual machine on Virtual Box.
By “scan-and-run” I mean carefully crafting a search string in DuckDuckGo.com (or one of those other search engines whose names escape me at the moment), quickly picking out the information you want from the results, and trying it on your disposable virtual server. Didn’t work? Congrats. You’ve just learned something you didn’t yet know.
Just make sure to properly document both your failures and successes so you don’t have to walk around the same park over and over again.
The command line
Given a choice, I generally prefer working from the Bash command line over GUI consoles. It’s not because I’m a command line snob (although I am), but I find the unambiguous and trackable nature of a CLI works well with iterative experiments. In plain language, that means it’s easier to retrace my steps to figure out exactly what worked and what didn’t. And don’t forget that Bash error messages can easily be recycled into terrific internet searches.
Another CLI advantage: the predictable patterns of a well-designed shell environment can make it even easier to anticipate functionality than a well-designed web GUI. Let me illustrate that using the AWS CLI. Once it’s installed and properly configured, even running `aws` without any arguments will get you something useful. Notice how the output guides you to add `help` to any partially completed command to return contextual assistance.
$ aws
usage: aws [options] [ …] [parameters]
To see help text, you can run:
aws help
aws help
aws help
aws: error: too few arguments
It’s true that there’s plenty of help available through the GUI: all AWS console pages have links to extensive documentation resources. But that would be AWS documentation which, while well written and carefully maintained, is usually very, very wordy and sometimes a bit confusing. The inline CLI docs are much more focused and get you in and out more quickly.
Just being familiar with how to access this kind of information can make you much faster and more effective…even through the early learning stages. And the basic structure is available far beyond just AWS.

Manning’s Learn Amazon Web Services in a Month of Lunches
On the other hand, as I wrote in my book, I feel that the AWS browser console is actually a better place to first come to grips with the workings of Amazon’s cloud. That’s because high-level structure plays such a large role in understanding the way the dozens and dozens of AWS services work together, and the website does such a good job visualizing it. But maybe that’s just me.
Official AWS documentation — complete with helpful illustrations
Do it yourself
More than anything else, your learning will be the most effective if you roll up your sleeves and try it out. Not only should you duplicate the documentation examples, but change the parameters around to see what breaks. And then plan and execute your own projects based on the technologies you’re learning. Applying your knowledge to the real world is critical.
Would you hire a junior Linux admin with these skills?
Smart and experienced admins are worth their weight in gold, but how many of them had that kind of value when they started out? Building up a solid and reliable IT team to serve your operation can be like planning a high-risk, long-term investment. So the best hiring managers will have a pretty clear idea of what they need right now and where they’d like to be in a year or two.
You’ll want your young admins to already have some core skills, of course, but also the ability to leverage what they already know to build on them. After all, not only is it impossible for any one person to be familiar with all the Linux tools and best practices currently out there, we can’t even be sure what they’ll be in five years.
So just what are those core skills that are both useful right now and make future learning more effective? Well I haven’t got a monopoly on the truth, and I’d love to hear feedback from the community.
But here’s how I think it might work. I designed my Manning Linux in Actionbook to use real-world projects as teaching tools. Each of the core skills required to run Linux systems will be covered, but only when needed for a practical project.
The pre-release version of Linux in Action — I’m actually about 85% through the draft chapters. The book is discounted on Manning’s site: use code hackernoonlinux50 to get 50% off
The goal is that by the time readers are done, they’ll have learned everything they would have from traditional sources. But by working through more than a dozen real, in-demand administration tasks using key research tools (like man, info, and online search techniques), they’ll hopefully begin to gain confidence and independence.
Just so it should be useful for as many readers as possible, the book packs some basic survival skills into Chapter One. Those include the Unix Filesystem Hierarchy Standard, navigation, file management, some tricks (like tab completion and file globbing), and sudo. But from there on, you’re off to the races.
During the project planning stage, I divided the key Linux admin skills into 15 domains. I then associated each domain with the specific tools that a junior admin would expect to use. These domains and tools (illustrated below) are the overall curriculum expectations around which the book would be built.
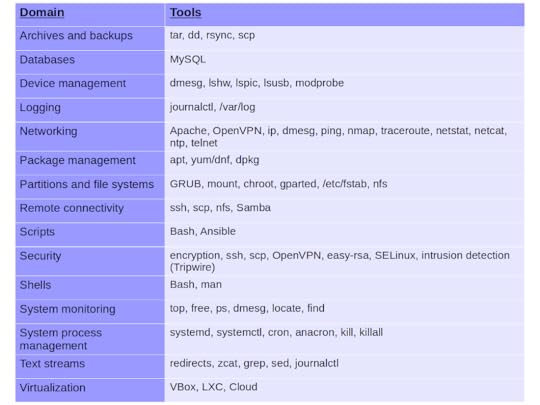
The base material from which my book was built
But the book’s structure would be built around projects like:
Configuring regular remote file system backup and archiving operations
Building recovery system devices
Building secure LAMP-based file sharing services
Establishing ongoing system monitoring protocols
Here’s the complete Table of Contents (at least at this point in the process):
Linux basics
Linux virtualization: building a safe and simple Linux working environment
Remote connectivity: safely access networked machines
Archive management: backup or copy entire filesystems
Automated administration: configure automated offsite backups
Emergency tools — build a system recovery device
Webservers: build a MediaWiki server
Networked file sharing: build an Nextcloud file sharing server
Securing your web server
Securing your network connections: create a VPN or DMZ
System monitoring: working with gigasized log files
Sharing data over a private network
Troubleshooting: system performance issues
Troubleshooting: Network issues
Troubleshooting: Peripheral devices
DevOps tools: deploy a scripted server environment using Ansible
The idea is, that by the time you’re done with the book’s projects, you’ll have worked with each of the domains and tools at least once. Hopefully, you’ll come out at the other end as a useful admin.
That’s what I’ve got to say, now it’s your turn. Do you think a “graduate” of my book would make a competent admin? What’s missing?
This article (which originally appeared on my Medium account) is related to my Manning “Linux in Action” book. This book is discounted on Manning’s site: use code hackernoonlinux50 to get 50% off. There’s lots more fun where this came from. Who knows…you might also enjoy my recently published Learn Amazon Web Services in a Month of Lunches.
AWS just announced a move from Xen towards KVM. So what is KVM?
Tied up in a recent AWS announcement about a new EC2 high-end instance type (the C5) is a strong suggestion that Amazon’s cloud computing giant has begun to shift its hundreds of thousands of physical servers away from the open source Xen hypervisor that’s run them until now, to the open source alternative, KVM.
Whether you’ve got your career and/or home mortgage deeply invested in the future of Xen or whether you never knew it existed, you might be interested in learning more about KVM. So here’s a general introduction adapted from my book, Teach Yourself Linux Virtualization and High Availability: prepare for the LPIC-3 304 certification exam.
Need some more basic background on either Linux servers or AWS? My Linux in Action and Learn Amazon Web Services in a Month of Lunches books from Manning might help, along with my Linux server administration courses at Pluralsight.
KVM
Like Xen, KVM (Kernel-based Virtual Machine) is an open source hypervisor technology for virtualizing compute infrastructure running on x86 compatible hardware. Also like Xen, KVM has both an active user community and significant enterprise deployments.
A KVM host actually runs on the Linux kernel along with two KVM kernel modules (the kvm.ko module and either kvm-intel.ko or kvm-amd.ko). Through its tight kernel integration — including the I/O connectivity with kernel block and network drivers provided by Virtio — KVM can offer its guests more seamless access to all the complex hardware and networking profiles that they might encounter.
Hardware virtualization extensions built into modern CPU designs and required for KVM deployments mean that, right out of the box, KVM guests can safely access only those hardware resources they need without the need to worry about leakage to the larger system.
Where exactly does QEMU fit in with all this? Besides being able to act as a hypervisor, QEMU’s strength is as an emulator. KVM, in its hypervisor virtualization role, can tap on to QEMU’s emulation powers to compliment its own hardware acceleration features, presenting its guests with an emulated chipset and PCI bus. The whole, as they say, can be greater than the sum of its parts.
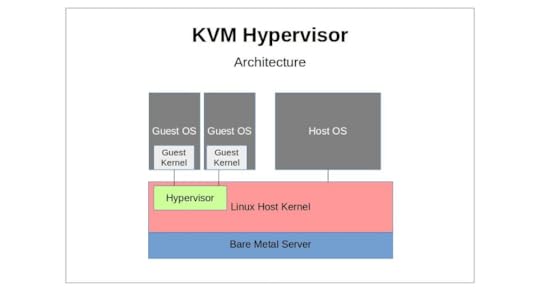
A KVM hypervisor sitting between the Linux host OS and its guest VMs
A great deal of management functionality for KVM is often actually provided by Libvirt. Therefore, you might sometimes want to refer to the detailed information about KVM-related features like networking, storage, and file system layouts that’s found in the fifth chapter of the Teach Yourself Linux Virtualization and High Availability book (“Libvirt and Related Tools”).
Installation
Before anything else, you’ll need to make sure that the physical machine you’re planning to use as a KVM host supports hardware virtualization. Besides the BIOS setting and the contents of /proc/cpuinfo (which we discussed in Chapter One), you can also quickly check this from a running Linux system using kvm-ok:
$ kvm-ok
It’s also a good idea to be sure which hardware architecture — 64 or 32-bit — you’re working with:
$ uname -m
But even if your hardware profile is up to the task, you’ll have to let the Linux kernel in on your plans. If they’re not already there, you should add the kvm and either kvm-intel or kvm-amd kernel modules.
# modprobe kvm-intel
If those modules fail to load (and there’s no /dev/kvm device in the file system), then there’s a good chance your CPU just isn’t up to the job you’d like it to to. However, if all that worked out, you’re ready to install the qemu-kvm package (and, if necessary, libvirt, virt-install, and bridge-utils as well).
Working with KVM Management Tools
It’s no secret that virtualization platforms have a well-deserved reputation for being complicated. But there are two things that can make getting started with KVM just a bit more challenging than some of the others:
There are quite a few management toolkits available, each offering similar — but not identical — functionality.
They have a nasty habit of changing the names used for the key binaries depending on which distribution and release you’re using.
I’ll introduce you to Libvirt Tools and vmbuilder in Chapter Five, but here, we’ll discuss the KVM tool kit.
Building new guests using what we’ll call the “KVM” way is a two step process. First, you’ll use qemu-img to create a new image — or modify or convert an old one. Then you’ll use qemu-kvm to set up a virtual machine that will start up the installation.
Did I just say “you’ll use qemu-kvm…”? Silly me. qemu-kvm was merged into qemu a long time ago and has been replaced by qemu-system-x86_64. In the meantime, some systems offer you kvm as a wrapper that executes qemu-system-x86_64 -enable-kvm — although you shouldn’t confuse the kvm wrapper with the old kvm binary that used a somewhat different syntax.
So let’s see how these two steps work. You create a disk image with qemu-img (which, by the way, can be used very effectively for other hypervisors as well), where “my-disk” is the name of the image you’d like to create, the maximum size of the image will be 6 GB, and qcow2 is the file format. qcow, by the way, stands for “QEMU Copy On Write”.
# qemu-img create -f qcow2 /home/username/myimages/my-disk.img 6G \
Formatting ‘/home/username/myimages/my-disk.img’, \
fmt=qcow2 size=6442450944 \
encryption=off \
cluster_size=65536 \
lazy_refcounts=off \
refcount_bits=16
Choosing a file format will depend on your specific needs. If you need greater compatibility and flexibility — including the ability to generate sophisticated snapshots — then qcow2 is probably going to be your best choice.
The qcow disk image format permits disk space allocation to grow only as needed, meaning the use of space is always as efficient as possible. Changes to a qcow read-only image can be saved to a separate file, which refers internally to the original image. qcow2 added the ability to create multiple image snapshots.
We’re now ready for step two. Here’s how we’ll build our VM:
# kvm -name my-VM \
-hda /home/username/myimages/my-disk.img \
-cdrom /home/username/Downloads/ubuntu-16.04-server-amd64.iso \
-boot d -m 1024
A new SDL window will often (although not necessarily for all distributions) pop up where you can complete the operating system installation process. Regaining control of your mouse from the Qemu terminal requires pressing CTRL+ALT.
To explain: using “kvm” (although the precise command you’ll need for your version may differ), we’ll call our new guest “my-VM”, designate the my-disk.img file as hda (“hard drive a”), point to the location of the operating system ISO (Ubuntu 16.04 server, in this case), and set 1024 MB as the maximum memory alloted to the VM.
By default, KVM will configure your guest for user-level networking (as though the parameters -netdev user,id=user.0 -device e1000,netdev=user.0 were specified). This will provide the guest with an IP address through KVM’s own DHCP service and access to your host, the Internet, and to LAN-based recourses. While the default configuration is simple, it may be overly restrictive for some scenarios, as there are often some performance and feature limitations.
Besides these, you can use command line flags to control various VM configuration parameters, including:
-smp 2 provides two processors (“smp” = symmetric multiprocessing).
The -net argument (example: -net nic,model=virtio,macaddr =52:54:00:05:11:11) establishes a network connection for your guest.
You can provision a network bridge using something like -net bridge,vlan=0,br=br0 — although this will require a matching -net definition on the host. The two are connected through a special “vlan” parameter.
-balloon virtio will allow me to expand or reduce a guest’s memory size without having to reboot it.
You can also use the -drive file= flag to define additional block storage devices. Adding a value for format= (qcow2, for instance).
The -M flag will assign a specific machine type hardware emulation. pc. For example, will provide a standard PC profile. For a complete list of available machine types, you can run kvm -M ?:
# kvm -M ?
Supported machines are:
ubuntu Ubuntu 15.04 PC (i440FX + PIIX, 1996) (alias of pc-i440fx-wily)
pc-i440fx-wily Ubuntu 15.04 PC (i440FX + PIIX, 1996) (default)
ubuntu Ubuntu 15.04 PC (i440FX + PIIX, 1996) (alias of pc-i440fx-vivid)
pc-i440fx-vivid Ubuntu 15.04 PC (i440FX + PIIX, 1996) (default)
pc-i440fx-utopic Ubuntu 14.10 PC (i440FX + PIIX, 1996)
pc-i440fx-trusty Ubuntu 14.04 PC (i440FX + PIIX, 1996)
pc Standard PC (i440FX + PIIX, 1996) (alias of pc-i440fx-2.5)
pc-i440fx-2.5 Standard PC (i440FX + PIIX, 1996)
pc-i440fx-2.4 Standard PC (i440FX + PIIX, 1996)
pc-i440fx-2.3 Standard PC (i440FX + PIIX, 1996)
pc-i440fx-2.2 Standard PC (i440FX + PIIX, 1996)
pc-i440fx-2.1 Standard PC (i440FX + PIIX, 1996)
pc-i440fx-2.0 Standard PC (i440FX + PIIX, 1996)
pc-i440fx-1.7 Standard PC (i440FX + PIIX, 1996)
pc-i440fx-1.6 Standard PC (i440FX + PIIX, 1996)
pc-i440fx-1.5 Standard PC (i440FX + PIIX, 1996)
pc-i440fx-1.4 Standard PC (i440FX + PIIX, 1996)
pc-1.3 Standard PC (i440FX + PIIX, 1996)
pc-1.2 Standard PC (i440FX + PIIX, 1996)
pc-1.1 Standard PC (i440FX + PIIX, 1996)
pc-1.0 Standard PC (i440FX + PIIX, 1996)
pc-0.15 Standard PC (i440FX + PIIX, 1996)
pc-0.14 Standard PC (i440FX + PIIX, 1996)
pc-0.13 Standard PC (i440FX + PIIX, 1996)
pc-0.12 Standard PC (i440FX + PIIX, 1996)
pc-0.11 Standard PC (i440FX + PIIX, 1996)
pc-0.10 Standard PC (i440FX + PIIX, 1996)
q35 Standard PC (Q35 + ICH9, 2009) (alias of pc-q35–2.5)
pc-q35–2.5 Standard PC (Q35 + ICH9, 2009)
pc-q35–2.4 Standard PC (Q35 + ICH9, 2009)
pc-q35–2.3 Standard PC (Q35 + ICH9, 2009)
pc-q35–2.2 Standard PC (Q35 + ICH9, 2009)
pc-q35–2.1 Standard PC (Q35 + ICH9, 2009)
pc-q35–2.0 Standard PC (Q35 + ICH9, 2009)
pc-q35–1.7 Standard PC (Q35 + ICH9, 2009)
pc-q35–1.6 Standard PC (Q35 + ICH9, 2009)
pc-q35–1.5 Standard PC (Q35 + ICH9, 2009)
pc-q35–1.4 Standard PC (Q35 + ICH9, 2009)
isapc ISA-only PC
none empty machine
xenfv Xen Fully-virtualized PC
xenpv Xen Para-virtualized PC
KVM Monitor
While working with QEMU, you can open a monitor console and interact with your clients in ways that might be difficult or even impossible using a regular headless server. You can launch the KVM Monitor by pressing CTRL+ALT, and then SHIFT+2, and a new console will open on your desktop. SHIFT+1 will close the console. You can also access the console from the command line using something like:
$ kvm -monitor stdio
You will probably NOT be able to launch the monitor as root (i.e., via sudo). Naturally, your version may require “qemu-system-x86_64” rather than kvm. This approach allows you to add command line arguments (like that -monitor which specified a console target). Consult man qemu-system-x86_64 for details on the kinds of operations the monitor allows.
This example (borrowed from en.wikibooks.org/wiki/QEMU/Monitor) will list all the block devices currently available to your system, and then point one of them to an ISO file you want to use:
(qemu) info block
ide0-hd0: type=hd removable=0 file=/path/to/winxp.img
ide0-hd1: type=hd removable=0 file=/path/to/pagefile.raw
ide1-hd1: type=hd removable=0 file=/path/to/testing_data.img
ide1-cd0: type=cdrom removable=1 locked=0 file=/dev/sr0 ro=1 drv=host_device
floppy0: type=floppy removable=1 locked=0 [not inserted]
sd0: type=floppy removable=1 locked=0 [not inserted]
(qemu) change ide1-cd0 /home/images/my.iso
Networking
By default, a KVM guest will receive an IP address within the 10.0.2.0/24 subnet, and have outgoing access (including SSH access) both to its host, and to the wider network beyond. By that same default however, it won’t be able to host services for network clients. If you need to open up incoming network connectivity, you’ll probably want to create a network bridge on your host that’s similar to the one we used for Xen in the previous chapter. As before, you will install bridge-utils on the host and, assuming you’re running a Debian-based system and you want your host to receive its IP from a network DHCP server, edit the /etc/network/interfaces to look something like this (on CentOS machines, edit files in the /etc/sysconfig/network-scripts/ directory):
auto lo
iface lo inet loopback
auto eth0
iface eth0 inet manual
auto br0
iface br0 inet dhcp
bridge_ports eth0
bridge_stp off
bridge_fd 0
bridge_maxwait 0
On CentOS, you’ll need to create an ifcfg-br0 file in the /etc/sysconfig/network-scripts/ directory to look something like this:
DEVICE=br0
TYPE=Bridge
BOOTPROTO=static
DNS1=192.168.0.1
GATEWAY=192.168.0.1
IPADDR=192.168.0.100
NETMASK=255.255.255.0
ONBOOT=yes
SEARCH=”example.com”
…And then add a line reading BRIDGE=br0 line to your primary network interface file (which will often be: /etc/sysconfig/network-scripts/ifcfg-eth0).
You will then stop and restart your network services (or reboot).
This article originally appeared in my Medium account. Looking for a solid introduction to Linux or AWS administration? Check out my Linux in Action and Learn Amazon Web Services in a Month of Lunches books from Manning. Prefer your tech learning in video? I’ve got Linux administration courses at Pluralsigh t just waiting to be watched.
Penetration testing: choosing the right (Linux) tool stack to fix your broken IT security
Got IT infrastructure? Do you know how secure it is? The answer will probably hurt, but this is the kind of bad news you’re better off getting sooner rather than later.
The only reasonably sure way to find out what’s going on with your servers is to apply a solid round of penetration testing. Your ultimate goal is to uncover any dangerous vulnerabilities so you can lock them down.
By “dangerous vulnerability” I mean obvious things like unprotected open ports and unpatched software. But I also mean the existence of freely available intelligence about your organization that’s probably just floating around the internet, waiting to be collected and turned against you.
Pen testing is made up of three very different parts, each with its own unique tools and protocols.
Passive information gathering, where testers scour the public internet looking for subtle hints or carelessly revealed private data that can be used against the organization.
Active information gathering, where the organization’s networks and servers are scanned for potential vulnerabilities.
Identifying exploits that could possibly be run against the organization’s infrastructure.
Let’s look at those one at a time.
Passive Information Gathering (OSINT)
Say your company has around 50 employees and a handful of outside contractors, each of whom is most likely active on both professional and personal social networks. And say you’ve got the usual range of corporate and product websites and social media accounts (like LinkedIn).
Now pause for a moment and try to imagine that you’re a hacker who’s searching for exploitable information about your company which he can use to launch an attack. Assuming he’ll stick exclusively to the public internet and not break any laws, how much do you think he’ll find?
Not too much? After all, no one is stupid enough to post passwords and account information to the internet, right?
Perhaps. But you won’t believe how easy it can be to use what is there to figure out all the passwords and administration information that hackers will need to get what they’re after. Don’t believe me? Do some passive information gathering yourself.
Among the fantastic/frightening information gathering tools available to help you (which also include Maltego and Shodan) there’s a great Linux-based open source package named Recon-ng — about which I created a video course on Pluralsight.
You start by providing Recon-ng with some information about your company and choosing the particular scans that interest you. All the hard work will then be done by tools they call modules. Each of the 90+ available modules is a script that reads data from the Recon-ng database and launches a scanning operation against some remote data resource.
Based on your choices, Recon-ng will intelligently comb through vast volumes of DNS, social media, and search engine results, plus information-rich position postings for new developers and hints to internal email addresses relating to your target. When it’s done, the software will prepare a report that’s guaranteed to scare the daylights out of you.
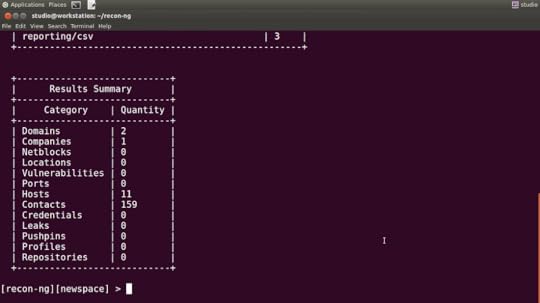
A text-based report based on a few Recon-NG scans
With this information, all a hacker would have to do is sift through the data and set the launch date for your attack. With this information, all you will have to do is tighten up your defences and speak with your team about being a lot more careful when communicating online.
That OSINT acronym I used above? It stands for Open Source Intelligence. Stuff anyone can get.
Active information gathering (vulnerability assessment)
Besides all the things you thoughtlessly leave lying around across the internet, there’s probably a lot more that a hacker can learn about your infrastructure from the infrastructure itself. If your servers are on a network, it’s because, to some degree, you want them exposed to network users. But that might also expose things you’d rather keep quiet, including the fact that you might be running software that’s buggy and open for exploits.
The good news is that government and industry players — like the US government’s NIST and their National Vulnerability Database — have been actively tracking software vulnerabilities for decades now and they make their information freely available. The bad news is that their databases contain hundreds of thousands of those vulnerabilities and it makes for really dull reading.
You’d like to be able to quickly and regularly scan your network and the devices attached to it to make sure there’s nothing that needs patching, but it’s just not humanly possible to do it manually. So forget humans. You’re going to need software.
Vulnerability scanners are software tools that automatically scan your network and servers for unpatched software, open ports, misconfigured services, and potential exploit vectors (like SQL injection or cross-site scripting). Generally, the software will handle the vulnerability data and search for any matches with what you’ve got running. It’s your job to define the target, set the scan types you want run, read the reports that come out the other end, and — most important of all — fix whatever’s broken.
Commercial scanning packages with free tiers include Nessus, Nexpose, and Burp Suite. OpenVAS is a mature, fully open source tool that can handle just about anything you throw at it. And, most conveniently, it just so happens that my Pluralsight collection also includes a video guide to using OpenVAS.
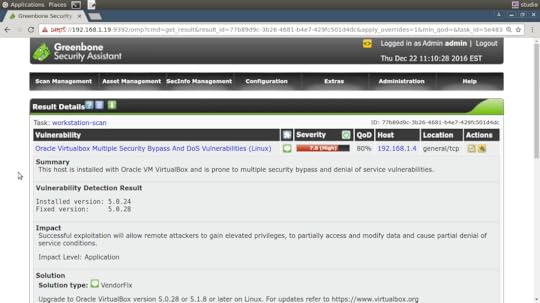
The results page of an OpenVAS scan — using their Greenbone browser interface
An outstanding platform for running all kinds of scans and testing is the Kali Linux distribution. Kali, which itself is highly secure by default, comes with dozens of networking and security software packages pre-configured. OpenVAS, while easily installed to Kali, was left out of the default profile due to its size.

Some pen-testing-friendly software packages available in Kali Linux right out of the box
It’s common to run Kali within a virtual environment like VirtualBox rather than having it take up a whole physical machine. That way you can safely isolate your testing from your regular compute activities…not to mention save yourself significant time and money.
Exploit (penetration) testing
Here (after obtaining explicit authorization from the organization’s management) is where your pen testers try to actually penetrate your defences to see how far in they can get. Testers will make use of tools like the Metasploit Framework (often also run from Kali Linux), which executes live exploits against target infrastructure. My bad luck: I don’t have a course on Metasploit, but other Pluralsight authors sure do.
The immediate goal is to leverage any of the network or operating system exploits discovered during the earlier stages of the scanning process. But the ultimate idea, of course, is to shut down the security flaws your pen tester uncovers. All the testing in the world won’t do you an ounce of good if you don’t use it to improve.
Besides the purely technical hacking tools you’ll use, the exploitation phase of pen testing can also incorporate some good old social engineering. That’s where (when authorized) you can use emails, phone calls, and personal contact to try to fool employees into giving up sensitive information.
It’s a lot of work and requires a great deal of training and preparation to do it well. But if you’re responsible for your company’s IT resources, you can’t leave pen testing for later.
So what’s your next step? If you’re a do-it-yourself type then by all means, carefully work through some online resources or courseware and dive right in. Otherwise, find a professional you can trust and see what they recommend.
Good luck!
Don’t think I’m just some kind of one-dimensional geek. Besides my Pluralsight courses , I also write books on Linux and AWS . Ok. So I suppose I am some kind of one-dimensional geek. This article originally appeared on my Medium account.
AWS S3-based enterprise network file sharing using Nextcloud
This article is excerpted from my Manning book, Linux in Action .
Nextcloud is an open source software suite that, when installed on a Linux server, can leverage storage capacity for saving, editing, and consuming a wide range of document types — including services like audio/video call hosting. Nextcloud also provides _client_ applications that allow users on Linux, Windows, MacOS, and smart phone platforms to engage with media resources.
Using Nextcloud, you can create your own private versions of Dropbox or Google Drive, but on your terms and without having to worry about unexpected changes to availability or service/privacy agreements.
So great. Nextcloud has some real benefits. But going it alone means you’re on the hook for the costs and complexity of data hosting, replication, and backups. Is it really worth all the trouble and expense when you can get lots of storage at little or no cost using any one of those other services?
Good news: you can have it both ways. For particularly sensitive data, you can keep the whole thing in-house. But you can also build a Nextcloud server as your front end (to finely control how users interface with your media), but have the data itself automatically and securely saved to cheaper, reliable third party services including Dropbox, Google Drive, and Amazon’s S3. If, down the line, you find you need to migrate your data away from a third-party provider like S3, you can do it without your users ever noticing the change.
Hardware prerequisites
Let’s put something together using Ubuntu.
It’s always a good idea to check out an application’s documentation to make sure that you’ve got enough hardware and software muscle to handle the load. The figure below shows Nextcloud’s System Requirements web page. If you’re planning to host a simple, lightly-used server providing for just a few dozen users, then you’ll find Nextcloud is a fairly easy to get along with, demanding nothing that can’t be handled by an off-the-shelf container.
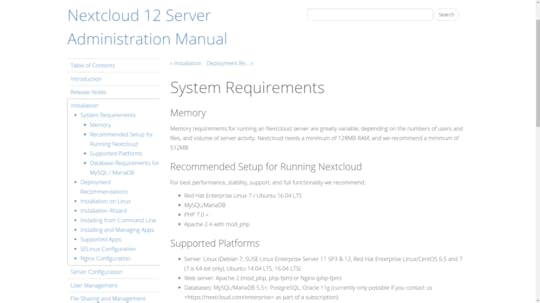
Hardware and software requirements for both recommended and minimal Nextcloud installations
Any old minimal hardware configuration will work just fine for technology testing, but I wouldn’t want to rely on a single LXC container running off an old PC to serve tens of thousands of users and terabytes of data. Planning an enterprise-scale deployment? Nextcloud provides a useful, multi-level Deployment Recommendations guide to provisioning full-strength platforms.
Here, for instance, is what Nextcloud recommends for a smaller work group with up to 150 users accessing up to 10TB of data:
One sever with 2 CPU cores
16GB of RAM
Authentication through Lightweight Directory Access Protocol (LDAP) (a widely-used distributed information protocol)
Red Hat Enterprise Linux or Ubuntu 16.04 _with_ vendor support
Apache with TLS/SSL encryption certificate
The MySQL or MariaDB database
The Btrfs file system mounted with _nodatacow_ for Nextcloud data partitions to permit _zero downtime_ backups
Caching with memcache to speed up access performance
Building a LAMP server
Building a base environment suitable for testing the package should be simple enough. Here are all the packages you’ll need for your server in a single command. I threw in wget and nano just in case they’re not already installed. In the interest of keeping the base image as small as possible, packages like nano are often not installed by default on some virtualized platforms like LXC containers.
# apt install apache2 mariadb-server libapache2-mod-php7.0 \
php7.0-gd php7.0-json php7.0-mysql php7.0-curl php7.0-mbstring \
php7.0-intl php7.0-mcrypt php-imagick php7.0-xml php7.0-zip \
wget nano
If you’re not picky about using MySQL rather than MariaDB — and you’re on an Ubuntu server — then you could just as easily spare yourself a lot of typing and go with the LAMP server metapackage I mentioned in the previous chapter. Again: don’t forget the caret (`^`) at the end of the package name.
# apt install lamp-server^
Once installed, don’t forget to run the MySQL secure installation tool:
# mysql_secure_installation
If you chose the MariaDB route and found yourself having to use sudo with that command, here’s a quick fix:
MariaDB [(none)]> SET PASSWORD = PASSWORD(‘your-password’);
MariaDB [(none)]> update mysql.user set plugin = ‘mysql_native_password’ where User=’root’;
MariaDB [(none)]> FLUSH PRIVILEGES;
Apache configuration
To ensure that Apache will be able to communicate with Nextcloud, there are a few relatively simple adjustments you’re going to have to make. First off, you should enable a couple of Apache modules through the a2enmod tool. The rewrite module is used to rewrite URLs in real time as they’re moved between a client and the server. The headers module performs a similar function for HTTP headers.
# a2enmod rewrite
# a2enmod headers
If you’re not planning to use this server for any other purpose, locating the Nextcloud application files in the Apache document root would work. Since the value of the `DocumentRoot` entry in the 000-default.conf file in your /etc/apache2/sites-available/ directory already points to /var/www/html/, there’s really nothing left for you to do.
However, placing Nextcloud’s data files in the default document root presents a potential security risk, so you will probably want your Nextcloud application in some other part of your file system.
There are two ways to tell Apache how to find site files that aren’t in the document root. The “Ubuntu method” involves adding a new section to your existing 000-default.conf file that contains all the necessary information. However, most people seem to prefer creating a new .conf file in the /etc/apache2/sites-available/ directory for each new service. Both work just fine, but here’s what the separate file should look like assuming you placed the application in /var/www/ rather than the document root:
Alias /nextcloud “/var/www/nextcloud/”
Options +FollowSymlinks
AllowOverride All
Dav off
SetEnv HOME /var/www/nextcloud
SetEnv HTTP_HOME /var/www/nextcloud
Note that the “Alias” line associates the contents of the /var/www/nextcloud/ directory with the “nextcloud” host (or “site”), and the two “SenEnv” lines assign environment variables that will define the way the Nextcloud application works
A similar directive using the Ubuntu method would involve adding a section in your 000-default.conf file that might look something like this:
ServerName bootstrap-it.com
DocumentRoot /var/www/nextcloud
ServerAlias bootstrap-it.com/nextcloud
As you can see in the figure, when Apache reads this file, it will redirect all incoming traffic addressed to example.com/nextcloud to the application files in /var/www/ (assuming, again, that your domain is example.com…as before, an IP address will work just as well).
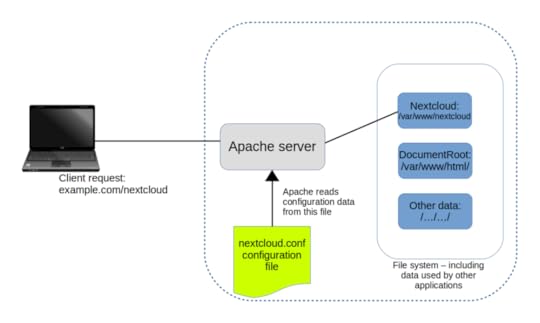
Apache reads configuration files in /etc/apache2/sites-enabled/ and uses their settings to redirect requests
Finally, you’ll need to create a symbolic link in the /etc/apache2/sites-enabled/ directory pointing to the nextcloud.conf file you created in /etc/apache2/sites-available/.
# ln -s /etc/apache2/sites-available/nextcloud.conf \
/etc/apache2/sites-enabled/nextcloud.conf
But why? And what’s a symbolic link?
When Apache starts up, it reads the contents of /etc/apache2/sites-enabled/ looking for site configurations to load. Those configurations won’t actually exist in /etc/apache2/sites/enabled/, but there will be symbolic links to the real files in /etc/apache2/sites-available/.
So why not just tell Apache to read /etc/apache2/sites-available/ in the first place and cut out the middleman? Because hanging it all on symbolic links makes it really easy and convenient to quickly disable a site and then — when you’ve finished a round of edits — re-enable it once again. Rather than having to actually delete and rewrite the real file, you’ll only need to play with an easy-to-manage link to it.
Symbolic links? They’re just objects that represent files or directories living elsewhere on a file system. They allow a user to execute or view a resource in one place, even though the resource itself is elsewhere.
Downloading and unpacking Nextcloud
You can download the most recent Nextcloud package from the Nextcloud Install page. If you’re installing to a container or VM — or from a server without a desktop GUI installed — then the most convenient approach is to get the package’s download URL and grab the package from the command line.
One quick way to get that URL from the Nextcloud site (from a regular session on your own PC) is to click the Download tab beneath Get Nextcloud Server and then, as you can see below, the Details and Download options button. Right click on the .tar.bz2 link and select Copy Link Address from the menu.
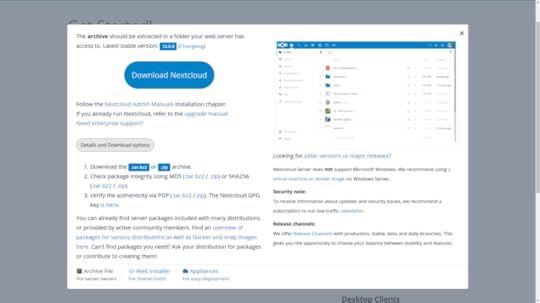
Links to Nextcloud download archives: either the .tar.bz2 or the .zip formats will work
You can copy that URL into a `wget` command either through right-clicking in the terminal and selecting paste, or through SHIFT+CTRL+v.
$ wget https://download.nextcloud.com/server/releases/nextcloud-12.0.0.tar.bz2
Don’t forget to click the MD5 or SHA256 hash links and confirm that those values are identical to the hashes you generate from the downloaded archive. Unpacking a .tar.bz2 archive requires the xjf arguments rather than the `xzf` you would use for a .gz.
$ tar xjf nextcloud-12.0.0.tar.bz2
The next step involves copying the unpacked files and directories to their new home — which, following the best practices I mentioned earlier — will be in /var/www/, a location outside the document root. Adding -r to the copy command will copy the files “recursively”, to include subdirectories and their contents.
# cp -r nextcloud /var/www/
Just two more small steps and you’re good to go. Apache will need full access to all the files in the Nextcloud directories in order to do its job. You could have root own them, but that means you’d have to give visiting users root powers to access those files. As you might imagine, giving everyone on the internet that kind of access to your files poses just a wee problem. So, many web servers use a special system user called www-data.
This next command will use chown to turn the user and group ownership of all those files over to the web server user www-data. Using the uppercase -R will (like the lowercase -r you used with cp) apply the command recursively to all files and directories in the directory hierarchy.
# chown -R www-data:www-data /var/www/nextcloud/
Apache has no idea of the kinds of stuff we’ve been up to while it wasn’t looking, so you’d better let it in on the fun by restarting the service.
# systemctl restart apache2
If that restart _wasn’t_ successful, then make a note of any error messages and see if there’s anything you can fix. You can also dig a bit deeper into the logs by displaying the last ten entries in the Journal. There might, for instance, be a reference to a specific line in the nextcloud.conf file.
# journalctl | tail
But if everything went well, then direct your browser to your container’s IP address followed by `nextcloud`. You’ll be taken to a page where you’re asked to create a new admin account and provide valid login credentials for your MariaDB database. Unless you’ve created a different database user account for the purpose, you’ll use `root` and the password you gave it earlier.
10.0.3.36/nextcloud
Once your information is digested, you’ll be shown links to Nextcloud’s client apps and then dropped into the administration console you can see in the next figure. That’s where you can upload, view, and share documents and media files.
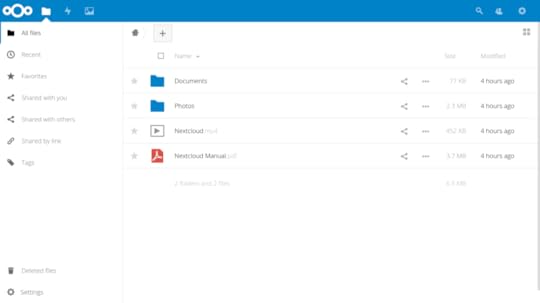
The main Nextcloud console, complete with sample folders and files — you can work with objects here just as you would using an OS file manager
As the site administrator, you can also create groups and users, assign permissions and quotas, and manage how the site functions.
Using AWS S3 as your primary Nextcloud storage
The thing about storing stuff is that you have to find space to put it all. And, since all storage devices will eventually fail without warning, you’ll need multiple copies of each device. Figuring out how to provision, connect, and maintain such storage arrays is time consuming, and keeping it going is relatively expensive.
Cloud storage, on the other hand, is comparatively cheap and — as you can read in my Manning “Learn Amazon Web Services in a Month of Lunches” book — simple to set up. Since the big cloud providers invest vast funds in data security and resilience, their services are pretty much guaranteed to be more reliable than anything you could put together.
Therefore, using cloud-based data as a back end to your locally hosted Nextcloud site is a serious option to explore. Here’s how it works.
You’ll first need to enable the External storage support App bundle. From the gear icon at the top right, click the Apps item, and then the Disabled apps link in the left panel. As the figure shows, the External storage support option appears in the list. Click Enable.
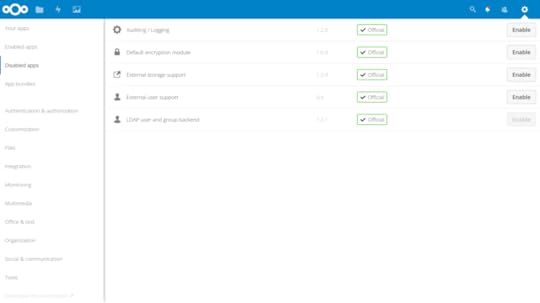
The list of currently available apps, including External storage support
Connect Nextcloud to an S3 bucket
From the command line on any computer with the AWS CLI installed and configured for your AWS account (see chapter 12 of my AWS in a Month of Lunches book for details), create a new bucket with a globally unique name.
$ aws s3 mb nextcloud32327
Retrieve a set of account Access Keys from the Your Security Credentials page in the AWS console (chapter 7 in the AWS book). You can also use an existing set of keys if you’ve got one available.
Now head back to your Nextcloud console, click on Admin from the gear drop-down, and then on the External storages link that should be visible in the left panel. This will open the External storages page, where you can click the Add storage drop-down and select Amazon S3 from the list — which also includes Dropbox and Google Drive.
You’ll be prompted to enter the S3 bucket you want to use along with your Access and Secret keys. All other fields — which allow you to customize your configuration using things like non-standard ports or SSL encryption — are optional. When you’re done, clicking the check mark to the right will save your settings and set Nextcloud off trying to authenticate with AWS.
If you’re successful, you’ll see a happy green circle to the left, as is visible in the figure. If it doesn’t work, the most likely cause is that you somehow used invalid authentication keys. It can’t hurt to confirm network connectivity to the internet and, in particular, AWS.
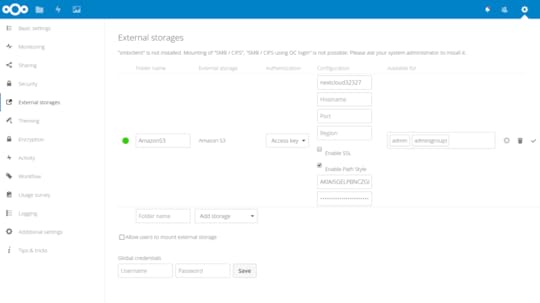
The External storages setup page for Amazon S3, showing a successful connection to my S3 bucket
You can test your new storage configuration by copying and pasting a file from your computer into the folder in your Nextcloud console. Then, from your AWS CLI, list the contents of your bucket.
$ aws s3 ls s3://nextcloud32327
testfile.pdf
Of course, you’ll need to test it the other way too. Copy a local file to the bucket from your command line.
$ aws s3 cp test.txt s3://nextcloud32327
That test.txt file should appear in your console. Glorious multi-platform storage integration.
This article – which originally appeared on my Medium account, is excerpted from my Manning “Linux in Action” book . There’s lots more fun where this came from . Who knows…you might also enjoy my recently published Learn Amazon Web Services in a Month of Lunches .