David Clinton's Blog, page 3
January 3, 2021
IT Security and Data Backups
Early one recent morning my Linux workstation failed to boot. And just like that, all my work plans for the day ground to an immediate halt.
This was the Linux workstation that was host to thirty years-worth of data: The original working drafts of all my books. The master versions of my course videos. My tax records, banking information, password vault, and the access keys to my cloud infrastructure.
Was I surprised? Not particularly. The day before I’d been struggling with a broken Python package and I knew there was a chance it wouldn’t end well the next time I fired up the machine.
Was I annoyed? Yup.
Did I break into a cold sweat, thinking about what was lost and whether I’d ever recover? Nope. That was never a concern. In fact, from the moment I decided that the original installation was no longer worth fighting for, it would only take an hour or so to get everything back up and running. (Not counting the time it took me to remember that a known hardware conflict required I disable a non-free Nvidia driver.)
Let me emphasise that: I erased the corrupted drive, installed a clean copy of Ubuntu Linux, and wrote fresh, reliable copies of around 20GB of data to the new installation in less than a single hour.
Besides having a fast fibre optics internet connection, what’s my secret sauce? I’m constantly backing up all my important data to multiple storage locations. When catastrophe hits, and I have a solid, tested recovery protocol in place. For all intents and purposes, the workstation part of that protocol involves installing my OS and then, with just two or three commands, restoring all my data to its new home. From that moment, I’ll be back to work.
I’m sure this story has left you overcome with relief and warm, sympathetic feelings. But what’s it all got to do with IT security? More than you might imagine. The fact is that there many reasons backup discussions belong here, but if you had to limit yourself to just one, this common and timely scenario (adapted from my recent “Linux Security Fundamentals” book from Wiley/Sybex)[https://www.amazon.com/dp/1119781469] would be it:
Imagine you’re responsible for the IT systems powering the municipal services for your small town. Without those computers and their data, municipal workers won’t get paid next month, the local library won’t know where any of their books are, the 911 emergency service communication system’s phones won’t ring, and the town’s information website will go offline.
Now imagine that one fine morning you log into the main server and you’re greeted by the cheerful news that all the data on your systems has been encrypted by a hacker from Eastern Europe and that they won’t give you the decryption key to restore your access unless you pay them a couple hundred thousand dollars’ worth of cryptocurrency. Don’t think this is realistic? Major hospitals, utilities, and entire small cities have been brought to their knees by just such attacks.
What are your choices?
You could pay the ransom and hope the attackers keep their promise to decrypt your data. But, historically, they often haven’t. Criminals aren’t known for being honest.You could try using decryption tools provided by major security companies and government agencies (like https://noransom.kaspersky.com/ ) and hope that they’ll work on your system. This is certainly a valid option, but it won’t work in all cases.You could wipe your systems clean and rebuild everything from scratch. This could be hugely expensive and take months to complete.
But do you know how you can stop the attack cold and walk away virtually untouched? If you had complete, up-to-date backup copies of your systems (both the user data and the application systems themselves), then all you’ll need to do is rebuild from your backups.
Worst case, you’re down for an hour or two, and few people even notice. Even better, you could plan things really well by designing an always-running “hot” backup infrastructure that’s preconfigured to go live the minute the main system goes down. It’s known as failover, and it’s the kind of plan that can make you a big hero and earn you a big raise.
Still not sure what backups have to do with security?
That Linux Security Fundamentals book also describes how to properly assemble all the parts your recovery plan will need. That’ll include a careful assessment of precisely how important your data is to both you and the organization you work for. Here’s how my book describes RTOs and RPOs:
How “quick” is quick enough and how “complete” is complete enough? That will depend on your organization’s operational needs. It’s common for administrators to measure their needs in terms of a recovery point objective (RPO) and recovery time objective (RTO). An RPO is the system state you need to be able to recover that will be current enough for your organization’s minimum requirements. So, for instance, if your recovered system will have data that includes all but the last hour preceding the crash, you’ll be able to get by. But a loss of two hours of data would be catastrophic; the financial or reputation loss you’d face would be too serious. For such an organization, you’d better make sure you have an RPO of one hour or less.
An RTO, on the other hand, is a measure of how soon you need to get your system back up and running at full speed before really bad things start happening to your organization.
By way of example, suppose your ecommerce site was offline for 12 hours. You’ll lose some business, obviously, but your business analysts tell you that anything up to 48 hours is still livable. More than 48 hours, however, and customers will assume you’re down for good and head over to the competition (which, all things being equal, will be Amazon).
Therefore, when you plan your backup regimen, you’ll take both the RPO and the RTO into account. You’ll need to make sure a new backup is run within the RPO (say, one hour) and also make sure you can access your backup archives and successfully restore the data to the applications in less than the RTO (48 hours, in our example).
Sure, RTOs and RPOs are usually applied to enterprise infrastructure workloads. But, on many levels, the underlying point can also apply to our own beloved workstations and laptops.
If you take some time now — today — to plan, create, and test your own recovery protocol, you can be sure that one day soon, you’ll thank yourself.
You can find much more technology content by David Clinton through is website. In particular, you might enjoy his new book, Keeping Up: Backgrounders to all the big technology trends you can’t afford to ignore .


November 16, 2020
How Companies Get Your Data – And What They Can Do With It
Curious about what kinds of personal and even private data you may be exposing through the course of a normal day on the internet? How about using “all kinds” as a starting point?
Here, adapted from my new book, Keeping Up: Backgrounders to all the big technology trends you can’t afford to ignore, is a way to break down the scope and nature of the problem by platform.
Financial transactions
Take a moment to visualize what’s involved in a simple online credit card purchase. You probably signed into the merchant’s website using your email address as an account identifier and a (hopefully) unique password. After browsing a few pages, you’ll add one or more more items to the site’s virtual shopping cart.
When you’ve got everything you need, you’ll begin the checkout process, entering shipping information, including a street address and your phone number. You might also enter the account number of the loyalty card the merchant sent you and a coupon code you received in an email marketing message.
Of course, the key step involves entering your payment information. For a credit card, this will probably include the card owner’s name and address, and the card’s number, expiration date, and a security code.
Assuming the merchant’s infrastructure is compliant with Payment Card Industry Data Security Standard (PCI-DSS) protocols for handling financial information, then it’s relatively unlikely that this information will be stolen and sold by criminals. But either way, it will still exist within the merchant’s own database.
To flesh all this out a bit, understand that using your loyalty card account and coupon code can communicate a lot of information about your shopping and lifestyle preferences. Not to mention records of some of your previous activities. And your site account comes with contact information and your home location.
All of that information can, at least in theory, be stitched together to create a robust profile of you as a consumer and citizen.
It’s for these reasons that I personally prefer using third-party e-commerce payment systems like PayPal because such transactions leave no record of my specific payment method on the merchant’s own databases.
Devices
Modern operating systems are built from the ground up to connect to the internet in multiple ways. They’ll often automatically query online software repositories for patches and updates and “ask” for remote help when something goes wrong.
Some performance diagnostics data is sent and stored online, where it can contribute to statistical analysis or bug diagnosis and fixes. Individual software packages might connect to remote servers independently of the OS to get their own things done.
All that’s fine. Except that you might have a hard time being sure whether all the data coming and going between your device and the internet is stuff you’re OK sharing.
Can you know that private files and personal information aren’t being swept in with all the other data? And are you confident that none of your data will ever accidentally find its way into some unexpected application lying beyond your control?
To illustrate the problem, I’d refer you to devices powered by digital assistants like Amazon’s Alexa and the Google Assistant (“OK Google”). Since, by definition, the microphones used by digital assistants are constantly listening for their key word (“Alexa…”), everything anyone says within range of the device is registered.
At least some of those conversations are also recorded and stored online and, as it turns out, some of those have eventually been heard by human beings working for the vendor. In at least one case, an inadvertently-recorded conversation was used to convict a murder suspect (not that we’re opposed to convicting murderers).
Amazon, Google, and other players in this space are aware of the issue and are trying to address it. But it’s unlikely they’ll ever fully solve it. Remember, convenience, security, and privacy don’t work well together.
Now if you think the information from computers and tablets that can be tracked and recorded is creepy, wait ’till you hear about thermostats and light bulbs.
As more and more household appliances and tools are adopted as part of “smart home” systems, more and more streams of performance data will be generated alongside them.
And, as has already been demonstrated in multiple real-world applications, all that data can be programmatically interpreted to reveal significant information about what’s going on in a home and who’s doing it.
Mobile devices
Have you ever stopped in the middle of a journey, pulled out your smartphone, and checked a digital map for directions? Of course you have.
Well, the map application is using your current location information and sending you valuable information but, at the same time, you’re sending some equally valuable information back. What kind of information might that be?
I once read about a mischievous fellow in Germany who borrowed a few dozen smartphones, loaded them up on a kids’ wagon, and slowly pulled the wagon down the middle of an empty city street. It wasn’t long before Google Maps was reporting a serious traffic jam where there wasn’t one.
How does the Google Maps app know more about your local traffic conditions than you do? One important class of data that feeds their system is obtained through constant monitoring of the location, velocity, and direction of movement of every active Android phone they can reach – including your Android phone.
I, for one, appreciate this service and I don’t much mind the way my data is used. But I’m also aware that, one day, that data might be used in ways that sharply conflict with my interests. Call it a calculated risk.
Of course, it’s not just GPS-based movement information that Google and Apple – the creators of the two most popular mobile operating systems – are getting. They, along with a few other industry players, are also handling the records of all of our search engine activity and the data returned by exercise and health monitoring applications.
In other words, should they decide to, many tech companies could effortlessly compile profiles describing our precise movements, plans, and health status. And from there, it’s not a huge leap to imagine the owners of such data predicting what we’re likely to do in the coming weeks and months.
Web browsers
Most of us use web browsers for our daily interactions with the internet. And, all things considered, web browsers are pretty miraculous creations. They often act as an impossibly powerful concierge, bringing us all the riches of humanity without even breaking into a sweat.
But, as I’m sure you can already anticipate, all that power comes with a trade-off.
For just a taste of the information your browser freely shares about you, take a look at the Google Analytics page shown in the figure below.
This dashboard displays a visual summary describing all the visits to my own bootstrap-it.com site over the previous seven days. From the data that was collected, I can see:
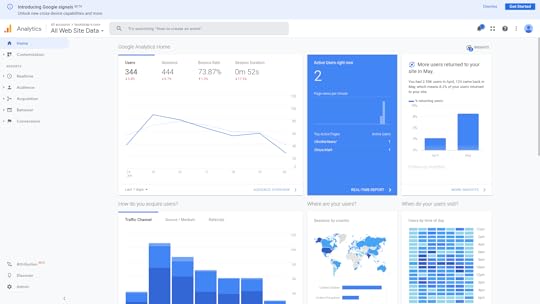
Where in the world my visitors are fromWhen during the day they tend to visitHow long they spent on my siteWhich pages they visitWhich site they left before coming to my siteHow many visitors make repeat visitsWhat operating systems they’re runningWhat device form factor they’re using (i.e., desktop, smartphone, or tablet)The demographic cohorts they belong to (genders, age groups, income groups)
Besides all that, a web server’s own logs can report detailed information, in particular the specific IP address and precise time associated with each visitor.
What this means is that, whenever your browser connects to my website (or any other website), it’s giving my web server an awful lot of information. Google just collects it and presents it to me in a fancy, easy-to-digest format.
By the way, I’m fully aware that, by having Google collect all this information about my website’s users I’m part of the problem. And, for the record, I do feel a bit guilty about it.
In addition, web servers are able to “watch” what you’re doing in real time and “remember” what you did on your last visit.
To explain, have you ever noticed how on some sites, right before you click to leave the page a “Wait! Before you go!” message pops up? Servers can track your mouse movements and, when they get “too close” to closing the tab or moving to a different tab, they’ll display that popup.
Similarly, many sites save small packets of data on your computer called “cookies.” Such a cookie could contain session information that might include the previous contents of a shopping cart or even your authentication status. The goal is to provide a convenient and consistent experience across multiple visits. But such tools can be misused.
Finally, like operating systems, browsers will also silently communicate with the vendor that provides them. Getting usage feedback can help providers stay up to date on security and performance problems. But independent tests have shown that, in many cases, far more data is heading back “home” than would seem appropriate.
Website interaction
Although I deal with this in greater depth in my “Keeping Up” book, I should highlight at least a couple of particularly relevant issues here. Like, for instance, the fact that websites love getting you to sign up for extra value services.
The newsletters and product updates that they’ll send you might we be perfectly legitimate and, indeed, provide great value. But they’re still coming in exchange for some of your private contact information. As long as you’re aware of that, I’ve done my job.
A perfect example is the data you contribute to social media platforms like Twitter, Facebook, and LinkedIn. You may think you’re just communicating with your connections and followers, but it actually goes much further than that.
Take a marvelous – and scary – piece of software called Recon-ng that’s used by network security professionals to test for an organization’s digital vulnerability. Once you’ve configured it with some basics about your organization, Recon-ng will head out to the internet and search for any publicly available information that could be used to penetrate your defenses or cause you harm.
For instance, are you sure outsiders can’t possibly know enough about the software environment your developers work with to do you any damage? Well perhaps you should take a look at the “desired qualifications” section from some of those job ads you posted on LinkedIn. Or how about questions (or answers) your developers might have posted to the Stack Overflow site?
Every post tells a story, and there’s no shortage of clever people out there who love reading stories.
Software like Recon-ng can help you identify potential threats. But that only underlines your responsibility to avoid leaving your data out there in public in the first place.
The bottom line? Smile. You’re being watched.
There’s lots more quick, fun, and accessible technology background goodness available in my Keeping Up book. Take a look.
How Companies Get Your Data â And What They Can Do With It
Curious about what kinds of personal and even private data you may be exposing through the course of a normal day on the internet? How about using âall kindsâ as a starting point?
Here, adapted from my new book, Keeping Up: Backgrounders to all the big technology trends you can’t afford to ignore, is a way to break down the scope and nature of the problem by platform.
Financial transactions
Take a moment to visualize whatâs involved in a simple online credit card purchase. You probably signed into the merchantâs website using your email address as an account identifier and a (hopefully) unique password. After browsing a few pages, youâll add one or more more items to the siteâs virtual shopping cart.
When youâve got everything you need, youâll begin the checkout process, entering shipping information, including a street address and your phone number. You might also enter the account number of the loyalty card the merchant sent you and a coupon code you received in an email marketing message.
Of course, the key step involves entering your payment information. For a credit card, this will probably include the card ownerâs name and address, and the cardâs number, expiration date, and a security code.
Assuming the merchant’s infrastructure is compliant with Payment Card Industry Data Security Standard (PCI-DSS) protocols for handling financial information, then itâs relatively unlikely that this information will be stolen and sold by criminals. But either way, it will still exist within the merchantâs own database.
To flesh all this out a bit, understand that using your loyalty card account and coupon code can communicate a lot of information about your shopping and lifestyle preferences. Not to mention records of some of your previous activities. And your site account comes with contact information and your home location.
All of that information can, at least in theory, be stitched together to create a robust profile of you as a consumer and citizen.
ââItâs for these reasons that I personally prefer using third-party e-commerce payment systems like PayPal because such transactions leave no record of my specific payment method on the merchantâs own databases.
Devices
Modern operating systems are built from the ground up to connect to the internet in multiple ways. Theyâll often automatically query online software repositories for patches and updates and âaskâ for remote help when something goes wrong.
Some performance diagnostics data is sent and stored online, where it can contribute to statistical analysis or bug diagnosis and fixes. Individual software packages might connect to remote servers independently of the OS to get their own things done.
All thatâs fine. Except that you might have a hard time being sure whether all the data coming and going between your device and the internet is stuff youâre OK sharing.
Can you know that private files and personal information arenât being swept in with all the other data? And are you confident that none of your data will ever accidentally find its way into some unexpected application lying beyond your control?
To illustrate the problem, Iâd refer you to devices powered by digital assistants like Amazonâs Alexa and the Google Assistant (âOK Googleâ). Since, by definition, the microphones used by digital assistants are constantly listening for their key word (âAlexaâ¦â), everything anyone says within range of the device is registered.
At least some of those conversations are also recorded and stored online and, as it turns out, some of those have eventually been heard by human beings working for the vendor. In at least one case, an inadvertently-recorded conversation was used to convict a murder suspect (not that weâre opposed to convicting murderers).
Amazon, Google, and other players in this space are aware of the issue and are trying to address it. But itâs unlikely theyâll ever fully solve it. Remember, convenience, security, and privacy donât work well together.
Now if you think the information from computers and tablets that can be tracked and recorded is creepy, wait âtill you hear about thermostats and light bulbs.
As more and more household appliances and tools are adopted as part of âsmart homeâ systems, more and more streams of performance data will be generated alongside them.
And, as has already been demonstrated in multiple real-world applications, all that data can be programmatically interpreted to reveal significant information about whatâs going on in a home and whoâs doing it.ââ
Mobile devices
Have you ever stopped in the middle of a journey, pulled out your smartphone, and checked a digital map for directions? Of course you have.
Well, the map application is using your current location information and sending you valuable information but, at the same time, youâre sending some equally valuable information back. What kind of information might that be?
I once read about a mischievous fellow in Germany who borrowed a few dozen smartphones, loaded them up on a kidsâ wagon, and slowly pulled the wagon down the middle of an empty city street. It wasnât long before Google Maps was reporting a serious traffic jam where there wasnât one.
How does the Google Maps app know more about your local traffic conditions than you do? One important class of data that feeds their system is obtained through constant monitoring of the location, velocity, and direction of movement of every active Android phone they can reach – including your Android phone.
I, for one, appreciate this service and I donât much mind the way my data is used. But Iâm also aware that, one day, that data might be used in ways that sharply conflict with my interests. Call it a calculated risk.
Of course, itâs not just GPS-based movement information that Google and Apple – the creators of the two most popular mobile operating systems – are getting. They, along with a few other industry players, are also handling the records of all of our search engine activity and the data returned by exercise and health monitoring applications.
In other words, should they decide to, many tech companies could effortlessly compile profiles describing our precise movements, plans, and health status. And from there, itâs not a huge leap to imagine the owners of such data predicting what weâre likely to do in the coming weeks and months.
Web browsers
Most of us use web browsers for our daily interactions with the internet. And, all things considered, web browsers are pretty miraculous creations. They often act as an impossibly powerful concierge, bringing us all the riches of humanity without even breaking into a sweat.
But, as Iâm sure you can already anticipate, all that power comes with a trade-off.
For just a taste of the information your browser freely shares about you, take a look at the Google Analytics page shown in the figure below.
September 4, 2020
How to Create a Disaster Recovery Plan for Your IT Team
You know the old joke: there are two kinds of companies, those that’ve been hit with an IT disaster, and those who don’t yet realize they’ve been hit with an IT disaster.
But what they all have in common is that there are plenty more disasters to come. So ask yourself whether you’re ready for the next one.
This article, which is based on my Pluralsight course, Linux System Maintenance and Troubleshooting, is intended to start you thinking about what building an effective protocol will take.
What you need to have in place
It all begins with the business continuity plan (BCP). This is a formal plan that’s meant to define the procedures an organization would use to ensure survival in the event of an emergency.
BCPs will generally include sub-plans to secure the immediate safety of employees and customers, work to restore previously-designated critical operations as soon as possible and, eventually, to restore full normal operations.
In addition, an effective BCP will also include two sub-plans that are specific to IT operations: the incident management protocol and disaster recovery plan.
The disaster recovery plan (DRP) aims to protect an organization’s IT infrastructure in the event of a disaster. Its primary goals are to minimize damage and to restore functionality as quickly as possible.
The reason we call this a “plan” is because it simply won’t work without serious prior preparation. Infrastructure protection, threat detection, and corrective protocols are critical parts of the plan.
An Incident Management Plan (IMP) is meant to address the specific threat of cyber attacks against IT infrastructure. Its goals are to minimize damage and remove the threat.
As you can easily tell, there will be some overlap between your DRP and IMP. But the key focus of disaster recovery is to get your infrastructure back on its feet, while incident management is much more closely aligned with the world of IT security.
For the rest of this short article we’re going to look at what goes into creating incident management and disaster recovery plans and how to ensure that your plan is sound and should, when executed, actually work.
Developing an Incident Management Protocol
Since incident management is going to be your first response to trouble, we’ll begin there.
The first indication that there’s trouble can come from a user who notices that something’s not right with the system. Or, if you’ve done a particularly good job configuring your infrastructure, it could also come to you in the form of an automated alert triggered by monitoring software.
When that alert comes in, it’ll be the job of the technician or admin on call to decide how it’s going to be handled and who has to handle it.
Escalation can happen through a direct phone call or email, a ticket submitted through a collaboration tool like Jira, or by using a purpose-built Security Information and Event Management (SIEM) tool.
Again, though, the more smart automation you build into the process, the faster and more efficient it’s likely to be.
Whoever ends up with the ultimate responsibility will coordinate efforts to definitively diagnose and resolve the problem. Ideally, where necessary, such coordination will include admins, developers, and other key stakeholders to ensure you’ve got all the resources you’ll need to address the problem.
When it’s all over, once you’ve confirmed the problem is resolved, you’ll want to close the incident by assessing what went wrong and what went right, how your response could have been better, and how you can rework things to reduce the risk of a repeat of the incident.
But what does all this have to do with IT administration? Well, responsible IT managers must be able to build resiliency into their infrastructure.
That will mean spending serious time fine-tuning their software monitoring systems so they’ll catch and alert you to real problems while issuing alerts for as few false positives as possible.
And it’ll probably also involve intelligently automating logging and intrusion detection systems and generally getting a good idea of how things are supposed to look.
Developing a Disaster Recovery Plan
Disaster recovery planning requires you to:
Define exactly what recovery meansIdentify the resources that achieving recovery will requireConvert those observations into a formal plan formatCommunicate the plan to the players who will one day have to carry it out
What does recovery mean? It’s when your poor, stricken infrastructure has returned to the shape it was in the moment before disaster hit.
What you’ll need to get you back to that point can be defined by establishing a Recovery Time Objective (RTO) and Recovery Point Objective (RPO) that fits your organization’s needs.
A Recovery Time Objective represents the maximum number of minutes, hours, or days that your organization could survive an IT service outage. So your recovery plan will need to incorporate that hard deadline into its protocols.
Of course that means you’ll need to have team members available to make it into the office even in the small hours of the night quickly enough to make a difference.
But it also means, say, that if your RTO is six hours, but restoring critical data from your backups would take a minimum of eight hours just to handle the transfer, then you’ll have to rethink those numbers before signing off on the plan.
A Recovery Point Objective is the amount of transaction data your organization could afford to lose during an outage and survive.
To illustrate, an e-commerce website that normally processes 25 transactions each minute could, perhaps, afford to issue apologies and refunds to 30 minutes worth of angry customers wondering why their credit cards were billed but their electric train sets weren’t delivered. Refunding more than 30 minutes worth, however, could deplete your financial reserves to the point that you’re no longer viable.
In any case, calculating accurate and reliable RTOs and RPOs is how you set the limits within which your recovery plan will have to operate. Or, in other words, you’ll have defined what recovery means.
Now what about resources? By which I mean the data backups and, when necessary, the physical equipment you’ll need to get your application back on its feet.
To make that work you’ll have to decide on an infrastructure backup system. Whether you choose to go with incremental or differential, on-site or off-site, and single or multiple media types, you’ll have to map out exactly how the recovery will go and whether or not it’ll meet your RTO and RPO limits.
Of course there’s no end of really bad things that can happen to make those plans utterly useless. What if your local server facility just burns down? What if it’s lost to some kind of political upheaval or widespread power disruption?
Even if you’ve conscientiously maintained up-to-date data backups off-site, what good will they do you if your hardware effectively no longer exists?
Thinking about all those horrors can make preparing a cloud-based backup protocol using platforms like AWS and Azure sound mighty attractive. The big public clouds have the resources to distribute their infrastructure widely enough that it’s virtually impossible for the whole thing to ever go down.
So you could, for instance, maintain a reliably replicated data store on a public cloud platform that mirrors your main deployment. You could also design an infrastructure template that could be loaded up with your backup data and then launched on demand to take over in the event of an outage. Because nothing is kept running until it’s actually needed, it can take a good few minutes to bring this one up to speed.
A warm standby recovery design might maintain your data running 24/7 on a minimal number of virtual servers. In an emergency, you can hit the switch and the platform’s auto scaling will fire up all the instances you’ll need.
You could set the scaling to kick in when triggered by an alert from your primary system. The public cloud presents endless possibilities, but they all require planning and preparation.
A solid disaster recovery plan must be effectively communicated long before crunch time. Practically speaking, that means it’ll all be written up, printed, and distributed to each of the key players who will carry out the plan.
That’s not to say it ends there: those players will of course have actually read the thing and, ideally, engage in realistic simulations until they’re confident they can make it work under pressure.
What goes in this book?
An enumeration of all the stuff that could go wrong and bring down your systemAn inventory of exactly what you’ve got running in your server room and what would be needed to replace itThe information you’ll need to access and restore backed up dataAn up-to-date contact list of the people who will be responsible for every aspect of the planThe exact sequence of the tasks and events that will make up the recovery
That’s a lot of detail. But it’s barely a drop in the bucket when compared with the total amount of preparation and plain old hard work that goes into creating a real-world recovery plan.
But for now, the key takeaway from this module is simply to keep all this in mind. Why? Because the next time you sit down to configure a monitoring package or administration framework, you’ll think about incident management protocols and disaster recovery plans and wonder how you should include them in your configuration.
There’s much more administration goodness in the form of books, courses, and articles available at my bootstrap-it.com.
July 30, 2020
What is a LAN? The Local Area Network Explained in Plain English
A local area network (LAN) is really nothing more than a structure for organizing and protecting network communications for all the devices running within a single home or office.
Let me break that down a bit. When I say, within a single home or office, I mean all the devices that are connected through either a physical or wireless connection to a network router. That router might be a WiFi access point or the modem your internet service provider (ISP) gave you.
By organizing I mean each device is given an identifying address, and its access to the internet beyond your local network is defined.
And by protecting I mean that, generally, traffic requests directed at your devices from external networks will be scanned and filtered to help prevent unauthorized and potentially dangerous access.
Based in part on content from my Linux in Action book, I’ll try to explain how all that works.
IPv4 addressing
Here’s how that might look. The Router in this image has a public IP address of 183.23.100.34 to which all incoming and outgoing traffic is associated.
At the same time, the router acts as a Dynamic Host Configuration Protocol (DHCP) server, assigning private IP addresses to all the PCs, laptops, smartphones, and servers in the house. The devices will use those addresses whenever they talk to each other.
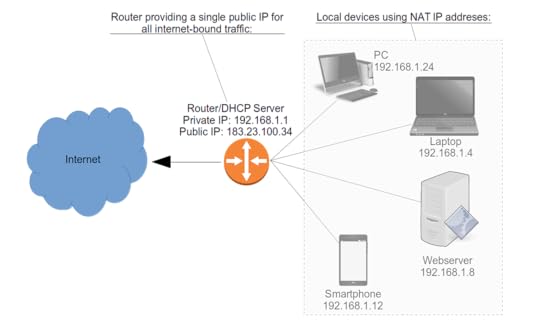 A typical local area network (LAN) topography
Notice how all the local devices are described as using something called “NAT IP addresses.” NAT stands for Network Address Translation, and it’s the method used for organizing devices within a private LAN.
But why? What’s wrong with giving all devices the same kind of public IP address the router has?
In the beginning, there was IPv4. IPv4 addresses are 32-bit numbers made up of four 8-bit octets separated by dots. Here’s what that might look like:
192.168.1.10
Subnet notation
Because itâs critically important to make sure systems know what kind of subnet a network address is on, we need a standard notation that can accurately communicate which octets are part of the network and which are available for devices.
There are two commonly used standards: Classless Inter-Domain Routing (CIDR) notation and netmask.
Using CIDR, one network might be represented as 192.168.1.0/24. The /24 tells you that the first three octets (8Ã3=24) make up the network portion, leaving only the fourth octet for device addresses. The second network (or subnet), in CIDR, would be described as 192.168.2.0/24.
These same two networks could also be described through a netmask of 255.255.255.0. That means all 8 bits of each of the first three octets are used by the network, but none of the fourth.
Understanding private networks
In theory, the IPv4 protocol allows for around four billion unique addresses, ranging from 1.0.0.0 to 255.255.255.255.
But even if all four billion of those addresses were practically available, it still wouldn’t come close to covering each of the billions of cell phones, billions of laptop and desktop computers, and billions more network-connected cars, appliances, and Internet of Things devices that are already out there. To say nothing of the billions more that’re coming soon.
So network engineers set aside three ranges of IPv4 addresses to be used exclusively in private networks. Devices using any address from those ranges will not be directly reachable from the public internet and will not be able to access internet resources. These are the three ranges:
Between 10.0.0.0 and 10.255.255.255
Between 172.16.0.0 and 172.31.255.255
Between 192.168.0.0 and 192.168.255.255
Remember what the “T” in NAT stood for? It was “Translation.” What that means is that a NAT-enabled router will take the private IP addresses used in traffic requests between the LAN and the internet and translate them to the router’s own public address. The router, true to its name, will then route those requests to their appropriate destinations.
This simple redesign of network addressing saved many billions of addresses for use with devices – like cell phones – that weren’t part of a private network. All those laptops, PCs, and so on running in all those homes and offices would conveniently (and seamlessly) share their routers’ public IPs.
Problem solved? Well, not quite. You see, even with all that efficient use of addresses, there still won’t be enough for the explosion of public-facing devices coming online. To manage that problem, more network engineers came up with the IPv6 protocol. Here’s what an IPv6 address might look like:
2002:0df6:0001:004b:0100:6c2e:0370:7234
That looks nasty, doesn’t it? And it looks like it’s a much bigger number than that wimpy IPv4 example from before.
Yup and yup. I’ve gotten pretty good at remembering some kinds of IPv4 addresses, but I’ve never even tried to “download” one of these monsters.
For one thing, it’s hexadecimal, meaning it uses the numbers between 0 and 9 and the first six letters of the alphabet (a-f)! Besides that, there are eight octets rather than four, and the address is 128-bit rather than 32-bit.
All of which means that, once the protocol is fully implemented, we won’t be at risk of running out of addresses for a very, very long time (meaning: forever). And what that means is that, from the perspective of address allocation, there’s no longer any need for private NAT networks.
Although, for security considerations, you’ll still want to give your devices some protection within your LAN.
There’s much more administration goodness in the form of books, courses, and articles available at my bootstrap-it.com.
July 7, 2020
Linux Package Management with Snaps
A big part of administrating Linux machines – especially remote machines – is managing and installing software.
When something goes wrong with a local application or when something on the file system breaks and needs fixing, you’re often going to want to push updates without having to travel many miles to sit down in front of a physical screen.
A lot of problems can be solved through Bash scripts, of course, but there are still plenty of use-cases where there’s no alternative to a good old fashioned binary.
Imagine that some of your remote systems need new applications installed so the team members using those computers will be able to perform some business function. Being able to leverage the integration and automation of one of the major Linux repository systems – like Debian or RPM – can make your administration tasks a whole lot easier.
In this article we’ll explore a relatively new standalone package management system: Snap.
As Linus Torvalds never tires of reminding us, the problem with many Linux software managements systems is that there are too many Linux software management systems.
App development and even Linux adoption have, over the years, become more complicated. All the time and work you invest in preparing your software for, say, Debian repos, won’t help you if you want to get them into RPM systems. And neither will help for SUSE’s zypper manager.
As I show in my Pluralsight course: Linux System Maintenance and Troubleshooting, one promising solution to the software silo problem is to distribute applications with their own self-contained environments that’ll work on any Linux distribution.
The two big standards in this young and growing field are AppImage and snap. We’ll start with snaps.
Working with Snaps
The snap system – under the guidance of Canonical, the company that sponsors Ubuntu – installs each individual application on your system within its own virtual partition. All those loop partitions sure make a royal mess of the output of the df command, but they also represent a rational approach to distributing a single version of software across any and all Linux installations.
$ df
Filesystem 1K-blocks Used Available Use% Mounted on
udev 7101884 0 7101884 0% /dev
tmpfs 1432092 3936 1428156 1% /run
/dev/sda2 479152840 183520724 271222724 41% /
tmpfs 7160452 329336 6831116 5% /dev/shm
tmpfs 5120 4 5116 1% /run/lock
tmpfs 7160452 0 7160452 0% /sys/fs/cgroup
/dev/loop2 384 384 0 100% /snap/gnome-characters/539
/dev/loop4 56320 56320 0 100% /snap/core18/1705
/dev/loop5 56320 56320 0 100% /snap/core18/1754
/dev/loop3 145664 145664 0 100% /snap/slack/23
/dev/loop0 2560 2560 0 100% /snap/gnome-calculator/730
/dev/loop6 15360 15360 0 100% /snap/aws-cli/130
[...]
/dev/loop21 521216 521216 0 100% /snap/onlyoffice-desktopeditors/38
/dev/loop22 145664 145664 0 100% /snap/slack/22
/dev/loop23 185472 185472 0 100% /snap/spotify/36
/dev/loop25 96128 96128 0 100% /snap/core/8935
/dev/loop26 319104 319104 0 100% /snap/onlyoffice-desktopeditors/43
/dev/loop27 1152 1152 0 100% /snap/drawing/16
/dev/loop24 56192 56192 0 100% /snap/gtk-common-themes/1502
/dev/loop31 2560 2560 0 100% /snap/gnome-calculator/748
/dev/sda1 523248 6152 517096 2% /boot/efi
tmpfs 1432088 12 1432076 1% /run/user/121
tmpfs 100 0 100 0% /var/lib/lxd/shmounts
tmpfs 100 0 100 0% /var/lib/lxd/devlxd
tmpfs 1432088 68 1432020 1% /run/user/1000
In this demo, I’m going to show you how to package a GitHub-based application as a snap. With such a package, you would theoretically be able to submit it to the official snap store where, if accepted, it would be freely available to anyone on earth.
Now, I could pretend that I worked tirelessly to figure out the very best way to get all this done from the command line – but that wouldn’t be completely honest. Actually, it wouldn’t be honest at all.
In fact, I simply used the “first snap” tutorial on the snapcraft.io website that lets you select a language and then helpfully guides you through each step of the process. At the very end, it shows you how to submit your snap to the official snap store.
I’m going to take you through the process from the command line but, if you’re doing this for yourself, it would probably make sense to check out the website to make sure nothing has changed.
So let’s begin. You’ll first need to make sure that the virtual machine manager Multipass is properly installed, since that’s what snap uses to create the VMs where the images will be build. Naturally, Multipass itself is available as a snap.
Likewise, you’ll need the snapcraft package. After installing snapcraft, you should follow it up with “hash -r” to refresh the list of places your shell will look for known programs.
$ sudo snap install multipass --classic
$ sudo snap install snapcraft --classic
$ hash -r
As I went with Python for my language, the tutorial provided me with a link to the GitHub site of an open source Python email backup project called OfflineIMAP. Don’t feel you’re restricted to Python, for that matter. And, obviously, you can substitute your own project for the example.
When I’ve cloned the project locally, I’ll cd into the new offlineimap directory. Next, I’ll use wget to download the special Python-specific version of the YAML configuration file.
Since there’s already a file with that name in the directory, this one will get an alternative name, so I’ll just overwrite the old copy by changing the name of the new one. We’ll then open the file and edit the three places where the word “name” appears in curly braces. I need to replace those with the name I’d actually like to use.
$ git clone https://github.com/snapcraft-docs/off...
$ cd offlineimap
$ wget https://snapcraft.io/first-snap/pytho...
From here, running “snapcraft” will take care of the packaging process. This can be a long process, especially if there’s software you need – like Multipass – that’s not yet installed and set up. You may see some errors, but the odds are that the install script with automatically fix them on the fly.
When that’s all died down, you can install the snap locally using the regular “snap install” command, but you’ll need to add –devmode and –dangerous because this isn’t an official, supported snap so, technically, no one knows what might happen when you start it up.
You can prove it’s installed by running “snap list” and then confirm that everything worked by running the test-offlineimap-mysnap command with -h to get the help screen.
Enjoy the software – I know that this kind of email backup is something I’ve been meaning to get to for years.
$ snapcraft
$ sudo snap install --devmode --dangerous *.snap
$ snap list
$ test-offlineimap-mysnap -h
If you’re interested in learning how to manage snaps within your Linux environment, you might also enjoy my “How to manage Ubuntu Snaps: the stuff no one tells you” and “snapd Makes Administering Nextcloud a Snap” articles.
Working with other package managers
We just got a pretty good look at snaps. But perhaps now is the perfect time to admit that I’ve left out some other big players in the alternative package manager world, in particular Flatpak and AppImages.
I discuss AppImages in some depth here, but a quick word or two about Flatpak wouldn’t be out of place here.
Flatpak’s primary goal is to let developers build their applications into a single package and then distribute them to any Linux distribution. As an end-user, you would install the Flatpak system using your regular software manager – like Apt on Ubuntu or Yum on CentOS. Flatpak is installed by default on Fedora. From there, it’s pretty much smooth sailing. Solves all the right problems, doesn’t it?
Perhaps. There’s been some recent criticism over possible (and significant) security weaknesses in the fundamental design of Flatpak. I’ll let you decide for yourself.
There’s much more administration goodness in the form of books, courses, and articles available at my bootstrap-it.com.
May 4, 2020
AWS CloudFormation: Where to Find Help When You Need It
Staring at a plain, dumb command line prompt with no clue what to do with the AWS CLI next can be a humbling experience. And, in my experience at least, staring at the Management Console for AWS CloudFormation can be worse.
So let me offer you some quick “getting started” help based on part of the content in my latest Pluralsight course.
First of all, if you’re planning to manage your CloudFormation stacks through the AWS CLI rather than the Management Console, I discuss the basics in this article. Once that’s all taken care of, you’ll be ready for anything.
Start simple:
$ aws s3 ls
2019-11-03 13:16:59 athena5905
2019-02-03 18:01:42 book-3939
2014-07-01 18:52:32 elasticbeanstalk-ap-northeast-1-426397493112
2014-08-28 16:57:49 elasticbeanstalk-us-east-1-426497493912
2019-05-04 22:17:50 ltest236
2018-07-15 15:52:30 mybucket99688223
2017-07-25 17:06:43 nextcloud3239027
“aws” in that example tells your shell that you want what comes next to be handled by the AWS CLI. The “s3” I type next tells the CLI that I’ll be using the S3 service – that’s Amazon’s Simple Storage Service. Finally, “ls” or “list” is the command I’d like to run against that service.
The CLI, using the account authentication variables that the configure tool added to my environment, will now hurry off and access my account, in this case retrieving the names of all of my buckets.
Predictably, you tell AWS that you’re looking to work with CloudFormation using “cloudformation.” If I just run that without specifying a command, I’ll get an error message:
aws cloudformation
usage: aws [options] [ ...] [parameters]
To see help text, you can run:
aws help
aws help
aws help
aws: error: the following arguments are required: operation
But it’s an important message, as it tells us how to access the inline documentation. Context-sensitive help is available at each layer.
See what happens if you add “help” after “cloudformation”. You’ll get a brief description and then a list of all the available subcommands.
$ aws cloudformation help
CLOUDFORMATION() CLOUDFORMATION()
NAME
cloudformation -
DESCRIPTION
AWS CloudFormation allows you to create and manage AWS infrastructure deployments predictably and repeatedly. You can use AWS CloudFormation to leverage AWS products, such as Amazon Elastic Compute Cloud, Amazon Elastic Block Store, Amazon Simple Notification Service, Elastic Load Balancing, and Auto Scaling to build highly-reliable, highly scalable, cost-effective applications without creating or configuring the underlying AWS infrastructure.
With AWS CloudFormation, you declare all of your resources and dependencies in a template file. The template defines a collection of resources as a single unit called a stack. AWS CloudFormation creates and deletes all member resources of the stack together and manages all dependencies between the resources for you.
For more information about AWS CloudFormation, see the AWS CloudFormation Product Page.
Amazon CloudFormation makes use of other AWS products. If you need additional technical information about a specific AWS product, you can find the product's technical documentation at docs.aws.amazon.com.
AVAILABLE COMMANDS
o cancel-update-stack
o continue-update-rollback
o create-change-set
o create-stack
o create-stack-set
o delete-change-set
o delete-stack
o delete-stack-instances
o delete-stack-set
o deploy
o describe-account-limits
o describe-change-set
o describe-stack-events
o describe-stack-instance
o describe-stack-resource
o describe-stack-resources
o describe-stack-set
o describe-stack-set-operation
o describe-stacks
o estimate-template-cost
o execute-change-set
o get-stack-policy
[...]
Now run the “describe-stacks” command. There are probably no live stacks in your account right now so you won’t see any output.
But do that again, this time adding “help”. This one will show you some options that’ll let you filter or manipulate the data you get back. You could, for instance, point the CLI to one specific stack by using “–stack-name” followed by the name of an existing stack.
$ aws cloudformation describe-stacks
$ aws cloudformation describe-stacks help
NAME
describe-stacks -
DESCRIPTION
Returns the description for the specified stack; if no stack name was specified, then it returns the description for all the stacks created.
NOTE:
If the stack does not exist, an AmazonCloudFormationException is returned.
See also: AWS API Documentation
See 'aws help' for descriptions of global parameters.
describe-stacks is a paginated operation. Multiple API calls may be issued in order to retrieve the entire data set of results. You can disable pagination by providing the --no-paginate argument. When using --output text and the --query argument on a paginated response, the --query argument must extract data from the results of the following query expressions: Stacks
SYNOPSIS
describe-stacks
[--stack-name ]
[--cli-input-json ]
[--starting-token ]
[--max-items ]
[--generate-cli-skeleton ]
OPTIONS
--stack-name (string)
The name or the unique stack ID that is associated with the stack,
which are not always interchangeable:
[...]
$ aws cloudformation describe-stacks --stack-name myname
Those are tools that’ll help you no matter what AWS service you’re using. But looking specifically at CloudFormation, there are some valuable official collections of sample templates you should know about. JSON or YAML syntax being what they are, you probably won’t want to start from an empty document.
Amazon itself has done a great job creating templates for us to work with. Your first stop should be the AWS CloudFormation Templates page. Here you’ll find links to snippets and specific application frameworks and some more cutting edge content.
But right now I’d like to draw your attention to one of the “sample templates” organized by AWS service (this code comes from one of the Amazon EC2 examples).
The template begins with a free form description that helpfully tells us what kind of stack this will generate. We’re also told that we could customize the template by using an existing Elastic IP address instead of one that’s automatically generated.
{
"AWSTemplateFormatVersion" : "2010-09-09",
"Description" : "AWS CloudFormation Sample Template EC2InstanceWithSecurityGroupSample: Create an Amazon EC2 instance running the Amazon Linux AMI. The AMI is chosen based on the region in which the stack is run. This example creates an EC2 security group for the instance to give you SSH access. **WARNING** This template creates an Amazon EC2 instance. You will be billed for the AWS resources used if you create a stack from this template.",
You’ll need to pass in the name of an existing KeyPair from the current region in your AWS account so you’ll be able to open remote SSH into the Linux instance that will be launched. You can alternatively pass along that value from the command line.
The Parameters section is also where you define the EC2 instance type. The default is t2.small, but we’d be allowed to either swap that value out for any of the other AllowedValues in this document, or override it from the command line.
"Parameters" : {
"KeyName": {
"Description" : "Name of an existing EC2 KeyPair to enable SSH access to the instance",
"Type": "AWS::EC2::KeyPair::KeyName",
"ConstraintDescription" : "must be the name of an existing EC2 KeyPair."
},
"InstanceType" : {
"Description" : "WebServer EC2 instance type",
"Type" : "String",
"Default" : "t2.small",
If you scroll down through the Mappings section, we can see long lists of available hardware architectures and Amazon Machine Image identifiers for each region.
This is an optional section where you can insert your own non-standard values so, say, an image type would be launched based on a particular set of parameters – perhaps even a private AMI image. Such data is organized into key/value pairs.
"Mappings" : {
"AWSInstanceType2Arch" : {
"t1.micro" : { "Arch" : "HVM64" },
"t2.nano" : { "Arch" : "HVM64" },
"t2.micro" : { "Arch" : "HVM64" },
The Resources section in this case defines your instance environment. The SecurityGroup, for instance, is configured to open the SSH port 22 but nothing else. The instance’s public IP address is also associated with the new Elastic IP address that will be allocated.
"InstanceSecurityGroup" : {
"Type" : "AWS::EC2::SecurityGroup",
"Properties" : {
"GroupDescription" : "Enable SSH access via port 22",
"SecurityGroupIngress" : [ {
"IpProtocol" : "tcp",
"FromPort" : "22",
"ToPort" : "22",
"CidrIp" : { "Ref" : "SSHLocation"}
} ]
}
}
},
One more important Amazon resource: Quick Starts. Strictly speaking the pre-built infrastructure stacks that are provided here to help you create more complex cloud deployments aren’t directly related to CloudFormation. They were provided by third-party companies to simplify the process of building their infrastructure in within the AWS platform.
But the fact is that each one starts with its own unique CloudFormation template. Clicking through to look at actual examples will often lead you to the stack source code templates within a GitHub repo. This example shows us the tools you’d need to fire up a HashiCorp Console:
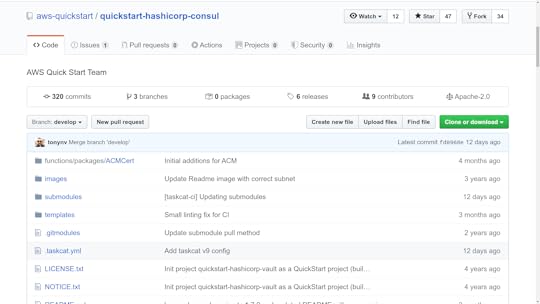
Either way, feel free to use these templates as learning tools – or browse through the selection to see if there’s a stack there that happens to fit your needs.
There’s much more administration goodness in the form of books, courses, and articles available at my bootstrap-it.com.
How to Create a Disaster Recovery Plan for your IT Team
You know the old joke: there are two kinds of companies, those that’ve been hit with IT disaster, and those who don’t yet realize they’ve been hit with IT disaster.
But what they all have in common is that there are plenty more disasters to come. So ask yourself whether you’re ready for the next one.
This article, which is based on my Pluralsight course, Linux System Maintenance and Troubleshooting, is intended to start you thinking about what building an effective protocol will take.
What you need to have in place
It all begins with the business continuity plan (BCP). This is a formal plan that’s meant to define the procedures an organization would use to ensure survival in the event of an emergency.
BCPs will generally include sub-plans to secure the immediate safety of employees and customers, work to restore previously-designated critical operations as soon as possible and, eventually, to restore full normal operations.
In addition, an effective BCP will also include two sub-plans that are specific to IT operations: the incident management protocol and disaster recovery plan.
The disaster recovery plan (DRP) aims to protect an organization’s IT infrastructure in the event of a disaster. Its primary goals are to minimize damage and to restore functionality as quickly as possible.
The reason we call this a “plan” is because it simply won’t work without serious prior preparation. Infrastructure protection, threat detection, and corrective protocols are critical parts of the plan.
An Incident Management Plan (IMP) is meant to address the specific threat of cyber attacks against IT infrastructure. Its goals are to minimize damage and remove the threat.
As you can easily tell, there will be some overlap between your DRP and IMP. But the key focus of disaster recovery is to get your infrastructure back on its feet, while incident management is much more closely aligned with the world of IT security.
For the rest of this short article we’re going to look at what goes into creating incident management and disaster recovery plans and how to ensure that your plan is sound and should, when executed, actually work.
Developing an Incident Management Protocol
Since incident management is going to be your first response to trouble, we’ll begin there.
The first indication that there’s trouble can come from a user who notices that something’s not right with the system. Or, if you’ve done a particularly good job configuring your infrastructure, it could also come to you in the form of an automated alert triggered by monitoring software.
When that alert comes in, it’ll be the job of the technician or admin on call to decide how it’s going to be handled and who has to handle it.
Escalation can happen through a direct phone call or email, a ticket submitted through a collaboration tool like Jira, or by using a purpose-built Security Information and Event Management (SIEM) tool.
Again, though, the more smart automation you build into the process, the faster and more efficient it’s likely to be.
Whoever ends up with the ultimate responsibility will coordinate efforts to definitively diagnose and resolve the problem. Ideally, where necessary, such coordination will include admins, developers, and other key stakeholders to ensure you’ve got all the resources you’ll need to address the problem.
When it’s all over, once you’ve confirmed the problem is resolved, you’ll want to close the incident by assessing what went wrong and what went right, how your response could have been better, and how you can rework things to reduce the risk of a repeat of the incident.
But what does all this have to do with IT administration? Well, responsible IT managers must be able to build resiliency into their infrastructure.
That will mean spending serious time fine-tuning their software monitoring systems so they’ll catch and alert you to real problems while issuing alerts for as few false positives as possible.
And it’ll probably also involve intelligently automating logging and intrusion detection systems and generally getting a good idea of how things are supposed to look.
Developing a Disaster Recovery Plan
Disaster recovery planning requires you to:
Define exactly what recovery meansIdentify the resources that achieving recovery will requireConvert those observations into a formal plan formatCommunicate the plan to the players who will one day have to carry it out
What does recovery mean? It’s when your poor, stricken infrastructure has returned to the shape it was in the moment before disaster hit.
What you’ll need to get you back to that point can be defined by establishing a Recovery Time Objective (RTO) and Recovery Point Objective (RPO) that fits your organization’s needs.
A Recovery Time Objective represents the maximum number of minutes, hours, or days that your organization could survive an IT service outage. So your recovery plan will need to incorporate that hard deadline into its protocols.
Of course that means you’ll need to have team members available to make it into the office even in the small hours of the night quickly enough to make a difference.
But it also means, say, that if your RTO is six hours, but restoring critical data from your backups would take a minimum of eight hours just to handle the transfer, then you’ll have to rethink those numbers before signing off on the plan.
A Recovery Point Objective is the amount of transaction data your organization could afford to lose during an outage and survive.
To illustrate, an e-commerce website that normally processes 25 transactions each minute could, perhaps, afford to issue apologies and refunds to 30 minutes worth of angry customers wondering why their credit cards were billed but their electric train sets weren’t delivered. Refunding more than 30 minutes worth, however, could deplete your financial reserves to the point that you’re no longer viable.
In any case, calculating accurate and reliable RTOs and RPOs is how you set the limits within which your recovery plan will have to operate. Or, in other words, you’ll have defined what recovery means.
Now what about resources? By which I mean the data backups and, when necessary, the physical equipment you’ll need to get your application back on its feet.
To make that work you’ll have to decide on an infrastructure backup system. Whether you choose to go with incremental or differential, on-site or off-site, and single or multiple media types, you’ll have to map out exactly how the recovery will go and whether or not it’ll meet your RTO and RPO limits.
Of course there’s no end of really bad things that can happen to make those plans utterly useless. What if your local server facility just burns down? What if it’s lost to some kind of political upheaval or widespread power disruption?
Even if you’ve conscientiously maintained up-to-date data backups off-site, what good will they do you if your hardware effectively no longer exists?
Thinking about all those horrors can make preparing a cloud-based backup protocol using platforms like AWS and Azure sound mighty attractive. The big public clouds have the resources to distribute their infrastructure widely enough that it’s virtually impossible for the whole thing to ever go down.
So you could, for instance, maintain a reliably replicated data store on a public cloud platform that mirrors your main deployment. You could also design an infrastructure template that could be loaded up with your backup data and then launched on demand to take over in the event of an outage. Because nothing is kept running until it’s actually needed, it can take a good few minutes to bring this one up to speed.
A warm standby recovery design might maintain your data running 24/7 on a minimal number of virtual servers. In an emergency, you can hit the switch and the platform’s auto scaling will fire up all the instances you’ll need.
You could set the scaling to kick in when triggered by an alert from your primary system. The public cloud presents endless possibilities, but they all require planning and preparation.
A solid disaster recovery plan must be effectively communicated long before crunch time. Practically speaking, that means it’ll all be written up, printed, and distributed to each of the key players who will carry out the plan.
That’s not to say it ends there: those players will of course have actually read the thing and, ideally, engage in realistic simulations until they’re confident they can make it work under pressure.
What goes in this book?
An enumeration of all the stuff that could go wrong and bring down your systemAn inventory of exactly what you’ve got running in your server room and what would be needed to replace itThe information you’ll need to access and restore backed up dataAn up-to-date contact list of the people who will be responsible for every aspect of the planThe exact sequence of the tasks and events that will make up the recovery
That’s a lot of detail. But it’s barely a drop in the bucket when compared with the total amount of preparation and plain old hard work that goes into creating a real-world recovery plan.
But for now, the key takeaway from this module is simply to keep all this in mind. Why? Because the next time you sit down to configure a monitoring package or administration framework, you’ll think about incident management protocols and disaster recovery plans and wonder how you should include them in your configuration.
There’s much more administration goodness in the form of books, courses, and articles available at my bootstrap-it.com.
April 30, 2020
AWS CLI Tutorial – How to Install, Configure, and Use AWS CLI to Understand Your Resource Environment
How to get exactly the account and environment information you need to manage your AWS account using just the AWS CLI
Installing the AWS CLI is actually quite simple. The best way to get it done is to head over to the AWS installation guide and follow instructions for your OS.
Right now they’re pushing us towards version 2 of the CLI and I haven’t seen any reason not to go along. I’m working with Linux so that’s where I’d head next.
To get it done, I’ll paste the curl command from the Amazon page into my Linux shell that’ll download the package and write it to a local zip file, which I’ll then unzip. That’ll create a new directory called aws that’ll contain a install script, which I can run using sudo to get admin privileges. I’ll run aws –version to confirm everything worked as it was supposed to.
curl "https://awscli.amazonaws.com/awscli-e..." -o "awscliv2.zip"
unzip awscliv2.zip
ls aws
sudo ./aws/install
aws --version
The next step will require one quick trip to the management console. You see, to authenticate the CLI to your account you’ll need a valid access key. Now, the CLI has a “create-access-key” command that’ll generate a new key, but that’s only possible once I’ve authenticated. I’m sure you understand the problem with that.
You access the security credentials page from the drop-down account menu at the top of any page on the console. With your credentials in hand, you can run “aws configure.” You’ll be prompted to enter your access key ID and the secret key itself. If you like you can then choose a default AWS region and output format. The format won’t be an issue so I’ll leave it as default.
aws configure
That’s it. Just to confirm it all worked, I’ll list all the S3 buckets in my account. With that, we’ll all set to get down to work in the next clip.
aws s3 ls
You may already know that Amazon’s CloudFormation service exists to let you manage your application infrastructure by organising it into stacks of your AWS account resources.
The CloudFormation templates that define those stacks can be shared, edited, and launched anywhere, giving you predictable and reliable cloud application environments wherever and whenever you need them.
You may also know that you can mange your CloudFormation stacks both through the AWS Management Console and, as I discuss in my new Pluralsight course, Create and Manage Stacks with AWS CloudFormation Using the Command Line Interface, using the AWS CLI.
If you do choose to go with the AWS CLI – something I highly recommend – you’ll need a way to gather key information about other account resources. But how you’re expected to get that information through the CLI might, at first, not appear so obvious.
To show you what I mean, let’s experiment with a more complex stack using a template that comes from the AWS documentation samples.
The Application Frameworks template set includes a template for auto scaled Linux servers that will come pre-provisioned with the Apache web server and the PHP scripting language, and a connection to a Multi-AZ RDS database instance running the MySQL database engine.
You can click View from that AWS documentation page and take a look at the template itself. There you’ll see Parameters sections defining the VPC and subnets into which your instance will launch and the MySQL database name, user, and password.
It’s critical that all the right services know those details because, otherwise, they won’t be able to talk to each other. We’ll have to figure out a way to add those values. To get things going, you can simply click to view the template (which you can see here), and copy the contents, pasting it into a new JSON file on your local machine.
You use the CLI to fire up a Cloudformation stack using the create-stack command. The command, however, takes a few arguments to pass important information. This minimal example shows you how to point CloudFormation to your JSON template file, a name to assign to your stack, and a valid SSH key so I’ll be able to log into the instance it creates.
aws cloudformation create-stack \
--template-body file://lamp-as.json \
--stack-name lamp \
--parameters \
ParameterKey=KeyName,ParameterValue=mykey
The problem is that, if you were to run that command against the template in your JSON document, it would fail. That’s because, as you’ll no doubt remember from looking through the template, there are some extra parameters that need satisfying. Specifically, we’ll need references to a VPC and to two subnets – and because this is a multi-availability-zone deployment, they’ll need to be in different zones.
How will that work? It’s the AWS CLI to the rescue. Need a VPC ID? Keeping in mind that VPCs are EC2 objects, you can run aws ec2 describe-vpcs and all the data you’ll need – including the VPC ID – will magically appear. And subnets? Well more of the same, obviously. Just copy subnet IDs for any two of the subnets that will appear and you’re in business.
aws ec2 describe-vpcs
aws ec2 describe-subnets
Now let’s put all that information together into our new version of the create-stack command. You’ll need to be careful with this as there are some nasty gotchas in the syntax.
aws cloudformation create-stack \
--template-body file://lamp-as.json \
--stack-name lamp-as \
--parameters \
ParameterKey=KeyName,ParameterValue=mykey \
ParameterKey=VpcId,ParameterValue=vpc-1ffbc964 \
ParameterKey=Subnets,ParameterValue=\'subnet-0e170b31,subnet-52d6117c\' \
ParameterKey=DBUser,ParameterValue=myadmin \
ParameterKey=DBPassword,ParameterValue=mypass23
The first new parameter is VPC-ID. But make sure you get the case right: using an uppercase D in Id will cause the whole thing to fail. I don’t know why they make things so difficult to live with, but that’s what we’ve got.
The next one is even more delicate. Since we need two subnets, we’ll need to enter them on a single line separated by a comma – but no space. However, we’ll also need to enclose the string within single apostrophes. But the CLI can’t read apostrophes just like that, so we’ll need to escape them using backslashes. Got that?
I’ll also add those two database parameters: DBUser and my ultra secret, super cryptic DBPassword. Will it work? You betcha. But don’t tell anyone how many times I had to try this without you watching before I got it right. Remember: failure is your friend.
When our stack is good and launched (which could take as long as half an hour), running describe-stacks will give us our website URL.
aws cloudformation describe-stacks
But that’s not the whole story. I’m going to use another aws ec2 command – describe-instances this time – to get some information about the EC2 instances that were launched as part of this stack. This one will filter results, restricting output to only those instances that are currently running.
aws ec2 describe-instances \
--filters Name=instance-state-name,Values=running \
--query 'Reservations[*].Instances[*].{Instance:InstanceId,PublicIPAddress:PublicIpAddress}'
I happen to have no other instances running in this region, so only the CloudFormation instances will show up. Now I use –query to further filter the output to give me only the Instance IDs and public IP addresses of those instances. There are, as you would expect, exactly two running.
Just a taste – and most of it related specifically to CloudFormation – but I think you get the idea of how information gathering works using the AWS CLI.
There’s much more administration goodness in the form of books, courses, and articles available at my bootstrap-it.com.
AWS CLI Tutorial â How to Install, Configure, and Use AWS CLI to Understand Your Resource Environment
How to get exactly the account and environment information you need to manage your AWS account using just the AWS CLI
Installing the AWS CLI is actually quite simple. The best way to get it done is to head over to the AWS installation guide and follow instructions for your OS.
Right now they’re pushing us towards version 2 of the CLI and I haven’t seen any reason not to go along. I’m working with Linux so that’s where I’d head next.
To get it done, I’ll paste the curl command from the Amazon page into my Linux shell that’ll download the package and write it to a local zip file, which I’ll then unzip. That’ll create a new directory called aws that’ll contain a install script, which I can run using sudo to get admin privileges. I’ll run aws –version to confirm everything worked as it was supposed to.
curl "https://awscli.amazonaws.com/awscli-e..." -o "awscliv2.zip"
unzip awscliv2.zip
ls aws
sudo ./aws/install
aws --version
The next step will require one quick trip to the management console. You see, to authenticate the CLI to your account you’ll need a valid access key. Now, the CLI has a “create-access-key” command that’ll generate a new key, but that’s only possible once I’ve authenticated. I’m sure you understand the problem with that.
You access the security credentials page from the drop-down account menu at the top of any page on the console. With your credentials in hand, you can run “aws configure.” You’ll be prompted to enter your access key ID and the secret key itself. If you like you can then choose a default AWS region and output format. The format won’t be an issue so I’ll leave it as default.
aws configure
That’s it. Just to confirm it all worked, I’ll list all the S3 buckets in my account. With that, we’ll all set to get down to work in the next clip.
aws s3 ls
You may already know that Amazon’s CloudFormation service exists to let you manage your application infrastructure by organising it into stacks of your AWS account resources.
The CloudFormation templates that define those stacks can be shared, edited, and launched anywhere, giving you predictable and reliable cloud application environments wherever and whenever you need them.
You may also know that you can mange your CloudFormation stacks both through the AWS Management Console and, as I discuss in my new Pluralsight course, Create and Manage Stacks with AWS CloudFormation Using the Command Line Interface, using the AWS CLI.
If you do choose to go with the AWS CLI â something I highly recommend â you’ll need a way to gather key information about other account resources. But how you’re expected to get that information through the CLI might, at first, not appear so obvious.
To show you what I mean, let’s experiment with a more complex stack using a template that comes from the AWS documentation samples.
The Application Frameworks template set includes a template for auto scaled Linux servers that will come pre-provisioned with the Apache web server and the PHP scripting language, and a connection to a Multi-AZ RDS database instance running the MySQL database engine.
You can click View from that AWS documentation page and take a look at the template itself. There you’ll see Parameters sections defining the VPC and subnets into which your instance will launch and the MySQL database name, user, and password.
It’s critical that all the right services know those details because, otherwise, they won’t be able to talk to each other. We’ll have to figure out a way to add those values. To get things going, you can simply click to view the template (which you can see here), and copy the contents, pasting it into a new JSON file on your local machine.
You use the CLI to fire up a Cloudformation stack using the create-stack command. The command, however, takes a few arguments to pass important information. This minimal example shows you how to point CloudFormation to your JSON template file, a name to assign to your stack, and a valid SSH key so I’ll be able to log into the instance it creates.
aws cloudformation create-stack \
--template-body file://lamp-as.json \
--stack-name lamp \
--parameters \
ParameterKey=KeyName,ParameterValue=mykey
The problem is that, if you were to run that command against the template in your JSON document, it would fail. That’s because, as you’ll no doubt remember from looking through the template, there are some extra parameters that need satisfying. Specifically, we’ll need references to a VPC and to two subnets – and because this is a multi-availability-zone deployment, they’ll need to be in different zones.
How will that work? It’s the AWS CLI to the rescue. Need a VPC ID? Keeping in mind that VPCs are EC2 objects, you can run aws ec2 describe-vpcs and all the data you’ll need – including the VPC ID – will magically appear. And subnets? Well more of the same, obviously. Just copy subnet IDs for any two of the subnets that will appear and you’re in business.
aws ec2 describe-vpcs
aws ec2 describe-subnets
Now let’s put all that information together into our new version of the create-stack command. You’ll need to be careful with this as there are some nasty gotchas in the syntax.
aws cloudformation create-stack \
--template-body file://lamp-as.json \
--stack-name lamp-as \
--parameters \
ParameterKey=KeyName,ParameterValue=mykey \
ParameterKey=VpcId,ParameterValue=vpc-1ffbc964 \
ParameterKey=Subnets,ParameterValue=\'subnet-0e170b31,subnet-52d6117c\' \
ParameterKey=DBUser,ParameterValue=myadmin \
ParameterKey=DBPassword,ParameterValue=mypass23
The first new parameter is VPC-ID. But make sure you get the case right: using an uppercase D in Id will cause the whole thing to fail. I don’t know why they make things so difficult to live with, but that’s what we’ve got.
The next one is even more delicate. Since we need two subnets, we’ll need to enter them on a single line separated by a comma – but no space. However, we’ll also need to enclose the string within single apostrophes. But the CLI can’t read apostrophes just like that, so we’ll need to escape them using backslashes. Got that?
I’ll also add those two database parameters: DBUser and my ultra secret, super cryptic DBPassword. Will it work? You betcha. But don’t tell anyone how many times I had to try this without you watching before I got it right. Remember: failure is your friend.
When our stack is good and launched (which could take as long as half an hour), running describe-stacks will give us our website URL.
aws cloudformation describe-stacks
But that’s not the whole story. I’m going to use another aws ec2 command – describe-instances this time – to get some information about the EC2 instances that were launched as part of this stack. This one will filter results, restricting output to only those instances that are currently running.
aws ec2 describe-instances \
--filters Name=instance-state-name,Values=running \
--query 'Reservations[*].Instances[*].{Instance:InstanceId,PublicIPAddress:PublicIpAddress}'
I happen to have no other instances running in this region, so only the CloudFormation instances will show up. Now I use –query to further filter the output to give me only the Instance IDs and public IP addresses of those instances. There are, as you would expect, exactly two running.
Just a taste – and most of it related specifically to CloudFormation – but I think you get the idea of how information gathering works using the AWS CLI.
There’s much more administration goodness in the form of books, courses, and articles available at my bootstrap-it.com.