Bacil Donovan Warren's Blog, page 4
August 7, 2018
With It or in It audiobook now on sale!
Just today, the audiobook version of
With It or in It: Desert Shield and Desert Storm from the Loader's Hatch
, went on sale through Audible. Pete Beretta did the narration, and did a fantastic job! Pick up your copy today, and if you're not already an Audible member use these links:
US Store—https://www.audible.com/pd/B07G5K7M9V/?source_code=AUDFPWS0223189MWT-BK-ACX0-124131&ref=acx_bty_BK_ACX0_124131_rh_usUK Store—https://www.audible.co.uk/pd/B07G5HLRBY/?source_code=AUKFrDlWS02231890H6-BK-ACX0-124131&ref=acx_bty_BK_ACX0_124131_rh_ukFrench Store—https://www.audible.fr/pd/B07G5JF52M/?source_code=FRAORWS022318903B-BK-ACX0-124131&ref=acx_bty_BK_ACX0_124131_rh_frGerman Store—https://www.audible.de/pd/B07G5LJBC7/?source_code=EKAORWS0223189009-BK-ACX0-124131&ref=acx_bty_BK_ACX0_124131_rh_de
If you click one of those links, become a member, and buy a book, both Pete and I get $25 each from Audible. The first link is a direct link to Audible and not part of that program, so if you prefer not do do the sharing/affiliate link thing, I totally get it.
Let me know what you think of the book!


July 19, 2018
Save me! Backing up Scrivener projects part 2: Automator workflow
Welcome back! Hopefully your summer continues to be awesome, and the A/C continues to hold out!
Today I’ll be discussing an Automator action that I use to make manual backups of my Scrivener projects when I reach milestones (or anytime, really, I just make sure I run it when I reach major milestones in a project).
Automator is an application for macOS, made by Apple and distributed in all versions of macOS (then, Mac OS X) since Tiger (10.4). It is an application that uses small libraries that other applications can create to automate tasks, and in a way that is much simpler to use than AppleScript (which is very powerful, but requires learning some basic programming). I have used both AppleScript and Automator for various things, but this is something that really lends itself well to Automator rather than AppleScript.
Also, since this is a macOS application, and made by Apple for the Mac, there is no Automator for Windows. Users of Scrivener for Windows can use similar tools, such as AutoHotKey or AutoIT, but since I haven’t had a Windows machine in many years I really cannot vouch for how simple (or hard) those tools are to use, nor how they work.
In any event, the general concepts of what I do should work, it’s really just an implementation detail on the Windows side, deciding which app can do the job, and exactly what steps need to be taken.
The basic idea
When I sat down to figure out how to make this additional step work, I knew I wanted to accomplish three basic things: • Make a compressed copy of one Scrivener project, • Rename the compressed file with the current time and date, and • Move it to external storage.
Since these are things that are repetitive and should be reasonably easy to automate, that’s what I did.
Creating a new Application
Once I basically knew what I wanted to do, I opened up Automator (by default, this is in the Applications folder on the boot drive), and started putting together the workflow.

When Automator is first launched, it opens the standard Open dialog asking for you to choose a file. In the lower-left corner of that dialog is the “New Document” button. When you click that, it gives you an empty, untitled workflow, and asks you what kind of item it will be. For this, I created an Application. An Automator Application can be run on its own, and will sit in the Finder (wherever you put it) just like any other application. Another option would be to create a Workflow, which can’t be run on its own, but instead runs from within Automator. Either of these two would work, but I chose to make an Application. That way, when it was working the way I needed it to work, I could save it to my desktop and run it by itself.
After selecting Application, Automator presents you with a blank document. In the Library to the left of the window, there should be two columns.
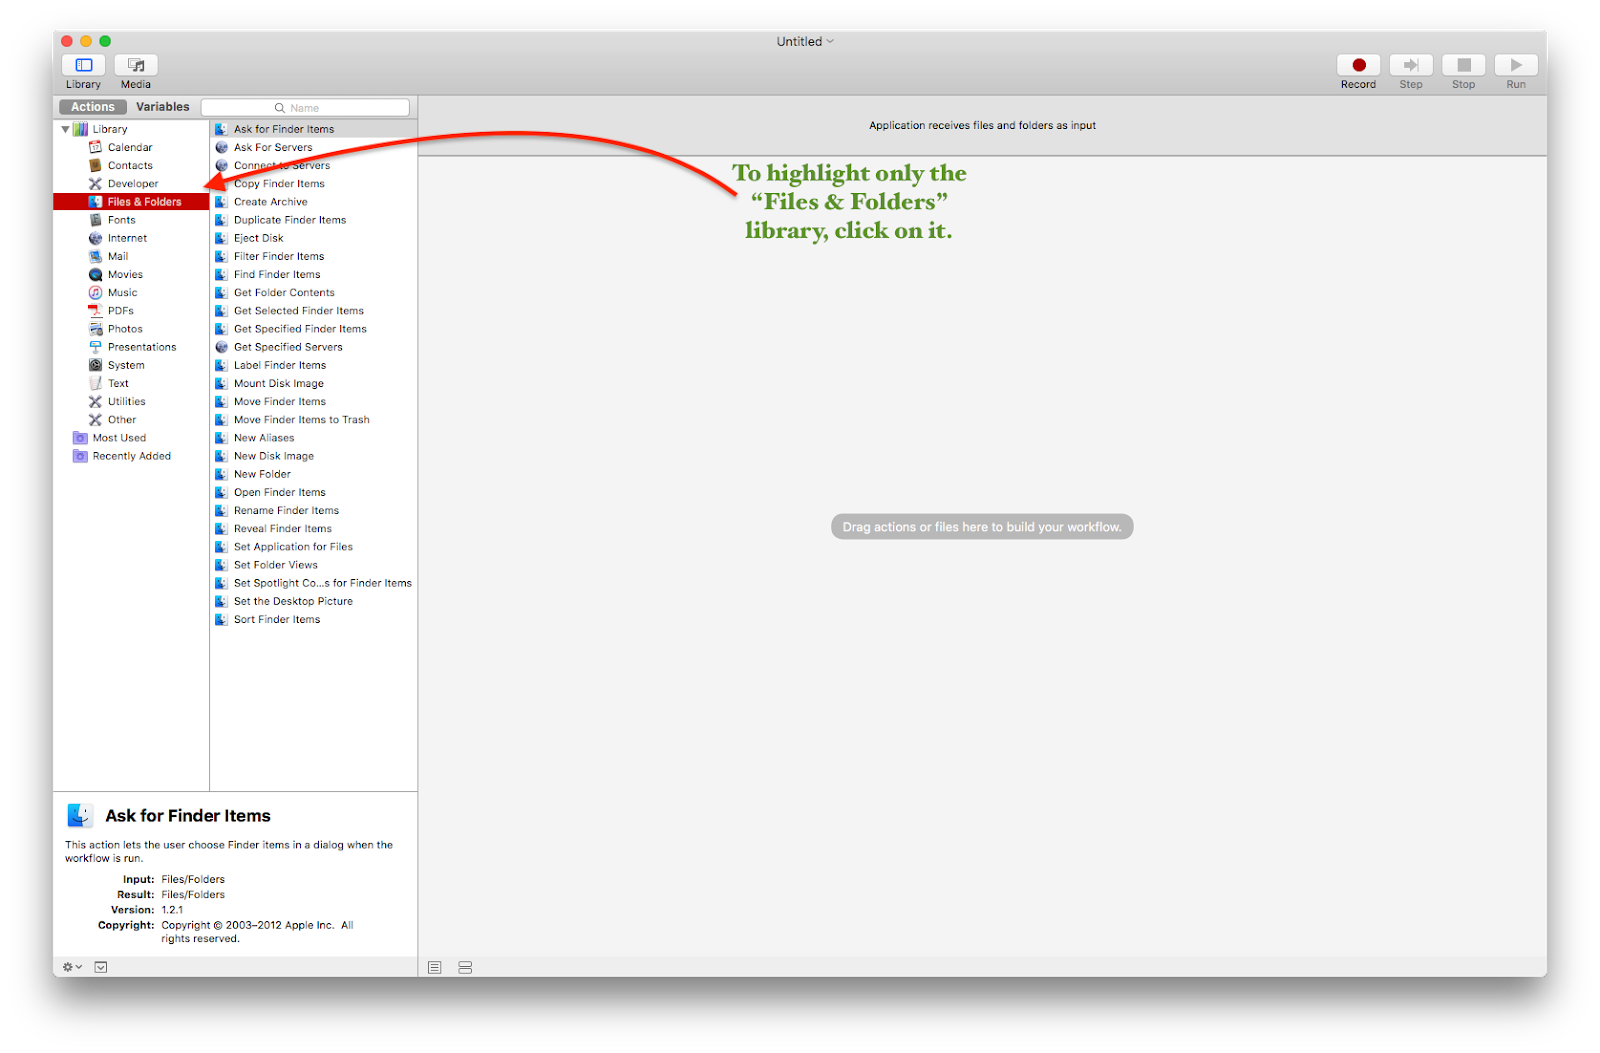
If all you see is a blank window with “Drag actions or files here to build your workflow, click “Library” in the top left corner. The first column should have “Actions” highlighted (if not, click on it), and the master container “Library” should be selected in the left most of those two columns.
Click on the “Files & Folders” in that list to show only the actions that apply to Files & Folders.
The steps
Step one: get the right file(s)
 For me, the first step was to select the correct file. Since an Application will run on its own, it needs to have direction about what items to work on, and this can be done in one of two basic ways (for my purposes, anyway): I can either give the Application a file or folder to use every time, or I can have it ask me which file or folder to deal with. I chose the latter of these two, and put the “Ask for Finder Items” action at the top of the list. To do this, click and drag “Ask for Finder Items” from the second column on the left into the main workflow area on the right.
There are a few options to set here. In the text field next to “Prompt:” is some text you are supposed to be able to edit to remind yourself what is happening. My experience, however, is that this text is not displayed. This may be due to how macOS does Open/Save now, but in any event it doesn’t seem to show up anywhere, so you can (for now) ignore it. Or, add the text you want to have to remind yourself later, in case this does start showing up.
 Next are the “Start at:” and “Type:” options. “Start at:” allows you to automatically set the folder where the “Open” dialog will start out. I set this to the top level folder where I keep all my Scrivener projects. If you keep yours loose in your Documents folder, say, you could select “Documents” from that dropdown menu, or whatever other folder you use for storing your documents. If your particular folder is not one of the ones listed in the menu, click the “Other…” item and select the folder where you want the “Open” dialog to start.
The “Type:” option allows you to permit Files, Folders, or Files and Folders both to appear as selectable items when the action runs. If you select “Files,” then you will only be able to select files, and clicking on Folders will drill down inside the folder. If you select “Folders” then files will be greyed out in the “Open” dialog and only folders will be able to be selected. You will still be able to drill down folder levels, but any files inside folders will be greyed out and unable to be selected. If you select “Files and Folders” it will permit you to select either files or folders in the Open dialog for further processing.
Quick aside, here: one key concept here is that this is a workflow, and that each step generally leads into the next step. Although Automator actions can be highly customized, and I will not even get into some of the more powerful things it can do, the basic idea is that there is a sequence of linked steps, each of which feeds the step after it.
What this step does is tells this workflow which file or folder (or, files or folders, if you click “Allow Multiple Selection” on) will be passed on to the next step.
Step two: compress the selected file
Once I’ve selected which file or folder I want to back up, next I want to tell the Finder to compress that file. This will leave the original unaltered, but will create a .zip archive of whatever was selected in the “Ask for Finder Items” action.
 To do this, drag the “Create Archive” action from the left side into the main document window, underneath the “Ask for Finder Items” action. What this will do is link the first action, the “Ask for Finder Items” action, to the second one in the list. That means the input from the first flows into the second, and the “Create Archive” will compress the file selected in the first action.
Options here include the ability to give the created archive a name, telling it where to save the archive, and whether the process should ignore unreadable items. In practice, “Ignore unreadable items” should probably always be checked (at least when starting out), so that any files which may be corrupted or are otherwise unreadable by the Finder don’t end up derailing the action.
I leave the “Save As:” text field blank so it gets the same name as the original file. This will not create a conflict, since this is a compressed .ZIP file of the Scrivener project (so, “Great American Novel.scriv” versus “Great American Novel.zip”). If you are uncomfortable with this, then of course you could add a filename in the text field, or you could save it to a different folder by selecting one under the “Where:” dropdown menu.
Step three: add the current time and date
Next, I want my compressed file to have the current time and date added to the filename. To do this I need to add the “Rename Finder Items” action to the workflow, under the “Create Archive” action. Just as before, click the item in the Library and then drag it underneath the bottom item in the workflow. This will then feed the archive created in the previous step into this one.
Dragging this action into the workflow will pop up a dialog box warning that this action will change the name of the existing Finder item, and offers to add the “Copy Finder Items” action (in between the previous action and this one) so that the original is not renamed. Since I have already created an archive, and am dealing with the archived file, I don’t worry about this warning and click “Don’t Add.” As the dialog notes, you can hold the Shift key down while dragging this action into place if you’d like to bypass the warning, and clicking “Do not show this message again” will prevent it from appearing in the future if you so desire.
There are several possible options here, but what I do is I set this action to “Add Date or Time” of the “Date/Time:” to “Current”, set “Where” to “Before Name”, set the “Separator:” to “Space”, use the “Format:” of “Hour Minute”, and set the second “Separator:” to “None”. I also click on the “Use Leading Zeroes” checkbox.
I then add a second “Rename Finder Items” action immediately below this one, with the only difference being that I change “Format:” to be “Year Month Day” instead.
What this does is takes my “Great American Novel.zip” file and renames it to (for example) “0945 Great American Novel.zip” and then “20180718 0945 Great American Novel.zip” after.All of this is just my personal preference. It makes it super easy for me to see by looking what file was backed up when. This is also overkill, in some ways, since the Finder can always sort folders by date created and such. I just am weird, and prefer this method.
You are, of course, under no obligation to subscribe to my weirdness, and could simply rename the archive in the “Create Archive” step and avoid all this. There are also other methods, such as putting the date & time after the filename, or changing “Add Date and Time” in the dropdown menu to “Make Sequential” or any of the other options there.
Step four: move to external storage
 Finally, I want my backup file, renamed and all, to be moved to an external storage medium. To do that, I drag the “Move Finder Items” action into the workflow, underneath the last “Rename Finder Item” action, and tell it where to send the backup file. In the “To:” dropdown menu are similarly options as in other locations, where you can pick one of several default locations, or “Other…” and navigate through the dialog to the external storage medium. One option here might be to select a cloud storage service like Dropbox, Box, Google Drive, or others, and save the archive to that location. If you have external disks (especially if you intend to use an SD card or USB stick), make sure that the volume you want to move the file to is mounted before you run the Application. Unless you decide to name your archives the exact same name, the “Replace existing files” option will have no effect.
 Here is my Automator workflow, in its entirety.
What happens now?
Now, save this Automator document, give it a fancy name and save it somewhere you can get to it, and that’s it! If you created an Application, double clicking on it will run the Automator workflow automatically, asking you for the file(s) or folder(s) you want to back up, create an archive of the selected item(s), rename the archive, and then move the renamed archive to the location you chose in the “Move Finder Items” action at the end.
If you created this as a Workflow document, double-clicking on it will launch Automator, where your Workflow will be sitting waiting for you to press the “Run” button at the top right. As a practical matter, it’s probably most convenient to opt for an Application. That way, you can just open it and have it run itself. Incidentally, Automator will give you the option to save the finished document as an Application, even if you chose “Workflow” at the beginning.
There are definitely some different ways you could approach this. As an example, the first action in the list could be “Get Selected Finder Items” instead of “Ask for Finder Items”. By using the “Get Selected” action instead, you can drag a file or folder onto the saved Automator Application, and the rest of the action will complete without asking for any input. In older AppleScript parlance, this used to be called a “Droplet,” meaning that it wouldn’t do anything on its own but would automatically process items dropped onto it.
With some additional research and experimentation, it should also be possible to modify the Workflow just described to take dropped items, ask for a destination, and then perform the rest of the actions.
Final thoughts
I use this Automator Application to make special backups of my Scrivener projects, specifically ones where I have reached critical milestones. For example, I recently completed the second revision of my upcoming novel Universo Responsoriis. Once I had created a good compile for my editor, I created snapshots of all the manuscript documents in the Binder (more on that in the next post on this topic!), then saved and closed the project.
This is important to note: the Scrivener project in question must be closed before … well, really any kind of Finder manipulation, automatic or otherwise. If the project is still open when this Automator Application is run, the project will be archived in the “I’m open!” state, which could cause issues later. Best bet is to just save and close the project, and then run the Automator Application.
In the next post on this topic, I will go over the Snapshot feature in Scrivener, and how to use it to create fall-back positions before or after you reach writing milestones.
If you are using Automator to create similar processes, what kinds of things are you running? What are your thoughts on Automator in general? Leave your comments below!
July 9, 2018
Save me! Backing up Scrivener projects part 1: Auto-save and Automatic backups in Scrivener
Hello again, and welcome back! Hopefully your summer has been less eventful than has mine. So far, the A/C has tried conking out three times (and one of those days it was 109 °F!), but fortunately I was able to get things right again. Today, I'm starting a new series covering some ways to save your hard work from technological issues that may strike the modern writer. In this series, I will go over some ways to use built-in Scrivener tools, as well as some of my thoughts on external automation tools, in order to help alleviate the inevitable crash, hard drive failure, or other disasters that may befall the CloudAge™ Author. In today’s cogitation, I’ll go over two Scrivener systems, auto-save and automatic backups. In Part 2, I'll look at a macOS option I use to help make this system more robust for my needs, as well as some ideas for modifications that others may find helpful and a note about possible ways Windows users can do something similar. In Part 3 I'll go over Snapshots and some ways they can help with disaster recovery, as well as some thoughts on them in general.
Scrivener itself has supported an automatic backup system since at least version 1.5, a system that offers the option for you to backup to a specific location, and when. It has also offered an auto-save feature as long as I’ve been aware, and I believe offered that from the very beginning. The automatic backup feature is optional, and fairly flexible. The auto-save feature is always-on, with a few configuration options.
With that, let’s take a look at auto-save and automatic backups in Scrivener 3 (which incidentally also work in Scrivener 2, although the preferences window will look slightly different).
Auto-save
 Auto-save in Scrivener is always-on, but the amount of time it waits before saving is configurable, and it also offers a couple of options for the writer who doesn’t particularly care for auto-save (I know there are some, although I am not among them).
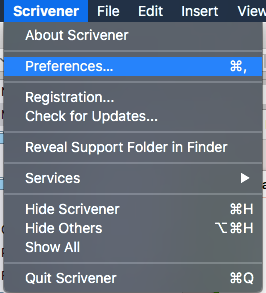
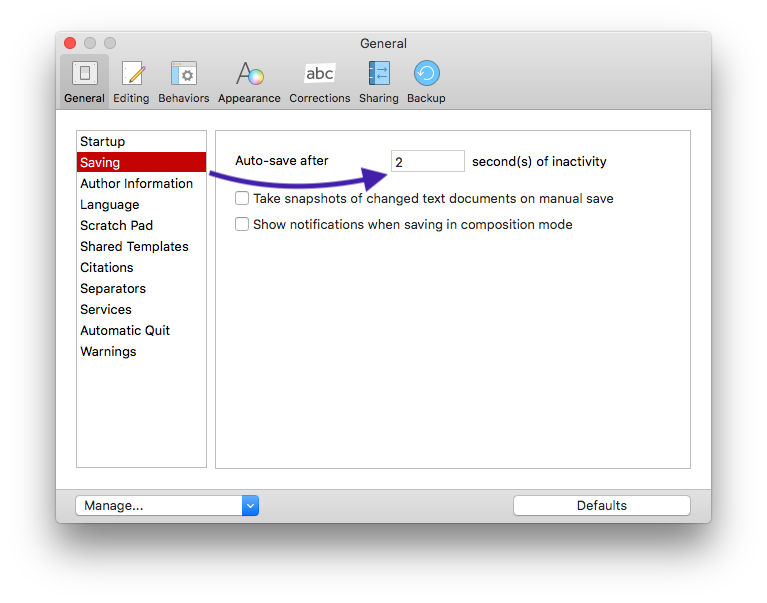
To access the settings for both auto-save and automatic backups, open a project in Scrivener and select the Scrivener menu, then click “Preferences …” (or, hold the command key and type a comma):
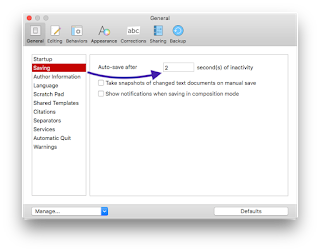
Once open, click the “General” tab, and click on the “Saving” item.
In this pane, you can tell Scrivener how long to wait before auto-saving, as well as whether to create Snapshots of any changed text documents when the “Save” command is manually invoked. There is also an option for notifications when an auto-save kicks off, if you’re in composition mode.
The latter two options may need a little exposition. The second one, “Show notifications when saving in composition mode,” will generate an on-screen display when a save occurs if you are writing in composition mode. That one is pretty straightforward, and if you want to be notified each time that happens, click that checkbox on.
The first of those two, “Take snapshots of changed text documents on manual save” allows you to essentially create backstops for your work each time you save manually. Although the Snapshots feature deserves (and I will give it) its own blog post, the short of it is that within a Scrivener project, you can save a copy of any of the elements of your manuscript at a given point in time. A Snapshot is basically just a “frozen” copy of a document, and continued editing on a document is done in the current version of the document, with one or more Snapshots acting as fall-back points.
If you enable that checkbox, then auto-save continues as normal by saving the current state of any changed documents whenever Scrivener is idle for the number of seconds listed in the Preferences. Then, anytime you manually save (with either a Command-S/Control-S or by selecting "Save" under the File menu), instead of just saving the changed files it will create a Snapshot of each changed document.
I have seen some discussion in the Literature and Latte forums about the auto-save, including requests to make it optional (which the developer has ruled out, so that’s just the way it goes). I myself rely on that auto-save (I have ADHD, and sometimes get hyper-focused on writing—when I do, I often forget to save!). So, I am glad it is there but if you really dislike it, you can set the auto-save to a ridiculously long time. Just keep in mind that the longer you set it, the more work you could potentially lose.
The most often cited reason for this is that with this auto-save setup there is no "Revert" option for Scrivener, and there are some writers who don't like that. I understand that perspective and it makes sense, but allow me to try to summarize the main reason there is no "Revert" feature, and how to effectively replace it. First, "Revert" in Word, or Pages, or Acrobat (among many, many others) works there because there is only one document open to which the "Revert" command can apply (yes, those applications can have several documents open at a time, but any "Revert" command almost always—and maybe actually always—only applies to the front-most document). Scrivener projects are project files, with multiple files open. In fact, if you write or edit (as I sometimes do) in Scrivenings mode, where multiple items selected in the Binder are all displayed in the Editor as an editable single "document," what does "Revert" mean in that case? Because of how Scrivener views projects, the "Revert" option doesn't make a lot of sense, but by creating Snapshots with manual saves and extending the auto-save time a bit you can create a replacement option to allow you to go back to a previous version of any edited document.
As a test of the manual save time, I put one hundred fifty thousand seconds in that field, and Scrivener didn’t crash. I don’t know for sure if that will actually translate to a nearly 2-day delay. There may be an internal maximum that I can’t override, but the manual doesn’t specify any such thing. So, it could very well be that it will accept any valid integer value up to the maximum size of a signed integer, which I believe is 9,223,372,036,854,775,807 on 64-bit macOS. That’s nine quintillion, two hundred twenty-three quadrillion, three hundred seventy-two trillion, thirty-six billion, eight hundred fifty-four million, seven hundred seventy-five thousand, eight hundred seven seconds, or more than 106 trillion years. If anyone finds out the actual maximum, let us know in the comments!
So, in any event, if you are not a fan of the auto-save, you can effectively disable it if you put in a value that is larger than you ever expect to actually keep Scrivener open. I suspect most people are fine with the auto-save feature, and turning on the checkbox to create Snapshots on manual save will help ameliorate any concerns about auto-saving garbage if the cat jumps on the keyboard and accidentally selects all and replaces it with gobbledygook.
Automatic backups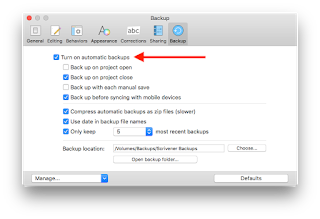
Also in the Preferences for Scrivener is the option to turn on automatic backups:
This feature is awesome, and has been available since version 1.5. As you can see, there are a lot of options here, so let’s take a look at them.
First, the checkbox to turn them on at all is at the top. When this box is checked “on,” Scrivener will automatically create backups according to the instructions in the next four options. It will either automatically backup projects:
• When a project is opened,
• When a project is closed,
• Every time you “Save” the project manually
• Or before syncing with mobile devices
Or any combination of these options (including all four).
Below these four are three settings which control whether or not to compress (zip) the backups, use dates in the name of the backup file, and how many backup files to keep.
Below those three are two more items, the Backup location and a button to select a backup folder, as well as a button to open that folder.
By default, automatic backups are turned on, and set to backup when a project is closed and before syncing with mobile devices. If you don’t use a mobile device (iPad, iPhone), the last option won’t have any effect (it only kicks in when you go into the File menu and select Sync->with Mobile Devices). Even though I don’t right now use my iPad as a writing tool, I might in the future (like, when I replace my current MacBook Air with what will likely be an iMac Pro, I may switch to using the iPad as my portable writing platform again), so I keep it ticked on. I also keep the “Backup on project close” option ticked on. Other people might prefer to have Scrivener backup the project when they open it, so that if they make a bunch of changes in a session and decide to scrap them, they can just recover from the project state as it existed before they started working. Either way it kind of amounts to the same thing, since a backup-on-close looks like the project did before opening it, so it’s really more about your personal preference and workflow.
The other option here is the “Backup with each manual save” option, which ties the backup process to the File->Save action (either by selecting "Save" in the File menu or by typing the keystroke shortcut). This means that whenever you either type Command-S (or Control-S in Windows) to "Save," or you click on the File menu and select the "Save" option, it will create a new backup for you. This is another way to create a fall-back point if you are one who doesn't like the auto-save feature. By combining the use of Snapshots on manual save with backups on manual save, you can create a series of intermediate fall-back points.
Depending on your circumstance, your computer, the size and available space of your backup drive, and so on, you may want to enable compressing backup files. If so, check “on” the checkbox for “Compress automatic backups as zip files (slower).” This will first backup the project, and then compress it. Beneath that is the option to add the date to the title of the backup file, which inserts the current date and time of the backup into the file name. Although the macOS Finder (and Windows) can sort folder items by created date, having the date and time in the title of the file can be helpful if you use other, external solutions for backing up these items.
Beneath that option is the option to control the number of backup files to maintain. If this checkbox is enabled, Scrivener will make a maximum of 3, 5, 10, or 25 backups of this project inside the backup folder. Once Scrivener has backed up a project the number of times equal to the one selected in the popup menu, the next time it tries to create a backup it will locate the oldest one, delete it, and create the new backup. How many of these backups you want to maintain will largely depend on how you write and work. I tell Scrivener to keep 5 backups. Since I have Scrivener backup on close, the amount of time it takes to backup is less relevant to me, so I tell Scrivener to compress those backups, and I also tell Scrivener to put the date in the file title.
If you tell Scrivener to backup on open, and close, and sync, and manual save, you may find that 25 better suits your style. If you find that 25 is still too few, you will need to implement some other kind of backup feature, such as a modification of the Automator action that I’ll discuss in part 2 of this series.
At the very bottom are the Backup location and “Open backup folder” items. Here, the “Choose…” button will enable you to select what folder Scrivener uses to store your backup files, and then to open that folder in the Finder (or Windows Explorer) if you need to access it. You can, of course, also open that folder normally in the Finder/Explorer if you need to. By default, this location is in your home folder, at ~/Library/Application Support/Scrivener/Backups (on Windows, I believe this is in your account’s AppData folder). You can change that location here if you wish. In my case, I have an external USB disk drive (“Backups”) that I use specifically for backup purposes (not just for Scrivener). I tell Scrivener to use a folder on that disk, instead of the default setting.
A word of caution about the backups. If you find you need to open a backup copy of a project, drag it out of the folder with the other backups. This can be by dragging it to the desktop, or making a copy in another folder, or (what I do) by holding down the option key and dragging the zip file to the desktop and then opening the zip file from there. Holding option while dragging a file or folder (or disk, or anything else really) in the Finder will create a copy of the dragged item. If you open a Scrivener project from within the folder it uses for automatic backups, you will get a warning dialog that the project is not in a recommended location. This will also happen if you tell Scrivener to use a folder for automatic backups where you are also saving your normal projects.
There’s a discussion about this on the Literature and Latte forums, but the short version of how to avoid the whole issue is to use a separate folder for your automatic backups. If you are like many people, and you have a separate folder in Documents for your Scrivener projects, set the “Backup location” to be anything else.
From a general perspective, the best thing to do is to have the “Backup location” be on a separate drive, such as a USB thumb drive or a Thunderbolt disk drive. If you don’t have any of these, at the very least the “Backup location” must be different from the folder where you store the projects you are working on. If you are like many writers and use Dropbox for your Scrivener projects (and if you're using Scrivener for iOS as well, you almost certainly are using Dropbox for that!), you could save your backups to your Documents folder instead. I still recommend having an external drive (SSD, Hard Disk, USB/SD flash drive, und so weiter), and keeping backups on there, because even if you use Dropbox it is still storing local copies on your internal drive. If your internal drive fails you may still be able to salvage your Dropbox from another location (assuming your drive's failure didn't trash the Dropbox folder and sync the trashed version, which is possible), but your backups are still on the internal drive if that doesn't work out. Safest thing is to do backups to an entirely different drive.
For me, I have an external hard disk drive (“Backups”) which has a subfolder (“Scrivener Backups”) where I tell Scrivener to store backups of my projects. In addition, occasionally I will drag-copy the “Scrivener Backups” folder onto a different drive, a USB flash drive, just to have an additional backup of the backups. Finally, I created an Automator action that I use when I reach milestones in my projects. Although this action makes a backup of my live project, not the backups, it could easily be modified to backup the backups instead of—or in addition to—my live project.
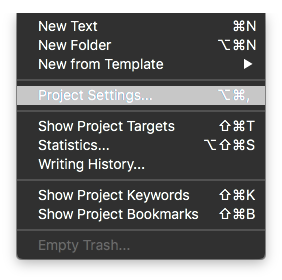 Finally, it is also possible to override a couple of the backup settings on a per-project basis (by going into the Project menu and selecting “Project Settings…”, or typing Option-Command-comma on a Mac):
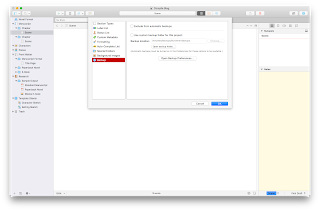 The top checkbox, if checked “on,” will tell Scrivener to not automatically backup this particular project (all other projects will still be backed up automatically, unless they also have this setting checked “on”). The second checkbox allows you to specify a different location for this project’s backup files. The other settings remain unchanged, so if you have the settings to “Only keep” the 5 most recent backups, that will still apply. It will just use the folder you set here, instead of the one in the “Backup” pane of the Scrivener Preferences, and only for this project.
If you like, you can have a different backup folder for each project (which is not a bad idea!), but if you have a lot of projects this can be a little tedious to manage. It may be worth it, though, depending on your situation.
One such option might be to create a generic backup folder on an external drive, and then inside that folder create a new folder for each project. When you create a new project, remember to go to the Project->Project Settings… menu and set this backup location. That way, each project’s backups are separate from each other. As with any backup, however, this folder needs to be separate from the one where your “live” version of the project is stored. I also recommend backing up this folder periodically (say, every Friday afternoon to a USB stick).
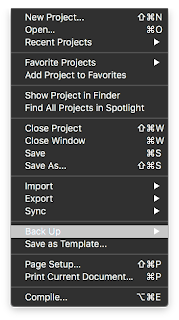 In addition to the automatic backups, you can also do manual backups by going into File->Backup:

Under File-Backup you will see two selection options, one to "Back Up To…" and one to "Back Up Now":
The "Back Up To…" option will prompt you (via a standard "Save" type dialog box) for a location to save a backup, as well as a checkbox option to Back up as a ZIP file. "Back Up Now" will create a manual backup using the settings in the Backup tab of the Preferences. Even if you have automatic backups disabled, it will use whatever other settings are set in the Backup tab (whether to ZIP or not, whether to use date in the filename or not, and the location for backups) and create a backup there. Keep in mind, however, that if you are using automatic backups, a manual "Back Up Now" create a backup of the project just as if it were automatic, so if you are at the limit for number of backups it will delete the oldest to make room for the manual backup.
In any event, Scrivener offers a fairly flexible automatic backup system for your writing projects, but there is still a little management for you, the writer, to make it work the way you need for it to work.
Some things to consider, and final thoughts
Scrivener offers a few options to help a writer avoid some of the disasters (such as a loss of power or computer crash) that can befall him or her, including automatic saving of modified open projects as well as automatic backups with some user-defined or -selected parameters. By considering your own needs and preferences, you can use these built-in tools to help maintain a robust system for preserving your hard work. In part 2 of this series, I will go over the Automator action that I use to manually backup important milestone versions of my live projects, and in part 3 I will take a look at the Snapshots feature of Scrivener, and how it can be used to help make auto-save and automatic backup even more useful.
If you use the automatic backups, what is your system for keeping them safe? How do you feel about the auto-save feature, and do you have any tips from your own experience? Feel free to share them in the comments!
Scrivener itself has supported an automatic backup system since at least version 1.5, a system that offers the option for you to backup to a specific location, and when. It has also offered an auto-save feature as long as I’ve been aware, and I believe offered that from the very beginning. The automatic backup feature is optional, and fairly flexible. The auto-save feature is always-on, with a few configuration options.
With that, let’s take a look at auto-save and automatic backups in Scrivener 3 (which incidentally also work in Scrivener 2, although the preferences window will look slightly different).
Auto-save
 Auto-save in Scrivener is always-on, but the amount of time it waits before saving is configurable, and it also offers a couple of options for the writer who doesn’t particularly care for auto-save (I know there are some, although I am not among them).
To access the settings for both auto-save and automatic backups, open a project in Scrivener and select the Scrivener menu, then click “Preferences …” (or, hold the command key and type a comma):
Once open, click the “General” tab, and click on the “Saving” item.
In this pane, you can tell Scrivener how long to wait before auto-saving, as well as whether to create Snapshots of any changed text documents when the “Save” command is manually invoked. There is also an option for notifications when an auto-save kicks off, if you’re in composition mode.
The latter two options may need a little exposition. The second one, “Show notifications when saving in composition mode,” will generate an on-screen display when a save occurs if you are writing in composition mode. That one is pretty straightforward, and if you want to be notified each time that happens, click that checkbox on.
The first of those two, “Take snapshots of changed text documents on manual save” allows you to essentially create backstops for your work each time you save manually. Although the Snapshots feature deserves (and I will give it) its own blog post, the short of it is that within a Scrivener project, you can save a copy of any of the elements of your manuscript at a given point in time. A Snapshot is basically just a “frozen” copy of a document, and continued editing on a document is done in the current version of the document, with one or more Snapshots acting as fall-back points.
If you enable that checkbox, then auto-save continues as normal by saving the current state of any changed documents whenever Scrivener is idle for the number of seconds listed in the Preferences. Then, anytime you manually save (with either a Command-S/Control-S or by selecting "Save" under the File menu), instead of just saving the changed files it will create a Snapshot of each changed document.
I have seen some discussion in the Literature and Latte forums about the auto-save, including requests to make it optional (which the developer has ruled out, so that’s just the way it goes). I myself rely on that auto-save (I have ADHD, and sometimes get hyper-focused on writing—when I do, I often forget to save!). So, I am glad it is there but if you really dislike it, you can set the auto-save to a ridiculously long time. Just keep in mind that the longer you set it, the more work you could potentially lose.
The most often cited reason for this is that with this auto-save setup there is no "Revert" option for Scrivener, and there are some writers who don't like that. I understand that perspective and it makes sense, but allow me to try to summarize the main reason there is no "Revert" feature, and how to effectively replace it. First, "Revert" in Word, or Pages, or Acrobat (among many, many others) works there because there is only one document open to which the "Revert" command can apply (yes, those applications can have several documents open at a time, but any "Revert" command almost always—and maybe actually always—only applies to the front-most document). Scrivener projects are project files, with multiple files open. In fact, if you write or edit (as I sometimes do) in Scrivenings mode, where multiple items selected in the Binder are all displayed in the Editor as an editable single "document," what does "Revert" mean in that case? Because of how Scrivener views projects, the "Revert" option doesn't make a lot of sense, but by creating Snapshots with manual saves and extending the auto-save time a bit you can create a replacement option to allow you to go back to a previous version of any edited document.
As a test of the manual save time, I put one hundred fifty thousand seconds in that field, and Scrivener didn’t crash. I don’t know for sure if that will actually translate to a nearly 2-day delay. There may be an internal maximum that I can’t override, but the manual doesn’t specify any such thing. So, it could very well be that it will accept any valid integer value up to the maximum size of a signed integer, which I believe is 9,223,372,036,854,775,807 on 64-bit macOS. That’s nine quintillion, two hundred twenty-three quadrillion, three hundred seventy-two trillion, thirty-six billion, eight hundred fifty-four million, seven hundred seventy-five thousand, eight hundred seven seconds, or more than 106 trillion years. If anyone finds out the actual maximum, let us know in the comments!
So, in any event, if you are not a fan of the auto-save, you can effectively disable it if you put in a value that is larger than you ever expect to actually keep Scrivener open. I suspect most people are fine with the auto-save feature, and turning on the checkbox to create Snapshots on manual save will help ameliorate any concerns about auto-saving garbage if the cat jumps on the keyboard and accidentally selects all and replaces it with gobbledygook.
Automatic backups

Also in the Preferences for Scrivener is the option to turn on automatic backups:
This feature is awesome, and has been available since version 1.5. As you can see, there are a lot of options here, so let’s take a look at them.
First, the checkbox to turn them on at all is at the top. When this box is checked “on,” Scrivener will automatically create backups according to the instructions in the next four options. It will either automatically backup projects:
• When a project is opened,
• When a project is closed,
• Every time you “Save” the project manually
• Or before syncing with mobile devices
Or any combination of these options (including all four).
Below these four are three settings which control whether or not to compress (zip) the backups, use dates in the name of the backup file, and how many backup files to keep.
Below those three are two more items, the Backup location and a button to select a backup folder, as well as a button to open that folder.
By default, automatic backups are turned on, and set to backup when a project is closed and before syncing with mobile devices. If you don’t use a mobile device (iPad, iPhone), the last option won’t have any effect (it only kicks in when you go into the File menu and select Sync->with Mobile Devices). Even though I don’t right now use my iPad as a writing tool, I might in the future (like, when I replace my current MacBook Air with what will likely be an iMac Pro, I may switch to using the iPad as my portable writing platform again), so I keep it ticked on. I also keep the “Backup on project close” option ticked on. Other people might prefer to have Scrivener backup the project when they open it, so that if they make a bunch of changes in a session and decide to scrap them, they can just recover from the project state as it existed before they started working. Either way it kind of amounts to the same thing, since a backup-on-close looks like the project did before opening it, so it’s really more about your personal preference and workflow.
The other option here is the “Backup with each manual save” option, which ties the backup process to the File->Save action (either by selecting "Save" in the File menu or by typing the keystroke shortcut). This means that whenever you either type Command-S (or Control-S in Windows) to "Save," or you click on the File menu and select the "Save" option, it will create a new backup for you. This is another way to create a fall-back point if you are one who doesn't like the auto-save feature. By combining the use of Snapshots on manual save with backups on manual save, you can create a series of intermediate fall-back points.
Depending on your circumstance, your computer, the size and available space of your backup drive, and so on, you may want to enable compressing backup files. If so, check “on” the checkbox for “Compress automatic backups as zip files (slower).” This will first backup the project, and then compress it. Beneath that is the option to add the date to the title of the backup file, which inserts the current date and time of the backup into the file name. Although the macOS Finder (and Windows) can sort folder items by created date, having the date and time in the title of the file can be helpful if you use other, external solutions for backing up these items.
Beneath that option is the option to control the number of backup files to maintain. If this checkbox is enabled, Scrivener will make a maximum of 3, 5, 10, or 25 backups of this project inside the backup folder. Once Scrivener has backed up a project the number of times equal to the one selected in the popup menu, the next time it tries to create a backup it will locate the oldest one, delete it, and create the new backup. How many of these backups you want to maintain will largely depend on how you write and work. I tell Scrivener to keep 5 backups. Since I have Scrivener backup on close, the amount of time it takes to backup is less relevant to me, so I tell Scrivener to compress those backups, and I also tell Scrivener to put the date in the file title.
If you tell Scrivener to backup on open, and close, and sync, and manual save, you may find that 25 better suits your style. If you find that 25 is still too few, you will need to implement some other kind of backup feature, such as a modification of the Automator action that I’ll discuss in part 2 of this series.
At the very bottom are the Backup location and “Open backup folder” items. Here, the “Choose…” button will enable you to select what folder Scrivener uses to store your backup files, and then to open that folder in the Finder (or Windows Explorer) if you need to access it. You can, of course, also open that folder normally in the Finder/Explorer if you need to. By default, this location is in your home folder, at ~/Library/Application Support/Scrivener/Backups (on Windows, I believe this is in your account’s AppData folder). You can change that location here if you wish. In my case, I have an external USB disk drive (“Backups”) that I use specifically for backup purposes (not just for Scrivener). I tell Scrivener to use a folder on that disk, instead of the default setting.
A word of caution about the backups. If you find you need to open a backup copy of a project, drag it out of the folder with the other backups. This can be by dragging it to the desktop, or making a copy in another folder, or (what I do) by holding down the option key and dragging the zip file to the desktop and then opening the zip file from there. Holding option while dragging a file or folder (or disk, or anything else really) in the Finder will create a copy of the dragged item. If you open a Scrivener project from within the folder it uses for automatic backups, you will get a warning dialog that the project is not in a recommended location. This will also happen if you tell Scrivener to use a folder for automatic backups where you are also saving your normal projects.
There’s a discussion about this on the Literature and Latte forums, but the short version of how to avoid the whole issue is to use a separate folder for your automatic backups. If you are like many people, and you have a separate folder in Documents for your Scrivener projects, set the “Backup location” to be anything else.
From a general perspective, the best thing to do is to have the “Backup location” be on a separate drive, such as a USB thumb drive or a Thunderbolt disk drive. If you don’t have any of these, at the very least the “Backup location” must be different from the folder where you store the projects you are working on. If you are like many writers and use Dropbox for your Scrivener projects (and if you're using Scrivener for iOS as well, you almost certainly are using Dropbox for that!), you could save your backups to your Documents folder instead. I still recommend having an external drive (SSD, Hard Disk, USB/SD flash drive, und so weiter), and keeping backups on there, because even if you use Dropbox it is still storing local copies on your internal drive. If your internal drive fails you may still be able to salvage your Dropbox from another location (assuming your drive's failure didn't trash the Dropbox folder and sync the trashed version, which is possible), but your backups are still on the internal drive if that doesn't work out. Safest thing is to do backups to an entirely different drive.
For me, I have an external hard disk drive (“Backups”) which has a subfolder (“Scrivener Backups”) where I tell Scrivener to store backups of my projects. In addition, occasionally I will drag-copy the “Scrivener Backups” folder onto a different drive, a USB flash drive, just to have an additional backup of the backups. Finally, I created an Automator action that I use when I reach milestones in my projects. Although this action makes a backup of my live project, not the backups, it could easily be modified to backup the backups instead of—or in addition to—my live project.
 Finally, it is also possible to override a couple of the backup settings on a per-project basis (by going into the Project menu and selecting “Project Settings…”, or typing Option-Command-comma on a Mac):
 The top checkbox, if checked “on,” will tell Scrivener to not automatically backup this particular project (all other projects will still be backed up automatically, unless they also have this setting checked “on”). The second checkbox allows you to specify a different location for this project’s backup files. The other settings remain unchanged, so if you have the settings to “Only keep” the 5 most recent backups, that will still apply. It will just use the folder you set here, instead of the one in the “Backup” pane of the Scrivener Preferences, and only for this project.
If you like, you can have a different backup folder for each project (which is not a bad idea!), but if you have a lot of projects this can be a little tedious to manage. It may be worth it, though, depending on your situation.
One such option might be to create a generic backup folder on an external drive, and then inside that folder create a new folder for each project. When you create a new project, remember to go to the Project->Project Settings… menu and set this backup location. That way, each project’s backups are separate from each other. As with any backup, however, this folder needs to be separate from the one where your “live” version of the project is stored. I also recommend backing up this folder periodically (say, every Friday afternoon to a USB stick).
 In addition to the automatic backups, you can also do manual backups by going into File->Backup:
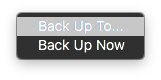
Under File-Backup you will see two selection options, one to "Back Up To…" and one to "Back Up Now":
The "Back Up To…" option will prompt you (via a standard "Save" type dialog box) for a location to save a backup, as well as a checkbox option to Back up as a ZIP file. "Back Up Now" will create a manual backup using the settings in the Backup tab of the Preferences. Even if you have automatic backups disabled, it will use whatever other settings are set in the Backup tab (whether to ZIP or not, whether to use date in the filename or not, and the location for backups) and create a backup there. Keep in mind, however, that if you are using automatic backups, a manual "Back Up Now" create a backup of the project just as if it were automatic, so if you are at the limit for number of backups it will delete the oldest to make room for the manual backup.
In any event, Scrivener offers a fairly flexible automatic backup system for your writing projects, but there is still a little management for you, the writer, to make it work the way you need for it to work.
Some things to consider, and final thoughts
Scrivener offers a few options to help a writer avoid some of the disasters (such as a loss of power or computer crash) that can befall him or her, including automatic saving of modified open projects as well as automatic backups with some user-defined or -selected parameters. By considering your own needs and preferences, you can use these built-in tools to help maintain a robust system for preserving your hard work. In part 2 of this series, I will go over the Automator action that I use to manually backup important milestone versions of my live projects, and in part 3 I will take a look at the Snapshots feature of Scrivener, and how it can be used to help make auto-save and automatic backup even more useful.
If you use the automatic backups, what is your system for keeping them safe? How do you feel about the auto-save feature, and do you have any tips from your own experience? Feel free to share them in the comments!
June 13, 2018
June 7, 2018
Universo Responsoriis 2nd draft update
So, today I sent off the 2nd draft of my SciFi novel (working title: Universo Responsoriis) for editing and review.
I am hopeful that I’ll be able to start the beta reading stage starting at the end of July.
I will post information about how to become a beta reader soon, so if you might be interested, keep an eye out on this space for details!
I am hopeful that I’ll be able to start the beta reading stage starting at the end of July.
I will post information about how to become a beta reader soon, so if you might be interested, keep an eye out on this space for details!
May 20, 2018
Brief Scrivener 3 post: Project Metadata in Scrivener 3
I know I promised an updated set of Scrivener posts for version 3 of Scrivener, and I will definitely do that sometime RealSoonNow™. I have been working pretty hard trying to get Universo Responsoriis ready for Beta readers, as well as working my actual job (transcriptions), and haven't has as much time to get to the updates as I had hoped.
I would like to take a few moments to praise the new metadata system in Scrivener 3.
For readers unfamiliar with metadata, in Scrivener at least, here's a basic rundown.
First, the concept is the same as it is for any other use of "metadata," in the sense that it's the data about the data. For example, the "Last Modified Date" of a file is metadata that tracks what date a file was last modified. It is not data inside the file per se, and updates automatically every time the file is modified, usually by the computer's operating system. For a non-computer use, the title and author of a book (say, Cryptonomicon by Neal Stephenson) are basically metadata. They are not part of the story; rather, they identify the work and the person who authored it. Additional metadata, in that case, might be the publisher, the date of copyright, the printing number (for a paper or hardback book), stuff like that.
In Scrivener, a project has quite a lot of metadata, some which are not directly editable (for example, the last modified date and/or time is updated automatically when a file is modified), and some which can be edited. In Scrivener version 1, a writer could add tags for labels, keywords, and status to documents inside a Scrivener project. Among other things, a writer could use the status tags to identify which documents in a project were still to-do, or were 1st draft ready, and so on. Labels could be used to mark whether a document was a scene, a chapter, an idea, and more. Keywords could tag a document's characters, plot arc, point-of-view character or voice, and a bunch more. All three of these features were customizable, and a writer could add labels, keywords, or status entries as they wished.
In version 2 of Scrivener, Literature and Latte added custom metadata to the mix. Custom metadata—which is defined on a per-project basis—serves a similar function to the keyword, status, and label, but in a different way. Although it is possible to include a document's status or label in the compiled document (using the placeholders), only one label or status can be assigned to a document at a time (one of each). A document can have essentially any arbitrary number of keywords, but the keyword placeholder will insert all of the document's keywords. So, while all three of these tools are useful for the writer (and others working on the project, like editors and such), the custom metadata added a whole new dimension of utility.
Say you're writing an historical fiction novel which parallels Caesar's Commentaries on the Gallic War, written from the perspective of his subordinate Titus Labienus. You want each scene in your novel to start with the date(s) that the scene covers. You could create a bunch of keyword tags, and then apply to each document the tag that corresponds with the scene's date(s). Then you could use the placeholder tag for keywords, and then remember to strip out all of the other keywords from each document just before compiling it: huge headache. Worse, you then lose the data about what other keywords were on the scenes, and have to spend time recreating that if you edit. Not ideal. You could use a Status or Label, and that would work, but then you can't use the Status or Label for other information that really are better suited to that (such as: 1st draft, 2nd draft, to-do, in progress, completed, etc. for the status, and Scene/Chapter/Note/Character/etc. information for labels). Instead, with custom metadata, you create a custom metadata field (let's name it "Scene_Calendar_Dates") and then give that field a specific value. Each document can have its own value for that field, as a text string. When compiling, you can insert placeholders where you want the value for that field to be inserted, then compile the document and hand it to your editor.
This is not just useful for compiling documents, either. Custom metadata fields can be added to the outline view for a project, and the outline can be sorted on the values in those fields (or, just printed/compiled as an outline for review, or included as supplemental material for an editor). Keywords, labels, and statuses can also be added to the outline (which is very handy, too), but each metadata field is treated as a distinct element.
In Scrivener version 3, custom metadata is no longer restricted to being simple text strings. In a blog post (written as Scrivener 3 was being finalized for release), Literature and Latte explains that custom metadata can also hold date fields, checkboxes, or lists, in addition to text strings. A date field (such as that in our historical novel example above) could be populated with the dates that correspond to each scene in the Labienus story, and then placeholder tags put into the document (or in the compile window) for output into the compiled document. In Universo Responsoriis, for example, I have set up certain custom metadata fields as lists (which show up as pop-up menus like the label or status) for things like time of day, or ephemeris settings (since some of the novel involves astronomical information). This makes it easy for me to check which scenes are associated with certain star positions—like, say, would Mars actually be visible in the night sky in this scene?—so I can make sure I have the right information.
What I have found the most useful (so far!) about these new metadata types is that the list types can have their settings changed in multiple files simultaneously, just like the label or status. One way to do that is to shift-click several items in the cork board, then right-click on them. Under the context menu that appears (once you have list-type custom metadata fields created), there will be an "Other Metadata" entry, and each field defined as a list will appear there.
As you might imagine, the possibilities here are quite wide. For example, instead of using keywords for POV or narrative voice, you could create a custom metadata list. When defining the field, set it up as a list type, and then populate the list with each character who has a POV. When you write the scene, select that scene's POV character from the popup list. Easy-peasy! Another option might be to create a list of locations—culled perhaps from the Locations folder under Research?—and select each scene's location from a different metadata popup list.
So, to sum up: Scrivener 1 metadata fine; Scrivener 2 custom metadata finer; Scrivener 3 custom metadata even finer!
I will, at some point, post a step-by-step tutorial on some ways that metadata (of all kinds!) can be tremendously helpful for organizing projects, but I was struck today with just how useful I have found the new custom metadata, and I couldn't wait to share that!
If you've used the new Scrivener 3 metadata features, what have you found the most useful (and least, as well)? What ways are you using these tools, or if you're not using them, what are some things that you find difficult about them?
November 20, 2017
Scrivener 3 released, new tutorials coming
Today, Literature and Latte released their latest update for Scrivener, version 3.0 (for Macintosh; the Windows version will be released "soonish" and will be pretty much feature-identical with the Mac version).
The new version is a major redesign and features significant changes to compiling documents (among a host of other changes as well).
I haven't had a chance to get into the weeds with it yet, but I will be publishing a new blog series on the compilation in 3. First will be a single blog for upgrading users, pointing out the differences and how to make the new compilation system work for old curmudgeons like myself. After that, I'll put together a logical series for new users.
One thing that promises to be true of version 3: it will be significantly easier for new users to work with, particularly with respect to compiling projects for publication or submissions to editors & agents.
I'm looking forward to figuring it all out, and getting new tutorials posted!
July 10, 2017
Editing updates July 2017
Just a quick update on the status of the revision of Universo Responsoriis, the Sci-Fi novel with which I originally "won" NaNoWriMo 2015.
I am in the process of rewrites and have the first 42k or so words—the first 11 chapters, of about 18 planned—revised and waiting for me to finish the last few chapters.
Once I finally get these last seven-ish chapters done, I'll do the 3rd draft revisions, which I am hopeful will mostly involve timeline and overall continuity revisions, rather than major structural problems or rewrites. (HA!)
I am very excited about this story! I think it will resonate with fans of Sci-Fi in general, and in particular with fans of Asimov, Herbert, and Clarke. Not that I'm claiming to be in their rarified air, but rather that there are some familiar themes that fans of their writing might enjoy.
Stay tuned for further updates and breaking news. ;-)
May 31, 2017
Teaser blurb for The Shrine of Broken Worlds, the (still a ways off) upcoming Book 2 in the Adventures Across Noflantia series
A religion once permeated the ground, trees, air, even the water around the area known as The Shine of Broken Worlds. An ancient religion of selfish strength, of uprisings and enslaving the weak, practiced by the orc and the ogre, the hobgoblin and the wood gnoll, as well as their nastier kin. Led by a strict order of non-combatant priests who communed with the avatars of Penem, the God of Nightmares, and Sariel, the Goddess of Fire and Pity, they ruled all of the land and waters for fifty leagues around the Shrine in every direction. They attracted uncounted legions of evil creatures, from the waters of Llandy Bay to the Llandy Vale, Caerphy Woods, and as far East as Diford Castle.
Fifteen centuries have passed since the lords and ladies of Wyham—the City of Castles—pressed their military forces Eastward to sack the Shrine. Dozens of thousands of bodies from both sides, who long ago perished in that massive war, stank their fetid rot into the mists and marshes, slowly melting into the ground and waters for fifty leagues in every direction around that foul altar for years afterward.
Even yet, it is said that a diabolical evil lurks there, unabatingly biding for a new manifestation to rise and wreak vengeance on those who desecrated these unholy sites. An evil that may have found its vessel, and could be teaching it how to reanimate the armies lost so long ago …
May 21, 2017
Old poem "The Vices", found while cleaning up my office
I was in my office a couple of days ago, letting my mind chew on some ideas I'm working on as I edit Universo Responsoriis. While cleaning, I decided it was time to go through a pile of old CD-R and CD-RW discs that were cluttering up several shelves in the closet, and in so doing came across a few poems that I wrote in the late 90s. During this time, I was suffering from an as-yet undiagnosed dysthymic disorder (a form of depression), and some of that emanates through the themes of many of them, this one included. It was my first (and as yet, only) attempt at something resembling a beat poem.
This poem is not in my chapbook Hooray for Pain!, but it will be in an upcoming second book of poetry.
The Vices
Walls dripping with memory, the places we inhabit breathe
an air of sureness, remembering the things we fight to forget
and flee from for fortune knows no nose can safely smell
sense: seize the carpe diem day from the past of ashes and dust
and diamonds and rust reminders all the visible wall is only a memory
stained by the past.
Roofs radiating reality, the shingles that cover us heave
chortling at the profundity of promises we make to those who abet
us in our white oval altar worship—exhortations we know will impel
our hell of reflexively cramping muscle cell movements which must
cover our besotted pleas for some signal of acceptable expiatory
offering better than the last.
Linens crumpled and cursed, curled into the chasm we cleave
with our long-forgotten oaths to keep forever apart the sweat
and stains of heated exchange from the sight of those who foretell
doom—a devoutly wished consummation dripping from lips we trust
to tease the tortured twistings of youth and history we know a prioriwill not deliver rings of brass.
Rings of steel, fire and stone surround our thoughts as we leave
worlds of dropped calls and mirrored walls straining to hear yet
always near to the heart of our lives where sirens scream and partners yell
and mothers cry and fortunes fall to pieces in gathering gloom just
beyond the thinly veiled veil of stoppage where gathered friends sing glory
to our day, now in granite cast.
p.p1 {margin: 0.0px 0.0px 0.0px 0.0px; font: 14.0px 'Times New Roman'} p.p2 {margin: 0.0px 0.0px 0.0px 0.0px; font: 12.0px 'Times New Roman'; min-height: 15.0px} p.p3 {margin: 0.0px 0.0px 0.0px 0.0px; font: 12.0px 'Times New Roman'}