Christine Haynes's Blog, page 7
January 19, 2015
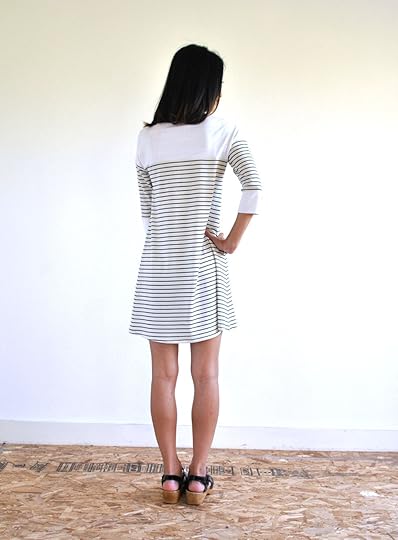
Marianne Dress Class Results!
 Left: Donna in View B with the collar of View A in a cotton & spandex knit
Right: Ji in View B with the collar of View A in ponte knitInstead of showing you one of my own Marianne Dress makes today, I'm so happy to show you the dresses of my sewing students!
 Left: Caitlin in View B in gray ponte knit
Right: Paula in View B without the cuff in cotton & spandex knit
This past weekend I taught eight amazing ladies how to sew my Marianne dress pattern. I cannot tell you how wonderful the experience was and just how fantastic all of my students did! We sewed for 6 hours on Saturday and 3 hours on Sunday at Sew L.A. and everyone finished their new dresses in one quick weekend!
 Left: Susanna in View B in merino wool knit and wool double knit
Right: Katie in View B in rayon jersey (the b&w stripes was from one of my kits!)
I've sewn a lot of Marianne Dresses for myself and I have seen it on a few people, but this was so amazing because all eight of the ladies had different body types and all used different fabrics. On top of that, they all used different elements and combinations of View A and View B, resulting in eight truly unique garments, all that I am happy to announce fit like a dream. Each student was thrilled with their dress and vowed to make many more.
 Left: Megan in View B with the collar of View A in rayon knit (from one of my kits!)
Right: Nisha in View B in merino wool solid and cotton knit print by Monaluna
I am honored that these lovely ladies spent the whole weekend to sew up my pattern with me. Thank you from the bottom of my heart to each and every one of you!!!


January 16, 2015
Marianne Dress in Black & White

Though my love for stripes and dots is widely known, I knew that the Marianne Dress in solid black would pretty much be the ultimate staple. So when I found a heavyweight ponte knit, I jumped at it for a classic and chic version.

I used the dress front and back of View A, then added the elbow sleeves and cuffs of View B. For a punch on the cuff, I used solid white buttons sewn with black thread. According to my man, this makes the dress.

As for the construction, there's not a lot new to be said, as I sewed this up per the instructions at my usual size 10. I know this dress is bound to get a lot of wear since it's simple and classic.
Happy weekend to you all!
January 15, 2015
Marianne Dress Sew-Along: Sewing the Collar

Today in the Marianne Dress Sew-Along we are going to sew the collar! Technically is collar is for View A, but of course, you can add it to View B too if you like! So, if you are choosing to add the collar, or if you'd just like to see how it's done, here we go!

Lay one collar piece down on your ironing board, wrong side up. Lay the collar interfacing piece on top of the collar, glue side down. Carefully line up all the edges. Note: The collar piece you are interfacing will be the top side of the collar.

Gently lay a press cloth on top of the entire collar piece. Tricot knit interfacing can melt with the heat, so the press cloth will protect the face of your iron.

Use your iron to melt the glue on the interfacing until it is adhered to the collar. Press firmly and use small circles instead of large motions to keep the interfacing in place on the fabric.

If you have any overhang from the interfacing, trim it off so the collar and interfacing are now one. Note: I like to use my paper scissors for any task involving interfacing so the glue doesn't damage my good shears.

Lay one collar piece down right side up. Lay the other collar piece on top of it, right side down. Line up the outer edges.

Pin the collar pieces together. Note: even though you will only be sewing the lower edge, pinning the entire collar can help to stabilize it and will help your sewing remain accurate.

At the center point of the collar, use a water soluble marking tool and seam gauge to mark the pivot point, as well as about an inch on either side of the point. I suggest using a marking tool like the one pictured above, with a very fine point for precise marking. This will help your center point be sewn correctly.

Sew the lower edge of the collar, starting at the side. This cannot be done with a serger or overlock machine due to the center pivot, so only use a conventional machine for this step. I prefer to use a regular straight stitch, as this part of the garment does not require any stretch.

When you reach the center, follow your guidelines that you drew as you approach the pivot. Because of the shape of the collar, you will not be able to follow the seam allowance markings on your machine.

Sink your needle directly into the point for the pivot at the center front of the collar and lift your presser foot. Note: if turning a full stitch will jet you beyond the pivot point, remember that you can turn down your stitch length for a shorter stitch so it will hit the spot perfectly.

Pivot the collar, realign with the markings, and lower your presser foot.

Continue sewing the rest of the collar until you reach the other side.

This is how your center point should now look!

Use small scissors and trim the seam allowance in half to about 1/4".

At the center point, make a small notch so the collar will lay flat at the center. Do not over trim! You can always trim more, but you cannot trim less, so start small and keep trimming if necessary.

Turn the collar right side out and press the lower edge. The seam should be smooth and right at the edge of the collar.

Pin the collar to the dress front. If you are adding the collar to View B, pin the collar to the front yoke piece. The interfaced side of the collar should be on top. Note: even though the lower edge of the collar is not getting sewn, I like to make sure it is flat on the dress by pinning it in place.

Using a conventional machine set to a baste stitch, sew the collar along the shoulders and along the neckline at a 1/4" seam allowance.

And voila! The collar is interfaced, sewn together, and securely attached to the front of your dress. Well done!
Join me tomorrow for another finished dress! Tuesday we will join the yoke pieces to the dress pieces for View B, so if you are using the dress pieces of View A, you are off the hook until Wednesday when we will tackle the shoulder seams.
Need to catch up? No worries! Just click here to see all the posts tagged with the Marianne Dress Sew-Along. And as always, let me know in the comments if you have any questions!
January 14, 2015
Marianne Dress Sew-Along: Cutting Your Fabric

Today in the Marianne Dress Sew-Along we are going to cut our fabric. Yay! Things are getting real today! If you've never cut knit fabric before, it can be intimidating because it's stretchy and can be hard to line up on grain. Below are some tips and I will walk you through all the steps for both views. Here we go!
First off, if you haven't already done so, you absolutely positively without any question MUST pre-wash your fabric. Was that blunt enough? Seriously, stop now and go wash your fabric if you haven't. Okay, moving on!
Next you will need to decide which elements of the pattern you want to make. All of the pieces are mix and match, so make sure you have enough fabric for each thing you're cutting. You will also need your interfacing if you are working with the collar. First I'll talk about tips for both views, then below there are additional notes on each specific view.
Cutting for Both Views

Just like with any other fabric, you want to lay your fabric out on your cutting table. It's important with knit that it doesn't hang off your cutting table. A woven fabric will simply slide off the table if it's hanging off too much, but a knit will stretch and pull, making the threads stretch. If you cut the pieces with the fabric stretched, the end result will be too small. You can see on my table in the photo above that the excess fabric is gathered up next to the edge of the table. Smooth out your fabric until it lays nice and flat.

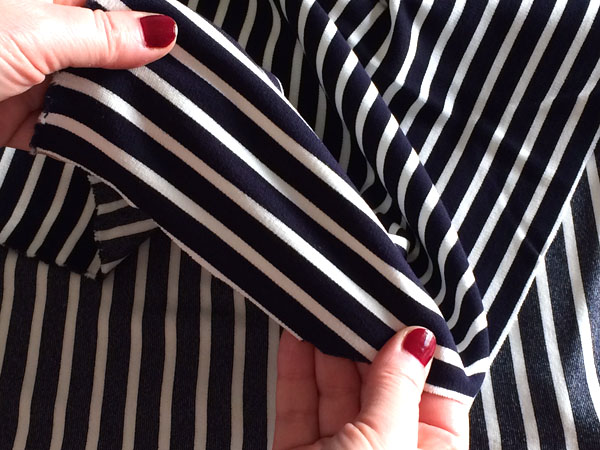
If you are working with a stripe, I would suggest either cutting in a single layer, or folding and pinning the stripes together prior to cutting the fabric. Above you can see I'm lining up the stripes, then pinning at each stripe to keep it in place.

When working with stripes, how do you get them to line up on the side seams? Easy! All you need to do is line up the bottom of the armscye at the top or bottom of a stripe. Above, the bottom of the armscye is at the bottom of the white stripe (this is the lower half of the dress for View B but the same spot exists on the dress front and back for View A).
When you cut out the other side of the dress (front or back depending on which you cut first), simply line up the bottom of the armscye at the same spot, and voila! They will line up perfectly.
Additionally, for View B, I like to make sure the top edge where the lower half of the dress joins the yoke is lined up exactly on one line.

Many people prefer to cut knits with pattern weights and a rotary cutter, and I am no exception. I prefer to lift and touch my knit fabric as little as possible once I have it all smooth on the cutting table, and I find that cutting with a rotary cutter can be more accurate when cutting knits. This is entirely up to you and what you're comfortable with, so know that pins (ball-point for knits) and scissors are totally fine too!

This pattern, and most knit patterns, has a 3/8" seam allowance, which is smaller than many are used to if you've only sewn with woven fabrics, which usually has a 5/8" seam allowance. Because of that, be extra careful when cutting your notches, as there is a smaller area for the notches. Just be sure to cut small. Remember that they are simply there for your reference, so as long as you can see them, they are big enough.

In addition to the notches, I also like to make a tiny snip at the center front mark on the neck binding so I can find that later. I don't snip the center of the actual neckline, rather I will mark that later with a pin. This is just personal preference, but in case you'd like to follow the way I actually do it, this is it!

Cutting View A

For view A, you will need one of the dress back pieces, one of the dress front pieces, two collar pieces, one neck binding piece, and one collar interfacing piece. All but the binding are cut on the fold. Reference the cutting layout in the instructions to see how you should lay your pieces out based on the width of your fabric and your chosen size.

If you would like to add the sleeves from View B to your View A dress, remember that you will need the notches on the sleeve hem to line up the sleeves later when you go to sew them on. Simply transfer the notch markings from the yoke front and back pieces of View B to the dress front and back pieces of View A.

Cutting View B

For View B, you will need the yoke front and back, neck binding, and cuffs cut in one fabric. Then the dress front and back are cut from a contrasting fabric. Of course, you can mix and match however you like, but if you are following the pattern as written, this is the plan.

That's it for today! Once you have all your pieces cut and notched, all can be set aside until we get to sewing! Tomorrow we will make up the collar for View A, so if you're not doing that part, you get the day off!
January 13, 2015
Marianne Dress Sew-Along: Choosing a Size
Today we are going to decide what size Marianne Dress we want to make. Selecting a size is a very critical step in the sewing process. When I teach, often my students want to rush through the first part of the class where we choose a size and cut out the pattern and fabric, but these steps are the building blocks towards a successful project. You cannot just rush to the sewing, because if you do, after all that work you might have something that is ill fitting. No one wants that!
When working with wovens it is always a conversation of how much ease will be included based on the style of the item and how it should fit. For example, a baby doll dress like my Chelsea Dress has a lot more ease than a fitted bodice, like on my Emery Dress. All these conversations are about positive ease, meaning that there is distance between your body and the garment.
In knitwear, most often there is negative ease, which means that the finished measurements of the completed item is actually smaller than the body it's going on. That is how a t-shirt stretches and fits snugly around your body. But just like with a woven garment, this is 100% personal choice. I rarely like my knits to have negative ease, unless it's a swimsuit, leggings, bra, or some other similar shapewear or workout item. For t-shirts, sweatshirts, dresses, and knits that will be worn out of the privacy of my apartment or the gym, I prefer positive ease. This might stem from having been born with curves, or a sense of modesty, but sausage casing dresses are just not my thing.
When I designed the Marianne Dress, it was important to me that it be as flattering as a knit sack-like dress could be. This dress should fit around the shoulders, on the arms, and at the bust, and then from there it should flow and glide down the body. If you choose to make your version tighter, that is totally your choice and the joy of sewing for yourself is being able to make those custom choices. If you want to wear the dress based on how I intended it to be worn, here's how to pick your size.
First, we want to measure the bust. Use a tape measure and measure around the fullest part of the bust. Remember that we are taking your actual bust measurement, so be sure to keep the tape measure level around the back and snug on the body. No boob squishing, but firm around the body is what we're after.

Next take your waist measurement. Stand up straight and lean to the left or right side. Where your body creases is where your natural waist is. Again, keep your tape measure snug and mark down your measurement. The hip is about 8" below the waist, or at the fullest part of the body, likely around the butt.
Compare your numbers to the body measurement sizes on the back of the Marianne Dress pattern. Do you fall perfectly into one size? Congratulations! That is rare. Most of you will not. So, what do you do if you don't land all into one size column? Here are some examples and how to handle them. The good news is that with this type of knit dress, there is a lot of wiggle room and fitting is much easier than with bust darts and princess seams and such on a woven garment. Yay!
Bust fits into one size - waist and hips fits into smaller sizeFor this, you have two options: First, you can make the dress to your bust measurement and accept that the skirt portion will be slightly fuller than it was designed to be, as your hips and waist are smaller than the size your bust fits into. Or, you can blend from a larger size to a smaller size after the bottom of the armscye. To do this, I would suggest only blending three or less sizes, as anything else will dramatically change the shape of the dress. Simply use a ruler and draw a line from the curve under the armscye to the hip, making sure to use a gentle slope and no drastic angles. This will keep the flow of the side seams in place.

Bust fits into one size - waist and hips fits into larger sizeThis is also very common, and personally this is what I have to do for every pattern I make. My shoulders are small and I'm an average B cup, but I have junk in the trunk, so nothing fits my hips at the same size as my upper body. No worries, simply follow the exact steps I wrote for the above alteration, but instead of blending from a larger size to a smaller one, you'll be going from a smaller size to a larger one. Easy peasy!
The dress length is too long or too shortWitten on the pattern for both View A and B is a "lengthen and shorten" line. That is precisely where you want to cut the pattern. Then all you need to do is add or subtract the amount you want to lengthen or shorten the dress by, and re-draw the side seam lines. Super easy!
These are the main issues you will be faced with, but if you have specific questions, please let me know in the comments below and I will do my best to help your fitting issues from afar!
Once you've made any alterations, then simply cut out the paper pattern pieces for the view you want to sew up. Tomorrow we start cutting the fabric! Yay! So join me here to actually get to the meat of the project!
January 12, 2015
Marianne Dress in Ponte Knit

Happy Monday everyone! I have another finished Marianne Dress for you! For this Marianne Dress, I used ponte, which is one of my favorite knits to sew and wear. It's got great drape, but it's thick and sturdy and holds its shape more than other flowy knits.

I used a gray ponte for the top yoke, sleeves, and cuff, and a navy and white stripe ponte for the lower part of the dress on the front and back.

The gray knit (which is more of a heathered charcoal gray in real life than in these photos) I picked up at the FIDM store in downtown Los Angeles, and the stripe I got at the LA branch of Mood. This version I made all in size 10 and made it exactly following the pattern's instructions.

For the cuffs, I used white and light blue vintage buttons I picked up on a trip to Paris. I only added two per cuff since they are 5/8" each and adding three seemed bulky. This dress is super cozy thanks to the ponte and is really classic thanks to the stripes. Win win!
Tomorrow we'll get back to the Marianne Dress Sew-along and talk about choosing your size, then we're ready to cut and sew! See you back here tomorrow!
January 9, 2015
Marianne Dress in French Terry

I've made a ton of Marianne Dresses, but this one gets the most wear hands down. I blame the fabric, as it's super cozy and impossible to resist.

For this version, I used the front and back from View A, with the elbow sleeves of View B, leaving off the yoke, collar, and cuff. I love this combo because it's just simple and versatile. The fabric was picked up months ago at Mood in Los Angeles. I spotted it and didn't know what I wanted to do with it at the time, but I knew I had to have it. It's like the greatest sweatshirt dress.

I sewed this up straight per the original instructions. The only changes I made is to slightly lengthen the neck binding as it's not as stretchy as thinner knits, and I blended from my usual size 10 to a 14 in the hips to make it a little wider to accommodate for the thickness of the fabric. The dress is not as drapey because of the thickness, which gives it a more a-line shape through the dress.

Hands down, this is my favorite Marianne so far! Stay tuned for more versions this month during the Marianne Dress sew-along!
And how are you all doing so far? Have you gathered your supplies? Monday I'll have another finished make for you, then Tuesday we'll get back to the sew-along and talk about choosing the correct size.
Happy weekend!
January 8, 2015
Marianne Dress Sew-Along: Tips & Tricks for Sewing with Knits
Sewing with knit fabrics can be scary if you've never done it before, but that's exactly why the Marianne Dress is an ideal first project–there are only a few seams to work with and there is a lot of room for error.
Knowing that not everyone that bought the Marianne Dress pattern would own a serger (or overlock machine), I wrote the instructions for both a conventional machine as well as a serger. That way, no matter how you choose to sew it up, you can read along and feel confident that you are doing the right thing.
I've been sewing with knits for decades and have many pointers to share. Below are some tips and tricks to working with knits that will help you move onto your project with confidence! And, of course, in addition to these general tips below, I will be walking you through each step of the dress making process with loads of advice for each step!
Pre-Washing
Knits shrink a lot more than wovens, so it's hugely important to pre-shrink your fabric before cutting it out. Sometimes you can skip this with quilt weight cottons, but trust me, knits are not a fabric you want to cut into without having washed first. As I wrote on the back of the Marianne Dress pattern, I suggest purchasing at least a 1/4 yard additional fabric for shrinkage, as it will likely shrink about 25%.

Pattern and Stripes
In addition to the shrinkage that will occur with pre-washing, if you have a print or stripes that you want to line up at the side seams, be sure to purchase a bit of extra yardage so you can shift the pattern pieces to hit right at the right spot for the stripes or motif to line up. Remember, the bigger the repeat, the more extra you will need!
Printed vs Woven Stripes
Also a huge thing to check when buying knits, is if the stripes are woven with different colored threads, or if the stripes are printed onto the face of the fabric with ink. This is really important with knits, as they can get off grain quickly, especially when pre-washing. If the stripes are printed onto the face of the fabric and the fabric gets off grain, the stripes will never be lined up on the sides, nor parallel across the body. Honestly, I never buy printed stripes, because I have never found them to be on grain. So if you have your heart set on stripes, be sure to check that they are woven and not printed.
Stretch
The reason knits are scary to work with is because they stretch. When I have new sewers in class ask me if sewing with knits is difficult, I always say to them, "imagine if the fabric you were just working with stretched in all directions, and yet, you weren't allowed to let it stretch as you were sewing it." That usually puts it into perspective for them really quick.
The key is working with the stretch and not against it. Don't fight it, don't stretch it, just let it go through the machine like any other fabric. I know this is easier said than done, but with some practice you will learn to love knits, I promise! Also, while knits sound scary, I find them to be incredibly forgiving. So hang in there and if everything isn't perfect, it will likely work out better than when things don't line up just right on a woven garment.
Start Slow
Yesterday I mentioned all kinds of knits that you can use to sew up your Marianne Dress, and some will prove to be more difficult than others. Therefore, I suggest starting with something more stable when you're new to sewing with knits. I find the most forgiving choices to be cotton and spandex blends, and ponte knits. Both of these have a bit more weight to them and have just enough synthetics in them to bounce back nicely.
Knits with a lot more drape, like rayon, bamboo, and modal will be much harder as they are a lot more slinky and will be very challenging to cut. Sweater knits are challenging for even the most experienced seamstress, so that is to be avoided unless you are quite experienced. And while 100% cotton can be easy, I find that because it all cotton, sometimes it can be a little stiff and the lack of return on the stretch can look bad if not done right. So if you're brand new, search out some ponte or cotton and spandex blends to try first!
Practice
When you're buying fabric, it's a great idea to get a bit extra to do some practicing on. Likely there will be scraps around the cut pieces, so there's no need to buy a lot extra, but just be sure to save some along the way somewhere to run through the machines you're using to test the stitches. I always run my fabric (in the amount of layers to be sewn) through the serger going with the crossgrain, with the length of grain, and then in a curve. That way I can see how it's going to stitch and stretch as I work it through the machine. I also test any hemming on my regular machine (zigzag stitch, straight stretch stitch, dual needle, etc) so there are no surprises at the end.

Research
Want even more help? If you're really serious about learning to sew with knits, I highly recommend the book, The Colette Guide to Sewing Knits. I own it, and though I've sewn with knits for a long long time, I still found it informative and helpful. And if you don't want to wait to get it in printed form, Sarai sells it as a digital book too, so you can have it on your tablet or laptop for quick reference and instant download! Do it, you won't be sorry!
January 7, 2015
Marianne Dress Sew-Along: Supplies

If this is your first time sewing with knits, the gathering of materials can be scary. But don't fret, I have some helpful tips to finding the right fabric, notions, and tools for you.
FabricThe main consideration is the fabric of course. What to look for largely depends on how you want to wear the dress. What I mean by that is that if I choose an open-weave sweater knit, that will be a much different wearing experience than choosing a polyester stretch jersey, or a heavy rayon knit. Below are some thoughts on the different options and how they will effect the end result. Remember, I also did a post on fabrics just after the pattern was released, so in addition to below, you might want to check out this post too!

Cotton Spandex
A great choice for this dress is a cotton and spandex blended knit. The Robert Kaufman Laguna jersey and the knits from Art Gallery Fabrics are both 95% cotton and 5% spandex, making them a perfect fabric for comfortable knitwear. The 5% spandex is an important element, as that gives the fabric a great recovery, so when you stretch it, it bounces back nicely instead of staying stretched out.

100% Cotton
If you are looking for something soft, 100% cotton is a good choice, but do know that it will stretch out as you wear it since it doesn't have the synthetic element to help it retain its shape.

Rayon Jersey
The fabric kits I offered on my site were rayon jersey. This is one of my favorite knits to work with since it has a tremendously fluid drape, with nice weight and presence. It feels luxurious and has a nice recovery. Note that because of the natural weight of the fabric, this can stretch with time so I like to store my dresses made with rayon jersey flat instead of hanging them in the closet as they will stretch due to gravity.

French Terry
I have made up a bunch of Marianne Dresses since releasing the pattern and the one I've worn the most is made of French terry. I absolutely love the way it wears, but there are a few things to consider when making this choice. First, it is thicker, so the dress will retain the a-line shape more than a fluid fabric like the rayon jersey. Also, it will stretch less, so you might want to consider making a size larger, and a slightly longer neck binding since it will not stretch as much as other fabrics.

Merino Wool Knit
All the samples that the models are wearing in the images on my site are made of merino wool knit. It was an absolute dream to work with and is a wonderful choice. If you are looking for your dress to be a bit warmer, this is the fabric for you!

Modal / Bamboo / Hemp
There are loads of thin and drapey knits on the market that would also be lovely choices. Just remember that the stretch will be a huge factor in how it will wear on your body. These fabrics will drape lovely but will also be more sheer, so as you debate which is best for you, hold it up and check it against the light and also pull on it for bounce.

Sweater Knits
Sweater knits vary so dramatically, I considered not even mentioning them here. But since you might be wondering if it would work or not, I thought I should address it. The short answer is yes, you can use a sweater knit for the Marianne Dress. However, I would absolutely steer clear of thick "sweater" fabrics with bulky cables and such, and head to those that look more like regular knits, but with a slight "sweater" feel to them. You will not get the binding at the neck and the hemming to do what you want if you pick a thick sweater knit.
Ponte Knit
I love ponte and it is an ideal choice for the Marianne Dress. Fluid with nice drape, yet still heavy and weighty, and always bounces back with great retention. It's an excellent choice for this dress and I just happen to have some ready to sew!
NotionsBoth views require some stability in the shoulder seams, and therefore require some form of notion to keep the seam from stretching. For View A, you also need interfacing for the collar, and for View B, buttons are required for the cuffs. Let's break each of these down and get to know what they are and why you need them.

Clear Elastic
I personally prefer to stabilize my shoulder seams with clear elastic. I like that it sews in quick and is sewn directly into the seam itself. Because the seam allowance is 3/8" the ideal width of clear elastic to buy is 3/8" but something thinner would also work fine too.
Twill Tape
An alternative to clear elastic is twill tape. This can be a great option if clear elastic is too hard for you to find (note: I do sell Notion Kits for the Marianne Dress in my shop). Twill tape is also a nice choice if you dislike the feel of clear elastic when it touches your skin. Since I'm using a serger for my seams, the clear elastic is entirely encased in the threads, but if you're using a conventional machine, your stabilizer will be more exposed, and twill tape might feel nicer when rubbing your skin. This is 100% a personal choice.
Interfacing
If you are choosing to add the collar from View A to your Marianne Dress, the collar will need to be thickened with interfacing. Because we are working with knit fabric, the best choice is a lightweight tricot knit fusible interfacing. This will match the fabric and will give you the best results. Again, if you can't find this near you, consider picking up the Marianne Dress Notions Kit in my shop. These are limited so if you want one, don't wait!
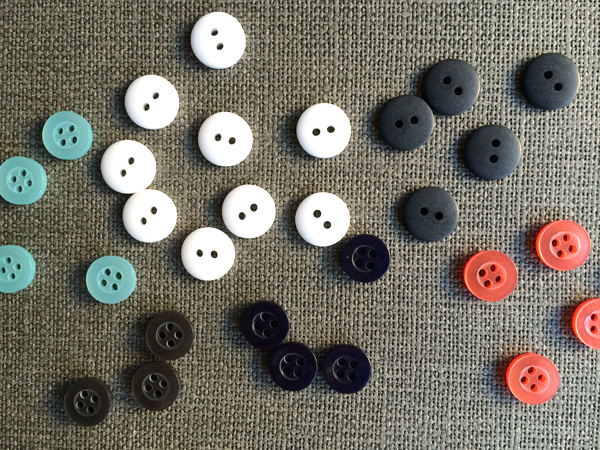
Buttons
For the cuffs of View B, which of course can be added to View A too if you choose to add the sleeves and cuffs to that version, you will need some buttons to close up the cuff. How many you add and the size of the buttons is totally subjective, so use whatever suits you! In the pattern, I suggest using three 3/8–5/8" buttons per cuff, but I have made a few versions with only two buttons, so this is entirely up to you. Because there are no buttonholes to worry about, you can pick whatever you like and change them up later if you find something you like even more.
ToolsThere are a few key items that you will want to have on hand when we start sewing next week, so if you're off to the fabric store to pick up fabric, check to make sure you have these items on hand too.

Ball-Point Needles
The threads of knit fabrics can be broken if sewn with a regular sewing needle, as the point is too sharp and can tear the threads when going in and out of the fabric. A ball-point needle has a slightly rounded point which helps the needle go through the fabric without breaking the threads. Why does this matter? Think of it this way: have you ever gotten a hole in a sweater? If so, what happened when you got that hole? It didn't just stay there as a hole right? Instead it starts a domino effect of unraveling threads, "unknitting" the threads of the knitted sweater. The same is true for knit fabric. So be sure to have ball-point needles in the size appropriate for your fabric weight.
Also, it's important to note that there is a difference between jersey ball-point needles (above, pictured left) and stretch needles (above, pictured right). Jersey ball-point needles are for jersey and knit fabrics, where stretch needles are for more synthetic stretch fabrics, like swimwear and performance fabrics for running leggings and dance wear.
Thread
While you're at the store, remember to pick up thread to match your fabric. If you are using a serger (or overlock machine) you will need cone threads in addition to the regular thread to sew the finishing.

Rotary Cutter and Mat
Many people choose to cut knits with a rotary cutter on a cutting mat instead of using scissors. It can be much easier since the knit moves less when cut on a flat surface. Remember that if you're going this route, you might want to consider using pattern weights instead of pins, so if you don't own pattern weights you might want to pick those up too.
Ball-Point Pins
Just like with your needles, when you need to pin the layers of your fabric together, ball-point pins will insert into the fabric much easier than regular pins. Because you are pushing them in by hand, there's less chance of tearing the fabric, but ball-point pins do glide into the knit fabric much easier, so that's incentive too.
- - - - - - - - - - - - - - - - - - - - - - - - - - - - - - - - - - - - - - -
Join me tomorrow where we will talk about the differences of sewing with knits versus sewing with wovens. I hope all you that are new to knits will join in on the fun! See you here tomorrow!
January 6, 2015
Welcome to the Marianne Dress Sew-along!

Happy New Year everyone! I hope you all had a wonderful holiday season and are ready for your first project of 2015! Today we will get acquainted with the Marianne Dress and the sew-along schedule. So without further ado, let's get started!
The ScheduleIf you missed this post about the sew-along schedule, here's the breakdown of the days to come. I am posting Tuesday–Thursday each week, giving everyone the weekend to get caught up. This dress goes together really quickly, but I also know that the Marianne Dress is likely just one of a few projects you're sewing at once, and of course, many of you have pesky interferences like jobs and kids and such, so hopefully this schedule is paced well for your busy calendar! Of course, if this feels too slow, you could make a few versions at the same time!
Tuesday, January 6 - Welcome to the Marianne Sew-along
Wednesday, January 7 - Supplies
Thursday, January 8 - Sewing with Knits Tips & Tricks
Tuesday, January 13 - Fitting & Choosing a Size
Wednesday, January 14 - View A & B Cutting
Thursday, January 15 - View A Collar
Tuesday, January 20 - View B Yoke Seam
Wednesday, January 21 - View A & B Shoulder Seams
Thursday, January 22 - View B Sleeves
Tuesday, January 27 - View A & B Side Seams
Wednesday, January 28 - View A & B Neck Binding
Thursday, January 29 - View A & B Hemming
Tuesday, February 3 - View B Cuff & Buttons
Tuesday, February 10 - Parade of Finished Marianne Dresses!
On the open Friday and Mondays I will post finished versions of the Marianne Dress that I have made to inspire you to see all the many variations and possibilities this pattern offers!
The Marianne DressI love this dress. It's the toss on and go dress that I always want to grab, as it's flattering, comfortable, modern, and really versatile. It's my go-to garment for car or plane travels, and you will arrive looking and feeling great. The dress is made of knit, so in this sew-along, we will discuss how to cut and sew with knits, how to fit knits, and why knits are different than wovens.
If you've never sewn with knits before, this is the perfect first project to launch you into the world of stretch fabrics. Once you try it, you will love it and this will open the door to t-shirts, undies, swimwear, leggings, and so much more. No more buying those basics at the mall anymore!
The Marianne Dress has two views, but like all my patterns, the elements can mix and match for unlimited options. View A, pictured below, is a simple front and back with a Peter Pan collar on the front. You can just leave it as is, or you could add the sleeves, the sleeves and cuff, or the sleeves and cuff and contrast yoke of View B to the collar of View A.

View B, pictured below, has a seam at the bust and matching across the back, but again, all of these elements are there for you to pick and choose from. I have made versions with the dress front and back of View A, with the elbow sleeves of View B and no cuff. I have also made versions with the back of the dress of View A, the front of the dress of View B, plus the collar, sleeves, and cuff. The possibilities are endless and entirely up to you! Seriously, don't you just love that?
I have a Marianne Dress Inspiration Pinterest board with tons of options, and when the pattern launched I also wrote a blog post about styling your version. So if you haven't browsed either of those, give them a look and start deciding which elements you'd like to include in your dress. And for some real-life inspiration, some bloggers have already whipped up some Marianne Dresses! Check out this post or search the hashtag #MarianneDress on Instagram!
Grab a BadgeI have prepared a variety of badge sizes, all available here. So go grab one and tell your followers that you're joining in on the sew-along!
- - - - - - - - - - - - - - - - - - - - - - - - - - - - - - - - - - - - - - -
That's it for today! Join me tomorrow where we will talk supplies! And remember, there's still time to grab a pattern! You can download it as an instant PDF print-at-home pattern, or get it mailed to you. Or check out your local retailer! They might have it too. We don't get to cutting and sewing until next week, so you have plenty of time to get your pattern!
See you tomorrow!