Christine Haynes's Blog, page 6
January 29, 2015
Shift Dress in Atelier Brunette Rayon

One of my must-stop shops when I'm in Paris is the lovely Anna Ka Bazaar. You might have seen me write about it in this post from my trip in 2014. During one of my visits last year, as I was loading my luggage up with goodies to bring home, I met the one of the owners and exchanged information. After arriving home, they launched a new rayon collection for their line of fabric, Atelier Brunette, and offered some to me to sew with.

I picked the "Halo" print in brown and it's very lovely in real life. The weight and drape is really great and is perfect for something that requires a flowy fabric. I picked the shift dress from my book, Skirts & Dresses for First Time Sewers , that incidentally, is released this month! You've seen this dress before if you follow me on this blog or on Instagram. It's a very simple front and back with gathered cuffs. It's an easy dress to toss on and look and feel pulled together.

I had just enough of the fabric to make the dress and it's a perfect fit for this silhouette. My only slight word of caution of the fabric is that the black ink of the background did rub off a bit on my arms after washing and drying the fabric in advance. I washed it a second time and never had the problem again, so note that you might want to give it a good washing. But the weight and drape was delightful, even after washing and drying it in a machine, making it super easy to care for later.

Even if you're not in Europe you can buy directly from their website. And if you're going to pick up some of the rayon, you might as well get some of their other cute prints too! There are tons of adorable goodies there! I know I'll be back this spring to load up on lots more!
*I was given the fabric for free by Atelier Brunette with no strings attached, and chose to sew and blog about it on my own. All opinions are mine.*


Marianne Dress Sew-Along: Hemming

In today's Marianne Dress Sew-Along post we are going to hem! If you're making View A, today you will hem both the sleeves and the hem of the dress, so you will be all done! Yay! If you're making View B (or View A with the cuffs added) we only have the cuffs left to do next week.
I know some people don't hem knits, but personally I prefer it for a more finished look. But if you'd like to leave your dress unhemmed, that's fine by me! It's your dress after all. But if you're into the hemming, here we go!

The dress and sleeve hemming is done exactly the same way and both have a 1/2" hem allowance. Use your seam gauge to fold the hem into the dress, wrong sides together, the full 1/2" allowance. Because this is a knit, the raw edge doesn't need to be finished and once it's sewn it won't fray. Pin the fold in place. Note: if you're using ball-point pins, make sure they're glass-head pins so when you press on them in the next step they don't melt!
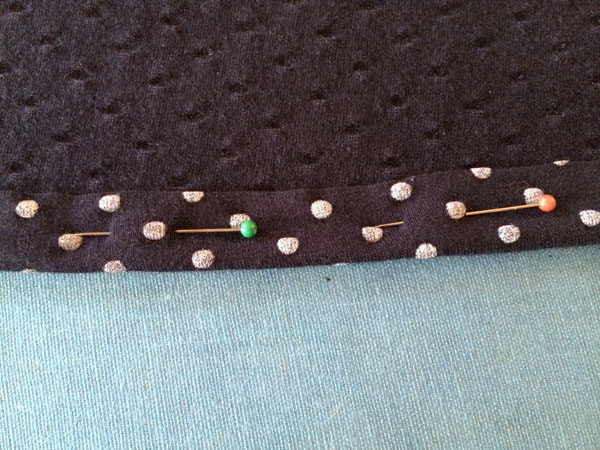
Pin all the way around the two sleeve hems for View A, and the dress hem for both views. Press the fold in place prior to sewing.

The hem of your sleeves and dress can be sewn in any way you like. Above are three different length and width combinations for a zigzag stitch, a 3-step zigzag stitch, and a honeycomb stitch. Your machine might offer these, plus a whole mess of other stitches. This step can be whatever you personally prefer. I do suggest that you use a stitch that stretches, so if you prefer something resembling a straight line, choose a straight stretch stitch so it moves along with your body movement.
If you have a fancy coverstitch machine, that is also a fantastic choice. When I had a ready to wear line, I sewed all my knits with an industrial coverstitch machine that was pretty much the greatest thing ever. Now that I don't have room or need for such a big machine, I no longer have a coverstitch machine, but I am considering purchasing one this year because they do an amazing and professional hem. To see beautiful examples of this, check out Andrea's post on her coverstitch machine.
Hems can also be sewn using a twin needle and two spools of thread on your machine. To be honest, I have never gotten my machine to sew this way very successfully, so you might be in the same boat as me. But, if you're never given it a try, see how it goes! It's a low-level of investment–just a needle and a second spool of thread–and it might turn out awesome. Colette has a good post on using twin needles on a hem, which is an excerpt from their great book that I mentioned in the early posts. If you're new to knits, I highly suggest purchasing this book!
Once you've chosen your hemming style of choice, sew the hem of the dress (and sleeves if applicable) and give the hem a nice press of the iron afterwards.
If you're making View A, CONGRATS! You're DONE! For the cuffs, we'll get to those next week so stay tuned!
January 28, 2015
Marianne Dress Sew-Along: The Neck Binding

Today in the Sew-Along we are going to attach the neck binding to our Marianne Dresses. This step can be tricky, so if you have never done this technique before, it's worthy to give it a practice run before sewing it up on your finished dress.
Also, it should be noted, in the instructions that come with the pattern, I list sewing the neck binding prior to sewing the side seams. Either order is correct, it's more a matter of ease. Some find it easier to work with the neck area with the side seams still open, but know that either order is fine. One doesn't effect the other, so it's up to you which you do first.
Okay, let's get to sewing!

Fold your neck binding in half with the short ends together, right sides facing. Pin the short end. Above I have the white binding for my version of View B, and the navy binding for View A.

Sew the short ends together with the usual 3/8" seam allowance. For a serger just sew it as is. For a conventional machine, sew with your stretch stitch and trim the seam allowance in half.

Press the seam allowance to one side for a serger seam, press open for a conventional machine. A sleeve board will prove very helpful for this and the next step.

Fold the neck binding in half, wrong sides together. Line up the raw edges and press along the center fold.

Use the same steps for either View A or B as pictured above.

All of the following steps are for either View A or View B, though View B is shown. For View A, the collar will be sandwiched between the binding and the neckline, but all the steps remain the same.
Fold the neckline in half and line up the shoulder seams. Line up the neckline at the front and without stretching the neckline, find the center point of the front and mark with a pin.

Repeat along the back of the neckline so you have both the center front and center back marked.

Line up the seam of the neck binding at the center back and pin in place. The raw edges of the binding should be flush with the raw edges of the neckline. Line up the center front of the neckline with the center point of the neck binding. To find this point, either fold the neck binding in half and mark with a pin or water soluble marking tool, or transfer the mark from the neck binding pattern piece. Pin the center front the same as you did at the center back with the raw edges together. The fold on the neck binding is facing down toward the dress.

Repeat the above process by finding the halfway point of the neck binding between the center front and center back and matching it up with the halfway point of the neckline. Note: this will not be at the shoulder seam, so do not use that as your guide! Repeat on the opposite side so you have four evenly pinned spots around the neckline as pictured above.

Carefully stretch the neck binding to fit the neckline and pin in place. This is a very fussy step and some knits stretch more than others, so this step might prove to be tricky. If you find that you have to stretch the neck binding a lot, you might want to consider cutting a slightly longer binding piece to accommodate for the lack of stretch. The binding should only require a little bit of stretch to fit.

I like to start at the center back and stretch the binding (but not the neckline) a little bit and pin, then continue around until I hit the center front. Once I get there, I check to see how evenly distributed the stretch is, then work my way back from the center front toward the center back, spreading the binding out and spacing the pins accordingly. Then I work the other half of the neckline until it's all pinned, as pictured above.

If you are working on a serger and have never sewn anything in the round before, do yourself a favor a try a few practice runs first. Sewing in the round is quite different than sewing with a beginning and end of the stitch line, since you are cutting off your seam allowance while sewing, so you have to veer into the seam, then out and off the seam, all at the 3/8" seam allowance. Since it's trimming off the excess, there's no room for error here. Once you're ready, start just after the center back seam so you're not sewing over the seam in the binding. Start on a slight angle and sew until you hit your seam allowance.

Once you're at the 3/8" seam allowance, keep sewing around the neckline, stretching the binding to fit the neckline between each pin. This can be tricky so take your time!

When you reach your starting point, keep sewing until your stitch line meets up evenly with the starting stitches and quickly, but smoothly, turn off the fabric for an even exit.
For a conventional machine, use the stretch stitch you've been using and simply sew around the neckline at 3/8" seam allowance. Trim the seam down in half after sewing.

Press the seam allowance away from the neckline, towards the dress, and breath a sigh of relief! This dress isn't complicated, but this can be a tricky step, so take your time and do some test runs first so when you sew your dress you feel confident and sure of success!
Tomorrow we hem! So if you're making View A, that's the final step! For View B ladies, we'll finish with the cuff and buttons next week! Yay!
Marianne Dress Sew-Along: The Side Seams

In today's post for the Marianne Dress Sew-Along (which is a day late–sorry!) we are sewing up the side seams! This is a step for any and all versions of the dress, so unless you want your side seams unsewn, we're all participating today! Let's get started!
The first step is to fold your dress, front facing back, with right sides together, as pictured above. Pin along the side seams. If you have a striped fabric as above, I suggest pinning at each stripe, or every other stripe. You spent the time to cut these to line up, so now we want to sew them lined up too!

When sewing side seams, I always suggest sewing towards the hem, because if anything were to get of kilter, you can always slightly adjust a hem. Of course, if you are pinned correctly, especially if using stripes, you will have locked the fabric in place already, but still, it's a good rule of thumb to sew towards the hem.
If you are making View B, sew from the end of the sleeve hem, under the arm, then all the way to the hem. Be careful at the underarm seam on a serger and take the curve pictured above nice and slow.

As you can see above, pinning stripes pays off in the end! So rewarding!

For View A, place the dress front and dress back, right sides together and pin along the side seams and sew from the sleeve opening to the hem.

If working with a conventional machine, sew with the same stitch you chose when sewing the shoulder seams together. Above is a simple zigzag stitch I used on my machine. You can opt to use an overlock stitch or a stretch stitch too.

After sewing the side seams on a conventional machine, trim the seam allowance in half. For both views, press the side seams after sewing. Easy!
Next up we'll do the neck binding! Look for that later today!
January 26, 2015
Maxi Marianne Dress

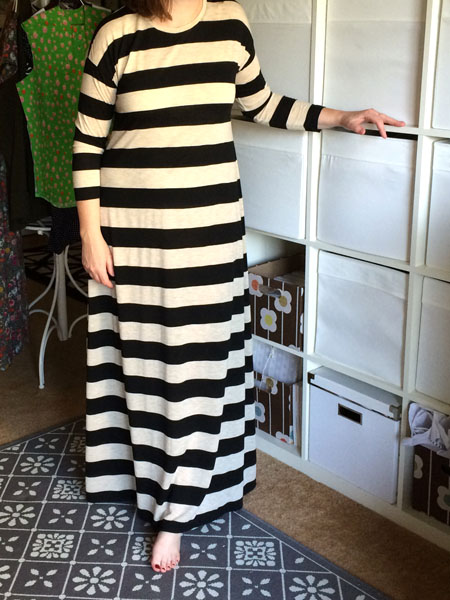
I work at home most days, and nearly every day I'm completely alone. But, that is not an excuse to work in my pajamas all day. So what's fancier than pajamas but equally as comfortable? A maxi dress made from knit! That's exactly what!

This is yet another version of my Marianne Dress, featured this month of the Sew-Along, and this one is to illustrate how cozy and comfy it can be when lengthened into a maxi dress!
Yep, if you were to drop by my home on a random Wednesday, you'd likely find me looking like these photos, which is why I figured I should photograph the dress the way I really wear it: barefoot in my studio. I am branching out and plan to make some other things to wear at home, but man, it does seem hard to find the time when you sew for a living. But that's for another post!

I made View A, and added the sleeves of View B, but instead of making a cuff, I extended the sleeve to be wrist length to be nice and warm. For the dress, I didn't do anything overly complicated or do any fancy pattern drafting. To make this version, I simply measured the length of a favorite maxi dress, extended the dress to that length, and made it as wide as the fabric would allow. I cut straight across one of the stripes and simply hemmed it along the stripe instead of using the original shape of the dress hem. That's it! Easy peasy!
I know this isn't the most flattering of garments, but I love wearing this version, even if it will only be really worn at home alone. (or poolside when hungover–as I did on New Year's Day!)


This knit is a super soft and thin cotton spandex blend that I have had in my stash so long I'm not sure where it came from. The oatmeal and black stripe spoke to me and I knew I had to have it at the time, but it took years for me to do anything worthy of the big stripes. I think this was the perfect choice!
Oh, and yes, this post was supposed to go up on Friday, so sorry about that! Time just got away!
Tomorrow we'll get back to the sewing for the side seams of both View A and View B! I hope you all got caught up this weekend! Remember you can always find all the posts at the Marianne Dress Sew-Along tag!
January 22, 2015
Marianne Dress Sew-Along: Sewing the Sleeves

In today's Marianne Dress Sew-Along post, we will be sewing the sleeves onto the dress. Technically this is part of View B, but you can of course also add them onto View A if you like! If you are using View A, remember that you need to transfer the notches from the yoke front and back of View B to the armholes of View A so you know where to line up the sleeves. You won't need the yoke seam notch, just the single and double notches for the sleeve front and back, as well as the center notch for lining up at the shoulder seam. Okay, let's sew!

Open up the dress completely so the entire dress is flat with the right side up. Place one of the sleeves on top of the dress, lining up the raw edge of the sleeve with the raw edge of the armhole. Start by pinning the center notch at the shoulder seam. Rotate the entire sleeve to the side and pin at the sleeve notch (double for back, single for front). Continue pivoting the sleeve and pin the remaining notch on that side of the sleeve at the yoke seam (if making View B). Lastly, pin the end of the sleeve at the end of the armhole opening. From those anchor points, pin in between and keep the raw edges aligned.

Repeat this step on the other half of the sleeve, so the entire sleeve is now pinned to one of the armholes.

Using the machine of your choice, sew from one end to the other, at the 3/8" seam allowance. Try to keep the shoulder seam in the direction that you pressed it in the last step. If using a conventional machine, trim the seam allowance down in half. Press the seam allowance toward the sleeves. Then repeat all of the above steps on the other sleeve!
Yes! It's really looking like something now! And in the next step, which is sewing the side seams, it's really going to feel like a dress! Tomorrow is another finished make to see, then we will return to the sewing on Tuesday, giving you the weekend to get caught up!
SPECIAL ANNOUNCEMENT: I'm Teaching at Camp Workroom Social!

We interrupt the Marianne Dress Sew-Along posts for a VERY IMPORTANT ANNOUNCEMENT! Yes ladies and gentlemen, this is an ALL CAPS MOMENT! I am so excited to announce that I am joining the lineup of teachers at Camp Workroom Social! WOOHOO!!!
 Photo of Frost Valley YMCA Camp by Esvy Photography
I honestly can hardly believe it! It's going to be amazing! So, what am I going to be doing there you ask? This camp is set up where each teacher teaches an intensive workshop, and mine will be a weekend Emery Dress extravaganza! Yes, we'll be making the entire Emery Dress (sans collar & bow) in a single weekend, surrounded by the beautiful fall foliage of the Catskill Mountains. It's going to be so great!
 Photo of Frost Valley YMCA Camp by Frost Valley YMCA
One of the joys of this kind of retreat is learning in a concentrated format, surrounded by people that share your love of sewing, uninterrupted by the day-to-day worries of everyday life. By immersing yourself in this experience, you will learn more, feel supported, and leave with new skills and new friends. This is truly an unique and wonderful opportunity!
For my Emery Dress class, a muslin will be provided in each size for campers to try on to ensure good fit, patterns will be pre-cut in every size, a hard copy of the pattern will be yours to take home for future use, and I will be there to help you each step of the way!
In addition to my class, there are some pretty stellar other teachers there too, so if you don't need help making an Emery Dress, no worries, come and learn something else! Below is a full line-up of the awesome classes you can take!
 Jen Beeman, Heather Lewenza, Norma Loehr, Melissa Watson, Erin Proud, & Whitney Crutchfield
Dressmaking with Christine Haynes of Christine Haynes PatternsSewing Fashion for Kids with Erin Proud of Brooklyn Pattern Co.Patternmaking with Jen Beeman of Grainline StudioBra-making with Norma Loehr of Orange LingerieJean-making with Heather Lewenza of Closet Case FilesFit for Your Body and Style with Melissa Watson of Palmer/Pletsch and Melissa Watson for McCall'sAnd a BONUS CLASS! Loom Weaving with designer Whitney Crutchfield (available for all campers to attend)
 Fleur Hoare, Jennifer Wiese, Sonja Gingerich, & Nellie Wu
Helping all of us teachers out will be some pretty awesome Camp Counselors too! You probably recognize these lovely ladies! Fleur Hoare of Maison Fleur, Jennifer Wiese of Workroom Social, Sonja Gingerich of Ginger Makes, and Nellie Wu of Mama Peaches.
 Photo of Frost Valley YMCA Camp by Frost Valley YMCA
And if all of that is not enough, there will be ziplining, karaoke, group meals in the mess hall, a fashion show of finished makes, and loads of bonding and fun. All of this goes down October 16–19 at the Frost Valley YMCA Camp in Claryville, NY on 5,000 acres in the heart of the Catskill Mountains.
Interested? Find out more about the teachers and counselors, read all about the classes, see the schedules of each day, and then register to attend!
I hope to see you there!!!
January 21, 2015
Marianne Sew-Along: Sewing the Shoulder Seams

Today in the Marianne Dress Sew-Along we are going to sew the shoulder seams! Things start to get real during this step, because this step involves something that might be new to many of you: clear elastic. Don't worry, I will talk you though it below and it's really not as hard as it seems. This step is for everyone, both View A and B, so let's get to it!

If you're using a conventional machine, set your zigzag stitch length to 2.0–2.5 and stitch width to 1.0–1.5. As always, test this on a scrap first, including all the layers about to be sewn. So for this step, that includes the front, back, collar (if including–which is two additional layers & interfacing), and clear elastic. All of that should be in your test to confirm that the stitch is set right. Trust me, pulling stitches out of knit is not fun and tends to leave holes behind, so make sure your stitch is right first!

Pin the shoulder seams together, with the fabric right sides facing. Line up the clear elastic in the seam so the stitch goes through the elastic. Note: be super careful not to pull the elastic while sewing. The fabric and elastic all need to go through the machine with ease and with no stretching. If it's stretched, the shoulder seam will pucker up and not look good.

Stitch at the 3/8" seam allowance and trim the seam down in half.

For a serger or overlock machine, pin the shoulders with right sides together. Place the fabric into the machine and then slide the elastic under the foot so it extends beyond the fabric. Grab the clear elastic with your left hand behind the fabric and stabilize as you begin to sew. Keep the right edge of the elastic flush with the fabric as it goes through the machine. Again, do not stretch the elastic or the fabric as it passes through. Give this a few practice runs with scraps until you feel comfortable.

Sew the shoulders at the 3/8" seam allowance and trim off the excess thread and elastic on the ends.

Since the shoulder seam is curved, place a pressing ham under the seam and press the seam allowance towards the back. Note: the clear elastic will melt to your iron, so keep it away from the heat!
That's it! See... that wasn't so hard, right? Tomorrow we will tackle the sleeves, so if you're making View B, or adding the sleeve onto View A, have them ready to go! And remember, if you need to reference these again later, you can see all the posts by clicking on the Marianne Dress Sew-Along tag at the bottom of this post, or on the toolbar on the side!
January 20, 2015
Introducing Lower US Shipping Rates!

I am so excited to announce lower US shipping rates! New rates for orders of one or two patterns in the US will now cost nearly half the price! Shipping a single pattern will now cost only $2.68, and two patterns will ship for only $3.58! This is a savings of $3.42 for a single pattern and $2.52 for an order of two patterns!
So if you were waiting for lower shipping rates, go to the shop now and pick up that pattern you've been spying!
How is this possible? As I am a one-woman operation, I made my shipping as streamlined as I could and only was offering USPS Flat Rate Priority Mail for all orders. This made it easy for me as I only had to stock a few types of packing materials. But after many many emails from customers about the high cost of shipping one pattern, I spent some time to retool my site, research and order new packing options, and it's now all set!
So now, anywhere in the world, an order of 1 or 2 patterns will ship via USPS First Class. Orders of 3 or more will ship at USPS Flat Rate Priority Mail, in a box or envelope appropriate to the size of the order.
I genuinely appreciate the feedback from all of my customers and do listen to any and all suggestions, even if it is a criticism! I hope that this change will encourage anyone on the fence about ordering a pattern to take the plunge!
Thank you for the constant support and feedback on what you'd like to see from me and my company! Have an idea or comment? Remember that there is a handy contact me page where you can let me know what you're thinking! And you never know... I might just do what you ask!
Marianne Sew-Along: Sewing the Yoke

Today in the Marianne Dress Sew-Along, we are going to attach the yoke front and yoke back to the dress pieces for View B. This step is very simple, so it's going to be a quick post, so here we go!
Pictured above, lay your front yoke piece down right side up. Lay one of the two dress pieces on top of the yoke and line up the top edges. I like to pin at the center and sides first, then pin in between.

Continue pinning all the way across the seam. Note: remember to use ball-point pins for your pinning, as they will glide into the fabric easier, and will not tear the weave of the fibers.

If using a serger, simply serge across the seam at the 3/8" seam allowance as pictured above.

If you are sewing with a conventional machine, use a narrow zigzag stitch to sew this seam. I prefer to use a length of around 2.0–2.5 and a width of around 1.0–1.5. Test your stitch on a scrap of the amount of layers you will be sewing first, and look for two key things: the stitch should appear smooth on the right side of the garment along the seamthe stitch should stretch in unison with the fabric

After sewing, press the seam allowance toward the dress. For a conventional machine, you can trim the seam allowance down to 1/4" before pressing if you choose.
Repeat all the above steps for the back yoke and dress piece, so you are left with a fully formed dress front and dress back. That's it!
Tomorrow we will tackle the shoulder seams for both View A and View B. So get your clear elastic ready! And remember, you can click here to see all the posts tagged with the Marianne Dress Sew-Along to reference anything from this series.