Christine Haynes's Blog, page 5
February 20, 2015
Building a Travel Wardrobe, Part Two
The easy part of building my travel wardrobe are all the basics that I wrote about yesterday–the outerwear, shoes, bags, and the things I'm likely to buy instead of make. The harder things to figure out are all the items I want to sew. There's never enough time in the day! I want to sew it all!
I've learned over the years to keep the to-sew list to a reasonable handful of items, consisting of many things I've made before, for guaranteed success. Below is this year's list of handmade things to take, a couple of which are already done and ready to go. Though many still need to be made, I know that they are very achievable.
One consistency you will notice below is that almost everything to wear out of the house has a free-form waist. I have learned that most days when I leave the apartment I really want something flowy and not too terribly fitted. Though I do like tailored details, so nothing is as casual as a t-shirt, but they are just as comfy, and clearly more Paris-appropriate.
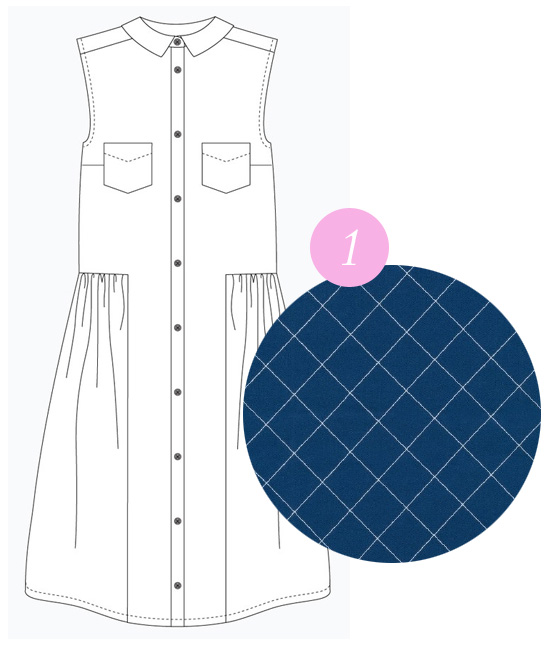
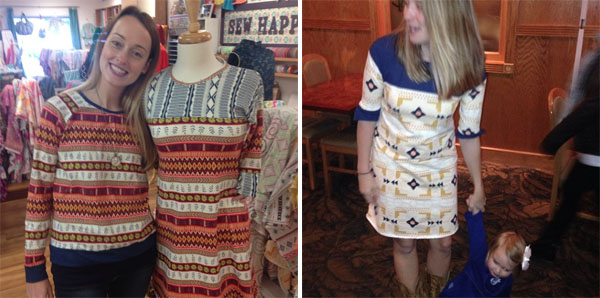
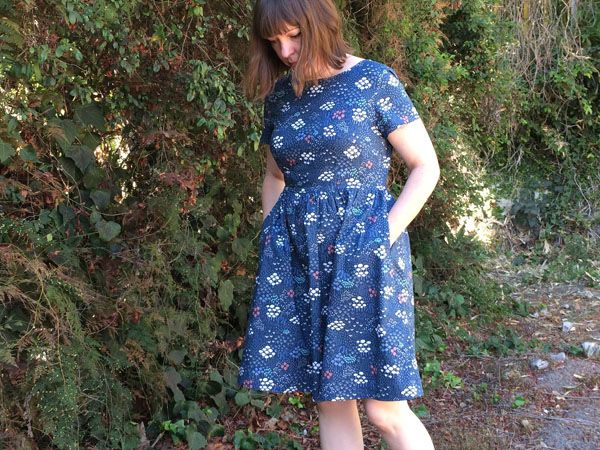
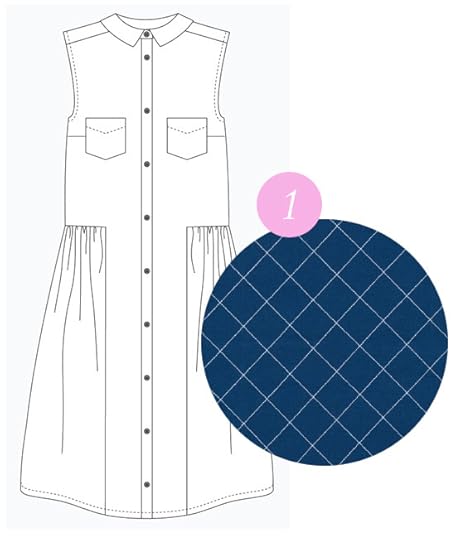 1. Grainline Studio Alder Dress + Carolyn Friedlander DoeI've been wanting to make up the Alder Dress and have just been waiting for the right fabric. When I saw this navy bias grid print from Carolyn Friedlander, I knew it was a match made in heaven. It's classic, a little bit preppy, and a perfect print for any occasion while traveling. This dress sews up well in quilt weight and I know that this will be a great staple for the trip.
 2. Closet Case Files Carolyn Pajamas + Amy Butler VoileLet's be real, we do a lot of lounging on our vacation. I mean, it is vacation after all, right? And as I mentioned yesterday, I long for fun vintage floral prints after a long day of wearing neutrals. So to have some crazy adorable Carolyn Pajamas made in this gorgeous Amy Butler vintage floral voile to wear in the apartment will just be the cherry on top of each and every day.
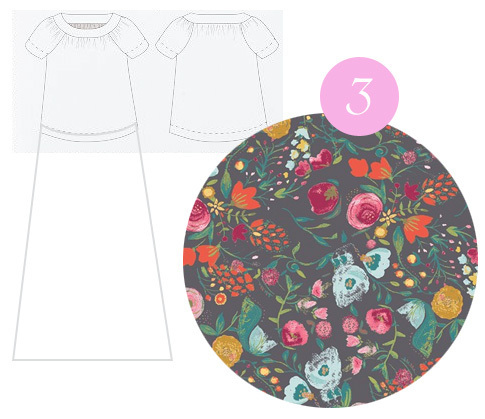 3. Fancy Tiger Sailor Top (turned maxi) + Bari J VoileI originally bought the Amy Butler voile pictured above to make a maxi dress after seeing her wearing one at last year's Quilt Market, but once I got this Bari J Voile, I really wanted to switch it up. And I'm glad I did, because I think Amy's voile is best suited for the pj's, and this voile is just perfect for turning the Fancy Tiger Sailor Top into a maxi dress muumuu. This is already made up and getting worn a lot!

4. Shift Dress from Skirts & Dresses for First Time Sewers + Cotton + Steel Lawns & RayonsThis Shift Dress is my favorite garment from my new book, Skirts & Dresses for First Time Sewers , and last year it's pretty much the only thing I wore on the trip, every damn day. It's chic and looks pulled together, but it's loose and flowing. It's the thing in my wardrobe that I love wearing over and over again. Also, because there's basically no bulk and the dress takes no space in my luggage at all, I feel at liberty to make and bring as many as I want! I plan to make at least two in the luscious new Cotton + Steel rayons and a couple of their soft cotton lawns as well.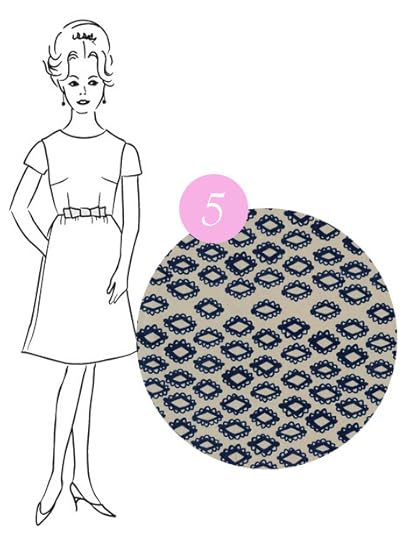 5. Emery Dress + Cotton + Steel Quilt CottonThis dress is also already made up, and though I don't like taking many fit and flare dresses with me on my holiday, I do like having one on hand in case the mood strikes me. And as I love this fun but neutral print from Alexia Abegg for Cotton + Steel, I think this is the perfect Emery Dress to take with me!
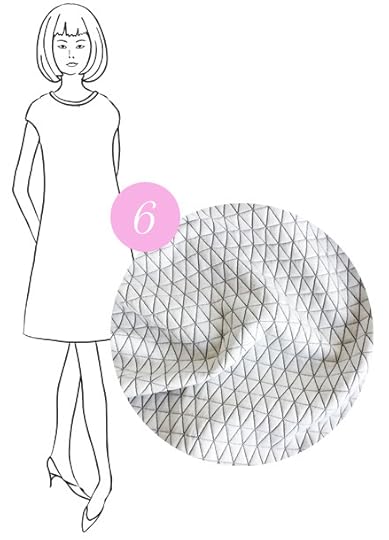
6. Marianne Dress + Blackbird Fabrics Quilted KnitEvery year I make a specific dress to wear on the plane there and back. And really, is there anything more comfortable than a knit shift dress? I think not. It's a long flight, and since I really hate flying, I think I should at least feel like I'm traveling in my jammies. This year my plane dress is my Marianne Dress made in the softest quilted knit from Blackbird Fabrics. Because of the bulk that the quilting adds, this is not a good luggage dress, so it is coming along specifically to wear en route, and I think it will do a perfect job. It won't even wrinkle!
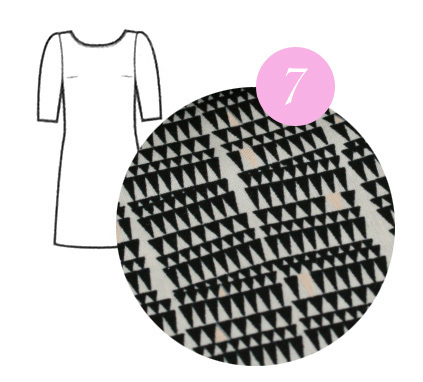 7. Colette Patterns Laurel Dress + Carolyn Friedlander DoeAnother favorite shift dress is the Colette Patterns Laurel Dress, and it's nice to have a slightly more tailored shift in my bag. My book shift and my Marianne Dress are both lovely, but a wee sloppy compared to the Laurel, so I like to have it as part of the group. And really, who doesn't love having another reason to use more of the Carolyn Friedlander Doe collection! Love it.
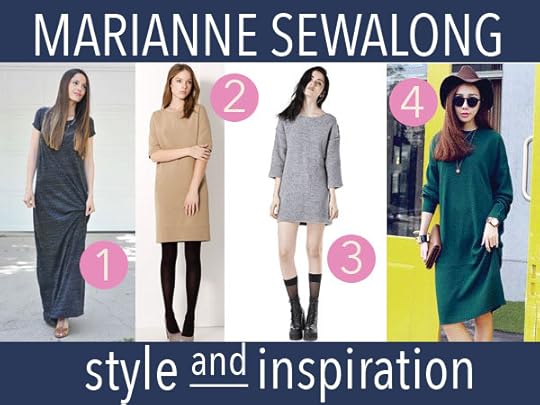
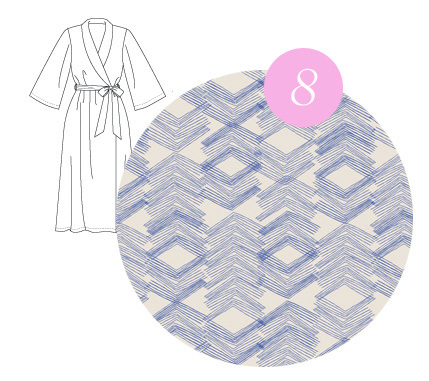 8. Robe (Pattern TBD) + Leah Duncan VoileTo go along with my muumuu and pajamas, I think a new robe is in order. But, as much as I love plushy fluffy robes, there's simply no room in my bag for that kind of space. So if I can't have fluffy, I at least want light and soft, and there's little as light and soft as voile. I haven't picked the robe pattern yet, but I'm leaning toward something classic, as pictured above, and without question I will be splurging and buying loads of the gorgeous Leah Duncan voile. Ahhh, I want this immediately!
I've learned over the years to keep the to-sew list to a reasonable handful of items, consisting of many things I've made before, for guaranteed success. Below is this year's list of handmade things to take, a couple of which are already done and ready to go. Though many still need to be made, I know that they are very achievable.
One consistency you will notice below is that almost everything to wear out of the house has a free-form waist. I have learned that most days when I leave the apartment I really want something flowy and not too terribly fitted. Though I do like tailored details, so nothing is as casual as a t-shirt, but they are just as comfy, and clearly more Paris-appropriate.
 1. Grainline Studio Alder Dress + Carolyn Friedlander DoeI've been wanting to make up the Alder Dress and have just been waiting for the right fabric. When I saw this navy bias grid print from Carolyn Friedlander, I knew it was a match made in heaven. It's classic, a little bit preppy, and a perfect print for any occasion while traveling. This dress sews up well in quilt weight and I know that this will be a great staple for the trip.
 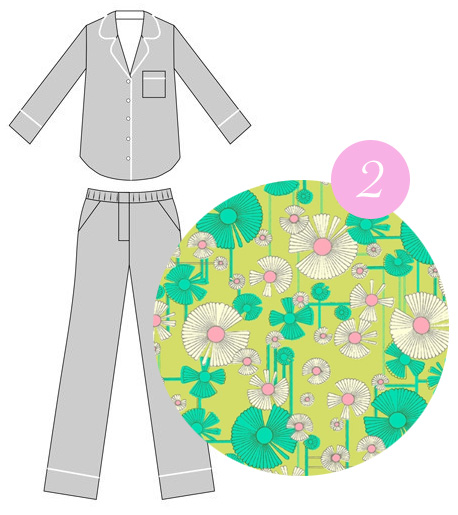 2. Closet Case Files Carolyn Pajamas + Amy Butler VoileLet's be real, we do a lot of lounging on our vacation. I mean, it is vacation after all, right? And as I mentioned yesterday, I long for fun vintage floral prints after a long day of wearing neutrals. So to have some crazy adorable Carolyn Pajamas made in this gorgeous Amy Butler vintage floral voile to wear in the apartment will just be the cherry on top of each and every day.
  3. Fancy Tiger Sailor Top (turned maxi) + Bari J VoileI originally bought the Amy Butler voile pictured above to make a maxi dress after seeing her wearing one at last year's Quilt Market, but once I got this Bari J Voile, I really wanted to switch it up. And I'm glad I did, because I think Amy's voile is best suited for the pj's, and this voile is just perfect for turning the Fancy Tiger Sailor Top into a maxi dress muumuu. This is already made up and getting worn a lot!
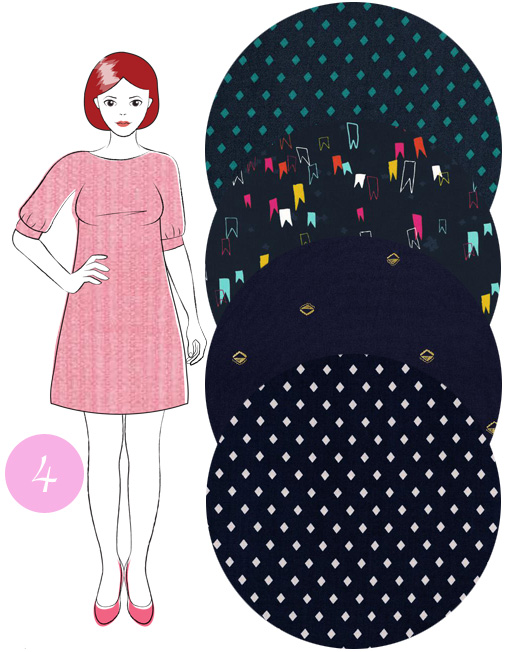
4. Shift Dress from Skirts & Dresses for First Time Sewers + Cotton + Steel Lawns & RayonsThis Shift Dress is my favorite garment from my new book, Skirts & Dresses for First Time Sewers , and last year it's pretty much the only thing I wore on the trip, every damn day. It's chic and looks pulled together, but it's loose and flowing. It's the thing in my wardrobe that I love wearing over and over again. Also, because there's basically no bulk and the dress takes no space in my luggage at all, I feel at liberty to make and bring as many as I want! I plan to make at least two in the luscious new Cotton + Steel rayons and a couple of their soft cotton lawns as well.
 5. Emery Dress + Cotton + Steel Quilt CottonThis dress is also already made up, and though I don't like taking many fit and flare dresses with me on my holiday, I do like having one on hand in case the mood strikes me. And as I love this fun but neutral print from Alexia Abegg for Cotton + Steel, I think this is the perfect Emery Dress to take with me!
6. Marianne Dress + Blackbird Fabrics Quilted KnitEvery year I make a specific dress to wear on the plane there and back. And really, is there anything more comfortable than a knit shift dress? I think not. It's a long flight, and since I really hate flying, I think I should at least feel like I'm traveling in my jammies. This year my plane dress is my Marianne Dress made in the softest quilted knit from Blackbird Fabrics. Because of the bulk that the quilting adds, this is not a good luggage dress, so it is coming along specifically to wear en route, and I think it will do a perfect job. It won't even wrinkle!
 7. Colette Patterns Laurel Dress + Carolyn Friedlander DoeAnother favorite shift dress is the Colette Patterns Laurel Dress, and it's nice to have a slightly more tailored shift in my bag. My book shift and my Marianne Dress are both lovely, but a wee sloppy compared to the Laurel, so I like to have it as part of the group. And really, who doesn't love having another reason to use more of the Carolyn Friedlander Doe collection! Love it.
  8. Robe (Pattern TBD) + Leah Duncan VoileTo go along with my muumuu and pajamas, I think a new robe is in order. But, as much as I love plushy fluffy robes, there's simply no room in my bag for that kind of space. So if I can't have fluffy, I at least want light and soft, and there's little as light and soft as voile. I haven't picked the robe pattern yet, but I'm leaning toward something classic, as pictured above, and without question I will be splurging and buying loads of the gorgeous Leah Duncan voile. Ahhh, I want this immediately!

February 19, 2015
Building a Travel Wardrobe, Part One
Each year for the last six years, my man and I have spent a sizable chunk of time traveling in France. Because of this, my sewing and shopping brain always has that in the back of my mind, asking myself with each purchase and project, "is this something I could, or should, take with me on our next trip?"
We are extremely light travelers, and though we go away from 4–7 weeks a year, we are strict carry-on-bag-only travelers. Each item that gets packed needs to fit the following list of rules:
Do I love it?Can I wear it once a week or more?Does it hang dry well?Will it go with everything else in my bag?Is it good on its own, or does it require many accessories to work?Is it comfortable enough to wear all day and into the evening, while walking 2–8 miles?Is is bulky to pack?
Yeah, this is a hard list of requests to fill, but somehow year after year, I mostly get it right. And as you can imagine, with each year, I get better and better at this. Below is my advice on how to do it.
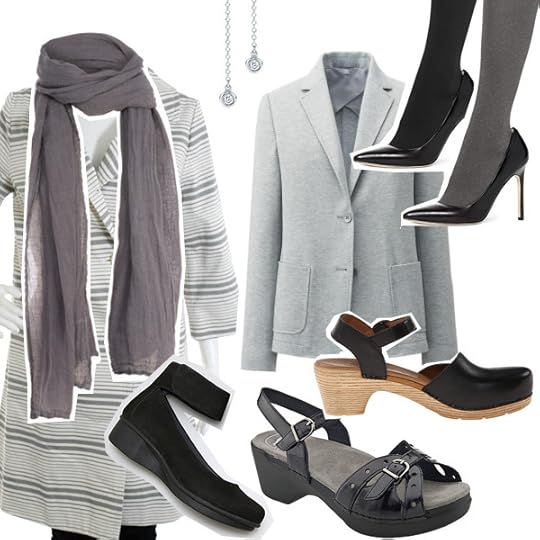 My actual items coming with me this year: my cotton trench coat, cotton gauze scarf, simple Tiffany diamond earrings, ponte knit blazer, black & gray tights, and 3 pairs of Dansko shoes.
1. Start with a group of basics
I begin with a color palate of neutrals, mostly gray, brown, black, cream, and white. From there, I add in some navy and other blues, with highlights of color here and there. But France is a place I feel most comfortable wearing neutrals when out and about. I am not going to generalize and say that all French only wear black and neutrals, but yes, many more do than not. So personally, I feel more comfortable saving my lush vintage florals for when I'm in the privacy of our Paris apartment and not when we're out and about. Let me be clear though; it's not them, it's me.
This might seem incredibly boring for some people, but honestly, I find it very liberating. My holidays are exactly that; a holiday from many things, including thinking about my wardrobe. While we are away, we live a very quiet life and that translates to what I wear, which is a form of being quiet. It quiets my mind to not have to think too much about what I am putting on and if things go together. It allows me to think about other things instead, which is refreshing. Think of it as a wardrobe holiday!
2. Buy the most comfortable shoes you can walk in for miles a day
I cannot go out into the world wearing sneakers. Sorry, I just can't. So, with that in mind, I have figured out what works for me, and I can state it in one word: Dansko. I have loads of "comfortable" shoes, but that's not the same as "comfortable walking" shoes. Walking is much different than standing, sitting, small strolls, etc. Walking is walking. Like a lot. Like miles and miles a day. Or at least that's how we do it.
Two trips ago we kept track of our walking paths each day and mapped them out on Google maps to see how much we walked, and I was shocked that we averaged around 4.5 miles a day. Some days we walked 7–10 miles! Some days it was only 1–2, but many were in the 4–6 mile range, so really walk in your shoes to see if you can walk that much in them. Or plan to take cabs and public transportation a lot.
3. Pack layers
I like to have a few different types of layers with me for a wide range of options. I always take at least one cardigan for wearing under my main jacket, and then I like to have something else to layer. This year I'm taking one cashmere cardigan, my cotton trench coat, and a ponte knit unlined blazer that will serve well as an in-between item. It will fill that space between a real coat and a light cardigan nicely.
In addition, I always take a scarf, some sort of hat, which is usually my black wool beret (yep, even for June & July), and a range of leg covering options like knee socks, tights, and leggings. This gives me a lot of choices for layers. I also try to plan my clothing to have some with short sleeves, some sleeveless, and some long sleeves, so depending on the weather I will be comfortable.
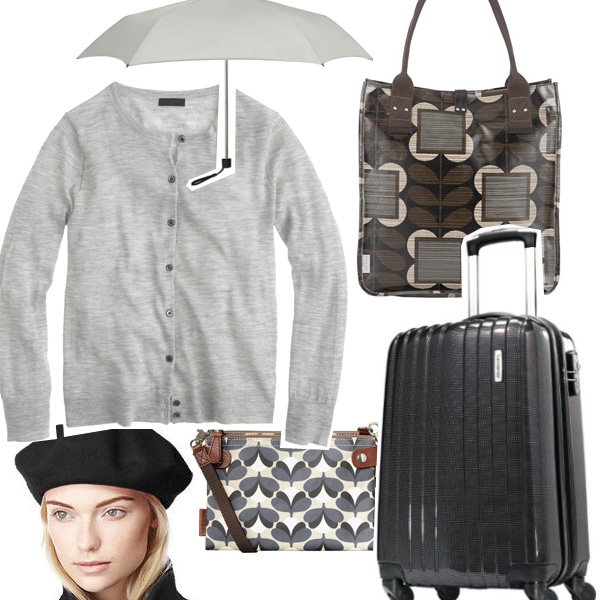
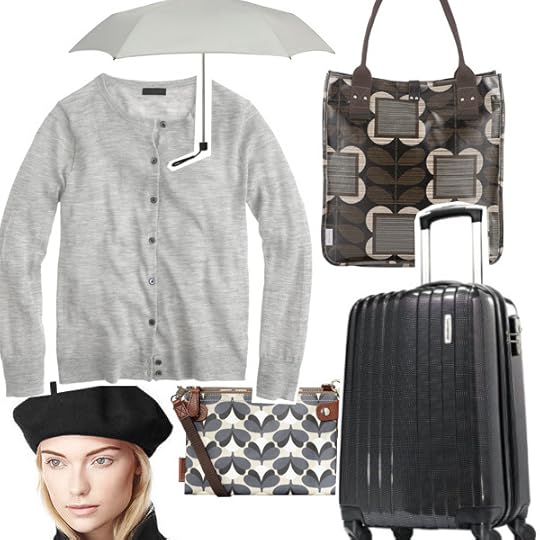 More of my basics coming this year: gray cashmere cardigan, gray folding travel umbrella, large tote bag, carry on hard shell luggage, small over the body bag, and a black wool beret.
4. Plan ahead
Your shoes will need breaking in, long before you go, so that is something to think about months prior to your trip. Buy them, wear them for real, not just lightly around the house. Let your feet get used to the pressure points, and try them in all the situations you might wear them in, like with socks, with tights, and/or with bare feet.
And of course, if you plan to make anything, that takes time! Trust me, I have planned crazy amounts of things to sew before a trip, only to have no time to do it. But I do get better each year about properly judging what I can really accomplish and what is just crazy.
Join me tomorrow when I talk about what I plan to sew for my trip to accompany this collection of neutrals above! And let me know how you do it? What's your best advice for packing for traveling?
We are extremely light travelers, and though we go away from 4–7 weeks a year, we are strict carry-on-bag-only travelers. Each item that gets packed needs to fit the following list of rules:
Do I love it?Can I wear it once a week or more?Does it hang dry well?Will it go with everything else in my bag?Is it good on its own, or does it require many accessories to work?Is it comfortable enough to wear all day and into the evening, while walking 2–8 miles?Is is bulky to pack?
Yeah, this is a hard list of requests to fill, but somehow year after year, I mostly get it right. And as you can imagine, with each year, I get better and better at this. Below is my advice on how to do it.
 My actual items coming with me this year: my cotton trench coat, cotton gauze scarf, simple Tiffany diamond earrings, ponte knit blazer, black & gray tights, and 3 pairs of Dansko shoes.
1. Start with a group of basics
I begin with a color palate of neutrals, mostly gray, brown, black, cream, and white. From there, I add in some navy and other blues, with highlights of color here and there. But France is a place I feel most comfortable wearing neutrals when out and about. I am not going to generalize and say that all French only wear black and neutrals, but yes, many more do than not. So personally, I feel more comfortable saving my lush vintage florals for when I'm in the privacy of our Paris apartment and not when we're out and about. Let me be clear though; it's not them, it's me.
This might seem incredibly boring for some people, but honestly, I find it very liberating. My holidays are exactly that; a holiday from many things, including thinking about my wardrobe. While we are away, we live a very quiet life and that translates to what I wear, which is a form of being quiet. It quiets my mind to not have to think too much about what I am putting on and if things go together. It allows me to think about other things instead, which is refreshing. Think of it as a wardrobe holiday!
2. Buy the most comfortable shoes you can walk in for miles a day
I cannot go out into the world wearing sneakers. Sorry, I just can't. So, with that in mind, I have figured out what works for me, and I can state it in one word: Dansko. I have loads of "comfortable" shoes, but that's not the same as "comfortable walking" shoes. Walking is much different than standing, sitting, small strolls, etc. Walking is walking. Like a lot. Like miles and miles a day. Or at least that's how we do it.
Two trips ago we kept track of our walking paths each day and mapped them out on Google maps to see how much we walked, and I was shocked that we averaged around 4.5 miles a day. Some days we walked 7–10 miles! Some days it was only 1–2, but many were in the 4–6 mile range, so really walk in your shoes to see if you can walk that much in them. Or plan to take cabs and public transportation a lot.
3. Pack layers
I like to have a few different types of layers with me for a wide range of options. I always take at least one cardigan for wearing under my main jacket, and then I like to have something else to layer. This year I'm taking one cashmere cardigan, my cotton trench coat, and a ponte knit unlined blazer that will serve well as an in-between item. It will fill that space between a real coat and a light cardigan nicely.
In addition, I always take a scarf, some sort of hat, which is usually my black wool beret (yep, even for June & July), and a range of leg covering options like knee socks, tights, and leggings. This gives me a lot of choices for layers. I also try to plan my clothing to have some with short sleeves, some sleeveless, and some long sleeves, so depending on the weather I will be comfortable.
 More of my basics coming this year: gray cashmere cardigan, gray folding travel umbrella, large tote bag, carry on hard shell luggage, small over the body bag, and a black wool beret.
4. Plan ahead
Your shoes will need breaking in, long before you go, so that is something to think about months prior to your trip. Buy them, wear them for real, not just lightly around the house. Let your feet get used to the pressure points, and try them in all the situations you might wear them in, like with socks, with tights, and/or with bare feet.
And of course, if you plan to make anything, that takes time! Trust me, I have planned crazy amounts of things to sew before a trip, only to have no time to do it. But I do get better each year about properly judging what I can really accomplish and what is just crazy.
Join me tomorrow when I talk about what I plan to sew for my trip to accompany this collection of neutrals above! And let me know how you do it? What's your best advice for packing for traveling?
February 17, 2015
Your Marianne Dress Makes!

I love seeing what you all make with my patterns–it's the ultimate satisfaction for any pattern designer!
I've scoured the web, Instagram, and Twitter to find all the Marianne Dresses I could, so if you made one, hopefully I found it! If you don't see your image below, do let me know! We all want to see your pretty dresses! Some of these dresses aren't necessarily from the sew-along, but that doesn't really matter to me. It's all the Mariannes I could find, sew-along or not!
If you'd like to see even more, in addition to these makes, don't forget all those made by me along the way (found here, here, here, and here) as well as my mom's version, all the versions my lovely students at Sew L.A. made, and the first Marianne makes by those that jumped on it before the sew-along.
All the photos are captioned with a link to each maker's blog or feed, so if you'd like to see more, do click over! Okay, here we go!

This version by Melissa Esplin is so cute, and proof that the Marianne makes an awfully great top/tunic as well as a dress! Check out her post to read all about it and how she made the side slits with a high-low hem and longer sleeves. So gorgeous!

Toni made the most unique version by far, using this fun floral print for the lower part of the front, then used a solid for the upper yoke and whole back. I love it so much! And in case you didn't know this could be done, the answer is yes–the front and back of View B will create the same size as View A, so you can do one side of the dress in one view, and the opposite side in the other view.

In addition to the floral version above, Toni also made a classic stripe View B. Read all about both versions and the making of her first ever knit dresses on her blog! Well done Toni!

Erin also made her Marianne Dress into a top and it just couldn't be any cuter! I love the bold stripes and fun colors. I seriously need to make a top version next! These versions are killing it!

Jaime of Fancy Tiger Crafts already made up one Marianne Dress in a fun print, but made a second version in some cozy solids for more everyday wearing. I love these soft blues and am flattered that she loves it so much! Love you lady!

Marrie is without question one of the most detailed sewers out there, and I knew she had a love of the Emery Dress, but I wasn't sure if she would be into the casualness of the Marianne. I'm happy she gave it a shot, as her version is so classic and cute!

Laura blogged about the gorgeous coat she made, but the Marianne Dress made a cameo and gets some mention in the post as the garment under the coat. Similar to Jaime's version, these classic colors are always a great choice!

Claire made a cozy gray and burgundy striped hybrid of View A dress with View B sleeves. I love how everyone is customizing the views to suit their tastes. I hoped this would happen, but one never knows if that would happen or not. And look at that perfect stripe line up on the neck binding! Well done Claire!

My adorable student Amy is pregnant with her first child and over the holidays she made up this cute version of View A in a holiday-appropriate plaid. On the right is a great version of View B made by my retailer Indie Sew. So cute!
Spotted on the Instagram feed for Five Eighth Seams, one of my lovely retailers, they made up two versions using some super fun Art Gallery Fabrics knits.

On the left is a lovely floral View A, found on the Instagram feed of becksdesign. On the right is a gorgeous floral and solid version of View B, made by the lovely Patricia, whom I was fortunate to meet at Raystitch last year.

Found on Anja's Instagram feed, this classic version of View B is so lovely! The adorable Amy made up a cute View A and View B hybrid, adding the sleeves, cuffs, and collar to her dress.

Another classic Marianne Dress, Melissa nailed this cozy and classic version of View B. Spotted on the Instagram feed of Patrycja, her adorable version features fox fabric!!! So cute!

Tracy whipped up a cute color blocked version of View B, and I'm pretty star struck that she wore it to meet the one and only Natalie Chanin!!! OMG, dying.

Ryann's version is so similar to the colors that one of my students made, and it's so perfectly mod and adorable! I think this color combo has my name on it. Too cute!

The print of She Sews a Lot's View A Marianne dress is crazy cute, but then if you look closely, you can see that she also has the collar on there! That's some brilliant pattern matching right there!

Two more cute Marianne Dresses found on Instagram – on the left, Style Maker Fabrics made a great version of View B, and on the right, Amy made pretty much the perfect collar on her version of View A.

I actually sewed up the two versions of View B on the left for the lovely folks at Robert Kaufman fabrics, featuring new prints from designer Valori Wells. My retailer Modern Domestic made the cute dress on the right to promote an upcoming class for the Marianne Dress!

Lastly, I love the long sleeved version of View A in Art Gallery knit on the left from the ladies at Thread, another one of my great retailers! And spotted on the Instagram feed of Dina, this is another cute striped version of View B.
Phew! So many dresses (and tops)!!! I am so honored when people choose to use my patterns and I hope this inspires those of you that have yet to try the Marianne Dress to give it a shot! I'm happy to report that last week was the first week (outside of the release week) that Marianne outsold Emery! Way to go! Thanks again everyone for sharing your images!
February 12, 2015
The Art of Handmade
Most of you reading this blog probably sew or make things by hand, so you understand the work and time that goes into making fine goods. But actually watching real hands make something of the highest quality is truly amazing.
I spotted two videos this week that show the level of craftsmanship and the number of steps it takes to craft something of beauty. These two videos are floating out there on the web, so perhaps you've seen them too, but if not, take a few minutes to appreciate the work that goes into making a Dior bag and Dior couture pleated garments. You will never ask yourself the question "why does this cost so much?" ever again.
I found the Dior bag video on the French Vogue website, via Oona's Facebook page, and the Dior pleats video was created and posted by Refinery29.
For fully explained details on the process shown in the video pleating, check out this post by The Cutting Class, where they explain the techniques in the video through stills. It's truly eye opening!
Other classic videos that are all oldies but goodies...
The making of one dress as part of the Dior 2011 couture show, back in the John Galliano days.
The process of screenprinting an Hermès scarf as seen at the Hermès Festival of Crafts. I love that the man says, "it takes time to do quality." Yep, true that.
The factory and printing process at one of my all-time favorite places, Marimekko, where the screenprinting is still managed by real humans.
And lastly, the gorgeous work it takes to make a bi-color Chanel knitted cardigan. Dude, wait for around 2:20 for a buttonhole stitch that will rock your world.
Enjoy!
February 11, 2015
Finished Marianne Photos Due Sunday!

I have had some requests for a "real" due date on the finished Marianne Dresses from the Sew-Along, so here it is! Please send me a link to photos, the actual photos, or tag yourself on Instagram with the #mariannedress hashtag so I can find it by end of day Sunday, February 15th, then I will be posting them on Tuesday, February 17th!
Thank you in advance for sharing your images with me and others, and huge thanks to those of you that already sent me your photos and links! xoxo
February 10, 2015
Marianne Dress for Mom

My mom recently visited me for a lovely week-long vacation, which gave us plenty of time for girl talk, visit some LA sites, watch BBC shows on PBS, and eat some lovely meals. My weakness for stripes is clearly hereditary, because the only person I know that loves stripes more than me, is my mom. She loves the Marianne Dress and had asked if I would make her a Marianne on one of the free days of her visit. Of course!
We hit The Fabric Store first, partly because my mom hadn't visited the shop yet, and also because they were having their winter sale. As usual, I visited with the lovely Brooke, the manager of the shop, and we browsed their gorgeous fabrics. My mom had very specific fabric in mind–ponte stripes–and unfortunately they didn't have exactly what we were looking for.

Moving on to Mood, I knew they'd have some good choices for this request of ponte stripes, as I was just there buying some knits for my Linden Swap with Jennifer and Nicole. After some debate, mom picked a lovely gray and white stripe (which is the same one that my student Caitlin used in my class at Sew L.A.) and a matching white solid for the contrast. You can sorta see in the photo below that the gray is slightly heathered. It's really dreamy with a substantial, yet soft hand.

We washed the ponte the day we bought it (washed the way I usually do–washed in cold water, dried on high–for maximum shrinkage), then the next day we sewed it up! Mom was rather impressed with my ability to custom fit it to her needs, and in the end the fit was perfect. She prefers a slightly oversized feel in the upper body, with plenty of positive ease for maximum comfort, but she's teeny tiny, so I had to come in many sizes in the dress to make sure the lower part didn't overwhelm her little frame. She also requested a slightly longer length so she can wear it with flats to church but also with sandals in the warmer months without feeling like her legs were too exposed.

Mom chose to have the sleeves, yoke, and cuffs in the solid white, with fun little gray buttons on the cuffs. I sewed no less than four different sizes to customize the fit, and there was much rejoicing when it was exactly what she wanted! I have a feeling I'm going to get email requests for more!
Thanks for posing for photos mom :)
February 9, 2015
Upcoming Events & Classes
Upcoming ClassesMy February and March classes at Sew L.A. and now officially underway, and I'd love to see you! Read all about my upcoming classes below, then click on the link to sign up directly on the Sew L.A. website. Spaces are limited, so don't wait!
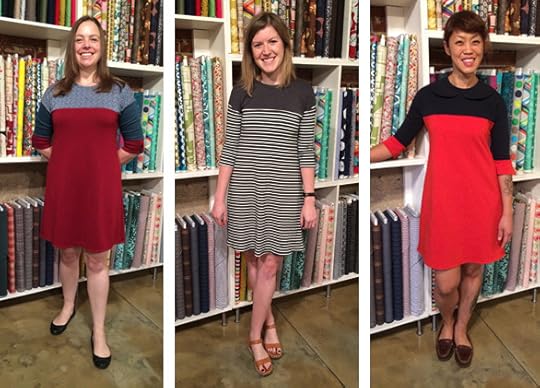 3 dresses from my last Marianne Dress workshop at Sew L.A.
I'm teaching another Marianne Dress class, this time as a 3-week Thursday night class, instead of a whole-weekend workshop, for those of you that prefer an evening class!
Thursday, March 5, 12, & 19 - 6:30–9:30pm
My Emery Dress class is also making a comeback, this time for a whole weekend long 2-day sewing extravaganza! Join me to master all kinds of dressmaking details in one weekend!
Saturday, March 14 & Sunday, March 15 - 11am–6pm (with an hour lunch break)
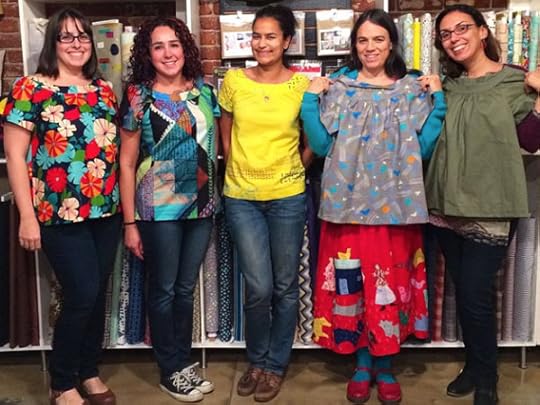 The results of my last Sailor Top class at Sew L.A.
I am also bringing back the Sailor Top by Fancy Tiger Crafts! This is going to be taught in a full-day Saturday and half-day Sunday weekend workshop, so come and make up this cute top in one weekend!
Saturday, March 7 - 11am–6pm (with an hour lunch break) & Sunday, March 8 - 3–6pm
In addition to these garment classes, I'm also teaching the following beginner classes:
Throw Pillow Covers - Tuesday, February 10 - 6:30–9:30pm
Vintage Pocket Skirt - Thursday, February 12, 19, & 26 - 6:30–9:30pm
Easiest Skirt - Saturday, February 14 - 11am–6pm (with an hour lunch break)
Construction Basics - Tuesday, February 24 - 6:30–9:30pm
Throw Pillow Covers - Saturday, February 28 - 11am–2pm
Machine Intro - Saturday, February 28 - 3–6pm
Machine Intro - Sunday, March 8 - 11am–2pm
Machine Intro - Saturday, March 21 - 11am–2pm
Machine Intro - Tuesday, March 31 - 6:30–9:30pm
- - - - - - - - - - - - - - - - - - -Craftcation Conference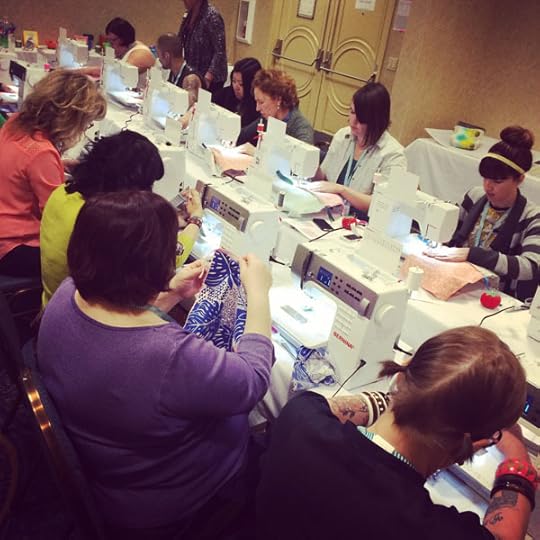
I'm super excited to be returning for another year of Craftcation! If you've not heard me chat about it in the past, you can find out loads of information on my recap from last year's event, by clicking on the Craftcation tab on the right, or by visiting their site directly!
Craftcation is always a super fun time and this year I'm teaching more sewing! For those slightly more experienced sewers (like the fine group of ladies that learn with me year after year!) I'll be teaching my Marianne Dress pattern! We'll be doing the easiest version for maximum success, but everyone will be leaving with a finished dress!
My Marianne Dress class is kindly sponsored by the lovely people at Robert Kaufman, who offered up my favorite knit (Laguna Jersey) for the occasion, so everyone will get some yummy knit to work with! Thanks Robert Kaufman!
I'm also teaching a repeat of last year's successful zipper bag, and a revamp of my construction basics class I did at the first Craftcation many years ago.
The deadline to sign up at the early bird rate is this Sunday, so jump on it! There are loads of other awesome people teaching this year, so there's a lot to learn and good times to be had!
- - - - - - - - - - - - - - - - - - -Jackalope Art Fair
I am honored to be one of three jurors for a new local arts fair in Pasadena, the Jackalope Art Fair! I will be sorting through all the applications to find the best of the best for this awesome event, so if you're interested in applying for a local fair in the LA area, check out their site and submit your handmade goodies! The deadline to apply is this Sunday, February 15!
- - - - - - - - - - - - - - - - - - -Camp Workroom Social & Camp Stitchalot

And not to leave these events out, just as a reminder, I will be teaching at the incredible upcoming events, the Camp Workroom Social in upstate New York in October, and the Camp Stitchalot in Michigan in May. Read all about these events on their sites and sign up today! I hope to see you there!
 3 dresses from my last Marianne Dress workshop at Sew L.A.
I'm teaching another Marianne Dress class, this time as a 3-week Thursday night class, instead of a whole-weekend workshop, for those of you that prefer an evening class!
Thursday, March 5, 12, & 19 - 6:30–9:30pm
My Emery Dress class is also making a comeback, this time for a whole weekend long 2-day sewing extravaganza! Join me to master all kinds of dressmaking details in one weekend!
Saturday, March 14 & Sunday, March 15 - 11am–6pm (with an hour lunch break)
 The results of my last Sailor Top class at Sew L.A.
I am also bringing back the Sailor Top by Fancy Tiger Crafts! This is going to be taught in a full-day Saturday and half-day Sunday weekend workshop, so come and make up this cute top in one weekend!
Saturday, March 7 - 11am–6pm (with an hour lunch break) & Sunday, March 8 - 3–6pm
In addition to these garment classes, I'm also teaching the following beginner classes:
Throw Pillow Covers - Tuesday, February 10 - 6:30–9:30pm
Vintage Pocket Skirt - Thursday, February 12, 19, & 26 - 6:30–9:30pm
Easiest Skirt - Saturday, February 14 - 11am–6pm (with an hour lunch break)
Construction Basics - Tuesday, February 24 - 6:30–9:30pm
Throw Pillow Covers - Saturday, February 28 - 11am–2pm
Machine Intro - Saturday, February 28 - 3–6pm
Machine Intro - Sunday, March 8 - 11am–2pm
Machine Intro - Saturday, March 21 - 11am–2pm
Machine Intro - Tuesday, March 31 - 6:30–9:30pm
- - - - - - - - - - - - - - - - - - -Craftcation Conference

I'm super excited to be returning for another year of Craftcation! If you've not heard me chat about it in the past, you can find out loads of information on my recap from last year's event, by clicking on the Craftcation tab on the right, or by visiting their site directly!
Craftcation is always a super fun time and this year I'm teaching more sewing! For those slightly more experienced sewers (like the fine group of ladies that learn with me year after year!) I'll be teaching my Marianne Dress pattern! We'll be doing the easiest version for maximum success, but everyone will be leaving with a finished dress!
My Marianne Dress class is kindly sponsored by the lovely people at Robert Kaufman, who offered up my favorite knit (Laguna Jersey) for the occasion, so everyone will get some yummy knit to work with! Thanks Robert Kaufman!
I'm also teaching a repeat of last year's successful zipper bag, and a revamp of my construction basics class I did at the first Craftcation many years ago.
The deadline to sign up at the early bird rate is this Sunday, so jump on it! There are loads of other awesome people teaching this year, so there's a lot to learn and good times to be had!
- - - - - - - - - - - - - - - - - - -Jackalope Art Fair

I am honored to be one of three jurors for a new local arts fair in Pasadena, the Jackalope Art Fair! I will be sorting through all the applications to find the best of the best for this awesome event, so if you're interested in applying for a local fair in the LA area, check out their site and submit your handmade goodies! The deadline to apply is this Sunday, February 15!
- - - - - - - - - - - - - - - - - - -Camp Workroom Social & Camp Stitchalot

And not to leave these events out, just as a reminder, I will be teaching at the incredible upcoming events, the Camp Workroom Social in upstate New York in October, and the Camp Stitchalot in Michigan in May. Read all about these events on their sites and sign up today! I hope to see you there!
February 4, 2015
Marianne Dress Sew-Along Roundup & How to Send Me Your Images!

I hope you all enjoyed the Marianne Dress Sew-Along and found the posts helpful! I don't love how sew-alongs can dominate an entire blog, so I tried to pop in with finished versions of both the Marianne Dress and other goodies throughout the month to keep things fresh and interesting for those of you not participating in the sew-along.
If you want to find all the posts for future reference, you can click on the tag to the right that says "Marianne Dress Sew-Along" under the "Categories" section. I also have a round up below of each post that you can get to in one handy post! Simply click on the image to go to the post.
When you work alone at home and do these sew-alongs, you really start to wonder if anyone is following along and sewing with you, so hopefully some of you were! If you would allow me to, I'd love to post images of your Marianne Dresses here on the blog next week! Here's how you can get me your shots:
email me images at info(at)christinehaynes(dot)comtag your Instagram images with the #mariannedress hashtaginclude them in the Christine Haynes Patterns Flickr groupemail me a link to images on your blog
I do hope that if you've made a version of the pattern you will send me some notification! I love seeing all the different versions and I know all of you do too, so I hope to hear from you! And no worries, if you'd rather not have your face in it, I know how hard it can be to pose for photos!
Thanks in advance for sending images! I look forward to seeing your pretty dresses!
Marianne Dress Sew-Along Posts


February 3, 2015
Marianne Dress Sew-Along: Cuffs and Buttons

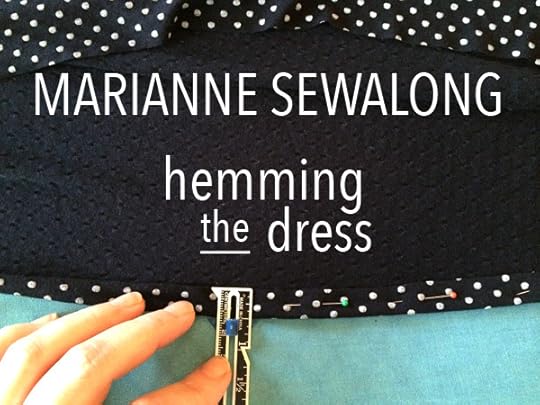
Welcome to the last post for the Marianne Dress Sew-Along! If you're sewing the cuffs onto your sleeves, this is the final bit. If you are hemming the sleeves without the cuffs, or if you are making yours without the sleeves, as in View A, you're already done! So, without further ado, let's get to the last step!

You should have two cuff pieces, one for each arm. Fold each cuff piece in half, right sides together, lining up the short ends. Pin the two short ends on each cuff piece.

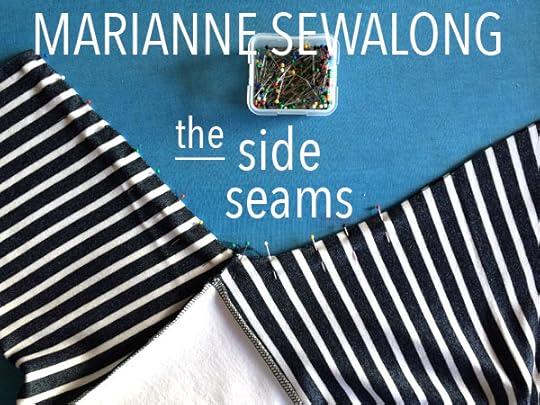
Sew the short ends in place, with a 3/8" seam allowance. If using a serger machine, simply sew it as you've been throughout the making of the dress. If using a conventional machine, use a stretch stitch and then trim the seam allowance down in half after stitching.

You should now have two pieces that look like the above cuffs!

Turn the cuffs right sides out and use a point turner to push out the corners until they are nice and pointy.

Use an iron to press the short ends flat. Also press the center fold in place as well, making sure the long ends of the cuff pieces stay lined up.

In the pattern instructions, I indicate to overlap the cuff pieces 1" and pin in place, then fit those circles to the end of the sleeve. You can do it this way, or this is an alternative that is even easier! First, line up the notch from the cuff at the seam on the sleeve. Pin in place, lining up the raw edges.

Roll the cuff piece around the sleeve hem, continuing to line up the raw edges and pinning in place. Stop about 2" before the notch on the sleeve on either side, opposite the seam on the sleeve, so the section around the notch is unpinned.

Making sure to place the cuff in the correct direction, continue pinning around the cuff, overlapping the excess amount of the cuff. If you didn't sew the cuff or sleeve perfectly, this may or may not be the original 1" overlap, but it doesn't really matter, as long as they overlap something close to 1" at the notch. Pin in place so that the layer on top is pointing toward the front of the dress, so when the cuff is flipped right side out, the layer on top is pointing toward the back of the dress.

Do not slip the sleeve opening over the free arm of your machine, unless it does so with lots of room to spare. You don't want it stretching while sewing! If you cannot fit it on your arm, sew it from the inside as pictured above. Like when attaching the neck binding, you will be sewing in a circle, so be careful to start into the fabric at a slight angle.

And then at the end of the stitch, be sure to meet up with your starting stitches, and turn off the stitch once the beginning and ending stitches line up perfectly at 3/8" seam allowance. If using a conventional machine, simply sew around the circle with your stretch stitch.

Press the seam allowance toward the sleeve. If you are using a conventional machine, trim the seam allowance in half prior to pressing.

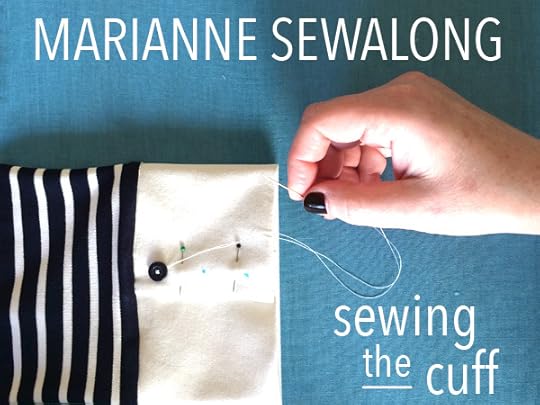
Pin the overlap on the cuff in place and mark the spots for your buttons. This is completely up to you as to where they are placed. I prefer to put them directly down the center of the overlap and evenly distributed from the hem of the sleeve to the hem of the cuff. But it's up to you! I've even seen some versions where the cuff is left without buttons!

Sew your buttons through the two overlapping layers with a needle and thread, and that's it! Woo hoo! Congratulations on finishing up your Marianne Dress!
Tomorrow I will post information on how to submit your dress to me so I can feature it here on the blog! I REALLY want to see your makes, so don't be shy! Thanks for following along, I hope these posts were helpful! And don't forget, you can always find them by simply clicking the Marianne Dress Sew-Along tag on the right hand tool bar for future reference!
February 2, 2015
Eliana Dress in Cotton + Steel Frock Rayon

I am honored to be the next stop in the Cotton + Steel Frock Fabric Blog Tour! If you haven't already seen some of the other stops on the tour, let me be the one to introduce you to the newest collection by the genius ladies of Cotton + Steel: Frock!


Frock is a group of eight rayon fabrics, with delightfully fun prints that are scaled with garment construction in mind. I love that fabric companies are seeing the importance in garment-friendly substrates! Yes, we do want to make quilts and all kinds of things with quilt weight cotton, but we also want to wear your prints on our bodies! Isn't that the ultimate compliment? So as someone who predominately sews garments, I am thrilled that the powers that be are allowing their designers to release their prints in wearable fabrics like rayon, knit, double gauze, lawn, and voile.


Rayon is hands-down one of my favorite fabrics to work with. It is silky and soft and has an amazing drape, but it is much easier to sew with and care for than similar fabrics, like silk. Many people think that rayon is a man-made fiber in line with polyester, but that's actually not true. Rayon's base fiber is cellulose from tree pulp. Much like cotton is from a plant, or silk is from a worm, rayon's source material originates from wood. Because rayon comes from a plant, it's a little more eco friendly than silk, has a better breathability than polyester, and is also an animal-free fabric.

When the ladies of Cotton + Steel asked if I wanted to be part of this blog tour, of course I said yes without any hesitation, because I love what they do and truth be told, I had already seen the fantastic prints and was excited to whip up something for myself. But I can honestly say that the quality of this rayon exceeded even my own high expectations. This is without doubt some of the nicest rayon I've ever used–it has a heavy and weighty hand, but retains a fluid and swishy drape. It's the kind of fabric you want to twirl in! It's not thin and flimsy; it flows and billows around the body beautifully.

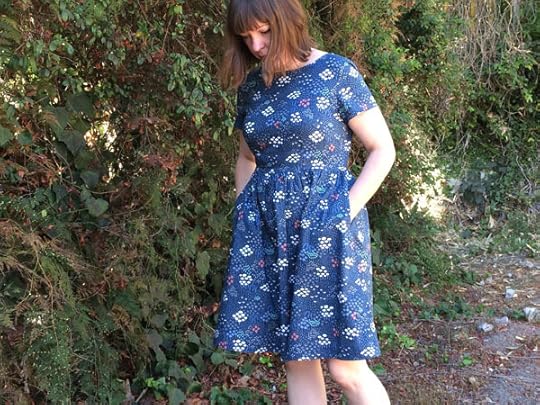
Though all the prints are divine, I knew I wanted to make a dress from the beautiful Pixel Print in the beige, white, red, and blue Bowling Pin colorway. Melody Miller, who designed this print, told me a while back that I was partly responsible for inspiring the colors she chose. So it just had to be, right?

After getting the fabric, I tossed it into the washing machine on cold and dried it on high heat. This isn't the recommended care for this fabric, but this is the way I've always pre-treated my rayon prints in the past, and I wanted to shrink it before sewing with it, so into the washer and dryer it went. I'm happy to report that it came out softer than ever! If you're not feeling as brazen as I, you can also dry clean your rayon, but I am a "wash on cold and hang-dry my dresses" kinda girl, so just know that this can be done.

Once my fabric was washed and ready to go, then came the tough task of deciding what to make. I debated this for a long time, trying to figure out if I should go for something new or something tried and true. After I had decided on making something else, Pauline Alice released her new pattern, the Eliana Dress, and I knew it was exactly what I was waiting for. This style of dress is perfect for showing off the gorgeous drape of the rayon.

Throwing all caution (and my own staunch advice) to the wind, I did not make a muslin and instead made some educated guesses on what pattern changes I'd need to make for this pattern to suit my body type. Here were my pattern changes and sewing details:
Subtracted 2" from the length of the topAdded 2" to the length of the skirtSubtracted 3 1/2" from the length of the sleevesChanged the bound sleeve hem to an elastic casingFully lined the skirtSewed the entire dress with French seams

Because this colorway of the rayon is rather sheer, I decided to line the skirt portion of the dress. To do this, I simply made a second skirt front and skirt back, and sewed them at the side seams. I joined this lining skirt to the main skirt when sewing along the waist seams and treated it as one unit along with the outer layer of the skirt. I then hemmed it with a slightly larger hem to keep it above the outer layer and hide on the inside of the skirt. Because the rayon is so lightweight, I used a cotton voile in beige that provides a visual barrier, while retaining the lightness and drape to the rayon.

I also sewed the entire dress with French seams, since I didn't want the stitching to show through the sheerness of the rayon. I have actually never sewn French seams on an in-seam pocket before, and found this tutorial by my pal Deborah Moebes on Sew Mama Sew. Except for the seam allowance amounts, I followed it and I am happy to report that it turned out beautifully!

Another change I made from the pattern instructions is I changed the sleeve hem from a gathered and bias-bound hem to a casing with 1/4" elastic. I love this kind of billowy sleeve, but I typically like to hold it in place, whether at my wrist or pushed up closer to my elbow, and the elastic allows me to move the sleeve and keep it there, wherever that spot might be. If the elastic wasn't in the hem, the sleeve would most always be all the way down, which is fine, but I know myself and I like to push them up sometimes, so the elastic allows me to do that.

I followed the rest of the pattern as written, and though it isn't a terribly hard pattern, it is a little fussy and the instructions are a little sparse, so I would suggest it for an advanced beginner, only because this dress is best suited for a slinky fabric and that makes a few of the steps a little challenging. The pattern went together like a dream and I'm so happy I picked it to feature the Cotton + Steel rayon. It really shows the lovely drape of the fabric. I will without question be making more Eliana dresses!
To pick up your own Frock fabric, find out which stores near you carry Cotton + Steel at their retailers page. This lovely collection is released in February and I for one am positively going to get more! It is the ultimate!

To see all the other garments being made up in the new Frock collection, check out the past and upcoming posts at these fine blogs:
January 28 - Jaime of Fancy Tiger Crafts
January 29 - Deborah Moebes of Whipstitch
January 30 - Amber of Fancy Tiger Crafts
January 31 - Rochelle New of Lucky Lucille
February 2 - me!
February 3 - Devon Iott of Miss Make
February 4 - Jemellia Hilfiger of JemJam
February 5 - Anna Graham of Noodlehead
February 6 - Oliver + S
February 7 - Rae Hoekstra of Made by Rae
Thanks to the lovely Cotton + Steel ladies for including me in this blog tour! I hope you all loved seeing a peek into this great collection!