Nick Robinson's Blog, page 22
November 3, 2014
A Labour of Love
Today’s task, Nick, should you choose to accept it, is to produce 3D assembly instructions for this delightful design by Denver Lawson. This diagrammer will self-destruct after 3 units….
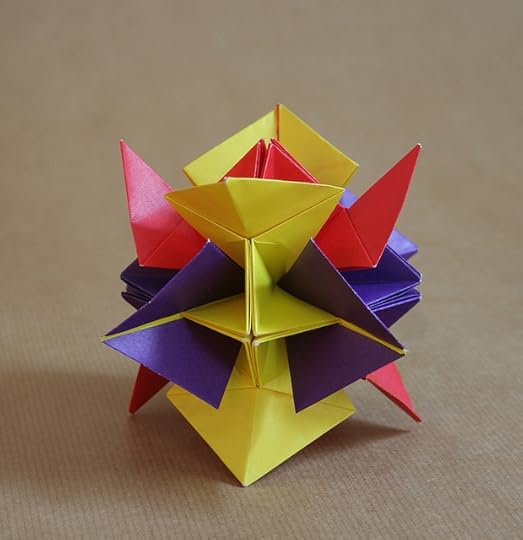
Leafed Octahedral Skeleton by Denver Lawson (folded by Paula Versnick)


November 2, 2014
Vampire Vid
It’s almost surreal the way in which your designs percolate round the world. I created a A4 based Vampire Bat many years ago, so old, in fact, that it was drawn by hand (yes!) and published only in an obscure Spanish book by Vicente Palacios. Someone must have seen it, since a 16 second video was posted on youtube in 2010 showing the final model “in action” with a weird soundtrack.
Then yesterday, my good friend and Ori-OCD victim Michel Grand told me about a more recent video by “Senbazuru Origami”. Much better quality, properly credited, but as ever, I had no idea it was being made or a chance to approve it. I wonder where they found the instructions?
October 2, 2014
Awesome Origami Pack
 A recent project should be released next month. I browsed for it on Amazon. Within hours, Facebook connected the two and offered me a targeted advert.
Tough sh*t facebook, I’m getting a free copy ;)
September 30, 2014
Geometric Conundrums
Working on a new book fo geometric origami, the more I play with these kind of ideas, the more possibilities emerge. However, I’m aware that I may well be re-creating existing designs. I check as much as I can, both in my substantial library, online, plus my living library (Wayne Brown), but some are not readily identifiable, however simple/obvious they may seem. With living subjects, you can quickly recognise a similar model. With geometric shapes, it’s far harder to compare models without diagrams.
Here’s a typical example. I spent many hours producing waterbomb base type shapes from within a square, starting with a one-piece solution from Larry hart. I felt his could do with moving some layers around, but couldn’t find a tidy way of achieving this. So, I decided to break the subject in half. More hours, many sheets down the line, I came up with an elegant, unknown (to me) solution, shown here. I sent diagrams to Wayne, who later identified it as being very similar to one by Kasahara, in a book I already owned!
I feel some spirit of ownership of this design, since I discovered it the hard way, with no prior influences, but evidently I’m not the first, or possibly even the second, to do so. I feel entitled to use the appellation “independantly discovered by”. When you browse through some of Fuse’s books, you might even be tempted to give up on trying for independent geometric work, since she’s covered so much of it, but if she can find new material, so can us mortals ;)

September 18, 2014
Google-eyed
I had an interesting session in one of the London offices of Google recently. They were launching a new feature for the staff and wanted me to supply a variety of models, but mostly flapping birds.
It was fascinating to see the inside of such a notable company but sadly, I’m sworn to silence on what actually went on. Equally, the only photo I can share with you is off the giant instruction board they created, curiously, for a half flap / half crane hybrid, which several members of staff said they couldn’t follow ;)
I offered a few ideas for future use of origami within the company and we’ll be having further talks – fingers crossed!

September 16, 2014
2 classics republished ;)
Two books from around 8 years ago have been republished, including the actual folded example on the cover. I’ve often wondered about exactly how these models are produced. Would hate to think I was responsible for an origami sweat shop in Taiwan. Now comes the task of trying to get a copy for my library…


September 11, 2014
Cut and Fold Techniques for Pop-Up Designs : Paul Jackson
 This book is part of a tetralogy of books written by Jackson for Laurence King Publishing, the others being: Folding Techniques for Designers, Structural Packaging and Cut and Fold Techniques for Promotional Materials.
As you would expect, it follows the same visual style of the others, being an 8.5″ square, devoid of any colour, with 130 pages of content. Having taught folding technology in universities around the world, few other people could bring such a wealth of experience and expertise to the subject.
The key to the books target audience is in the title – “techniques”. This is not a book showing finished pop-up models, whether in the Victorian theatre style or the contemporary work of Reinhart or Pienkowski, but a compendium of techniques that can be combined and adapted to almost any purpose. The techniques involve almost exclusively straight-line cuts and folds, favouring “surface design over complex cutting”, as the publishers explain. No glue is needed! This does limit the subject to what you might call “natural” pop-ups, so there is nothing on multiple layers, floating layers, pull-up planes etc. so cleverly used in modern children’s books.
However, this is not the target market. The book is aimed fair and square at marketing and packaging students and professionals, for whom it will undoubtedly form “required reading”, along with the others in the series. Together, they form a resource that is (to the best of my knowledge) unrivaled in the world of print.
Available for the unusual price of £11.16 on Amazon, it’s not a book for origamists, but it was never intended to be and outside the world of origami, Jackson is far better known as a paper artist rather than a creator of representational models. If you have any interest in folding technology, you should buy them all and there are special offers if you wish to do so.
More information can be found on the publishers’ site, including a link to a series of videos.
September 9, 2014
Sipho Mabona
I had the wonderful opportunity to get to know SIpho Mabona at the recent BOS convention in Bradford. He is a hugely gifted creator of origami, but more importantly, is a thoughtful and highly creative artist as well. From what he said, it’s clear origami may not be his main focus of attention for much longer, but the way in which he uses origami concepts to inform other creative work is nothing short of inspiring.
Having exhibited at galleries in the early 90s, I have For many years sublimated my artistic urges in favour of earning a living through origami, but I now feel reinvigorated and hoping to create art for arts sake once more. Our interview with Sipho was filmed and I’m sure many of you will find it equally inspiring when it is posted.

(L-R) Larry Hart, Dave Brill, Sipho Mabona, Nick & Mark Robinson
ideas for geometric origami?
I’m putting together some project ideas for a book on geometric origami and would welcome your thoughts as to what designs I should include to best illustrate the genre?
August 24, 2014
Going Dotty
 Origami diagrams are a means of communication, using symbols rather than words. The symbol set used these days is largely the same, based on the set developed by Yoshizawa and Randlett in the 50’s. Like any language, variations (dialects?) have developed and new symbols have entered the set from time to time.
Since I am producing diagrams almost every day, I am constantly striving to find better ways of illustrating a given step. My style has developed over the years and one change I made a few years ago was to replace the old double line “crease and unfold” with a single line using hollow and solid arrowheads. This didn’t offer more information, but made the drawings cleaner.
More recently, I have begun to use the dotted line, in two ways. Firstly, to show where a flap is folded underneath a layer. Previously, I used a cut-off arrowhead, but this didn’t allow me to specify exactly where a point would finish up. My new technique is;
1) draw the line in its entirety
2) cut the line where it meets an edge, then convert the line to dots
3) add an arrow-head at the end
Secondly, I have used dots to help make folds that have no obvious location points. Traditionally, the reader is supposed to look ahead at the next drawing to work out where to fold to. For example, here I am making a precrease for a reverse fold. The sequence is;
 1) Draw dotted lines to match the edges that will be reversed (shown here slightly offset so you can see them).
2) Use the reflect tool, select the lower point as the point of reflection, then flip the shape over.
3) Add the arrows (using my current fold and return style).
The result is an accurate illustration of where the paper will go, allowing the reader to make use of any reference points they can. Another bonus is that when the reverse has been made, you can quickly convert the dotted line into the reversed paper without having to redraw it.