Kayla I. Shown-Dean's Blog, page 10
December 30, 2024
Streamline Your Web Design Process: An 11-Step Checklist
Designing and developing websites is complex. User expectations rise alongside advancements in what is technically possible. As a consequence, the process has many moving parts you must keep in mind if you want to design and build web presences that provide a great user experience, rank well in search engines, and achieve client goals.
Even as an experienced freelance or agency developer, you might struggle to remember every item on the to-do list. The good news is, you don’t have to. By establishing a formalized web design process, you can create a roadmap to follow each time you build a new website.
Doing all the thinking beforehand ensures that you don’t forget anything crucial. It also frees up headspace for doing the actual work, avoids overwhelm, improves efficiency, and allows you to build better websites on repeat.
In this post, we’ll help you reap those benefits by establishing your own web design process. We’ll go through all the necessary steps and give you actionable advice on how to implement each and every one of them. This will give you a foundation to develop your own workflow and make life easier in the future.
How to use this information to develop your own processWe’ll go over the following steps (you can click on the links to jump directly to the part that most interests you):
Goal-settingScopingResourcingProject managementSitemap / wireframesCopy / content creationStaging site setupVisual designTestingLaunchSite maintenanceOur goal is to cover each point as completely as possible to provide you with a blueprint for developing your own process. Take what’s useful and relevant to you and add any additional information you might need for your particular use cases, working style, industry, or else.
Be aware that a formalized web design process is a living document that you’ll likely change over time as you repeatedly go through it and as web design requirements change. That way, it always reflects your latest way of working and current level of technology.
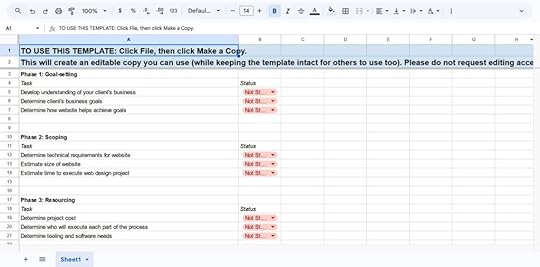
To make getting started extra easy, we also created a customizable checklist template. To use it, just create a copy and adapt it to your needs as you go through the information below.
 1. Determine website goals
The first thing you need is background information on the website you are about to build. The main objective is to understand its purpose, as this lays the groundwork for many decisions down the line.
For that, your first task is to understand who your client is. Their type of organization, industry, and audience make a big difference in the end product. Good questions to ask are:
What exactly does your business do?What are the company’s vision, mission, and/or values?How do you differ from the competition?Which problems do you solve for your customers?Which challenges, opportunities, and trends are shaping your industry?What regulations or compliance requirements does your industry have?Is there an existing brand identity?Once you have a better picture of the client, the second step is to find out how the website fits into their business. This is a set of questions that will help you do so:
What’s the goal you hope to achieve with the site?Who is the intended audience? What’s the first impression they should have when entering the website and what actions should they take on it?What type of content are you planning to publish?What are must-have features and functionality?How should the site be different or the same as that of competitors?What’s the budget and timeline?Questions like this are important for several reasons. First of all, lots of industries have distinct conventions when it comes to website design. For example, you would use a very different color scheme for a children’s toy store compared to a corporate financial services website. The client might also already have existing branding that you have to take into account to preserve an established look and hit the right tone.

In addition, the type of site you will build also has a big influence on the web design process. A brochure website, blog, and online shop all have very different purposes and require unique approaches. There can even be legal requirements that you have to meet. For example, on real-estate websites, visitors might have to virtually sign a contract before they can view portfolio items.
Without being crystal clear about what you are making and for what purpose, you are almost certain to get off on the wrong foot, which can be costly and time-consuming to correct. Therefore, spend enough time on the discovery phase until you have a firm grasp of the client’s needs. Extensive contact with stakeholders, market research, audience personas, a design brief, and competitor analysis are all useful tools for this stage.
2. Scope the projectOnce you know what you are tasked with designing, the next step in the web design process is to put together the project scope. This is where you determine the exact functionality and technical requirements for the site. It also helps you estimate how long the process will take, allowing you to agree on the exact work to be done (to prevent scope creep) as well as deadlines and milestones with your client.
Ask your client for these basic pieces of information:
How many pages does the site need?What will they contain? Do you have to account for things like forms or e-commerce functionality?What other features will be on the site?What about content? Will the client provide it, or is that part of your duties?Once you have collected key information, you can estimate how long the total project will take. Be sure to build in some buffer for when, not if, something unexpected happens.
A very useful tool for visualizing the timeline is a Gantt chart.
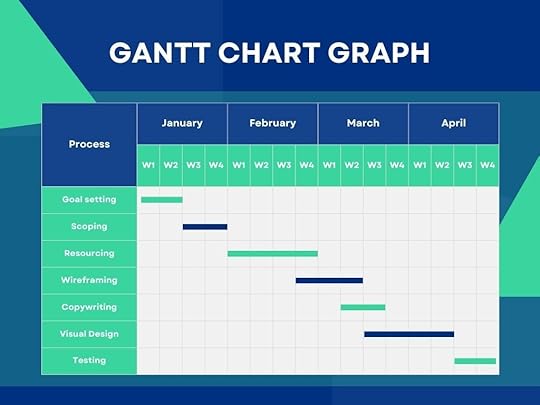
It shows the project timeline, key deliverables, and their expected completion times. You can easily create Gantt charts using existing Excel or Google Sheets templates.
3. Identify and allocate resourcesAfter this, it’s time to deal with your resources, including money, workforce, and tools. Let’s go over them one by one.
An established scope makes it easier to calculate project costs. For example, it helps you see how many hours it will take and calculate the cost of labor. However, don’t just think about the time—also consider external costs, such as:
Domain and hosting feesPlugins or themes you might need to purchaseStock photos or graphicsFonts or other assetsBe sure to calculate these beforehand for yourself and to provide an accurate estimate to your client. We have a checklist for website costs if you need a refresher. For hosting options, consider:
WordPress.comPressableBluehostIf you need a free tool for local development, check out Studio.
Another part of resourcing is determining who will do the work. If you’re a freelance full-stack developer, you might handle everything yourself. If you’re part of an agency, the work will likely be divided between the design and development teams. Either way, ensure there’s a clear plan and everyone knows what’s expected of them.
4. Prepare your project management platformBy now, you should have a good overview of the work that awaits you. It’s time to put it into order and make it more manageable.
The first step is to list all the phases and tasks the project will go through and add them to a project management tool. This also allows you to bring them into the correct order. Recommended tools include:
TrelloAsanaJiraGoogle SheetsExcelAs mentioned earlier, you can also use the free checklist template included in this article.
Feel free to break the phases down into smaller chunks if that’s how you prefer to work. In addition, include all the resources you already have and attach them to their respective tasks. While you are at it, don’t forget to input the timings and milestones you determined earlier for each item. This will help you stay organized.
By the way, your planning should also include regular check-ins with clients for approvals and updates. This fosters collaboration and ensures everyone stays on the same page.
5. Create a sitemap and wireframesFrom here, it’s time to start conceptualizing the end product and create a plan to follow along.
You’ve already determined the must-have pages for the website in the project scope. These often include the usual suspects (homepage, about page, contact page, legal pages, etc.), but you might also have less common ones depending on the project. The next step is to put them into relation to each other and plan the site structure. You can do so with a basic sitemap.

The way pages are arranged greatly influences a website’s navigation and user experience. For example, it determines how easy it is to find content and how often visitors have to click to reach it. A good structure also makes the site more crawlable, giving it an SEO boost.
Part of the site structure are also navigation and menus. They point out important pages and are often an initial entry point for visitors, so it’s important to consider them as well as other navigation elements like breadcrumbs.
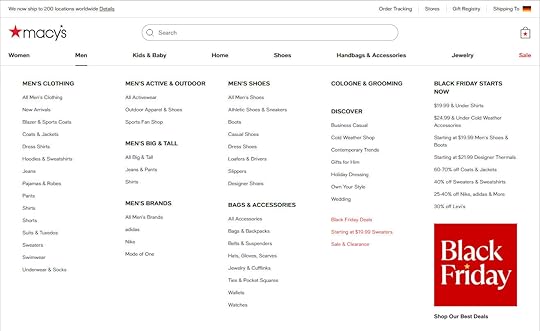
Once you have the overall structure, the next task is to visualize individual pages. This is where you create layouts for each page and determine how elements will be arranged—a process also known as wireframing.
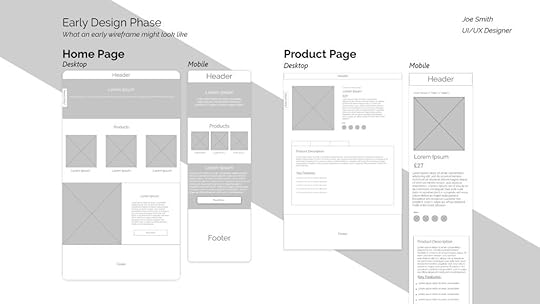
Wireframes let you map out the page structure before dealing with design considerations. They help you focus purely on usability and are a great tool to collect feedback from clients. Be sure to also map out your mobile layouts!
You can create wireframes using a variety of tools:
Graph paper – Go old school with pen and paper.Google Docs – While not the best option, it still works. Tables are your friend.Professional design tools – Options include Balsamiq or Figma. If you use Figma, consider using a wireframing kit like Johannes WP, which is specifically made for wireframing WordPress websites.You can find additional options in our article about wireframes.
6. Write the website copyWith the concept finished, you can start creating the visual parts of the website. Ideally, this doesn’t start with colors, fonts, and CSS but rather with written content.
While this might seem backward, it actually makes a lot of sense. Design should follow content, not the other way around. You don’t want to find yourself in a situation where you have a finished design but it can’t accommodate the intended text.

Writing copy doesn’t just mean crafting text for the main sections of the page wireframes you created earlier but also for navigational elements, buttons, forms, and other page elements.
There are several ways to handle this step:
Receive the content from the clientDraft the copy yourself (if that’s part of your agreement)Hire a content writer or copywriter.Use Jetpack AI to create placeholder copyIt’s important to be a bit flexible here. Content might still change and not everything has to be fully ready. It’s fine to use placeholders for some parts, like product descriptions.
However, you want at least a rough idea of what you need to accommodate in your page designs before you start creating them. This saves you from having to make time-consuming changes later.
7. Set up a staging siteNow that you’re ready to work on the actual website, it’s crucial to set up a development version. As a professional web developer, you know better than to do the design process on a live domain.
The typical approach is to use a staging site (which, incidentally, are available on all WordPress.com Business plans and above), or set up a local development environment, such as the aforementioned Studio.

Once that’s ready, you can immediately start creating the raw structure of the site. This includes setting up all the pages you scoped earlier and creating navigation items pointing to them.
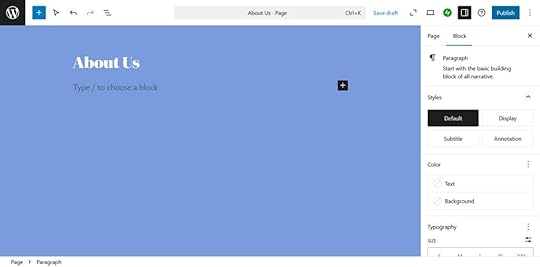
While you’re at it, you can also install any plugins included in your scope, implement features like forms, and insert written content into the appropriate places to create a rough version of the site.
8. Create the visual designThe next step is visual design. This is where you implement the structure from your wireframes and make it look good with fonts, colors, and other elements that create the website’s aesthetic.
This part of the process often happens in two phases: first creating a design mockup and then implementing it. In a WordPress website, the central element for that is the theme, which controls the website’s design.
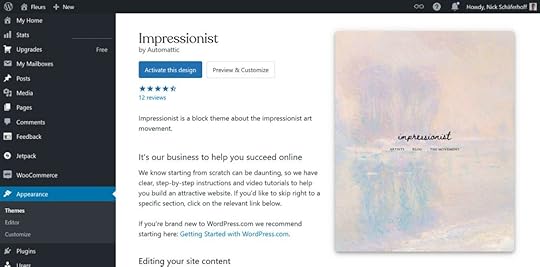
Here, you can either go with an existing theme or create your own. If you have a WordPress.com Business plan, either is an option since you can upload any third-party theme you want.
Obviously, making a theme from scratch is more work though it gives you the possibility to create a bespoke solution. Going with an existing theme takes less effort, yet it might not have all the features you want or need.
The most time-friendly solution is often to take a hybrid approach. That means finding a theme that is very close to what you are looking for in terms of design and functionality, and then customize it according to your needs.
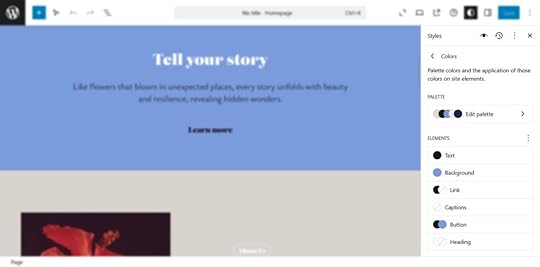
Thanks to block themes and the WordPress Site Editor, this has become simpler than ever. For example, you can adapt visual elements like colors easily using Styles and/or the WordPress Customizer.
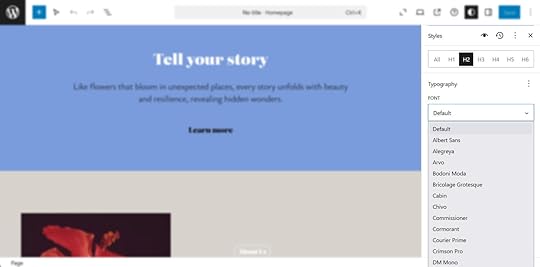
In addition, the Site Editor gives you control over all typography available on your website. You can assign a multitude of fonts to any text elements on your website.
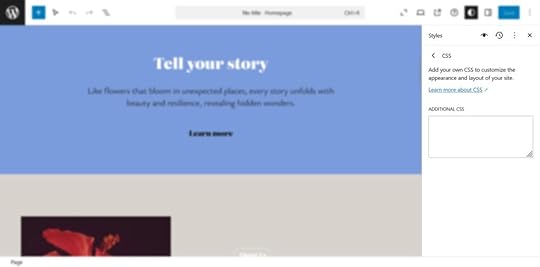
Using custom CSS is also a possibility.
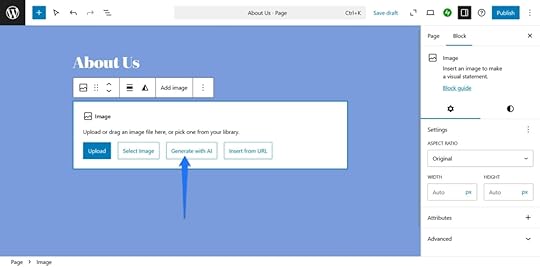
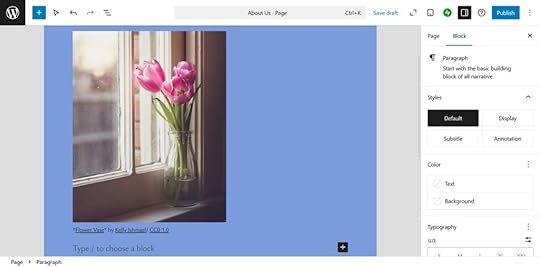
Finally, your website will likely also include visual page content, such as photos, icons, graphics, or videos. Depending on your contract, these might either come from the client or be something you create. Be aware that you have the possibility to source free images directly inside the WordPress.com editor.
First, there is the Jetpack AI image creator. Simply insert an Image block and choose Generate with AI.
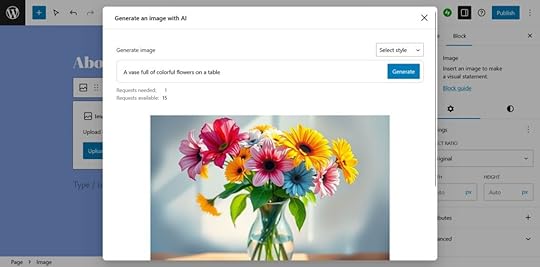
Then, input your prompt in the panel that shows up.
You can also insert images from Openverse and Pexels.com by clicking the Block inserter button and choosing the Media tab.
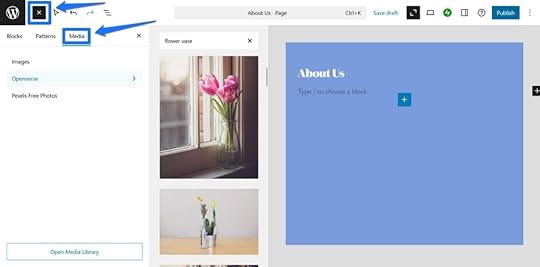
Search for any image and click on a result you like to automatically add it to the editor, complete with the correct attribution.
 9. Test the website thoroughly
Already done with the design? Alright hot shot, let’s move on then. Now it’s time to get to testing, which is one of the most crucial stages of the web design process. You don’t want to launch a website only to find parts or even the entire site not functioning correctly.
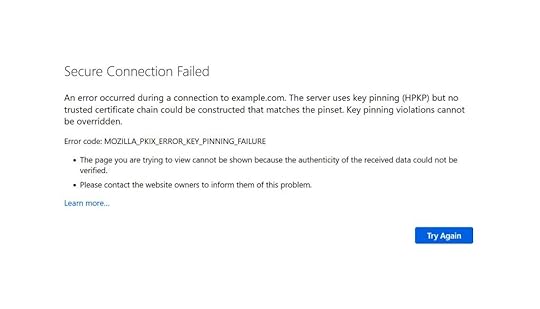
Testing should ideally happen on a staging site, especially one that uses the same environment as the eventual live website. This allows you to spot potential conflicts or problems that didn’t surface during development.
Here are the most important things to examine each page for:
Double check the content – Content is the main attraction of any website. Go through all pages to ensure there are no typos, missing images, or other errors that detract from the user experience.Ensure all features work – Test all central functionality, such as web forms, shopping carts, and interactive elements. For example, see that form submissions reach the intended destination.Verify all links – A well-planned site structure is only effective if users can actually use it. Make sure that links go to the correct destinations and are not broken. A tool like Screaming Frog lets you scan for broken links in bulk.Check SEO – Make sure all pages have correct meta information, such as title tags and meta descriptions. Screaming Frog also allows you to scan for that.Measure speed – Page speed is a major usability and ranking factor. Run all pages through tools like PageSpeed Insights to identify performance bottlenecks and fix them. You can also use WordPress.com’s free Site Profiler tool.Test on different devices and browsers – Since most users access websites on mobile devices, ensure the site looks good on all screen sizes. Test the site on multiple browsers as well.Validate accessibility – Modern web design must meet accessibility standards, such as WCAG guidelines. Check for sufficient color contrast, keyboard navigation, and compatibility with assistive technologies using tools like Lighthouse (which is also part of PageSpeed Insights) or WAVE.Invite your clients or other stakeholders to get involved in testing as well. Fresh eyes can catch issues you might have missed. Plus, you’ll need client sign-off on the website before launching. User testing is also a possibility at this stage.
10. LaunchWith testing complete and any problems resolved, it’s time to publish the website. Here, too, having a detailed launch checklist can be extremely helpful to ensure you don’t overlook anything.
After all, there are important things to do, such as connecting Google Analytics and Search Console, setting up security measures, creating user accounts, and configuring backups.
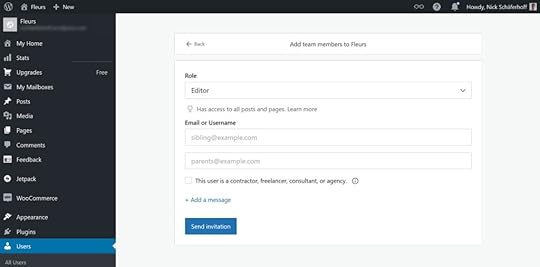
When you set a launch date, be sure that any promotional efforts, such as social media updates and email campaigns, are prepared in advance. This coordination ensures that your website makes a big splash as soon as it goes live.
11. Do regular site maintenanceWhile the website design process is mostly done after launch, it doesn’t mean your work is over. Websites are ongoing projects that require regular maintenance to stay functional, secure, and effective.
Here are some common maintenance tasks:
Addressing smaller bugsPublishing and updating contentCreating new pagesBuilding trafficPerforming software updatesConducting security auditsRunning backupsMeasuring KPIs through analyticsSmart developers have a plan for maintenance to continue creating value for clients—and revenue for themselves.
Of course, it’s best to automate as much of this work as possible. For example, WordPress.com automatically handles backups and updates, so you don’t have to do them manually or set up a separate solution.
You can find a full list of recommended maintenance tasks in this article.
Stay on top of things with your own web design processCreating a website that meets today’s high standards for design, usability, and performance is no small feat. With countless moving parts to manage, having a structured web design process is essential to stay on track.
By following a plan beforehand, you can save time, reduce errors, and ensure that nothing important gets overlooked. It allows you to focus on delivering results that align with your client’s goals while making your workflow repeatable for future projects. The steps outlined in this article serve as a flexible foundation to help you put together a process that works for you.
Now it’s your turn: What strategies or tools have helped you master the web design process? Share your thoughts in the comments below!
December 27, 2024
Meet Jetpack: Fueling Your WordPress.com Website
No matter what type of website you want to build, WordPress.com has all the tools you need to build your online home.
Many of those features are powered by Jetpack, a versatile plugin that provides WordPress websites with a suite of essential tools for site security, performance, and more. It’s included with every WordPress.com website (even sites on our Free plan). For self-hosted sites, Jetpack tools are also available on a subscription basis, with bundled and ala carte options.
Jetpack provides WordPress.com with tons of value. It makes sure your site performs well so you can build and create with confidence. But what exactly does Jetpack do and why should you care? Let’s look at just some of the ways Jetpack gives your WordPress.com site superpowers.
What’s inside the Jetpack toolbox?Jetpack offers tools in four categories to meet your website’s needs: security, performance, growth, and management. Many of these tools are included with free WordPress.com websites, with additional tools unlocked on higher plan tiers.
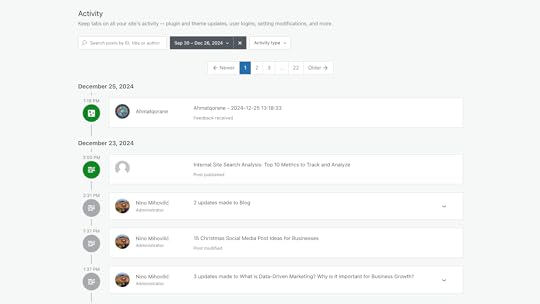
Activity Log: Keep tabs on every moveFree; additional features unlocked on Premium and above
With the Activity Log, you always have a high-level view of changes and actions taken across your site, from comments to new posts to downloads. Whether you have a large team of content creators or you’re trying to find the source of a pesky bug, the activity log offers transparency and accountability for every website change.
Free users have access to the 20 most recent website updates. Upgrade to a paid plan to view your complete site activity across your plan’s data retention period.
 Learn more about Activity LogAkismet Anti-Spam: Keep your site squeaky clean
Free and above
Spam can attack your site faster than you can say “where’s the firewall?” but Akismet Anti-spam offers professional-grade defenses. Using advanced machine learning, Akismet can filter out 99.99% of spam in user-submitted text, including spam comments, bot form responses, and fake leads, keeping your site and CRM looking pristine and professional.
Akismet Anti-spam can be found in the Jetpack section of the WP Admin. From there, you can monitor how much spam has been blocked across your site and choose whether you want to review or automatically delete potential spam messages.
Learn more about Akismet Anti-spamVaultPress Backup: Your site’s safety netBusiness Plan and above
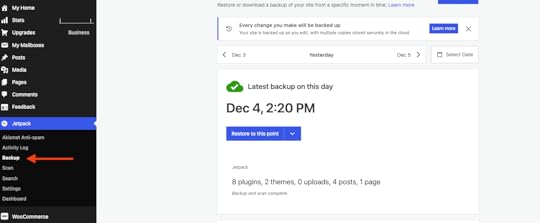
Accidentally broke your site with a new plugin? Never fear: VaultPress Backup has you covered. With daily backups and additional backups created every time you make an edit, it ensures that your website is crisis-proof.
To enable backups, simply navigate to the Jetpack tab in your WordPress Admin and select “Backup.”
Once VaultPress Backup has been enabled, it will automatically create daily backups of your site and backups after every change, with multiple secure copies stored across the cloud. If you ever want to return to a previous version of your site, click the date arrows to navigate to the date you want to roll back to. Click the “Restore to this point” button to revert your site with just one click.
 Learn more about VaultPress BackupJetpack Stats: Understand what’s resonating with your readers
Free; more features unlocked on Personal and above
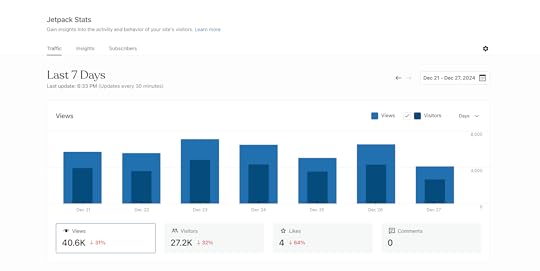
Use Jetpack Stats to see your website performance at a glance, including how many visitors are on your site and what content is performing best. Quickly see where your traffic is coming from to better optimize your marketing and partnership strategies. Jetpack is fully GDPR compliant so you can track your visitor metrics with confidence.
To access your free stats, navigate to the “Stats” tab in the WP Admin. For even more information on your website’s trends and insights to improve your website’s performance, upgrade to Premium.
 Learn more about Jetpack StatsJetpack Social: Share in a snap
Free and above
Gone are the days of logging into every social platform to share your newest blog post with your followers. Jetpack Social lets you preview and share your content across major platforms – Facebook, Twitter, Instagram, Linkedin, Mastodon, and Threads – with just one click from within the WordPress Editor.

Jetpack Social also enables you to automatically put quick share buttons on your posts, enabling your visitors to share their favorite content with their communities, expanding your content’s reach.
Learn more about Jetpack SocialJetpack Newsletter: Jump from post to inboxFree and above
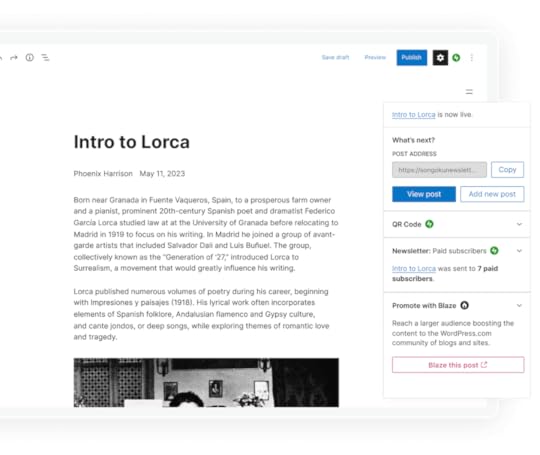
You no longer need a separate platform to get your content into people’s inboxes: Jetpack Newsletter allows you to convert your blogs into emails right from your post-publish page. Jetpack offers tools to support your newsletter from start to finish, from collecting subscribers on your website to sending and tracking your newsletter’s performance – all from within WordPress.com. Already have a dedicated following? Simply import your existing subscriber list to get started.
 Learn more about Jetpack NewsletterJetpack Search: Ctrl-F your content
Business and above
Do you have a large website with a lot of content? Help your visitors find what they’re looking for quickly by enabling Jetpack Search. You can turn on Jetpack Search and filtering with just one click in the Jetpack tab of WP Admin. Jetpack will automatically index all of your site content and offers flexible design options that match your brand.
For eCommerce sites, this is particularly valuable: research shows that people are 2x more likely to purchase something when they search versus standard browsing.
 Learn more about Jetpack SearchSEO Tools: Climb the ranks on search
Business and above
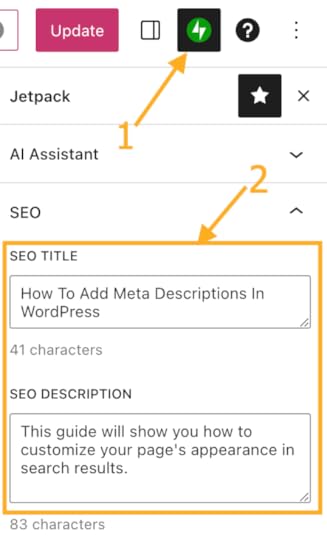
Help new users find your site with Search Engine Optimization, which helps your website climb up the ranks on popular search engines like Google. With the Jetpack SEO tools on WordPress.com Business plans and above, you can control your title tags and meta descriptions to ensure your site is optimized for search.
You don’t have to be an expert to use Jetpack SEO: Jetpack will notify you if your text exceeds the recommended character count limitations to ensure your metadata looks great in search engine results.
 Learn more about SEO ToolsAI Assistant: Your creative co-pilot
With a suite of AI-assisted tools, creating engaging content for your website has never been easier. Jetpack’s AI Assistant can help you quickly generate text, lists, tables, and AI-generated images. AI can also help you edit existing content, highlight readability challenges, identify tonal shifts, and suggest word and image updates to optimize user engagement on every page.
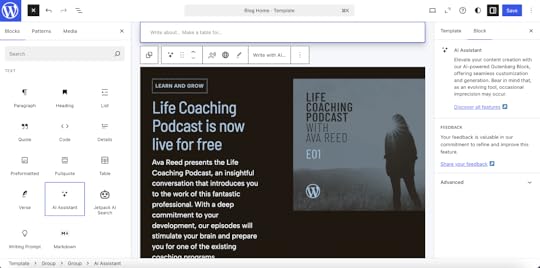
Plus, there’s more to explore with Jetpack Blocks – navigate to the Jetpack tab on the WordPress Site Editor (Jetpack is activated by default) or check out the Jetpack Blocks support guide.
Learn more about AI AssistantAdditional Plugins from JetpackBusiness plan users and above can install additional plugins to their websites. Let’s look at two top-tier plugins the Jetpack team offers to further extend your site’s capabilities.
Jetpack Boost: Make the jump to lightspeedPaid plugin
Speed matters: just a one-second delay in website loading times can cause a 20% drop in website conversions, with slow sites causing users to experience stress equivalent to watching a horror movie or taking a math test. With Jetpack Boost, you can get suggestions to optimize your website and give your website a relative speed score. Boost will also optimize your code for ultra-fast response times, no developer required.
With Jetpack, you can be sure you’re getting the best: Boost beat out the top 5 WP performance plugins in a head-to-head test.
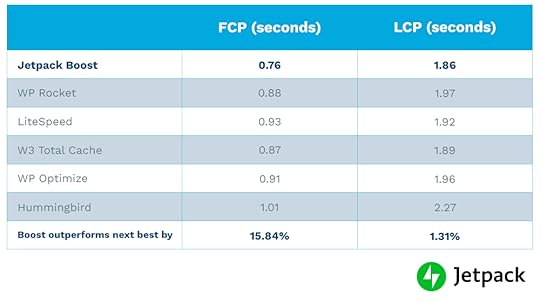 Source: JetpackLearn more about Jetpack BoostJetpack CRM: Know your customers
Paid plugin
For a fully integrated, simple CRM, try out Jetpack CRM (formerly known as Zero BS CRM). Jetpack CRM allows you to manage your customers and website visitors with ease, ensuring you never lose a contact or a sale. With integrations for WooCommerce, Paypal, Stripe, Gravity Forms, and more, you can ensure all your data and sales operations are at your fingertips. Unlike complex CRM platforms, Jetpack CRM keeps things simple so that you can run your business effortlessly.
 Learn more about Jetpack CRMReady for takeoff?
With Jetpack built into every WordPress.com website, you get best-in-class tools to help build and grow your site, no matter which plan you choose. It’s that special ingredient that helps make WordPress.com the best place to host your website (in our biased opinion). Sign up to create your first website today or upgrade your existing plan to access everything Jetpack has to offer.
December 23, 2024
Why Alt Text Matters: Boost Accessibility and SEO with Every Image
The internet is a treasure trove of visuals, overflowing with inspiration and information. Images are what draw us in, keep us engaged, and help us learn, and create. But imagine the internet without those visual cues—navigating it would be a real challenge.
Luckily, for people with visual impairments, those dealing with slower internet connections, and even the robots powering search engines, there’s a simple yet powerful solution: alt text (short for alternative text). This unsung hero of the digital world ensures that everyone can access and benefit from the images we often take for granted.
What is alt text?Alt text is exactly what it sounds like—a description of an image that appears on the page. Simple, right? But there’s more to it than that. To write truly effective alt text, it’s important to understand why it matters, when an image needs an alt attribute (spoiler alert: not every image does!), and the best tools to help you make sure your images are covered. Let’s dive in and make your alt text work smarter, not harder!
Why alt text is importantAlt text isn’t just a box to check—it’s a powerful attribute that serves two important purposes: making your content inclusive and helping search engines understand your images.
AccessibilityAlt text provides a written description of an image for those who rely on screen readers or encounter issues loading images. It’s there to ensure that no matter the barrier—be it visual impairments or low-bandwidth connections—your content remains accessible and meaningful to all users.
Without proper alt text, you risk not only making your site inaccessible to visitors but also potentially violating accessibility laws like the Americans with Disabilities Act (ADA), which could result in fines or other legal consequences. Similar laws are found throughout the European Union, Canada, the Republic of Korea, and Australia—just to name a few. If you’re trying to make the case for an equitable online experience for your team, this is a great place to start.
Want to learn more about building an inclusive online community? Here are a few resources to get you started:
WordPress Accessibility DayWordPress Accessibility StandardsWordPress Accessibility ForumSearch engine optimization (SEO)Search engine crawlers pull several key details from an image, including its file name, captions, title, and alt text. Among these, alt text is the most important for helping search engines understand the image’s subject within the page’s overall content. This information works alongside the other content on the page to enhance search engine algorithms, boost your rankings, and drive more traffic to your site.
When writing alt text, aim for clear, meaningful descriptions that fit naturally with the page’s content. Incorporate keywords thoughtfully, and most definitely resist the urge to overdo it—keyword stuffing not only disrupts the user experience but can also result in search engines penalizing your site as spam.
Not familiar with keyword stuffing? Keyword stuffing is all about cramming in as many keywords as possible in an attempt to boost rankings on search engine results pages. This doesn’t work and often backfires. Here’s an example:
 Photo by Tuqa Nabi on Unsplash.
Keyword stuffed alt text:
alt=”Cute kitten playing with a ball of yarn, adorable kitten, fluffy kitten, playful kitten, cute kitten image, kitten for sale, kitten pictures.”Well-written alt text can both enhances accessibility and support your SEO strategy. Use your commonsense and keep your (human) site visitors top of mind.
How to know which images need alt text and how to write itAfter all that, you may be surprised to learn that not all images require alt text. In fact, it becomes an exhausting experience for some users with screenreaders to endure fluffy alt text applied to images that don’t provide any value. Luckily for us, the W3 has categorized web images and offered some tips about how to treat images within each category.
Here’s how to write the right kind of alt text depending on what your image is for:
Informative images: These are the most common images found on sites and include pictures, photos, or illustrations that represent concepts or information. Your alt text should give a short description that conveys the essential meaning of the image.

For example, this image illustrates all of the integrations available with Automattic’s P2, but those integrations are not named in the accompanying content. It’s important here that the alt text provides that information for visitors that may not be able to see or load the image. It should look something like this:
alt="Logos for available P2 integrations: Crowdsignal, Figma, Twitter, GitHub, YouTube, Vimeo, Google Calendar, and Loom"Decorative images: If an image is just there to look nice and doesn’t add any important info, use a null alt attribute (alt=””). This tells assistive technologies to skip it.
Functional images: If an image works as a button or link, the alt text should explain what it does—not what it looks like.
For example, the alt text for a video icon might say “Watch this video about hibernating bees on Vimeo.”
Images of text: If the image contains readable text (like a graphic with a quote or a logo), the alt text should include the same words.
Complex images: Charts, graphs, or diagrams need more detailed alt text to describe the data or information they present. You might even link to a longer description.
Groups of images: If multiple images work together to convey one idea, the alt text for one of the images should cover the whole message. A good example of this would be process shots for a recipe or other how-to tutorial that includes steps.
Image maps: For images with clickable areas, provide alt text that explains the overall purpose of the image, and include alt text for each clickable section describing where it leads.
Not sure how to categorize an image? Check out the W3 Images Tutorial for help.
While there are no official length guidelines, it’s generally recommended to keep alt text under 140 characters. Longer descriptions can become tedious when read by screen readers. Be descriptive, but stay concise—this is not the place for creative flourishes.
Tools to ensure your images include alt textChrome Accessbility ReportThe Chrome accessibility report is an easy-to-use resource built right into your browser, when you want to quickly test a single page on your site.
Alt Text ToolsThe Alt Text Tools from the NerdPress team is a free, light-weight plugin that generates a CSV file of the images used in your content, along with their alt attributes.
Once the scan is complete (it’s very fast!), you can open the CSV file in the spreadsheet application of your choice. There you can quickly identify images that have missing alt attributes and scan for any that may need some improvement. The file also includes links to edit the posts where the images appear, making it quick and easy to update their alt attributes.
Equalize Digital Accessibility CheckerThis freemium WordPress plugin from Equalize Digital goes beyond alt text to ensure your site is accessible to a wide range of visitors. If you and your team are committed to making your content accessible, this is a great resource.
Equalize Digital also runs a Facebook Group and hosts a monthly virtual meet up for WordPress developers, designers, and users interested in learning more about creating accessible websites that can be used by people of all abilities.
Alt text may seem like a small detail, but it plays a big role in making the internet more inclusive and user-friendly. By writing thoughtful, descriptive alt text, you’re not just improving accessibility—you’re also optimizing your content for search engines and enhancing the overall user experience. With the right approach and tools, adding alt text can be an easy step toward a more accessible and SEO-friendly site.
Start a blog on WordPress.comStart optimizing your content with a blog hosted on WordPress.com.
Choose the plan that works best for your business, and let us manage the rest. With any WordPress.com plan, you get all the benefits of fast, secure managed WordPress hosting.
December 19, 2024
State of the Word 2024 Video + Recap
On Dec. 16, WordPress co-founder Matt Mullenweg, Lead Architect Matías Ventura, and Executive Director Mary Hubbard were joined by WordPress community member Junko Nukaga to reflect on all things WordPress at Tokyo Node Hall in Tokyo, Japan. The venue provided the perfect location for the annual event, which was held for the second time outside of the United States.
After delivering the evening’s keynote, Matt, Matias, and Mary were joined by distinguished guests including author and poet Mieko Kawakami, Things Become Other Things author Craig Mod, mgn CEO Hajime Ogushi, and SAKURA Internet Inc. Senior Director Genki Taniguchi. The talented pianist Aiko Takei also performed during the introduction and intermission.
If you missed the livestream, you can watch the full event below:
Highlights from 20242024 was a busy year for the WordPress project. Here are some particularly noteworthy moments and milestones that Matt, Matias, and Mary reflected upon from the event stage:
WordPress is growing in Japan (and beyond). Our favorite open-source CMS currently powers 43.6% of all websites around the world, and has a CMS share of 62.3%. In Japan, it powers 58.5% of all websites and maintains a 83% CMS share. The global community is growing too. WordPress sites using languages other than English are expected to surpass English language sites by 2025. It’s all about extensibility. WordPress users downloaded plugins 2.35 billion times in 2024. Users can install plugins on the Business plan and above. Writing and designing with WordPress has never been easier. An improved distraction-free mode provides a cleaner experience when writing in the editor. Thanks to the new zoom-out view, you can use patterns without setting up each single block. Enhancements for builders and developers. The Templates API streamlines registering and managing custom templates, while WordPress Playground became even more useful thanks to an improved Github integration. Even more free-to-use visual and audio content. Openverse, a free tool that makes it easy to find open-licensed and public domain works, grew to 884 million images and 4.2 million audio files. Learn how to use Openverse directly in WordPress.com.WordPress in JapanWordPress is flourishing all around the world, thanks in part to the generous support and contributions of the Japanese WordPress community. Here are a few key highlights and fun facts:
Japan was the first country to localize WordPress, thanks to a forum post from the user Otsukare. Wapuu, WordPress’s lovable mascot, was created by web designer and illustrator Kazuko Kaneuchi. You can learn all about Wapuu (and even buy Wapuu merchandise) at wapu.us.The popular forms plugin Contact Form 7, created by Japanese developer Takayuki Miyoshi, reached 10 million downloads in 2024. You can follow Miyoshi’s blog (which is hosted on WordPress.com) at ideasilo.wordpress.com.The Japanese WordPress community hosted 189 meetups in 2024. Find WordPress meetups in your area or learn how to start your own meetup.Q&A sessionIt wouldn’t be State of the Word without a question-and-answer segment. Audience members (including Tokyo Vice author Jake Adelstein) sparked engaging conversations around topics that included:
What open social platforms like Bluesky and Mastodon mean for web publishers.How will AI continue to impact search engine optimization in the future.Why websites are still relevant (and why it’s important to own your online home)And much more. You can watch the full session below:
New Year, New Story: Share Your 2025 Wishes with the World
As the last days of 2024 wind down, we’re inviting WordPress.com bloggers to kick off the new year by doing what we love most: sharing our stories.
Reflecting on the past 12 months and looking forward to the New Year is a natural part of the season, but blogging about those thoughts? That’s a modern twist that turns personal contemplation into community inspiration.
This January, we’re challenging you to write about the turning of the year – from your experiences during 2024, to your hopes, dreams, and goals for 2025, to everything that’s in between. We can’t wait to read what you come up with!
How to participate in the #2025-new-year-challengeParticipating is easy:
Write your post: Craft a heartfelt, honest, or even humorous post about what comes up for you as we enter the new year. Dream big, get specific, or keep it wonderfully vague – it’s your story.Schedule for January 1st: Use our handy scheduling feature to have your post go live on January 1st, right as the new year begins. Nothing says “fresh start” like a post dropping on day one!Tag it right: Add the #2025-new-year-challenge tag to your post. This is your ticket to others seeing and interacting with your post.Get the word out: Blog about the challenge or share this post with others. Let’s get as many stories as we can!Discover and connectWant to see what others created? Starting January 1st, visit wordpress.com/tag/2025-new-year-challenge to explore a world of reflections, aspirations, dreams, and more.
You might find a haiku encapsulating the past year, a fitness enthusiast planning their marathon, or someone simply resolving to be kinder to themselves. Every story matters, and every reflection is a step towards a new beginning.
Make it yours with the Personal planReady to make your online presence more personalized? Our Personal plan is the perfect companion for your blogging journey this new year. Get a custom domain (first year included) and transform your blog from a generic URL to your very own corner of the internet.
Imagine telling people, “Check out my resolution progress at [yourname].com” – pretty cool, right?
Let’s make 2025 remarkableWhether you’re nostalgic for 2024 or excited to learn a language, read more books, or simply smile more this upcoming year – we want to hear about it. Your post might just inspire someone else on their own journey.
So grab your laptop, warm up those typing fingers, and let’s welcome 2025 with stories of growth, hope, and possibility.
Happy writing, and here’s to new beginnings!
December 17, 2024
Using WordPress as a Data-Entry Site to Power a Central API
One of the areas where WordPress shines is content management. This is also corroborated by the fact that it is the world’s leading Content Management System, or CMS, by numbers.
The most popular way of displaying the content hosted by WordPress is through a frontend, like through blog posts and pages. That is wonderful for human visitors but there are other ways of consuming that content –– for example, web APIs.
In this article, we’ll explore how we can leverage WordPress in order to power a central API for projects like phone apps, browser extensions, or the frontends of other WordPress sites!
Following alongAll the steps described in this article were made in WordPress Playground. If you want to see the end result and maybe sometimes skip ahead as we go, download this ZIP file, and perform these steps:
Visit https://playground.wordpress.net/Restore the site from the ZIP fileLog in into the admin areaWhat is a web API?API stands for Application Programming Interface and it’s a way for software applications to communicate with each other in a standardized fashion. A web API is simply one that is accessed through “the internet” –– for example, by entering a certain URL in your web browser.
There are multiple types of web APIs, and one common way to group them is the protocol they use. In this article, we’ll be implementing two APIs, one based on the REST protocol, and another based on the GraphQL protocol. Other protocols you might have heard of include SOAP, RPC, or gRPC.
WordPress actually includes a built-in REST API which powers the Gutenberg Block Editor. As of October 2024, the popular WPGraphQL plugin has become a canonical plugin paving the road for an official GraphQL API as well.
What data we’ll be modelingBy the end of this article, we’ll have built a WordPress site that allows users to login in order to add/update/delete data entries which will be queryable both via REST routes and a GraphQL endpoint.
The data entries will collectively represent a company’s organizational chart –– things like employees, teams, and offices. While a little bland, the concepts can be applied to absolutely anything else.
Optional: Trimming down the frontendWhile an optional step, it makes a lot of sense to do this if your site won’t be serving any content via pages but exclusively through APIs.
Once you have a hosted WordPress website, you can start by installing a minimalist WordPress theme like Blank Canvas and deleting every single demo post and page on your site. Continue by using the site editor to include information on the homepage for visitors who find it unintentionally.
For example, add your business’ name and logo, and tell them that they probably landed there in error. You can also include a button linking to the admin area for maintainers of the content. Something along the lines of:
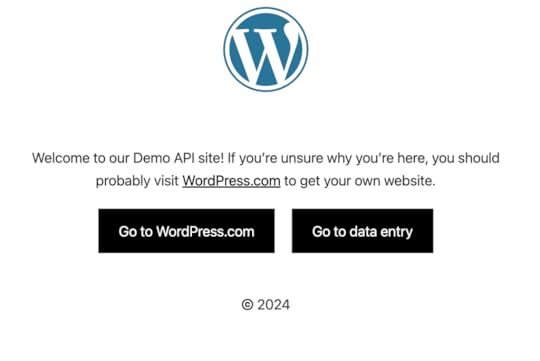
One way to prevent your site from being found in search engine results is by checking the Discourage search engines from indexing this site in your site’s settings.
If you would rather fully lock down the frontend and not even have the homepage described above, you can add the following code snippet either to a plugin like Code Snippets or to your child theme’s functions.php file:
/** * Disables the frontend for non-logged-in users. */add_action( 'template_redirect', static function (): void { $authorization_required_code = \WP_Http::UNAUTHORIZED; // 401 if ( ! is_user_logged_in() ) { \status_header( $authorization_required_code ); die( \get_status_header_desc( $authorization_required_code ) ); // phpcs:ignore WordPress.Security.EscapeOutput.OutputNotEscaped } }Custom post types and taxonomiesNow it’s time to focus on the website’s admin area and the data modeling part of this tutorial. The most straightforward way of compartmentalizing your data is by using WordPress’ built-in functionality of custom post types and custom taxonomies.
While there are many ways to do this, for the purposes of this tutorial, we’ll organize our data like this:
An employee custom post typeA team custom taxonomyAn office custom post typeIn order to create these custom data types, you can either add custom code to your site, or use a plugin (like in this video). A very popular plugin for creating custom post types and taxonomies using the admin interface is Custom Post Type UI – and that is what we’ll be using in this tutorial.
Here is the JSON configuration for importing the data into your installation:
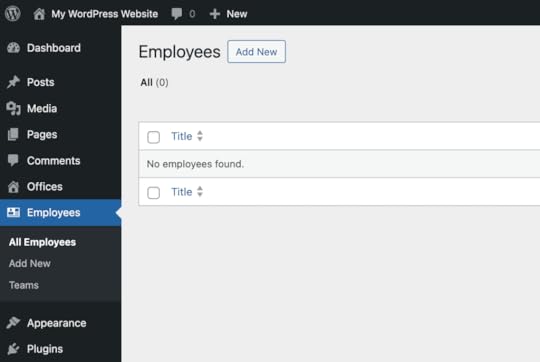
For custom post types {"employee":{"name":"employee","label":"Employees","singular_label":"Employee","description":"","public":"false","publicly_queryable":"false","show_ui":"true","show_in_nav_menus":"false","delete_with_user":"false","show_in_rest":"false","rest_base":"","rest_controller_class":"","rest_namespace":"","has_archive":"false","has_archive_string":"","exclude_from_search":"true","capability_type":"post","hierarchical":"false","can_export":"true","rewrite":"false","rewrite_slug":"","rewrite_withfront":"true","query_var":"false","query_var_slug":"","menu_position":"","show_in_menu":"true","show_in_menu_string":"","menu_icon":"dashicons-id","register_meta_box_cb":null,"supports":["title","thumbnail","excerpt","revisions"],"taxonomies":[],"labels":{"menu_name":"Employees","all_items":"All Employees","add_new":"Add new","add_new_item":"Add new Employee","edit_item":"Edit Employee","new_item":"New Employee","view_item":"View Employee","view_items":"View Employees","search_items":"Search Employees","not_found":"No Employees found","not_found_in_trash":"No Employees found in trash","parent":"Parent Employee:","featured_image":"Profile image for this Employee","set_featured_image":"Set profile image for this Employee","remove_featured_image":"Remove profile image for this Employee","use_featured_image":"Use as profile image for this Employee","archives":"Employee archives","insert_into_item":"Insert into Employee","uploaded_to_this_item":"Upload to this Employee","filter_items_list":"Filter Employees list","items_list_navigation":"Employees list navigation","items_list":"Employees list","attributes":"Employees attributes","name_admin_bar":"Employee","item_published":"Employee published","item_published_privately":"Employee published privately.","item_reverted_to_draft":"Employee reverted to draft.","item_trashed":"Employee trashed.","item_scheduled":"Employee scheduled","item_updated":"Employee updated.","parent_item_colon":"Parent Employee:"},"custom_supports":"","enter_title_here":"First and Last Names","show_in_graphql":"1","graphql_single_name":"Employee","graphql_plural_name":"Employees"},"office":{"name":"office","label":"Offices","singular_label":"Office","description":"","public":"false","publicly_queryable":"false","show_ui":"true","show_in_nav_menus":"false","delete_with_user":"false","show_in_rest":"false","rest_base":"","rest_controller_class":"","rest_namespace":"","has_archive":"false","has_archive_string":"","exclude_from_search":"true","capability_type":"post","hierarchical":"false","can_export":"false","rewrite":"false","rewrite_slug":"","rewrite_withfront":"true","query_var":"true","query_var_slug":"","menu_position":"","show_in_menu":"true","show_in_menu_string":"","menu_icon":"dashicons-admin-home","register_meta_box_cb":null,"supports":["title","thumbnail","revisions"],"taxonomies":[],"labels":{"menu_name":"Offices","all_items":"All Offices","add_new":"Add new","add_new_item":"Add new Office","edit_item":"Edit Office","new_item":"New Office","view_item":"View Office","view_items":"View Offices","search_items":"Search Offices","not_found":"No Offices found","not_found_in_trash":"No Offices found in trash","parent":"Parent Office:","featured_image":"Featured image for this Office","set_featured_image":"Set featured image for this Office","remove_featured_image":"Remove featured image for this Office","use_featured_image":"Use as featured image for this Office","archives":"Office archives","insert_into_item":"Insert into Office","uploaded_to_this_item":"Upload to this Office","filter_items_list":"Filter Offices list","items_list_navigation":"Offices list navigation","items_list":"Offices list","attributes":"Offices attributes","name_admin_bar":"Office","item_published":"Office published","item_published_privately":"Office published privately.","item_reverted_to_draft":"Office reverted to draft.","item_trashed":"Office trashed.","item_scheduled":"Office scheduled","item_updated":"Office updated.","parent_item_colon":"Parent Office:"},"custom_supports":"","enter_title_here":"Add Office","show_in_graphql":"1","graphql_single_name":"Office","graphql_plural_name":"Offices"}}For custom taxonomies{"team":{"name":"team","label":"Teams","singular_label":"Team","description":"","public":"false","publicly_queryable":"false","hierarchical":"false","show_ui":"true","show_in_menu":"true","show_in_nav_menus":"false","query_var":"false","query_var_slug":"","rewrite":"false","rewrite_slug":"","rewrite_withfront":"0","rewrite_hierarchical":"0","show_admin_column":"true","show_in_rest":"false","show_tagcloud":"false","sort":"false","show_in_quick_edit":"","rest_base":"","rest_controller_class":"","rest_namespace":"","labels":{"menu_name":"Teams","all_items":"All Teams","edit_item":"Edit Team","view_item":"View Team","update_item":"Update Team name","add_new_item":"Add new Team","new_item_name":"New Team name","parent_item":"Parent Team","parent_item_colon":"Parent Team:","search_items":"Search Teams","popular_items":"Popular Teams","separate_items_with_commas":"Separate Teams with commas","add_or_remove_items":"Add or remove Teams","choose_from_most_used":"Choose from the most used Teams","not_found":"No Teams found","no_terms":"No Teams","items_list_navigation":"Teams list navigation","items_list":"Teams list","back_to_items":"Back to Teams","name_field_description":"The name is how it appears on your site.","parent_field_description":"Assign a parent term to create a hierarchy. The term Jazz, for example, would be the parent of Bebop and Big Band.","slug_field_description":"The slug is the URL-friendly version of the name. It is usually all lowercase and contains only letters, numbers, and hyphens.","desc_field_description":"The description is not prominent by default; however, some themes may show it."},"meta_box_cb":"","default_term":"","object_types":["employee"],"show_in_graphql":"1","graphql_single_name":"Team","graphql_plural_name":"Teams"}}At this point, your WordPress admin interface might look something like this:
 To Gutenberg or not to Gutenberg
The Gutenberg block editor is functional, adaptable, and easy to use, and you should be using it to edit your traditional WordPress posts and pages. However, when it comes to CPTs without a frontend, there might not be any content to warrant the use of a performant editor like Gutenberg.
If you are positive that all of the information you need is not HTML-based, then it might make sense to disable Gutenberg for these CPTs and default back to the classic post editor that was the standard before WordPress 5.0.
The simplest way to disable Gutenberg support for a CPT is to set the show_in_rest argument to false when registering it (as we’ve done above).
Alternatively, if you want to keep the built-in REST routes that WordPress provides for every CPT, you can add this code to your child theme:
/** * Disables the block editor for certain CPTs. */add_filter( 'use_block_editor_for_post_type', static function( bool $use_block_editor, string $post_type ): bool { if ( in_array( $post_type, array( 'employee', 'office' ), true ) ) { $use_block_editor = false; } return $use_block_editor; }, 10, 2);Custom FieldsNow that we have our basic data types in place, we need to start populating them with entries. Before we do that, we need to ensure that we can record all the necessary data on each entry, and for that we will need to build custom fields.
The easiest way to add custom fields to your custom post types is to register them with custom-fields support. When you then edit a post, it will include a metabox like this:
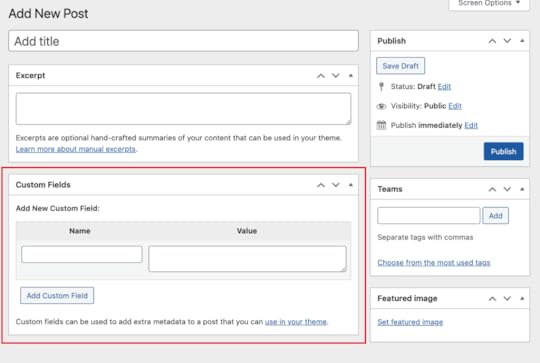
While this type of “key-value” interface can be enough, you might want to build a more user-friendly interface with fields like checkboxes, dropdowns, media selectors, and so on.
A popular way to add those types of custom fields is the Meta Box plugin, which, as mentioned above, is what we’ll be using in this tutorial. Using their online custom fields generator, we got the PHP code needed to register the fields we wanted and then added them to Code Snippets.
Using a fake data generator, we populated the custom post types with a bit of seed data:
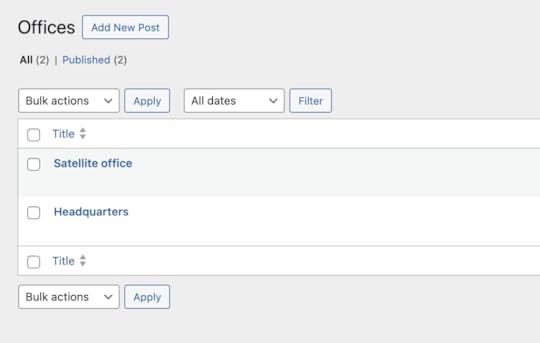
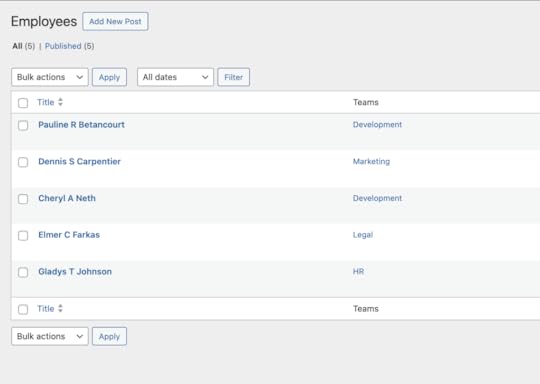 Other UI customizations
While we won’t explore any further UI customization options in this tutorial, we wanted to note that it’s possible to use various WordPress filters to tweak things like:
The default Add title placeholder on new posts (e.g., to First and Last Names)The columns hidden or visible by default on the CPT list table viewVarious other labels and messages throughout the admin interfaceAccess controlBefore we start looking into making the data available via API, it’s time to think about who should have access to it.
The custom post types and taxonomies mentioned above were registered in such a way that any logged-in user with the ability to edit regular WordPress blog posts will also have the ability to edit these. However, it’s possible to make that much more granular.
You can create custom user roles with custom capabilities in order to ensure that the UI is as clean-as-possible in order to promote focused-work for the users doing the data maintenance. This is particularly important if you anticipate a very high number of entries, especially on an ongoing basis.
While it is possible to control this entirely with custom code, a way to maintain a simpler overview of access management is provided by Access Policies implemented by the Advanced Access Manager plugin.
For example, you can create a separate access policy for each CPT you create. Then you may assign the policy either to a role or to individual users in order to maintain full control over who may add new Employee entries or even just edit existing ones. Deleting entries can be a capability reserved only for administrators.
Here is an example of how a policy named Employees CPT – Full Control and assigned only to Administrator users can look like:
{ "Version": "1.0.0", "Dependency": { "wordpress": ">=6.6.2", "advanced-access-manager": ">=6.9.42" }, "Statement": [ { "Effect": "allow", "Resource": [ "Capability:edit_employees", "Capability:edit_others_employees", "Capability:edit_private_employees", "Capability:edit_published_employees", "Capability:read_private_employees", "Capability:publish_employees", "Capability:delete_employees", "Capability:delete_private_employees", "Capability:delete_published_employees", "Capability:delete_others_employees" ] } ]}Here is an example of what the admin interface can look like for a dummy operator user that has the Data Entry Operator user roles (cloned from the Subscriber role) with two AAM Access Policies attached – one for each custom CPT:

Notice how the lack of most menu items makes it easier to focus solely on the data-entry aspect. The policies can be made more granular, for example, to also restrict who may delete an entry or create new ones.
Custom REST routesWhile WordPress will automatically create REST routes for every CPT as long as it is registered with the show_in_rest argument set to true, you can also create your own custom rest routes that are better suited for serving the CPT content in a way that makes more sense to your use-case.
The easiest and most standard way to achieve this is by extending one of the REST API controller classes. For maximum control over the output, you may want to extend the base WP_REST_Controller class itself.
You can choose to have your routes publicly accessible if the permission_callback argument is set to the __return_true function or you can choose to lock down calls using any permission scheme you want.
The recommended way of locking down access is behind a capability check, i.e. a call to current_user_can. You can use the AAM Access Policies mentioned above to grant or withdraw permission from individual roles or users, and you can use WordPress’ application passwords to authenticate API requests.
Hint: even if you decide that GET (read) requests should/can be publicly available, we still recommend that any POST // PUT // DELETE (create, update, delete) requests always be guarded by a current_user_can check.
Here is a REST controller that we added to Code Snippets in order to be able to list the employees on the site and fetch them by ID:
add_action( 'rest_api_init', function() { if ( ! class_exists( 'WP_REST_Controller' ) ) { return; } class Employees_Controller extends WP_REST_Controller { protected $namespace = 'custom/v1'; protected $rest_base = 'employees'; public function register_routes(): void { register_rest_route( $this->namespace, "/$this->rest_base", array( array( 'methods' => WP_REST_Server::READABLE, 'permission_callback' => array( $this, 'get_items_permissions_check' ), 'callback' => array( $this, 'get_items' ), 'args' => $this->get_collection_params(), ), 'schema' => array( $this, 'get_public_item_schema' ), ) ); register_rest_route( $this->namespace, "/$this->rest_base/(?P[\d]+)", array( 'args' => array( 'employee_id' => array( 'description' => __( 'Unique identifier for the employee.', 'psapi-features' ), 'type' => 'integer', ), ), array( 'methods' => WP_REST_Server::READABLE, 'permission_callback' => array( $this, 'get_item_permissions_check' ), 'callback' => array( $this, 'get_item' ), ), 'schema' => array( $this, 'get_public_item_schema' ), ) ); } public function get_items_permissions_check( $request ): WP_Error|bool { return true; // This information is public. You probably want to do a `current_user_can` check. } public function get_item_permissions_check( $request ): WP_Error|bool { return $this->get_items_permissions_check( $request ); // Same as for listing all. Can be different. } public function get_items( $request ): WP_Error|WP_REST_Response { $response = array(); $employees = new WP_Query( $this->prepare_posts_query_args( $request ) ); foreach ( $employees->posts as $employee ) { $data = $this->prepare_item_for_response( $employee, $request ); $response[] = $this->prepare_response_for_collection( $data ); } $response = rest_ensure_response( $response ); $response->header( 'X-WP-Total', $employees->found_posts ); $response->header( 'X-WP-TotalPages', $employees->max_num_pages ); foreach ( $this->prepare_link_headers( $request, $employees->max_num_pages ) as $key => $value ) { $response->link_header( $key, $value ); } return $response; } public function get_item( $request ): WP_Error|WP_REST_Response { $employee = get_post( $request['employee_id'] ); if ( ! $employee ) { return new WP_Error( 'rest_not_found', __( 'No employee found for the given identifier.', 'wpcom-demo' ), array( 'status' => 404 ) ); } $response = $this->prepare_item_for_response( $employee, $request ); return rest_ensure_response( $response ); } public function prepare_item_for_response( $item, $request ): WP_Error|WP_REST_Response { $fields = $this->get_fields_for_response( $request ); $data = array(); if ( rest_is_field_included( 'id', $fields ) ) { $data['id'] = $item->ID; } if ( rest_is_field_included( 'name', $fields ) ) { $data['name'] = $item->post_title; } if ( rest_is_field_included( 'picture', $fields ) ) { $picture = get_the_post_thumbnail_url( $item, 'full' ); $data['picture'] = empty( $picture ) ? null : $picture; } $data = rest_sanitize_value_from_schema( $data, $this->get_item_schema() ); $response = rest_ensure_response( $data ); if ( rest_is_field_included( '_links', $fields ) ) { $response->add_links( $this->prepare_links( $item, $request ) ); } return $response; } public function get_item_schema(): array { if ( $this->schema ) { return $this->add_additional_fields_schema( $this->schema ); } $this->schema = array( '$schema' => 'http://json-schema.org/draft-04/schema#', 'title' => 'employee', 'type' => 'object', 'properties' => array( 'id' => array( 'description' => __( 'Unique identifier for the employee.', 'wpcom-demo' ), 'type' => 'integer', 'readonly' => true, ), 'name' => array( 'description' => __( 'The name of the employee.', 'wpcom-demo' ), 'type' => 'string', 'required' => true, ), 'picture' => array( 'description' => __( 'URL to the employee profile picture.', 'wpcom-demo' ), 'type' => array( 'string', 'null' ), 'format' => 'uri', 'required' => true, ), ) ); return $this->add_additional_fields_schema( $this->schema ); } protected function prepare_posts_query_args( WP_REST_Request $request ): array { return array( 'post_type' => 'employee', 'post_status' => 'publish', 'order' => $request['order'], 'orderby' => $request['orderby'], 'posts_per_page' => $request['per_page'], 'paged' => $request['page'], 's' => $request['search'] ?? '', 'tax_query' => $this->prepare_posts_taxonomy_query_args( $request ), // phpcs:ignore WordPress.DB.SlowDBQuery ); } protected function prepare_posts_taxonomy_query_args( WP_REST_Request $request ): array { $tax_query = array(); if ( $request['team'] ?? false ) { $tax_query[] = array( 'taxonomy' => 'team', 'field' => 'slug', 'terms' => array( $request['team'] ), ); } return $tax_query; } protected function prepare_link_headers( WP_REST_Request $request, int $max_pages ): array { $link_headers = array(); $base = add_query_arg( urlencode_deep( $request->get_query_params() ), rest_url( $request->get_route() ) ); $next_page = $request['page'] < $max_pages ? ( $request['page'] + 1 ) : null; if ( $next_page ) { $link_headers['next'] = add_query_arg( 'page', $next_page, $base ); } $prev_page = $request['page'] > 1 ? ( $request['page'] - 1 ) : null; if ( $prev_page ) { $link_headers['prev'] = add_query_arg( 'page', $prev_page, $base ); } return $link_headers; } protected function prepare_links( WP_Post $employee, WP_REST_Request $request ): array { $links = array(); if ( ! isset( $request['employee_id'] ) ) { $links['self'] = array( array( 'href' => rest_url( "$this->namespace/$this->rest_base/{$employee->ID}" ), ), ); } else { $links['collection'] = array( array( 'href' => rest_url( "$this->namespace/$this->rest_base" ), ), ); } return $links; } } ( new Employees_Controller() )->register_routes(); });Testing your REST routes
Your custom REST routes will be available under /wp-json//. For example, the path for retrieving the list of employees could look like this:
/wp-json/custom/v1/employees?team=marketingHint: the team query added there will be parsed by WordPress and made available in the controller; you can then choose to either ignore it or filter the results by it – anything you want!
The easiest way to test your endpoints, especially if they will require an application password to access, is to use a tool like Postman which lets you test APIs in a very user-friendly manner. Publicly available GET requests can also be tested by simply visiting the URL endpoint in your browser!
Querying via GraphQLNow that we are able to fetch the data via REST routes, let’s explore how we might be able to fetch it using GraphQL as well.
If you’re unfamiliar with GraphQL, what you need to know is that it’s actually a querying language just like SQL but for APIs. You can read more about it on the official website over at https://graphql.org/.
The simplest way to add GraphQL support to our site is by installing the newly-canonical plugin WPGraphQL. It also has a documentation page where you can learn more about what it provides out-of-the-box, and also examples of how to handle much more complex scenarios.
If you’ve been paying attention to the JSON configuration of the custom post types shared above, you might’ve already noticed a key named show_in_graphql set to 1 (true/active). That is all we need in order to allow the custom post types we added to be queries using GraphQL.
Here is an example of a GraphQL query that can be used to list Employees which you can test in the built-in GraphQL IDE bundled with the plugin:
query GetEmployeesEdges { employees { edges { node { id name: title image: featuredImage { node { sourceUrl } } } } }}Building your ownIf this sounds like something you want to build for your own business, you can work on it on your own computer using Studio by WordPress.com. You can even share your work with colleagues (for free!) using a demo site, and when you’re ready, any WordPress.com Business plan or higher will be able to host and manage your site.
December 13, 2024
State of the Word 2024: Watch Live on December 16
State of the Word 2024 is just around the corner! Join us for this live stream event on Monday, Dec. 16th at 18:00 JST / 09:00 UTC.
State of the Word is the annual keynote address delivered by the WordPress project’s co-founder and Automattic CEO, Matt Mullenweg. Every year, the event celebrates the open source project’s progress and offers a glimpse into its future.
State of the Word 2024 will be held in Tokyo, Japan, at Tokyo Node Hall. This will mark the first year the event has ever been held in Japan, where WordPress powers 58.5% of all websites. This year’s edition promises to deliver insight from Matt, Lead Architect Matías Ventura, and General Manager Mary Hubbard, as well as a lineup of guest panelists, from acclaimed authors to leaders in the Japanese WordPress community.
It will be live-streamed worldwide via the WordPress YouTube channel.
Watch State of the Word 2024 live!What: State of the Word 2024
When: Monday, Dec. 16th at 18:00 JST / 09:00 UTC / 04:00am EST
How: The live stream is embedded above in this post and will start at the time of the event. It will also be available through the WordPress YouTube channel. Prefer to watch with other WordPressers? There will also be locally-organized watch parties happening around the world. Search to find one near you or learn how to host your own watch party.
December 12, 2024
Dream It. Build It. Here’s 25% Off to Make it Happen.
Every great journey starts with a single step—and yours starts today.
You’ve had the idea. You’ve imagined the possibilities. Whether it’s a blog, a business, or a creative project, the dream has always been there, waiting. But here’s the truth: dreams can’t grow until you take action. And right now is the perfect time to start.
At WordPress.com, we’re here to help you bring your vision to life. With our year-end promotion, you’ll get 25% off any new annual plan—plus a free domain for your first year—to make starting even easier.
Use coupon code DREAM25 at checkout and start building today.
Save 25% TodayWhy wait when everything you need is right here?
Design your dream. Choose from stunning, customizable themes that make your site uniquely yours.Be seen effortlessly. Built-in SEO tools help grow your audience and expand your reach.Turn passion into profit. Accept payments, offer subscriptions, and much more.Get expert help, 24/7. Our team is always available to support your success.And that’s just the beginning. From intuitive tools to seamless performance, we’ve built the platform to help you succeed—whether you’re starting your first blog, scaling your business, or taking your passion to the next level.
But here’s the thing: your dream won’t wait forever, and neither will this offer. This exclusive 25% discount ends on December 31st, 2024. Use coupon code DREAM25 at checkout and start building today.
The future you’ve been imagining? It’s closer than you think. Dream it. Build it. Grow it—with WordPress.com.
Save 25% TodayDecember 11, 2024
Snow Time Like the Present for WordPress.com
About 17 years ago we added an option called “Show falling snow on my blog” to WordPress.com. The name said it all: it added falling snow to your blog. Then, one day, it disappeared. It wasn’t because spring came and melted the snow away. We were cleaning up code, juggling lots of different priorities, and the snow was shoveled away.
When we first announced this bit of fun in 2007, we were inspired because WordPress co-founder and our CEO Matt Mullenweg was missing out on a White Christmas in his hometown of Houston. Ever since it went away, some of you have let us know you’ve also been missing out on snow — on WordPress.com. Thanks to everyone who reminded us, we’re bringing back this frosty feature today, available now for every WordPress.com user.
Want to join the fun? Log into your WordPress.com account and visit Settings in the left-hand sidebar. There, you’ll find an option to add some fresh powder to your site:
 Your personal snow machine, free for all WordPress.com users.
Voilà! With one click, your visitors can enjoy a wintry surprise, no matter where they are in the world:
We like to think of it as a fun gift for a time of year when so many people around the world will be sharing gifts — whether or not it’s snowing where you’re writing on your blog.
Now, we know not everyone appreciates snow as much as we do. So, we’ve been working hard on a flurry of other gifts over the past few months too, adding tons of improvements to WordPress.com. Until now, we just haven’t told you about them on our blog! This seems like a great time to recognize all those other small features, improvements, and wishlist items that make the WordPress.com world just a little bit nicer:
With all these new features and improvements, there’s snow time like the present to build your websites with WordPress.com. Feeling the giving spirit too? It’s easy to share WordPress.com with a gift subscription. No pressure, of course. Enjoy the snow, and look for even more enhancements and features to come in 2025!
December 4, 2024
Hot Off the Press: New WordPress.com Themes for December 2024
Another month means another fresh batch of excellent themes for WordPress.com. Let’s look at some of the latest additions to the WordPress.com themes gallery, with great options for content creators, small businesses, event organizers, and personal sites. Preview each one below (and maybe try taking one for a spin).
CoachAva Designed for: Professional coachesAlso great for: Consultants, thought leaders, speakers, and content creators with paid course offerings
With a clean, single-hued design, minimal photography, and approachable fonts, CoachAva is built for professional coaches looking to highlight their core offerings and showcase their expertise.
Whether you’re a seasoned executive coach, a life coach, or a subject matter expert looking to sell digital or in-person services, CoachAva can help you establish trust with potential clients by putting your thought leadership front and center. Blocks make it easy to share blog posts, podcasts, and/or customer testimonials on your homepage. The flexible design makes it easy to define, package, and showcase your different offerings, connecting clients to the perfect programs.
CastCore Best for: PodcastersAlso great for: Bloggers, serial content creators, news sites with limited photography
Ideal for podcasters building their first site, Castcore features bold, attention-grabbing titles and a minimalist aesthetic that keeps your listeners focused on what matters most – your content.
With a simple homepage design, this template makes it easy for listeners to scroll through your recent content to find the right episode. Castcore is a great option for podcasters who want to build their subscriber base. The Podcast Player block makes it super easy to create an embedded mini-player for your episodes: simply copy your podcast’s RSS URL to engage listeners right on your page. Choose a grey and black color combo for a classic design or go young and bold with bright yellow.
CoachBen Designed for: Professional coachesAlso great for: Thought leaders, speakers, and content creators with paid course offerings
CoachBen’s dark theme with bright accents offers a bold and professional design that perfectly reflects a coach at the top of their game. Striking and to the point, this theme allows professional coaches to quickly articulate their value proposition and define their services.
With pre-designed blocks for displaying company logos of past clients, a calendar of speaking events, and a blog subscription, there are plenty of ways to show potential clients your expertise and experience. When they’re ready to dig in, they can learn more about specific offerings on your courses page or reach out to schedule a call.
GreenSeed Designed for: Flexible visual sitesAlso Great for: Brick and mortars, Restaurants, Personal care providers, Digital portfolios, visual artists, photographers
Greenseed is a beautifully simple, highly adaptable theme that makes it easy for businesses to take their brick-and-mortar brands online. Designed with full-site editing in mind, Greenseed can be customized to match any brand style, but its open spaces and bold visuals make it a particularly great choice for businesses looking to establish a streamlined online presence that embraces custom photography.
This minimal, approachable layout gives your photos space to breathe while providing key business information like address, phone number, and store hours. Link to your reservations page or provide visitors with a contact form to make it easy for potential customers to make an appointment or plan a visit.
Aether Designed for: Small jewelry or accessory brandsAlso great for: Eco-conscious consumer brands, wedding suppliers
 Like the jewelry and accessory brands it was built for, Aether embodies modern elegance. With delicate fonts and natural-toned color palettes, this product-focused template offers a tasteful design that allows artisan accessories and jewelry to truly sparkle.
With social media integrations and the ability to highlight products on your homepage, Aether creates a flexible hub for your digital brand. You can allow your customers to purchase products directly through WordPress’s e-commerce plugins or you can link your website to an existing storefront. With Aether, you can be sure your customers will understand your brand’s commitment to quality and design.
Miko Designed for: Personal professional websiteAlso great for: Writer portfolios, speakers, brand consultants
With a bold split-page design and minimalist elements, Miko keeps your brand center stage. Best for individuals, creators, or service providers who want to make a lasting visual impact, this template allows visitors to navigate through all of the pages of your site on the left side without ever navigating away from the image and title anchored on the right.
Featuring a variety of hyper-modern font options and cool color combos, Miko can lean sweet and delicate or bold and artistic, effortlessly complimenting a huge range of personal and professional website identities. Regardless of the style you choose, Miko is the perfect theme for anyone who wants to present themselves as a modern, polished professional with an eye for design.
Conference
The best way to market your upcoming conference is with a sleek custom website. Conference is a flexible template that helps conference planners create a credible online presence.
The Conference template can support both marketing and event logistics: You can highlight your speakers, sponsors, and conference news to draw in new attendees via the signup form. Once attendees register, the site acts as a home base for key information, providing pages for the conference location, daily schedules, and lists of attendees to help your participants connect in advance. Whether you are hosting a multi-day affair or an intimate workshop, Conference can scale to meet the needs of your event.
Ready to give your site a makeover? You can explore these themes by clicking the “Demo” button on each theme page. Whether you’re starting a coaching business or looking to improve your professional online presence, you might just find the perfect jumping-off point for your future website.
Most premium themes are available to use at no extra charge for customers on the Personal plan or above. You can explore all of our premium themes by navigating to the “Themes” page, which is under “Appearance” in the left-side menu of your WordPress.com dashboard, or by clicking the button below:
Explore all WordPress.com themesPartner themes are third-party products that can be purchased for $99/year each on the Business or Commerce plans, so if you haven’t found what you’re looking for today, there are plenty of alternatives available.


