Kayla I. Shown-Dean's Blog, page 14
August 23, 2024
The Fediverse Files: The Magic of Federation
Remember when commenting on blogs and interacting with other commenters was one of the core pieces of enjoying the web? Matthias Pfefferle is making commenting cool again with ActivityPub for WordPress, a plugin that seamlessly connects your WordPress website to the fediverse.
In this interview, Doc Pop and Matthias talk about fediverse applications that apply beyond social media—and where the ActivityPub protocol can go in the future.
Will you be one of those people? Federate your website today and get 25% off a WordPress.com Business or Commerce hosting plan by using coupon code federate25—or click below:
Get your 25% offAugust 20, 2024
Building Studio in Public: Maintaining High Performance in Our Local Development App for Enhanced UX
We’re back with Part 2 of our “Building Studio in Public” series! Today, we’re diving into the challenges we faced while optimizing Studio’s performance. This post will be especially valuable if you’re developing an Electron app and dealing with performance issues or if you’re simply curious about how the Studio app functions behind the scenes.
If you’re following the series, be sure to check out our first post: Using WordPress Components and Tailwind CSS in our Local Development App .
As a reminder, Studio is our free, open source local development app. It’s based on Electron (the focus of today’s post!) and is currently available for Mac and Windows.
Download Studio for freeOvercoming the challenges of running local development sitesRunning a local development site can be complex, often requiring the setup of multiple tools. A typical approach involves using multi-container applications like Docker and Docker Compose in addition to setting up a web server with a WordPress installation and a MySQL database. This process can become even more challenging when managing multiple sites simultaneously.
Studio was designed to simplify this process, allowing users to set up sites quickly without any prior configuration. This capability is powered primarily by the WordPress Playground project, which enables anyone to run a fully functional WordPress site within a browser or Node.js environment.
For each site created with Studio, we run a basic web server using ExpressJS to handle web requests and use WordPress Playground to process them.
Initially, this was implemented in the Electron-based Studio app without noticeable performance issues.
However, as we expanded our testing across Mac and Windows, we observed some slowness in UI interactions when managing and navigating sites. Everything seemed properly configured, but something was clearly off.
 Keeping the main process lightweight
As we delved into these performance issues, we discovered that running sites within Electron’s main process was the primary cause of the slowdown. Processing web requests and executing the associated PHP code for WordPress in the main process added extra load, which negatively impacted other operations, aka that UI slowness we were seeing.
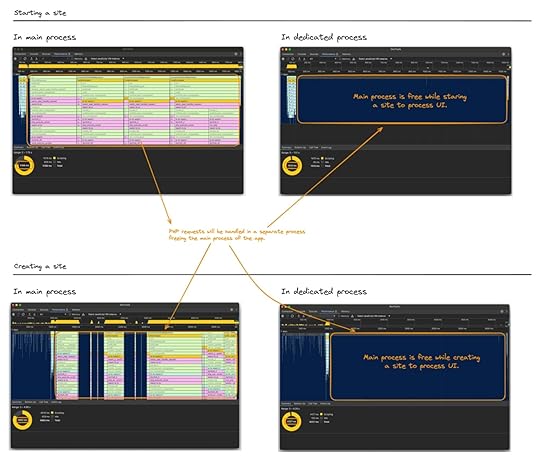
Electron’s documentation is incredibly valuable for addressing performance issues, particularly those related to blocking the main process. It was clear that maintaining a lightweight main process is crucial, and avoiding heavy or blocking operations in this context is essential. However, this realization presented a new challenge: how do we detach the running sites from the main process?
Spawning dedicated processesTo tackle the performance issues, we adopted the tried-and-true strategy of “divide and conquer.”
The idea was to run Studio’s sites in dedicated processes, separate from the main one. Since Electron is built on Node.js, spawning child processes seemed like a plausible solution. However, Electron also offers a utilityProcess utility, which behaves similarly to Node’s child processes, but operating at the browser level and aligning more closely with Electron’s app model.
While this approach promised to alleviate the load on the main process, it also introduced additional complexity. We had to manage these new processes and handle communication between the main and dedicated processes via messages. Additionally, we encountered challenges related to the build configuration and using Webpack for building the application.
Below is a full example of implementing this approach (click to expand each example to see the full code):
Dedicated Process Manager (process.js):const { app, utilityProcess } = require( 'electron' );// This path should be calculated dynamically as the file could be in// different locations depending on the build configurationconst PROCESS_MODULE_PATH = './process-child.js';const DEFAULT_RESPONSE_TIMEOUT = 120000;class Process { lastMessageId = 0; process; ongoingMessages = {}; async init() { return new Promise( ( resolve, reject ) => { const spawnListener = async () => { // Removing exit listener as we only need it upon starting this.process?.off( 'exit', exitListener ); resolve(); }; const exitListener = ( code ) => { if ( code !== 0 ) { reject( new Error( `process exited with code ${ code } upon starting` ) ); } }; this.process = utilityProcess .fork( PROCESS_MODULE_PATH, [], { serviceName: 'dedicated-process', env: { ...process.env, IN_CHILD_PROCESS: 'true', APP_NAME: app.name, // Note that Electron context won't be available in the dedicated process. // Add here other environment variables that might be needed. }, } ) .on( 'spawn', spawnListener ) .on( 'exit', exitListener ); } ); } // This is an example function. Feel free to add more for other purposes. async exampleFunc( command, args ) { const message = 'exampleFunc'; const messageId = this.sendMessage( message, { command, args } ); return await this.waitForResponse( message, messageId ); } // It's important to keep in mind that the process will be running // until it's explicitly stopped. async stop() { await this.killProcess(); } sendMessage( message, data ) { const process = this.process; if ( ! process ) { throw Error( 'The process is not running' ); } const messageId = this.lastMessageId++; process.postMessage( { message, messageId, data } ); return messageId; } async waitForResponse( originalMessage, originalMessageId, timeout = DEFAULT_RESPONSE_TIMEOUT ) { const process = this.process; if ( ! process ) { throw Error( 'The process is not running' ); } if ( this.ongoingMessages[ originalMessageId ] ) { throw Error( `The 'waitForResponse' function was already called for message ID ${ originalMessageId } from the message '${ originalMessage }'. 'waitForResponse' may only be called once per message ID.` ); } return new Promise( ( resolve, reject ) => { const handler = ( { message, messageId, data, error } ) => { if ( message !== originalMessage || messageId !== originalMessageId ) { return; } process.removeListener( 'message', handler ); clearTimeout( timeoutId ); delete this.ongoingMessages[ originalMessageId ]; if ( typeof error !== 'undefined' ) { console.error( error ); reject( new Error( error ) ); return; } resolve( data ); }; const timeoutHandler = () => { reject( new Error( `Request for message ${ originalMessage } timed out` ) ); process.removeListener( 'message', handler ); }; const timeoutId = setTimeout( timeoutHandler, timeout ); const cancelHandler = () => { clearTimeout( timeoutId ); reject( { error: new Error( `Request for message ${ originalMessage } was canceled` ), canceled: true, } ); process.removeListener( 'message', handler ); }; this.ongoingMessages[ originalMessageId ] = { cancelHandler }; process.addListener( 'message', handler ); } ); } async killProcess() { const process = this.process; if ( ! process ) { throw Error( 'The process is not running' ); } this.cancelOngoingMessages(); return new Promise( ( resolve, reject ) => { process.once( 'exit', ( code ) => { if ( code !== 0 ) { reject( new Error( `Process exited with code ${ code } upon stopping` ) ); return; } resolve(); } ); process.kill(); } ).catch( ( error ) => { console.error( error ); } ); } cancelOngoingMessages() { Object.values( this.ongoingMessages ).forEach( ( { cancelHandler } ) => { cancelHandler(); } ); }}module.exports = Process;Dedicated Process Logic (process-child.js):// Replace with initial setup logic based on the environment variables if needed.console.log( `Run initial setup for app: ${ process.env.APP_NAME }` );const handlers = { exampleFunc: createHandler( exampleFunc ),};async function exampleFunc( data ) { const { command, args } = data; // Replace this with the desired logic. console.log( `Run heavy operation ${ command } with args: ${ args }` );}function createHandler( handler ) { return async ( message, messageId, data ) => { try { const response = await handler( data ); process.parentPort.postMessage( { message, messageId, data: response, } ); } catch ( error ) { process.parentPort.postMessage( { message, messageId, error: error?.message || 'Unknown Error', } ); } };}process.parentPort.on( 'message', async ( { data: messagePayload } ) => { const { message, messageId, data } = messagePayload; const handler = handlers[ message ]; if ( ! handler ) { process.parentPort.postMessage( { message, messageId, error: Error( `No handler defined for message '${ message }'` ), } ); return; } await handler( message, messageId, data );} );Run example (main.js):async function runExample() { const process = new Process(); await process.init(); await process.exampleFunc( 'my-command', [ 'example', 100 ] );}…app.whenReady().then( () => { runExample();} );…Note: The code above has been adapted for use in a generic example Electron project. You can test it using Electron Fiddle .
Build configuration and WebpackOur project build setup relies on Forge and Webpack. Implementing dedicated processes introduced extra complexity, as we initially bundled all the code into a single file.
However, since dedicated processes require their code to run in isolation from the main process, we needed to separate the bundles. After adjusting the Webpack configuration, we successfully set it up to produce the necessary files.
Below is an example of the changes we applied (click to expand each example to see the full code):
Before:import { type Configuration } from 'webpack';export const mainConfig: Configuration = { // This is the main entry point for your application, it's the first file // that runs in the main process. entry: './src/index.ts',...After:import path from 'path';import { type Configuration, DefinePlugin } from 'webpack';// Extra entries are bundled separately from the main bundle. They are primarily used// for worker threads and forked processes, which need to be loaded independently.const extraEntries = [ { name: 'siteServerProcess', path: './src/lib/site-server-process-child.ts', exportName: 'SITE_SERVER_PROCESS_MODULE_PATH', }, // Here you can configure other dedicated processes];export default function mainConfig( _env: unknown, args: Record< string, unknown > ) { const isProduction = args.mode === 'production'; // Generates the necessary plugins to expose the module path of extra entries. const definePlugins = extraEntries.map( ( entry ) => { // The path calculation is based on how the Forge's webpack plugin generates the path for Electron files. // Reference: https://github.com/electron/forge/blo... const modulePath = isProduction ? `require('path').resolve(__dirname, '..', 'main', '${ entry.name }.js')` : JSON.stringify( path.resolve( __dirname, `.webpack/main/${ entry.name }.js` ) ); return new DefinePlugin( { [ entry.exportName ]: modulePath, } ); } ); return { ...mainBaseConfig, plugins: [ ...( mainBaseConfig.plugins || [] ), ...definePlugins ], };}export const mainBaseConfig: Configuration = { entry: { // This is the main entry point for your application, it's the first file // that runs in the main process. index: './src/index.ts', // Inject extra entries into the Webpack configuration. // These entries are primarily used for worker threads and forked processes. ...extraEntries.reduce( ( accum, entry ) => { return { ...accum, [ entry.name ]: entry.path }; }, {} ), },...Note: The code above is directly from Studio , written in TypeScript .
Bonus tip: avoid blocking file system operationsWe also noticed performance issues when using synchronous file system operations when building Studio, specifically when using the synchronous versions of functions, which can block the main process. To prevent this, it’s best to use the promise-based or callback versions of these functions.
For example, instead of using:
fs.readFileSync( path, 'utf8' );Use:
await fs.readFile( path, 'utf8' );Ready to build?If this information has piqued your interest, or if you’re developing WordPress sites, start leveraging the power of Studio today. It’s free, it’s open source, and it seamlessly integrates into your development workflow.
Download Studio for freeAfter downloading Studio, connect it to your WordPress.com account (free or paid) to unlock features like Demo Sites.
Want to contribute to Studio? Here are some GitHub issues you can dive into:
php_curl missing and curl_exec deactivatedTotal and free size of filesystem reported in sites doesn’t match actual values Permission issues using a theme that uses composerAugust 16, 2024
The Fediverse Files: Making Social Media Fun Again
In this episode of the Fediverse Files, Doc Pop talks with Bart Decrem, the co-creator of Mammoth, an open source Mastodon app for iOS.
Doc and Bart discuss how the walled gardens of modern social media platforms are finally getting some real competition from a better, and more open social web. The rise of the fediverse signals a return to the original promise of the web: that anyone can find a home, their own place on the internet, and connect with whomever they want without getting trapped in a single platform.
Whether it’s through a newsletter, a podcast, or a publisher’s website, Bart’s goal is to get a million websites and a hundred million people onto the fediverse.
Will you be one of those people? Federate your website today and get 25% off a WordPress.com Business or Commerce hosting plan by using coupon code federate25—or click below:
Get your 25% offAugust 15, 2024
How We Built It: Beeper’s New Blog
Automattic recently welcomed Beeper, an all-in-one messaging app, to our umbrella of life-improving apps. (If you haven’t yet, check out Day One, Pocketcasts, and Tumblr, too!)
Since Beeper joined a company best known for its world-class WordPress hosting and plugin solutions, we knew our special projects crew would love creating a shiny new blog for the messaging team.
With blog.beeper.com, our team showed off what can be quickly done with a minimalist framework. In this post, we’ll give you a short tour of the new site, including some design inspiration as well as before and after shots.
Take a look at Beeper’s new blog and remember to download the app today on iOS, Android, or desktop.
Maintaining Beeper’s clean and colorful aesthetic
Beeper’s design sensibility has always been fun and playful, featuring a blue-purple color palette, simple icons, and friendly imagery and messaging. We knew we didn’t need to reinvent the wheel on that front, so we maintained the overall aesthetic while giving the new blog a clean background that’s ideal for reading and absorbing content. The Beeper homepage, in comparison, offers a colorful, sparkly background that’s perfect for immediately drawing in visitors.
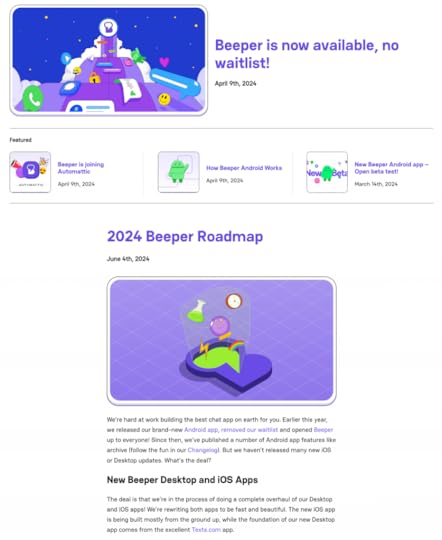
Rather than complicate the design with a noisy layout, the team quickly decided that a one-column, minimalist structure using the popular Livro theme would be best for this project. The only custom flourish we’ve added is a simplified “Featured” section that the Beeper team controls and edits.
Breaking free of Substack’s constraints Beeper’s old blog at Substack is shown on the left, and at WordPress.com on the right. The first iteration of Beeper’s new blog didn’t include the featured section at the top. With WordPress, a design can always be reimagined and improved, even after launch day.
 We transferred Beeper’s 7,000+ subscribers and all their archived content from Substack to WordPress.com. Our system beautifully handled those moving pieces and even ensured that all the links worked properly at their new home.
Moving Beeper off of Substack and onto WordPress made this project unique for our team. Along the way, we realized some of Substack’s constraints, like styling and layout restrictions, and were glad to be able to move beyond them.
On the design front, for example, Beeper appreciated having more freedom than Substack’s pre-built, busy-looking magazine layout. And while there was some customization available, little details like the “Subscribe” box or even a “Download” button couldn’t be styled with Beeper’s branding aesthetic. These details do a lot to present a distinct and cohesive message.
While it’s a subjective measure, we’re comfortable in saying the new design just feels better and more authentic to Beeper.
Start using WordPress.com todayIf you’re impressed by what our team did with Beeper’s blog, consider moving your blog or newsletter to WordPress.com today. With our convenient importer tool, you can click a button, sit back, and dream about just how high your content can fly when not constrained by a platform’s built-in limitations.
And if you’re curious about using WordPress.com to build sites for your clients, click below to learn more about our world-class hosting and development features:
Start buildingAugust 13, 2024
Move to WordPress.com, and We’ll Handle the Migration for Free
If your WordPress website is hosted somewhere other than WordPress.com, we’d love for you to ask one simple question: Why?
Maybe you started there because of a stellar pricing deal on hosting and just stayed put for years. Maybe their offering was cutting-edge at one time, but now it seems outdated. Are all those paid add-ons starting to look a little bloated?
The WordPress.com of 2024 is vastly reimagined from what you may have encountered a couple of years ago. Our SEO tools, security features, unlimited bandwidth, and developer tools are world-class and built right in at no extra cost.
And for a limited time, we’ll move your existing WordPress site from any host to WordPress.com for free.
Let us do the work for you. We’re here to help and ensure that you’re getting the very best WordPress experience out of the box.
Move your siteHow it worksThe migration process takes only a few minutes, with no downtime involved. (Read those last four words again, because they’re very important!) Once your site is migrated, you’ll connect the domain and your site will be ready to go. Here’s how it works:
 Head to WordPress.com/move and enter the URL of the WordPress site to migrate.Select the option to create a new site, or select the existing WordPress.com site where you’ll move the old site to. Select “Migrate site” to move all of your site’s content, themes, plugins, users, and customizations. (This selection requires our Business plan. More on that below.) Select “Do it for me” to get our team to review and handle your migration for you. Again, this option is 100% free for a limited time. Why move to WordPress.com?
Migrating to WordPress.com enhances your entire online presence with better security, improved performance, unlimited visitors and bandwidth, and reliable support. Here are some of the benefits:
Rock solid reliability: With a 99.999% uptime guarantee, your site will always be available, fostering more trust, sales, and peace of mind.Blazing fast performance: Our 28+ location CDN ensures your site loads at lightning speed, leading to happier users and higher conversion rates. Plus, WordPress.com is the top WordPress hosting provider per Google’s Core Web Vitals.Top-tier security: Our advanced protection measures keep your site safe from hacks and DDoS attacks, protecting both your business and your customers.Always up-to-date: You’ll always have the latest WordPress, PHP, and plugins, complete with new features and security updates.Complete control and customization: Use our extensive library of themes and design customization options to create a site that truly reflects your brand.Scalability and support: Ready to grow? We’ve got your back with advanced scaling to handle traffic spikes at no added cost. Plus, our managed hosting means we take care of updates and maintenance, allowing you to focus on what you love.Get all of this and more by choosing the hosting platform built from the ground up by WordPress Core’s biggest contributors: WordPress.com.
The best place to WordPressOur Business plan supercharges your WordPress website with plugins, third-party (or custom) themes, and everything else you need to host a professional website:
Plugins: Access over 50,000 plugins or upload/build your own.Third-party themes: Upload any WordPress theme or custom design.SEO tools: Access advanced SEO options and install plugins like Yoast Premium.Custom code: Add custom JavaScript, iframe, and header code for services like Google Adsense and Mailchimp.Backups: Ensure site safety with daily backups and easy one-click restorations.Uninterrupted performance: Improve user experience and load times with our multi-data center support, real-time replication, and global caching.Enhanced security: Use Jetpack Scan for malware and security threats.Advanced developer features: Use the development tools you know, love, and rely on like staging sites, WP-CLI, GitHub deployments, SFTP/SSH, database access, PHP version switching, and more.How do those features translate to a better experience for you? Here’s what Michael P. had to say about the experience of migrating to WordPress.com::
Want to migrate three (or more) sites?“After migrating to WordPress.com our site is faster, easier to use, more secure, and technical support is nearly instant. The level of competency and understanding is a far cry from GoDaddy’s WordPress offering. It was a relief to work with a company that really knows how to manage WordPress!”
For those of you who are managing multiple sites for others, our new Automattic for Agencies program may be a good fit for you.
Through Automattic for Agencies, you can access agency pricing, referral earnings, premier support, and cutting‑edge tooling like WordPress.com, WooCommerce, Jetpack, and more. Joining is free, and signing up today will grant you early access and provide you the opportunity to shape the program.
Make the moveBeing part of Automattic, the primary driver of the WordPress project, we are a uniquely positioned host to the core software development. Our commitment to the open-source community is unparalleled, with substantial engineering time and expertise dedicated to enhancing WordPress. As a WordPress.com customer, you directly benefit from this relationship through exceptional reliability, early access to innovative features, and support from the most skilled systems team in the industry.
Move your site to WordPress.com today, for free.
Move your siteAugust 9, 2024
The Fediverse Files: ActivityPub Interview with Evan Prodromou
In this episode of the Fediverse Files, Doc Pop talks with ActivityPub co-creator Evan Prodromou. ActivityPub is a fediverse technology that’s akin to what RSS is for podcasts and blog feeds; it’s the foundational element that connects platforms and allows them to communicate with each other.
Doc Pop and Evan discuss the past, present, and future of ActivityPub and the fediverse.
Ready to take the leap? Federate your website today and get 25% off:
Get your 25% offAugust 8, 2024
Beyond Avatars: How Gravatar is Transforming Online Identity
Gravatar, short for Globally Recognized Avatar, is a powerful service from Automattic, the company behind WordPress.com. For over two decades, Gravatar has been the driving force behind billions of avatar views across the web. Beyond WordPress, you’ll find Gravatar powering user profiles on platforms like ChatGPT, GitHub, Slack, and many more.
But Gravatar is far more than just a profile pic that follows you around the web. Let’s dive into seven key features that make Gravatar an indispensable tool for WordPress users.
From a WordPress avatar to a profile for everywhere
When Gravatar was first integrated into WordPress way back in 2006, it solved two critical problems:
WordPress lacked native image editing capabilities.Most servers hosting WordPress sites struggled with image resizing and performance.Gravatar elegantly addressed these issues while offering users the convenience of uploading their avatar just once for use across multiple sites and blogs. Today, you’ll find Gravatar profiles integrated across the web.
It was, and still is, a win-win!
Put a face to a comment
Gravatar is what provides profile pictures on all the lovely comments on your blog. That simple addition—a photo where there might otherwise be a bland icon—dramatically increases reader engagement. Users with Gravatars are more likely to comment, and their contributions tend to be of higher quality. This can lead to more vibrant discussions on your blog, fostering a sense of community.
Increase engagement with hovercards
Hovercards are an often-overlooked feature that can also significantly enhance user interaction. When enabled, hovering over an avatar reveals a snapshot of the user’s profile information.
To activate hovercards:
Go to Settings > Discussion in your WordPress dashboardLook for the “Gravatar Hovercards” option and enable itNote: If you’re not on a WordPress.com hosted site, you’ll need the Jetpack plugin installedGet verified
Gravatar’s Verified Accounts feature lets you link your profile to services and social media platforms like Instagram, GitHub, TikTok, and Threads. This verification process confirms your ownership of these accounts, adding a layer of authenticity to your online presence and making your interactions more trustworthy.
Your link-in-bio solution
Did you know that Gravatar was the original link-in-bio service? Every Gravatar account comes with a free, customizable profile page that’s perfect for sharing:
Your bio and interestsImportant linksSocial media accountsPayment optionsContact informationIt’s a versatile hub for your online identity, all in one convenient location.
Own your name on the web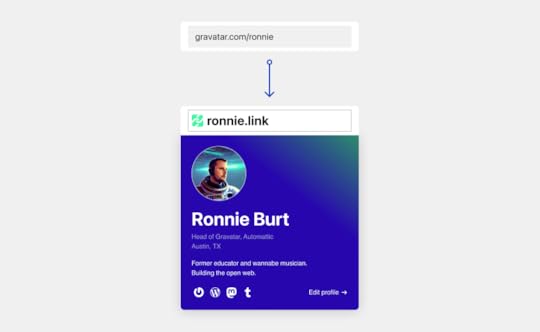
Instead of using gravatar.com/username, you can now have a custom web address that truly represents you. This personalized domain isn’t just for vanity; it opens up new possibilities, such as using it as your username on emerging platforms like Bluesky.
To kick off custom domains, we’ve partnered with .link to offer you a free domain for the first year. This limited-time offer lets you personalize your Gravatar profile URL, making it more memorable and shareable.
Here is a video about why you should own your name as a domain and what it can unlock.
More TLDs and domain options will be available in the months to come.
Innovate with profiles-as-a-service
For developers looking to enhance user experiences, Gravatar’s new REST API offers exciting possibilities:
Enrich customer profilesCustomize onboarding processesAdd delightful touches to user interactionsThe best part? It’s completely free to use.
WordPress site owners, keep an eye out for an upcoming WordPress plugin that will add even more Gravatar integrations to your site.
Get your free domain nowDon’t miss out on these powerful features and our exclusive domain offer. Visit the Gravatar blog to learn how to set up your custom domain and take control of your online identity.
Get your domain todayAugust 6, 2024
Clearer Writing at Your Fingertips: Introducing Write Brief with AI (Beta)
At WordPress.com, writing isn’t just a task. It’s how we think. Automattic is a globally distributed company, which means our work is almost always done asynchronously. For us, written communication is oxygen. But that communication is not built around email. Instead we use a homegrown internal blogging tool. Since every piece of our writing lives as a blog post that will stay published and searchable forever, we need to write clearly and succinctly.
The team at Jetpack AI started wondering if there was a writing tool that could help everyone at Automattic, from right inside the WordPress editor. Rather than search externally, we built one. And today we’re excited to share it with you. Say hello to Write Brief with AI from Jetpack.
Meet Write Brief with AIInternally, we called this tool Breve—Latin for “brief.” It started as a hack week project and caught on across the entire company. In fact, we saw just how useful and beloved it quickly became and decided to release it into the world. Write Brief with AI is available for free (while in beta) for all WordPress.com plans and users.
What can Write Brief with AI do? Measure readability. Check how readable your writing is with a simple grade score. Our research shows you should aim for a score of 8-12 for the highest readability. (The lower the number, the better.) The tool calculates your score as you type.Tell you about long-winded sentences. Long sentences tire readers. Write Brief with AI highlights those examples so you can break them down. You can even ask Jetpack AI to simplify them for you.Boost your confidence. Writing needs to be strong and clear. This tool highlights words that sound uncertain, like “possibly,” “might,” or “could.” Replace them with more assertive alternatives to make your point confidently. Or, ask Jetpack AI to remove them for you with one click.Simplify your vocabulary. Complex words can bog down your message. The tool highlights complex words like the ones found in plainlanguage.gov and suggests simpler alternatives, keeping your writing clear and direct. Seamless WordPress.com integration
Write Brief with AI works right within the WordPress editor, handling blocks, nested blocks, patterns, and more. It’s an editing tool built to streamline your writing process directly in your familiar workspace. Write, edit, blog, directly from WordPress.
Simply click the Jetpack icon on the top right of your screen, and Write Brief with AI will get to work based on what’s check or unchecked in the sidebar.
We’re just getting startedWe’re constantly improving and refining our platform based on your feedback. Write Brief with AI is just one step in our journey to make writing with WordPress even better. We’re excited for you to join us in this new chapter. Try it out in the post or page editor today and let us know what you think. Or click below to learn more.
Learn moreFor this release, Write Brief with AI is available exclusively in English. We’re working hard to expand language support in future updates.
August 2, 2024
Welcome to the Fediverse Files: What Is the Fediverse?
You’ve probably seen it on social media and in headlines around the web in the last few years: the fediverse. But what is it, really? A Boba Fett theme park? A Kevin Federline production? Some sort of cheese pun? In this first episode of our new YouTube series, the Fediverse Files, designer, illustrator, and fediverse expert Doc Pop explains exactly what the fediverse is so that you can jump in today to start building community and sharing content.
To kickstart your efforts, we’re giving you 25% off your first year on a Creator or Entrepreneur plan.
Get 25% off todayJuly 31, 2024
Building Studio in Public: Using WordPress Components and Tailwind CSS in our Local Development App
At WordPress.com, our goal is to provide the best tools for WordPress developers and agencies.
We built Studio for that reason. Our free local WordPress development environment launched a few months ago; it’s based on Electron and is currently available for Mac and Windows. Plus, we have big exciting updates coming for Studio users soon.
Download Studio for freeOne of the unique things about Studio is that it’s an open source tool, and it has been since day one. This directly aligns with the Automattic Creed, the driving force behind what we do at WordPress.com (and all of our other Automattic brands):
I know that Open Source is one of the most powerful ideas of our generation.
For this reason, we love building in public. In our new Building Studio in Public series, we want to share some of the learnings and insights we gained from building Studio, and our hope is that some of the lessons can help you build better products.
If you want more in-depth articles about why we chose Electron, why this is an open source project, or any other question you have about Studio, leave a comment below, and we’ll make it happen.
First up in this series, we’ll explore how we decided to use Tailwind CSS and the WordPress components that make up Studio and why that decision gave us extra flexibility for the future of Studio.
WordPress components everywhere
Components allow developers to create reusable pieces of code that can be composed together to build complex user interfaces. They encourage a modular and declarative approach of building UIs, where each component is responsible for a single piece of functionality or user interface element.
WordPress components are a great example of that. These components allow core and extender developers to create organized, separate, and interconnected parts of the WordPress admin interface. Not only do components make development easier and more streamlined, but they are also predictable and familiar across all WordPress users. To maintain a uniform look and feel across the entire wp-admin area, it’s recommended not to override the default styles of these components.
Do not confuse WordPress components with Gutenberg Blocks. While the latter are used to build WordPress frontend websites, the former are designed for building the admin interface of the WordPress site editor. They are React-based, making them versatile and applicable in any WordPress plugin or theme admin interface. They also come in handy for building different apps beyond WordPress; the only requirement is that the project uses React.
WordPress components offer a consistent style and behavior that match the WordPress admin interface out of the box, so using them in other projects outside of the WordPress ecosystem gives a familiar look and feel to the interface and user experience.
Not only that, the components are accessible and receive constant updates and improvements. They are implemented in JavaScript as React components, which means they can be integrated into any project. Plus, by using WordPress components in Studio, developers can more easily contribute back to this open source project because Studio is using a technology they’re already used to.
To quickly find the right component and experiment with them, you can use the WordPress Storybook, an open source tool for developing system designs and creating components in isolation. Storybook even gives you sneak peeks and allows you to interact with components from other npm WordPress packages like @wordpress/dataviews. The DataViews component is intended for future use in managing lists of posts, pages, and media uploads.
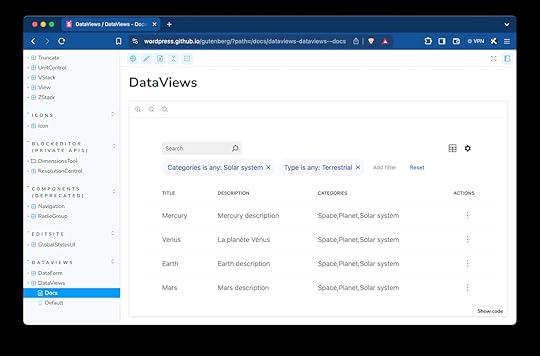 Components in Studio
By integrating WordPress components into Studio, we ensure a familiar user experience for WordPress users––you’re building WordPress with a tool that looks and feels like WordPress.
Most buttons, dropdowns, and menus will be familiar to WordPress users, and because Studio is an open source tool, anyone with Gutenberg experience will find it much easier to understand Studio’s code and contribute if they are interested.
Even though Studio is a desktop application using Electron and not a WordPress site, we recommend not overriding the styles of WordPress components. We wanted to keep them as close to Core as possible from the design phase. This approach also reduces misalignments when updating WordPress dependencies. For styling our custom React components, we used Tailwind CSS.
Tailwind CSS is a popular, utility-first CSS framework that we use to customize the styles of our custom components and modify outer styles, such as the spacing of WordPress components, using only CSS classes.
Utilizing the power of WordPress components and Tailwind CSS future-proofs the Studio app; it’s easy to reuse these components for new features and app updates because they’re already imported into the project in a style that suits the app.
If a screen needs a new button, we already have loads of Studio-styled buttons to choose from; we don’t need to design from scratch each time a new button is needed.
Here’s how we used WordPress components and Tailwind CSS to build Studio (and how you can use them for your own projects, too):
Step 1: Set up Tailwind CSS and install WordPress componentsAfter setting up Tailwind in your project, you’ll need to install WordPress components. Simply run the following command:
npm install @wordpress/components –saveStep 2: Import WordPress component stylesYou’ll need to import WordPress component styles to inject the CSS that is built into the components by default. This speeds up the process of building your project’s interface.
In your main CSS file, import the Gutenberg component styles:
@import '@wordpress/components/build-style/style.css';Step 3: Customize React components with Tailwind CSSUse the className property to apply Tailwind CSS styles. Sometimes, the ! modifier is needed to mark the style as important and override existing WordPress styles.
Take Studio’s Header component, for example:
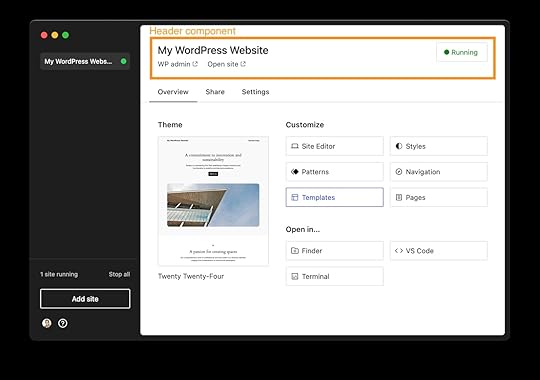
We’re using:
@wordpress/react-i18n for translations.@wordpress/icons to display the icons.@wordpress/components for base components like Button, TabPanel, among others.To use Tailwind CSS in any component, you need to pass in the utility classes to style the elements into the className React prop. Occasionally, we needed to override the outer spacing of certain components, for which we used the exclamation mark (!).
 Step 4: Accessing nested elements for use across your project
With Tailwind CSS, you can use sophisticated selectors to target user interactions and nested elements within a component. This will allow you to dynamically change stylings across your project based on user and app behavior.
For example, in Studio’s Demo Sites area, we change the style of the nested element’s site name and badge to a grey color when the demo site expires.
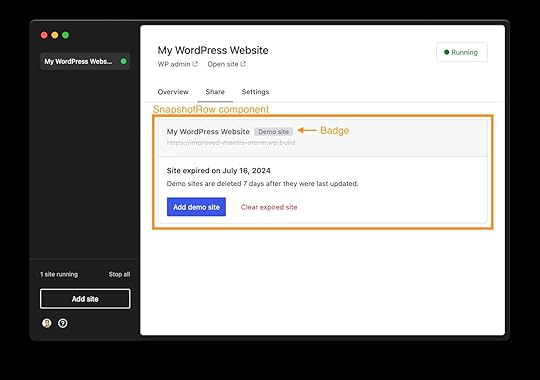
To dynamically style this component, we use [&_.badge]:text-red, where & means current element and _ means any child element. You can apply specific styles to a direct child element by using the greater-than operator, like this: [&>div]:text-red.
 Ready to build?
By leveraging WordPress components and a few custom components with Tailwind CSS, you can significantly enhance your development process, providing a seamless and professional user experience.
This decision allowed us to create an app that looks and feels like the WordPress interface in a way that benefits users and speeds up our development time. That’s a win-win, in my book.
If you’re building WordPress sites, start developing your WordPress sites locally with the power of Studio today. It’s free, it’s open source, and it will effortlessly fit into your development workflow.
Download Studio for freeOnce you download Studio: Be sure to connect Studio to your WordPress.com account (free or paid) to access features like Demo Sites.
And if you want to help us build Studio, here are some GitHub issues that you can contribute to right away:
php_curl missing and curl_exec deactivatedTotal and free size of filesystem reported in sites doesn’t match actual values Permission issues using a theme that uses composer


