
Kayla I. Shown-Dean's Blog
September 30, 2025
How to Make a Portfolio Website in Three Simple Steps (+ Six Pro Tips)
Creating a portfolio website is one of the easiest ways to showcase your work as a creative — whether you’re a designer, writer, photographer, or developer. Initially, in my career as a freelance writer, I thought a static PDF or Google Doc collating my best work would suffice.
Having a professional portfolio website, however, makes quite a difference. For starters, it raises your stature because it signals a certain level of credibility and commitment to your craft that isn’t evident in other formats (like PDFs or online portfolio makers).
Beyond first impressions, creating a portfolio website has tons of functional benefits — it’s interactive, easier to keep up-to-date, and more accessible. I can also see which pages on my website get the most views and engagement to optimize my portfolio better.
Best of all, building a professional-looking website is easier than you think. It might appear overwhelming at first, but this guide will make the process straightforward.
How to build a portfolio website in three simple stepsBuilding a portfolio website seems daunting at first — especially if you haven’t created a website before. It seems easier to rely on mock portfolio builders than to make a site from scratch, but I promise the process is easier than you think. Here are all the steps you need to follow:
Step 1: Select your best pieces of workIt’s tempting to dump all the work you’ve ever done in your portfolio, but take it from someone who used to have writing samples from college internships (yikes) on her site: You must only show your best work on your portfolio website.
Why? Your prospective clients are busy people. They don’t have the time to scour through a ton of samples to evaluate your work and determine whether you’re a right fit for their needs. Displaying too many pieces of work also doesn’t leave a lasting impression. You want a potential client to land on your portfolio website, find your best work easily, and remember you.
So, pick only the best of the best work you’ve done so far to display on your portfolio website. If you work in multiple industries or have different categories within your work, you can pick a few samples from each segment.
For example, I write for various sectors — such as the creator economy, software, and productivity. On my portfolio site, each niche is a different page containing a few of the best samples from each category.
Now, when a prospective client lands on my website and they’re in the software industry, they can easily find the best samples in that domain instead of sifting through irrelevant pieces of work.
Organizing my portfolio this way also saves me time when I’m communicating with a lead and need to send relevant samples.
If you want to show work you’ve done for fun, you can classify it separately as your passion project(s).
Takeaway: Select the best pieces of work you’ve done to showcase on your portfolio website. There’s not a singular ideal number of samples — it depends on your work experience, industry, and more. It always helps to think from a client’s perspective.
If they land on your portfolio website, which samples would impress them? How many samples would look too cluttered and make a client bounce? Which samples would best show your range of work? Start putting yourself in your client’s shoes and pick the best pieces of work accordingly.
If you’re already using WordPress.com to set up your site, you’re ahead of the game. If you’ve landed on this article without a WordPress.com account, no worries. Stick with me here — we’ll cover the foundation you need before you can bring your portfolio site to life.
You need two things to begin creating your portfolio website: a web host and a domain name.
A web host is a service provider that stores your website’s files and makes them accessible on the internet. We recommend WordPress.com.A is your website’s address on the internet.Tip: If you’re confused between domain and hosting, this article highlights their differences and explains why you need both services for your website.
If you want to avoid the headache of finding and integrating a web host, a domain name, and a website builder, you can choose a managed WordPress hosting provider like WordPress.com — where everything is in one place. You also don’t lose the flexibility and control to customize your website however you wish.
Anyone can get a website up and running with WordPress.com. Start with one of these resources:
Getting Started on WordPress.com (your intro to all things WordPress.com). Five-step website setup (a quick and easy guide to spinning up your site). Create Your Website on WordPress.com (our free and beginner-friendly video course that walks through the basics of building a website.Once you go through the sign up flow, you’re ready to start building your website.
Tip: When you sign up with WordPress.com, you’ll be asked to choose a domain name. This can be something related to your business name, personal brand, or simply your full name.
You can also search available domain names with our domain finder tool or transfer an existing domain name to WordPress.com if you have one with another domain provider.
The final step is actually designing your portfolio. If you’ve chosen WordPress.com as your host, you’ll have access to thousands of free and premium themes. There are also various themes specifically for portfolios so you don’t have to start building your website from scratch.

Once you decide on a theme, customize the website to your brand’s colors and fonts. If you have a logo for your creative business, you can add it to your website, too.
Then, start adding pages to your website. Here are the pages you should have on your portfolio site:
Homepage: This is the first place someone lands on when they type your domain or discover your portfolio site. Your home page should briefly introduce who you are and explain what you do. It should also have call-to-actions — like “see my work” or “contact me” — to help potential clients navigate your website. Learn how to set your homepage.About page: This is where someone can go to learn more about you. Use this place to share your professional experience and sprinkle in some personality. The goal is to make someone connect with the person behind the website.
Contact page: You can have a dedicated contact page or embed a contact form on your site on various pages. Make it easy for people to reach you — include your email address, social media links, and a contact form. If you’re comfortable, you can also include your phone number.
Resume page (if applicable): If you need it, you can also include a resume page where people can view and download your resume. Learn how to upload documents and use the File block to make your resume downloadable.
Portfolio page: This is the core of your site, where you show the work you selected in step one. WordPress.com has a dedicated portfolio function to showcase your work. Learn how to use it on your site. There are also portfolio plugins to help you organize your work in different ways.
The above are the essential pages you should have on your portfolio website, but don’t be afraid to get creative and add more pages if you need them. For example, if you’re planning to add blog posts that show your expertise, you can add a separate page for them on your site.
Tip: Don’t select your best work once and then let it collect dust. You need to regularly update your website with new samples to showcase your current skill level. I set aside an hour at the end of each month to add recent work to my portfolio. Set up a similar ritual that works for you to ensure your portfolio site always matches your existing skillset.
A look inside my portfolio websiteHere’s how I’ve designed my portfolio site using the steps outlined in the previous section. Hopefully, it helps you get some ideas about elements you can use in your own portfolio.
1. Home pageThe home page has a clear hero image and a headline about what I do. I start by introducing myself and giving a brief summary about the clients I work with and the services I provide. I debated about adding my photo, but I realized it instantly humanizes my website.

The call-to-action in the first section is to either visit the portfolio or scroll down to learn more about my work process. If you are a service provider, some details about how you work together can help clients feel more confident about your professionalism and get a rough idea about how you work.
The goal isn’t just to give potential clients a snippet of what working together feels like, but also to filter out clients who might not be a good fit.

In the middle of the home page, I’ve also added testimonials and logos of some of the brands I’ve worked with. This instantly builds trust and makes a potential client curious to learn more.

I’ve also added a contact form and an FAQ section at the end, so it’s easy for clients to contact me without leaving the website and have their common queries answered.
 2. Portfolio
The portfolio page on my website begins with a reiteration of who I am, what I do, and logos of some notable brands I’ve worked with. I find this repetition is often helpful because potential clients often land on my portfolio page before they land on my home page.

The next section contains an image of me with the “Why should I hire you?” question answered. I’ve found adding this bit often helps soothe doubts of potential clients and helps me showcase how I stand out compared to the competition.

After that, I put a spotlight on my best two testimonials from notable (present or former) clients in my industry to build some credibility. In future updates, I also plan on highlighting a few core phrases in these reviews to make the website more skimmable and memorable.

Then come the samples. I categorize my samples into various folders to cater to the different kinds of clients I work with. I highly recommend doing this if you work in multiple industries, no matter how niche the difference is between them. It helps clients easily find exactly what they’re looking for to make the decision to hire you. It’s also handy when you want to send only one category’s sample to a potential client.

The portfolio page ends with the contact form and two more testimonials to seal the deal.
 3. Work Samples
The work sample pages are simple: Each contains six samples and a relevant testimonial. These are the pages I update the most because I want these samples to reflect my latest and best work. Focus on being accessible instead of fancy here. Don’t make a client jump through hoops to find your best work.

What do I mean by relevant testimonials? Let me explain with an example: In the above productivity samples, I have added a majority of the work from my client, Todoist. So the testimonial is from the content manager in the same company.

This adds more weight and credibility in the eyes of a future client browsing this page. They can not only see the latest samples, but also read a review from a client in the same industry. Of course, this isn’t always possible, but do your best to pair each testimonial with relevant work samples. If you can’t grab a testimonial, a case study can also work wonders.
I also plan to add contact forms in these pages that are more personalized to the category. This will not only help clients contact me easily, but also help me precisely track where the majority of my leads are coming from.
Tip: Depending on how much time you have available, expect to spend about a week to build a small portfolio site with four or five pages. You can also consider using our custom website design service or expediting the process with our AI website builder.
How to use and promote your portfolioTo make the best use of your portfolio website, it’s important to get the word out and make it accessible. Ideally, it’d be the first thing a prospective client finds when they want to learn more about you and your work.
Here are five easy ways to make the most of your portfolio website:
Add your portfolio site to your email signature: This way, everyone you communicate with can see and access the link. Over time, your email signature will make it easy for people to remember who you are and where they can learn more about you.Optimize your site for user experience: Make your website visually clean, easy to navigate, and mobile-friendly. Think from a client’s perspective and add relevant call-to-action buttons to make it easy for people to find what they need.
Use SEO best practices: It’s ideal to rank in search terms that relate to your field and expertise. Write meta descriptions with relevant keywords, add alt text to images, and compress images for faster loading times. Learn more about WordPress SEO to make your portfolio site rank in search results.
Share your portfolio website wherever relevant: The best way to make your portfolio more visible is to market it wherever appropriate. If you practice email marketing, add it to your newsletters. If you use a marketplace to find clients, add your portfolio site to your profile. If you have an about section on your client’s website, ask them to add your website there. Share it when you’re networking professionally or asking for referrals, too.
Monitor website visits: Use Jetpack Stats to track site visitors (which is included with every WordPress.com website). For deeper website analysis, you can also set up Google Analytics. Use data to refine your website and identify areas for improvement.
Now that you’ve learned how to create, use, and promote your portfolio site, let’s understand how to transform it from good to great.
Six tips for putting together an effective portfolioOver my half a decade of self-employment, I’ve seen a fair share of portfolios from creatives across a variety of fields. Here are six things the best portfolio sites have in common:
1. Tell a (short) story with every projectWe’ve already covered why it’s essential to include only your very best work in your portfolio. The goal is to curate, not accumulate.
However, when you’re handpicking your best samples, it’s also important to add context to your projects. For example, if you’re a designer, you can add the goal and results of each sample alongside the work. If a project was more unique than usual, you can add that with the work sample and highlight how you solved any unexpected challenges.
Adding a brief context with your projects can help clients understand your work beyond the finished product — they’ll also see how you solve problems and the range of work you’ve done.
2. Be specific about the kind of work/clients you want to attractThe goal of your portfolio website isn’t just to attract clients, it’s to attract the right kind of clients. If you specifically work with B2B companies, for instance, you don’t want to be fielding contact forms from DTC businesses.
On your website’s home page and portfolio, make it clear exactly who you work with and the kind of work you do. For example, include a table about the kind of services you offer and the ones you don’t. I’ve also seen many people add their rates to their portfolio site. This helps leads determine quickly if their budget is a fit. I got a lot of inquiries about ghostwriting and how I approach it, so I added it as an FAQ on my website.

If you’re getting many irrelevant requests via your portfolio site, it might be a signal that you need to be more specific about your services and clients. Remember this isn’t an irreversible decision — if you’re offering a new service or working with clients from a new industry, you can simply update your website to reflect that.
3. Keep your portfolio refreshed and updatedIt’s really easy to make your portfolio site once and let it gather cobwebs (been there, done that). You never know how many opportunities you’re missing simply because your portfolio doesn’t reflect your current skillset and services.
I set aside one day each month to refresh my portfolio. This doesn’t just mean updating the samples with my latest work, but also adding more testimonials, showing the impact of my work (like social shares), and editing my service offerings if I’m making any procedural changes.
Make it a part of your weekly or monthly routine to update your portfolio website. The longer you put it off, the harder it becomes to pick up the task, and if you refresh your site regularly, it’s much less time-consuming, too.
4. Integrate your site with your social media accountsA client might discover you via your social media account. When they do, they should land on your portfolio with minimal effort, making it easy to contact, communicate, and hire you. Luckily, almost all social media platforms make it easy to add a link in your bio where you can add your portfolio. I’ve added mine across LinkedIn, Instagram, and X.

Integrating your portfolio website seems like a small thing, but it goes a long way. It funnels your client exactly where you want them (on your portfolio website) rather than letting them open another tab, search your name, and then find your website.
5. Include testimonials from past clientsTestimonials from previous clients build trust and credibility for your work on a whole other level. Your samples just show the finished product, but testimonials show your communication skills, how pleasant you are to work with, and any standout qualities you have compared to the competition.
Ask your existing or past clients to write a testimonial that you can add to your website. To make it easier for them, provide a list of questions they can answer to write it.
Once you get a few testimonials, add them across your website. You can highlight key quotes to make them more impactful, too.
6. Consider adding a blog that showcases your expertiseThis tip is optional, but it can be beneficial to add a blog on your portfolio website that relates to your service. For example, if you’re an email marketer, you can write posts about best practices to follow in an onboarding sequence, common mistakes you see people make, etc. These kinds of posts can build even more trust and show off your expertise in the service you provide.
You don’t need to publish a blog on your site every week, but even a couple every quarter can help you stand out from the crowd. Think about what would impress your clients and write blogs about that. If you already post on social media, you can easily repurpose content in both formats.
Your portfolio needs its own homeBuilding your portfolio website using a web host like WordPress.com means you have complete control over how you present your work, who sees it, and how you want to scale your presence. Closed or proprietary platforms can change their rules, restrict customizability, or even disappear overnight. That’s a big risk — especially for a site that’s your bread and butter.
The best investment you can make for your creative career is owning your online presence. Build your site using WordPress.com today.
Build your portfolio website with WordPress.com

September 25, 2025
Will AI Replace Web Developers (And How Should You Adapt)?
The more time I spend on social media reading posts by AI influencers, the more I see web developers (like myself) worrying that they’ll be out of a job in less than a year.
It reminds me of something I read a few years ago, the golden rule of software development:
No matter what the question is, the answer can almost always start with ‘It depends…’
Whenever a developer asks me if I’m worried that AI will replace me, I find myself saying, “Well, it depends…”
We’re standing on the threshold of a web development revolutionI think about the recent progress of AI the same way I think about the first steam-powered road vehicles (or what we commonly refer to today as cars).
Back in the mid-19th Century in the UK, people were concerned that compared to horse-drawn modes of transportation, these steam-powered vehicles would block up roadways, endanger public safety, and cause fatal accidents.
This led to a series of parliamentary acts that heavily restricted the use of road-going steam-powered vehicles. The most restrictive law was the Locomotives Act of 1865, which required vehicles to travel at a maximum of 4 mph (6.4 km/h) in the country and 2 mph (3.2 km/h) in the city, as well as requiring a man carrying a red flag to walk in front of road vehicles hauling multiple wagons. These acts effectively halted automobile development in the United Kingdom for most of the 19th century.
While fears regarding automobiles were justified — and eventually realized — cars were gradually accepted as they became more common and accessible. Simply put, automobiles made it easier for products to get from point A to point B. I think we can all agree that in some places, especially cities, too many cars on the road can be detrimental. We also can’t deny their impact on our society and how many aspects of our daily lives are made better by having a personal road-going vehicle.
AI usually gets it rightI’ve been fortunate enough to have used various forms of AI to support my work since early 2021. Back then, OpenAI had released GPT-3, and I was using it regularly as a Technical Writer for blog posts, tutorials, and documentation. Later that year, GitHub released CoPilot, and I was able to snag an open-source maintainers license, which I’ve used consistently for code generation. Since then, practically anything I’ve worked on has been AI-assisted. Generally, it’s been a positive experience.
I’ve successfully built everything from plugins to web-based games, and even a few personal utility desktop applications, all using AI. My most recent success was building the WordPress.com Content Calendar in approximately 2 hours, utilizing Perplexity for R&D and Cursor for the build.
But when it gets it wrong…Every now and then, though, AI loses the plot.
I’ve read stories of people vibe coding SaaS apps, only to have their customer details leaked after the apps were hacked due to multiple security vulnerabilities. Recently, an AI agent deleted a company’s entire production database during a code freeze. I’m sure we’ve all heard stories of AI chatbots and agents confidently saying the code is fixed or working when, in reality, it is still broken.
Earlier this year, I used Cursor to build WP Debug, a small Electron desktop application that allows you to read and display the WordPress debug.log more cleanly. Someone opened a ticket to request adding the GitHub repository URL to the app’s About window. Because I had no Electron experience, it took me the better part of two full days just to implement this small request, something that an experienced Electron developer could probably have completed in an hour. Each time the Cursor agent confidently told me the About window had been implemented correctly, and each time I tested, it failed miserably.
Last week, I was using Perplexity to help me create a lesson on anonymizing production data. As I was reviewing the generated output, everything looked good until I got to the section on anonymization strategies. Perplexity had generated this:
WordPress provides several built-in sanitization functions that should be leveraged in custom anonymization scripts:
// Sanitize email addresses$sanitized_email = sanitize_email( $raw_email );// Sanitize text fields$sanitized_text = sanitize_text_field( $raw_text );// Sanitize file names$sanitized_filename = sanitize_file_name( $raw_filename );// Sanitize HTML content$sanitized_html = wp_kses_post( $raw_html );If you know anything about WordPress development API functions, you know that sanitization is not the same as anonymization. If you want to see how wrong a vibe-coded project can go, check out my first attempt at building a browser-based 3D shooter game. Fair warning, only attempt to open the game in your browser if you have a lot of free RAM.
AI isn’t going to replace developers who adaptSome years ago, when I was still a freelance developer, I had a client who built food blogs. She maintained a couple of single-purpose plugins that managed specific functionality, such as adding a recipe custom post type and various other tasks she required. I would hear from her when she needed something new added to any of these plugins. She knew what she wanted, but lacked the coding experience to build it; however, she excelled at providing specific requirements and thoroughly testing each addition. I can almost guarantee that today, she’d be able to manage this all herself without needing to hire a developer.
Just like those first steam-powered vehicles, AI-assisted web development is going to make what takes hours possible in minutes. Like any new technological advancement, there will be concerns about the use of AI to develop software, including its environmental impact, the security of the code it generates, and the impact it will have on the skills and abilities of human programmers. Its adoption is, however, inevitable, and to ensure that this AI-infused future remains a productive and positive environment, it relies on the developer community to evolve and adapt alongside it.
What you should be doing nowLike any new technology, there are two key takeaways. First and foremost, take heed of the hype, but learn to distill it down to the facts.
Social media is ablaze with folks who are trying to sell a future where the human element to AI is non-existent. It’s important to recognize these for what they are, the modern equivalent of those infomercial-driven late-night shopping channels from the early 2000s. Sometimes what’s advertised will end up being useful, but a lot of it will eventually end up on the digital trash heap.
AI, just like any other software, relies on humans to iterate and improve. Just like any other software, it’s prone to bugs that need fixing, new features that need documenting, and requires some training and education to operate effectively.
Second, learn how AI works, what it does well, and what it does poorly. Learn about prompting, context, tools, and all the things that make AI coding possible. That allows you to make valid decisions about when to use AI to streamline your processes, and when it makes sense to roll up your sleeves and do some manual work.
AI software experts recommend following good software development practices like clearly defining project scope, planning each step of the development process, writing tests as early as possible, constantly reviewing and validating AI-generated code, using robust security audits, and ensuring ongoing developer education to offset potential skill erosion.
At the end of the day, AI development tools are at their best when they are used as productivity aids — never as replacements for human expertise or oversight. The future of web development will be shaped by those who embrace these tools with a healthy dose of skepticism, understanding, and a willingness to learn.
This post was written by a human, assisted by Grammarly for grammar and spelling, inline wordsmithing using Google Gemini for clarity, and research via Perplexity.
September 23, 2025
Telex Turns Everyone into a WordPress Block Developer
As a WordPress developer for more than a decade, I’ve built numerous WordPress blocks, ranging from simple callouts and icon blocks to multi-block forms and slideshows. The process can be demanding and requires a solid grasp of how WordPress works under the hood, as well as familiarity with React, JavaScript, PHP, and other relevant technologies.
Scaffolding tools like WordPress’s create-block help. Modern AI code editors, such as Cursor, and assistants like Claude Code, also speed things up. With the right setup and context, you can abstract away much of the complexity. The catch is that you still need to provide the AI with WordPress-specific context and wire everything together. That’s fine for developers, but it keeps the barrier high for everyone else.
What if you could skip that complexity entirely? That’s where Telex comes in.
 What is Telex?
Telex is an experimental tool from the Automattic AI team that turns natural-language prompts into working WordPress blocks. You simply describe what you want, and Telex generates the block.
Everyone can use Telex, from:
Site owners who want custom functionality tailored to their site or who want to experiment with a new idea.Agencies and freelancers who need quick prototypes or small utility blocks for client projects.Developers who want fast scaffolding in a real WordPress context and code they can refine.Aspiring developers who learn best by seeing a working example and reading the code behind it.Under the hood, Telex packages your block as a single block plugin and previews the result in your browser, all powered by WordPress Playground. There’s no local setup. You can refine the block with short follow-up prompts or edit the code directly, then download the plugin and install it on a site when you’re ready. You can also share your work as a link.
Since Telex is an experiment, results will vary and you may run into bugs and issues along the way. That’s part of the process. We’re learning where AI can remove friction in block creation and where it can be genuinely useful. It is also not an AI website builder. Think of it as an AI that helps you make small functional tools as blocks.
Telex is currently free to use and you can create as many blocks as you like. Give it a try now.
Start creating with TelexHow to build blocks with TelexStart by thinking about what you want to create. It could be a feature your site is missing or a playful idea to see what Telex can do. This is an experiment, so exploration is welcome. You can also check out one of the featured projects on the Telex homepage for inspiration.
For this post, I’m stepping into the shoes of a food blogger. I have a chocolate chip cookie recipe to share, and I’d like to display an ingredient list that readers can scale up to 4 times. Readers should be able to check off ingredients as they go. There should also be a copy button on the frontend that copies the ingredient list to the clipboard. In the editor, I want to add ingredients in a simple table with three columns: quantity, unit, and ingredient. I should also be able to remove and reorder ingredients up or down in the table using buttons.
I started by entering this prompt in Telex:
Please build an Ingredient List block. This will display a list of ingredients (think food blog) that readers can check off. Add a copy button on the front end that copies the ingredient list to the clipboard. Include a built-in recipe scaler so readers can 2x, 3x, and 4x the recipe, updating ingredient quantities accordingly. In the editor, I need to enter ingredients in a table with three columns: quantity, unit, and ingredient. I should also be able to remove and reorder ingredients up or down in the table using buttons.
I then clicked Build, and Telex got to work.

The more context you include in your initial prompt, the better. Still, don’t hesitate to try a quick prompt. You can spin up as many blocks as you want, even at the same time. Just open a new browser tab.
In about two minutes, I had a working WordPress block with all the functionality I requested. Here’s a look at the Editor view with the ingredients for my recipe entered into the table. Notice the action buttons like I requested.

The frontend delivered all the functionality immediately, though the styling needed some refinement. This is where additional prompts help to fine-tune things.

I generally prefer a block to inherit my theme’s styles. I also wanted checked ingredients to show a strikethrough, and I wanted ingredient quantities formatted as whole numbers or fractions where possible. Finally, to add a bit of excitement, when the reader checks off all items, perhaps there’s a confetti animation.
I handled each change with multiple short follow-up prompts:
Let’s simplify the styling so this ingredient list inherits the current theme styles.
On the front end, when a reader checks an ingredient, also apply a strikethrough.
Convert ingredient quantities to whole numbers or fractions on the frontend where possible. No decimals, please.
For fun, when a reader checks off all the items on the ingredients list, shower the screen with a confetti animation.
I recommend giving Telex one task at a time in your follow-up prompts. After four iterations, one for each of the tasks above, my Ingredient List block looked like this:

You can also modify the code directly, which is handy if you prefer to make quick, targeted changes. It’s also a great way to learn how the block is assembled.
In my case, I wanted the scale buttons to look a bit different and to update the table in the Editor, so I switched to Code view and adjusted the style.scss and editor.scss files manually.

Here’s the final result. It took about 10 minutes to build in total:
Note: Telex is not deterministic. If you try the prompts outlined in this post, expect slightly different results. No two builds will be exactly the same.
Of course I could have kept iterating. Perhaps add JSON-LD structured data to the ingredient list for search engine optimization, or the ability to convert the units to metric. The possibilities are endless.
Once satisfied with your block, you have two options: use the Download button to get the plugin zip file, or click the Share button. The latter copies a unique link to your clipboard. Anyone with this link can view your block in Telex without needing to log in.

Here’s the link to the block I built for this blog post:
Preview the Ingredient List blockIf you click the preview link above, you’ll also be able to download the Ingredient List block as a zip file, just as if you had created the block yourself. You can then install it on any WordPress site that supports plugin uploads, or test it locally using WordPress Studio.
Troubleshooting and known gapsTelex is experimental, so you may hit the occasional hiccup. Sometimes the AI makes a wrong assumption or generates code that does not run. This is common with all AI tools. If you see a warning like the one below, keep iterating. Ask Telex to fix the specific error or copy the details to a new prompt. Then describe the outcome you expect. You can ask as many follow-up questions as you like. If things get tangled, start a fresh session and restate your block requirements.

There are also many ways to build a block in WordPress, and part of this experiment is to identify areas that need improvement in Telex. For example, blocks that require inner blocks are not currently supported. A slideshow with a parent “Slideshow” block and child “Slide” blocks is a common use case, and Telex will struggle to implement it.
If you run into a scenario where Telex repeatedly fails to complete your request, please let us know in the comments or share your feedback in the in-app feedback form. Sharing your prompt, the error message, and a brief description of what you were trying to build will help the team improve Telex.
 Keep iterating
 Telex is an early look at how AI can lower the barrier to block creation. We’ll keep improving it based on what you build and the feedback you share, so spin up a block, post your preview link, and tell us what worked and what didn’t.
Some ideas we’re considering for the future include version history, visual descriptors to make your project list more visual, uploading and customizing existing blocks, and other improvements, whether big or small.
Together, we can make WordPress block development faster, friendlier, and more accessible to everyone.
Build your next block with TelexSeptember 18, 2025
Time to Move: Typepad Is Shutting Down September 30, 2025
Typepad, the veteran blogging platform that has served creators for years, recently announced it will be shutting down permanently on September 30, 2025. According to their official announcement, all user accounts will be terminated on that date. This means you’ll need to export your content before the deadline — or risk losing it forever.
If you’re a Typepad user, time is running out to find a new home for your blog. The good news? We’re here to help make your transition as smooth as possible.
Import your Typepad site to WordPress.com nowWhy WordPress.com is your best choiceWe’re built to last. WordPress powers over 40% of the web and has been the backbone of online publishing for two decades. Unlike platforms that come and go, WordPress is committed to supporting creators and keeping the open web thriving for years to come. Plus, content on WordPress.com sites is never deleted. Even if your plan or domain name expires.
Your content stays yours. With WordPress.com, you maintain complete ownership of your content and can export it anytime with our one-click export tool. You have the freedom to move your content anywhere you choose. No platform lock-in, no sudden shutdown announcements, and no “move-it-or-lose-it” ultimatums.
Make it truly yours. WordPress.com offers unmatched customization options with thousands of professional themes, powerful plugins, and deep design features. Our flexible block editor makes it easy to create beautiful layouts, whether you want to recreate your current Typepad design or try something completely new.
Ready to make the move?Don’t wait until the last minute. Use our dedicated Typepad importer to transfer your content safely and efficiently (free for sites with up to 1GB of media files and storage). For larger storage needs including media and video files, you can purchase a paid hosting plan with 6GB, 13GB, or 50GB of space, with optional add-on upgrades available for even greater capacity. Our detailed support documentation will guide you through every step of the process and help you get your new WordPress.com site up and running on the plan that best fits your needs.
We can’t wait to welcome you to the WordPress community!
Import your Typepad site to WordPress.com nowSeptember 16, 2025
Transforming Digital Education: From WordPress Campus Connect to WCUS
Just a few months ago, students at CIFP Santa Catalina in Aranda de Duero (Spain) knew little to nothing about WordPress. Yet, this vocational school became the stage for the very first WordPress Campus Connect held in Spain, a pioneering project designed to transform the way students and teachers engage with the web, open source, and digital entrepreneurship.
Last August, Javier and Andrés — two of those students — traveled on scholarships to WordCamp US in Portland, where they took the stage as speakers in a panel discussion, sharing their journey with the world.
What exactly is WordPress Campus Connect?WordPress Campus Connect is an international program for students that brings web development, open-source software, and digital entrepreneurship into the classroom. Through hands-on mentorship and professional resources, participants learn how to build and manage websites with WordPress, developing key skills that will shape their professional future.

But WPCC goes beyond teaching a tool. Its mission is to shape a new generation of digital creators who understand the importance of freedom on the internet, digital privacy, the value of open source, and the right of every individual to own their own content.
The First Campus in Spain, in Ribera del DueroThe WordPress.com team fell in love with this initiative and decided to support the very first edition of WordPress Campus Connect in Aranda de Duero.
Over the course of four weeks, 30 students took part in both in-person and virtual workshops, developed their own web projects, and worked in a collaborative environment where they shared ideas, solved challenges, and supported one another throughout the process.
 First face-to-face workshop.
This edition happened thanks to a partnership between the Centro Integrado de Formación Profesional Santa Catalina, whose faculty trusted the project from the very beginning, and the rural coworking space Ribering, which generously hosted the workshops.
Beyond technical training, WordPress.com provided free hosting for the students, along with close mentorship throughout the program. Watching their progress was truly rewarding — many started with no prior knowledge and finished by publishing functional, creative websites full of personality.
From Aranda to PortlandTo recognize that effort, WordPress.com awarded the two most outstanding projects with a trip to WordCamp US 2025 in Portland, Oregon, where their creators took the stage as guest speakers and shared their experience in a panel discussion with the international community.

 Javier and Andrés at WordCamp US with Mary Hubbard and Matt Mullenweg.
The selected projects were:
ritmoribera.com: a music events calendar showcasing the cultural life of Ribera del Duero, created by Andrés Parra. A site with a public service spirit and a genuine connection to its community.Rocstudio.blog: a video game development portfolio designed by Javier Montes de Blas, with a technical focus, a polished aesthetic, and a clear entrepreneurial ambition.WordPress.com in EducationAt WordPress.com, we believe in an Internet that is open, accessible, and in the hands of the people who create it — and we work to bring that vision to everyone, including students, teachers, and educational institutions.
With this goal in mind, we created the WordPress.com Education program in Spain, designed to build connections with schools and universities that want to bring their students closer to the tools of the real digital world. What started in Spain and India is only the beginning — we’re now preparing to expand WordPress.com Education to more countries around the world.
We want students to work with world-class technology—the same they will encounter in their future careers — and we want teachers to have access to support, resources, and ongoing training. In this way, we turn our values as a tech company into concrete actions in the classroom, connecting the global with the local, and the technical with the human.
We witnessed the birth of the internet and have been part of building it as an open, collaborative project. Now we want to help shape students who understand that this is not only about technology — it’s about values.
What’s Next? Now It’s Your TurnThis first WPCC was only the beginning. New editions are already underway in Cartago and San José (Costa Rica), as well as in Pontevedra (Spain). And we’re excited to bring it to even more places.
Whether you work at an educational institution, teach, or simply feel inspired by this vision, you are invited to join one of two online info sessions on September 25 at 0:00 UTC and 10:00 UTC
September 12, 2025
How to Collect Email Addresses with Gated Content on WordPress Sites
What’s the easiest way to collect emails on my site and give people a downloadable freebie in return?
Users often ask our Happiness Engineers about this topic, and we love helping with it. Here’s how we usually walk folks through setting up gated content to build an email list.
Why this mattersWhen someone visits your site, you’ve already done the hard part — you’ve got their attention. However, unless you give them a reason to stay in touch, they might disappear forever (no pressure). That’s where email comes in.
Collecting email addresses lets you build real connections with your readers, customers, or future superfans, and offering a freebie is one of the simplest, most effective ways to do it. It’s a little nudge that says, “Hey, I’ve got something useful for you — want it? This here is a two-way street where we both benefit.”
This article is for you if you’re running a business, growing a blog, or sharing your creative work — a small step that can make a big difference in growing your site.
Why collect email addresses? Build relationships: You’re not just chasing clicks, you’re building ongoing connections, turning casual visitors into long-term, loyal readers/customers/followers. You get to stay on their radar even when they’ve left your site.Stay in control: This is so important — you get to own your list, not a social platform, not a search engine! That means your list (and your connection with your tribe) stays strong even when algorithms change, even when your traffic dips. Support future growth: If you have any concrete plans to launch a product, open a store, promote a service, etc., you’ll want that list. You’re building this site for a reason, and building a connection with your audience can help you get there.Look at it this way: you’re building your best long-term asset!
Tip: You don’t need a long list. You need a list of the right people.
Why would anyone give you their email address?People are protective of their inboxes (you and I are too) — so what makes them say yes?
They’re getting something valuable: A fair exchange of sorts, you’re offering them something that solves a problem for them, saves them time, or inspires them to take action. If it feels like a win to them, it is. The important thing here is to keep in mind that the right freebie is the one that speaks directly to what they need. Or want. Or both. They trust you: Your site feels helpful, thoughtful, and especially in this day and age, human. You nailed your tone; it’s welcoming and informative. Over time, they get a sense that whatever you’re sending their way is worthwhile. They want to stay in the loop: They might not be ready to take any concrete form of action yet, but they feel they’re not willing to miss out on what you want to say. In a nutshell, they like what you’re doing, they like you, and they want to hear more.Tip: They share their email when what you’re offering feels “worth it.”
What is a freebie, and more importantly, what is a good freebie?A freebie (or “lead magnet”) is something you’re offering in exchange for their email address.
The best ones generally pack a punch in terms of value and practicality. Here’s what will make your visitors consider your freebies a steal so they end up using them often:
They solve a real problem: Save them time, answer a question, offer a helpful shortcut.They’re relevant to your site: They need to match your site content or product or service. They just feel thoughtful: They show your audience you know them and care about what they need.Tip: Think of freebies as small gifts that say, “I see you, and here’s something that might help.”
What do they look like in practice?Here are some examples – for you to pick from, depending on your content, your audience and your goals:
Shop owner: You could offer a “How to care for your [product]” factsheet or a coupon code. Lifestyle blogger: Think printable checklist, e.g., morning routine or pantry staples, travel prep, or self-care ideas.Creative/freelancer: A free template, a “how I work” client guide, or a mini-portfolio sampler. Coach/trainer: A short audio or video recording of a helpful exercise or a journaling/reflection prompt. Personal or passion-based business/website: A curated reading list, your favorite tools, or a printable list of inspiring quotes.Tip: Keep them simple, relevant, and useful. When in doubt, a good rule of thumb is to think what would get you excited to download yourself.
How to offer your freebie effectivelyOnce your freebie is ready, make sure it’s easy for your visitors to say yes. This is where a good CTA (call to action) comes in — that short, friendly invitation that nudges visitors to take action.
Here’s what makes up an effective CTA:
Clear: Let people know exactly what they’re getting. Warm: A line like “Want the checklist? Pop your email here” sounds friendlier than “Submit.” Visible: Don’t hide it at the bottom of the page — give it room to shine. What are your options?The built-in form option is our favorite for its ease and simplicity (see below). If you’re looking for more advanced features, there are other ways to set up your freebie using a variety of plugins you can try.
Here are a some popular options.
Use the form blockSee our recommended option below for details. For WordPress.com users, the Form block is available on all plans.
Mailpoet (plugin)
MailPoet (plugin): Lets you build sign-up forms, send automated emails, and deliver your freebie — all without leaving your site. It’s the best option if you want a built-in email marketing tool with automation. It integrates well with your favorite CMS and allows you to reach and grow your audience by offering features such as GDPR-compliant email newsletters, templates, segmentation, and many Woo-related features for your store.
Once you set it up, you can use this guide to send your freebie to your subscribers. MailPoet is awesome, if we say so ourselves, and it’s free for up to 500 subscribers.
Contact Form 7 Gated Content (plugin)
Contact Form 7 Gated content (plugin): lets you gate access to files so your visitors don’t see the Download button until they’ve successfully submitted the information you request. It works as an add-on for sites already using Contact Form 7. It doesn’t include email automation or list management but it’s great if you want a clean, no-code way to restrict access to a download until your visitor takes action. You set the rules, connect it to your content, and the plugin handles the gating part.
MailerLite / Mailchimp / KitMailerLite/Mailchimp/Kit (formerly ConvertKit) (third-party tools): Great if you’re already using these tools or looking for advanced marketing features.
You’d build your form on either of these tools, then set up an automated email that delivers your freebie, and finally, paste the embed code into your WordPress.com site using a custom HTML block (you’ll want to have a Business plan to use the Custom HTML block). It’s important to know that while these tools have free tiers, some features will be paid.
Our recommended approachThat said, we are all about making things as easy, straightforward, and lightweight as possible, so we recommend using an adapted Form block to get this done. It’s quick, built right into WordPress.com, and it gets the job done beautifully, no extra tools needed. Here’s how to set it up.
Step 1: Upload your file to your siteHead over to your Dashboard > Media and upload your file. Once you’re done, click on the file and copy its URL, like so:
 Step 2: Add the form to your page
 On your page, navigate to where you’d like to add your “grab your freebie” button:

Add the form block, then select the Registration form:

Once that is complete, the full form will be added to your page.
Step 3: Customize your formUse the List view to remove any fields that you don’t need:

You can further customize the form layout by using the contextual menu at the top or the side panel on your left:

Tip: Be sure to select the right element in the list menu so you can be sure you’re editing the correct options. Each element in the list view will have its own settings.
Next, customize the text and the layout of your button:

Finally, add the file to the form:

You’re all set! Your visitors’ emails will be added to your Dashboard > Feedback > Form responses, and you can use the export buttons (CSV, Google Sheets) if you’d like to use the email addresses in a different tool. Each tool will have a different way to import these email addresses — check their documentation for tool-specific guidance on how best to import your email list.:

You’ll also get email notifications to the email address associated with your WordPress.com account.
Tip: Test your form as a visitor. Seeing it work feels good – and reminds you that yep, you built something useful.
Over to youOur point is: you don’t need a giant funnel or fancy tech — just a good freebie and a way for people to raise their hand and say, “Yes, I’m in.”
If you hit a bump in the road? We’re right here to help.
We’d love to see what you create, and we’re excited to see your links in the comments below!
September 10, 2025
The Pattern System: Publish Faster with Reusable WordPress Layouts
WordPress Patterns let you reuse layouts without rebuilding them every time you publish. That means no more duplicating old posts, fixing headers, or untangling spacing issues every week.
They help you move faster and keep your website layout consistent, even when you’re juggling multiple offers or collaborators.
In this guide, you’ll learn how synced, unsynced, and locked patterns work and how to use them to build a repeatable publishing system. Plus, you’ll get a free toolkit with four ready-made layouts to plug directly into your site.
They’re built to help you:
Reuse layouts without rework.Centralize updates across your site.Protect your website’s structure when collaborating.Publish faster with less formatting cleanup.Download your free Pattern System toolkitWhy publishing workflows slow you down (and how patterns help)Copying and pasting layouts seems like a good idea at first, but it slows you down when you don’t have a proper system. Layouts drift, CTAs fall out of sync, formatting mismatches occur, and updates get lost between drafts and edits.
On their own, these issues don’t seem like a big deal. When they show up every week, however, they turn a 15-minute post into an hour-long fix-it session, making publishing a drag.
This worsens when you’re working with freelancers, other team members, or client contributors. Because without a system to standardize layouts, centralize updates, and protect your designs, everyone ends up doing things their own way, and your website starts looking disconnected.
You onboard a VA for help, but before long, you’re spending more time communicating (and still fixing) structure than improving content.
That’s exactly what WordPress Patterns help with. They are layout templates you structure once and then reuse whenever you need to, all inside the WordPress Site Editor.
They also make collaboration easier for you. You can safely hand off a post to a VA or guest contributor without worrying about formatting.
In fact, synced, unsynced, and locked patterns give you more control and flexibility, but only if you use the right one for the job.
How synced, unsynced, and locked patterns workEach pattern behaves differently depending on how you create it. Some update everywhere, some stay flexible, and others protect your layout when collaborators step in.
Here’s how each type works and how to use them together to build a faster, more reliable publishing flow.
Synced patternsThese are customizable global blocks. When you edit one, it updates everywhere, automatically.
Let’s say you have a “Subscribe to the newsletter” bar on your homepage, blog posts, and sidebar. If you change the CTA text from “Join 1,000 readers” to “Get the weekly roundup” in any one place, that change applies everywhere that synced pattern is used.

Synced patterns are perfect for when you need to keep messages consistent across your entire site. You can use them to:
Add newsletter CTAs to post footers or sidebars.Promote launches, sales, or limited-time offers with a global promo bar.Display affiliate disclosures or legal disclaimers across your site.Highlight live events like webinars or workshops with consistent banners.Keep bios or intros consistent across guest and multi-author posts.You can easily create a synced pattern in your WordPress website. Go to Appearance → Editor → Patterns → Add Pattern. Just make sure to toggle Synced on while creating the pattern because once you save it as unsynced, you can’t switch it to Synced later.
 Unsynced patterns
Now, if you toggle it off, your pattern will be saved as a customizable unsynced or not synced pattern.

As the name implies, these are unsynced or disconnected from each other. They use the same structure, but any changes you make to one won’t affect others.
Say you use the same custom layout for your “Weekly Favorites” roundup: title, image grid, short blurbs. With an unsynced pattern, you can insert that layout from your My Patterns library each week, add your new content, even change the layout, and publish. It won’t affect any other place where that pattern is used.

These are ideal for repeatable formats where you want to start with the same layout, but want the flexibility to change both the content and structure as needed. So use them to:
Publish weekly roundups, digests, or curated lists.Share recurring feature updates or changelogs.Highlight rotating testimonials or community spotlights.Announce new launches or seasonal campaigns with a familiar layout.Repurpose social content into blog posts using a consistent template.Need a hand building your own patterns? Use this tutorial to make your own custom synced and unsynced patterns for repeatable layouts you frequently use.
Locked patternsLocked patterns are pre-built layouts that let others edit content without altering the structure. This helps when you share templates with VAs, freelancers, or guest authors, because they can edit the content, fill in the text, images, or links, but they can’t change the layout.
These are perfect for multi-contributor workflows, like when you’re collaborating on client posts, assigning guest articles, or handing off translations. They’re especially handy when you’re using Editor or Contributor roles on the Business plan, where layout control matters.
You can easily lock any pattern added in My Patterns. Just open the pattern in the block editor, select the parent block, click the three-dot menu, then select the Lock option (just like you would lock any other block).

Make sure you check all these boxes so all blocks inside the pattern are protected.

If you’re thinking locked sound a lot like unsynced patterns, the key difference is unsynced patterns let you change both the content and structure, while locked patterns restrict structural edits, so you can only change the content.
Each pattern type solves a different publishing problem. That’s why the toolkit includes all three, so you can move faster, stay consistent, and adapt as you go.
Toolkit overview: Build your publishing systemNow that we’ve covered the building blocks (so to speak), here are four ready-made patterns you can import and use right away. We recommend customizing these patterns to match your branding, but other than that, they’re good to go.
Each one is built for a specific purpose and will help you save a lot of time.
Weekly publishing layout gives you a repeatable structure for roundups, updates, or content series.Synced CTA (my personal favorite) lets you update newsletter bars, promo banners, or announcements from one place.Testimonial loop makes it easy to showcase relevant social proof across services, posts, and pages in just a few clicks.Guest shell locks your branded layout, so contributors just need to fill in the blanks.The kit also comes with a Format tracker PDF so you can identify what patterns work better and turn your publishing into a performance system.Tip: WordPress.com has also published new header, footer, and Link in Bio patterns you can add from the Site Editor to make each page feel more on-brand.
To start using the patterns:
Download the Pattern Systems Starter toolkit file from this blog post. It includes four JSON files and one tracker PDF. In your WordPress dashboard, go to Appearance → Editor → Patterns → My patterns.Click Add Pattern → Import Pattern from JSON and upload the JSON files one by one. Once imported, patterns will appear in My patterns.Add it to any post or page using the block inserter. Click the “+” button, go to Patterns → My Patterns, and select the one you want to use.
Once uploaded, you can use the block editor’s styling controls to match your site’s style, change colors, add logos, or swap fonts as needed. They’re adaptable and flexible to your preferences.
Plus, whether your focus is on optimizing for SEO, LLMs, or humans, these layouts keep everything clean, structured, and skimmable.
Use the Weekly publishing layout to publish blog posts in under ten minutes
This layout includes a headline, short intro, flexible content grid, and CTA bar, all pre-structured for fast publishing. Just add it to your new post, update the content, and hit Publish.
This is a huge time-saver if you’re:
Publishing a newsletter or content digest on a regular basis.Updating readers with new product features, launches, or behind-the-scenes recaps.Managing recurring blog posts for client brands or content series.Turning Instagram or LinkedIn posts into a polished weekly blog update.This pattern, however, can do more than you think. Try these five ideas to simplify your weekly content workflow to save even more time.
Share weekly product or feature updates: Use the layout to highlight what’s new, what’s changed, and what’s next. Turn newsletters into blog posts: This layout helps you archive newsletters as posts without extra formatting to make your email content searchable.Turn social content into digest posts: Collect your top tweets or threads from the week and drop them into the grid. This is ideal if you want to build a public archive or recap series.Support recurring client content: If you’re working with agencies or collaborators, reuse the layout to publish client updates in a set format. It makes publishing easier for you and clearer and more consistent for your clients. Make content batches easier to manage: You don’t need to do one blog post each time; you can also queue three to four posts in one go. Insert the layout, drop in your content, and either publish or schedule ahead.Tip: Use the Format tracker worksheet (more on this below) to log what topics, formats, or layout tweaks perform best week to week. This will help you see what works and what doesn’t.
Use the “Synced CTA” pattern to update promos across ten+ posts in seconds
I still remember digging through twelve old posts to swap out one link. Thanks to synced patterns, not anymore. Layout includes a heading, short body text, a CTA button, and a reminder to repurpose your update across LinkedIn, email, and social, all wrapped in a synced block.
All you have to do is drop the Synced CTA pattern into your posts once, and any time you need to update it, just do it in one place. WordPress will automatically apply your changes site-wide.
This is a real time-saver if you’re a creator:
Here are five ideas to make it work harder across your blog, landing pages, and archives.
Grow your newsletter: Add a persistent sign-up CTA in every post footer. Update the copy as your lead magnet or as your offer evolves.Create multiple synced CTA patterns by campaign: One for your newsletter, one for your current product launch, and another for affiliate promos. This makes things so much easier, especially if you’re juggling multiple offers or content series.Drop a synced CTA for your webinar in evergreen posts: After the event, switch it to a replay or waitlist to keep the traffic converting.Rotate seasonal promos: Create separate synced patterns for holidays or occasions such as “Black Friday” or “Spring Launch,” and update them as the calendar changes.Match CTAs to content categories: For example, if you write on multiple topics, you’ve probably got different target audiences. Use something like “Read our SEO tips” for search content and “Join our weekly podcast” for podcast lovers.Read this guide to learn how to design high-performing CTAs that align with your content and audience goals.
Use the Testimonial loop pattern to add social proof in thirty seconds
Adding tailored testimonials to pages can have a real impact on your audience. It takes a lot of time, however, (most of which involves formatting), which is why many creators just skip it.
This pattern includes stacked quote blocks with room for names, blurbs, and social proof. It’s built so you can tailor each quote to match the offer, page, or audience.
Because it’s unsynced, you can insert a Quote block or Pullquote block inside the testimonial loop to personalize each page’s social proof. This is especially helpful if you’re:
Managing multiple offers (like courses, services, or launches).Publishing sales or landing pages that need tailored proof.Sharing weekly updates and want fresh testimonials per post.Showcasing reader or client feedback across different categories.Just paste in a quote, update the name or source, and that’s it. Try these five ways to add social proof exactly where your readers need it.
Add a testimonial beside your pricing or opt-in blocks (aka my go-to move): Add testimonials right below your pricing table, opt-in form, or CTA (usually when people hesitate) to gently nudge decision-making.Add visual rhythm to long posts: Use testimonials strategically between dense content sections to give the reader a breather, while subtly reinforcing ideas. Cheeky, right?Swap in fresh quotes weekly without reformatting: If you publish regularly, rotate short praise or feedback from new customers, readers, or partners to capitalize on your best quotes.Feature micro-testimonials from social or DMs: Pull short messages from Twitter replies, Instagram comments, or emails and paste them directly into the testimonial block.Reinforce your hook by pairing it with real feedback: Start a post or section with a quote that mirrors your headline. When readers see someone else validating what you’re about to say, they stay longer.Tip: You can also save multiple versions of this layout as synced patterns by use case — one for each program, product, or service. That way, when you add new testimonials for each use case in one place, they’ll update everywhere the pattern is used.
To do this, copy the testimonial loop JSON and name the new version Synced testimonial loop for [use case]. Now open it using TextEdit and change:
"syncStatus": "unsynced"To this:
"syncStatus": "synced"Now, when you upload the JSON, it’ll upload as a synced pattern.
Use Guest shells to let collaborators write without breaking your layout
Whether you’re assigning a guest post or letting a VA prep drafts, that’s mostly where formatting goes rogue. Guest shells include locked headings, formatted body sections, and placeholder fields, providing a clear, editable structure for others to follow.
They preserve your brand’s fonts, spacing, and structure and let others focus solely on adding content. This way, collaborators can only edit inside safe zones you’ve approved (and you finally get peace of mind).
Use Guest shells when you need to:
Assign drafts to guest contributors or clients.Let virtual assistants or editors upload content.Collaborate with team members who have Editor or Contributor roles.Maintain layout consistency across multi-person teams.Guest posts are just one way to use this layout; here are five more to keep your layout safe, no matter who’s writing.
Prep client drafts in a locked layout: Start with a Guest shell that includes your approved headings, layout, and styles. Add placeholder content, then assign the post for client feedback. They can review and comment without changing your structure.Use it for weekly updates with consistent formatting: For recurring content like product changelogs or digests, drop in the same Guest shell every time so you can focus purely on writing the update.Add contributor bios to guest posts automatically: Extend your shell to include a locked bio section at the top or bottom. Add a placeholder image and sample name. Every time you assign a guest post, just update those fields.Build category-specific shells for different post types: Make copies of this pattern and change the headers or intro text to match your use case. Protect layout while translating content: Use the shell when handing off posts for translation. Track performance with the Format trackerLet’s say you’ve reused your favorite CTA pattern in a few blog posts this month. One’s for a launch, another’s for a newsletter opt-in. A third? You’re not even sure—it was a quick drop-in for a roundup post.
Now it’s time to plan next week’s content… but you’re guessing which version actually worked. That’s where the Format tracker comes in.
It’s a simple printable that can help you turn patterns into a performance system. Instead of wondering which post, layout, or hook performed best, you’ll have the answer right there.
Just fill it in and keep track of where you used patterns and how they perform.
If you publish once in a while, you probably don’t need to use a tracker. Do it intentionally, such as when you’re testing layout ideas, running multiple offers, or publishing content at scale. It’s especially helpful when you’re:
Rotating offers or promos (like webinars, launches, or seasonal CTAs).Reusing layouts across posts and want to know what works best.Testing different testimonial placements, hooks, or post formats.Managing content across clients or a team and want visibility.Tip: If you want to turn this into a digital tracker? You can rebuild it in Google Sheets and use a plugin like Pretty Links to track CTA clicks.
Test new hooks by duplicating your favorite patternsWhen you’re a marketer, you can’t help it! You need to know what UI combinations actually work. This makes patterns even more valuable. They’re not just good for reusing, but for testing, too.
Once you’ve added a pattern like Weekly layout or Synced CTA, duplicate it, try a new hook or layout tweak, and see which one gets better results.
Click the “three-dot menu,” then select “Duplicate.”

Use this approach when you want to:
Test blog intros using different hooks: Try a question instead of a stat, or lead with a personal story vs. a bold claim.A/B test CTA copy: Emphasize urgency in one version, long-term value in another.Adjust layout structure: Try different testimonial formats or rearrange where sign-up forms appear.Experiment with visual tweaks: Change image size, button placement, or spacing, and track what gets more clicks.Save reusable templates by hook type: Create versions for “Narrative,” “Pain Point,” or “Stats First” so you always have strong openers ready to drop in.Build a repeatable publishing system with WordPress PatternsYou’ve got more important things to do than reformat the same layout every week. WordPress Patterns aren’t just nice to have; they’re systems that secure your branded layouts, centralize updates, and help you move faster, without losing consistency.
They allow you to focus on writing, creating, and shipping great content instead of hunting down old posts.
Now that you know which pattern type does what, you can start using synced, unsynced, and locked patterns to easily reuse layouts you rely on, from weekly roundups to global CTAs.
To get the most out of them, combine them:
Pair a locked Guest Shell with a Synced CTA.Start every newsletter with the Weekly Layout + Testimonial loop.Use Synced CTAs + Testimonial Loop patterns together to tailor the social proof to match each post’s audience.To get started, download the free Pattern System toolkit.
What’s inside:
4 import-ready JSON filesFormat tracker PDFREADME PDF instructionsDownload your free Pattern System toolkitSeptember 5, 2025
The 5 Best Things About WordCamp US 2025
Last week, I was excited to join 1,000+ other attendees in Portland, Oregon, for WordCamp US. This is the largest event in the US for the WordPress community to contribute to, showcase, share knowledge on, and learn everything WordPress.
I’ve been lucky enough to attend, volunteer at, and speak at several WordCamps. I usually jump at the chance to attend and spend time with the WordPress community. But if you haven’t been, you might be wondering what all the fuss is about. So I’ve put together 5 of my personal highlights from WordCamp US 2025.
Were you there? Please share your own experiences in the comments!
1. The diverse program offered learning and connectionWordCamp US spanned four days from August 26-29: contributor day, showcase day, and two presentation days.
On contributor day, nearly 300 community members across 19 teams spent the day contributing to the open source WordPress project. Anyone could walk up to these teams at their tables, sit down, and contribute.
Showcase day highlighted real-world examples of how WordPress is used, from the people behind them. There were plenty of talks, panels, and several in-depth workshops to get attendees energized about the possibilities of WordPress.
Then, it was time for the two presentation days. These featured keynote speakers, and three tracks of talks and panels from folks around the WordPress community. Topics ranged from using AI to code plugins and in neuroscience research, to design systems, data visualization, and accessibility.
On August 28, I spoke about Putting Creativity to Work. In my talk, I nerded out about P2 (the system of WordPress.com blogs we use to communicate internally here at Automattic), and I even gave away copies of my P2 comic in zine form.

This was my fourth time speaking at a WordCamp, and it reminded me of the incredible power of sharing your ideas at an event like this. Even though I had plenty of nerves (and imposter syndrome) for the days leading up to my talk, the many wonderful interactions I had afterwards reminded me that all the effort was worthwhile.
2. There was cool swag and great conversation in the sponsor hallI overheard one attendee say “There are so many great talks, but I’m here for the hallway track.” It’s true that a huge benefit of WordCamp US is that so many interesting people are gathered in the same physical space. Why not take advantage of that, by introducing yourself and having impromptu conversations?
The sponsor hall had many areas for these spontaneous connections. Cozy sitting areas, lawn games, a photo booth with props, skeeball and pinball games, displays of art from the WordPress photo directory, and even a live mural artist made for an energetic and inspiring space. Also featured in the space was a happiness bar, career corner, and creator studio, where attendees could troubleshoot WordPress issues, learn about available jobs in the ecosystem, and access a recording studio for creating content.
[image error]Photo credit: Pixel Nick PhotographyAnother highlight of every WordCamp is swag. Every sponsor booth had some kind of gift to give away, from stickers to food items, water bottles to tote bags. One standout was a poster, designed by Blue Ivory Creative, that was intricately illustrated with all kinds of WordPress and WordCamp imagery. There was even a claw machine filled with stuffed Wapuu toys. This was the only claw machine I’ve seen that actually wants you to win a prize!
Not to mention eating! With Portland being a famously foodie town, WordCamp organizers ensured attendees had access to its best-known treats. From a Voodoo Doughnuts truck in the sponsor hall to s’mores at the after party, I was never hungry.
I staffed the WordPress.com booth, which featured a prize wheel that made a very satisfying clicking noise when spun. This made for some great conversations about our powerful hosting for developers. I was proud to stand alongside other Automattic brands (WooCommerce, Jetpack, Gravatar, WordPress VIP, Pressable) to talk about the value we offer across the entire WordPress ecosystem.
 3. Portland is a vibrant and interesting location to explore
WordCamp US attendees were not only lucky enough to participate in all the fun of the event, but in our downtime I could also enjoy other delights of the city — like Powell’s Books, Forest Park, the Nike company store, and multiple vibrant neighbourhoods with hip bar and food scenes.
All these attractions were easy to get to on Portland’s public transit system. With a station right between the convention center and hotel, the MAX light rail made it super easy to get around. At registration, WordCamp US attendees were given a free pass for the duration of the conference, and I enjoyed taking it downtown, to the closing party, and to the airport.
4. The WordPress community is warm and welcoming, even for newbiesAlthough I am now familiar with many folks in the WordPress community, I still remember walking into my first WordCamp without knowing anyone. That’s always a daunting experience, no matter which space you’re entering. But at a WordCamp, you can expect lots of friendly faces, and people always willing to help you or engage in conversation. It’s a very inclusive space — all are welcome, from beginners to seasoned pros.
One personal highlight — I was invited to the Creator’s Studio to chat with Michelle Frechette and Darian Lusk, and ended up going live on TikTok with their guests Christian Taylor and Michael Cunningham. You just never know what’s going to happen!
5. The future of WordPress is brightOverall, WordCamp US showed me that there is no slowing down in the ecosystem of the world’s most popular content management system. This is a vibrant and productive community, with a diverse range of talented people helping each other, sharing knowledge, and moving the software further.
In WordPress co-founder Matt Mullenweg’s closing address, he highlighted the momentum and growth of WordPress, what’s shipping next (block-level commenting is so exciting!), and how AI will shape the project in the future.
I hope you can join us for one or more flagship WordCamps happening in 2026: WordCamp Asia in Mumbai, WordCamp US in Phoenix, or WordCamp EU in Krakow. Also, look out for local WordCamps near you.
See you there!
September 4, 2025
Learn at Your Own Pace With Our Free Courses
Whether you’re building your very first website, starting a blog, or looking to improve your site’s visibility, WordPress.com offers a growing library of free courses to help you every step of the way.
Our goal is simple: to give you the knowledge and confidence to bring your ideas online — with clear and practical guidance.
Explore Our CoursesWe currently offer three self-paced courses:
Create Your Website on WordPress.com (video course)
Perfect for anyone launching a new website, whether it’s for a small business, portfolio, or personal project. This course walks you through choosing a theme, setting up your homepage, editing your header and footer, adding essential content, and preparing to launch.
Self-guided Step-by-stepNo registration requiredBite-sized video lessonsGo at your own paceView CourseCreate Your Blog on WordPress.com (video course)
Ready to share your thoughts with the world? Whether you’re launching a niche blog, starting a personal journal, or building your online presence, this video course will guide you through every stage. You’ll learn how to:
Choose a theme that matches your styleWrite and format your first blog postOrganize your content using categories and tagsCustomize your blog’s layout and navigationEngage with readers and grow your audienceView CourseIntroduction to SEO (text-based course)
If you want more people to discover your site through search engines, this text-based course is for you. The learning objectives for this course are:
Understand how search engines find and rank your siteIdentify and use keywords that match what your audience is searching forStructure your content with headings, internal links, and media to make it easier to read and easier to findUse tools like Jetpack Stats and Google Search Console to monitor performance and make improvementsIn today’s crowded internet, good SEO helps you stand out from competitors and connect with your target audience. Higher search rankings lead to more visitors, increased engagement, and potentially more conversions for your business or cause.
View CourseLifelong learningWe know that learning how to use a website platform can feel overwhelming at first. These courses are designed to give you a clear path forward, one step at a time. You can learn at your own pace, explore the features that interest you, and skip the ones you know.
Each course is built for independent learning and hands-on discovery so you stay in control the whole way through.
Who Will Benefit Most?These courses are ideal for:
Beginners who are just getting started with WordPressSmall business owners building a web presenceCreators and bloggers looking to grow their audienceWhat’s Next?We’re always looking to expand our course selection to support users’ WordPress journey better. What course would you like to see next? Share your suggestions in the comments!
Start Learning TodayAll our courses are free and available now. Whether you’re building, blogging, or growing, we’re here to help you along the way.
View All CoursesSeptember 3, 2025
Is Your WordPress Site Slow? Here’s How to Fix It
Slow websites frustrate visitors, reduce your site’s visibility in search engines, harm conversion rates, and damage your brand.
Whether you built your website for fun and just want more people to enjoy your content, are using your site to promote your services and find clients, or are running a business website, slow load times are limiting its effectiveness.
Fortunately, you can fix a slow WordPress website.
In this guide, we cover the common causes of slow load times and how you can fix them. You’ll also learn how to test the speed of your site and record objective measurements of your site’s performance.
The costs of slow-loading websitesHere are some of the issues that slow site speed can cause:
Increased visitor abandonment rates: Studies show that over half of mobile users will abandon sites that take more than three seconds to load. Poor search engine rankings: Speed has long been a ranking signal used by Google to determine where to display sites in their search engine results. According to Google documentation, the main content of a page should load in under 2.5 seconds.Lower conversion rates: Google reports that each one-second delay in load time causes retail conversions to fall by 20%.Bad user experience: Even if the speed of your site isn’t slow enough to cause visitors to leave, it can still deliver a poor user experience, harming engagement, your brand perception, and the likelihood of a return visit.With the cost of slow load times being so high, testing the speed of your website and then taking action to improve its performance is highly recommended.
How to test your site speed
There are several ways to test your site speed, each offering slightly different insights into its performance and potential areas for improvement.
Here are our recommended tools for testing the speed of your site:
WordPress.com Speed Test : Our free tool is specifically designed for WordPress sites, providing clear and easy-to-understand insights into your site’s performance, with helpful suggestions for improvement. GTmetrix: Get free insights into site performance with multiple test locations and waterfall charts providing request-by-request visualization of the page load to help you identify problems in your content. PageSpeed Insights: Google’s free tool highlights issues with the metrics used by its search engine to evaluate site performance and determine rankings. SolarWinds Pingdom: Test the speed of your site for free from a range of locations, with a paid version that automatically tests load times at regular intervals and emails you the results.Review the results for both mobile and desktop tests to get a comprehensive picture of your site’s performance.
Which metrics actually matterWhen testing your site, you’ll see a range of metrics, including performance grades, letter ratings, and marks out of 100, as well as the page size and the time it takes to fully load.

These metrics can help you assess the impact of changes made to your site. However, they’re not the most useful when it comes to determining if your site is loading quickly enough.
For a better indication of how fast your site loads and its impact on user experience, conversion rates, and SEO rankings, the Core Web Vitals metrics are more important.
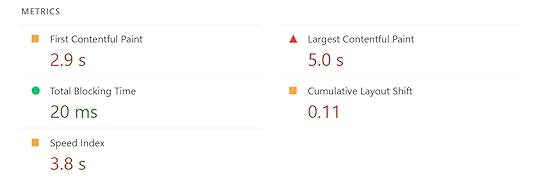
Core Web Vitals are a set of user experience metrics defined by Google. They focus on how fast, stable, and responsive a webpage feels to users, rather than just the time it takes them to fully load. This gives better insight into the impact of load times on the user experience.
There are currently three main Core Web Vitals that you should focus on:
Largest Contentful Paint (LCP) : Measures the time it takes for the page’s main content to load. Aim for LCP to occur within the first 2.5 seconds of the page starting to load. Interaction to Next Paint (INP) : Measures the time it takes for the page to respond and visually update after a user interacts with it, such as clicking a button. Aim for an INP of less than 200 milliseconds. Cumulative Layout Shift (CLS) : Measures the extent to which visible content, including images and buttons, unexpectedly shifts during loading. Aim to have a CLS score of less than 0.1.The tools mentioned in the section above measure these metrics.
Once you start testing the performance of your website, you’re going to get a lot of data. It’s natural to feel overwhelmed by this, and focusing on the Core Web Vitals will be the most effective use of your time and effort.
Common causes of slow-loading WordPress websitesBelow are the most common causes of poor performance, along with steps to fix them. Working your way through this list will get you well on the way to being the proud owner of a fast WordPress site and enjoying all the benefits of improved load times.
Shared hosting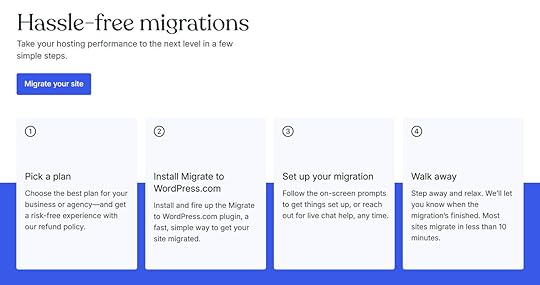
The quality of your web hosting has the biggest impact on how quickly your site loads. For example, sites using low-cost, generic shared hosting load more slowly than those using high-quality, managed WordPress hosting.
Upgrading your hosting can significantly impact the speed of your site. Depending on your starting point, upgrading your hosting is probably the biggest lever you can pull when it comes to improving site speed.
When upgrading, your main option is to switch to a higher-performance plan from your current host or move to another provider altogether. For a quick win, consider moving to WordPress.com managed hosting. Moving is easier than you think, thanks to its straightforward migration process.
For more information on choosing a host, check out our guide to the different types of web hosting.
Using a slow website builder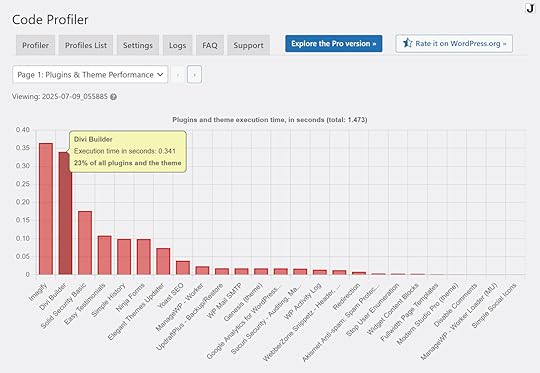
Adding a website builder to your WordPress site is an excellent way to take control of its design. However, not all website builder plugins are created equal, and some have the potential to slow down your site due to the way they’ve been built and the designs they produce.
One way to assess the impact of your website builder plugin on your site’s speed is to install a plugin like Code Profiler, which can help detect possible performance problems with themes and plugins. You should also test the load time of any pages you create with the builder to see how fast they’re loading compared to the other parts of your site.
Switching to a more performance-focused website builder, like WordPress.com’s website builder, can help solve the problem. However, any existing page designs will have to be recreated with the new builder if you want to improve their load times.
Unoptimized images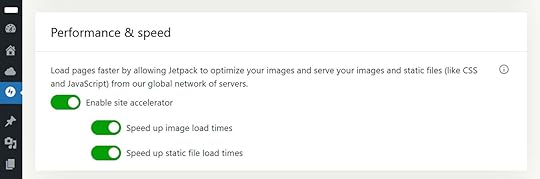
Images on your WordPress site can significantly slow it down. The larger their file size, the longer they’ll take to load and be displayed.
Running your site through a reliable speed test tool will highlight any images that could be causing problems. A good tool will also provide recommendations for improving image-related issues.
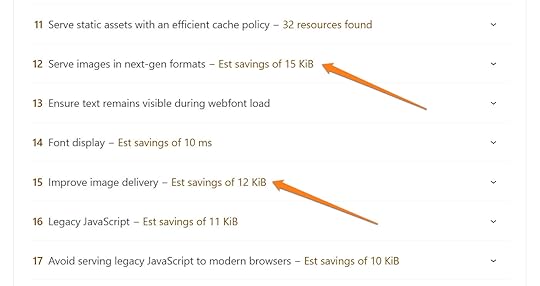
Ways to optimize your images so they don’t slow down your site include compressing them before uploading, using the appropriate file format, and enabling “lazy loading.”
Another option is to use the Jetpack Site Accelerator (CDN). This tool is available as a standalone plugin and is also included on the WordPress.com Business and Commerce plans. It can automatically resolve image-related load time issues.
Plugin bloatEach plugin you add to your site has the potential to slow it down. Therefore, it’s best to only add those you need, while also choosing plugins that are well-maintained and have positive user reviews.
A tool like Code Profiler can help identify the plugins on your site with the longest execution times. You can then swap these plugins for faster alternatives.
Another option is to replace multiple plugins with a single plugin that provides the same functionality. An example of this is Jetpack, which has a wealth of features covering backup, security, analytics, and SEO functionality, enabling it to replace multiple individual plugins.

You can also choose a web host that includes functionality currently covered by multiple plugins. For example, WordPress.com hosting includes backup, security, caching, social sharing, AI, monetization, and newsletter features that remove the need to install multiple single-feature plugins.
Lack of caching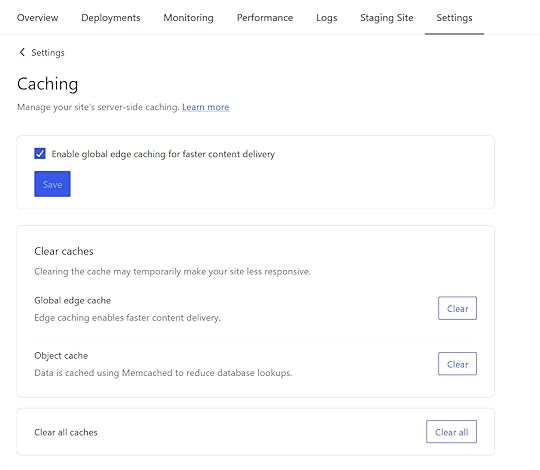
Caching speeds up load times for return visitors by storing copies of a site in a location that’s faster for them to access. There are several types of caching, including browser, page, and object caching, all of which can improve site speed.
Some web hosts, including WordPress.com, provide caching as part of their service. If your host doesn’t provide effective caching, many plugins for WordPress can add this functionality to your site, including Jetpack Boost, LiteSpeed Cache, and others.
Outdated WordPress or PHP versions
WordPress runs on PHP, a server-side scripting language, and like the WordPress software itself, new versions are released fairly often.
To keep your site running smoothly and as fast as possible, it should use the latest version of WordPress. Additionally, your hosting environment should be using the latest version of PHP, as newer releases often include performance improvements, enhanced optimization, and bug fixes.
Running older versions of WordPress and PHP can cause plugin compatibility issues, which can slow down your site or even cause it to malfunction. To help with this, enable automatic updates for your WordPress site. However, it’s essential to back up your site before updating WordPress in case something goes wrong.
Tip: Some web hosts, including WordPress.com, automatically back up your site before updates and keep the WordPress software and PHP updated for you, helping to prevent this issue.
Outdated theme or pluginsLike PHP and the WordPress software, themes and plugins are regularly updated, with older versions having the potential to slow down your site. This is due to new releases often containing code and performance improvements that can enhance load times and prevent issues that could be slowing things down, such as incompatibilities and security vulnerabilities.
Tip: Many plugins and themes can be set to automatically update every time a new version is released. Backing up your site before updating is recommended. Some hosts, including WordPress.com, automatically take care of that for you.
Too many ad or tracking scriptsAd and tracking scripts are typically added to a site to collect data on user behavior, including how visitors interact with the site, often for analytics and marketing purposes.
If you’re using third-party services like Google Analytics or Facebook Pixel, then ad and tracking scripts will be active on your site.
These third-party scripts increase the amount of data that’s loaded when a page is viewed. The overall size of the page increases, and the visitor’s browser must load data from a range of external sources. This slows down your site.
It’s usually not one script that’s having a large impact, but the combined effect of all of them.
To see which scripts are loading on your site and how long they’re taking to load, you can use WebPageTest and access the Waterfall and Request Details sections. The scripts will appear as entries with a domain that’s different from your site.
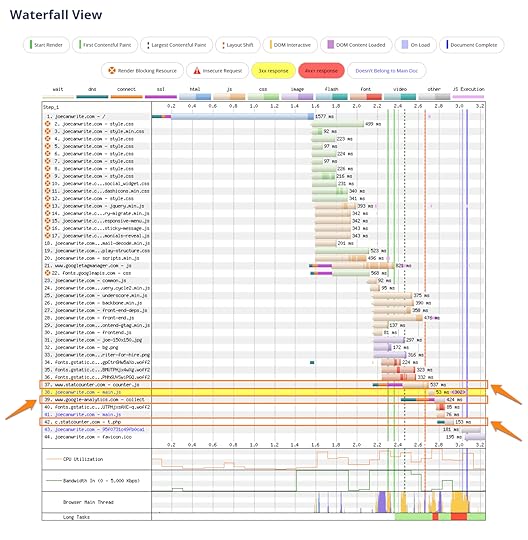
You can also use the Network tab in the Chrome browser DevTools to get similar insights.

Some ad, tracking, and other third-party scripts are inevitable if you want to have certain features on your site. However, be aware of how these scripts affect load time. You can then decide whether the impact is worth it.
Testing site speed before and after adding any features that require third-party scripts is also highly recommended.
Excessive pop-ups
Pop-ups are an effective way to grow your email list and promote offers, but they can slow down your site. This usually happens when they’re used excessively and are inefficiently coded and designed.
To prevent pop-ups from slowing down your site:
Use them sparingly.Ensure that you’re not loading more than one pop-up per page.Make them as lightweight as possible by optimizing any images you add to them.If your plugin allows, set them to only display after the page has fully loaded.Tip: For a lightweight pop-up tool, consider the Jetpack Newsletter feature.
Using HTTP instead of HTTPSIf your site isn’t using HTTPS, which you can easily check for yourself, it could be slowing your site’s load times. With HTTPS enabled, your site can use modern protocols to load faster through improved compression and the ability to load multiple files simultaneously over a single connection.
Using HTTPS also helps keep sensitive data secure. Therefore, it’s something you should add to your site by purchasing an SSL certificate or using one issued by your hosting provider.
Tip: WordPress.com hosting customers don’t need to worry about enabling HTTPS, as our plans include SSL certificates at no extra cost.
Improperly embedded third-party mediaAdding third-party media to your site, including YouTube videos and Instagram posts, can be a great way to enhance your content. However, if embedded improperly, they can slow down your site due to multiple network requests and the use of additional scripts to display the content.
Enabling “lazy loading” settings can prevent this media from being loaded until it’s in the visitor’s viewport. Replacing embedded videos with static thumbnails can also help stop content from loading until it’s needed.
You can ensure any third-party media is embedded properly by using the official WordPress Embed block or the blocks built for specific platforms, such as YouTube.
Excessive redirectsRedirects automatically send visitors from one URL to another. Redirects are often used when the address or URL of a page has changed, and when you’re merging and removing old content.
When used correctly, redirects can maintain your SEO and a user-friendly experience. However, too many redirects can slow down your site. This is especially true when multiple redirects are used consecutively, creating a redirect chain: As the visitor is redirected from one point to the next, the load time increases.
Online tools can help you fix the issue of excessive redirects by identifying them on your site. Once identified, you can remove any unnecessary redirects. You can also check site links and navigation elements, including menus, to verify they point to the current page URL and not an outdated one.
Heavy themesOne of the best reasons to build your site with WordPress is its vast library of high-quality themes. However, poorly coded themes or those bloated with excessive features, such as page builders, font libraries, and sliders, can unnecessarily slow down your site.
To avoid this, look for themes from reputable sources and check their reviews. Opt for themes marketed as being lightweight rather than all-in-one solutions. Avoid themes packed with features that your web host already provides or that you don’t need.
Tip: WordPress.com hosting plans include access to themes that are vetted for performance and quality, helping you to find a design for your site that won’t slow it down.
Database bloatWordPress uses a database to store your site’s content, including posts, pages, and images.
Over time, this database can become bloated with unnecessary data, such as post revisions, deleted content, spam comments, and data from plugins. As the database grows larger, it takes longer to find and retrieve the necessary data for pages to load.
There are several plugins you can install to keep your database optimized and running smoothly. However, managed hosting companies like WordPress.com take care of this for you, making it another task you won’t have to worry about.
Additional solutions and preventative measuresOther tips to correct a slow WordPress site include:
Minify HTML, CSS, and JavaScript. Reducing the size of your site’s HTML, CSS, and JavaScript files by removing unnecessary spaces and characters can improve its load times.Use a Content Delivery Network (CDN). A CDN distributes your site’s content across a global network of servers, helping it load more quickly, regardless of your visitors’ locations.Install an optimization plugin. Optimization plugins that can help speed up your site include WP Super Cache, WP-Optimize, and Jetpack.Hire a professional. Hiring a professional who’s skilled in optimization can help you identify and resolve the specific issues currently slowing down your WordPress site, as well as those that may arise in the future. As a cost-effective alternative, consider signing up with a managed hosting service that provides expert one-on-one support.Ready to move to WordPress.com?Moving to a faster web hosting provider is the one change that can have the most significant impact on the speed of your WordPress site. If you’re ready to get access to fast, secure hosting with a built-in website builder and many other useful features, try WordPress.com hosting. There’s even a hassle-free migration service to simplify the move.
Move your site to WordPress.com

