
Marly Bird's Blog, page 194
August 4, 2015
Sharon Zientara, Author 3 Skeins or Less: Quick Crocheted Accessories
Sharon Zientara, Author 3 Skeins or Less, Quick Crochet Accessories visited us on the Yarn Thing podcast with Marly Bird. This was her first time visit, but her experiences in our fiber world is was not that of someone who hasn’t had learning opportunities.
 Sharon learned to knit when her mom came and taught knitting her second grade class. Her mom, Sharon says is an amazing seamstress who did a little of everything. A friend had an alpaca farm in Colorado so she moved there to help out and get paid in yarn, knowing Interweave was nearby. She applied for an intership, worked with Eunny Jang, and moved along to Interweave Crochet, working also with Marcy Smith.
She moved to Seattle to work with Skacel in their new retail location Makers Merchantile. This was an opportunity to work with many teachers, like Franklin Habit and Cat Bordhi. Meeting June Hemmons Hiatt, who wrote Principles of Knitting, was life changing for her as she and June’s son met and feel in love, he moved to Seattle and they are working to further June’s work, updating and 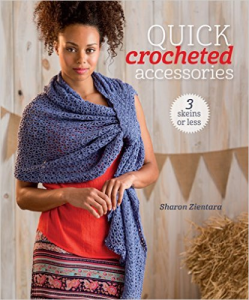 publishing a second edition of Principals, he redesigned The Knitting Belt.
Just last year (amazingly!) Sharon’s first book was published, It Girl Crochet (link to publisher, Interweave), followed by her current book is just out 3 Skeins or Less: Quick Crocheted Accessories both included patterns from a wide variety of designers, with varied collection of projects. She said her goal was great looking modern accessories, not strictly for women, and would make great gifts.
You can follow Sharon Zientara’s work in her Ravelry Designer page (where she admits to owning five cats).
http://www.blogtalkradio.com/yarnthing/2015/08/04/sharon-zientara-author-3-skeins-or-less-quick-crochet-accessories-1 or in iTunes.
The post Sharon Zientara, Author 3 Skeins or Less: Quick Crocheted Accessories appeared first on Marly Bird.


July 30, 2015
Designer Christine Marie Chen
Designer Christine Marie Chen was the guest on The Yarn Thing podcast with Marly Bird today. 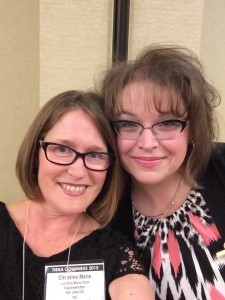 Christine was a guest at Marly Bird’s Designer Dinner and responded to an invitation to all the lovely attendees to share what’s new with them on the show.
Christine is a mostly self-taught knitter; she started with crochet as a child specifically granny squares. As an adult after her son was born, she went to a local library for a free class, to learn knit & purl to work up a scarf. She continued to use the library’s resources to learn more about knitting through books. Eventually she wandered into a Local Yarn Store who was recently without a teacher and offered to help.
Inspired by other designers she did commission work for, especially Lorna Miser (who will be a guest on the Yarn Thing podcast very soon). She began designing herself by approaching yarn companies and asking if they had in-house designers or were looking for designers. She was turned away by some and some approached her before she got to  them. Lorna recommended ‘Love of Knitting’, and Christine designed ‘Tangled Vines Hat’.
Christine says her love of knitting gives her the ability to knit with a wide range of yarn including a new company that is starting up in her area, so no one has worked with it yet, and Christine will help them develop pattern support.
Christine hopes to continue on this as a lifelong occupation, with books added into the mix. You can follow Christine’s blog at her website, her designs listed on Ravelry. She has a Mystery Knit Along (MKAL) you can find HERE (Ravelry Link).
If you missed getting to hear this live, you may catch the archived episode at this link: http://www.blogtalkradio.com/yarnthing/2015/07/30/designer-christine-marie-chen or in iTunes.
Thank you to our sponsors, please let them know when you shop or visit their webpages that you heard about them on The Yarn Thing Podcast with Marly Bird.

The post Designer Christine Marie Chen appeared first on Marly Bird.
July 29, 2015
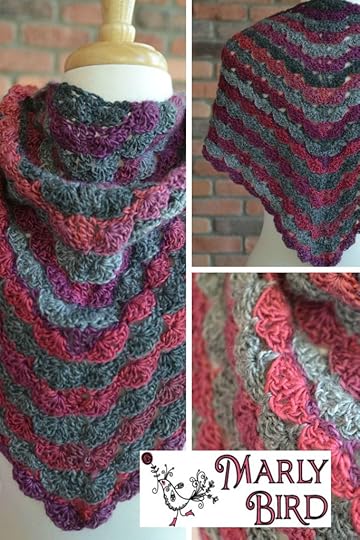
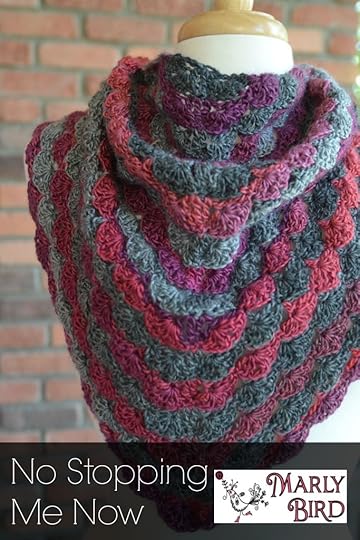
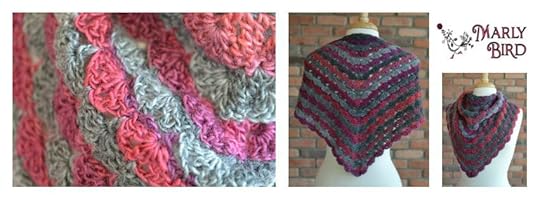
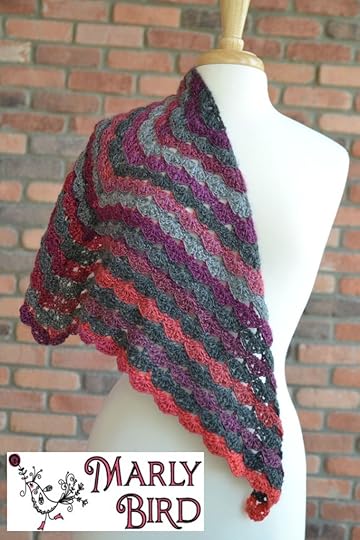
Free Crochet Shawl: No Stopping Me Now
This free crochet shawl pattern is one that I designed as a free pattern giveaway at the Marly Bird Meet and Greet while attending the Knit and Crochet Show, 2015. I wanted to use a yarn that I love working with in two color-ways that I just KNEW would look great together. After playing around with several stitch patterns I finally decided to use a pattern that I absolutely love. Lo and behold, you can now see the ‘No Stopping Me Now’ Shawl! 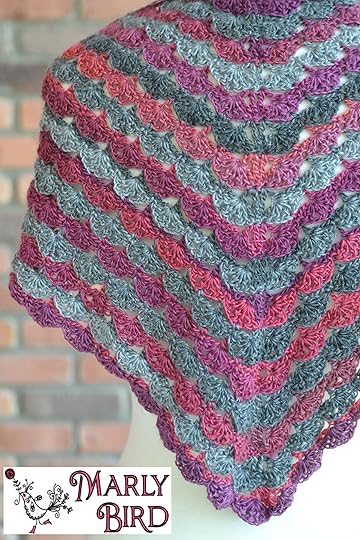
 **Disclaimer: this post contains affiliate links**
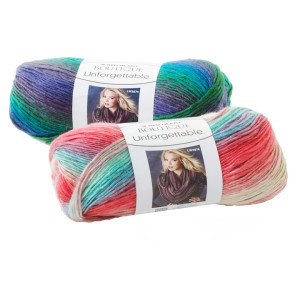
This shawl is super fun, super simple and super addictive! It begins at the center top and increases are worked at the beginning, middle and end to make this fantastic triangle shawl. Using Red Heart, “Boutique Unforgettable” yarn in Bistro and Winery (don’t those names just make your mouth salivate?) I changed colors every two rows making unique.
Using this long color changing yarn and changing colors every two rows really makes the crocheter eager to get to the next repeat to see how the colors will look in the final piece! I’m not lying when I tell you that making this free crochet shawl is addictive.
The finished sample didn’t use the full two balls of yarn so you could make it larger without any problem. You simple continue in pattern until you run out of yarn…but make sure you finish on a row 2 of the pattern. That’s why I named it the ‘No Stopping Me Now’ shawl because you just don’t want to stop!
No Stopping Me Now Shawl
Add this pattern to your Ravelry Queue and Favorites
Size
Finishes sample is approx. 20” (50 cm) long at center, 41 ½” (105.4 cm) wingspan.
Materials
Yarn Red Heart Boutique “Unforgettable” (100% acrylic, 269 yds / 246m, 100g / 3.5 oz):
Bistro #3944 (A) – 1 ball, Winery #3955 (B) – 1 ball, Or colors of your choice
Hook Size H-8 (5mm) or size required for gauge
Notions Yarn needle
Gauge
Rows 1-6 of Shawl = 3″ (7.5 cm) long at center and 6 1/2″ (16.5 cm) across
4 shells = 4 1/4″ (10.8 cm) across in Shawl pattern
Notes
To change colors, work last st of row to final yo, yo with new color and complete last st.
Special Stitches
CL (cluster): * Yo, pull up a loop in indicated st, yo and draw through 2 loops on hook, rep from * once more, yo and draw through all 3 loops on hook.
Shell: CL, (ch 2, CL) twice all in same st or sp.
Abbreviations
beg – begin(ning)
ch – chain
dc – double crochet
rep – repeat
RS – right side
sc – single crochet
st – stitch
tr – triple (treble) crochet
WS – wrong side
Yo – yarn over
 Shawl Pattern
Using A, ch 8.
Row 1 (WS): Sk 7 ch (counts as 1 tr and 3 ch), (dc, ch 3, 2 tr, ch 3, dc, ch 3, tr) all in 8th ch from hook, turn.
Row 2: Ch 1, sc in first tr, shell (see Special Stitches) in next dc, sc in each of 2 center tr, shell in next dc, sc in 4th ch of beg ch-7 of previous row, turn.
Row 3: Ch 7 (counts as 1 tr and 3 ch), dc in first sc, ch 3, sc in center CL of shell, ch 3, (dc, ch 3, tr) in next sc, (tr, ch 3, dc) in next sc, ch 3, sc in center CL of shell, ch 3, (dc, ch 3, tr) in last sc changing to B in last st, turn.
Row 4: Ch 1, sc in first tr, shell in next dc, * sc in next sc, shell in next dc; rep from * to 2 center tr, sc in each of 2 center tr, shell in
next dc, rep between * and * to end, sc in 4th ch of beg ch-7 of previous row, turn.
Row 5: Ch 7 (counts as 1 tr and 3 ch), * dc in sc, ch 3, sc in center CL of shell, ch 3; rep
from * to 2 center sc, (dc, ch 3, tr) in next sc, (tr, ch 3, dc) in next sc, ch 3, sc in center CL
of shell, ch 3, rep between * and * to last sc, (dc, ch 3, tr) in last sc changing to next color in last st, turn.
Rep Rows 4 and 5 only, changing colors every 2 rows, until yarn is used up or piece measures desired size. Ending on a row 4.
Finishing
Weave in ends. Wash and block piece to really open up the lace or leave as it for an equally beautiful shawl.
I hope you enjoy No Stopping Me Now free crochet shawl pattern! It was super fun to crochet – and fast too! I love when the yarn does half the work for me as it does in this pattern, with just one skein of each color you get a truly unique shawl.

Written pattern copyright Marly Bird 2015, all rights reserved. Please do not reprint or repost this pattern, but please do link to this page to share this pattern with others. To print this pattern for personal use, please use Print Friendly button at the bottom of the pattern. Thank you to Red Heart Yarns for providing the yarn for this pattern!
The post Free Crochet Shawl: No Stopping Me Now appeared first on Marly Bird.
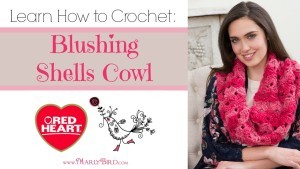
How to Crochet: Blushing Shells Cowl
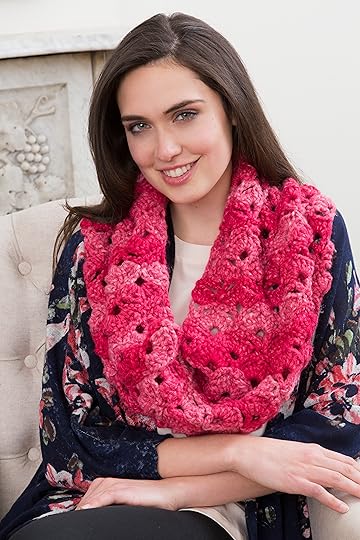
Blushing Shells Cowl by Diane Moyer is just one of the many wonderful free patterns over at RedHeart.com. This cowl is made with their brand new yarn called Infinity and I just LOVE IT!
This video sponsored by Red Heart but all the views are my own. So when I tell you that I seriously loved working with this yarn I am not kidding you. I enjoyed working on the step-outs for this video more than I should  Honestly, I can’t wait to wear my sample of this cowl because I know people will be complimenting me on it!
Now, you too can make this fun and fast cowl. With the free crochet pattern and the free video tutorial taught by me, Marly Bird you will have nothing but success.
*Disclaimer: this post includes affiliate links**
BLUSHING SHELLS COWL
Gorgeous color and a bit of matching sparkle take this yarn into the realm of dreaminess. Sit back and enjoy how quickly you can crochet this shells cowl with this bulky yarn beauty.
Pattern:
Here is the link for the FREE BLUSHING SHELLS COWL
Supplies:
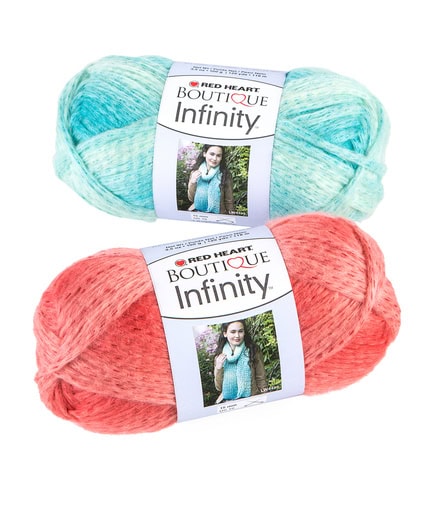
RED HEART® Boutique Infinity™: 1 skein 1938 Beachy
Susan Bates® Crochet Hook: 9mm [US M-13]
Susan Bates® Steel Yarn Needle
Stitches Used:
ch = chain; dc = double crochet; sc = single crochet; st(s) = stitch(es); ( ) = work directions in parentheses into same st; * = repeat whatever follows the * as indicated. Make note of the special stitches at the start of the pattern.
YouTube Video by Marly Bird:
YouTube Video Notes:
In this video you will learn begin with a foundation chain that incorporates double crochets, work the pattern stitch for the cowl, see a sample of this cowl worked up in a thinner yarn and fewer stitches, and I tell you how to seam up the cowl.
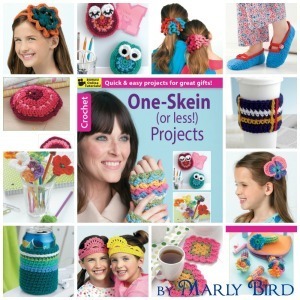
Looking for more? I love making quick projects and even wrote a leaflet with Leisure Arts on how to do some fun things! If you too are looking for fun and quick projects go and check out the One Skein or Less book by Marly Bird.
 Look at more patterns by Diane Moyer
 Check out Marly Bird Designs

The post How to Crochet: Blushing Shells Cowl appeared first on Marly Bird.
July 27, 2015
Bijou Basin Ranch Giveaway
 This Giveaway is for 3 hanks of Bijou Basin Ranch, Lhasa Wilderness Yak Yarn, Canvas Project Bag and a 16 oz bottle of Allure Fine Fiber Wash! Oh, and a FREE SHAWL PATTERN (coming soon)!
DETAILS: This giveaway is open to anybody around the world and ends 8/3/15 at 12:15am MT.
To enter:
1. Share this video publicly with your friends via facebook/twitter/tumblr/pinterest. (very important as I will check to see if I can find your share)
2. Leave a comment on this video (comments on the blog post will NOT count) and be sure to include where you shared the video so I can see! (very important as I will use the number generator to choose the winner from the comments)
3. Lastly, be sure to smash that like button and Subscribe to the Marly Bird YouTube Channel!
That’s it! Once you do all that, check out some of my other videos here on the Marly Bird Channel.
Find out more about Bijou Basin Ranch at www.BijouBasinRanch.com
Learn More about Eileen Koop from the Yarn Thing Podcast!
SUBSCRIBE so you can stay up to date with all my new videos.
Website: http://www.MarlyBird.com
Podcast: http://www.MarlyBird.com/podcast
Facebook Group: http://www.facebook.com/MarlyBird
Ravelry Group: http://www.ravelry.com/groups/marly-b...
Please check out my website for more patterns at –
http://www.marlybird.com/patterns/
The post Bijou Basin Ranch Giveaway appeared first on Marly Bird.
July 24, 2015
CGOA Design Contest WINNERS ANNOUNCED
CGOA Design Contest Winners Announced

At the The Knit & Crochet Show, which is a combination of TKGA and CGOA, there was a special area for viewing entrants for the CGOA Design Competition, voting done as the People’s Choice.
Here are the Categories, Winners and the Section Sponsors:
First Time Entrant ~ Susan Bates
3rd Place: #49 Harem Nights, by Amy Curtain
2nd Place: #28 Woodland Winter Jacket, by Heather Galluzzi
1st Place: #54 Emily Rose, by Kayt Ross
Young Designer ~ The Marian G Wilburn Foundation for Fiber Arts
1st Place: #68 Catherine Wheels Skirt, by Grace Rosburg
Artistic Expression ~ Creativebug
3rd Place: #53 Danikil Depression, by Kayt Ross
2nd Place: #55 Cobblestones, by Kayt Ross
1st Place: #58 Spiral Blues, by Ann Wicker
Accessories ~ Clover
3rd Place: #34 Spring Floral Pin, by Jean DeMony
2nd Place: #22 Eleanor Shawl, by Kathryn White
1st Place: #50 Hearts Galore, by Sandy Gold
Home Decor 7 Afghans ~ WEBS America’s Yarn Store
3rd Place: #41 Behind the Picket Fence Throw, by Shari White
2nd Place: #5 The Long & Short of It, by Vicki Buford
1st Place: #10 Country Gardens Pillow, by Joyce Geisler
Thread Crochet ~ Bernat
3rd Place: #25 Blue Bird Doily, by Kathryn White
2nd Place: #48 Spring Leaves Wedding Dress, by Brandi Isham
1st Place: #24 Free Spirit Doily, by Kathryn White
Fashion ~ Interweave Crochet / Love of Crochet
3rd Place: #44 Velella Poncho, by Shari White
2nd Place: #13 Tunica Geometrica, by Susan Walsh
1st Place: #21 Legacy, by Kathryn White
Technical Merit ~ Mary Maxim
Winner: #48 Spring Leaves Wedding Dress, by Brandi Isham
People’s Choice ~ Happily Hooked Crochet Magazine – to be announced Sat.
Winner:
Grand Prize Winner ~ Red Heart
Winner: #54 Emily Rose, by Kayt Ross
The post CGOA Design Contest WINNERS ANNOUNCED appeared first on Marly Bird.
July 22, 2015
Ribbed Scarf Red Heart
redirect page to http://www.redheart.com/free-patterns...
The post Ribbed Scarf Red Heart appeared first on Marly Bird.
July 21, 2015
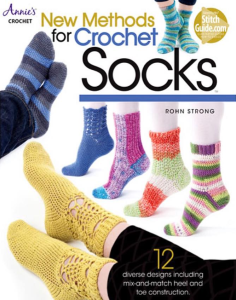
Rohn Strong is Back with NEW Sock Book
Rohn Strong is back with NEW Sock Book and sharing with us at the Yarn Thing podcast with 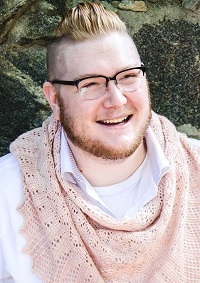 Marly Bird and he’s knocking our socks off!
Rohn started crocheting when he found a failed attempt of his mother’s to make an afghan for his dad. That afghan was never finished, but the fun was begun and he was off like a rocket!
He began with knitting a sweater for his mom, of super bulky yarn on very short straight needles. He says his partner encouraged him to pick it up when he put off knitting and crocheting for awhile. Charles Voth asked Rohn for a design while he was at Inside Crochet. In 2013 he went with Marly to TNNA…. in just three years, he went from creating a few designs to SO, SO MUCH MORE and he really has an appreciation for what’s happened to him in such a short time.
Rohn says he was watching Alex Tinsley on a podcast sharing her designing experience and he decided he needed to do that also. He designed a collection of men’s hats, not as a career. For a period of time he plodded through with minimal success, believing that designing more patterns was the way he should go. At a point he says he found where he needed to be and things just took off!
Working with Annie’s Catalog came about because a friend shared his work with a friend, who shared it with…. He created an online class with them of Tunisian Crochet which goes beyond the basic techniques (he actually recommends a class with Kim Guzman to learn) with color changing patterns. Next up was his New Methods for Crochet Socks book which he will soon begin filming an online class to go with it.
Recently, he filmed for the Knit and Crochet show (with Robin Chachula, Kristin Nicholas, Ellen Gormley and Lena Skvagerson) which has undergone some changes, and filming has begun with it’s new host Deborah Norvile. Here is the link to his blog post where he shared his excitement about that experience.
Rohn is learning about crochet and learning how it works and the shapes crochet creates, but also continuing to learn how to teach others. He shared that he has future online classes and books to come. Check out the patterns listed in New Methods for Crochet Socks in Ravelry, purchase in Annie’s Craft website or Amazon (Kindle edition available).
Follow Rohn Strong at his website, his designs listed in Ravelry and in Facebook. To hear Rohn’s earlier visit from 2013, CLICK HERE
IF you missed getting to hear this live, please take time to hear this episode in the archive: http://www.blogtalkradio.com/yarnthing/2015/07/21/rohn-strong-is-back-with-new-sock-book or iTunes.
The post Rohn Strong is Back with NEW Sock Book appeared first on Marly Bird.
July 16, 2015
NEW Craftsy Class with Lucy Neatby
*AFFILIATE LINKS* NEW Craftsy Class with Lucy Neatby was the subject of today’s Yarn Thing with Marly Bird  podcast. A new learning opportunity with an advocate of Happy Stitches could not be a bad thing!
Lucy says she never intended to be a knitter, but has been solidly knitting since she was 17. Her home life had craft overtones, that things were made over when they didn’t fit their purpose anyore. She ran away and joined the merchant marines and at one point wanted a Guersey, so she visited a knit shop and worked on it while at sea for six months at a time.
Marly discovered Lucy’s DVDs in a big box store.Lucy began creating these about ten years ago, and they are still available at her website, 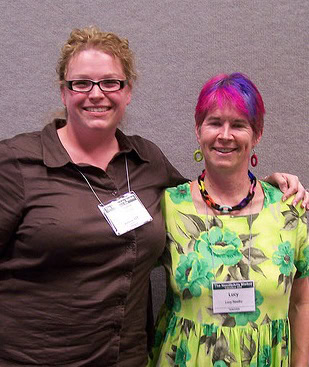 inspired by the over-the-shoulder method of sharing with a neighbor her techniques. (Marly met Lucy in 2008 at TNNA, picture at left.) She uses the dvd’s when she teaches a class so that the whole group is able to see the techniques while she explains and guides the students in person.
Lucy says her new Craftsy Class, Fearless Knitting: Empowering Techniques for Every Knitter starts at a beginning and works through a progression. She begins with individual stitches, which are never alone, and how they hold hands as friends and interconnect to create fabrics. Finishing and Rescue techniques is not just something you can skip to, because it’s all interconnected. One of the commenters on her class says she’s been knitting for 50 years and only until now could she fix her mistakes. Being ‘Fearless’ and ‘Empowered’ becomes very important assets.
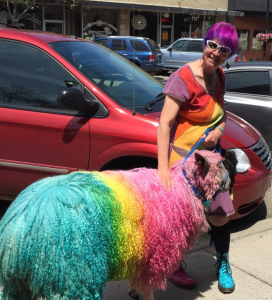
Lucy was recently in Idaho, where the sheep with the fun rainbow dye hair-do was part of the event. His fleece was raffled off that weekend, but what a terrific photo op… During today’s Yarn Thing visit, Lucy shared that she checks in from where ever she is visiting on her students in her Craftsy classes, which is one of the best reasons to for her to teach by that method. Lucy’s two previous classes with Craftsy are My First Socks and Foundations of Double Knitting. (These are Marly’s affiliate links.) Lucy couldn’t reveal if there are other classes in the works, but loves that it reaches students who can’t travel.
You can follow Lucy Neatby at her website, her designer page in Ravelry and she is also in Instagram (where many follow her adventures) and on Facebook, Twitter. Here is the link from her visit last year, just for fun.
If you didn’t get to listen to this LIVE you can still catch it as an archive: http://www.blogtalkradio.com/yarnthing/2015/07/16/new-craftsy-class-with-lucy-neatby or in iTunes.
The post NEW Craftsy Class with Lucy Neatby appeared first on Marly Bird.
July 14, 2015
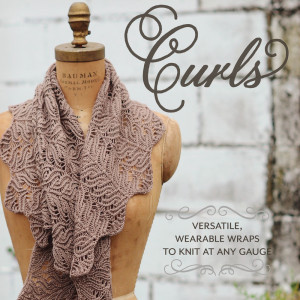
Hunter Hammersen, author of CURLS
Hunter Hammersen, author of CURLS, visited us in HD today on the Yarn Thing Podcast with Marly Bird. Everybody sounded wonderful!
Hunter says she has some guilt about having to give knitting more than one try before she was hooked. First try in colllege, nope, a couple of years later, no again, again in 2007 with a pair of socks began the dawn of understanding.
She almost immediately began tweaking her work, then after being requested to write the patterns down, she did. In 2009, Hunter began posting patterns online in Ravelry, she says she posted about 14 patterns, knitting till it hurt. Her first book, out in 2011, the next year her first self-published books, CURLS is her seventh self published and another will be out this fall, with a sequel to CURLS out next summer. SO VERY EXCITING for fans of her beautiful designs.
Writing CURLS came about because she created a swatch that she liked the shape of, appreciated that it could be made with many different yarns into a really pretty, wearable accessory. The gauge issues is non-existent, because if you create a swatch and like how the fabric looks, you’ve got gauge. You can create really big or small as you prefer, if you’re petite and just want something to wrap around your neck or tall like Marly and Hunter feel the need for more cover — Go For It!

Hunter says she can’t imagine knitting a sweater, that her attention span isn’t great enough. Shawls work for her, especially the less fussy the better. Choosing yarns for CURLS was eclectic, so that knitters could see that THEIR favorite yarns could work they range through all the yarn weights, then the colors (all the names are based on colors) so everyone sees the stitch definition. (She’s promising to make the names easier from now on!) Hunter also makes the cast-on easier, with just a few stitches rather than many hundreds to mess up!
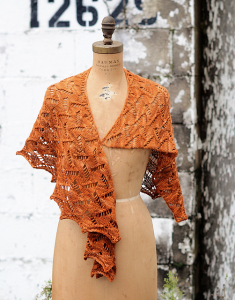 Nacarat was the one that Hunter knit herself and has fallen in LUST with, as it seems to fit her and her wardrobe. Icterine is another that she is admiring whole-heartedly, for the color and giant cables.
When Marly asked if she is being tempted with knitting these designs again, Hunter gave us glimpses to look forward to, in that the sequel she mention will be done in all grays (but not the same gray!) which many find is easier to imagine in your beloved colors. She learned so much when putting together Knitter’s Curiosity Cabinet (another Ravelry link), that she’s taken down her earliest patterns and recreating them, keeping in mind as a knitter, what would she hope to see in a pattern.
I can find two episodes that Hunter Hammersen was on Yarn Thing before (and today is not the last time either) if you’d like to hear them, here is the link to her visit in October 2013 and earlier the link to her visit in August 2012. Follow Hunter at her website www.violentlydomestic.com and she has a Ravelry Group.
If you missed getting to hear this live, it can still be heard as an archive: http://www.blogtalkradio.com/yarnthing/2015/07/14/hunter-hammersen-author-of-curls
The post Hunter Hammersen, author of CURLS appeared first on Marly Bird.
Marly Bird's Blog

- Marly Bird's profile
- 19 followers

