
Marly Bird's Blog, page 192
September 30, 2015
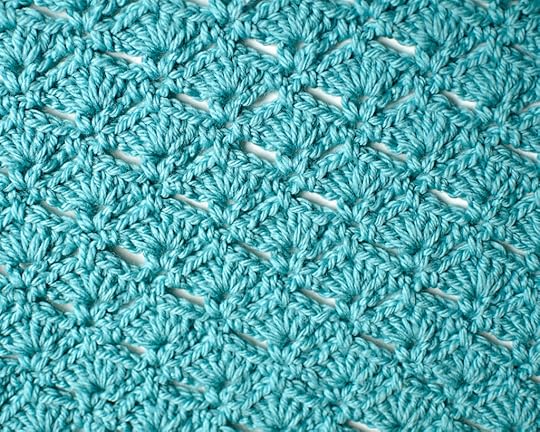
Bobble Crochet Stitch
Time to add some REAL texture to the blanket with the Bobble Crochet Stitch. This is the fourth block in the Crochet Stitch Sampler Baby Blanket CAL Sponsored by Red Heart Yarns and hosted by Marly Bird.
You can click here for the first square, here for the second square, here for the third square
Where is the Full Pattern?
During the Crochet-along (CAL) you will be able to get the written and chart instructions as well as the HD Video tutorial for the next step in the Crochet Stitch Sampler Blanket every Tuesday and Thursday. The full pattern will not be posted until the end of the CAL.
GET FULL CAL DETAILS HERE
Get a little help from your friends!
Follow along and complete each step with my help as well as the wonderful group of other Marly Bird CAL members in the Facebook Group. In the group you can post pictures, ask questions and get general crochet support.
I’m ready! Let’s get this party started!
I chose the Bobble Crochet Stitch square for this blanket because I wanted to add a rich textured stitch to balance the other two really textured stitches.
The stitch pattern of this stitch makes it so the bobble is off set every other row. By doing so we get a very symmetric look.
Click on the stitch below if you need a quick refresher on how to do it.
Slip Knot and Chain Stitch
Single Crochet
Double Crochet
CROCHET STITCH SAMPLER BABY BLANKET
Add this pattern to your Ravelry Queue and Favorites
Materials
Yarn: Red Heart, “With Love” (100% Acrylic; 315 yds/170g): 1 skein of 4 different complementary colors and 2 skeins of main color.
Designer NOTE: Original was made with a discontinued yarn– STITCH NATION by Debbie Stoller™ “Washable Ewe™”: [for sample size blanket] 2 balls each 3903 Strawberry, 3540 Currant, 3501 Robin Egg, 3652 Clover; 3 balls each 3365 Earth.
Hooks: you will need a variety of different sized hooks for this blanket. Use the hook size that will get you the desired square size. Some squares will require a smaller hook and others a larger hook depending on the stitch pattern. For the sample I used G/7 and H/8.
Notions: Stitch markers, tapestry needle
Gauge
Each Full Size Square: 11” x 11″ [27.94 X 27.94 cm]
Each stitch count given for the full square will result in approximately the same size square as long as you adjust hook size when necessary. YOU decide how large you want your squares to be. Once you choose the size for your blanket just make sure that each square will measure that.
Designer NOTE: To make sure each square I made was the same size, I washed and blocked each square as I made it. Doing so made it so I knew right away if my stitches were too tight or too loose.
Abbreviations
This is the full list of abbreviations used for all the patterns. I will be sure to add this to each pattern so you don’t have to go searching for it as your working on the square.
beg – begin(ning)
bpdc – back post double crochet
ch – chain
dc – double crochet
fpdc – front post double crochet
hdc – half double crochet
rep – repeat
rnd – round
RS – right side
sc – single crochet
sk – skip
sl st – slip stitch
sp – space
st – stitch
tch – turning chain
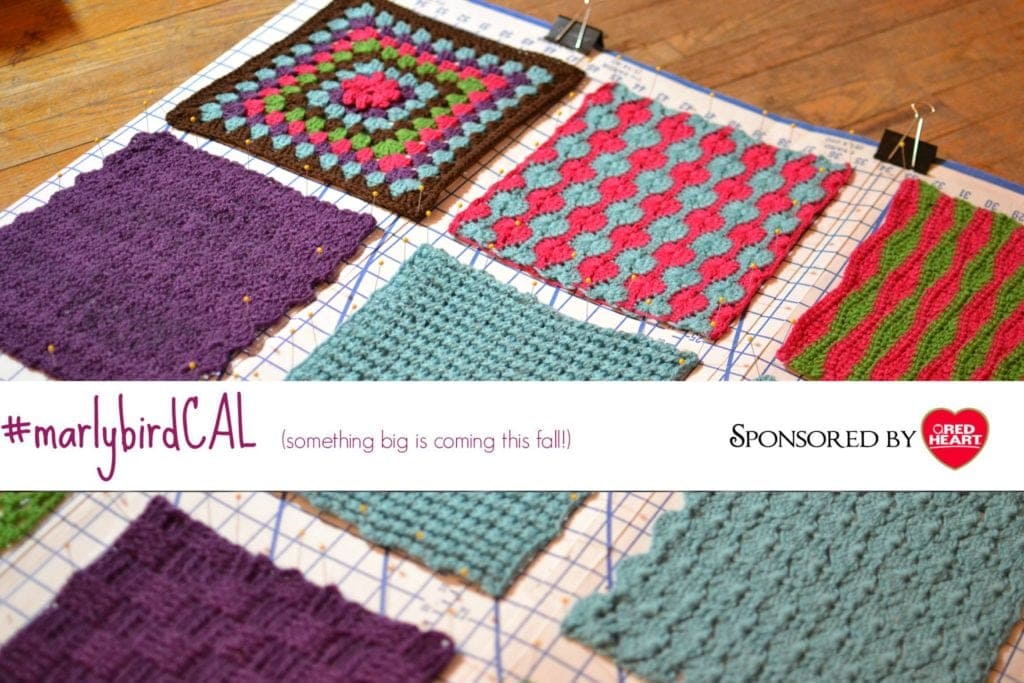
tr – treble crochet
WS – wrong side
yo – yarn over
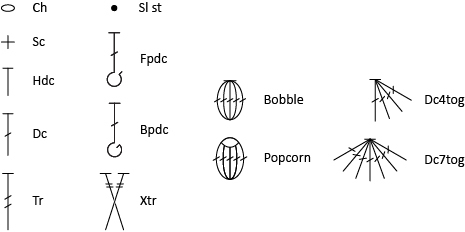
Symbol Key for Crochet Charts
This is the symbol key for all the charts used for all the patterns. I will be sure to add this to each pattern so you don’t have to go searching for it as your working on the square.
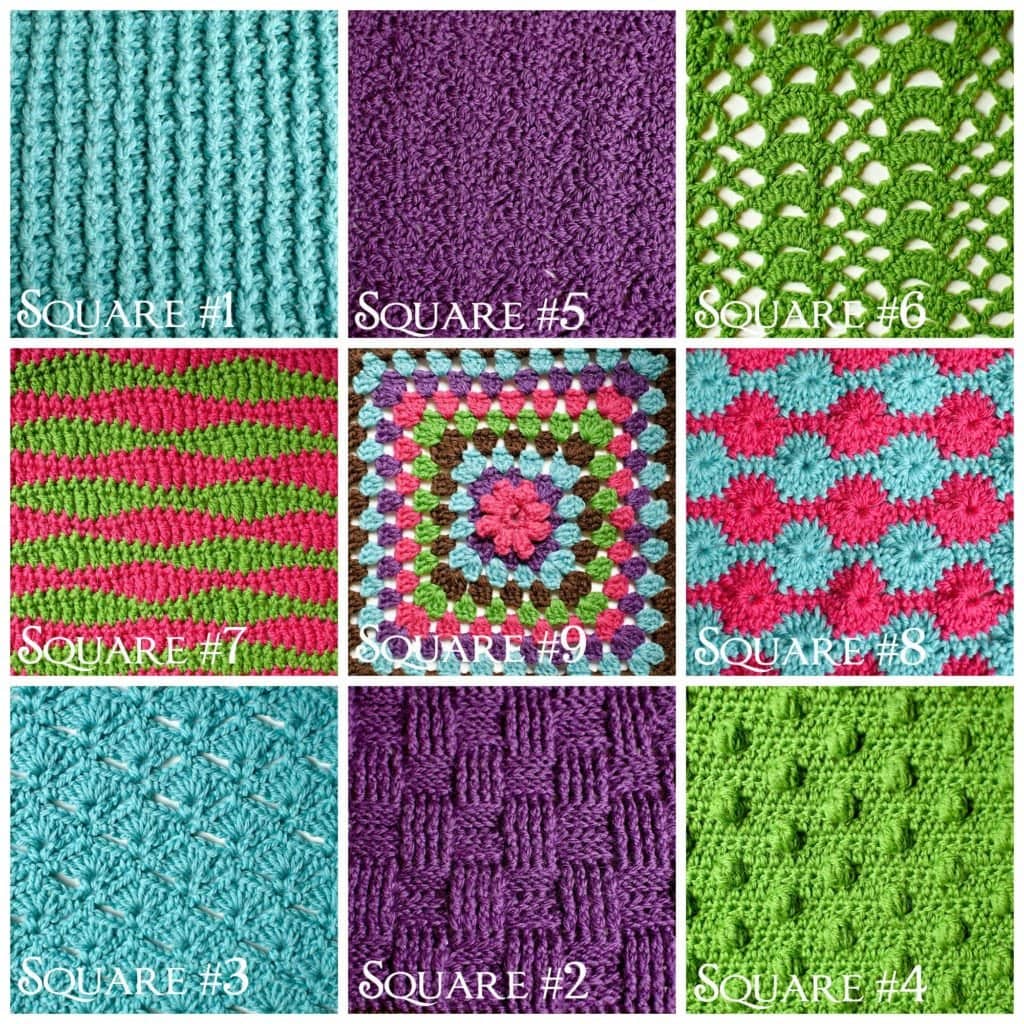
Layout
Here is the layout of the sample blanket incase you want to follow along with the same placement and color sequence. It should help you in choosing when to use a particular color for your blanket as well. But please remember, you can mix and match any way you wish; you _do not_ have to use my same layout!
Pattern
Special Stitches
Bobble: Dc5tog all in the same st or sp
Dc5tog (Double crochet 5 together): (yo, pull up a loop in indicated st, yo and draw through 2 loops) 5 times, yo and draw through all 6 loops on hook.
Why are there two different chain amounts? Well, for each square stitch pattern you decide if you are going to learn the stitch first with the in class block size or if you are a dare devil and want to jump in and start on the full size block.
Either way, choose the correct chain amount below.
Bobble Crochet Stitch Square (Green in sample):
Using one of the 4 complementary colors.
If you wan to use this pattern stitch for another pattern you need to know how many chains are used for the foundation. For the Bobble–Foundation chain is a multiple of 4 + 3.
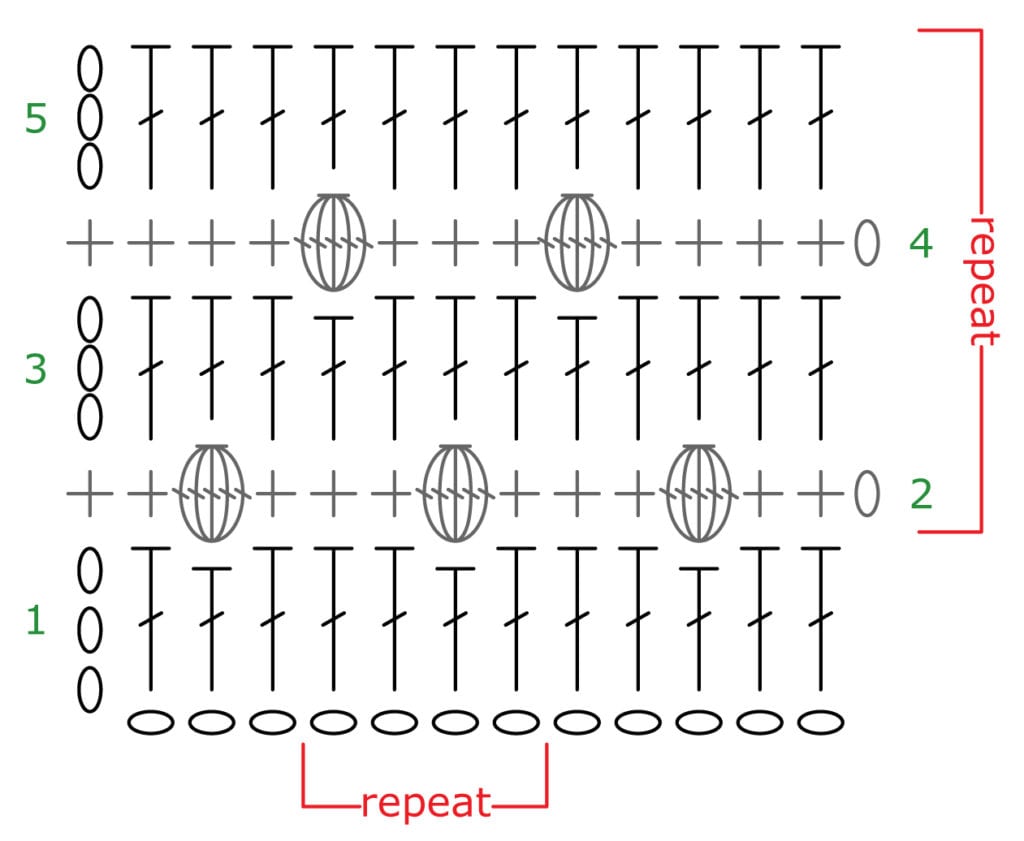
In class block: Ch 15, continue to row 1. (see also In Class Block Chart below)
This is the foundation chain amount I do in the HD Video tutorial. This ‘in class block’ is a great way to get familiar with the stitch pattern before you commit to a larger square. It is also a good way to test out your gauge.
OR
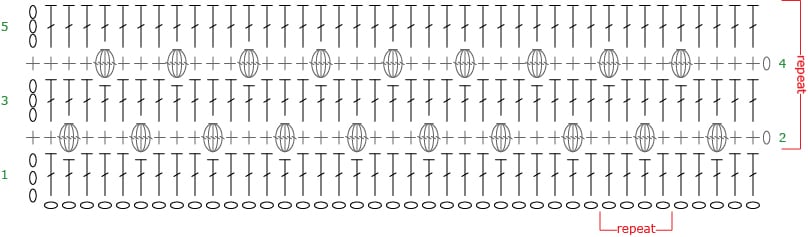
Full size block: Ch 43, continue to row 1. (see also Full Size Block Chart below)
This is the foundation chain amount I did for the full square in the sample blanket. This number of stitches will give you the same size squares as long as you use the correct hook size to get the size you want.
Designer NOTE: I fount this stitch to be pretty average for me. However, if your squares are turning out much bigger than my 11″ by 11″ this might be one of the squares you use a smaller hook for and/or adjust the beginning chain amount.
Row 1 (RS): Skip 3 ch (counts as 1 dc), dc in each ch to end.
Row 2: Ch 1, sc in each of the 1st 2 dc, bobble in next dc, *sc in each of the next 3 dc, bobble in next dc; rep from * to last 2 sts, sc in each of the last 2 sts, placing last sc in tch.
Row 3: Ch 3 (counts as 1 dc), dc in each st to end.
Row 4: Ch 1, sc in each of the 1st 4 dc, *bobble in next dc, sc in each of the next 3 dc; rep from * to end, placing last sc in tch.
Row 5: Ch 3 (counts as 1 dc), dc in each st to end.
Rep rows 2-5 only, ending piece after a Row 5.
Designer NOTE: Are you bobble’s not popping off the fabric very well? Take a look at the HD Video to get a tip from me!

Charts
For these charts you will notice that the numbers on the sides count the rows. You can also use these numbers to let you know from which side you will begin reading that row of the chart. For example: Row 1 will be read from the left to right.
Each of the charts provided in this pattern are written with the same number of foundation chain stitches as the ‘in class block’. I did this so that you have a full chart that allows you to see exactly what stitches go where for the entire swatch. However, for this square I also am providing a chart showing the same number of foundation chain stitches as the ‘full size block’. I thought it would help you to see how many bobbles you should have at the end of the row if you are following my same numbers.
In Class Block Bobble Crochet Stitch Chart
Full Size Block Bobble Crochet Stitch Chart
HD Video Tutorial
Please SMASH THAT LIKE BUTTON on the video when you watch it 


September 29, 2015
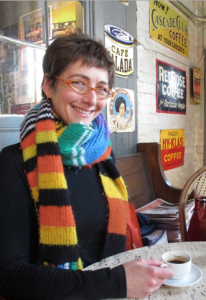
Fabulous Knitwear Designer Faina Goberstein
Fabulous Knitwear Designer Faina Goberstein was the guest on the Yarn Thing podcast with Marly Bird, not for the first time but we are so tickled when she makes time for us to let us know what’s going on new with her.

Faina was born in Russia (lives in California now) and learned to knit about 8 from a neighbor, her mom did not knit and she did not have her grandmothers. The neighbor made socks and for a long time, Faina didn’t know there was anything else to knit, but she never stopped knitting from that tender age 8. At age 14, she discovered there was more in a magazine! While she was at university to become a math professor while still in Russia, she took a class through a magazine to increase her skills, a knitting course that included fit and couture fashion. She immigrated to the US, a small town where there was no firm she could join with her engineering skills, so she taught at University and discovered a store in Chico where she could work and teach one day a week, and also found a large variety books and yarns to work with. She says in Russia there were two kinds of yarns, worsted and fine weights so this was a totally new experience for her, but obviously she met that challenge. 
In 2008 she wrote her first book, and attended her first TNNA in 2009 where she met Marly and Simona Merchant-Dest. Faina had been working with Simona by e-mail, but had not met until that TNNA, when Faina turned around in a class and read Simona’s name tag. Simona is from the Czech Republic which is not Russia where Faina is from, but enough in common as neighbors that they work well together as we discovered when they worked on the Art of Seamless Knitting. Faina Goberstein visited with her co-author Simona Merchant-Dest about this book, which is a great source of beautiful work.
There were things that didn’t make it into that first book, Faina says they kind of overwhelmed the publisher. These pieces naturally became a NEW Book, The Art of Slip Stitch Knitting. By e-mail and visits with Skype they found inspiration in their swatches to create patterns for readers. The book also includes helpful stitch dictionary work that has not been included for the most part anywhere else, divided into helpful sections of traditional mosaic work, woven-look which uses floats in the front of your work, fancy stitches (which combines mosaic with lacy) and reversible slip stitches.
 The Gobelin bag in the book was a popular topic during this visit, which is the perfect segue to Faina’s NEW Craftsy Class Slipped Stitch Colorwork: Mosaic & Beyond (that was Marly’s affiliate link). The bag was cut from the first book, which was part of a chapter on colorwork that was not included. Faina and Simona fell in love with the handles from Jul Designs, designed the bag Gobelen to complement them. Faina designed a similar bag for her Craftsy class.
You can follow Faina Goberstein at her website: Faina’s Knitting Mode which includes her blog. She also invited us to subscribe to her newsletter there! You can also find her designer page in Ravelry, where she also has her patterns that are appearing in magazines (during the chat, a caller noticed the Bath Abbey hat from Interweave Knits Fall 2015, and Faina mentioned Spiral that appears in Knit.Purl Fall 2015). The book is available in paperback from Interweave or as an e-book. She continues to teach, in fact she will be at Vogue Knitting Live this weekend in Chicago, and has plenty of time for that since she has retired from teaching math.
IF you missed getting to hear this live, it’s still available in the archives http://www.blogtalkradio.com/yarnthing/2015/09/29/fabulous-knitwear-designer-faina-goberstein or in iTunes.
The post Fabulous Knitwear Designer Faina Goberstein appeared first on Marly Bird.
September 28, 2015
Fan Tail Crochet Stitch
Time to jump in and learn the Fan Tail Crochet Stitch. This is the third block in the Crochet Stitch Sampler Baby Blanket CAL Sponsored by Red Heart Yarns and hosted by Marly Bird.
You can click here for the first square and here for the second square

Where is the Full Pattern?
During the Crochet-along (CAL) you will be able to get the written and chart instructions as well as the HD Video tutorial for the next step in the Crochet Stitch Sampler Blanket every Tuesday and Thursday. The full pattern will not be posted until the end of the CAL.
GET FULL CAL DETAILS HERE
Get a little help from your friends!
Follow along and complete each step with my help as well as the wonderful group of other Marly Bird CAL members in the Facebook Group. In the group you can post pictures, ask questions and get general crochet support.
I’m ready! Let’s get this party started!
I chose the Fan Tail Crochet Stitch square for this blanket because I wanted to add a lace stitch. There are some bold and rather solid stitches in this blanket and I felt like this stitch was a good relief stitch.
The stitch pattern of this stitch makes it so the fan tail is off set every other row. By doing so we get a very symmetric look.
Click on the stitch below If you need a quick refresher on how to do it.
Slip Knot and Chain Stitch
Single Crochet
Half Double Crochet
Double Crochet
CROCHET STITCH SAMPLER BABY BLANKET
Add this pattern to your Ravelry Queue and Favorites
Materials
Yarn: Red Heart, “With Love” (100% Acrylic; 315 yds/170g): 1 skein of 4 different complementary colors and 2 skeins of main color.
Designer NOTE: Original was made with a discontinued yarn– STITCH NATION by Debbie Stoller™ “Washable Ewe™”: [for sample size blanket] 2 balls each 3903 Strawberry, 3540 Currant, 3501 Robin Egg, 3652 Clover; 3 balls each 3365 Earth.
Hooks: you will need a variety of different sized hooks for this blanket. Use the hook size that will get you the desired square size. Some squares will require a smaller hook and others a larger hook depending on the stitch pattern. For the sample I used G/7 and H/8.
Notions: Stitch markers, tapestry needle
Gauge
Each Full Size Square: 11” x 11″ [27.94 X 27.94 cm]
Each stitch count given for the full square will result in approximately the same size square as long as you adjust hook size when necessary. YOU decide how large you want your squares to be. Once you choose the size for your blanket just make sure that each square will measure that.
Designer NOTE: To make sure each square I made was the same size, I washed and blocked each square as I made it. Doing so made it so I knew right away if my stitches were too tight or too loose.
Abbreviations
This is the full list of abbreviations used for all the patterns. I will be sure to add this to each pattern so you don’t have to go searching for it as your working on the square.
beg – begin(ning)
bpdc – back post double crochet
ch – chain
dc – double crochet
fpdc – front post double crochet
hdc – half double crochet
rep – repeat
rnd – round
RS – right side
sc – single crochet
sk – skip
sl st – slip stitch
sp – space
st – stitch
tch – turning chain
tr – treble crochet
WS – wrong side
yo – yarn over
Symbol Key for Crochet Charts
This is the symbol key for all the charts used for all the patterns. I will be sure to add this to each pattern so you don’t have to go searching for it as your working on the square.
Layout
Here is the layout of the sample blanket incase you want to follow along with the same placement and color sequence. It should help you in choosing when to use a particular color for your blanket as well. But please remember, you can mix and match any way you wish; you _do not_ have to use my same layout!
Pattern
Special Stitches
Fan: [3 dc, ch 1, 3 dc] in indicated st or sp.
Why are there two different chain amounts? Well, for each square stitch pattern you decide if you are going to learn the stitch first with the in class block size or if you are a dare devil and want to jump in and start on the full size block.
Either way, choose the correct chain amount below.
Fan Tail Crochet Stitch Square (Blue in sample):
Using one of the 4 complementary colors.
If you wan to use this pattern stitch for another pattern you need to know how many chains are used for the foundation. For the Fan Tail–Foundation chain is a multiple of 10 + 2 sts.
In class block: Ch 22, continue to row 1.
This is the foundation chain amount I do in the HD Video tutorial. This ‘in class block’ is a great way to get familiar with the stitch pattern before you commit to a larger square. It is also a good way to test out your gauge.
OR
Full size block: Ch 52, continue to row 1.
This is the foundation chain amount I did for the full square in the sample blanket. This number of stitches will give you the same size squares as long as you use the correct hook size to get the size you want.
Designer NOTE: The nature of this stitch is to be open so it could easily be made too big. If your squares are turning out much bigger than my 11″ by 11″ this might be one of the squares you use a smaller hook for and/or adjust the beginning chain amount.
Row 1 (RS): Sc in 2nd ch from hook, sc in next ch, sk 3 ch, Fan in next ch, sk 3 ch, * sc in next ch, ch 1, sk 1 ch, sc in next ch, sk 3 ch, Fan in next ch, sk 3 ch; rep from * to last 2 ch, sc in each of the last 2 ch. Use a stitch marker to mark this as the right side.
Row 2: Ch 2 (counts as 1 hdc), hdc in 1st st, ch 3, sc in center sp of next Fan, ch 3, * Vst in next 1-ch sp, ch 3, sc in center sp of next Fan, ch 3; rep from * to end, 2 hdc in last sc.
Row 3: Ch 3 (counts as 1 dc), 3 dc in 1st st, sc in next 3-ch sp, ch 1, sc in next 3-ch sp, * Fan in center sp of next Vst, sc in next 3-ch sp, ch 1, sc in next 3-ch sp; rep from * to end, 4 dc in tch.
Row 4: Ch 1, sc in 1st st, * ch 3, Vst in next 1-ch sp, ch 3, sc in center sp of next Fan; rep from * to end, working last sc in tch.
Row 5: Ch 1, sc in 1st st, sc in next 3-ch sp, Fan in center sp of next Vst, sc in next 3-ch sp, * ch 1, sc in next 3-ch sp, Fan in center sp of next V-st, sc in next 3-ch sp; rep from * to end, sc in last sc.
Rep rows 2-5 only, ending piece after a Row 2 or Row 4.
Designer NOTE: Don’t let your butt hang out by working into the actual chain of the V-st or 3-ch’s, work in to the space! I talk about this on the HD Video.
Chart
Fan Tail Crochet Stitch Chart
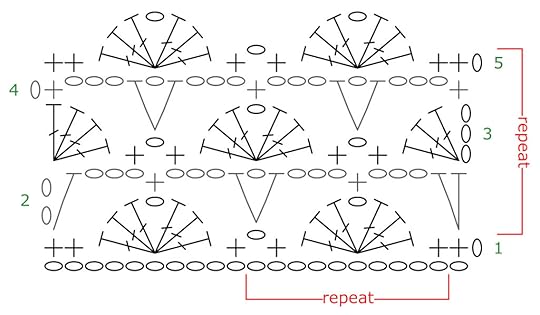
For this chart you will notice that the numbers on the sides count the rows. You can also use these numbers to let you know from which side you will begin reading that row of the chart. For example: Row 1 will be read from the right to the left.
Each of the charts provided in this pattern are written with the same number of foundation chain stitches as the ‘in class block’. I did this so that you have a full chart that allows you to see exactly what stitches go where for the entire swatch.
To use the charts for the full size block you will simple repeat the stitches and rows as indicated in red on the chart.
HD Video Tutorial
Please SMASH THAT LIKE BUTTON on the video when you watch it
September 24, 2015
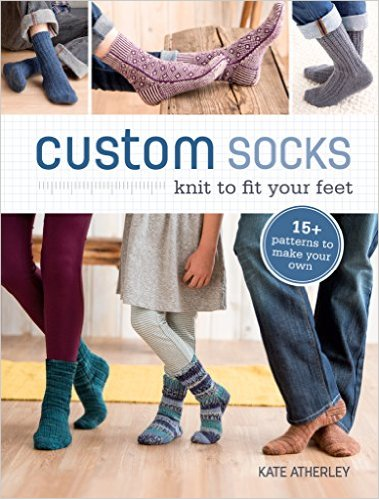
New Custom Socks Book by Kate Atherley
NEW Custom Socks, book by Kate Atherley was our HOT TOPIC on today’s Yarn Thing podcast with Marly Bird. Did I just hear you say ‘Sock it to me!’? OK, let’s go!
 This was Kate’s first visit to the Yarn Thing podcast, which seems incredible until you think about how busy she’s been. She doesn’t remember a time that she did not know how to knit. Grandmother was a ‘hard-core’ crafter, who included Kate in the process of the sweaters made for her, as the fascination of that process gave her a life-long love. As an adult after moving to Toronto, she resided in the neighborhood of Romney Wools, which she describes as ‘sucking her back into knitting’. She says as an adult, for the longest time she she was stuck in one cast-on and one bind-off, but loves that the internet and podcast have inspired her to increase her skill level. She says there is a story about her grandmother knitting socks for everyone in the neighborhood, and for the war effort, which can’t be confirmed as grandmother is gone. She thinks she would be proud of Kate’s work.
As an adult she worked in computer software industry, knitting socks in her off-time. Kate says she knit a few socks before she realized that they weren’t fitting her well, and that discovery inspired her whole career. A co-worker shared that a friend of hers knits and is opening a yarn store to which Kate altered the course of her life by saying ‘I want to teach’. She spoke of her understanding her own misunderstandings have helped her teaching.
Kate transitioned fairly easily from the highly technical software industry to the highly technical editing of patterns with Knitty.com. When she began writing her own patterns, she included instructional information, that she hopes increases the knowledge of the knitter, as you would learn when taking a class.
The CURRENT excitement is her new book through Interweave Custom Socks: Knit to Fit Your Feet which is available in a lovely paperback edition and a e-book version. Following her desire to help us increase our skills she included tips and information: for instance for plain socks, often called Vanilla Socks, she’s added information for 9 gauges and 12 sizes, in both Toe-Up and Top-down. That is probably the most amazing part of this book!
Marly expressed her love for an early book that Kate authored, Pattern Writing for Knit Designers (which is currently out of print, being re-vamped and published again in early 2016, so watch for it at her website and at Interweave). Kate feels that a lot of pattern writing and tech editing requires the ability to put yourself in someone else’s shoes. It’s been very helpful for knitters to understand patterns as well.
At this point, Technical Difficulties tried to defeat us, but Marly was able to bring me, Tammy, on the line while she reconnected. I asked her if she has favorite yarns, specifically what she looks for in a yarn. She mentioned wool blends (75% wool/25% nylon) sock yarns, whether indie-dyed or factory made. She loves a blend with cashmere because she lives in a colder place and they make for softer, longer wear. If she does make socks with a all natural blend, she creates socks with a tighter stitch. Kate really emphasized that she has a habit of hand-washing a lot of her delicates, the nylon content will help protect if something is accidentally washed with the rest of her laundry. And air-drying always.
Blocking and fiber care is a big topic in one of her Craftsy Class, which Marly really wanted to have Kate share as she has taken Kate’s Craftsy Classes. Kate says the Sheep do love to get wet, that’s not the problem with washing your knitwear, it’s the agitation that the sheep don’t care for. Here are Marly’s affiliate links to Kate’s Classes in Craftsy too (Let’s our Awesome Sponsor know where you heard about them:) Here is Blocking Handknits and Perfect Knits Every Time: Understanding Knitting Patterns.
Kate’s website: www.kateatherley.com/ and this is the link to her Ravelry Designer page.
If you missed getting to hear this live, it is available as an archived episode: http://www.blogtalkradio.com/yarnthin... or in iTunes
The post New Custom Socks Book by Kate Atherley appeared first on Marly Bird.
September 22, 2015
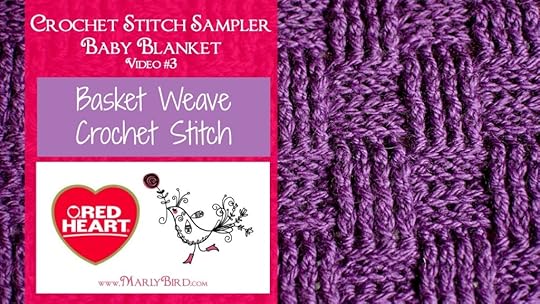
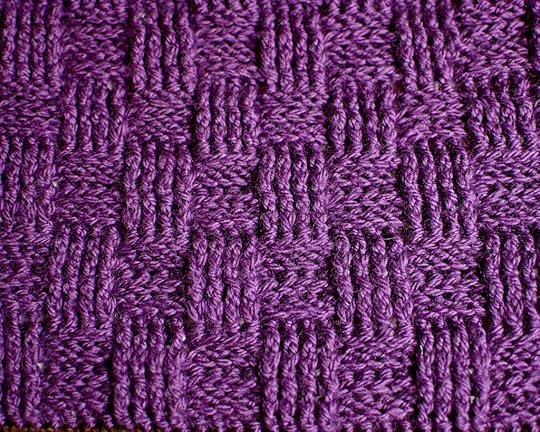
Basket Weave Crochet Stitch
Time to jump in and learn the Basket Weave Square. This is the second block in the Crochet Stitch Sampler Baby Blanket CAL Sponsored by Red Heart Yarns and hosted by Marly Bird.
This is one of those stitches that becomes easier after you get through the first 10 rows but prior to that it feels a little clumsy. But I think with the written instructions I’ve provided and the HD Video and the charts you will get there. Regarding the charts…*deep sigh*…part of me hesitates to give you the charts for this square because I feel like they might be more confusing for you. Please know that is not my intention, let me explain.
There was a LOT of deliberation between the testers and my self about the best way to present the symbols on the basket weave charts. Some wanted me to have the symbols represent on each row with the actual stitch symbol that you would be working. My problem with that is that a chart is supposed to be a direct visual representation of what your fabric will look like on the right side/public side. For most crochet charts this is the case without having to worry about changing symbols, but when we are dealing with stitches that look differently on the RS vs. WS or vice versa that doesn’t hold true. Therefore, in an attempt to keep with the idea that a chart is supposed to be a direct visual representation of what the fabric will look like on the right side/public side, I’ve decided to present the charts as if you are looking at the RS of the fabric.
What this means is the double crochet post stitch symbols have to be distinguishable as to RS or WS. Just like in knitting when you read a chart and it has a blank square and the key reads ‘knit on RS and purl on WS’; the blank square is the same symbol but when you see it you have to know whether you are on a RS or WS of the fabric to know which stitch you are supposed to use. Same will go for the post stitches.
See what I mean by getting confusing? Listen, you have the written instructions as well as the charts and the video. Follow along which ever one speaks to you. Hopefully some combination of all 3 will work and you will end up with a beautiful square 
Where is the Full Pattern?
During the Crochet-along (CAL) you will be able to get the written and chart instructions as well as the HD Video tutorial for the next step in the Crochet Stitch Sampler Blanket every Tuesday and Thursday. The full pattern will not be posted until the end of the CAL.
GET FULL CAL DETAILS HERE
Get a little help from your friends!
Follow along and complete each step with my help as well as the wonderful group of other Marly Bird CAL members in the Facebook Group. In the group you can post pictures, ask questions and get general crochet support.
I’m ready! Let’s get this party started!
I chose the Basket Weave Crochet Stitch as the second square because you’re fresh off the 1 x 1 Double Crochet Ribbing square which was made with post stitches and the basket weave uses them too. So, instead of throwing something totally new at you, I figured it would be nice to work on a square where you are already familiar with all the stitches. Plus, it is nice to see how the same stitches can make such different looks when worked in a different pattern.
The basket weave crochet stitch uses the basic double crochet stitch for the entire square but the texture and unique look of woven fabric is created by the placement of the double crochet.
We will work these double crochets in the front post and the back post of the stitches. By doing post stitches the square will be more 3d with great texture, visually stimulating and it is a reversible stitch.
Click on the stitch below If you need a quick refresher on how to do it.
Slip Knot and Chain Stitch
Double Crochet
Front Post
Back Post
CROCHET STITCH SAMPLER BABY BLANKET
Add this pattern to your Ravelry Queue and Favorites
Materials
Yarn: Red Heart, “With Love” (100% Acrylic; 315 yds/170g): 1 skein of 4 different complementary colors and 2 skeins of main color.
Designer NOTE: Original was made with a discontinued yarn– STITCH NATION by Debbie Stoller™ “Washable Ewe™”: [for sample size blanket] Complementary colors: 2 balls each 3903 Strawberry, 3540 Currant, 3501 Robin Egg, 3652 Clover; Main Color: 3 balls each 3365 Earth.
Hooks: you will need a variety of different sized hooks for this blanket. Use the hook size that will get you the desired square size. Some squares will require a smaller hook and others a larger hook depending on the stitch pattern. For the sample I used G/7 and H/8.
Notions: Stitch markers, tapestry needle
Gauge
Each Full Size Square: 11” x 11″ [27.94 X 27.94 cm]
Each stitch count given for the full square will result in approximately the same size square as long as you adjust hook size when necessary. YOU decide how large you want your squares to be. Once you choose the size for your blanket just make sure that each square will measure that.
Designer NOTE: To make sure each square I made was the same size, I washed and blocked each square as I made it. Doing so made it so I knew right away if my stitches were too tight or too loose.
Abbreviations
This is the full list of abbreviations used for all the patterns. I will be sure to add this to each pattern so you don’t have to go searching for it as your working on the square.
beg – begin(ning)
bpdc – back post double crochet
ch – chain
dc – double crochet
fpdc – front post double crochet
hdc – half double crochet
rep – repeat
rnd – round
RS – right side
sc – single crochet
sk – skip
sl st – slip stitch
sp – space
st – stitch
tch – turning chain
tr – treble crochet
WS – wrong side
yo – yarn over
Symbol Key for Crochet Charts
This is the symbol key for all the charts used for all the patterns. I will be sure to add this to each pattern so you don’t have to go searching for it as your working on the square.
Layout
Here is the layout of the sample blanket incase you want to follow along with the same placement and color sequence. It should help you in choosing when to use a particular color for your blanket as well. But please remember, you can mix and match any way you wish; you _do not_ have to use my same layout!
Pattern
The trick with the basket weave is remembering that alternating the post position on every 5th row you are doing and to pay attention to the Right Side (RS) and the Wrong Side (WS).
Why are there two different chain amounts? Well, for each square stitch pattern you decide if you are going to learn the stitch first with the in class block size or if you are a dare devil and want to jump in and start on the full size block.
Either way, choose the correct chain amount below.
Basket Weave (Purple in sample):
Using one of the 4 complementary colors.
If you want to use this pattern stitch for another pattern you need to know how many chains are used for the foundation. For the Basket Weave–Foundation chain is a multiple of 8 sts + 4.
In class block: Ch 20 (use the chart for the CLASS SIZE BLOCK for this size square)
This is the foundation chain amount I do in the HD Video tutorial. This ‘in class block’ is a great way to get familiar with the stitch pattern before you commit to a larger square. It is also a good way to test out your gauge.
Base Row (WS): Sk 3 ch (counts as 1 dc), dc in next ch and each ch to end.
Row 1 (RS): Ch 2, (counts as 1 dc), sk 1st st, * fpdc around each of the next 4 sts, bpdc around each of the next 4 sts; rep from * to end, dc in tch. Use a stitch marker to mark this as the RIGHT SIDE of the square.
Rows 2-4: As row 1.
Time to change up the pattern to get the basket weave effect.
Row 5: Ch 2, (counts as 1 dc), sk 1st st, * bpdc around each of the next 4 sts, fpdc around each of the next 4 sts; rep from * to end, dc in tch
Rows 6-8: As row 5.
Rep rows 1-8.
OR
Full size block: Ch 48, continue to row 1. (use the chart for the FULL SIZE BLOCK for this size square)
This is the foundation chain amount I did for the full square in the sample blanket. You will notice that adding a half repeat of the stitch pattern makes the block symmetric. Meaning, if you begin with fpdc you will end with fpdc and vice versa.
If you want to use this stitch pattern for another pattern and you want it to be symmetric then your foundation chain is a multiple of 8 sts.
Regarding the CHART: It is important that you follow the specific chart for this stitch count if you are following along with the chart. Use the FULL SIZE BLOCK chart for this multiple of stitches.
This number of stitches will give you the same size squares as long as you use the correct hook size to get the size you want.
Designer NOTE: This square tends to be a tad wide. I was able to make my square the same size using the larger hook/the same hook I used for the 1×1 double crochet ribbing BUT some of the testers found that dropping a hook size was needed for this square.
Alternative Full Block Chain Amount: If you want to not do the added half repeat that makes the full block symmetric you can choose to do a chain of 44 and follow the instructions as written for the in class block. This is another option for those of you who might have a hard time getting the squares to match in size.
No matter which chain amount you use, be sure to check your measurement as you go to make sure your first square will match up to this one. Remember, you will use the size hook YOU need to get the finished square will be the correct size YOU want.
Base Row (WS): Sk 3 ch (counts as 1 dc), dc in next ch and each ch to end.
Row 1 (RS): Ch 2, (counts as 1 dc), sk 1st st, fpdc around each of the next 4 sts, * bpdc around each of the next 4 sts, fpdc around each of the next 4 sts; rep from * to end, dc in tch. Use a stitch marker to mark this as the RIGHT SIDE of the square.
Row 2: Ch 2, (counts as 1 dc), sk 1st st, bpdc around each of the next 4 sts, * fpdc around each of the next 4 sts, bpdc around each of the next 4 sts; rep from * to end, dc in tch.
Row 3: As row 1.
Row 4: As row 2.
Time to change up the pattern to get the basket weave effect.
Row 5: As row 2.
Row 6: As row 1.
Row 7: As row 2.
Row 8: As row 1.
Rep rows 1-8.
Charts
First, it is important that I point out that these charts are to be read as if the RS is facing you. Which means a symbols meaning on the RS will mean the opposite on the WS. Take a look at the key given with these charts; I’ve color coded the symbols so you know the difference.
If you are printing the page it is best to do it in color. If your printer is only black and white, you can still use the charts but you will have to make note that the odd rows are RS and even rows are WS. By placing a stitch marker on the RS of your work after row 1 you will not have any problem knowing which side is which.
Each of the charts provided in this pattern are written with the same number of foundation chain stitches. I did this so that you have a complete chart that allows you to see exactly what stitches go where for the entire swatch or square.
Unlike some of the other pattern stitches in this blanket, for the Full Size Block of the Basket Weave crochet stitch pattern, the chart (see FULL SIZE BLOCK) also has the same chain amount because I thought it was easier for you to work this pattern with a full chart like that. Given that it might throw some of you off that the whole square is not made up of full repeats as I added half a repeat to make the square symmetric.
Basket Weave (CLASS SIZE BLOCK)
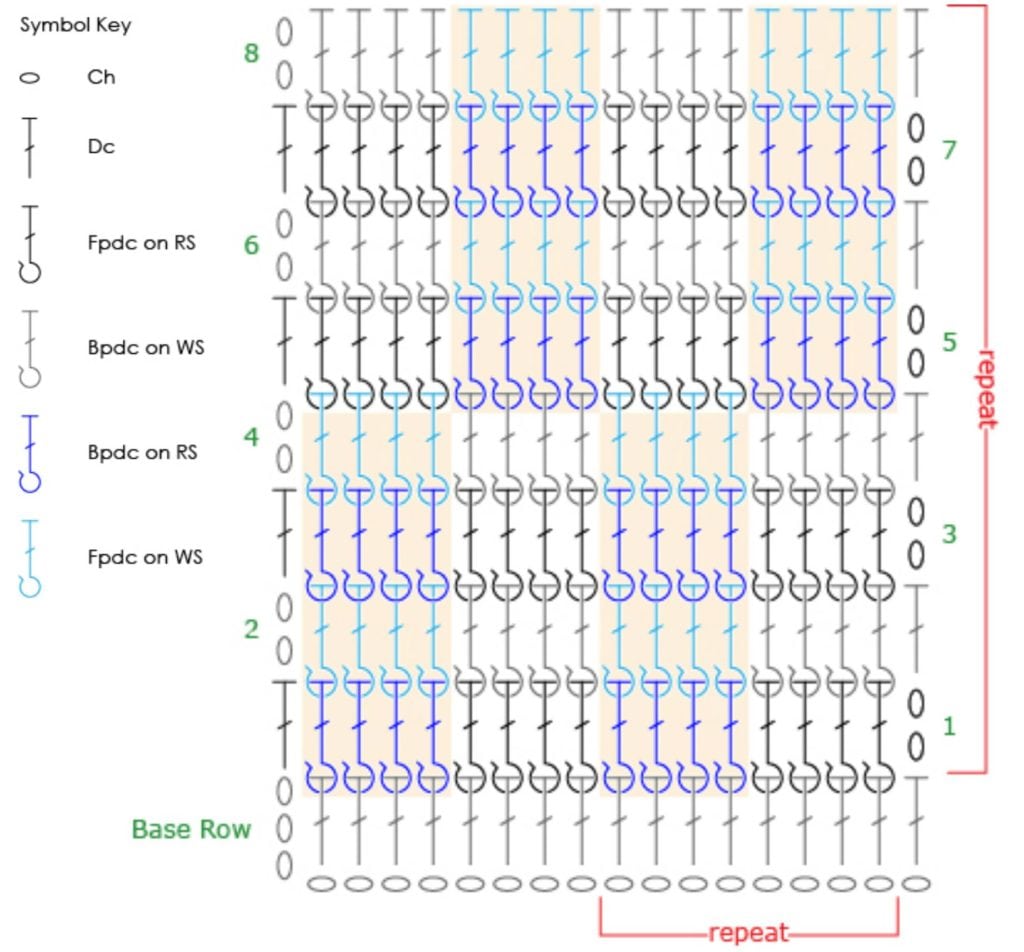
*REMEMBER: this chart is written as if the RS is always facing you.
Notice that the numbers on the sides count the rows. You can use these numbers to let you know from which side you will begin reading that row of the chart. For example: Row 1 (RS) will be read from the right to the left; Row 2 (WS) will be read from left to right.
As noted (several times by now) the chart is made with the symbols representing the Right Side (RS) view of the fabric. That means, that if a stitch symbol on the RS is a FPDC and you are on the Wrong Side (WS) you will actually do a BPDC. Hence the reason the symbols are color coded. It is to let you know…hey, this is a FPDC on the RS but because you are working on the WS and it is shaded gray so you will be doing a BPDC for that stitch. The BPDC you do on the WS you will actually look like a FPDC on the RS.
That might not be very clear yet, but hopefully you can begin to work the pattern and see what I mean.
Designer NOTE: I find it easier to read a chart like this one (where the symbols NEARLY look identical) by shading in the symbols. If you use a colored pencil and shade in just the back post stitches or just the front post stitches you will be able to quickly see what the stitch is without having to strain to see if the symbol has the little bar pointing in towards the circle or out away from the circle. That is why the 4 row sections are shaded orange.
Basket Weave (FULL SIZE BLOCK)
Again, it is important that I point out that these charts are to be read as if the RS is facing you. Which means one symbols meaning on the RS will mean the opposite on the WS. Take a look at the key given with these charts; I’ve color coded the symbols so you know the difference.
If you are printing the page it is best to do it in color. If your printer is only black and white, you can still use the charts but you will have to make note that the odd rows are RS and even rows are WS. By placing a stitch marker on the RS of your work after row 1 you will not have any problem knowing which side is which.
Each of the charts provided in this pattern are written with the same number of foundation chain stitches. I did this so that you have a complete chart that allows you to see exactly what stitches go where for the entire swatch or square.
Once again I will mention, this block has an added half repeat so the chart I am providing in the FULL SIZE BLOCK shows that half repeat That is why there are two different charts for this pattern stitch. Also, this chart
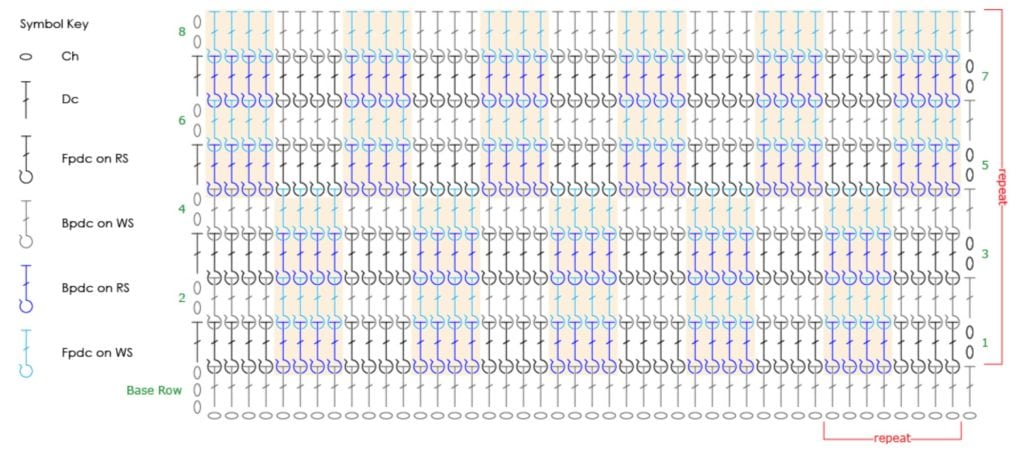
*REMEMBER: this chart is written as if the RS is always facing you.
Notice that the numbers on the sides count the rows. You can use these numbers to let you know from which side you will begin reading that row of the chart. For example: Row 1 (RS) will be read from the right to the left; Row 2 (WS) will be read from left to right.
The chart is made with the symbols representing the Right Side (RS) view of the fabric. That means, that if a stitch symbol on the RS is a FPDC and you are on the Wrong Side (WS) you will actually do a BPDC. Hence the reason the symbols are color coded. It is to let you know…hey,this is a FPDC on the RS but because you are working on the WS and it is shaded gray so you will be doing a BPDC for that stitch. The BPDC you do on the WS you will actually look like a FPDC on the RS.
That might not be very clear yet, but hopefully you can begin to work the pattern and see what I mean.
Designer NOTE: I find it easier to read a chart like this one (where the symbols NEARLY look identical) by shading in the symbols. If you use a colored pencil and shade in just the back post stitches or just the front post stitches you will be able to quickly see what the stitch is without having to strain to see if the symbol has the little bar pointing in towards the circle or out away from the circle. That is what I had done in the pattern chart above.
HD Video Tutorial
Homework
Learn this stitch pattern either with the in class block or the full size block. Once you feel like you have it, make your square for the blanket and get ready for the next square. It will be released on Tuesday.
If you have only just started, that is okay! It is not too late to join in the fun.
Don’t forget, if you have questions or need help we are here to help you. Well, not here but over in the facebook group dedicated to the Marly Bird CAL sponsored by Red Heart Yarns. Come and join us!
Next square: Fan Tail Stitch
The post Basket Weave Crochet Stitch appeared first on Marly Bird.
Teacher, Designer Benjamin Krudwig
Teacher, Designer Benjamin Krudwig was our guest today on the Yarn Thing podcast with Marly Bird.
Benjamin says he is Multi-craftural. Marly met him at the Interweave Yarn Fest this year, when he was showing off his weaving talents. He began as a crocheter in High School, also learned to knit. His work at Schacht Spindle Co also led him to weave and spin. He pursued a career in evolutionary and ecological biologist, and used crocheting and knitting as a stress relief. Working at Schacht has really opened vistas for him… With all the avenues in fiber he has to be careful with his time!
Benjamin says there is a purpose to every yarn, it just has to tell him what it wants to be; even using acrylic to try something out before investing hundreds of dollars in finer yarns. He says spinning and knitting has is focus right now, but when specifically asked by Marly, he has admits he has three knitting and one crochet projects in progress, also itching for more crochet and is inspired to weave again soon. At the moment, he admires lace more in a crochet motif and speaks of Bijou Basin Ranch yak fibers for sweaters with tingly excitement.
In his personal life, Benjamin has just shared an anniversary with his wife, who he’s taught to knit, crochet and weave. She’s an opera singer, so obviously focused with that, but we know that she will find comfort as she gets into this more. Benjamin says he’s made a few things for her, and it’s helpful to have her model things. Benjamin says he hopes to focus on menswear more…. of course things would look awesome on her but they end up in his closet.
 http://www.ravelry.com/patterns/libra...
Speaking of menswear his hope in future is to update trends that have been bulky or intended solely originally intended for women (such as shawls) that can be comfortable and finer gauge. For example, his recent creation is the Tyton Cardigan, which he created from Quince and Co Owl Tweet (these are links in Ravelry), a wool and alpaca blend for softness with a tweed blending colorized texture, and his design itself adds a slight textural added to the stitchwork that guys (and girls) love.
Benjamin admits that he’s in the baby stages of his career. Eventually, he wants to be known for menswear designs, hopes to add books… he sees ‘anything is go’ and all he has to do is work and work hard.
Follow Benjamin Krudwig at his blog, or in Ravelry he has a group. In fact he’s offering 25% off all his patterns in Ravelry… He can also be found in Instagram, Twitter, Facebook …. he’s saying just Google him, but I think if you love him, you’ve already found him.
If you missed getting to hear this live, catch it as an archived episode: http://www.blogtalkradio.com/yarnthing/2015/09/22/teacher-designer-benjamin-krudwig or in iTunes.
The post Teacher, Designer Benjamin Krudwig appeared first on Marly Bird.
September 21, 2015
1 x 1 Double Crochet Ribbing
Time to jump in and learn the 1 x 1 Double Crochet Ribbing square. This is the first block in the Crochet Stitch Sampler Baby Blanket CAL Sponsored by Red Heart Yarns and hosted by Marly Bird.
Where is the Full Pattern?
During the Crochet-along (CAL) you will be able to get the written and chart instructions as well as the HD Video tutorial for the next step in the Crochet Stitch Sampler Blanket every Tuesday and Thursday. The full pattern will not be posted until the end of the CAL.
GET FULL CAL DETAILS HERE
Get a little help from your friends!
Follow along and complete each step with my help as well as the wonderful group of other Marly Bird CAL members in the Facebook Group. In the group you can post pictures, ask questions and get general crochet support.
I’m ready! Let’s get this party started!
I chose the 1 x 1 Double Crochet Ribbing square as the first square because I think it is the perfect ‘whet your appetite’ square. It uses the basic double crochet stitch for the entire square but the texture is created by the placement of the double crochet.
We will work these double crochets in the front post and the back post of the stitches. By doing post stitches the square will be more 3d with great texture and reversible stitches.
Click on the stitch below If you need a quick refresher on how to do it.
Slip Knot and Chain Stitch
Double Crochet
Front Post
Back Post
CROCHET STITCH SAMPLER BABY BLANKET
Add this pattern to your Ravelry Queue and Favorites
Materials
Yarn: Red Heart, “With Love” (100% Acrylic; 315 yds/170g): 1 skein of 4 different complementary colors and 2 skeins of main color.
Designer NOTE: Original was made with a discontinued yarn– STITCH NATION by Debbie Stoller™ “Washable Ewe™”: [for sample size blanket] 2 balls each 3903 Strawberry, 3540 Currant, 3501 Robin Egg, 3652 Clover; 3 balls each 3365 Earth.
Hooks: you will need a variety of different sized hooks for this blanket. Use the hook size that will get you the desired square size. Some squares will require a smaller hook and others a larger hook depending on the stitch pattern. For the sample I used G/7 and H/8.
Notions: Stitch markers, tapestry needle
Gauge
Each Full Size Square: 11” x 11″ [27.94 X 27.94 cm]
Each stitch count given for the full square will result in approximately the same size square as long as you adjust hook size when necessary. YOU decide how large you want your squares to be. Once you choose the size for your blanket just make sure that each square will measure that.
Designer NOTE: To make sure each square I made was the same size, I washed and blocked each square as I made it. Doing so made it so I knew right away if my stitches were too tight or too loose.
Abbreviations
This is the full list of abbreviations used for all the patterns. I will be sure to add this to each pattern so you don’t have to go searching for it as your working on the square.
beg – begin(ning)
bpdc – back post double crochet
ch – chain
dc – double crochet
fpdc – front post double crochet
hdc – half double crochet
rep – repeat
rnd – round
RS – right side
sc – single crochet
sk – skip
sl st – slip stitch
sp – space
st – stitch
tch – turning chain
tr – treble crochet
WS – wrong side
yo – yarn over
Symbol Key for Crochet Charts
This is the symbol key for all the charts used for all the patterns. I will be sure to add this to each pattern so you don’t have to go searching for it as your working on the square.
Pattern
Why are there two different chain amounts? Well, for each square stitch pattern you decide if you are going to learn the stitch first with the in class block size or if you are a dare devil and want to jump in and start on the full size block.
Either way, choose the correct chain amount below.
1 x 1 Double Crochet Ribbing Square (Blue in sample):
Using one of the 4 complementary colors.
If you wan to use this pattern stitch for another pattern you need to know how many chains are used for the foundation. For the 1 x 1 Double Crochet Ribbing–Foundation chain is a multiple of 2 sts.
In class block: Ch 22, continue to row 1.
This is the foundation chain amount I do in the HD Video tutorial. This ‘in class block’ is a great way to get familiar with the stitch pattern before you commit to a larger square. It is also a good way to test out your gauge.
OR
Full size block: Ch 42, continue to row 1.
This is the foundation chain amount I did for the full square in the sample blanket. This number of stitches will give you the same size squares as long as you use the correct hook size to get the size you want.
Designer NOTE: This square tends to pull in a bit so I suggest using one of the larger size hooks so that the finished square will be the correct size you want.
Row 1 (WS): Sk 3 ch (counts as 1 dc), dc in next ch and each ch to end.
Row 2: Ch 2 (counts as 1 dc), sk 1st st, * fpdc around next st, bpdc around next st; rep from * to end, dc in tch.
Rep row 2 only until the block is approx. square.
Designer NOTE: After you complete row 2 you should be able to just read your crochet to know what stitch you are to work. Meaning, if the stitch you are working in to is a front post double crochet then you will do a front post double crochet…if the stitch you are working in to is a back post double crochet then you will do a back post double crochet. I talk about this on the HD Video.

Chart
1 x 1 Double Crochet Ribbing
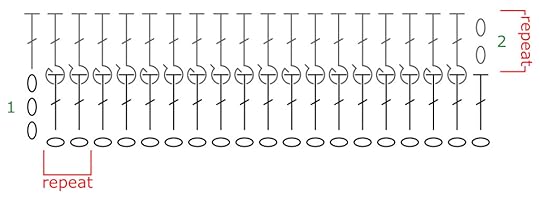
For this chart you will notice that the numbers on the sides count the rows. You can also use these numbers to let you know from which side you will begin reading that row of the chart. For example: Row 1 will be read from the left to the right.
Each of the charts provided in this pattern are written with the same number of foundation chain stitches as the ‘in class block’. I did this so that you have a full chart that allows you to see exactly what stitches go where for the entire swatch.
To use the charts for the full size block you will simple repeat the stitches and rows as indicated in red on the chart.
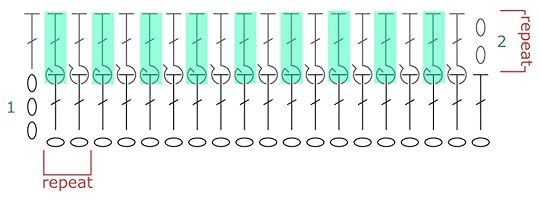
Designer NOTE: I find it easier to read a chart like this one (where the symbols NEARLY look identical) by shading in the symbols. If you use a colored pencil and shade in just the back post stitches or just the front post stitches you will be able to quickly see what the stitch is without having to strain to see if the symbol has the little bar pointing in towards the circle or out away from the circle. Something like the picture below.
HD Video Tutorial
Homework
Learn this stitch pattern either with the in class block or the full size block. Once you feel like you have it, make your square for the blanket and get ready for the next square. It will be released on Thursday.
Don’t forget, if you have questions or need help we are here to help you. Well, not here but over in the facebook group dedicated to the Marly Bird CAL sponsored by Red Heart Yarns. Come and join us!
Next square: Basket Weave
The post 1 x 1 Double Crochet Ribbing appeared first on Marly Bird.
September 17, 2015
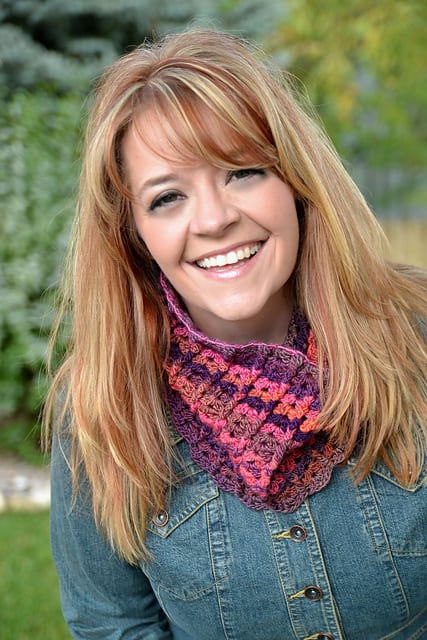
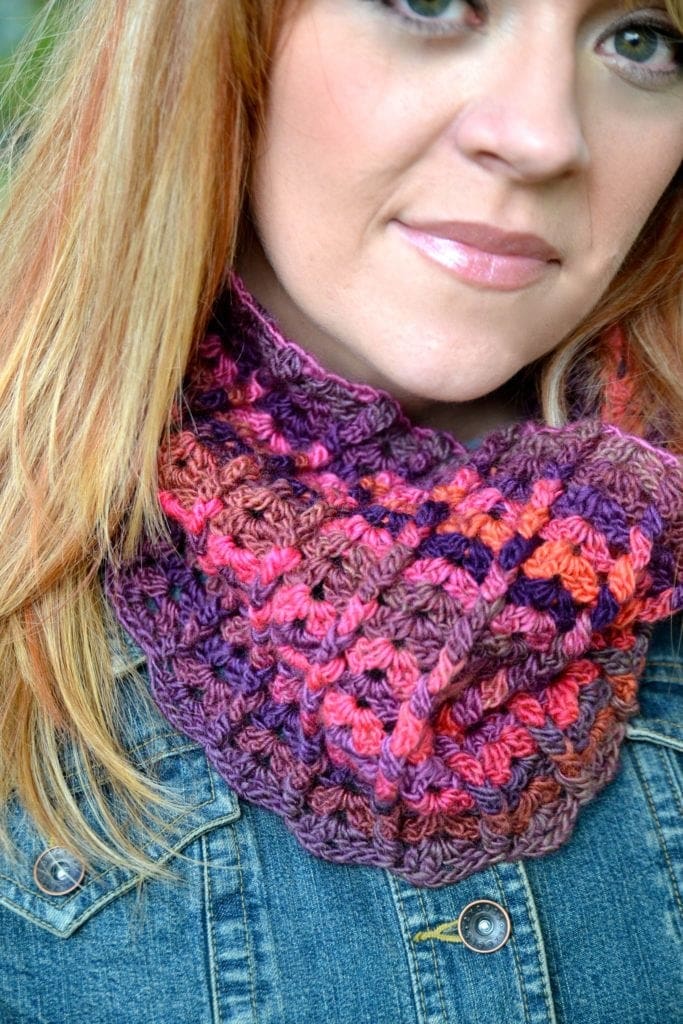
Sherbet Crochet Cowl
 SHERBET CROCHET COWL
Add this pattern to your Ravelry Queue and Favorites
The Sherbet Crochet Cowl is one of those designs that was dictated by the yarn. This yarn was screaming at me to make something with it..so the night before I was scheduled to shoot my Mitten and Gloves Galore Craftsy.com class I did!
It became a cute neck accessory for me to wear and I LOVED IT!
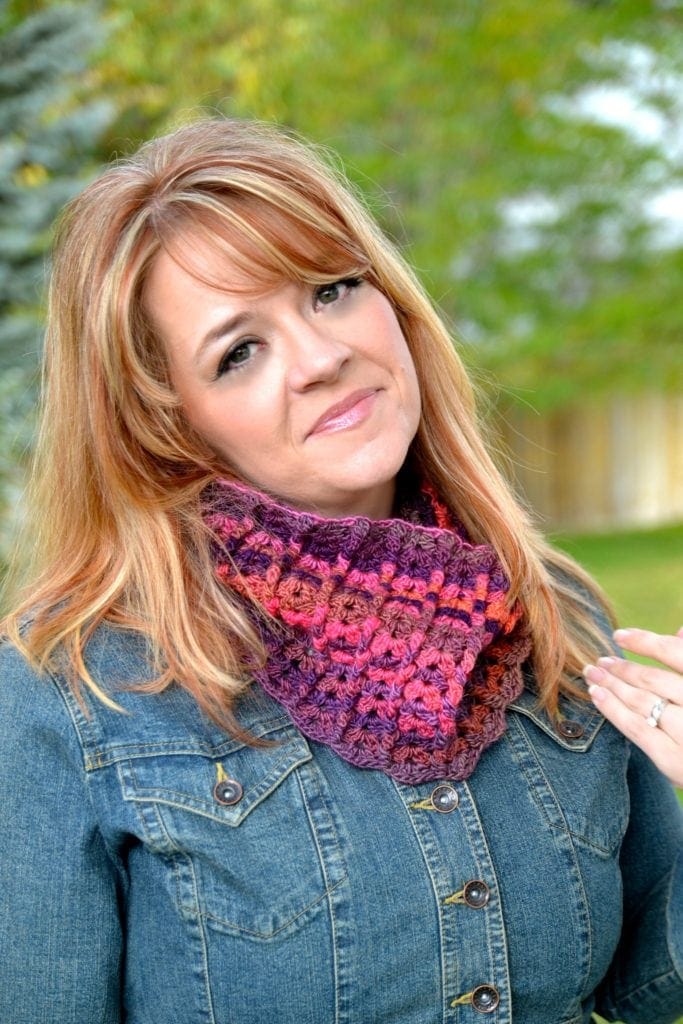
FINISHED MEASUREMENTS
24” [61 cm] circumference of body; 8” (20.3 cm) tall.
MATERIALS
Yarn: Red Heart Boutique “Unforgettable” (100% acrylic; 280 yds [256m], 3.5 oz [100 g];): #3955 Winery, 1 ball.
Hook: Size US H/8 (5 mm) or size to obtain correct gauge.
Notions: Tapestry needle.
GAUGE
1 rep wide = 1.2” (3cm) in pattern stitch. Gauge is not crucial, but it will affect the finished size and yarn requirements.
SPECIAL STITCHES
fpdc: Front Post Double Crochet
bpdc: Back Post Double Crochet
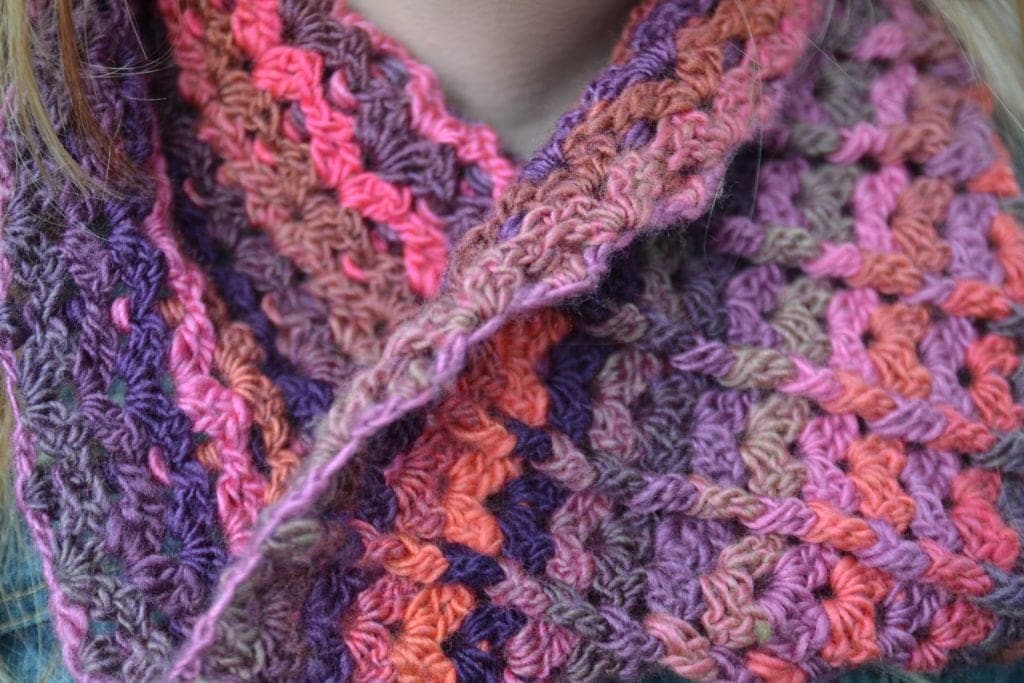
PATTERN STITCHES
Cluster (cl): Holding back last loop of each dc on hook, 2 dc in next st, yo, pull through all loops on hook.
Front post cluster (fpcl): Holding back last loop of each dc on hook, 2 fpdc (see special stitches) around next st, yo, pull through all loops on hook.
Back post cluster (bpcl): Holding back last loop of each dc on hook, 2 bpdc (see special stitches) around next st, yo, pull through all loops on hook.
PATTERN NOTE
Chain-3 at beginning of row counts as first double crochet unless otherwise stated.
PATTERN
BODY
Chain 123
Row 1 (RS): (2 dc, ch 2, 2 dc) in 6th ch from hook (first 5 chs count as first dc, sk 2 chs), *sk next 2 chs, cl (see pattern stitches) in next ch, sk next 2 chs, (2 dc, ch 2, 2 dc) in next ch; rep from * across to last 3 chs, sk next 2 chs, dc in last ch, turn.
Row 2 (WS): Ch 3 (see pattern note), *(2 dc, ch 2, 2 dc) in next ch-2 sp, bpcl (see pattern stitches) around next cl; rep from * across to last ch-2 sp, (2 dc, ch 2, 2 dc) in last ch-2 sp, sk next 2 dc, dc in 5h ch of beg 5 chs, turn.
Row 3: Ch 3, *(2 dc, ch 2, 2 dc) in next ch-2 sp, fpcl (see pattern stitches) around next bpcl; rep from * across to last ch-2 sp, (2 dc, ch 2, 2 dc) in last ch-2 sp, sk next 2 dc, dc in last st, turn.
Row 4: Ch 3, *(2 dc, ch 2, 2 dc) in next ch-2 sp, bpcl around next fpcl; rep from * across to last ch-2 sp, (2 dc, ch 2, 2 dc) in last ch-2 sp, sk next 2 dc, dc in last st, turn.
Repeat rows 3 and 4 for pattern stitch 8 times more, or to desired length. Finish off.
FINISHING
With RS facing, whip stitch the short sides together.
Weave in all loose ends.
Wash and block to measurement
Looking for more? I love making quick projects and even wrote a leaflet with Leisure Arts on how to do some fun things! If you too are looking for fun and quick projects go and check out the some of Marly’s Books!
 Look at some other Marly Bird Designs
The post Sherbet Crochet Cowl appeared first on Marly Bird.
September 15, 2015
Designer, Teacher Lorna Miser
Designer, Teacher Lorna Miser was the lovely guest today on the Yarn Thing podcast with Marly Bird. This is the first visit for Lorna, unbelievably, although she has been a great friend to Marly (Tammy recalls meeting her at a Stitches Pajama Party where she participated as a judge).
Lorna is most recognized as the founder of Lorna’s Laces. Lorna briefly shared the beginnings of that and how it became so universally known. And her love of purple. Lorna’s Laces is now recognized by Beth Casey and Lorna is fond of the memories of being so busy, but having a product so beloved that a 3 month delay in receiving product was OK. She is appreciating the need now of teaching others to carry on this craft.
 This graphic was stolen from the Fiber Wild Facebook page. Thanks guys!
Designing has been part of her work, too. She says her favorite designs incorporate a simple design that is much easier than it looks. And right now, Baby items are a favorite project, especially with four grandchildren and two more on the way. She loves textures and colors, putting grown-up fashions on little folks tickles her. She says the kids are so impressed what what’s made for them!
Lorna is not a yarn snob, she (like Marly) are both designing with Red Heart Yarns. In fact, searching Ravelry for RHY patterns designed by Lorna yields between 60 and 70 designs! They realize that there are some projects that demand certain factors of care or colors. Lorna has been playing with dying a little and, while not competition for Lorna’s Laces, is feeling inspiration.
Lorna’s website is www.lornamiserdesigns.com and she has a designer page in Ravelry. The Fiber Wild Lorna Miser Make-A-Long (CAL/KAL) can be found at this link. Scroll all the way to the bottom for that fun button!
If you missed hearing this live, it’s available as an archive at this link: http://www.blogtalkradio.com/yarnthing/2015/09/15/designer-teacher-lorna-miser or in iTunes.

The post Designer, Teacher Lorna Miser appeared first on Marly Bird.
September 14, 2015
Crochet Stitch Sampler Baby Blanket CAL Details
The Crochet Stitch Sampler Baby Blanket Crochet-along is sponsored by Red Heart and hosted by Marly Bird.
This is the very first CAL I’ve hosted that is based on my own pattern and includes a full set of HD videos of me demonstrating how to do each step of the blanket!
THE PROJECT
As a designer, I make a lot of gauge swatches. One day, I noticed that I had several swatches that were roughly the same size and fiber. I figured that I could seam the swatches together and make a quick baby blanket for my daughter. With this idea, came the pattern for the Crochet Stitch Sampler.
Given all the different stitch pattern books on the market today the sky’s the limit for blanket possibilities. By adjusting hook size and chain amounts to get a certain size it is possible to make any crochet stitch into a block. When you have several blocks that are the same size simply crochet them together and voila you have a blanket.
This crochet-along will show you 9 different stitches used in my. In the videos I demonstrate how to make the ‘in class block’ so you can get used to the pattern and have the ability to make a full size square on your own. Once all the blocks are crocheted you will seam them together and add a border. Then, voila, you too will have a great baby blanket!
THE DATE
The official start date is Sept. 22, 2015 – Oct. 30, 2015. There will be two videos released each week.
THE COMMUNITY
There is a dedicated Facebook group for this CAL that is monitored by me and several of the WONDERFUL sampler crocheters who tested this pattern for me. We are all there to help you with this project. Please join us!
You should really go and take a look at all the finished samples made by the testers. There are many different yarns used and color ways. They really are all so beautiful and inspiring. Some of the crocheters followed the pattern exactly and others put on their designer hat and used this pattern as a template to make their blanket their own! It was fun to watch them make their blankets.
THE PATTERN
During the CAL timeframe each section of the pattern will be released at the same time as the corresponding video release. This will help everybody who wants to participate in the crochet-along (CAL) stay at the same pace and subsequently make it easier for me to help!
Once the CAL is complete the full pattern will be available at MarlyBird.com.
THE VIDEOS
As I mentioned, two videos will be released each week during the CAL timeframe. In these videos I walk you though making this fun blanket and offer tips and tricks and suggestions to help you crochet the perfect project. Here is a link to the introduction video #1.
You will be able to find all the videos at: http://www.YouTube.com/MarlyBird.
THE MATERIALS NEEDED
Suggested Yarn: Red Heart, “With Love” (100% Acrylic; 315 yds/170g): 1 skein of 4 different complimentary colors and 2 skeins of main color.
NOTE: Original was made with a discontinued yarn– STITCH NATION by Debbie Stoller™ “Washable Ewe™”: [for sample size blanket] 2 balls each 3903 Strawberry, 3540 Currant, 3501 Robin Egg, 3652 Clover; 3 balls each 3365 Earth.
Hooks: you will need a variety of different sized hooks for this blanket. Use the hook size that will get you the desired square size. Some squares will require a smaller hook and others a larger hook depending on the stitch pattern. For the sample I used G/7 and H/8.
Notions: Stitch markers, tapestry needle
THE GAUGE
Each Full Size Square: 11” x 11″ [27.94 X 27.94 cm]
Each stitch count given for the full square will result in approximately the same size square as long as you adjust hook size when necessary.
There is a note given for each pattern stitch suggesting a hook size. If you want to learn more about how to measure for gauge check out this video.
DESIGNER TIP: I found it easiest to wash and block each square as I made them to insure that each was the correct size. You can wait until all the blocks are complete to wash and block each square to the exact measurement if you wish. Doing so will make seaming easier.
THE MISSION…
…Should you accept it. Gather your materials, join the facebook group and let’s make this fantastic project
Marly Bird's Blog

- Marly Bird's profile
- 19 followers

