
Marly Bird's Blog, page 190
November 5, 2015
Beth Whiteside, Teaching, Editing and Designing in the Fiber Arts
Beth Whiteside, teaching, editing and designing in the fiber arts world, shared her story for the first time on the Yarn Thing podcast with Marly Bird.

Beth says her parents immigrated to the US in the early 50’s and her parents were very self-sustained, she and her mom did a lot of crafts together, one of those crafts being knitting. A friend, Katie, encouraged her to knit, taking her to a knit shop and getting her hooked up with a Lopi Sweater. Knitting became a hobby.
When Beth worked in Boston, working as a quality assurance engineer testing software she and her with her co-workers discovered that a bunch of them were knitters, it sounds like lunchtimes became knit groups, and sometimes included and adventures to yarn shops. She enjoyed color and bounced around with all that could be done with knitting. Her mother referred to her as a ‘Jack of all Trades’ with her craft, not as a bad thing, but as there was so much to experience.
At some point the software career faded, and yarn became her career. The Jack of all Trades realized combining the skills she’d accumulated, the technical detail, the knowledge of graphic design, her love of writing could be used in the yarn industry. She found Atelier Yarns which is where Beth began teaching. Beth created a syllabus of classes she could teach. Over the years, she has found she has become not just a Jack of all Trades, but a Master of Plenty.
Beth attended a Stitches West when it was held in Oakland, about ten years ago, vowing never to miss another one and she hasn’t. Beth is now teaching at the various XRX Books/Stitches Events and co-hosting with Rick Mondragon the student fashion show held on Saturday evenings. She has been working with and learning from others that she’s met through the experience, like Sarah Peasley that we heard a couple of weeks ago, Laura Nelkin and Stacy Trock among others. Beth’s career of teaching at Stitches, began when she mentioned to the event coordinator that she would like to help with the learn-to-knit classes they were just beginning. (There’s others too, learn-to-crochet….) She was asked if she could travel, even with a small son she felt she could handle the other three locations. The thought by Beth that she could encourage new knitters was a very wonderful opportunity for her. She loves seeing the light bulb moment with students as they get it.
With Craftsy, Beth gets to share her love of Steeking, which is a technique many knitters haven’t the heart to attempt. 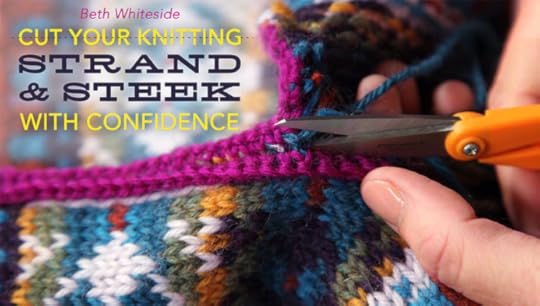 Cutting your Knitting Strand & Steek with Confidence, accomplishes both the helpful tips to accomplish double strand knitting colorwork and then the courage we need to CUT our work. Beth admits she was nervous about this technique herself for many years. She actually took a class at Stitches where they practiced on a baby sweater, so it’s not a lot of time or money investments involved. The benefits of taking the class with Craftsy include the fact that your not walking away from class missing the nuggets you needed to accomplish something a little technical, you can go back and review, you can ask questions, you can read the questions of other students.
Creative Knitting (remember we just heard from Kara Gott Warner, the editor, when she shared the Annies Craft Festival) is hosting a KAL (Knit-A-Long) with Beth, HERE is the link to the Group Ravelry to experiences Mosiac knitting. Beth will also be taking over the newsletter from Tabitha Hedrick.
You can follow Beth Whiteside at her website www.bethwhitesidedesign.com, She has a designer page in Ravelry, a professional page in Facebook (which could use some likes, so go follow her there!) take a class with her at Stitches West or Stitches South (sharing the links to what’s currently open for registration for 2016).
If you missed getting to hear this live it is still available as an archived episode: http://www.blogtalkradio.com/yarnthing/2015/11/05/beth-whiteside-teaching-editing-and-designing-in-the-fiber-arts or in iTunes.
 http://www.marlybird.com/sponsors/
The post Beth Whiteside, Teaching, Editing and Designing in the Fiber Arts appeared first on Marly Bird.


November 3, 2015
CEO of Creativebug Ursula Morgan
CEO of Creativebug Ursula Morgan was the smiling voice we heard we heard on the Yarn Thing podcast with Marly Bird today.
Ursula Morgan’s crafting background began in Dublin, Ireland. In  school the children are taught to knit, but her household was a crafting one. Her mother knit jumpers (what they call pullovers) that she wore to school. Her mother’s family was very busy, sewing costumes for the big theater productions locally. She dreamed of being a textile designer but was told she couldn’t draw at about an age 13. She listened to that teacher and left that dream behind until about 17. She was encouraged to go back to that teacher who said when she was tested earlier, that she had scored very high in art, so she crammed and applied to art colleges and got in. Ursula now believes that if anyone believes they are creative and wants to pursue it, they should, the are only limited by what they believe they can or cannot do.
Ursula became a graphic designer. She remembers her children playing under her desk as she worked as she used to play under her mother’s sewing machine. ‘The Macintosh became my sewing machine’ she says as she recalls working for Future Publishing, in London, She magazine, Good Houskeeping until her husband was moved to Bath, to work on the fishing magazines… They had a cross stitching magazine that she edited for a while, then they asked her to become a publisher, which she at first balked at especially when looking at the numbers. After while she found herself bored of cross stitching, wanted to do a knitting magazine. At first they did the balking, that the numbers didn’t support a knitting magazine, but she took out a loan and started Simply Knitting.
She paid off the loan with two issues of the magazine.
After that she started The Knitter and proceeded to create a portfolio of knitting magazines in the UK. From there, working with Red Heart, Crochet Today and Knitting today, she was asked to come to work in San Francisco. At about that time, Ursula met Marly at one of the Stitches West’s Pajama Parties, leading lip sync karaoke and having fun with knitters. When Marly greeted her, Ursula was star struck! Her was a designer who’s work she’d published!
 Ursula’s boss introduced her to the founders of Creativebug, perhaps to interview and investigate this new thing, because she knew so much about the craft industry, she was on the Craft Yarn Council at the time so this was right in her area of wisdom. Ursula was blown away (from the sound of it) by this incredibly affordable way of encouraging crafters to give other crafts a try. She says she fell in love with Creativebug and with it’s philosophy, and left Future Publishing, to add her ideas to this platform. For instance, Ursula instituted a ‘if you liked this class….’ after you have taken a class, there may be something similar to continue your education. There is a credit system with Creativebug, earning tokens toward free classes, and perfect to make gifts of classes to others.
Ursula revealed that she loves crafting when she’s traveling, making the TSA agents look twice at her knitting needles. She uses the aps to download the classes and watch them on-the-go without having to be online.
The filming of the classes was meant to make it feel intimate, as if you were sitting next to the instructor in their workspace or living room. Somehow at the moment the videographers are all guys (a lot of skateboarders, and others who make their own films on the weekend), who are very interested in the crafts they are filming. The pre-production is very thought out and the before the instructor arrives they are very organized how they are going to film. She cited one of the the filmers, Devlin, who has been knitting socks and is working on an animal, at the legs. He has been learning a lot from Norah Gaughan and was completely impressed when she came to film.
Marly spoke of her own experience, especially the video that introduced  Marly to the Creativebug audience. (Her mom LOVES it!) TODAY they are releasing the second episode in the Shawl Workshop. And there will be another video NEXT week, the third in the series so STAY TUNED! Ursula mentioned the popularity of Marly’s videos, like the Southwestern Throw, which is currently at the top of the list in YouTube with Creativebug.
~AS A GIFT to all listeners and fans of Marly Bird, Creativebug is give a FREE MONTH to try out Creativebug! Use the codeword YARNTHING (This is different from what was mentioned on the show) at www.creativebug.com
If you missed hearing this live, it is still available where it aired originally as an archived episode: http://www.blogtalkradio.com/yarnthing/2015/11/03/ceo-of-creativebug-ursula-morgan or in iTunes.
The post CEO of Creativebug Ursula Morgan appeared first on Marly Bird.
October 29, 2015
What is Creativebug
What is Creativebug?
 #ad Affiliate Links are used on this page
Well, CreativeBug is an award-winning online arts and craft learning site offering unlimited access to take beginner-to-advanced yarn crafting classes in everything from knitting and crochet to weaving and needle felting, as well as hundreds more across other crafting mediums. Additionally, it now provides its users with lifetime access to the classes that mean the most to them, whether they maintain an ongoing subscription or not. It’s simple. For every month someone subscribes, they receive a token to save one class of their choice to their personal library. These classes never expire, even if the user cancels their subscription.
For less than $5 per month you can now hone your skills while learning from and being inspired by top crochet and knitwear designers – like Marly Bird, Norah Gaughan and Wendy Bernard – and build their your special collection of classes with lifetime access.
The award-winning online arts and craft learning site offers unlimited access to
“We are artists supporting artists,” said Creativebug.com CEO Ursula Morgan. “It’s important to not only inspire creativity and learning, but to also support our customers’ artistic journey for the long-haul. Giving them the opportunity to keep a personal library of their favorite classes to look back on for help or inspiration as they grow in their craft.”
A monthly subscription to Creativebug.com costs $4.95. In addition to unlimited access to over 500 classes and the option to choose one class per month for lifetime access, Creativebug.com also provides:
Award-winning high-quality video workshops that provide an intimate in-person-like experience for the student
Instruction from first-class designers and artists featured in Martha Stewart Living, O’ The Oprah Magazine, Vogue and more
A free mobile app for learning on-the-go – no internet connection required
Beginner-to-advanced classes across a variety of mediums from knitting, crochet, sewing and quilting to paper crafts, food cra
fts, jewelry making, flower arranging sketching, watercolor, bath & body and more
A vast array of inspiring projects from fashion and home décor to gifts, holiday decorating and more
A Work-Along Discussion Board where users can interact with each other by making comments, “liking,” and posting photos and updates for their class projects

A 14-day free trial with unlimited access to over 500 video classes and lifetime access to one free class (no commitment necessary to keep free class)
To sign up for a free trial, check out free classes and techniques or learn more about Creativebug.com and its offerings please visit www.creativebug.com.
Find out more about Marly’s Creativebug Classes HERE
Marly’s newest class with Creativebug is a Crochet Shawl Workshop that includes lessons on how to crochet 3 uniquely different shawls. Get the class today and have a shawl completed by the end of the weekend!
The post What is Creativebug appeared first on Marly Bird.
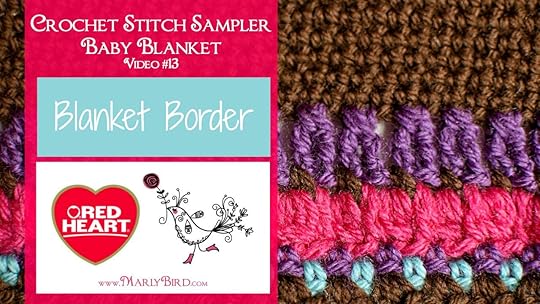
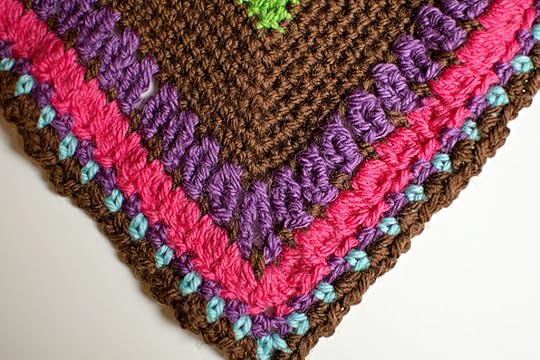
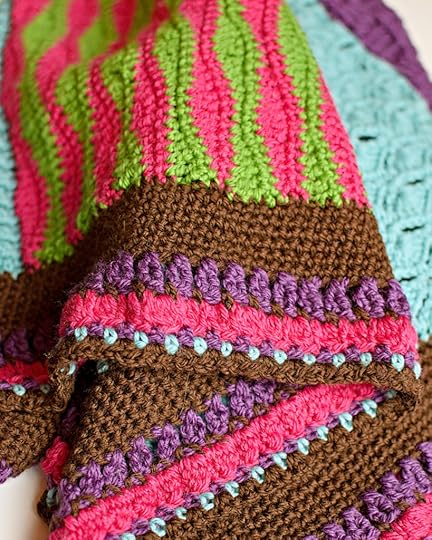
Stitch Sampler Baby Blanket Border
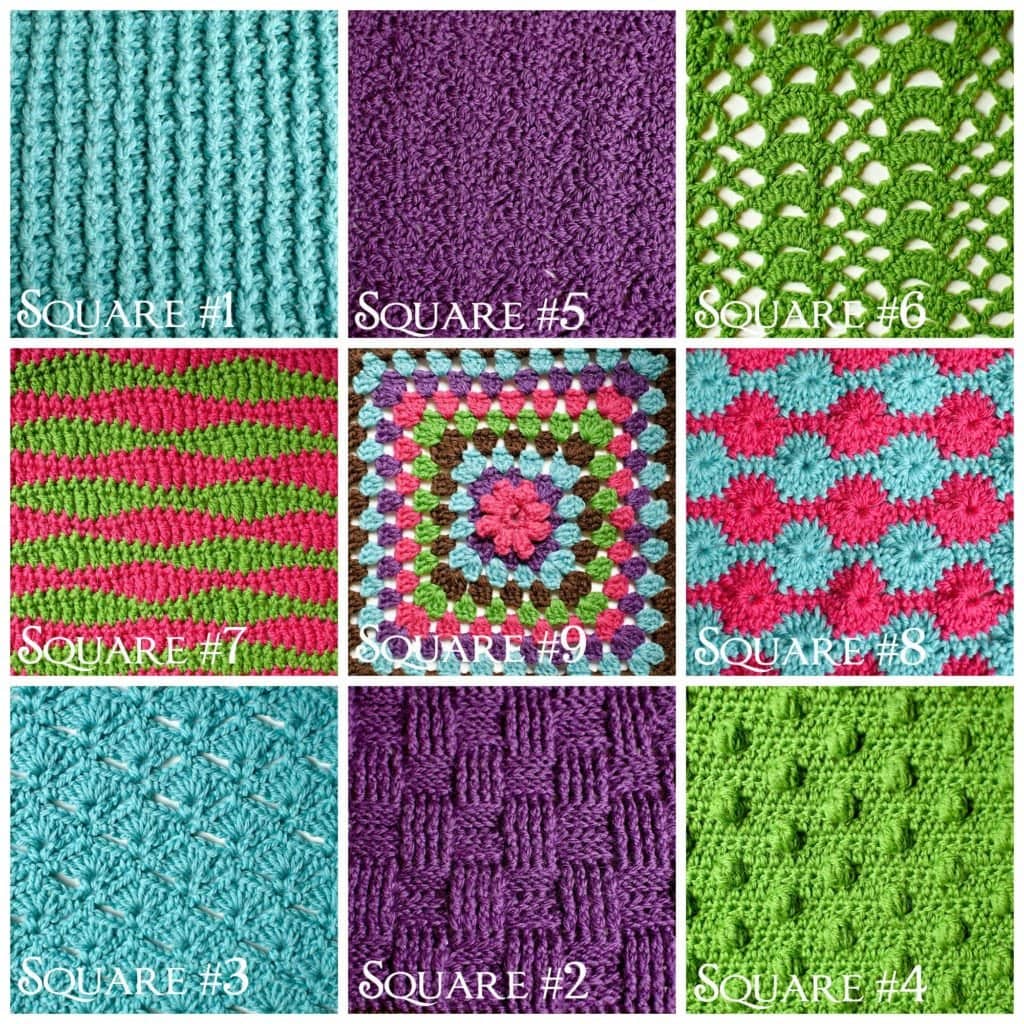
You’ve made 9 squares, blocked them, seamed them and now you are ready for Stitch Sampler Baby Blanket Border! Okay, LET’S DO THIS! Crochet Stitch Sampler Baby Blanket CAL Sponsored by Red Heart Yarns and hosted by Marly Bird.
You can click here for the first square, here for the second square, here for the third square, here for the fourth square, here for the fifth square, here for the sixth square, here for the seventh square, here for the eighth square, here for the ninth square, here for the seaming video.
Where is the Full Pattern?
During the Crochet-along (CAL) you will be able to get the written and chart instructions as well as the HD Video tutorial for the next step in the Crochet Stitch Sampler Blanket every Tuesday and Thursday. The full pattern will not be posted until the end of the CAL.
GET FULL CAL DETAILS HERE
Get a little help from your friends!
Follow along and complete each step with my help as well as the wonderful group of other Marly Bird CAL members in the Facebook Group. In the group you can post pictures, ask questions and get general crochet support.
I’m ready! Let’s get this party started!
I chose this border for the blanket because it looks AWESOME and will be a GREAT finishing touch!
I did use EVERY color in the border, But mainly I used the main color (in the sample that is brown). Once again, noticing that baby toys and such tend to be really bright colors I thought adding this really visually appealing stitch was just PERFECT for this baby blanket. This pattern teaches you about working increases in the corners and working a border in the round
Click on the stitch below If you need a quick refresher on how to do it.
Slip Knot and Chain Stitch
Single Crochet
Double Crochet
Treble Crochet
Bobble Stitch
CROCHET STITCH SAMPLER BABY BLANKET
Add this pattern to your Ravelry Queue and Favorites
Materials
Yarn: Red Heart, “With Love” (100% Acrylic; 315 yds/170g): 1 skein of 4 different complementary colors and 2 skeins of main color.
Designer NOTE: Original was made with a discontinued yarn– STITCH NATION by Debbie Stoller™ “Washable Ewe™”: [for sample size blanket] 2 balls each 3903 Strawberry, 3540 Currant, 3501 Robin Egg, 3652 Clover; 3 balls each 3365 Earth.
Hooks: you will need a variety of different sized hooks for this blanket. Use the hook size that will get you the desired square size. Some squares will require a smaller hook and others a larger hook depending on the stitch pattern. For the sample I used G/7 and H/8.
Notions: Stitch markers, tapestry needle
Gauge
Each Full Size Square: 11” x 11″ [27.94 X 27.94 cm]
Each stitch count given for the full square will result in approximately the same size square as long as you adjust hook size when necessary. YOU decide how large you want your squares to be. Once you choose the size for your blanket just make sure that each square will measure that.
Designer NOTE: To make sure each square I made was the same size, I washed and blocked each square as I made it. Doing so made it so I knew right away if my stitches were too tight or too loose.
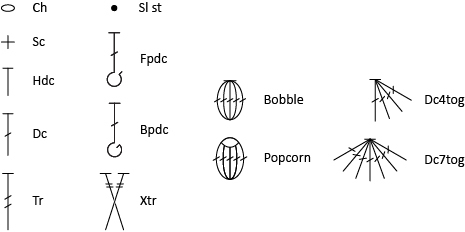
Abbreviations
This is the full list of abbreviations used for all the patterns. I will be sure to add this to each pattern so you don’t have to go searching for it as your working on the square.
beg – begin(ning)
bpdc – back post double crochet
ch – chain
dc – double crochet
fpdc – front post double crochet
hdc – half double crochet
rep – repeat
rnd – round
RS – right side
sc – single crochet
sk – skip
sl st – slip stitch
sp – space
st – stitch
tch – turning chain
tr – treble crochet
WS – wrong side
yo – yarn over
Special Stitches
Bobble: Dc5tog all in the same st or sp.
Xtr (Crossed triples): sk 1 st, tr in next st, working behind tr just made, tr in skipped st.
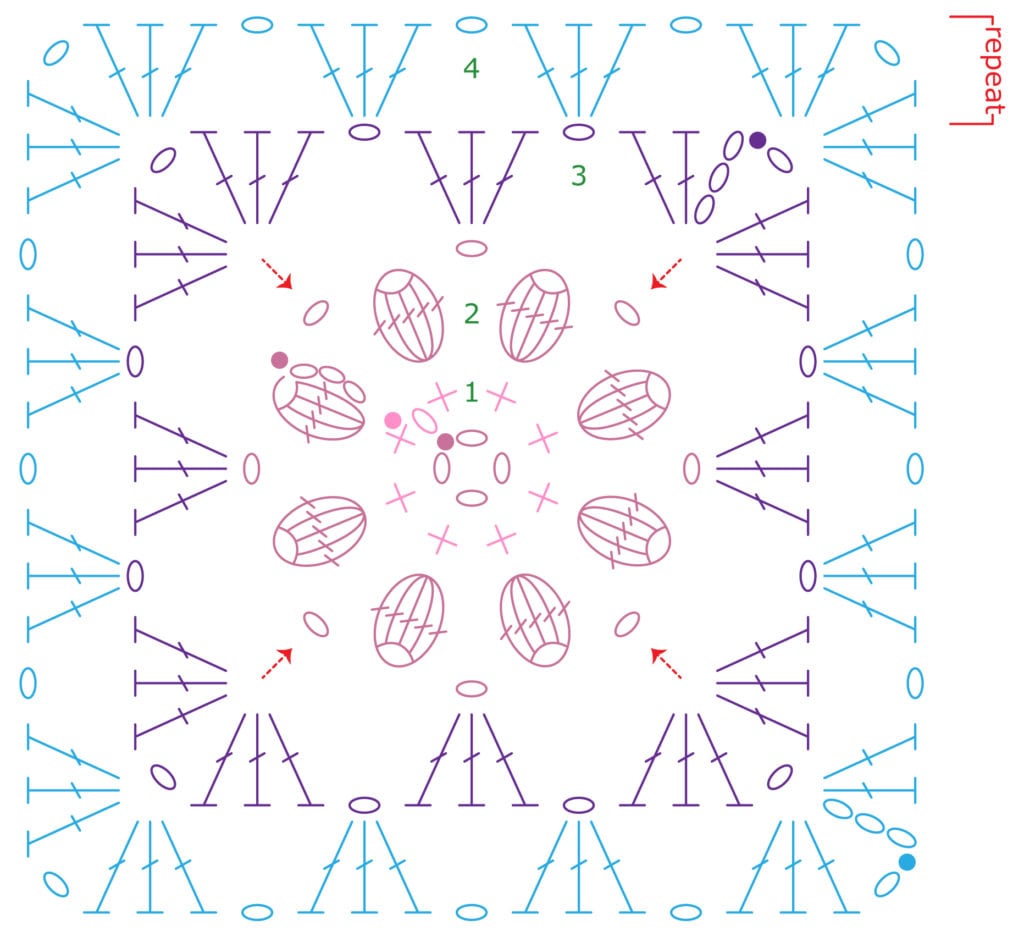
Symbol Key for Crochet Charts
This is the symbol key for all the charts used for all the patterns. I will be sure to add this to each pattern so you don’t have to go searching for it as your working on the square.
Layout
Here is the layout of the sample blanket incase you want to follow along with the same placement and color sequence. It should help you in choosing when to use a particular color for your blanket as well. But please remember, you can mix and match any way you wish; you _do not_ have to use my same layout!
Pattern
Blanket Border (FOUR COLORS in sample):
The stitch multiple for this particular border is 2 + single center corner stitches (4 total).
At this point, you need to designate what colors you will use for Colors A, B, C, D.
Solid Border Base
With Main Color (on the sample this was also color B)
Rnd 1: Join yarn at any corner space with a slip stitch, ch 1, * 2 sc in corner, place a marker around the last sc completed, sc once more in corner, sc an even number of stitches, evenly spaced to the next corner; rep from * to end, join with a slip stitch to the first sc.
NOTE: Throughout the solid border base you will put 3 sc in each marked center corner stitch.
Rnd 2: Ch 1, sc in same stitch as join, *3 sc in marked sc, remove marker and place it around the 2nd sc completed, sc in each stitch to next marked sc; rep from * to last stitch of rnd, sc in last stitch, join with a sl st to first sc.
Repeat Rnd 2 five times more. Fasten off on last round.
Body of Border
Work with 4 colors: A, B, C, and D.
Join A 4 sts (or any even number of sts) to the right of any corner sc.
Rnd 1: Ch 4 (counts as 1 tr), working behind beg ch, tr in st to the right of last st, * [Xtr over next 2 sts] to corner sc, working 1st tr of final Xtr in corner sc, ch 3, Xtr in next sc and corner sc; rep from * 3 more times, [Xtr over next 2 sts] to end, sl st in beg Xtr to connect.
Rnd 2: Change to B, ch 1, sc in sp made by connecting sl st, ch 1, [sc in sp between next 2 Xtr, ch 1] to corner sp, [sc, ch 1] 3 times in corner sp; rep from * 3 more times, [sc in sp between next 2 Xtr, ch 1] to end, sl st in beg sc to connect.
Rnd 3: Change to C, ch 3 (counts as 1 dc), bobble in next 1-ch sp, * [dc in next sc, bobble in next 1-ch sp] to corner sc, [dc, ch 1, dc, ch 1, dc] in corner sc, bobble in next 1-ch sp; rep from * 3 more times, * [dc in next sc, bobble in next ch sp] to end, sl st in 3rd of beg ch 3 to connect.
Rnd 4: Change to A, ch 1, sc in same st as connecting sl st, ch 1, * [sk next bobble, sc in next dc, ch 1] to corner dc, ch 1, [sc, ch 1] twice in corner dc, sc in next dc, ch 1; rep from * 3 more times, [sk next bobble, sc in next dc, ch 1] to last dc, sc in last dc, sc in beg sc to connect.
Rnd 5: Change to D, ch 1, sc in sp formed by connecting sc, ch 1, * [sk next sc, sc in next 1-ch sp, ch 1] to corner 1-ch sp, [sc, ch 1] twice in corner 1-ch sp; rep from * 3 more times, [sk next sc, sc in next 1-ch sp, ch 1] to last 1-ch sp, sc in last 1-ch sp, sc in beg sc to connect.
Rnd 6: Change to C, ch 1, sc in sp formed by connecting sc, ch 3, sc in same sp, [sc, ch 3, sc] in each ch-1 sp around, sl st in beg sc to connect.
Fasten off.
Designer NOTE: Are you have a little trouble? Check out the HD Video and let me help.
Chart
Border Chart
HD Video Tutorial
Please SMASH THAT LIKE BUTTON on the video when you watch it 
Teacher, Designer and Book Author Margaret Hubert
Teacher Designer and Book Author Margaret Hubert returned to the Yarn Thing podcast, and we couldn’t be happier with a returning guest to have HER.
 Margaret tell us she’s been very busy this year, she’s written FOUR books. Margaret says she had a couple of them about Granny Squares, which was a project she put on the shelf because when she originally offered them, the publishers AT THAT TIME thought Granny Squares were passe.
She said she learned to knit first and later when she picked up crochet her mother wasn’t interested. But when Margaret began creating Granny Squares, mom became interested and in fact worked on a project Margaret still has. Her daughter picked up Granny Squares. Margaret says ‘Granny has kind of taken over my life…. it’s a golden thread between the generations’ as she begun to teach her grand daughter.
Margaret finds the portability of a square has great potential for herself, not so much for the join-as-you-go method. For those of us like Margaret that take our craft with us, we can understand having our hands busy everywhere to work on when we are at some point waiting, and a square at a time will go with her. (She will leave the other method to others who teach that, she finds it easier to teach just the methods of creating a square.)  Margaret cites Warm-Up America for using squares that are donated then assembled to provide warmth to those in need.
Margaret shared a story about teaching in her local shop, three hikers walked in off the Appalachian Trail wanting to make hats. When the boys of the trio heard the concept by using math which they got immediately, but had struggled with the concept of creating a hat before. They came back later and shared their hats.
Margaret says her very first book was published in 1978, and was called One Piece Knits that Fit. (Searching a link for that) Margaret says her mother was a fabulous knitter, always in pieces. Her Mother-in-Law always did top-down and it fascinated her. In this book, Margaret combined knitting and crocheting in the same book, from top-down, bottom-up, from side-to-side… Margaret received a note from a lady in Israel who said this book has been her bible! She got to meet again her very first editor at Rhinebeck recently, so Margaret is very excited to get reacquainted with her too!
Margaret has been in the business of fiber for a very long time, but for her it never gets old. New ideas come to her all the time, even in the middle of the night. As in the case of the Granny Squares we mentioned earlier, sometimes ideas just need to hang out. The new book Customize Your Crochet came from her classes, where she says she finds she gets rejuvenated by her students and others she meets. She gets to jump in with both feet and even at age 80, she doesn’t take a moment of that feeling for granted. She says when she sees our Marly and the smile on her face, she stands at least two inches taller and knows she’s going to get a hug.
With Customize Your Crochet, Margaret heard people say they avoided making garments because the finished project doesn’t fit. Margaret’s included FOUR garments, with details on how to adjust to the four different body types, The Classic Rectangle, Triangle, Inverted Triangle and Hourglass. Many of us fall between the different shapes, she’s provide tips and shows how to adjust for that. PLUS how to embellish these garments with pockets, collars, experiment with different borders and trims, closures. FLOWERS too! There’s also advice on how to fix things.
Margaret as a cancer survivor wants us to keep an eye out for a special project Cast Off Chemo, an e-book to support Dr. Craig, who has been doing research and working toward with using chemotherapy. There will be a Ravelry Group and Margaret will have something in the book too.
You can follow Margaret Hubert through Ravelry, she’s also in Facebook and Twitter. We also hope she gets back to posting and sharing her stories at her blog. Here is the link, just for fun, to hear Margaret’s previous visit to the Yarn Thing podcast.
If you missed getting to hear this live, you can still listen where it aired originally as an archived episode http://www.blogtalkradio.com/yarnthing/2015/10/29/teacher-designer-and-book-author-margaret-hubert or in iTunes.
The post Teacher, Designer and Book Author Margaret Hubert appeared first on Marly Bird.
October 27, 2015
Romi Hill, Teacher, Designer and Creator of Beautiful
Romi Hill, teacher, designer and creator of beautiful, was our guest today on the Yarn Thing podcast with Marly Bird, we think for our 301st episode at Blogtalk, it doesn’t get more special.
Romi called in from her home in the Sierra Mountains. We could hear her love of the area as she described the forest, and the high desert elevations. We can imagine her gazing out the window at the beauty of her neighborhood, reminices with us about her crafting history. She says she learned to knit at age 9, but had probably learned to crochet much earlier, around 4, and took her a long time to convince her mother to teach her to knit, when the rest of her family were crocheters. It was the feel of the fabric knitting creates that drew her, especially mohair. She knit through high school and college, picking yarn from the sale bins, improvising projects with bits from different patterns. When she was pregnant with her second son, and so sick that there was not much she could do, she became really engrossed in her knitting. At that time, internet was really becoming a helpful tool for finding help and communities for knitters. She attended Stitches West and purchased lace-weight yarn to create a giant shawl. Romi admits it was hard for her to read her knitting, discouraging to because it was hard to imagine the mess in her lap would become anything near as beautiful as the pattern would be.
Romi loved the lace but thought it really needed a pin to keep it in place so that wearing it would not be so fiddly. This was a natural thought as she had been making beaded pieces as a teenager. About ten years ago, she started posting her jewelry online. Her first published pattern was beaded napkin rings through Knitty, later she published through Interweave a beaded knit and crochet jewelry book.
Marly asked Romi where she gets her ideas for her designs. Obviously, it comes through her muse, because she seems to draw it from many different directions. It may be from a stitch dictionary, even heavily modified, or from her walks and adventures in the area she lives. Often she worries about the designs as they are being created that they are what people want to create for themselves, and really can’t believe anyone will want to until her original creation is blocked does she see it as something to share.
 One of her first self-published collections 7 Small Shawls, she says was inspired by the story in the movie Julie & Julia, to see the progress through a year long creative project, and it has continued for five years! Romi says she loves seeing what others create and the yarns they use.
Craftsy has also asked Romi to teach her love of lace shawl knitting, New Directions in Lace (Marly’s affiliate link) in a project driven format, to create Fiori Autumnali, a beautiful shawl… not a surprise but it is something we all love that we can sit through Romi’s process and be Part Of The Process With Her.
With her new book, New Lace Knitting, Designs for Wide Open Spaces, Romi created pieces that combine timeless pieces with beloved lace styling in a fresh way. Her goal was that the pieces become wardrobe staples, worn to the office or an evening out.
Looking forward, Romi is working on the next Pins & Lace Club also, which is something knitters get weak in the knees with as it combines Romi’s pattern and the yarn it was created for and her beautiful pins, jewelry created by Romi! Check out her Ravelry Group for more information or this page in her website.
Romi Hill (who often can be found as Rosemary Hill) has a website: designsbyRomi.com, we can follow her designer page in Ravelry, she has a business page in Facebook, also in Twitter and Instagram as RomiDesigns.
If you missed getting to hear this LIVE it is still available as an archive where it aired originally: http://www.blogtalkradio.com/yarnthing/2015/10/27/romi-hill-teacher-designer-and-creator-of-beautiful or in iTunes
The post Romi Hill, Teacher, Designer and Creator of Beautiful appeared first on Marly Bird.
October 22, 2015
Candace Melville Ledbetter
Candace Melville Ledbetter was the guest today on the Yarn Thing podcast with Marly Bird. If that names sounds to formal, you may recognize that she is Caddy Melville. (Pronounce that like the Cadillac “Caddy”.)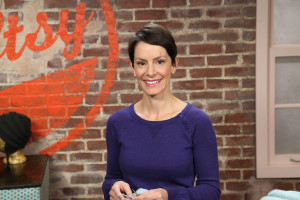
Caddy and her mom, Sally Melville, have told the story many times, that Sally tried to teach Caddy to knit MANY times. It wasn’t until Sally was teaching Caddy’s boyfriend that Caddy realized she could do this, too, as an adult. (He’s still around, Caddy says she taught him again when she was prepping for her new Craftsy Class.) She says because of their history, Sally didn’t POUNCE on teaching Caddy this time, but they took it slow and without expectations.
Caddy says that once she got into knitting she immediately began trying things her own way, making hats and scarves, getting help from mom for execution tips. Especially when it came to 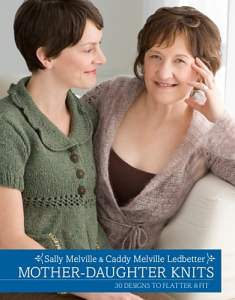 the book that they did together. Random House approached Sally who somewhere mentioned Caddy was knitting now, which got really exciting for them because the Publisher had wanted to do a Mother/Daughter book but could not find a team. That became Mother-Daughter Knits: 30 Designs to Flatter & Fit, Caddy also contributed to Warm Knits, Cool Gifts.
Caddy had been doing some designing before that, and before she had her first daughter had been teaching around Ottawa, which slowed down and then REALLY slowed down with the birth of her second daughter. Filming the Craftsy Class is really her focus until her daughters are in school full-time. Perhaps because learning to knit was such a challenge for her, she has been VERY thoughtful about to help a student feel progress and not feel overwhelmed.
Watching Caddy, we are looking forward to her teaching more and the patterns she will create. She wants to make things no one has made before, not complicated.
Which is what we all want.
Please find Caddy’s new Craftsy Class using Marly’s Link. She can also be found in Facebook.
If you missed getting to hear this live you can listen where it aired originally as an archived episode: http://www.blogtalkradio.com/yarnthing/2015/10/22/candace-melville-ledbetter or in iTunes.
The post Candace Melville Ledbetter appeared first on Marly Bird.
October 21, 2015
All About Annies Craft Festival with Kara Gott Warner
All About Annies Craft Festival with Kara Gott Warner made for a SPECIAL Wednesday episode of the Yarn Thing podcast with Marly Bird.
 Kara says she began knitting at about age 12, it was her grandmother that taught her. She lost interest as kids do, until about early 20’s. Kara worked in the garment industry of New York City and found a yarn shop that drew her like Mecca. ‘Her peeps’ welcomed her, and she realized she wanted to learn more about knitting and design. Later on, she attended a TNNA and met Michele Fortune, Executive Vice President of Annies, who has become her boss.
As Editor of Creative Knitting, which is published by Annies, Kara focuses each issue on a central theme, puts out a call for submissions and approaches the designers they work with regularly, plus keeping up with trends in knitting, yarns, fashion.
Annies also produces video as online classes. Many of the Yarn Thing podcast guests have mention being included in this educational opportunity. In fact in just the knitting category, Patty Lyons, Kate Atherley, Beth Whiteside, Tabetha Hedrick and Kara herself have shared their knowledge with students. Knit and Crochet Now is a tv show that airs in most areas of the US on local PBS stations. (Not mentioned: There’s big changes happening there, too, with Deborah Norville stepping in to host.)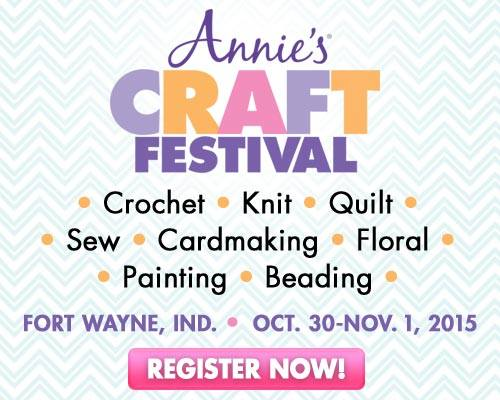
Annies Craft Festival, the first ever event from Annies, hopes to encompass ALL craft as the Publication company does. This event is taking place in Ft Wayne, IN, the weekend of October 30th, through November 1st. The website for the event is at this link, she whetted our appetite for the market place but also the events that are happening during the event like the Gala Dinner Friday night where Debbie Macomber will be speaking and the Crafts and Cocktails evening on Saturday that Kara herself will be hosting.
As if, with all this, Kara Gott Warner was not busy enough, she began podcasting Power Purls earlier this month. This has 10 episodes up already with guests like Trisha Malcom in the first episode! (Trisha is the editor of Vogue Knitting.) Since then, she’s had Patty Lyons, Norah Gaughan, Stephen Be and Stephen West, Beth Whiteside, Jeanne Carver of Imperial Stock Ranch, which is an impressive list already. Kara says about 99% of her friends now are knitters, she hopes to draw from these friends the real stories of the yarn industry.
If you’d like to continue following Kara Gott Warner, here are some helpful links to pick and choose your bookmarks. Her Website, which also offers link to her first podcast program The Morning Cooldown, The Power Purls Podcast website, Facebook page and RAVELRY Group, it can also be found in iTunes for your listening pleasure. Kara’s Twitter, if her schedule permits (!) she may offer a new design, so you can follow her designs in Ravelry, also, which we didn’t have time to get into.
If you missed getting to hear this live, you can still hear it where it aired originally aired as an archive: http://www.blogtalkradio.com/yarnthing/2015/10/21/all-about-annies-craft-festival-with-kara-gott-warner or in iTunes.
The post All About Annies Craft Festival with Kara Gott Warner appeared first on Marly Bird.
October 20, 2015
Teacher, Designer and Blogger Kellie Nuss
Teacher, Designer and Blogger Kellie Nuss was our guest today on the Yarn Thing podcast with Marly Bird. It’s was a wonderful thing to get this busy, busy lady to make time for us in her busy, busy day.
 We’re being redundant but it’s not an exaggeration. Married at 19, having 5 kids before age 30 (2 while hubby was in Law School) she says she got to a point where she just needed to get out of the house. She went to her local yarn store and begged to be allowed to help and became a Saturday Shop Girl at The Weaver’s Place. They noticed that she was great at helping customers with their tricky problems and had her start teaching. One of those at the shop sent her info to XRX Books to help at Stitches Expos, and in 2005 when it was in Atlantic City, which began her career teaching across the country.
At the events, she built relationships and one of those was with Gwen Bortner. They realized they had a harmony even though they seem different. Similar to the knit stitch which from a different angle is a purl but it’s still the same stitch, they each have a love of sharing their craft. They began blogging together with Two Sides — Two Points and in 2014 started an online subscription service, EduKnit which takes knitting up a level.
Kellie says she actually had a lesson in a girls group, like Brownies, but nobody else was as intrigued as she was and the lady never came back, so as a teenager she pursued it on her own. For instance, when she examined cables and realizing that they were just stitches that traded places. It wasn’t until much later that she found cable needles and realized their usefulness after having done without!
So when people would come into the shop, Kellie’s ability to read knitting and understanding the structure, the others in the shop would call her the Rain Man because she could figure things out so easily.
With Eduknit, Kellie shared that each month they try to find a topic and focus on that. For instance this month, they examined stranded knitting, first understanding how it works, then from each of their perspectives (does it have to be in the round), the third week brings in an expert (Beth Brown-Reinsel who we’ve met recently) and then close out the month with new patterns that are published through Ravelry, to try out the things they have been focusing on that month. Kellie says Gwen has been the teacher and Kellie has been the photographer. Then it gets sent to an editor and posted by their own Social Media assistant. The membership for a month is $10 or a for a year $100. This includes the patterns.
Kellie doesn’t really consider herself a designer, she has 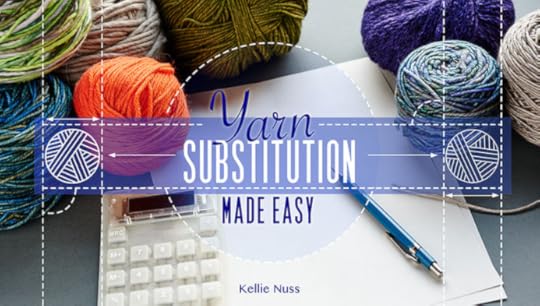 created information materials as part of her class that includes a pattern to follow for her class. Kellie’s personal favorite knitting involves playing with color, as in Alice Starmore‘s work. (Ravelry link to her designer page).
One of the things that Kellie became good at was Yarn Substitution. Because yarns aren’t always available everywhere, she found that knowing the attributes of what IS available was helpful to people. Craftsy looked at Kellie’s work, her catalog and online presence and put together this class with Kellie so that we may all get Kellie’s expertise. With Yarn Substitution Made Easy she says, they get empowered! The class includes a project where you experience yarns…. It is our opinion that this class and Sarah Peasley’s we spoke of last week on Getting Gauge (SWATCHING!) would work well together. (These are Marly’s Craftsy affiliate links.)
Kellie’s role in the yarn industry she hopes is as a cheerleader, that she is encouraging people to be creative, to relieve the stress we all experience in the society we live in.
If you missed getting to hear this LIVE you can always listen to the archived episode where you will HEAR the keyword to leave in your comments (HINT!) where it aired originally http://www.blogtalkradio.com/yarnthing/2015/10/20/teacher-designer-and-blogger-kellie-nuss or in iTunes.
The post Teacher, Designer and Blogger Kellie Nuss appeared first on Marly Bird.
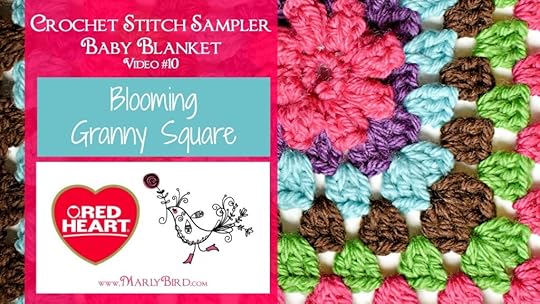
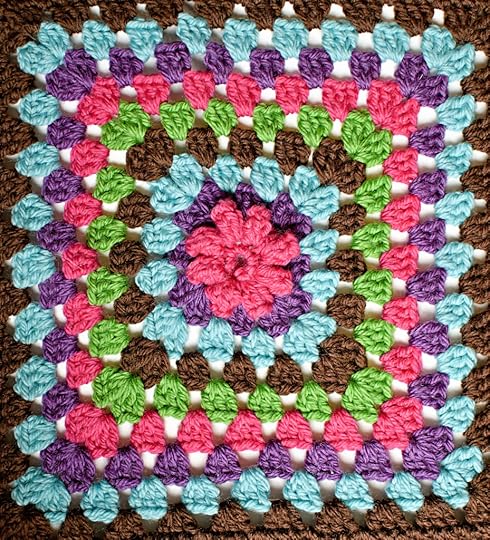
Blooming Granny Square
Let’s make the Blooming Granny Square Square! You are nearing the finish line, way to go! This square combines All The Colors! It is the focal point to the entire blanket. This is the ninth and final block in the Crochet Stitch Sampler Baby Blanket CAL Sponsored by Red Heart Yarns and hosted by Marly Bird.
You can click here for the first square, here for the second square, here for the third square, here for the fourth square, here for the fifth square, here for the sixth square, here for the seventh square, here for the eighth square.
Where is the Full Pattern?
During the Crochet-along (CAL) you will be able to get the written and chart instructions as well as the HD Video tutorial for the next step in the Crochet Stitch Sampler Blanket every Tuesday and Thursday. The full pattern will not be posted until the end of the CAL.
GET FULL CAL DETAILS HERE
Get a little help from your friends!
Follow along and complete each step with my help as well as the wonderful group of other Marly Bird CAL members in the Facebook Group. In the group you can post pictures, ask questions and get general crochet support.
I’m ready! Let’s get this party started!
I chose the Blooming Granny Square for this blanket because it looks AWESOME and will be a GREAT center focal point to the blanket! The Granny Stitch is a quintessential crochet stitch and I wanted to have something like that in the blanket…with a twist! This square is called the Blooming Granny Square because it has a flower at the center. Cool, huh?
I did use EVERY color in this square, including the main color (in the sample that is brown). Once again, noticing that baby toys and such tend to be really bright colors I thought adding this really visually appealing stitch was just PERFECT for this baby blanket. This pattern teaches you about working in the round (all the other blocks have been back and forth squares) I talk about that in the video 
Click on the stitch below If you need a quick refresher on how to do it.
Slip Knot and Chain Stitch
Single Crochet
Double Crochet
Popcorn Stitch
CROCHET STITCH SAMPLER BABY BLANKET
Add this pattern to your Ravelry Queue and Favorites
Materials
Yarn: Red Heart, “With Love” (100% Acrylic; 315 yds/170g): 1 skein of 4 different complementary colors and 2 skeins of main color.
Designer NOTE: Original was made with a discontinued yarn– STITCH NATION by Debbie Stoller™ “Washable Ewe™”: [for sample size blanket] 2 balls each 3903 Strawberry, 3540 Currant, 3501 Robin Egg, 3652 Clover; 3 balls each 3365 Earth.
Hooks: you will need a variety of different sized hooks for this blanket. Use the hook size that will get you the desired square size. Some squares will require a smaller hook and others a larger hook depending on the stitch pattern. For the sample I used G/7 and H/8.
Notions: Stitch markers, tapestry needle
Gauge
Each Full Size Square: 11” x 11″ [27.94 X 27.94 cm]
Each stitch count given for the full square will result in approximately the same size square as long as you adjust hook size when necessary. YOU decide how large you want your squares to be. Once you choose the size for your blanket just make sure that each square will measure that.
Designer NOTE: To make sure each square I made was the same size, I washed and blocked each square as I made it. Doing so made it so I knew right away if my stitches were too tight or too loose.
Abbreviations
This is the full list of abbreviations used for all the patterns. I will be sure to add this to each pattern so you don’t have to go searching for it as your working on the square.
beg – begin(ning)
bpdc – back post double crochet
ch – chain
dc – double crochet
fpdc – front post double crochet
hdc – half double crochet
rep – repeat
rnd – round
RS – right side
sc – single crochet
sk – skip
sl st – slip stitch
sp – space
st – stitch
tch – turning chain
tr – treble crochet
WS – wrong side
yo – yarn over
Special Stitches
Popcorn: 5 dc in indicated st or sp, remove hook being careful not to unravel last loop, insert hook in 1st of 5 dc just made, pick up dropped loop and draw it through, ch 1.
Symbol Key for Crochet Charts
This is the symbol key for all the charts used for all the patterns. I will be sure to add this to each pattern so you don’t have to go searching for it as your working on the square.
Layout
Here is the layout of the sample blanket incase you want to follow along with the same placement and color sequence. It should help you in choosing when to use a particular color for your blanket as well. But please remember, you can mix and match any way you wish; you _do not_ have to use my same layout!
Pattern
Blooming Granny Square (EVERY COLOR in sample):
Using all the colors.
For all the patterns up to this point, if you want to use this pattern stitch for another pattern you needed to know how many chains are used for the foundation. For the Blooming Granny Square–you make this in the round so you simple adjust the number of rounds you work to adjust the size.
In class block: There is no in class block for this pattern.
Full size block: Using A, ch 4, and sl st in 1st ch to form a ring.
Rnd 1: Ch 1, 8 sc in ring, sl st in beg sc to connect.
Rnd 2 (popcorn rnd): Ch 3 (counts as 1 dc), 4 dc in 1st sc, remove hook being careful not to unravel last loop, insert hook in 3rd of of beg ch 3, pick up dropped loop and draw it through, ch 1 (1 popcorn made), ch 1, * popcorn in next sc, ch 1; rep from * 6 more times, (8 popcorns made), sl st in top of beg popcorn to connect, fasten off A.
Rnd 3: Join B in any 1-ch sp, ch 3 (counts as 1 dc) 2 dc in same sp (half corner made), * ch 1, 3 dc in next 1-ch sp, ch 1, [3 dc, ch 1, 3 dc] next ch-1 sp (corner made), rep from * twice more, ch 1, 3 dc in next 1-ch sp, ch 1, 3 dc in same sp as beg half corner, ch 1, sl st in 3rd of beg ch 3 to connect (beg corner completed), fasten off B.
Rnd 4: Join C in any corner sp, ch 3 (counts as 1 dc), 2 dc in same sp (half corner made), * [ch 1, 3 dc in next 1-ch sp] to corner sp, ch 1, [3 dc, ch 1, 3 dc] in corner sp, rep from * twice more, [ch 1, 3 dc in next 1-ch sp] to corner sp, ch 1, 3 dc in same sp as beg half corner, ch 1, sl st in 3rd of beg ch 3 to connect (beg corner completed), fasten off C.
Rep rnd 4 only, changing colors at beg of each rnd until square is to the size you desire. This square should match up to be the same size as all the other squares.
Designer NOTE: Are you have a little trouble? Check out the HD Video and let me help.
Chart
Blooming Granny Square Chart
For this chart you will notice there are only 4 rounds shown. To continue the pattern you will repeat round 4 placing 3 dc in each ch-1 space along the sides and placing (3 dc, ch 1, 3 dc) in the ch-1 at the corners
HD Video Tutorial
Please SMASH THAT LIKE BUTTON on the video when you watch it
Marly Bird's Blog

- Marly Bird's profile
- 19 followers

