Carol Fenster's Blog, page 5
July 24, 2017
Have You Tried Coffee Flour?
At our house, the whir of the coffee grinder is a familiar sound. My husband, also known as “Latte Larry,” is an expert at making coffee lattes. For the best flavor, he prefers to grind his own coffee beans just before “pulling” an espresso shot.
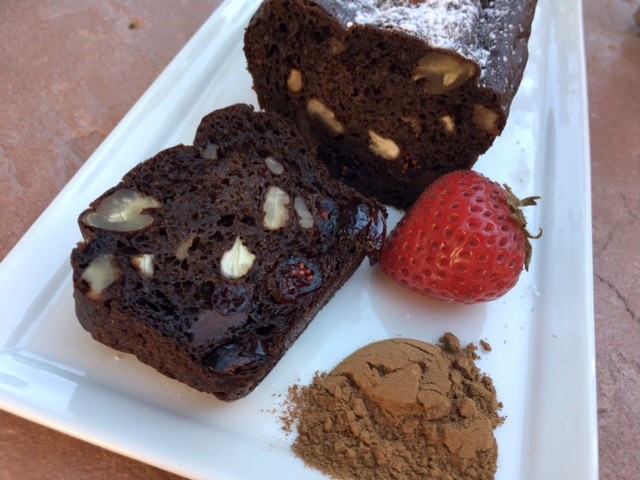
Chocolate Banana Bread with Coffee Flour
My morning coffee routine is also precise. I grind the coffee beans fresh just before I make my coffee using the old-fashioned “pour-over” method, which brews a single cup at a time. I savor every sip.
Now that summer is here, we are drinking cold-brewed coffee on ice with a splash of NutPods dairy-free creamer. Then, there’s the coffee ice cream in my freezer and the brewed coffee that I add to my baked goods to accentuate the chocolate flavor. I even enjoy coffee-flavored candy.
Given the above, I guess you could say we are coffee aficionados at our house.
COFFEE FLOUR
So, when I heard about coffee flour I was excited. Then I accidentally found Baker Josef’s coffee flour at Trader Joe’s, so I just had to have it. In my nearly 30 years of gluten-free cooking, I’ve worked with just about every gluten-free flour on earth so coffee flour was destined to be my next experiment.
WHAT IS COFFEE FLOUR? WHAT DOES IT TASTE LIKE?
You may not realize this, but coffee beans actually grow inside a coffee fruit on trees (see photo).

Coffee Cherry
I once toured a coffee farm on the Big Island of Hawaii and was amazed at how beautiful the coffee trees are. They sort of resemble cherry trees. In the past, the pulpy fruit (the red part in the photo above) that surrounds the coffee bean has typically been discarded. But some really smart folks realized if this pulpy fruit is dried and pulverized it can then be used as flour in baking.
What does coffee flour taste like? The package describes it as a fruity, roasted flavor. I’m not sure about the “fruity” part but there is definitely a “roasted” flavor with undertones of coffee. And, I’m not sure that simply tasting ground coffee fully prepares you for the flavor of a brewed cup so tasting coffee flour isn’t a good predictor either. I think it’s the blending of the subtle coffee flavor with the other ingredients that make it worthwhile to use coffee flour in our food.
HOW DO YOU USE COFFEE FLOUR?
The most obvious way to use it is in baking. Experts recommend substituting 10-25% of the flour with coffee flour. For example, if a recipe calls for 2 cups of gluten-free flour blend, then replace anywhere from 3 Tablespoons to 8 Tablespoons of the gluten-free blend with coffee flour.
Despite this recommendation, my advice is to first try the lowest amount (3 Tablespoons) and see how it works for you. The high fiber in coffee flour means that it absorbs more liquid than our usual gluten-free flours so you may need to add more liquid (perhaps 10 to 25% more liquid) for proper batter texture. Also, too much coffee flour might significantly alter the flavor of your baked items. As with many things in life, too much of a “good thing” isn’t good.
But which baked goods? I would suggest using it in recipes that you are already comfortable with rather than trying a brand-new recipe. So, I looked at my own recipes to see which ones might work. Coffee flour is dark brown, so I would avoid using it in light-colored foods. Since chocolate and coffee pair well, I started with my chocolate recipes and offer one here, with the coffee flour measurement included:
Chocolate Banana Bread with Coffee Flour
By Carol Fenster
This small, but mighty recipe is very versatile because you can use whatever add-ins you like and vary the fruit juice―both of which are very good for you. There are lots of flavors going on here: chocolate, banana, coffee, cinnamon but this recipe gives you a chance to try coffee flour and see how you like it. For a no-sugar-added bread, omit the tablespoon of sugar. Enjoy!!
1 small ripe banana, mashed
1 large egg, at room temperature
1/3 cup prune juice or pomegranate juice
1/4 cup canola oil
1 tablespoon coffee flour
7 tablespoons gluten-free flour blend (see below)
1/4 cup unsweetened cocoa powder
1 tablespoon sugar (optional)
1 teaspoon ground cinnamon
1 teaspoon baking powder
1/2 teaspoon baking soda
1/2 teaspoon xanthan gum
1/4 teaspoon salt
Add-ins
1/2 cup gluten-free semi-sweet chocolate chips
1/4 cup each finely chopped nuts, raisins, coconut, and dried cranberries (make sure total equals 1 cup)
[1] Preheat the oven to 350⁰F. Lightly grease two nonstick 3 ¼ x 5¾-inch mini-loaf pans.
[2] In a medium bowl, beat together the mashed banana, egg, juice, and oil with an electric mixer on low speed until well blended.
[3] With the mixer still on low speed, beat in the coffee flour, flour blend, cocoa, sugar (if using), cinnamon, baking powder, baking soda, xanthan gum, and salt until smooth. Stir in the add-ins. With a wet spatula, spread the batter evenly in the pans.
[4] Bake until a toothpick inserted into the center comes out clean (or with only a bit of melted chocolate on it), about 35 to 40 minutes. Cool on a wire rack for 20 minutes, remove the bread from the pans, and cool completely before cutting. Makes about 5 to 6 small slices per loaf.
Gluten-Free Flour Blend
1 ½ cups sorghum flour or brown rice flour
1 ½ cups potato starch (not potato flour)
1 cup tapioca flour (also called tapioca starch)
Whisk the ingredients together and store, tightly covered, in a dark, dry place.
Here are some other recipes to try:
[1] Chocolate Refrigerator Cookies http://www.carolfenstercooks.com/index.php/2014/10/chocolate-refrigerator-cookies-quick-decadence-100-quick-glutenfree-recipes/
[2] Pumpkin-Chocolate Marbled Loaf with Orange Glaze http://www.carolfenstercooks.com/index.php/2017/01/pumpkin/
[3] Chocolate Cake with Almond-Coconut Crust http://www.carolfenstercooks.com/index.php/2011/02/chocolate-cake-with-almond-coconut-crust/
[4] Chocolate Brownies http://www.carolfenstercooks.com/inde...
[5] You could also try coffee flour in hearty breads or muffins. Or, in smoothies, truffles, puddings, and mousses. In flourless recipes, I would use this rule-of-thumb: for every serving use ½ teaspoon of coffee flour and make sure it’s thoroughly blended into the ingredients.
[6] Here is a measurement tip: In the Chocolate Banana Bread recipe above, I placed 1 tablespoon coffee flour in a ½ cup measuring cup and then added the gluten-free flour blend on top and leveled it off with a knife. This automatically gave me 7 tablespoons of gluten-free flour blend and with the tablespoon of coffee flour already in the cup it automatically equaled 1/2 cup or 8 tablespoons.
THE BENEFITS OF COFFEE FLOUR
Nutritionally, coffee flour can be a powerhouse (see Nutrition Facts here www.coffeeflour.com). But it also a matter of how much you consume, which isn’t a lot in baked goods.
However, environmentally, coffee flour uses up a product that would ordinarily be discarded into rivers and it also provides financial payback for the coffee-growers. For the gluten-free community, it provides more variety and some wonderful taste experiences.
Although the bag of coffee four is not labeled gluten-free, it was found to be gluten-free by www.glutenfreewatchdog.com


July 18, 2017
Chocolate-Berry Breakfast Pizza

Chocolate-Berry Breakfast Pizza
When I was growing up, I can honestly say that I never ate chocolate for breakfast. Not once! We certainly ate it at other times of the day, but never breakfast. But as an adult, I have a new motto: “Who says you can’t have chocolate for breakfast?”
How about a decadent chocolate pizza for breakfast?
My standard pizza recipe is the answer—sweetened up a notch—becoming the base for chocolate, berries, and nuts. And it is just plain gorgeous, as well.
When I originally developed this recipe, I had hoped to use Nutella or Justin’s Chocolate Hazelnut Butter Blend as the chocolate—which European kids grow up eating, much like American kids eat peanut butter. But I found it wasn’t as easy to spread, perhaps needing some warming in the microwave before it became “spreadable.”
So, I turned to chocolate chips which were much easier to handle. I think you will like this decadent breakfast.
Chocolate-Berry Breakfast Pizza
Recipe by Carol Fenster© www.CarolFenster.com
This is the same crust as my famous Pizza, but with additional sugar (plus cinnamon and vanilla) to make the perfect base for lovely spring berries, resting on a layer of yummy chocolate. Dusted with powdered sugar, it makes a gorgeous dish.
Makes a 12-inch pizza
YEAST MIXTURE
1 tablespoon active dry yeast
3/4 cup warm (110°F) milk of choice
4 teaspoons sugar, divided
DRY INGREDIENTS
2/3 cup brown rice flour, plus more for sprinkling
1/4 cup potato starch
1/4 cup tapioca flour
1 1/2 teaspoons xanthan gum
1/8 teaspoon ground cinnamon
1/2 teaspoon salt
LIQUIDS
1 tablespoon canola oil, plus extra for brushing the crust
1/2 teaspoon vanilla
TOPPING
1 cup gluten-free chocolate chips, or more to taste
1/2 cup fresh berries, such as raspberries or sliced strawberries OR dried fruit such as apricots, cherries, blueberries, or cranberries
2 tablespoons slivered almonds (or your favorite nuts)
Powdered sugar, for dusting
[1] Place oven racks in bottom and middle positions of oven. Preheat the oven to 350⁰F. Dissolve yeast and 1 teaspoon of the sugar in warm milk for 5 minutes. In food processor, blend yeast mixture, remaining sugar, oil, and vanilla until dough forms very soft ball. (Or, blend in medium bowl, using an electric mixer on low speed.)
[2] Place pizza dough in center of greased (no cooking spray; it hinders spreading dough on pan) 12-inch nonstick (gray, not black) pizza pan. Liberally sprinkle rice flour onto dough; then press dough into pan with your hands, continuing to dust dough with flour to prevent sticking. Make edges thicker to contain toppings, taking care to make dough as smooth and even as possible for prettiest crust.
[3] Bake pizza crust 10 minutes on bottom rack. Remove from oven and brush edges of crust with a little canola oil. Place pizza on middle rack and bake until edges are nicely browned, about 10 minutes—depending on your oven. Watch carefully to avoid burning. Remove pizza from oven and sprinkle with single layer of chocolate chips (or warmed chocolate-hazelnut spread) to completely cover pizza crust. Return to oven and watch carefully as chips melt. Remove from oven and top with berries and almond slivers. Let pizza stand until it cool enough to handle (about 5 minutes), then cut and eat warm, dusted with a little powdered sugar.
July 11, 2017
Blackberry Coolers for Hot Summer Days
Hot summer days are here. This calls for cool, refreshing beverages. I’ve got a great one for you today.

Cool, refreshing Blackberry Coolers
First, as you can see from the photo, this beverage is gorgeous to look at. Your guests will be impressed! But, it is also light and refreshing and it is gluten-free and can be made dairy-free.
Plus, it is versatile—you can also make it with raspberries instead of blackberries if you prefer. Personally, we like blackberries at our house so that’s how I usually make it.
To make it dairy-free, I’m fond of coconut-based “ice cream” because I like the flavor. But use what works at your house. Enjoy!!!!
2 cups blackberries
3 tablespoons water
3 tablespoons sugar, or to taste
1/4 gallon vanilla ice cream of choice (can use non-dairy coconut or rice versions)
20 ounces seltzer water
Fresh mint, for garnish
[1] In a small saucepan, combine all but 12 of the blackberries with the water and sugar and bring to a boil over medium heat. Reduce the heat to low and simmer, uncovered, until the berries are very soft—roughly 7 to 10 minutes. Remove from the heat and cool.
[2] Press the blackberries through a sieve set over a bowl and discard the solids. Refrigerate the blackberry mixture until cold.
[3] To serve, divide the ice cream among 4 tall (at least 16 ounce, to contain the fizzing!!) glasses. Pour the seltzer on top, then divide the blackberry mixture evenly in each glass. Garnish with the remaining whole blackberries and a sprig of mint. Serve immediately with straws and spoons.
Makes 4 coolers (16 ounce glasses). For 8 small servings, use 8 ounce glasses.
per 16 ounce glass serving: 357 calories; 6 grams protein; 16 grams total fat; 5 grams fiber; 10 grams saturated fat; 50 grams carbohydrates; 63 mgs cholesterol; 146 mgs sodium
July 4, 2017
Oat, Blueberry, and Walnut Bars
Summer is here. Lots of picnics, backyard barbecues, and beach parties. To me, this means people might be eating while standing up rather than seated at a table.
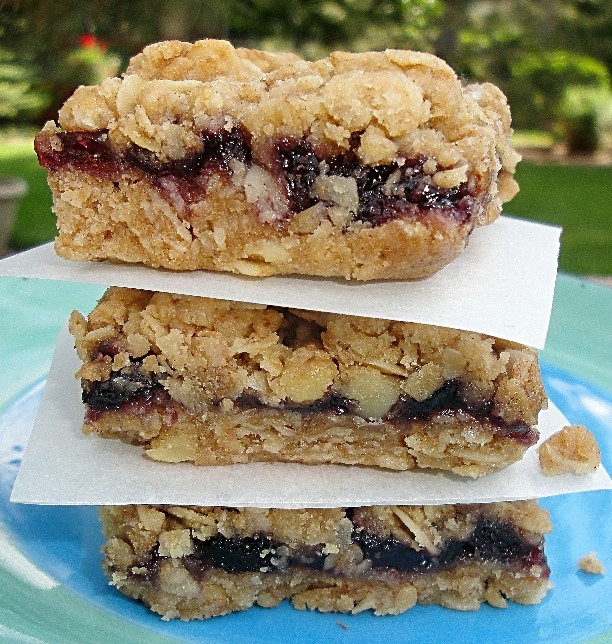
Vegan oat bars use gluten-free oats and oat bran.
Because of this, I’m always on the lookout for desserts that can be eaten without a utensil, perhaps even without a fork. This means desserts that can sit on a buffet table or be carried with you as you mingle at a party.
For me, this bar fits the bill. It is extremely easy to make, it’s made from healthy ingredients, and it’s not too sweet. (You can also cut the sugar to ¼ or 1/3 cup if you like.) And, you can vary the jam. It’s equally delicious with jams made from raspberry, blackberry, fig, strawberry, or cherry.
Oatmeal
Many of you may not remember that there was a time when oats were off-limits for the gluten-free diet because they could be contaminated with wheat. Thanks to several manufacturers we can now buy various forms of gluten-free oats and oat bran that are grown and processed in controlled settings to make them safe for us. So, here is a delicious, easy dessert that uses oats. Enjoy!
Gluten-Free Oat, Blueberry, and Walnut Bars
adapted from 125 Gluten-Free Vegetarian Recipes by Carol Fenster (Avery/Penguin Group, 2011)
Blueberries, cinnamon, and walnuts team up with rolled oats and oat bran to make a hearty, flavorful bar that is also quite versatile. Use your favorite nuts such as pecans, almonds, or pine nuts. These bars are also vegan and freeze and travel well.
1/2 cup butter or buttery spread, melted
2 teaspoons pure vanilla, divided
1 cup GF Flour Blend (see below)
3/4 cup GF rolled oats*
1/2 cup packed light brown sugar
¼ cup GF oat bran* or ground flaxmeal
1/4 cup walnuts, finely chopped
1 ½ teaspoons xanthan gum
1 teaspoon baking powder
1/2 teaspoon sea salt
1/4 teaspoon ground cinnamon
2/3 cup blueberry jam
*Check with your physician before eating gluten-free oats.
[1] Place rack in middle of oven. Preheat oven to 375°F. Generously grease 8-inch square nonstick (gray, not black) metal pan. Or line pan with aluminum foil, leaving 2-inch overhang for easy removal. Grease foil.
[2] In medium bowl, combine melted butter and 1 teaspoon vanilla. Stir in flour blend, rolled oats, brown sugar, oat bran, walnuts, xanthan gum, baking powder, salt, and cinnamon until thoroughly blended, then press 1 ½ cups of mixture firmly on bottom of pan.
[3] Stir remaining teaspoon of vanilla into blueberry jam until smooth, then spread evenly on top. Sprinkle remaining oat mixture evenly on jam, then pat to make smooth and even.
[4] Bake until top is lightly browned and firm, about 20 to 25 minutes. Cool bars in pan for 30 minutes on wire rack. If using foil lining, invert pan onto large cutting board and remove foil before cutting into 16 squares. Otherwise, serve bars directly from pan. Makes 16 small bars.
Per serving: 175 calories; 2g protein; 7g total fat; 2g fiber;27 g carbohydrates; 16mg cholesterol; 119mg sodium
GF Flour Blend
1 ½ cups sorghum flour or brown rice flour
1 ½ cups potato starch
1 cup tapioca flour
Whisk together and store in a dark, dry place.
June 27, 2017
Whole Grain Sorghum Salad for July 4th Celebrations
July 4th is always the time for traditional summer foods such as wieners, burgers, potato salad, jello, baked beans, coleslaw, and so on. I love those foods because they say “summer” to me.

Whole Grain Sorghum Salad
But this year, why not change things up by adding a grain salad that is gorgeous and showy and your guests will love. It can be made ahead, chilled, and then served whenever you like. You can use the shrimp (or not, and make it a vegetarian dish).
In my family, the number of vegetarian members is growing so I’m always looking for protein-rich dishes that they can enjoy…but that everyone else can also eat as well. That way, nobody feels singled out because of what’s on (or not on) their plate. This dish is also a good replacement for the bulgur-based dishes that I see at many picnics.
What is Sorghum?
In case you’re not familiar with it, sorghum is an ancient grain that has been used for over 8,000 years in Africa and Egypt and is increasingly available in the United States. It is the 5th most important cereal grain in the world. Growing up on a farm in eastern Nebraska, we raised sorghum but called it milo back then. It is grown primarily in the south-central states (Nebraska to Texas), but some is grown in other states such as California.
Even as a small child, I could distinguish the stalks of sorghum in our fields from other tall-growing crops like soybeans or corn but I also knew that it was only used for livestock feed. Since then, growers have modified the grain to be “food-grade” and it is now a welcome, nutritious addition to our gluten-free diet. Sorghum flour is readily available in natural food stores and some grocery stores but—until recently—whole grain sorghum was hard to find. Now it is much easier to find and the Bob’s Red Mill brand is sold in natural food stores so that’s where I buy mine.
Whole Grain Sorghum Salad
Reprinted from 125 Gluten-Free Vegetarian Recipes by Carol Fenster (Avery/Penguin Group, 2011)
This whole grain sorghum dish may become one of your all-time favorites. It’s gorgeous, showy, and hearty….yet light enough for a hot summer day. Plus, it is best served at room temperature (rather than hot or chilled) so it’s perfect for buffets or picnics.
To cook the sorghum:
1 cup uncooked whole grain sorghum (soaked overnight in water to cover)
3/4 teaspoon sea salt, divided
2 cups water
Sherry Vinaigrette Dressing:
2 tablespoons freshly squeezed lemon juice
3 tablespoons extra-virgin olive oil
1 tablespoon sherry vinegar (or 2 tablespoons for a sharper flavor)
1/8 teaspoon white pepper
Vegetables:
1/4 cup shelled raw pumpkin seeds or pine nuts
1 English or hothouse cucumber, unpeeled and chopped
3 green onions, chopped
1 small red bell pepper, chopped, or 12 grape tomatoes, halved
1 small yellow bell pepper, chopped
1/2 cup cooked edamame (or lightly-steamed peas or asparagus)
1/2 cup chopped seasonal fruit (figs, pears, apples, oranges, or dried cranberries)
1/2 cup chopped fresh parsley, plus extra for garnish
1/2 cup chopped fresh cilantro
1/4 cup chopped fresh mint
1/4 cup crumbled feta cheese or queso fresco (optional)
Mixed Greens
12 cooked large whole shrimp, peeled (or more to taste, or omit for vegetarian option)
[1] Drain the soaked sorghum and discard water. In a heavy medium saucepan with a lid, combine sorghum, 1/2 teaspoon of the salt, and 2 cups water. Bring to boil. Cover and reduce heat, simmering for 40 to 45 minutes. Transfer to a strainer and drain well. Set aside to cool.
[2] Make the dressing: In a screw-top jar, shake the lemon juice, oil, vinegar, remaining 1/4 teaspoon of sea salt and pepper until thoroughly blended and creamy. Set aside.
[3] Toast pumpkin seeds in a skillet over medium heat, stirring constantly until lightly browned, about 5 minutes. Set aside.
[4] In a large bowl, combine the sorghum and the vegetables and toss to blend. Add dressing and toss until all ingredients are well coated. Let stand for 20 minutes before serving.
[5] Arrange mixed greens on a large platter, top with salad, arrange shrimp on top, and serve, garnished with fresh parsley. Makes 6 servings.
June 20, 2017
Panzanella Salad
One thing is for sure at this time of year: tomatoes take over gardens, Farmer’s Markets, and the grocery store produce aisles.

Gluten-free bread, tomatoes, and fresh basil make a delightful bread salad.
One of my favorite ways to use tomatoes is an Italian bread salad known as Panzanella. Originally a dish devised by frugal Italian cooks to use up stale bread, it has evolved into a classy dish that goes far beyond bread, tomatoes, and basil dressed in an olive oil and vinegar dressing. And, it is absolutely gorgeous as you can see in the photo.
I serve this vibrantly colorful dish to rave reviews by dinner guests every summer and although you can serve it year-round, it is best when made with the best tomatoes you can find, which will be summertime. Whether it’s from your own vines, the Farmer’s Market, or generous neighbors the quality of this dish depends on the tomatoes. And it is a great way to use up gluten-free bread.
I have to warn you: If you serve this to guests, make plenty because they will love it and you’re likely to run out. They don’t care if it is gluten-free; it just tastes that good!
Panzanella: Italian Bread Salad
Reprinted with permission from 1,000 Gluten-Free Recipes by Carol Fenster (Wiley, 2008)
This is my favorite summer salad and guests happily devour it. It is very colorful and the pleasing crunch of the bread cubes contrasts nicely with the soft, juicy tomatoes. I often vary it by adding marinated artichokes, olives, and baby spinach (and occasionally shrimp or chicken for a main dish) but this is the basic version I start with.
6 slices white gluten-free bread
1/2 cup extra-virgin olive oil, divided
2 tablespoons unsalted butter or buttery spread
3/4 teaspoon salt, divided
1 garlic clove, minced
2 cups cherry or grape tomatoes, washed, stemmed and halved
1/2 cup thinly sliced red onion
2 tablespoons white balsamic vinegar
1/2 teaspoon freshly ground black pepper
1/2 cup chopped fresh basil leaves, chopped (or more to taste) plus a few leaves for garnish
[1] Place a rack in the middle of the oven. Preheat the oven to 350°F. Line a large 9×13-inch baking sheet (not nonstick) with foil. Cut crusts from bread (use them for bread pudding or stuffing) and cut remaining bread into 1/2-inch cubes. Place bread cubes in a large bowl.
[2] In a small pan, combine 6 tablespoons of the oil, butter, 1/4-teaspoon of the salt, and garlic in a small pan and cook over low heat until the butter melts, stirring to blend ingredients thoroughly. Pour the oil mixture over the bread cubes and quickly toss to mix well. Spread the bread cubes in a single layer on the baking sheet.
[3] Bake 10 to 20 minutes or until the bread cubes are golden and fragrant, stirring and turning cubes occasionally halfway through for even browning. The amount of time required to brown bread cubes varies depending on the bread you use, so watch carefully to avoid burning. Remove the baking sheet from the oven and let the bread cubes cool slightly on the baking sheet. The toasted bread cubes should be used within the next 15 minutes for best result
[4] In the same large bowl, whisk together the remaining 2 tablespoons oil, the remaining 1/2-teaspoon salt, vinegar, and pepper. Add the bread cubes, tomatoes, and onion, and chopped fresh basil and toss until blended. Serve immediately, garnished with additional chopped fresh basil leaves. Makes 4 servings.
Carol’s Kitchen Notes: How to Handle Tomatoes without Bruising Their Egos
[1] Tomatoes should be stored at room temperature, rather than refrigerated because the cold makes them mealy and diminishes their flavor.
[2] Experts say that tomatoes stored stem-side down stay fresh longer. Apparently, the scar where the stem is located releases moisture and provides an entry point for mold and fungus.
[3] Store tomatoes in a single layer, not on top of each other. I put mine in a flat tray on my countertop where they add a pretty, colorful touch to my kitchen.
[4] When my grape or cherry (my favorite variety) tomatoes start to shrivel, I cut them in half, toss with olive oil, and spread them out on a parchment-lined baking sheet to dry in the oven. A setting of about 200°F is ideal. If you have a convection oven, use that setting at 200 degrees. Or, use a dehydrator specially designed for drying food. The amount of time it takes depends on the size and moisture of the tomatoes, so watch carefully. When dry, cool completely on the baking sheet on a wire rack. Then freeze in resealable freezer bags. Use them in soups, salads, sandwiches… any recipe that needs dried tomatoes. I rarely soak them in water to reconstitute, but you can if you like.
June 13, 2017
Make Chimichurri for Big Flavor
Make The Green Sauce, Mom

Chimichurri made from fresh herbs in Carol’s garden.
Years ago, my son found a recipe for a “green sauce” that he loved. So, I made it for him frequently as he was growing up. I didn’t know it then and the recipe never referred to this name, but it was a variation of Chimichurri—a piquant sauce from South America made of herbs, garlic, vinegar, olive oil, and a little chili pepper— traditionally used on grilled meat, such as steak.
I have since lost that recipe. But as summer gets underway and my herb pots start flourishing—and with my love for bold flavors—I want this flavorful food in my diet. I use parsley in my version, but I have seen Chimichurri made with a wide variety of herbs so feel free to vary yours to suit what’s growing in your herb pots or garden. The chlorophyll in the parsley keeps the Chimichurri looking green, so keep a little parsley in your recipe for that reason. But try also using some fresh oregano or basil or chives, depending on what’s available.
Chimichurri as Marinade in Addition to Sauce
One clever way to use Chimichurri is to reserve three-fourths of it to use as a sauce at serving time, but marinate your meat overnight in the remaining one-fourth (discard the marinade after you remove the meat). That way, your meat absorbs some of the flavors before grilling. As summer grilling season gets underway, you will use this sauce again and again. Enjoy!
Chimichurri
Adapted with permission from 1,000 Gluten-Free Recipes by Carol Fenster (Houghton Mifflin Harcourt/Wiley, 2008)
This is an excellent way to use herbs year-round, but especially in the summer when you may have them growing in your backyard. Chimichurri is naturally gluten-free and transforms a plain old steak into something special. But, if you’re vegetarian, I’ve even used it with tofu, so give it a try.
1 cup minced flat-leaf parsley
½ cup extra-virgin olive oil
½ cup red wine vinegar
1 tablespoon chopped onion
2 garlic cloves, whole
2 teaspoons ground cumin
½ teaspoon salt
½ teaspoon freshly ground black pepper
¼ teaspoon crushed red pepper
Place the parsley, oil, vinegar, garlic, paprika, cumin, crushed red pepper, salt, and pepper and in a food processor and pulse until combined but leave a few chunks for texture. Refrigerate until serving time, but let stand at room temperature about 20 minutes before serving. Makes about 1 cup.

June 6, 2017
Layered Bean-Tortilla Casserole for Two
Ever walked in the door after work and wondered, “What’s for dinner?” Research shows that by 4 PM on any given day, about 75% of us don’t know what we’re cooking for dinner that night. Personally, I have found myself in that situation more than once.
Here is a last minute meal idea. The ingredients for this quick and easy casserole are likely to already be in your pantry, fridge, or freezer so dishes like this flavorful Layered Bean-Tortilla Casserole can come together with little effort or planning.

Layered Bean-Tortilla Casserole. Photo by Tom Hirschfeld
Everyone raves about this casserole, including Faith Middleton and her radio crew when I was interviewed on Faith Middleton’s Food Schmooze on WNPR Radio. It is designed to be a light meal for two people, making it perfect for empty-nesters or couples or newlyweds. As Faith suggested, why not make this a brunch dish and serve with some Cava. Sounds good to me.
Layered Bean Tortilla Casserole
Text excerpted from Gluten-Free Cooking for Two ©2017 by Carol Fenster. Reproduced by permission of Houghton Mifflin Harcourt. All rights reserved.
Packed with hearty beans, this casserole is already a filling vegetarian main dish. But if you want to make it even heartier, add ½ cup of cooked diced chicken or pork—or cooked ground beef. Feel free to vary the ingredient proportions, for example, using more cheese—this dish is fail-proof. When we are extra hungry at our house, I make a casserole for each of us.
3 6-inch gluten-free corn tortillas
1/2 can (15.5 ounces) black or pinto beans, rinsed and drained
1/3 cup Mexican salsa or salsa verde (I like Herditz or La Victoria)
1/2 cup fresh or frozen corn
4 ounces (about [1/2] cup, shredded) Monterey Jack cheese or cheese substitute
1/4 cup chopped fresh cilantro, divided
Garnishes: sour cream or sour cream alternative, chopped fresh avocado, green onion, and black olives
[1] Preheat the oven to 425⁰F. Generously grease a 6-inch round cake pan (I use a glass pie pan or a cast-iron skillet). Place a tortilla on the bottom of the pan. Top with one-third of the beans, one-third of the salsa, one-third of the corn, and one-third of the cheese. Repeat twice more with remaining tortillas and remaining beans, salsa, corn, and ending with the cheese. Sprinkle with 2 tablespoons of the cilantro. Cover tightly with aluminum foil (or a lid).
[2] Bake the casserole, for 20 minutes. Remove the foil and bake until heated through and the cheese is melted and bubbling, about 5 more minutes. Cut in half and serve immediately. Garnish with the remaining cilantro and your chosen garnishes.
Makes a 6-inch casserole, two servings.
Per serving: 435 calories; 24g protein; 19g total fat; 10g fiber; 46g carbohydrates; 50mg cholesterol; 648mg sodium
TIPS FROM CAROL
[1] This dish is equally good made with either pinto beans or black beans, and I’ve even made it with white kidney beans (known as cannellini beans).
[2] Personally, I prefer La Victoria Chunky Salsa Verde but hubbie likes red salsa but either works great.
[3] This is a great make-ahead dish. Just assemble the casserole, cover with foil, refrigerate, and proceed to Step 2. Bake for 25 minutes rather than 20 minutes.
May 23, 2017
Grow Your Own Herbs for Huge Rewards
Fresh Herbs are a Good Thing
“Is it time yet?” Every spring—when the weather starts to turn warm—I ask myself this question as I ponder when to plant my herbs. My concern is frost.

Sage plant in my garden.
Depending on where you live, the last frost was long ago or still about to happen or never happened at all. Here in Denver, we’re advised to wait until after Mother’s Day to plant anything and every year that I don’t follow those instructions, I regret it. This year, I didn’t obey the experts. We had a very mild winter and I was just sure we were done with frost by early May. So I planted my herbs on May 6, then it snowed on May 17. They survived, barely!
I Love Fresh Herbs; You Should Too
More Flavor: Everyone knows that I love fresh herbs. Herbs add flavor to our food—no matter what diet you follow, gluten-free, Paleo, vegetarian, low-fat or whatever. They can be used decoratively in floral arrangements as well as food garnishes and they also have medicinal qualities (e.g., sage tea for sore throats or thyme tea for respiratory congestion).
Save Money: Growing your own herbs saves money. A package of fresh herbs at the grocery store costs about $3 (or more if organic). An herb plant may cost that much at the nursery, but is likely to yield about 10 times that amount over the course of the summer. So, growing your own herbs makes sense economically. If you grow too much, share your bounty with friends and neighbors. When I travel during the summer, I ask my neighbors to use my fresh herbs while I’m gone.
Sensory: And, then there is the purely sensory enjoyment of fresh herbs. One of my favorite summer experiences is stepping outside my kitchen door to the herb pots on my patio and clipping fresh herbs to use in preparing dinner that night. I use basil, oregano, sage, and rosemary in Italian dishes, savory, dill, and thyme in stews, and of course, I use parsley and cilantro in almost everything but especially as garnishes. I even use fresh-cut herbs as fillers in flower arrangements, or sometimes I just put a bunch of herbs in a small vase and that serves as the centerpiece when I’m entertaining.
How to Grow Herbs for Maximum Yield
Follow directions for your zone and fertilize accordingly. Location (in relation to the sun) is critical. Some herbs, such as rosemary, thrive in lots of sun while others, such as basil, can’t tolerate too much. Where I put my plants in relation to the shade and time of day is critical to how well they fare throughout the summer. I have found that my northeast-facing patio is an excellent location because it gets the morning sun, but is then shielded from the harsh afternoon sun by the shade of my house. You will need to experiment to find the best place for herbs at your house.
Pinch new growth regularly— just above a node or joint in the stem—to maintain a healthy, bushy plant. I found that this is especially important with basil, one of my favorite herbs. Don’t let it produce seeds or flowers (called bolting) so pinch those off right away. Remove any withered or yellowed growth.
Water according to what the plant needs; some can tolerate drier soil while others like it wetter. Read the directions that came with the herb plant or look it up in a gardening book or the Internet.
Storing Fresh Herbs
When you pick a whole bunch of herbs from your garden or buy a lot at the Farmer’s Market, store them properly to prolong their freshness. Store fresh herbs with cut ends in a glass of water in fridge OR wrapped loosely in a damp paper towel in a plastic bag. Leave the end of the plastic bag unsealed to allow for some air circulation.
So, Plant Your Own Herbs
I hope you’re encouraged to plant your own herbs this summer. Whether it’s herbs in a huge garden or herbs in small pots, you’re bound to enjoy huge rewards.
May 16, 2017
24 Gluten-Free Hours in Santa Fe, New Mexico
Land of Enchantment.
That’s what it says on the license plates in New Mexico. All I know is that I’ve been enchanted by New Mexico for a very long time. There is something about the clear blue sky, mountains, pinon scent, and the ever present green chiles in many foods that lures me in. Whenever I can manage a visit (which is about once a year), I go to my favorite restaurants. This time, I was passing through on my way to tape some shows for “Creative Living with Sheryl Borden” at PBS station KENW-TV in Eastern New Mexico. Santa Fe beckoned to me and I couldn’t resist.
We (husband Larry and I) had less than 24 hours in Santa Fe before flying from Albuquerque back to our home in Denver. So, I plotted our restaurants in advance to make the most of our time. I chose three favorites that we’ve visited many times before.
La Boca
After taping 3 shows that morning, we arrived at La Boca, known for its Modern Spanish Cuisine. Chef James Campbell Caruso, a James Beard award nominee several times, offers a Happy Hour where appetizers are half-priced. Almost everything is gluten-free, so eating here was a breeze.

Larry & Carol at Inn of the Anasazi Restaurant.

La Boca Chicken Skewers
Plus, if you ask, they serve their own gluten-free bread which I have eaten several times. The restaurant has been acclaimed by the New York Times, the Food Network, Travel and Leisure, and Esquire, to name a few. It is excellent and usually full every time we visit.
After driving for 4 hours, we were famished. But, first we started with Blood Orange Sangria. This isn’t La Boca’s recipe, but it is really good. Then we turned our attention to the menu. We started with a bowl of superb olives, then added Tacos, Chicken on skewers (fried in rice flour, not the usual wheat flour), Bacon-wrapped dates, and finished it off with La Boca’s fabulous Chocolate Pots de Crème.

La Boca tacos.
Because we were there during Happy Hour, our bill was less than $60 which was extremely reasonable for this feast.

Brussels Sprouts and Bacon-Wrapped Dates
Last year, we stayed at the marvelous Antigua Inn, but they were full this year so we just stayed at a non-descript place on Cerrillos Road. If you can stay at the Antigua Inn, I really recommend it. It will be memorable!
Rosewood Inn of the Anasazi
We started the next day with breakfast at one of our favorite breakfast spots: Rosewood Inn of the Anasazi. The Anasazis (translates into “the ancient ones”) populated this area centuries ago, yet mysteriously disappeared.
This restaurant is a very upscale place, and the menu choices are tantalizing. After much deliberation, I chose the Applewood-Smoked Ham Benedict with Chipotle Benedict.

Applewood-Smoked Ham Benedict with Chipotle Hollandaise Sance
Larry chose the Huevos Rancheros. This is a very gluten-free-friendly restaurant, so my Benedict featured house-baked gluten-free bread rather than the usual English muffin. It was absolutely wonderful and beautifully-plated, as the photo shows.
After breakfast, we visited a market that I’ve noticed for several years called Kaune’s Neighborhood Market on Old Santa Fe Trail. It is an upscale market, with several gluten-free choices. In fact, I found a new bread from Flax 4 Life called Toaster Buns. They are heavy and dense (the way I like them) and should be cut in half before toasting. Slathered with Almond Butter and a smear of jam, they are a delightful change of pace for breakfast.
La Casa Sena
Our final meal was in the courtyard of the lovely La Casa Sena (this place was actually someone’s home long ago). The weather was in the 70’s, sunny like most New Mexico days, and the menu was very appealing. Like the other restaurants, many of the dishes were naturally gluten-free. I decided on the Beef Oxtail-Stuffed Piquillo Peppers. It was extremely good, but I was saving room for the dessert—Three Chocolate Mousse, which was beautifully plated and a work of art in itself.

Three Chocolate Mousse
After three superb meals in less than 24 hours, we drove to Albuquerque for our flight home with happy memories and fully-sated taste buds. As we flew over Santa Fe, I noticed the contrast of snow-capped mountains, red-brown soil, pinon-forested hills, and the low-slung adobes that characterize Santa Fe. The lure to come back was already starting! We’re planning our next visit soon!