Carol Fenster's Blog, page 23
May 6, 2013
In Honor of Mother’s Day: Secret Anniversaries of the Heart
Henry Wadsworth Longfellow supposedly believed that the most precious times were not the holidays on the calendar, but rather those we observe silently, in private. He called them “secret anniversaries of the heart.” These special times are evoked by our senses and— among these senses— scent is one of the most powerful emissaries.

Carol Fenster celebrates Mother's Day with her mother's chocolate cake recipe, converted to gluten-free, of course.
For example, the smell of roses makes me think of my maternal grandmother who used a rose-scented hand lotion. When I think of her I inevitably recall her homemade chocolate cookies that she always had waiting for her visiting grandchildren. (Her 12 children produced lots of visitors!). To this day, I associate those cookies with her and her warm, unconditional love.
Think back over your life and your secret anniversaries. For many of us, certain memories trigger thoughts of food and celebratory times. Perhaps it’s winning the coveted part in a school play . . . or the music that played on your first date or . . . when you found out you were pregnant with your first child…or the day your first child entered kindergarten or graduated from high school.
Maybe it’s a sad memory such as the loss of a parent . . . or the day you learned about a job transfer that took you thousands of miles away from your friends and loved ones . . . or the bittersweet joy of children marrying and moving far away from home.
If these memories—whether they’re happy or sad—evoke thoughts of food, then let those foods be markers for those anniversaries. Though she’s been gone for over 30 years, I still have warm thoughts as I prepare some of my Mother’s favorite recipes—such as the chocolate cake in this photo. Every time I make it, I think of her. And, sometimes I prepare those dishes simply because I have that longing to reconnect with her using food as the medium. You don’t have to explain why you’re serving a particular dish. If it makes you happy or arouses melancholy thoughts that allow you to indulge your feelings, that’s your secret.
Food is a way to celebrate life and the rituals we embrace. So my motto is “Celebrate anything and everything—with food.” As Mother’s Day approaches, many of us will prepare special foods for Mom (or she may prepare them for you!) Embrace the love that’s poured into the effort of preparing food and tuck away one more memory for the future.
What are the secret anniversaries of your heart? What foods or aromas evoke memories for you?


April 29, 2013
Celebrate Cinco de Mayo with Gluten-free Tortilla-Shell Salads
Here in the Southwest, we observe Cinco de Mayo (May 5), a day of celebrating Mexican heritage and pride.

Gluten-free flour tortillas made crispy tortilla shell salads.
While it has some serious roots in the history of Mexico, this date is also a good excuse to indulge in Mexican food and drink and have a little fun.
In keeping with the Mexican theme, ever craved these crispy little tortilla shells filled with salads? I have, and then I discovered the fluted metal tortilla shell pans (4 to a box, around $10-$12 per box) in my local Kroger grocery store and I just absolutely had to make them.
TO MAKE TORTILLA SHELLS
[1] Place the fluted tortilla shell pans on a rimmed 9×13-inch baking sheet for easier handling and to prevent sliding.
[2] Gently press the flour tortillas into each pan with your hands, taking care not to tear the tortillas. (see photo, below left) If the tortillas have been refrigerated or are stiff, steam each one on a splatter guard set over a skillet of simmering water, covered with a lid, until soft and pliable, about 5 to 10 seconds. Then press it into the pan while it is still bends easily.
[3] I tried all of the brands of gluten-free flour tortillas and the brand that is easiest to work with is Rudi’s and the flavor that best complements the Mexican salad is Fiesta flavor, although I used all 3 flavors (Spinach, Fiesta, and Regular) with great success.
[4] Bake, following the instructions on your package. The time varies depending on the size of the tortilla but will be under 10 minutes. Let the shells cool in the pan and then remove them and fill with your favorite salad. I used a simple oil-and-vinegar salad dressing but you can use whatever you like.

Crispy gluten-free tortillas bake into crispy shells.
FILLING
The salad in the photo (above left) contains lettuce, beans, tomatoes, black olives, cheddar cheese, avocado, and some cilantro and a dollop of sour cream but you could add chopped cooked chicken or cooked ground beef as well. Whatever makes a good Mexican filling is fine. Top with your favorite Mexican salsa and a wedge of lime and serve it with your favorite gluten-free beer. Here in Colorado, we’re partial to New Planet, brewed in Boulder, CO.
The best part of this dish? You get to eat the shell so enjoy!!!
Happy Cinco de Mayo!
April 22, 2013
Ancient Grains Go Modern: Red Quinoa Salad with Beets, Pomegranate Seeds, & Clementines
“Eat more whole grains.” But setting aside time to cook whole grains requires discipline and planning, since most whole grains must be cooked from scratch and that takes precious time.

Red Quinoa Salad is perfect for entertaining
One ancient grain (technically a seed), quinoa—called the “mother grain” because it is one of the most nutritious of all grains—cooks just like rice, in about 15 to 20 minutes, so it easy to plan its preparation for our gluten-free meals.
I first tasted red quinoa a few years ago at True Food Kitchen in Scottsdale—a Dr. Andrew Weil-inspired restaurant— in a salad similar to the one below. I was hooked because the flavor of red quinoa is a little less intrusive and a little more pleasantly nutty than the regular, white-tan quinoa and that makes it more versatile.
I’ve been tinkering with a red quinoa salad for awhile now and really like this vibrant, nutritious version that is also extremely flavorful. Red beets, pomegranates, and spinach are powerhouses of nutrition and the Clementines (called Cuties) add color and Vitamin C. Even beet-haters might like it because the beets are cut in shoe-strings and just blend in with all of the other wonderful parts of this salad. So, try this recipe and let me know what you think. I’m betting you’ll love it!
Red Quinoa Salad with Beets, Pomegranate Seeds, and Clementines
Red quinoa is much more colorful than white quinoa and—along with the vibrant colors from the beets and Clementines—is a stunning dish, especially when made with dark green spinach for a lovely color contrast.
SALAD
1 ¾ cup vegetable broth or low-sodium chicken broth
1 cup red quinoa
¼ teaspoon salt
2 small Clementines or 1 medium orange, some segments reserved for garnish
½ can (14-ounce) shoestring beets, thoroughly drained
Seeds from 1 pomegranate (about ½ to ¾ cup), reserve some for garnish
½ cup raisins or dried cranberries
1 cup baby spinach, washed and patted dry
½ cup slivered almonds (optional)
2 tablespoons chopped fresh parsley or cilantro, plus 1 tablespoon for garnish
DRESSING
[1/4] cup freshly-squeezed orange juice
2 tablespoons sherry vinegar
1 medium garlic clove, minced
[1/4] teaspoon sea salt
1/8 teaspoon freshly ground black pepper
2 tablespoons extra-virgin olive oil
[1] In large saucepan, bring broth to boil high heat. Add quinoa and salt and cook, covered, until broth is absorbed, about 20 minutes. Transfer quinoa to large bowl; drain any excess broth.
[2] Grate the Clementine (or orange) to yield two teaspoons zest and add to quinoa, then cut Clementine into segments and add to quinoa. Add the beets, pomegranate seeds, raisins, spinach, almonds, and 2 tablespoons of parsley. Toss to combine thoroughly
[3] Make dressing: In small bowl or glass jar, whisk together orange juice, vinegar, garlic, salt, and pepper until blended. Slowly whisk in oil in thin stream until well combined. Add enough dressing to quinoa to coat thoroughly and serve, either in large bowl or large platter, garnished with remaining Clementine segments, pomegranate seeds, and parsley. Serves 4 as a main dish; 6 as a side dish
April 15, 2013
Sunny Sweetness for Snowy Days: Orange Marmalade
Winter refuses to release its icy grip on Colorado. It is snowing heavily right now, making travel difficult but filling our mountain reservoirs with precious water for our arid state.
However, a bit of sunny sweetness would be perfect for these cold snowy days.

Orange Marmalade
How about Orange Marmalade, one of the easiest recipes you’ll ever make.
It is a brilliant orange color, has an enticing aroma and fabulous taste, and can be made in less than 10 minutes. The hardest part is chopping the oranges. Unlike some jams, you don’t add pectin to this recipe because the natural pectins in the orange rind help the marmalade firm up as it cools.
Although I made my last batch with Tangelos and often use naval oranges (as in the photo), I prefer clementines (a tangerine or mandarin orange that is usually sold under the name “Cuties”) because they have a sweeter, mellower flavor than regular oranges, plus softer membranes and less pith (the white part), brighter color, thinner skins, and fewer seeds. So while I search for Cuties, I usually use whatever organic version or oranges are available. Be sure to scrub them thoroughly no matter what oranges you use because you eat all of the peel.
Orange Marmalade
By Carol Fenster©
The amount of marmalade you will get depends on the size and number of oranges you use.
Oranges (Clementine cuties, naval, tangelo), washed but unpeeled
Granulated cane (white) sugar
[1] Cut oranges into quarters, removing any seeds or white pithy centers. Place quarters in food processor and pulse until peel reaches desired size (1/8-inch to ¼-inch pieces are best). Place oranges in large glass Pyrex measuring cup to see how much you have because you will add the same amount of granulated sugar. For example, for 2 cups pureed oranges use 2 cups granulated sugar. Stir to blend well.
[2] Microwave orange-sugar mixture on High, covered with a sheet of waxed paper, one minute. Stir, then heat again for 30 seconds. Repeat in 30 second intervals until marmalade thickens slightly. Store, tightly covered, in the refrigerator.
Note: Don’t reduce the sugar; the recipe needs this much for best flavor and proper thickening. I have tried using less sugar (or sugar substitutes) with disappointing results (dull appearance, less flavor). So don’t do it!
Can You Freeze Marmalade?
The answer is YES. Simply fill your thick-glassed, 1-cup mason jar to within 1-inch of the top, label clearly, and freeze. (Jam doesn’t expand much in the freezer.) To thaw, let it sit overnight in the refrigerator and always keep unused portions refrigerated. Enjoy your frozen jam within one year; after a year it will start to lose flavor.
Ways to Enjoy Marmalade
[1] Spread on your favorite gluten-free toast, muffins, pancakes, or waffles
[2] Spread between your favorite gluten-free cookies for an easy Whoopie
[3] Make it a secret ingredient by adding ¼ cup to gluten-free muffin batter for flavor and sweetness (especially good in cranberry muffins but also in chocolate cupcakes)
[4] Spread between gluten-free cake layers for a European-style layer cake
[5] Savor a teaspoon of marmalade “straight-up” when you need a sugar-lift. It is a sweet indulgence with only 10 calories.
[6] Spread the joy! Give a jar to a friend, along with a batch of freshly-baked gluten-free muffins. What a treat!
April 8, 2013
Two Sets of Nostrils? The Science of Tasting and Smelling our Food
They say “we eat with our eyes.” Certainly, seeing our food is part of enjoying it—such as admiring a lovely entrée before eating it. That’s why restaurants work hard to make food look so enticing.
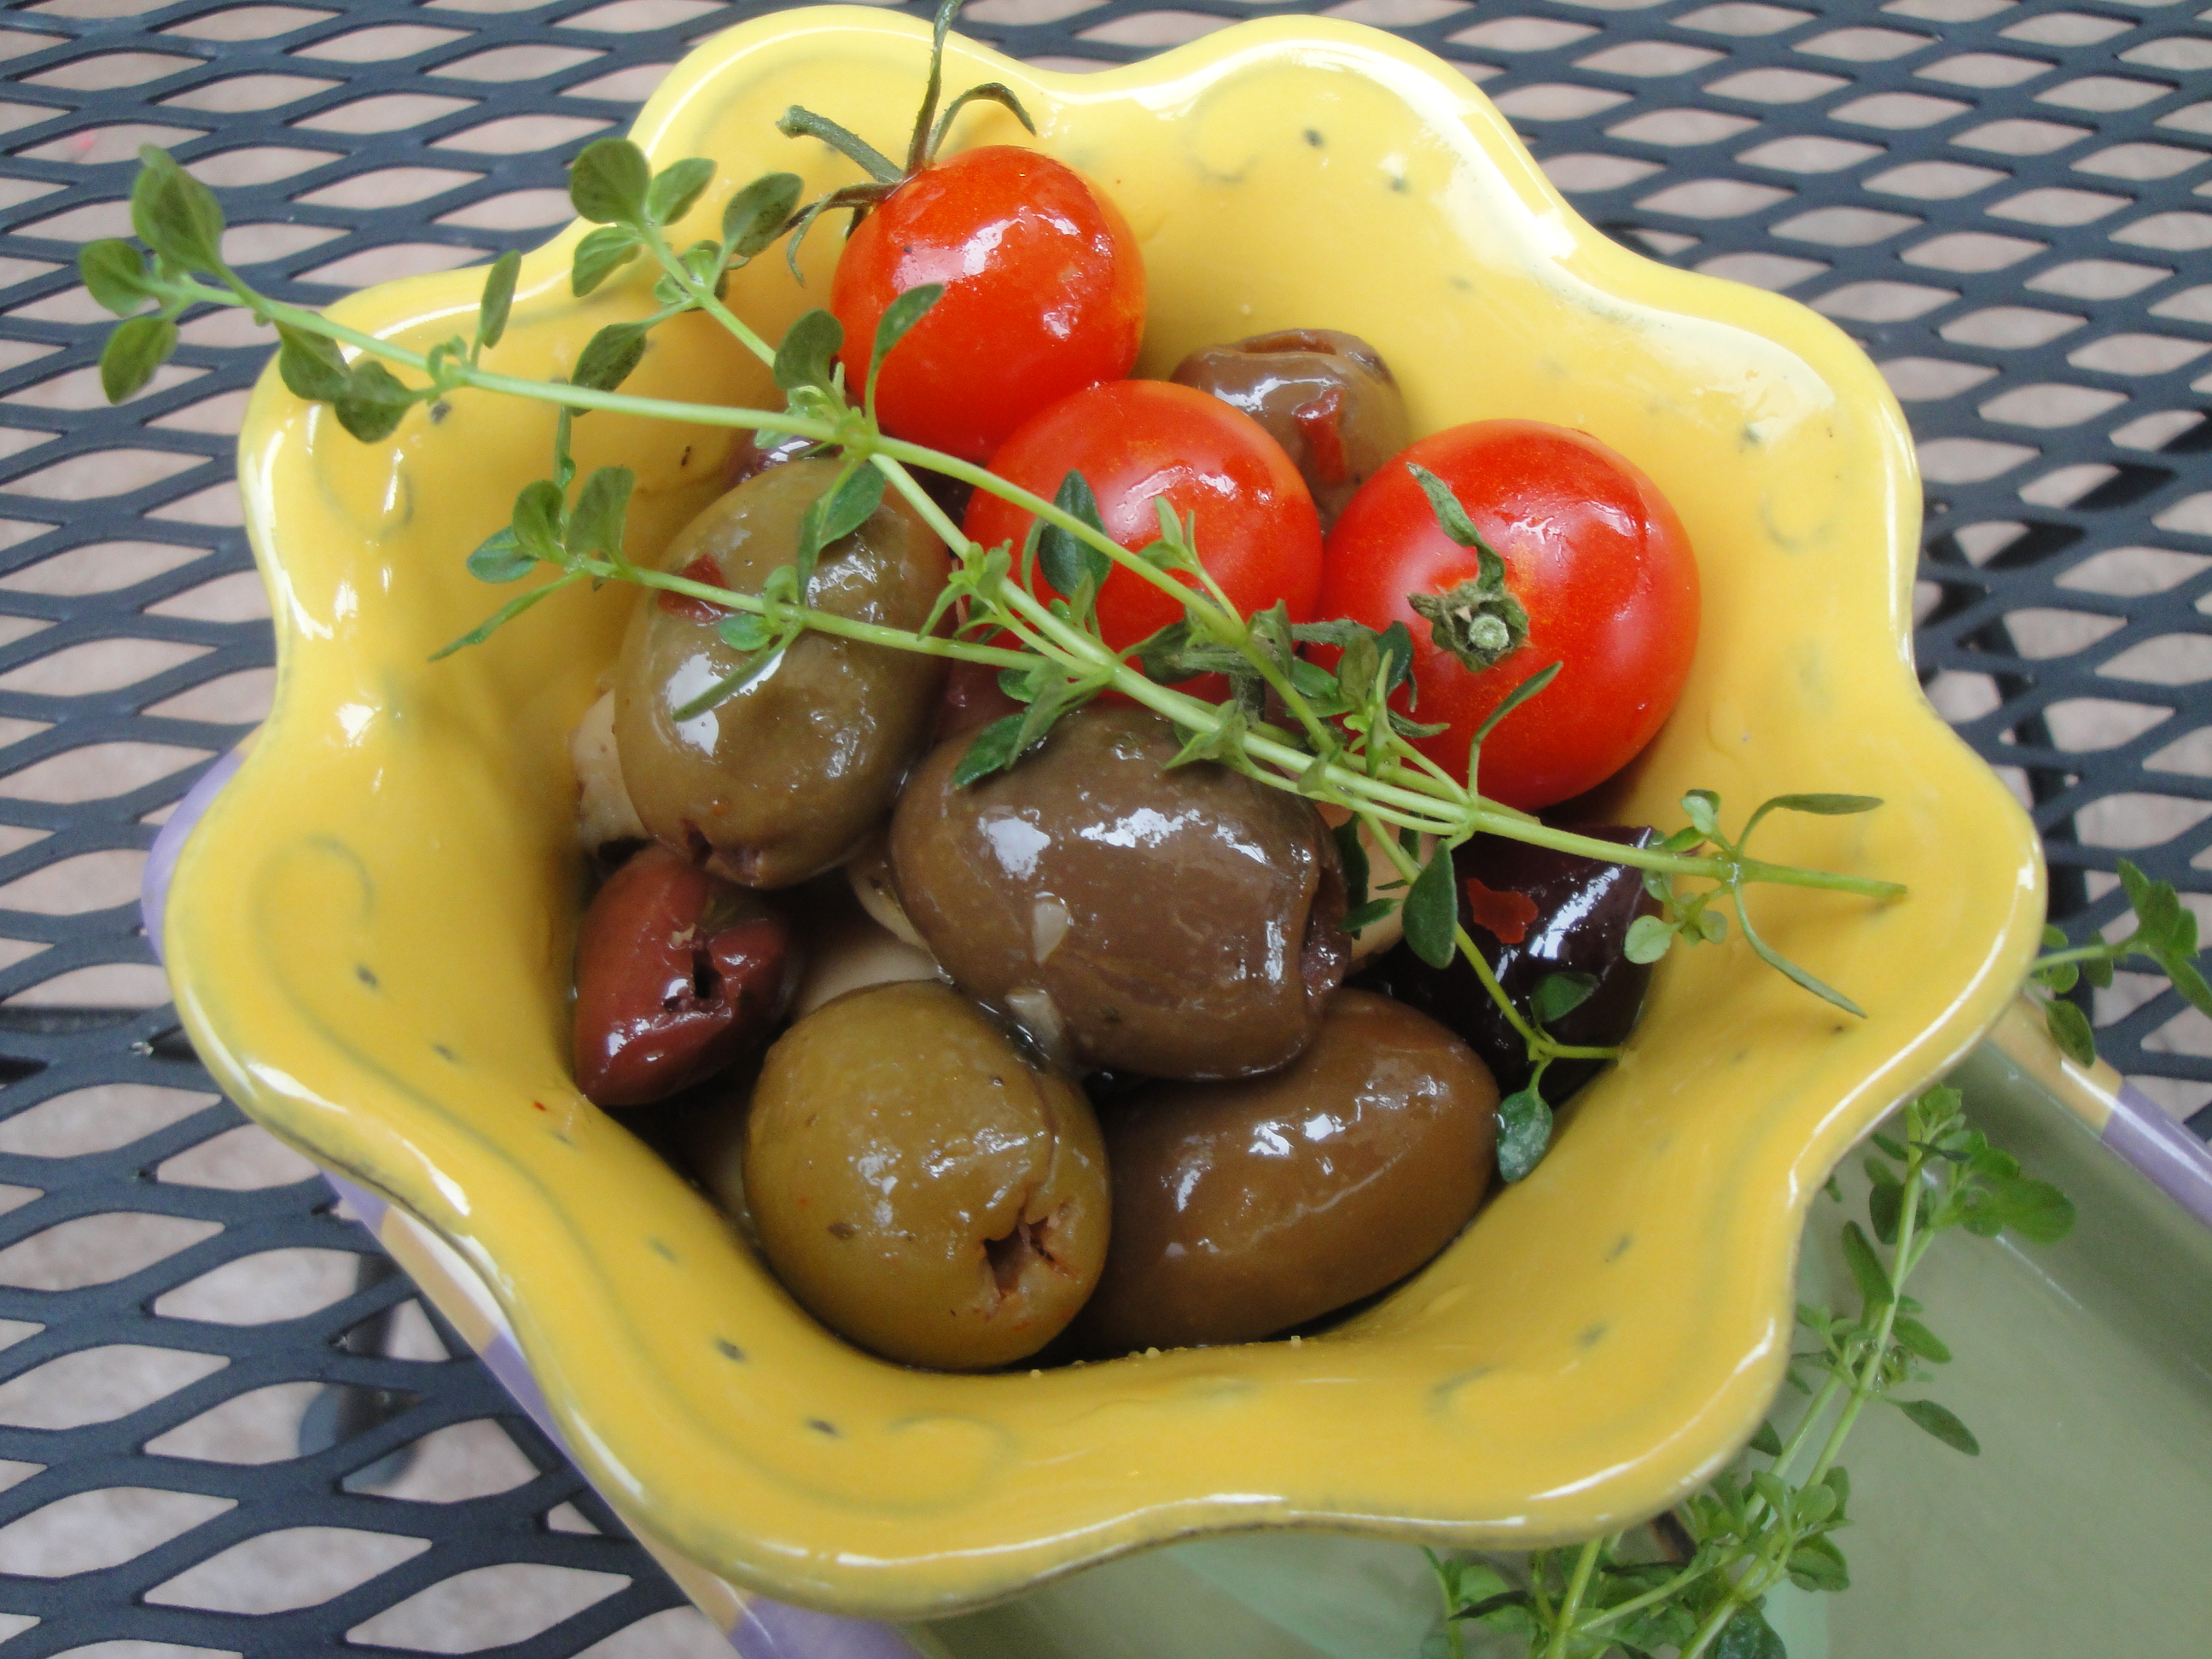
Olives have smell, taste, touch and sight to entice us.
Of course, other senses are at play when it comes to food: the sizzle of bacon as it fries or the feel of silky fuzz on a peach, or the slippery feel of olives (like those in the photo) on your tongue. Lately, I’ve been reading that we might not be fully aware of another one of our senses—smell.
THE NOSE KNOWS
Your nose has more to do with eating than you might think.
Who hasn’t walked through a shopping mall and been enticed by the aroma of cinnamon rolls…or soft pretzels…or chocolate chip cookies—without even seeing them? All the more maddening since they’re not gluten-free! We read about realtors who strategically place aromatic items in for-sale houses to entice potential buyers. Citrus, vanilla, cedar, lavender, or something baking in the oven—such as bread or cookies—is common.
Mireille Guiliano says in her book, French Women Don’t Get Fat, that we really only need 3 bites of a food to satisfy our sense of taste. After that, our taste buds adjust to that particular taste and now we’re just eating mindlessly rather than mindfully. If you practice her approach, portion control automatically kicks in as well—which might be a good thing!
But think of what our sense of smell does for us? The aroma of beef stew cooking on the stove; a chocolate cake in the oven, coffee brewing in the morning, or freshly-popped popcorn. These are just a few of life’s aromatic joys. The Wall Street Journal recently reported that shoppers spend significantly more money in home-décor stores that are scented with pure orange, rather than a blend of orange, basil, and green tea.
TWO SETS OF NOSTRILS?
Apparently, our bodies have two sets of nostrils: the ones on our face and another set at the back of the mouth that leads up to the nasal passage. When you chew food, some of the airborne molecules in your mouth go through this internal nose up to the brain, which processes the odors of what you are eating, according to a Wall Street Journal article “Uncork the Nose’s Secret Powers.” Apparently, if you hold your nose and put chocolate in your mouth, you won’t taste the chocolate! How sad! Imagine life without the joy of chocolate!
The role of smell may also explain why food tastes “off” when we have a cold or sinus infection. If you can’t smell your food, your taste is diminished as well.
Sadly, however, that sense of smell that gives us so much pleasure wanes as we age. In fact, we experience a detectable loss by the time we’re in our thirties, says that same Wall Street Journal. By the time we reach 60, half of us have a reduced sense of smell. By age 80, that figure climbs to three-fourths. Experts think that our sense of smell helps us avoid eating spoiled food, but it may also “warm up” the digestion process and, in the end, help us metabolize and digest our food more efficiently.
HOW TO SHARPEN YOUR SENSE OF SMELL
[1] Place chocolate ice cream and vanilla ice cream, side by side. (For the purpose of scientific research, of course!!) Close your eyes and taste each one. If you can differentiate between the two—without seeing them—your sense of smell is normal.
[2] Or, hold a cotton ball soaked in alcohol just beyond your chin and inhale. If you can’t smell it, your sense of smell is weakened.
[3] People can detect a rose fragrance—or onion or garlic— long after they can no longer detect other smells. Not sure why that is.
[4] Our sense of smell is most acute in humid, rather than dry climates. In fact, it is sharpest when just stepping out of the shower.
[5] When drinking coffee or tea, smell it before drinking it. Do the same with food. Take 3 shallow sniffs rather than one big one—especially if you sample several different things in a short time—so your nose doesn’t get tired. Doing this regularly can enhance your sense of smell over time by sparking different receptors in the nose.
[6] You can train your nose over time. Put small amounts of cinnamon, clove, nutmeg, celery, carrot, pencil shavings (yes you read that correctly—it provides a cedar note) in tiny jars. Each day, sniff them (without peeking) to see if you can identify them. In fact, experts recommend doing this 4 to 6 times a day, but that seems a little excessive to me!!
[7] To taste your food more fully, hold it in your mouth for a few extra seconds and breathe out through your nose so that all of the aromas have to travel through your inner nostrils. (This advice from the new book, Gulp by Mary Roach, which I am just starting to read.)
[8] Finally, avoid cigarette smoke, pollution, cleansers, and paint because they compromise your sense of smell.
As for me, I plan to take more time to actually smell the world around me, including my food. I will continue to enjoy that first cup of coffee in the morning, the smell of cinnamon, chocolate cookies baking in the oven, and the yeasty scent of bread dough. What are your favorite smells?
April 3, 2013
Chocolate Banana Bread (Gluten-Free, with No Sugar Added)
Chocolate bread? Why not! Dense, dark, and chewy, this not-too-sweet bread contains no added sugar.

Gluten-free Chocolate Banana Bread makes a delightful breakfast treat.
The mild sweetness comes from the bananas, fruit juice, and chocolate chips so it is a good start for the day….or anytime!
Think of it as a flatbread, cut it like brownies, and eat it when you want something rewarding, with a bit of fiber from the nuts and dried fruit. And the prune juice or pomegranate juice brings wonderful health benefits as well. As for the chocolate chips? Well, consider them a well-deserved bonus.
As I always say, “there’s no such thing as too much chocolate.” Now, get in the kitchen and try this yummy bread.
Chocolate Banana Bread© (No Sugar Added)
By Carol Fenster
This small, but mighty recipe is very versatile because you can use whatever add-ins you like and vary the fruit juice―both of which are very good for you. Enjoy!!
1 medium ripe banana, mashed
1 large egg, at room temperature
1/2 cup prune juice or pomegranate juice
1/4 cup canola oil
1/2 cup gluten-free flour blend (see below)
1/4 cup unsweetened cocoa powder
1 teaspoon ground cinnamon
1 teaspoon baking powder
1/2 teaspoon baking soda
1/2 teaspoon xanthan gum
1/4 teaspoon salt
Add-ins
1/2 cup gluten-free semi-sweet chocolate chips
1/4 cup each finely chopped nuts, raisins, coconut, and dried cranberries (make sure total equals 1 cup)
*****
[1] Preheat the oven to 350⁰F. Lightly grease an 8-inch square nonstick (gray, not black) pan.
[2] In a medium bowl, beat together the mashed banana, egg, juice, and oil with an electric mixer on low speed until well blended.
[3] With the mixer still on low speed, beat in the flour blend, cocoa, cinnamon, baking powder, baking soda, xanthan gum, and salt until smooth. Stir in the add-ins. The dough may be heavy and dense, depending on the add-ins you use. With a wet spatula, spread the batter evenly in the 8-inch pan.
[4] Bake until a toothpick inserted into the center comes out clean (or with only a bit of melted chocolate on it), about 25 to 35 minutes. Cool on a wire rack, cut into 16 squares, and eat slightly warm, while the chocolate chips are gooey. Makes 16 squares.
Gluten-Free Flour Blend
1 ½ cups sorghum flour or brown rice flour
1 ½ cups potato starch (not potato flour)
1 cup tapioca flour (also called tapioca starch)
Whisk the ingredients together and store, tightly covered, in a dark, dry place.
March 25, 2013
Grain-Free Orange Cake with Chocolate Sauce

Grain-Free Orange Cake with Chocolate Sauce
There are a number of special occasions just around the corner— Easter, Passover, Seder, and then in a month or so, Mother’s Day, graduations and so on— at which many of us will either host or be a guest at a meal in which the dessert needs to be grain-free, leavening-free, dairy-free, and gluten-free.
I have the perfect dessert for this occasion―a flourless cake made with almond meal and sweetened with orange marmalade. This cake turns out moist and flavorful and—when garnished with a drizzle of chocolate sauce—reassures those with food sensitivities or special diets that it is possible to “have your cake and eat it, too!”
There is a great deal of interest these days in grain-free baking, partly due to the Paleo diet and right now, to the Jewish holidays. Other people simply feel better when they avoid grains. In this case, almond meal (or other nut meals made from pecans, walnuts, or hazelnuts) is perfect for baking. It can also be called almond flour; if you can’t find it, grind 2 cups of blanched almonds in the food processor to make almond meal. If the almonds are whole, the skins will make the cake darker in color and not as pretty so it’s better to use blanched or slivered almonds, which have the skins removed.
To garnish it, I dust the cake with powdered sugar and eat it plain or garnish it with a drizzle of your favorite store-bought chocolate sauce/syrup, with some pretty raspberries and fresh mint for garnish. It is so moist that it keeps very well on the countertop for a couple of days, although this is dangerous since you will find yourself grabbing a slice throughout the day as you walk by. Trust me….it is irresistible.
Grain-Free Orange Cake with Chocolate Sauce
Adapted from 1,000 Gluten-Free Recipes by Carol Fenster (Wiley, 2008)
This is the perfect dessert for those occasions where guests have a variety of special diets; it’s fail-proof, gorgeous, and delicious. You can even bake it ahead of time, freeze (tightly wrapped) and thaw on the countertop before serving at room temperature.
1 ¼ cups store-bought orange marmalade
2 cups almond meal
¼ cup packed light brown sugar
1 teaspoon xanthan gum
5 large whole eggs, at room temperature
1 teaspoon pure vanilla extract
½ teaspoon salt (optional)
4 tablespoons powdered sugar, for dusting
Store-bought Chocolate sauce, fresh mint leaves, and fresh raspberries, for garnish
[1] Place a rack in the middle of the oven. Preheat the oven to 350⁰F. Generously grease an 8-inch nonstick (gray, not black) springform pan and line it with parchment paper. Grease again; set aside.
[2] In a food processor, process the marmalade, almond meal, brown sugar, xanthan gum, eggs, vanilla, and salt (if using) for 30 to 40 seconds. Scrape down the sides with a spatula, and blend again 30 to 40 seconds or until all the ingredients are thoroughly blended. Spread evenly in the prepared pan.
[3] Bake until a toothpick inserted into the center of the cake comes out clean, about 35 to 40 minutes. Cover with foil during the last 20 minutes of baking to avoid overbrowning, if necessary. Cool the cake in the pan 10 minutes on a wire rack. Gently run a sharp knife around the edge of the pan to loosen the cake. Remove outer rim. Cool the cake completely on the wire rack. Invert onto a serving plate and remove parchment paper. Serve with a dusting of powdered sugar, chocolate sauce, fresh mint, and fresh raspberries.
March 18, 2013
Butternut Squash Soup for a Healthy Gluten-Free Winter Soup
When it comes to vegetables, butternut squash may not be at the top of your list. It certainly wasn’t on mine until recently.

Gluten-Free Butternut Squash Soup for a Mediterranean diet
But it’s time that you become familiar with it because it is not only a nutritional powerhouse; it’s amazingly versatile in terms of how you can spice it up—without a hint of any squash taste whatsoever!
March is National Nutrition Month and a good time to try some new soups while the weather is still chilly, at least here in Colorado where March is one of our snowiest months. Nightly temperatures drop below freezing, making a tasty soup the perfect dish. And, we’ve had some of our biggest storms in March (including 4-foot snowstorms) so there’s still plenty of winter left here in the Rockies!!
Butternut Squash Soup is just perfect for upping your daily vegetable intake (I aim for 2 ½ cups a day, but daily quotas vary by gender and age). it is a member of the squash family and is thought of as a winter squash—related to acorn, spaghetti, and pumpkin squashes— although it is available year-round in frozen form. I buy mine in the grocery store in frozen boxes or Whole Foods Market 365 brand in 1-pound bags, which saves considerable time instead of peeling, chopping—especially the Whole Foods brand where the cubes of squash are individually frozen and don’t have to pried apart as with the boxed variety. This makes them easier to roast (perhaps for a risotto?), but back to the soup idea.
According to Dr. Andrew Weil, butternut squash is a rich source of vitamin A. Just a cup of baked flesh provides 214 percent of the daily value for this vital nutrient. Also, many of the butternut squash’s carbohydrates come from pectins that appear to have antioxidant, anti-inflammatory and insulin-regulating properties. Check out Dr. Weil’s Anti-Inflammatory Diet to see other recommended vegetables.
Plus, recent research reported in the Wall Street Journal shows that a Mediterranean diet that emphasizes vegetables — along with olive oil, tree nuts and peanuts, fruits, fish, legumes and wine — cuts the risk of stroke and cardiovascular problems among high-risk people by 30 percent. So, Butternut Squash Soup fits right in with this plan.
Another reason I like butternut squash is that its mild nutty flavor lends itself to so many herbs and spices. As you know, I lean toward flavorful foods and this soup has a lot of flavor coming from mustard, nutmeg, cumin, coriander, and a little heat from the red pepper flakes. It is also very pretty and colorful, which I think is important since we eat with our eyes. Here in the Southwest, we put chiles in everything—hence the Chipotle Cream. But if chipotle isn’t to your liking, omit the cream and just sprinkle a few chives on your soup.
Butternut Squash Soup with Chipotle Cream
Reprinted with permission from 125 Gluten-Free Vegetarian Recipes by Carol Fenster (Avery/Penguin Group, 2011)
Apple juice provides just the right touch of sweetness to balance the spices in this vibrant soup. Its rich, orange color and the drizzle of Chipotle Cream and a sprinkle of chives make it look so elegant. It’s also vegetarian/vegan.
2 cups apple juice
24 ounces frozen butternut squash
1 large onion, chopped
2 large garlic clove, minced
1 tablespoon canola oil
2 teaspoons ground coriander
1 teaspoon ground cumin
1 teaspoon ground mustard
1/4 teaspoon freshly grated nutmeg
1/2 teaspoon sea salt
1/4 teaspoon crushed red pepper flakes
1 tablespoon lemon juice
2 tablespoons chopped fresh chives or parsley, for garnish, or parsley
CHIPOTLE CREAM
1/4 cup low-fat mayonnaise or vegan mayonnaise
1/4 cup low-fat sour cream or vegan sour cream
2 tablespoons lime juice
1/4 teaspoon agave nectar
1/8 teaspoon chipotle chile powder
[1] In a large pot, combine all of the soup ingredients except the lemon juice and chives. Bring to a boil; reduce the heat to low and simmer, covered, 30 minutes. Stir the mixture occasionally to break up the frozen chunks of squash.
[2] While the soup simmers, make the Chipotle Cream: In a small bowl, whisk together the mayonnaise, sour cream, lime juice, agave nectar, and chipotle chile powder. Set aside.
[3] With a handheld immersion blender, puree the soup until very smooth. If it seems too thick, thin with some hot water to desired consistency. It will thicken up as it cools. Stir in the lemon juice and serve hot, garnished with chives and a drizzle of Chipotle Cream. Refrigerate any leftover cream, tightly covered, for a week. Serves 4
March 4, 2013
Cream of Broccoli Soup for March as National Nutrition Month
Here in snowy Colorado we weathered last week’s back-to-back snowstorms and frigid temperatures and now it is snowing again.  This gets me in the mood for soup.
But not just any soup. Since March is National Nutrition Month, I want a really healthy soup, one chock-full of vegetables so I can reach my daily goal of 2 ½ cups of veggies per day. (That amount varies with gender and age.)
Broccoli comes to mind. What better way to warm the soul this winter and eat more vegetables than a creamy, soul-satisfying Broccoli Soup. Even if you’re not a broccoli fan, this soup might change your mind because cooking it as soup mellows the flavor. I like to serve it with a slice of gluten-free Cornbread, hot from the oven.
Broccoli has a lot going for it. It is an excellent source of vitamins A, C and K and according to Dr. Andrew Weil, it has unique anti-inflammatory benefits. Personally, I’m trying to eat more anti-inflammatory foods and so broccoli is a good choice. If you’re not familiar with the Anti-Inflammatory Diet, it is a very healthy way to eat.
Plus, recent research reported in the Wall Street Journal shows that a Mediterranean diet that emphasizes vegetables — along with olive oil, tree nuts and peanuts, fruits, fish, legumes and wine — cuts the risk of stroke and cardiovascular problems among high-risk people by 30 percent. So, creamy Broccoli Soup fits right in this plan.
How do I get this soup to be so creamy and thick? One of the easiest and most effective ways is to simply cook a little chopped raw white potato along with the vegetables. Rather than use a thickener such as cornstarch, the starch from the potatoes thickens this soup nicely, without changing its flavor or color. And, just one serving gives me one-half cup of broccoli, or 20% of my daily quota. What a delicious, healthy way to work toward my goal.
Cream of Broccoli Soup
Adapted with permission from 125 Gluten-Free Vegetarian Recipes (Avery/Penguin Group, 2011)
A lovely shade of light green, this soup packs a wallop of nutrients from broccoli and the nutmeg lends a subtle, but welcome flavor. The raw potato and coconut milk lend creaminess. The soup is vegan, but you can sprinkle a bit of crumbled cooked bacon or prosciutto on top for the meat-eaters in your family.
Serves 6; Makes 8 cups
2 tablespoons butter or buttery spread or olive oil
1 large shallot, finely chopped
2 whole garlic cloves, minced
1/2 cup Russet potato, peeled and chopped
1 bunch broccoli, about 3 cups (can use stems, too)
6 cups GF chicken or vegetable broth
1/2 teaspoon salt
1/4 teaspoon freshly ground black pepper
1/2 cup cream or canned coconut milk or milk of choice
1/8 teaspoon freshly ground nutmeg
2 tablespoons fresh lemon juice
Salt and freshly ground black pepper to taste
Fresh chopped parsley or chives, for garnish
Dash of paprika, for garnish
[1] In a large pot, melt the butter over medium heat and cook the shallots until tender, about 2 to 3 minutes. Add the garlic and potato and toss to coat with butter. Add the broccoli, broth, salt, and pepper and bring to a boil. Reduce the heat to low and cook, covered, until the potato and broccoli are tender, about 15 to 20 minutes.
[2] Place half of the soup in a blender, add half of the cream, and puree in a blender or food processor until very smooth. Repeat with remaining soup and cream. Return the soup to the pot and add nutmeg, lemon juice, and more salt and pepper, if desired. (Or, use an immersion blender to puree the soup.) Bring to serving temperature over medium heat, stirring constantly. Serve hot, garnished with a sprinkle of parsley or chives and a dash of paprika (and a dollop or sour cream, if you wish).
February 25, 2013
Heavenly Dark Chocolate-Peanut Butter Cookies
If you are a chocoholic, you will love my February blogs… all on chocolate!

Gluten-Free Chocolate-Peanut Butter Cookies
At this point, I could remind you of the wonderful things dark chocolate does for us, but I’m not going to. Instead, I give you permission to eat dark chocolate simply for your sheer enjoyment. And, that’s a good enough reason right there!
Another nice thing about this recipe is that it only takes one kind of flour (rather than a blend) and it gives you a chance to try different gluten-free flours. Instead of sorghum or brown rice, perhaps the same amount of whole grain flours such as amaranth, buckwheat, or millet flour instead. The deep chocolate flavor will mask these stronger-flavored flours, yet you will get their nutrient benefits.
But let’s take it one more step. Is there any better combination than chocolate AND peanut butter? Well, maybe….but this blissful combination is my focus today.
Dark Chocolate-Peanut Butter Cookies©
by Carol Fenster
You can freeze some of the balls of dough for later baking when the chocolate urge strikes.
20 ounces bittersweet chocolate chips (at least 60% cocoa), divided
3 tablespoons butter or buttery spread
2 tablespoons creamy peanut butter
3 large eggs
1 cup sugar
1 teaspoon pure vanilla extract
½ cup sorghum flour or brown rice flour
¼ teaspoon baking soda
¼ teaspoon xanthan gum
¼ teaspoon salt
1 cup finely chopped walnuts
[1] In medium microwave-safe bowl, heat 8 ounces (1 heaping cup) of chocolate chips, butter, and peanut butter on Low power in microwave oven 1 to 2 minutes, or until melted. Stir; set aside to cool.
[2] In large bowl, beat eggs, sugar, vanilla, flour, baking soda, xanthan gum, and salt with electric mixer on low speed until very well blended. Beat in melted chocolate mixture until no flour streaks remain. Stir in walnuts and remaining chocolate chips. Dough will be soft. Refrigerate, covered, 2 hours.
[3] Preheat oven to 375°F. Line 15×10-inch baking sheet (not nonstick) with parchment paper. Shape dough into 48 walnut-sized balls and place 12 balls, at least 1 ½-inches apart, on sheet.
[4] Bake just until cookies are shiny and crust starts to crack, about 10 to 12 minutes. Do not overbake. Cool cookies 2 minutes on baking sheet, then transfer to wire rack to cool completely. Repeat with remaining dough. Or, freeze balls up to 1 month and bake later. Makes 48 cookies
A Health Note from Carol
To get serious for a moment, aside from the important benefits of dark chocolate that we hear about, the walnuts in this cookie are important too. According to Dr. Andrew Weil, they are natural sources of omega-3 fatty acids, essential fats that promote cardiovascular health, help maintain optimal cognitive function, and tone down inflammation. They also contain heart-healthy monounsaturated fats and ellagic acid, an antioxidant compound that helps support a healthy immune system and protect against cancer, as well as L-arginine, an essential amino acid that promotes healthy blood pressure. And, new research released this week touts the benefits of walnuts in the Mediterranean diet. While chopped peanuts are also a healthy choice, I like the taste of the walnuts. So, there you have it. Many reasons to eat these delicious cookies!