Carol Fenster's Blog, page 22
July 23, 2013
Enjoying and Preserving Fresh Herbs
HERBS ARE A GOOD THING; WHY IT’S IMPORTANT TO PRESERVE THEM
You all know that I love my herb garden. And for good reason. Herbs add flavor to our food—no matter what diet you follow, gluten-free, Paleo, vegetarian, low-fat or whatever.

Two types of sage grow in Carol Fenster's herb garden.
They can be used decoratively in floral arrangements as well as food garnishes and they also have medicinal qualities (e.g., sage tea for sore throats or thyme tea for respiratory congestion)
A package of fresh herbs costs about $3 (or more if organic), yet most recipes don’t use the whole package. Leftover herbs are often thrown away after wilting in the fridge—or our over-abundant garden produces too much to use up at one time.
So, preserving those precious fresh herbs saves money and makes them available to us throughout the year, whenever we want. Here are my tips:
GROWING AND HARVESTING YOUR OWN HERBS FOR MAXIMUM YIELD
Follow directions for your zone and fertilize accordingly. Location (in relation to the sun) is critical. Some herbs, such as rosemary, need sun while others, such as basil, can’t tolerate too much. Where I put my plants in relation to the shade and time of day is critical to how well they fare throughout the summer, so experiment to find the best place for yours.
Pinch new growth regularly— just above a node or joint in the stem—to maintain a healthy, bushy plant. Remove any withered or yellowed growth.
Water according to what the plant needs; some can tolerate drier soil while others like it wetter. Read the directions that came with the herb plant or look it up in a gardening book or the Internet.
STORING FRESH HERBS

Parsley is a healthy garnish and a delicious herb.
When you pick a whole bunch of herbs from your garden or buy a lot at the Farmer’s Market, store them properly to prolong their freshness. Store fresh herbs with cut ends in a glass of water in fridge OR wrapped loosely in a damp paper towel in a plastic bag. Leave the end of the plastic bag unsealed to allow for some air circulation. When they start to look wilted, it’s time to preserve them before they’re no longer usable.
PRESERVING FRESH HERBS WITH A MICROWAVE OVEN
There are many ways to dry herbs, such as hanging a bunch by the stems (covered by paper bag) in a dry place for a few days (this works especially well for sage). My favorite method is much quicker.
[1] Wash and pat the herbs with a paper towel to remove excess moisture. Discard any mushy or wilted parts.
[2] Place the herb sprigs in a single layer on a paper towel-lined, microwave-safe plate. Microwave on High power for 2 to 3 minutes, in 1-minute increments. Check after each 1-minute increment; they should be completely dry and brittle. If there is any moisture, they could mold during storage. The exact time to dry them will vary by the amount of moisture in the herbs and your microwave.
[3] Strip off the leaves with your fingers and discard stems, which can be tough and woody. Last year, I failed to remove all of the thyme stems and now I have to pick them out by hand from the dried leaves.
[4] Place the dried herbs in airtight glass jars with tight-fitting lids, not plastics or metals. Be sure to clearly label each herb. Glass spice jars work especially well for this purpose. Store these jars in a dark, dry place without sunlight so moisture doesn’t build up inside and cause them to spoil.
FREEZING FRESH HERBS

Dill is perfect for salads, pickles, and entrees.
Some herbs―especially soft herbs that hold a lot of moisture such as basil, lemon balm, chives, cilantro, dill, mint, and parsley―freeze well in plastic freezer bags for up to six months. Rinse them first and pat as dry as possible, then place in the bags. They will look a little bruised when thawed—and they must be used in cooked dishes (e.g., in soups, stews, casseroles, etc.) and won’t look nice in fresh foods like salads since they will be mushy—but their flavor is still intact and they retain all of their health benefits. In fact, I routinely freeze parsley and save considerable time later by not having to chop it up; it’s just waiting for me in the freezer. And, it keeps its color fairly well, too. Plus, I save money because it doesn’t go to waste.


July 15, 2013
Grilled Fruit for Easy Summer Desserts

Pears, plums, peaches, nectarines, and figs are perfect for grilling.
Usually, I prefer something baked (preferably chocolate) for dessert. But when summer arrives, I love to grill fruit. Naturally gluten-free, grilled fruit is a fantastic way to enjoy the seasonal bounty of Colorado. With Farmer’s Markets in full swing right now, grilling local fruit is a delicious way to support local businesses.
Why does grilled fruit taste so good?
Fruit is basically made up of water and sugar. Grilling concentrates the flavors by reducing the water and caramelizing the natural sugars. Plus, the flavor of food is heightened when it is warm. Amazingly simple, grilled fruit is a fuss-free way to entertain, too. Your guests can be a part of the action as you prepare dessert right before their eyes!
The added benefit is that it just seems natural to grill fruit when the barbecue grill is already hot from cooking dinner. And, in the heat of summer you don’t have to turn on your kitchen oven.
WHICH FRUITS SHOULD YOU GRILL?

Grilled peaches make wonderful desserts.
Pears, plums, peaches, and nectarines work especially (and figs―when they are in season― I wish they grew here in Colorado, but we are famous for our Colorado peaches) because they are soft, cook quickly, and have a nice texture when warmed. Plus, fruit for dessert gets us that much closer to our daily quota (5 to 9 servings, depending on age and gender) of fruits and vegetables.
Simple Grilled Fruit
The nice thing about grilled fruit is that you can grill any amount you like. Generally, two pieces of fruit per person is considered a serving—such as two figs or two apricots. For larger fruits, such as peaches and nectarines, one fruit per person may be enough. You be the judge!
Ripe, but firm fruit (pears, peaches, plums, figs, or nectarines)
Mascarpone cheese, cream cheese, or cream cheese alternative, slightly softened (about 1 tablespoon per person)
Canola oil, for brushing
Honey, for drizzling (about 2 tablespoons per person)
Ground cinnamon, nutmeg, or mace (optional)
Fresh mint leaves, for garnish (optional)
[1] Make sure cooking grate is clean and well-oiled. Prepare grill to medium heat (you can hold your hand an inch over the cooking grate for 2 to 3 seconds). Halve fruit; remove core or seed and place cut-side up on cutting board or tray. Brush with light, neutral-flavored oil such as canola.
[2] Using tongs, place fruit, cut-side down, on heated grill. Close the lid and cook until grill-marked and heated through, about 5 to 10 minutes (actual time varies by type and size of fruit and the heat of your grill so watch closely so you don’t burn them). Halfway through cooking, use tongs to turn fruit by 90 degrees to make pretty cross-hatch grill marks. Carefully remove fruit from heat and place on serving plate. For shinier fruit, brush immediately with more oil or honey. Top each half with tablespoon of mascarpone or cream cheese or sour cream, then drizzle with honey, sprinkle with cinnamon, and garnish with sprig of mint. Or, set everything out and let guests assemble their own desserts. Serve warm for best flavor.
Tips from Carol
[1] Serve grilled fruit over vanilla ice cream with crisp gluten-free cookie for nice texture contrast. Sherbet or martini glasses make pretty serving dishes.
[2] Serve grilled fruit on slices of Boar’s Head blue cheese, chunks of feta cheese, or slices of Parmesan or Swiss cheese for savory contrast.
[3] Arrange grilled fruit on tray (as in photo) and let guests choose from an array of toppings, such as cheeses, yogurt, whipped topping, honey, etc.
[4] The larger and denser the fruit, the longer it takes to cook. Figs cook quickly because they are small and porous; pears take the longest because they are bigger and denser. Peaches, plums, and nectarines are somewhere in between. Check doneness of fruit during grilling by inserting toothpick from side (rather than stabbing with fork) so you don’t mar or squash fruit.
July 10, 2013
Pie Crust 101 Video
Carol Fenster demonstrates how to make a gluten-free cherry pie.
July 9, 2013
Homemade Dill Pickles (1-day pickles without the “canning fuss”)
Summer’s garden bounty is in full-swing and Farmer’s Markets are bursting at the seams with lovely fresh produce. I always buy far more than I need, but I just can’t resist.
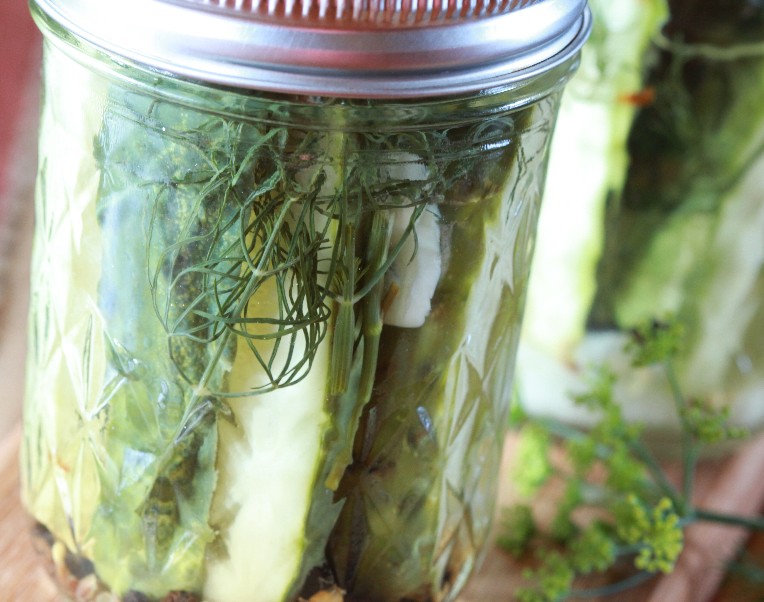
Homemade Dill Pickles are gluten-free and don't require canning equipment.
One of the vegetables that beckons to me is small, Kirby cucumbers—just right for pickling. But the thought of hauling out all of the usual canning equipment to make pickles does not excite me at all.
Instead, I make my dill pickles the quick way—overnight—brining in the fridge. One taste and you’re hooked: the flavor is fresh and “dilly” but lower in sodium because you control the salt. The dill spears are crisp and crunchy. Even the grandkids love these pickles and they’re tough customers!
Here is the easy recipe for these delicious pickles, which keep for about a week in the fridge. Don’t worry, they won’t last that long!
HOMEMADE DILL PICKLES
For best results, use the small, Kirby cucumbers for this recipe —they fit more easily in small jars. I prefer fresh dill from my backyard herb garden, but you can use dill seed.
3 small pickling (Kirby) cucumbers
½ teaspoon black peppercorns
½ teaspoon mustard seeds
2 sprigs (about ½ ounce) fresh dill (or ½ teaspoon dill seed)
2 garlic cloves, peeled and thinly sliced
¼ small onion, sliced
1 cup water
¾ cup white wine vinegar
¼ teaspoon salt
¼ teaspoon sugar
[1] Wash and quarter the cucumbers lengthwise into spears and divide evenly between two 8-ounce jars with lids. Divide the peppercorns, mustard seeds, dill, garlic, and onion evenly between the jars.
[2] In a small saucepan,bring the water, vinegar, salt, and sugar to a boil, Stir until the sugar and salt are dissolved and then divide evenly between the two jars. Cover and refrigerate overnight. Keeps for 1 week, refrigerated. Makes 12 pickles.
Per pickle: 16 Calories ; 0g Fat; 0g Sat Fat; 1g Protein;1g Fiber;4g Carbohydrates; 48mg Sodium; 0mg Cholesterol
June 27, 2013
Making Gluten-Free Bread and Pie at Bob’s Red Mill Cooking School
Once again, my friends at Bob’s Red Mill invited me to teach two cooking classes on bread and pie at the Bob’s Red Mill Cooking School.

Carol with Bob Moore at Bob's Red Mill
That’s Bob and me standing in his memorabilia-filled office. He gave me a personal tour of their gluten-free manufacturing plant which continues to grow and serve us better and better. Thanks, Bob!
PIECRUST
Handling gluten-free piecrust can be challenging, but my super-easy recipe rolls out beautifully and is no-fail, no matter what. From one simple crust recipe, we made Chicken Potpie, Quiche, ice cream pie, and the highlight of the evening—old-fashioned cherry pie. It was a hit! Most of these recipes are on this blog (just use the search box) or in my book, 1,000 Gluten-Free Recipes.

Gluten-Free Cherry Pie
Here are some of the tips I shared:
[1] Use a food processor for quick, thorough blending. It works better than an electric mixer. Be sure to use sweet rice flour, as the recipe calls for. It’s the secret to the suppleness and pliability.
[2] Roll the dough between sheets of plastic wrap (not foil or parchment paper), anchored on the bottom by a wet paper towel. The suppleness of the plastic wrap prevents the crust from cracking as you transfer it from countertop to pie pan.
[3] Freeze the dough in 1-inch disks (2 per recipe) and thaw in the fridge the night before you make pies. For best results, bake pies in the morning or early afternoon for serving that night.
[4] Set aside time to make several batches of piecrust dough for future use. Roll the dough to a 10-inch circle between two sheets of plastic wrap. Then freeze the rolled-out crusts (plastic wrap and all) in a gallon-size freezer bag. The day before you plan to make pies, thaw them in the fridge, still in the bag. Or, shape a single-crust in a pie pan, freeze (tightly wrapped) and you’re ready to make quiche, one of my favorite ways to use piecrust.
[5] Gluten-free piecrust dough rolls best when you massage it in your hands until it is the same temperature as your hands. Unlike regular piecrust, ours works better when warm rather than cold.
YEAST BREADS
The breads we focused on included French Baguettes, Focaccia, Pizza, Breadsticks, and a sweet Chocolate Berry Breakfast Pizza that blends chocolate and berries. Yummm!!
[1] Cold-Oven: The cold-oven method only works with narrow shapes (such as baguettes or breadsticks), or thin breads (such as pizza). Basically, you prepare the dough and shape it on the pan and then put it in the oven, starting the heat and the timer at that time (without preheating the oven). The dough rises as the oven preheats and then bakes when the oven reaches full temperature. The crust dries slightly as it rises (a good thing in French breads, baguettes and breadsticks) and can be ready in about 40 minutes, including making the dough and baking. (Loaf breads and Focaccia don’t work with this technique; they are too thick and dense.)
Not all ovens are appropriate for this technique (e.g., quick/fast pre-heat ovens cannot be used for this method). Try the method once in your own oven; if the bread won’t rise or burns quickly you know you have to use the traditional method of bread-baking next time.
[2] Refrigerating Bread Dough. My marvelous colleagues, Susan Gilbertson and Lori Sobelson from Bob’s Red Mill, helped immensely and Susan made our pizza dough the day before so we could demonstrate this method. Many chefs make and then refrigerate bread dough for up to 3 days before baking.This means you can make dough on the weekend and bake it when you want later in the week. Gluten-free dough is easier to shape when cold (less sticky).

Refrigerate bread dough for better taste and texture
The benefits of refrigeration are: [1] better taste, since enzymes work together during refrigeration to produce a more complex flavor, and [2] better texture, since these same enzymes produce a texture more like the “normal” bread texture with irregular holes (rather than the cake-like texture we often see in gluten-free breads). When entertaining, I make dough the night before or the morning of a dinner party and that gives me more time right before a party when preparations can be hectic.
[3] Baking ahead. The third technique requires planning ahead. Certain breads (e.g., pizza) are well-suited to this technique. Bake the pizza crust on the bottom rack of the oven (as directed in the recipe), then (instead of topping it) bake it on the middle rack just until it is lightly browned all over, about 15 minutes. Remove the crust from the oven and cool completely on a wire rack. Freeze, tightly wrapped, for up to 1 month. You have a ready-to-bake pizza crust, much like the Boboli shells we once ate.

Gluten-free Pizza Ready to Bake
Then ―when you are ready to eat pizza―unwrap the crust and place it on the pizza pan. It will thaw while you prepare the toppings. For best results, have toppings, sauce, and cheese at room temperature. If you are using vegetables (as we did in class) have them microwaved or sautéed so they are no longer crunchy because the pizza only needs to bake as long it takes to melt the cheese and reach serving temperature. By the way, for the dairy-free students we used Daiya cheese and it tasted great.
So there you have it! Tips for two favorite gluten-free food: bread and pie. Now, get in the kitchen and start baking!
June 17, 2013
Spurtles, Pinheads, and Scotland
Confused by the title of today’s blog? Let me explain: A spurtle is a wooden stick used to stir porridge; pinhead is a Scottish term for steel-cut oats. As for Scotland: how would you like to have a free, all-expense paid trip to that marvelous country, plus $2500 spending money—courtesy of Bob’s Red Mill?
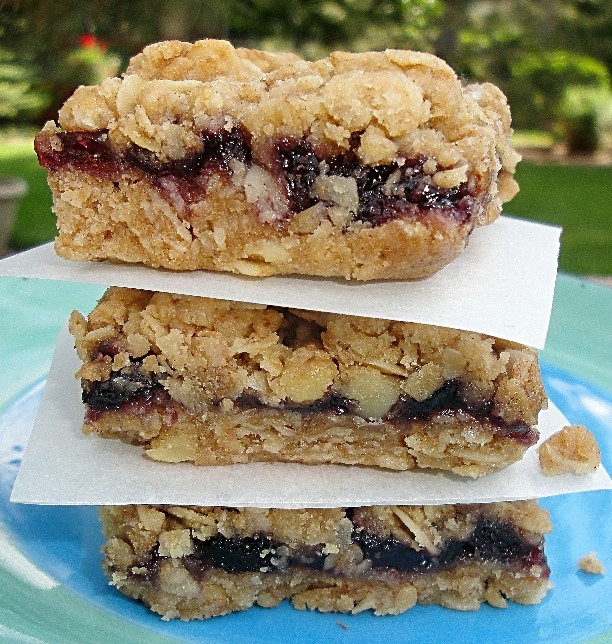
Oat bars use gluten-free oats from Bob's Red Mill
All you have to do is enter the Bob’s Red Mill contest called “Spar for the Spurtle” and be the winner. You have to use Bob’s Red Mill Steel-Cut Oats, and since there is a gluten-free version of these hearty oats, there’s no reason why a gluten-free recipe can’t win.
The details are here at Spar for the Spurtle Rules but basically you submit a recipe and video by July 22, 2013. If selected, you compete at Bob’s Red Mill headquarters in Milwaukie, OR for the chance to represent them at the Annual Golden Spurtle World Porridge Making Championship this fall in Scotland. By the way, I’ve been to Scotland and it is fabulous so I know you will like it!
Why do I care about oats or this contest? I have no financial interest in the outcome of this contest, but I would love to see a gluten-free winner. I grew up eating oatmeal every morning for breakfast. Yes— Every. Single. Morning. Fortunately, I love oats!
For a long time, oats were off-limits for gluten-free folks. That’s because—while oats are inherently gluten-free—they were contaminated by wheat in the field and manufacturing plant. But now Bob’s Red Mill (and several other gluten-free companies in North America) offers a full range of gluten-free oat products—including gluten-free steel cut oats—so we can indulge in this important whole grain. The Whole Grains Council suggests 3 to 5 daily servings of whole grains and oats qualify as a whole grain. It only takes one-half cup to equal a serving, by the way.
Matthew Cox, marketing director for Bob’s Red Mill, won the Annual Golden Spurtle World Porridge Making Championship in Scotland in 2009 with his Oregon Orchard Oat Brulee and it is absolutely delicious. In 2012, Laurie Figone represented Bob’s Red Mill at this International event with her Italian Pinhead Torta. Although Bob’s Red Mill didn’t bring home the spurtle last year, Laurie’s dish was a creative, delicious way to use oats in a “non-breakfast” way.
There are many ways to get steel-cut oats into your diet, whether you enter the contest or not.
Make it your goal to get more oats into your diet. Here are some ideas to get you started.
[1] Add uncooked oats to smoothies as a thickener
[2] Add cooked oats to soups and stews as a thickener
[3] Use cooked oats in muffins, quick breads, and yeast breads
[4] Use it in casseroles, as did last year’s winner Laurie Figone with her
[5] Use oat flour as part of your flour blend in breads, muffins, quick breads, bars, and cookies; grind your own from steel cut oats with a small coffee or spice grinder
[6] Replace mashed potatoes with cooked oats as a base for gravy, sauces, and eggs
[7] Make pilaf from oats rather than rice
[8] Make oats the basis for dessert such as these Blueberry Walnut Oat Bars
June 4, 2013
GfreeCuisine.Com Offers Gluten-Free Menu Planning & Grocery Lists
“What’s for dinner?”
When the authors of RelishRelish started their online menu planning service, they wanted to help busy families make that decision, so RelishRelish began.

GfreeCuisine.com offers Shrimp Tostadas
What they didn’t anticipate was many, many requests for a gluten-free version. So, they set up a sister site called GfreeCuisine —just like RelishRelish, but gluten/dairy-free. That’s where I entered the picture, making sure your choices are gluten-free.
Today’s busy families are pressed for time, but time is an even bigger issue for gluten-free families who must prepare much of their own food at home for safety reasons. Our computer-based service helps gluten-free families decide dinner menus for the coming week and then receive customized grocery lists designed just for them—saving precious time and money because you know exactly what you need to buy.
In May, GfreeCuisine was re-launched with a whole new look, full-color photos, and features that make menu-planning even quicker and easier. Take a look at www.GfreeCuisine.com to see what I mean.
BUT WAIT, I’M NOT COMPUTER-SAVVY
Of course, computerized menu-planning isn’t for everybody. If you prefer the tactile sensation of holding a cookbook in your hand, thumbing through pages, and hand-writing personal notes in the margins to create your own culinary diary (e.g., “bake 5 minutes longer”…”hubbie preferred this one”…”add more sugar”… “kids loved it”), then a weekly e-cookbook probably isn’t your thing.
But if you are comfortable with computers and appreciate the ease and efficiency of e-books, then a weekly e-cookbook is right for you. Our audience is computer-savvy families who like to have someone plan menus for them and like to shop with organized grocery lists which can be printed out or emailed to a mobile phone—one of our most attractive, time-saving features.
Here’s how gfreecuisine.com works
Each Thursday, 15 new menus (with side-dishes) are e-mailed to subscribers, who pay $21 for 3 months (averaging $7 per month). They choose 5 of the menus for the coming week and print out a customized grocery list—based on their menu choices—organized by sections of the grocery store to save time and make shopping more efficient. It also saves money because you buy only what is needed for the coming week. You can add your own pantry items to the list, as well.
All dishes are gluten-free and dairy-free and several are also designated as kid-friendly and vegetarian. Subscribers always have access to additional recipes for a wide array of desserts and breads —two foods that we miss the most. Plus, we design party menus to help you celebrate special occasions such as Mother’s Day or July 4th.
To sum it up, subscribing to GfreeCuisine is like getting a mini-e-cookbook delivered each week for pennies per recipe. Your family’s favorite GfreeCuisine recipes can always be included in any future week’s menu, so personal choices are always possible to satisfy your cravings.
WHY PREPARING OUR OWN FOOD IS IMPORTANT
I agree with Michael Pollan, author of Cooked
that we need to cook more of our own food because there are several advantages to preparing one’s own food at home, particularly to gluten-intolerant families who worry about safety, nutrition, and cost.
First, food preparation at home assures complete control over the ingredients that go into the food, such as choosing gluten-free versions of soy sauce and chicken broth. We tell you which gluten-free brands we use in testing and developing these recipes, but you can choose your own gluten-free brands, too. Just be sure to always read those labels!
Second, cooks who prepare food at home have complete control over the standards under which it is prepared?including cleanliness and safety. Cross-contamination is always a concern in restaurants, but you are in control by not using the same knife to spread peanut butter or sharing a toaster.
Third, food prepared at home is cheaper than take-out food or restaurant dining and usually has fewer calories and less sodium and fat. Each GfreeCuisine recipe offers nutrient content—including protein, fat, and carbohydrates, plus Weight Watchers info—so families know what’s in their food.
IS GFREECUISINE.COM RIGHT FOR YOU?
Check it out for yourself. We offer 3-month subscriptions for $7 a month (pennies per recipe), and even cheaper rates for longer subscriptions. It makes a great gift, too.
May 28, 2013
Chocolate-Berry Pizza for a Special, Gluten-Free Breakfast
Looking for something special for breakfast? How about something decadently chocolate?  And, who says you can’t have chocolate for breakfast? My standard pizza recipe is the answer—sweetened up a notch—becoming the base for chocolate, berries, and nuts. And it is just plain gorgeous, as well.
Now, this treat should be reserved for those occasions when something special is just perfect.
When I originally developed this recipe, I had hoped to use Nutella or Justin’s Chocolate Hazelnut Butter Blend as the chocolate—which European kids grow up eating, much like American kids eat peanut butter. But I found it wasn’t as easy to spread, perhaps needing some warming in the microwave before it became “spreadable.”
So, I turned to chocolate chips which were much easier to handle—even if they aren’t quite as nutritious. You can use either one, but remember that Nutella has dairy in it while Justin’s is a dairy-free choice.
Chocolate-Berry Breakfast Pizza©
Recipe by Carol Fenster© www.CarolFenster.com
This is the same crust as my famous Pizza, but with additional sugar (plus cinnamon and vanilla) to make the perfect base for lovely spring berries, resting on a layer of yummy chocolate. Dusted with powdered sugar, it makes a gorgeous dish.
yeast mixture
1 tablespoon active dry yeast
[3/4] cup warm (110°F) milk of choice
4 teaspoons sugar, divided
DRY INGREDIENTS
[2/3] cup brown rice flour, plus more for sprinkling
[1/4] cup potato starch
[1/4] cup tapioca flour
1 1/2 teaspoons xanthan gum
[1/8] teaspoon ground cinnamon
[1/2] teaspoon salt
LIQUIDS
1 tablespoon canola oil, plus extra for brushing the crust
[1/2] teaspoon vanilla
Topping
1 cup gluten-free chocolate chips, or more to taste
[1/2] cup fresh berries, such as raspberries or sliced strawberries OR dried fruit such as apricots, cherries, blueberries, or cranberries
2 tablespoons slivered almonds (or your favorite nuts)
Powdered sugar, for dusting
[1] Place oven racks in bottom and middle positions of oven. Preheat the oven to 350⁰F. Dissolve yeast and 1 teaspoon of the sugar in warm milk for 5 minutes. In food processor, blend yeast mixture, remaining sugar, oil, and vanilla until dough forms very soft ball. (Or, blend in medium bowl, using electric mixer on low speed.)
[2] Place pizza dough in center of greased (no cooking spray; it hinders spreading dough on pan) 12-inch nonstick (gray, not black) pizza pan. Liberally sprinkle rice flour onto dough; then press dough into pan with your hands, continuing to dust dough with flour to prevent sticking. Make edges thicker to contain toppings, taking care to make dough as smooth and even as possible for prettiest crust.
[3] Bake pizza crust 10 minutes on bottom rack. Remove from oven and brush edges of crust with a little canola oil. Place pizza on middle rack and bake until edges are nicely browned, about 10 minutes—depending on your oven. Watch carefully to avoid burning. Remove pizza from oven and sprinkle with single layer of chocolate chips (or warmed chocolate-hazelnut spread) to completely cover pizza crust. Return to oven and watch carefully as chips melt. Remove from oven and top with berries and almond slivers. Let pizza stand until it cool enough to handle (about 5 minutes), then cut and eat warm, dusted with a little powdered sugar.
Makes a 12-inch pizza
May 21, 2013
Easy Berry Ice Cream Pie Perfect for Hot Summer Days
One of my favorite things about summer is the berries.

Berry Ice Cream Pie is perfect for summer.
Whether it’s strawberries, blueberries, raspberries, or blackberries….there is something so marvelous, so mystifying about these perfect little orbs, so intricately designed and colorful.
As a child, however, the beauty of berries didn’t fully register on me as we knelt down in the hot Nebraska sun to pick those luscious strawberries in our farmyard garden before the rabbits or birds (or whatever other wildlife eats berries) got to them or the deer trampled them.
Today, I buy my berries at the grocery store or farmer’s market, and then look for ways to use them. One of my favorite desserts is to fill a pastry crust or cookie crumb crust with a berry ice cream or sorbet and then make a sauce from the fresh berries.
Here is a quick, easy dessert….at least once it’s made, it is so quick and easy to just pull it from your freezer and serve it on a hot summer day. So, keep one of these in your freezer and you’re ready for anything.
Berry Ice Cream Pie©
It’s always smart to have a dessert in the freezer for last minute treats. Choose your favorite seasonal fresh berries as the theme for this ice cream pie. Here, strawberry ice cream, topped with strawberry jam and fresh strawberries is delightful. Or, follow the same idea with raspberries or blackberries or blueberries.
Basic Pastry Crust for a 9-inch pie, single crust (see any of my cookbooks for recipe)
1 quart gluten-free berry ice cream, softened enough to spread in pie crust
1 cup gluten-free chocolate chips
1 cup berry jam of choice (we use strawberry jam in the photo)
2 cups fresh berries to complement berry jam (we use fresh strawberries in the photo)
[1] Place racks in the bottom and middle of the oven. Prepare the Basic Pie Crust dough as directed in any of my cookbooks. Divide the dough in half (freeze remaining half for another dessert) and roll the dough to a 10-inch circle between two sheets of plastic wrap. Remove top sheet of plastic wrap, invert the crust into a 9-inch nonstick (gray, not black) pie pan, and remove the remaining plastic wrap. Trim the edge and flute it decoratively. Prick the bottom of the crust with a fork to let steam escape.
[2] Bake the crust on the bottom rack of the oven for 15 minutes. Shift the pie crust to the middle rack and continue baking just until the crust and edges become firm and are lightly browned, about 10 to 15 minutes. Watch carefully at this stage to avoid over-browning. Remove the crust from the oven and sprinkle the bottom evenly with chocolate chips. Cool completely on a wire rack.
[3] Spread the softened ice cream evenly in the baked crust. Wrap tightly and freeze at least 4 hours or overnight.

Keep this pie in your freezer for last-minute desserts.
[4] To serve, thin the berry jam with enough hot water to make a sauce. Cut the pie into 8 slices and drizzle the sauce on top, garnished with fresh berries. Makes 8 slices.
NOTE: See Carol’s Pie Crust 101 for her pie crust tips.
May 14, 2013
Gluten-Free Quiche Lorraine
Quiche has been the brunt of jokes (remember the book, Real Men Don’t Eat Quiche), but one thing’s for sure: Quiche is delicious!

Quiche Lorraine is perfect for brunch.
Once I mastered the art of making gluten-free pie crust—at first, quite daunting to get that pie crust to roll out without breaking—we starting eating quiche frequently at our house and now I regularly serve it to guests.
Don’t let the pie crust stop you: use a gluten-free store-bought version or omit the crust altogether for a crustless quiche. Personally, I like the contrast of the crispy crust with the creamy filling.
The beauty of Quiche is that it is so versatile. You can make the basic Quiche Lorraine which has bacon or make it vegetarian (see recipe headnote). Use different herbs, even vary the cheese from the traditional Swiss. I have made quiche with non-dairy cheeses such as Vegan Gourmet or Daiya. The flavor varies with the cheeses, but is still delicious.
Quiche Lorraine
Reprinted with permission from Gluten-Free 101 by Carol Fenster (Houghton Mifflin Harcourt, 2013)
Quiche is perfect for Sunday brunch, but it is also appropriate for luncheons and even dinner. This version with bacon is delicious, but it is also wonderful with [1/2] cup chopped asparagus, mushrooms, spinach, broccoli, or dried tomatoes.
Makes a 9-inch pie; 6 servings
4 bacon slices
1 cup Swiss cheese or cheese alternative (about 4 ounces), diced
[1/2] cup finely diced yellow onion
[3/4] cup half-and-half or whole milk or milk of choice
1 tablespoon cornstarch
4 large eggs
[1/2] teaspoon salt
[1/4] teaspoon sugar
[1/8] teaspoon grated nutmeg
[1/4] teaspoon freshly ground black pepper
1 9-inch store-bought gluten-free pie crust OR use the pie crust recipe in my cookbooks
[1] Place racks in the bottom and middle positions of the oven. Preheat the oven to 375⁰F. Place a 9-inch unbaked pie crust on a rimmed baking sheet for easier handling.
[2] In a heavy skillet, fry the bacon over medium heat until crisp, drain on a paper towel, and dice. Sprinkle the bacon and the cheese in the bottom of the pie crust. Discard all but 1 tablespoon of bacon grease from the skillet and fry the onion in it over medium heat until golden and translucent, about 3 to 5 minutes. Arrange the onion over the cheese.
[3] In a medium bowl, whisk the cornstarch into [1/4] cup of the half-and-half until smooth and then add the rest of the half-and-half. Whisk in the eggs until smooth and then whisk in the salt, sugar, nutmeg, and black pepper until well blended. Pour over the cheese.
[4] Bake the quiche on the bottom rack of the oven for 15 minutes, then shift it to the middle rack. Continue baking until a knife inserted in the center comes out clean, about another 35 to 40 minutes. Lay strips of foil over the pie crust edge if it starts to brown too much. Remove from the oven and let stand 10 minutes on a wire rack before cutting into 6 slices. Serve warm.
Carol’s Tips
[1] Look for ready-made pie crusts by Whole Foods or Gillian’s. Or make your own with the pie crust recipe from any of my cookbooks.
[2] One time-saver is to assemble a shaped pie crust in the pie pan and freeze it, tightly wrapped. Later, when you’re rushed, yet want to serve quiche just let it thaw on the countertop as you prepare the filling. It’s like finding a present to yourself in the freezer! Just pour the filling into the pie crust and bake. To see Carol making pie crust, go to Videos at www.CarolFensterCooks.com
[3] Quiche makes perfect appetizers. Bake it in a 9-inch pan and cut into mini-squares for serving.