Carol Fenster's Blog, page 10
November 2, 2015
Oat, Blueberry, and Walnut Bars
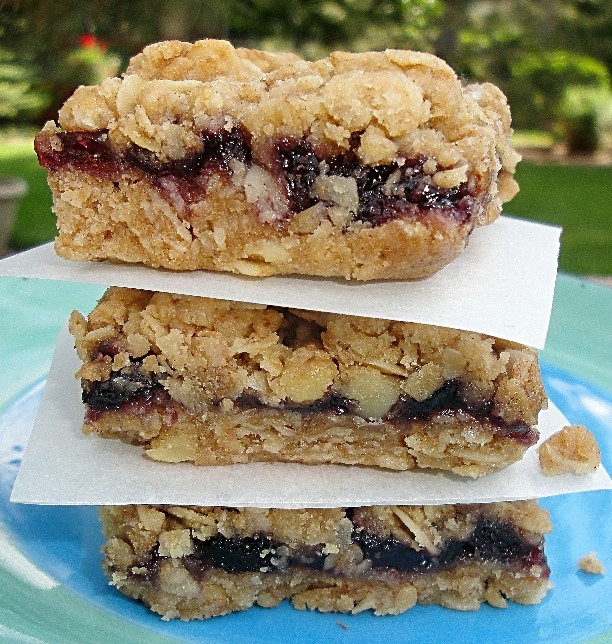
Vegan oat bars use gluten-free oats and oat bran.
Oatmeal. The word invokes images of home, wholesomeness, and all-American goodness. When I was growing up, we ate cooked oatmeal every day for breakfast. Every. Single. Morning.
The only time it differed is when my mother forgot the salt. On rare occasions, she would fry slabs of leftover oatmeal (like a pancake) and we would drizzle homemade maple syrup and melted butter on top. That was a real treat! So, given my background, you can see why oats evoke lots of memories.
There was a time when oats were off-limits for the gluten-free diet because they could be contaminated with wheat. Thanks to several manufacturers we can now buy various forms of gluten-free oats and oat bran that are grown and processed in controlled settings to make them safe for us. So, here is a delicious, easy dessert that uses oats. Enjoy!
Gluten-Free Oat, Blueberry, and Walnut Bars
adapted from 125 Gluten-Free Vegetarian Recipes by Carol Fenster (Avery/Penguin Group, 2011)
Blueberries, cinnamon, and walnuts team up with rolled oats and oat bran to make a hearty, flavorful bar that is also quite versatile. Feel free to change the filling—-it is equally delicious using raspberry, fig, or strawberry jam. Or, use your favorite nuts such as pecans, almonds, or pine nuts. These bars are also vegan and freeze and travel well.
1/2 cup butter or buttery spread, melted
2 teaspoons pure vanilla, divided
1 cup GF Flour Blend (see below)
3/4 cup GF rolled oats*
1/2 cup packed light brown sugar
¼ cup GF oat bran* or ground flaxmeal
1/4 cup walnuts, finely chopped
1 ½ teaspoons xanthan gum
1 teaspoon baking powder
1/2 teaspoon sea salt
1/4 teaspoon ground cinnamon
2/3 cup blueberry jam
*Check with your physician before eating gluten-free oats.
[1] Place rack in middle of oven. Preheat oven to 375°F. Generously grease 8-inch square nonstick (gray, not black) metal pan. Or line pan with aluminum foil, leaving 2-inch overhang for easy removal. Grease foil.
[2] In medium bowl, combine melted butter and 1 teaspoon vanilla. Stir in flour blend, rolled oats, brown sugar, oat bran, walnuts, xanthan gum, baking powder, salt, and cinnamon until thoroughly blended, then press 1 ½ cups of mixture firmly on bottom of pan.
[3] Stir remaining teaspoon of vanilla into blueberry jam until smooth, then spread evenly on top. Sprinkle remaining oat mixture evenly on jam, then pat to make smooth and even.
[4] Bake until top is lightly browned and firm, about 20 to 25 minutes. Cool bars in pan for 30 minutes on wire rack. If using foil lining, invert pan onto large cutting board and remove foil before cutting into 16 squares. Otherwise, serve bars directly from pan. Makes 16 small bars.
Per serving: 175 calories; 2g protein; 7g total fat; 2g fiber;27 g carbohydrates; 16mg cholesterol; 119mg sodium
GF Flour Blend
1 ½ cups sorghum flour
1 ½ cups potato starch
1 cup tapioca flour
Whisk together and store in a dark, dry place.


October 26, 2015
Upset the Apple Cart with This Twist on Apple Pie

Enjoy Apples!
Fall is here, apples are at their best, and the aroma of apples baking in the oven is both comforting and enticing. Of course, you can make a traditional, two-crust Apple Pie, but here is a super-simple No-Bake Caramel Apple Pie from the Denver Post.
Although the Denver Post recipe is not gluten-free, it will be if you use easy-to-find, gluten-free versions of all the ingredients. Warning: It is extremely decadent, and doesn’t cut into clean slices. You just scoop it onto your plate. But it is so darn good, you won’t care about that!
No-Bake Caramel Apple Pie – What’s In It?
The pie is basically apples cooked with caramels and spices, piled in a crumb-crust (use gluten-free cookies if you can’t find gluten-free graham crackers) and top it with whatever you like: crushed gluten-free cookies, chopped nuts, and mini-chocolate chips were used in the Denver Post recipe. Personally, I like crushed toffee-chocolate bars such as Skor, butterscotch or white-chocolate chips, and then perhaps Pamela’s Ginger or Chocolate cookies. If you plan Halloween wisely, maybe you will have leftover candy for this pie.
Even though the pie is “no-bake” you do have to cook the apples before putting them in the crust. Here are some tips for which apples to use and some secrets to a good apple pie filling. They may not all apply to the above recipe, but will be very useful when you make a traditional two-crust pastry apple pie.
Secrets to Baking Success in Apple Pies
Pre-Cooking the Apples
Cook’s Illustrated magazine says to pre-cook the apple filling before making pies. They recommend simmering the filling ingredients for about 15 to 20 minutes on low heat (or until the apples just start to break down). Apparently, when gently heated (and the key is “gentle,” not to exceed 140°F or you won’t get the desired result), the pectin in apples is converted to a heat-stable form that keeps them from becoming mushy when cooked further in the oven. Who knew?
An added benefit is that our gluten-free pastry pie crusts don’t stand up well to prolonged baking, so pre-cooking the apples helps reduce baking time. Also, precooking the apples shrinks them down a bit and you can fit more apples into the pie crust if you like a really big, high pie (which I do!).
Use a Blend of Apple Varieties
These same experts recommend using a blend of apples in pies, rather than just one variety. Some apples remain firm, others get mushy. Some diminish in flavor from baking, while others actually improve. For baking, they suggest equal parts of both tart and sweet apples…such as Granny Smiths, Empires, or Cortlands for the tarts and Yellow Delicious, Jonagolds, or Braeburns for the sweets.
Sweeteners, Spices, and Flavorings
For sweeteners in pie, use two-thirds white and one-third brown sugar, rather than just white sugar. The molasses in brown sugar adds a hint of caramel that complements apple flavor. Maple syrup or apple cider (reduced to half by simmering over low heat) provide nice flavor, too. A squeeze of lemon and a teaspoon of lemon zest provide acid to highlight flavors and balance sweetness. A quarter-teaspoon of salt heightens flavors.
Spices are such a personal thing; I have a heavy-hand when it comes to spices but you may prefer a milder approach. For some, just a quarter-teaspoon of cinnamon is all they need. Others want more variety, so they add one-eighth-teaspoon ground allspice and maybe a quarter-cup of finely chopped crystallized ginger. For a spicier pie, add one-eighth teaspoon ground cloves, along with the cinnamon and allspice. Or, if allspice isn’t your thing, use the same amount of ground nutmeg. Of course, you can just use apple pie spice (a blend of cinnamon, nutmeg and allspice) and use as much as you like!
Finally, Pastry Pie Crust
Wondering about gluten-free pastry pie crusts? Each of my cookbooks has a no-fail pastry pie-crust recipe. Or, use one of the gluten-free pie crust mixes such as Bob’s Red Mill. For a visual guide to shaping gluten-free pie crusts, see my website for my video on making Pie Crusts.
October 19, 2015
How Do You Like Your Brownies: Fudgy or Cakey?
A kitchen conundrum that really fascinates me is the issue of fudgy versus cakey brownies.

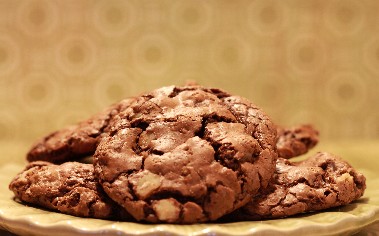
Fudgy Gluten-Free Chocolate Brownies
Fudgy or Cakey?
Some people prefer the rich, dense decadence of the fudgy type, while others want their brownies more like a light, airy cake. Personally, I will devour either kind but—given a choice—I choose the fudgy version.
The folks at Martha Stewart Living explored the science behind these two choices in a recent magazine article and on their website.
The Science
They boil down the science on brownie texture to this: All brownies are made of the same basic ingredients: butter, eggs, chocolate, flour, and sugar. However, it is the ratios or proportions of each ingredient that make all the difference in texture.
In their series, Kitchen Conundrums, they lay out the basic rules for choosing a brownie texture:
[1] For a fudgy brownie use more butter and chocolate, but less flour.
[2] For a cakey brownie use less butter, but more flour—plus a little baking powder for leavening.
[3] Keep the amount of sugar and eggs the same in both versions.
[4] Bake fudgy brownies for 2 to 5 minutes less than cakey brownies.
[5] Their analysis is on gluten brownies, so I add a fifth tip: add 1/8 teaspoon xanthan gum to make sure the brownies don’t crumble.
You can use these general guidelines to tweak your own gluten-free brownie recipe, or follow the Martha Stewart version (but add xanthan gum for less crumbling). To watch brownies being made in the Martha Stewart kitchen, go here.
How Does My Brownie Recipe Stack Up?
When I look at my own Brownie recipe from my book, Gluten-Free 101, I see that it really leans more toward the cakey version. So, how can I modify it to be fudgier? I will follow the same steps that Martha suggests, but make these adjustments:
First, I will reduce the flour to ½ cup, omit the baking powder, and reduce the xanthan gum to 1/8 teaspoon. Second, I will increase the butter to 1 stick (1/2 cup) and omit the water or coffee. Third, I will bake the brownies for 2 minutes less than the original 20 minutes, or just until they look barely set, knowing they will continue to cook after they are removed from the oven. Of course, my new fudgy brownies will be thinner than the original because there is no baking powder to make them rise.
Carol Fenster’s Chocolate Fudgy Brownies
Reprinted with permission from Gluten-Free 101: The Essential Beginner’s Guide to Easy Gluten-Free Cooking by Carol Fenster (Houghton Mifflin Harcourt, 2014)
This is my new fudgier version of my original Brownie recipe. Be forewarned: it is intensely chocolatey. This version is plain, but feel free to add chocolate chips or nuts for added variety.
½ cup Carol’s Sorghum Blend (see below)
½ cup unsweetened cocoa powder (natural or Dutch-process)
1/4 teaspoon salt
1/8 teaspoon xanthan gum
½ cup (1 stick) unsalted butter or buttery spread, melted and cooled
½ cup granulated sugar
½ cup packed brown sugar
1 large egg, at room temperature
1 teaspoon vanilla extract
[1] Preheat the oven to 350°F. Generously grease an 8-inch square nonstick pan (gray, not black). In a medium bowl, whisk together the flour blend, cocoa, salt, and xanthan gum until well blended.
[2] In a large mixing bowl, beat the butter and sugars with an electric mixer on Low speed until well combined. Add egg and vanilla; beat until thoroughly combined.
[3] With mixer on Low speed, add the dry ingredients. Mix until just blended. Spread batter evenly in prepared pan.
[4] Bake 18 minutes. Cool brownies before cutting. Makes 16 small bars.
Per brownie: 150 calories; 1g protein; 7 g total fat; 1g fiber; 24g carbohydrates; 27 mg cholesterol; 75 mg sodium
Carol’s Sorghum Blend
1 1/2 cups sorghum flour
1 1/2 cups potato starch
1 cup tapioca starch/flour
Whisk ingredients together until well-blended and store (tightly covered) in a dark, dry place.
October 12, 2015
It is Pumpkin Spice Latte Time!
Every fall, one “flavor” gets a ton of attention.

Pumpkin Spice Latte
Pumpkin.
In fact, one sure sign that Fall has arrived is the Pumpkin Spice Latte, which returns to Starbucks with regularity. If you are a coffee fan—as I am— then this is good news since I love that Pumpkin Spice flavor. More about that word “flavor” later.
Pumpkin is Everywhere!
It appears that we are a pumpkin-loving society! That unmistakable pumpkin flavor shows up in pie filling, coffee, yogurt, milk, desserts—even dog food. (Yes, you read that right.) Pumpkin-flavored dog food fetched more than $12 million in 2014. If you would like to see where we spent our dollars on pumpkin-flavored food last year, see this Nielsen data. This might make good cocktail-party conversation, you never know!
History of Pumpkin Spice Latte
Do you know the history of the Pumpkin Spice Latte? When it was developed in 2003 by the Starbucks lab, they weren’t sure it would catch on. But it became an instant hit and by 2006 it was even available as pods (K-cups) for home brewers. By 2007, other coffee chains began offering it and the Twitter handle of #PSL appeared. According to CNN, today the Starbucks’ Pumpkin Spice Latte has 85,000 followers on Twitter.
Make Your Own Pumpkin Spice Latte
If you want to make your own Pumpkin Spice Latte or PSL, we can thank the Food Network for this recipe. One of the things I like about making my own PSL is controlling the sugar, since I find the Starbucks version too sweet for my tastes.
Make Ahead and Keep on Hand
Using the recipe from the Food Network as a base, you can modify your homemade latte as you like. Certainly less sugar for me! And, while I love nutmeg, I prefer less than this recipe uses so I cut it in half. You may have other preferences, so try the recipe and see how you like it. Of course, your homemade version will be gluten-free because you control what goes into it.
Another great thing about making your own is that you can make a base (all the ingredients except the coffee and milk) and store it in the refrigerator. Then heat the milk and coffee (or, steam the milk if you’re lucky enough to have an espresso machine that also froths milk) and stir in as much of the base as you like. Using whipped cream on top is up to you (I don’t usually do that, except as an occasional treat). And, a final dusting of grated fresh nutmeg (or cinnamon) is the perfect touch. And, of course, your homemade version will be much cheaper.
Pumpkin Flavor without the Pumpkin?
Notice that the Food Network’s recipe contains real pumpkin. It may surprise you to learn that many “pumpkin-flavored” items don’t have any pumpkin in them at all. Of course, foods such as Pumpkin Pie and Pumpkin Bread contain real pumpkin, but most commercial coffee drinks do not. Have you ever tasted pumpkin by itself? It is actually quite bland and not necessarily that inviting. In fact, it’s awful. However, when blended with all those wonderful spices it is absolutely divine.
Wondering what to do with the leftover pumpkin? If you make a lot of lattes, you will use up a 14-ounce can in a few days. Store any leftover pumpkin, tightly covered, in the fridge for up to a week and use it to bake gluten-free Pumpkin Bread.
Happy Pumpkin Spice Latte!
October 5, 2015
FODMAP-Friendly Gluten-Free Shrimp Risotto
There has been a lot written about FODMAP-friendly foods recently.

The Gluten-Free, Hassle-Free Cookbook by Marlisa Brown, MS, RD, CDE
Just what are FODMAPS? The word itself is an acronym that includes: Fermentable Oligo-Di-
Monosaccharides and Polyols. FODMAPS are actually sugars and are found in many foods. It is believed that, for some people, sensitivity to FODMAPS is the source of their discomfort. If you believe you may be affected by FODMAPS, the question is “How do you prepare food that meets the requirement of this diet?
My friend and colleague, Marlisa Brown, a dietitian who practices in New York has the answer in the 2nd edition of her very helpful book, The Gluten-Free, Hassle-Free Cookbook. Marlisa is not only a registered dietitian, but also a certified diabetes educator and chef. Her company is called Total Wellness, Inc. and her clients include some of the most famous people and companies in the U.S., plus she studied at the Culinary Institute of America. So, I trust what she says and I’m glad to have Marlisa and her book as a guide to help people avoid FODMAPs if they (and their health professionals) think this is the right diet for them.
Here is what’s in Marlisa’s book:
• Over 100 Delicious Gluten-Free Recipes
• Allergy Information for Top Allergens on Every Recipe
• Vegetarian and Vegan Highlighted
• FODMAPs Recipes Highlighted
• Kid Friendly Snacks
• Comfort Food Classics
• Quick Weeknight Dinners
• Color Photos
• Holiday Recipes, Appetizers, Luscious Desserts, and more
For more information, go to Marlisa’s blog. I know you are anxious to try one of Marlisa’s delicious recipes so here it is:

Shrimp Risotto (FODMAP-friendly)
Shrimp Risotto
Reprinted with permission from The Gluten-Free, Hassle-Free Cookbook, 2nd edition
By Marlisa Brown MS, RD, CDE, CDN
A classic Italian rice dish.
2 Tablespoons olive oil
1 pound large shrimp, peeled and deveined
¼ teaspoon sea salt
½ teaspoon black pepper
½ cup chopped onion
1 teaspoon minced garlic
1 cup uncooked Arborio rice
½ cup dry white wine (optional)
3 cups (24oz) gluten-free low sodium chicken broth
1 cup green peas
¼ cup grated Parmesan cheese
2 Tablespoons chopped fresh parsley
1 Tablespoon chopped fresh basil
1 teaspoon grated lemon zest
[1] Heat 1 tablespoon oil in a large saucepan over medium heat. Add the shrimp and sprinkle with salt and pepper. Cook until the shrimp are just opaque in the center, about 3 minutes. Transfer the shrimp to a bowl to cool.
[2] Return the pan to the heat. Add 1 tablespoon olive oil. Add onion and garlic and sauté for about 3 minutes.
[3] Add the rice and stir until coated about 1 minute. Add the wine and cook until the wine is absorbed.
[4] Add a ½ cup of the broth to the rice stirring constantly until liquid is absorbed. When the rice is almost dry, add another ½ cup broth and repeat the process. Continue adding broth until the rice is tender and all the liquid is absorbed.
[5] Stir in the peas, Parmesan cheese, parsley, basil and lemon zest and reserved shrimp. Serve immediately. Serves 6
Nutritional information: 238 calories, 15.3 grams protein, 29.1 grams carbohydrates, 6.6 grams fat, 69.6 milligrams cholesterol, 656.9 milligrams sodium, 1.8 grams fiber, 77 milligrams calcium,
FODMAPs: To make FODMAP-friendly, omit onion and replace with chopped green onions.
Omit the garlic and use garlic infused oil.
Allergy Tip: Gluten-Free, Egg-Free, Soy-Free, Nut-Free, Peanut-Free, Fish-Free. Double check the chicken broth for soy. To make milk free, use a milk free cheese substitute for the Parmesan cheese.
Tip: Risotto turns glutinous when held too long so you should serve it right away.
September 28, 2015
Too Much Zucchini? Make Gluten-Free Zucchini Bread!
Summer is waning here in Colorado, but it is still warm enough for certain crops—such as zucchini. Here is a delicious way to use it up—Zucchini Bread! Bake several batches and freeze for later this winter.

Gluten-Free Zucchini Bread
ZUCCHINI BREAD
Reprinted with permission from Gluten-Free 101: The Essential Beginner’s Guide to Easy, Gluten-Free Cooking by Carol Fenster (Houghton Mifflin Harcourt, 2014)
Though often maligned, most of us like zucchini in bread so bake a batch and enjoy this classic.
2 cups GF flour blend (see below)
3/4 cup sugar
2 teaspoons baking powder
1 teaspoon cinnamon
1 1/2 teaspoons xanthan gum
3/4 teaspoon salt
1/4 teaspoon baking soda
2 large eggs, room temperature
1/2 cup canola oil
1 teaspoon pure vanilla extract
2 cups grated zucchini (about 1 medium or 2 small)
1/2 cup raisins
1/2 cup chopped pecans (or your favorite nuts)
[1] Place a rack in the lower third of the oven. Preheat the oven to 350ºF. Generously grease three 6×4-inch nonstick (gray, not black) loaf pan(s).
[2] In a medium bowl, whisk together the flour blend, sugar, baking powder, cinnamon, xanthan gum, salt, and baking soda until well blended. In a large mixing bowl, beat the eggs with an electric mixer on medium speed until light yellow and frothy, about 30 seconds. Add the oil and vanilla and beat on low speed until well blended. With the mixer on low speed, beat the flour mixture gradually into the egg mixture until the batter is smooth and slightly thickened. The batter will be very stiff, but then beat in the grated zucchini and it will become softer. With a spatula, stir in the raisins and nuts. Spread the batter evenly in the pan(s).
[3] Bake until the tops are nicely browned and a toothpick inserted into the center comes out clean, about 45 to 55 minutes. Cool the bread in the pans 10 minutes on a wire rack. Remove the bread from the pan(s) and cool completely on the wire rack. Slice with an electric or serrated knife and serve slightly warm. Makes 3 small loaves
Per slice: 270 calories; 3g protein; 13g total fat; 2g fiber; 38g carbohydrates; 31mgs cholesterol; 237mgs sodium
GF Flour Blend
1 ½ cups sorghum flour or brown rice flour
1 ½ cups potato starch
1 cup tapioca flour/starch
Whisk together and store, tightly covered, in a dark, dry place.
September 21, 2015
Chocolate Cookies from Grape Skin Flour at Holy Cross Abbey Winery
Chocolate Cookies Made from Grape Skin Flour
Looking for a delightful way to spend a lovely Fall day in Colorado? I will be the guest author at the fabulous Harvest Fest at Holy Cross Abbey Winery in the Royal Gorge Country of Canon City, Colorado on September 26 and 27.
Come see me! There will be music, food, many booths to explore, and of course—wine-tasting.
I will be serving special gluten-free chocolate cookies, using flour made from Chardonnay grape skins. These flours are darker in color so they are perfect for chocolate cookies. Grape skin flour can be made from any varietal of grape, with each lending its own uniqueness. It contributes antioxidants but can have an astringent taste, so using it in small portions, as in this chocolate cookie, is a perfect way to use it. You can find grape skin flour online or in specialty stores. I use a brand called Whole Vine, which comes from the wine country in California.
CHOCOLATE COOKIES MADE FROM GRAPE SKIN FLOUR
Adapted from 100 BEST QUICK GLUTEN-FREE RECIPES © 2014 by Carol Fenster.
Reproduced by permission of Houghton Mifflin Harcourt. All rights reserved.
If you don’t have grape skin flour, use the same amount of sorghum, brown rice, millet, bean, or amaranth flour—or whatever flour you prefer.
21 ounces gluten-free bittersweet chocolate chips (at least 60% cacao)
5 tablespoons (about 1/3 cup) butter or buttery spread
3 large eggs
1 cup sugar
1/2 teaspoon pure vanilla extract
1/2 cup grape skin flour ( or your choice of gluten-free flour)
1/4 teaspoon baking soda
1/4 teaspoon xanthan gum
1/4 teaspoon salt
1 cup finely chopped walnuts
[1] In a medium microwave-safe bowl, heat 9 ounces of the chocolate chips with the butter in the microwave on Low power for 1 to 2 minutes, or until melted. Stir until well blended.
[2] In a large bowl, beat the eggs, sugar, and vanilla with an electric mixer on low speed until thick, about 1 minute. In a small bowl, whisk together the flour, baking soda, xanthan gum, and salt, and beat into the eggs on low speed until no flour streaks remain. Beat in the chocolate mixture. Stir in the walnuts and the remaining 12 ounces chocolate chips. The dough will be very soft. Cover the bowl tightly and refrigerate for 2 hours.
[3] When thoroughly chilled and solid, shape the dough into 2 logs, each 1 [1/2]-inches in diameter. Wrap tightly in plastic wrap to hold the shape, and refrigerate for up to 3 days. Or, shape the dough into 48 walnut-size balls with your hands, place in a plastic freezer bag, seal tightly, and refrigerate for up to 3three days or freeze for up to 1 month.
[4] When ready to bake, place an oven rack in the middle position of the oven. Preheat the oven to 375⁰F. Line a 13×18-inch baking sheet (not nonstick) with parchment paper. Cut twelve [1/2]-inch-thick slices from the log and place on the baking sheet; or place 12 walnut-size balls on the baking sheet.
[5] Bake for 10 to 12 minutes or just until the cookies look shiny and the crust starts to crack. Cool the cookies for 2 minutes on the pan; then transfer to a wire rack to cool completely. Repeat with the remaining dough. Serve or store.
STORAGE: Refrigerate leftovers, tightly covered, for up to 3 days or freeze for up to 1 month.
Makes 48 cookies (make them half as big for nearly 100 cookies)
Preparation time: 10 minutes
Chilling time: 2 hours
Baking time: 10 to 12 minutes
Per cookie: 110 calories; 2g protein; 7g total fat; 1g fiber; 13g carbohydrates; 15mg cholesterol; 22mg sodium
September 14, 2015
Shrimp Tostadas for Quick Weeknight Meals
When you have kids in school, weeknights can be hectic. There’s homework, dance lessons, lacrosse or soccer practice, and that’s just the kids. You have the work you brought home from the office or calls to make for the PTA. You just want some easy, quick weeknight meal ideas such as this easy, colorful tostada.

Shrimp Tostadas with Chipotle Sauce
If you have the ingredients prepped ahead of time, family members can assemble their own tostadas when they please. This is especially important on school nights when everyone has a different schedule. Enjoy!
SHRIMP TOSTADAS WITH CHIPOTLE SAUCE
Adapted from Gluten-Free 101: The Essential Beginner’s Guide to Easy, Gluten-Free Cooking by Carol Fenster (Houghton Mifflin Harcourt, 2014)
These gorgeous tostadas go together quickly if you have all the ingredients prepped in advance. The Chipotle Sauce isn’t essential, but it makes these tasty little treats go from “great” to “wow, these are fantastic.”
TOSTADA
8 gluten-free tostada shells
1 container (9 ounces) bean dip
[1/2] cup chopped red onion
2 plum tomatoes or 8 cherry tomatoes, cored and diced
[1/2] pound cooked shrimp, tails removed and chopped
1 medium avocado, peeled, pitted, and diced
2 cups chopped iceberg lettuce
[1/2] cup chopped fresh cilantro
[1/2] cup store-bought Mexican tomato salsa or salsa verde
CHIPOTLE SAUCE
[1/2] cup low-fat sour cream or sour cream alternative
1 tablespoon fresh lime juice, or more to taste
[1/2] teaspoon honey or agave nectar
[1/4] teaspoon chipotle chile powder, or to taste
Preheat the oven to 300 degrees.
[1] Place racks in middle and lower third of oven. Place tostada shells on two 9×13-inch rimmed baking sheets (shells may overlap a little). Spread each shell with scant 2 tablespoons of bean dip. Place one sheet on each rack in oven to warm, about 5 to 10 minutes, while preparing remaining ingredients.
[2] Whisk together sour cream, lime juice, honey, and chile powder to make smooth sauce, adding enough lime juice to reach thin consistency. Remove tostadas from oven. Top each tostada with equal amounts of onion, tomato, shrimp, avocado, lettuce, and cilantro. Drizzle with chipotle sauce and serve immediately with the Mexican salsa. Makes 8 tostadas.
Per tostada: 250 Calories ; 12 g Fat; 2g Saturated Fat; 11g Protein; 4g Fiber; 27g Carbohydrates; 345mg Sodium ; 58 mg Cholesterol
September 7, 2015
One-Pan Mexican Skillet Beef & Rice
School is back in session and your time just got even more precious. I remember the days when I would rush home from work after a long commute and head straight to the kitchen to start dinner. We had to eat quickly because there was always the inevitable homework for my son, office work for me, and—on some nights—a school or community meeting to attend.

Mexican Skillet Beef and Rice from 100 Best Quick Gluten-Free Recipes; Photo by Jason Wyche
Early on, I decided that we would not sacrifice our health by skipping meals or resorting to TV dinners or simply snacking over the kitchen sink. So, I made time to sit down and eat a meal at the table. Of course, I had my repertoire of quick recipes for nights like this but I would have loved this recipe back then.
I strongly believe in planning ahead (such as having cooked rice and browned ground beef on hand for this recipe), but I know that even the best intentions go astray. I read recently that home cooks who plan the week’s meals still tend to “fall off the wagon” by mid-week so that Thursday and Friday are more likely to be take-out meals or hastily-assembled affairs.
I can relate to this: it takes discipline and commitment to adhere to a weekly meal plan, especially if you are extremely busy. But I also feel strongly that what we eat is the most profound thing we do to our bodies, so I still prepare our own meals as often as I can. I hope you do too.
Let this quick, easy dish called Mexican Skillet Beef and Rice be one of your late-week recipes. It’s got loads of flavor from the chili powder, oregano, and cumin plus protein from the ground beef. You serve it right from the skillet, so no extra serving bowls to wash. Super-easy, boldly flavorful, it is sure to become one of your family’s favorites.
MEXICAN SKILLET BEEF AND RICE
Excerpted from 100 BEST QUICK GLUTEN-FREE RECIPES © 2014 by Carol Fenster. Reproduced by permission of Houghton Mifflin Harcourt. All rights reserved.
This dish is for really busy nights, when you want dinner on the table right away. Serve it with a tossed salad, along with corn tortillas wrapped in damp paper towels and heated gently in the microwave. This is a good way to use up leftover cooked brown rice that you’ve stored in the refrigerator or freezer. Or, quickly cook instant brown rice while browning the ground beef.
8 ounces lean ground beef
1/4 cup chopped onion or 1 tablespoon dried minced onion
½ cup water
1 1/2 tablespoons chili powder
1 teaspoon chopped fresh oregano or ½ teaspoon dried
1/2 teaspoon ground cumin
1/4 teaspoon salt
1 cup cooked brown rice
1 can (14- to 15- ounce) can pinto beans or black beans, rinsed and drained
1 can (4- ounce) can diced green chiles
2 medium Roma or plum tomatoes, seeded and chopped
2 tablespoons chopped fresh cilantro, for garnish
[1] In a large skillet, cook the ground beef and onion over medium-high heat until browned, about 5 minutes, stirring to crumble the beef. The beef will be more flavorful if it is fully browned and all the liquid has evaporated.
[2] Add the water, chili powder, oregano, cumin, and salt and stir to combine. Stir in the rice, beans, and chiles and heat to serving temperature, about 5 minutes. Top with the chopped tomatoes; garnish with the chopped cilantro. Serve immediately, right from the skillet.
STORAGE: Refrigerate leftovers, tightly wrapped, for up to 3 days.
Makes 4 servings
Preparation time: 10 to 15 minutes
Cooking time: 10 minutes
Per serving: 520 calories; 29g protein; 8g total fat; 28g fiber; 85g carbohydrates; 21mg cholesterol; 234mg sodium
August 31, 2015
Gluten-Free Gazpacho
It may be September, but tomatoes are still abundant at Farmer’s Markets and supermarkets—and perhaps your own backyard. Labor Day is coming up and I am always looking for ways to feature tomatoes in easy dishes that showcase their marvelous flavor.

Fresh tomatoes are perfect for gluten-free Gazpacho.
One of my favorite ways is to make Gazpacho―a tomato-based soup that is like a liquid salad from the southern Spanish region of Andalusia. It is typically a summertime dish because it is cool and refreshing and needs no cooking. There are many ways to make this delightful dish; I have a very simple version in my vegetarian cookbook, 125 Gluten-Free Vegetarian Recipes, that I serve as an appetizer in over-size shot glasses.
Here is another version that we use in my weekly online cookbook, www.GfreeCuisine.com that is also extraordinarily tasty. Serve it as appetizers in whatever little dishes you have (such as shot glasses or martini glasses) or as an entrée-size in soup bowls or large wine or margarita glasses. Gazpacho’s flavor improves if it is refrigerated overnight, so chill it for at least 4 hours after making it to let the flavors meld.
Gazpacho
Used with permission from www.GfreeCuisine.com
My favorite way to serve gazpacho is these cute little appetizers (see photo), but it makes a great hot-weather lunch too.
2 cucumbers, diced
3 large ripe tomatoes, diced
1 red pepper, seeded and chopped
1 green pepper, seeded and chopped
1 white onion, chopped
3 garlic cloves, minced
1/4 cup red wine vinegar
2 1/2 cups tomato juice
Coarse salt and freshly ground pepper, to taste
2 tablespoons gluten-free Worcestershire sauce
1/4 cup Italian parsley, chopped
1/4 cup fresh basil, chopped (or more to taste)
Juice of 1 lemon
Frank’s hot sauce, to taste
Garnishes: GF croutons, lemon wedges, diced avocado, chopped parsley, and sour cream
[1] In large glass bowl combine vegetables. Add remaining ingredients and mix well. Add half the mixture to a food processor and blend until smooth. Combine puree with original mixture. Chill for 4 hours and serve with garnishes of your choice. Serves 4 as lunch; 8 as appetizers.
Variations
There are so many ways to make Gazpacho, but usually it is made from tomatoes. A common method is to use pieces of bread to thicken it. This means we should be careful when ordering Gazpacho in a restaurant. However, I find that using bread isn’t necessary and, in fact, I never use any thickener. If your recipe seems excessively watery, simply reduce the amount of liquid (usually tomato juice) by about 25 percent. After all, it is a soup so it should be liquid!
I rarely see this in recipes, but I like to add a pinch of sugar or agave nectar to tomato-based dishes like this Gazpacho to heighten the flavors and balance the acidity of the tomatoes. Try it and see what you think; you won’t know the sugar’s there.
How to Serve Gazpacho
Garnishes are like the “frosting on the cake.” They make our food look prettier and more enticing. I listed several possible garnishes but—if you don’t want to use them—simply sprinkle a little chopped parsley or a basil leaf on each serving and you’re good to go. For a little protein, I sometimes top the appetizers with cooked little shrimps. Very pretty and tasty!
If you are serving the Gazpacho as an appetizer, you don’t have to worry about what to serve with it. But if it is a main dish, then try serving it with a gluten-free baguette that you baked from one of my cookbooks. Or, toast any of the wonderful gluten-free sandwich breads and top with butter and a dusting of Parmesan cheese. Or, serve it with crispy gluten-free crackers….anything to provide a crunchy contrast.
How to Store Tomatoes
You probably already know that tomatoes should never be refrigerated; keep them at room temperature to preserve their texture and flavor. I recently learned that tomatoes will last longer if stored with the stem-end down which prevents moisture from escaping and mold or bacteria from getting in. I plan to try this tip with fresh peaches and apricots, too, just to see what happens (since they should not be refrigerated either).