Carol Fenster's Blog, page 12
June 15, 2015
It’s Berry Time: Make Homemade Strawberry Jam
You may be surprised to learn that there was a time when fresh strawberries were only available in spring and only for a short period of time.

Homemade Strawberry Jam
Yes, it’s true. This was before strawberries were flown in from around the world all year long. As a child, I remember back-breaking days in the hot Nebraska sun plucking ripe, juicy strawberries near our farmhouse. Since strawberries grow close to the ground on vines, we had to kneel down or squat to reach them. Maybe that’s why kids were assigned this task: we were closer to the ground to start with!
I have many favorite ways to eat strawberries (e.g., strawberry shortcake), but one of my favorites is a quick and easy homemade jam that contains no pectin and no preservatives. The natural pectin in the strawberries interacts with the sugar and lemon juice to thicken the jam. It doesn’t have to be canned or frozen so you don’t need any extra equipment. Simply keep it in your refrigerator for up to 2 weeks and enjoy on toast, pancakes, waffles, or spooned over ice cream Enjoy!
Quick and Easy Homemade Strawberry Jam
This easy jam lets the flavor of strawberries shine through without any added pectin or preservatives—and no canning equipment. I usually make it while I’m preparing dinner so I’m able to monitor its progress. It’s an especially good way to use up strawberries that are a little past their prime, but still delicious. I use a minimal amount of sugar in my recipe, but if you like your jam sweeter use 3/4 cup sugar.
1 pound fresh strawberries, washed, hulled and diced (about 3 cups diced)
½ cup sugar
1 tablespoon fresh lemon juice
Pinch salt
Stir the ingredients together in a 1-quart saucepan. With a fork or potato masher, mash a few of the strawberries. Place the pan over high heat and bring to a boil. Then quickly reduce the heat to low and simmer, uncovered, until the mixture is slightly reduced and somewhat thick and syrupy, about 15 to 20 minutes. Transfer the mixture to a clean glass jar with a lid. Refrigerate and use within two weeks. Makes about 1 cup.
Calories per tablespoon: 25; 0g fat, 1g fiber; 0 protein, 6g carbohydrates, 0g cholesterol, 4g sodium


June 8, 2015
Red Velvet Cupcakes for Father’s Day
Father’s Day is June 21– a week from this coming Sunday. Celebrate that special guy in your life with these decadent Red Velvet Cupcakes. You can make the cupcakes ahead of time, freeze for up to a week, then defrost in the fridge the night before you frost them. Take the time to thank the men in your life (Dad, husband, grandfather, brother, or uncle) for all they do for you and your family.
For my husband, I usually prepare his favorite meal for Father’s Day. That is usually something on the grill, perhaps salmon or a juicy steak. He gets to choose dessert, and it has to be something chocolate. So, even though these cupcakes have only a little cocoa in them they will fit the bill just fine.
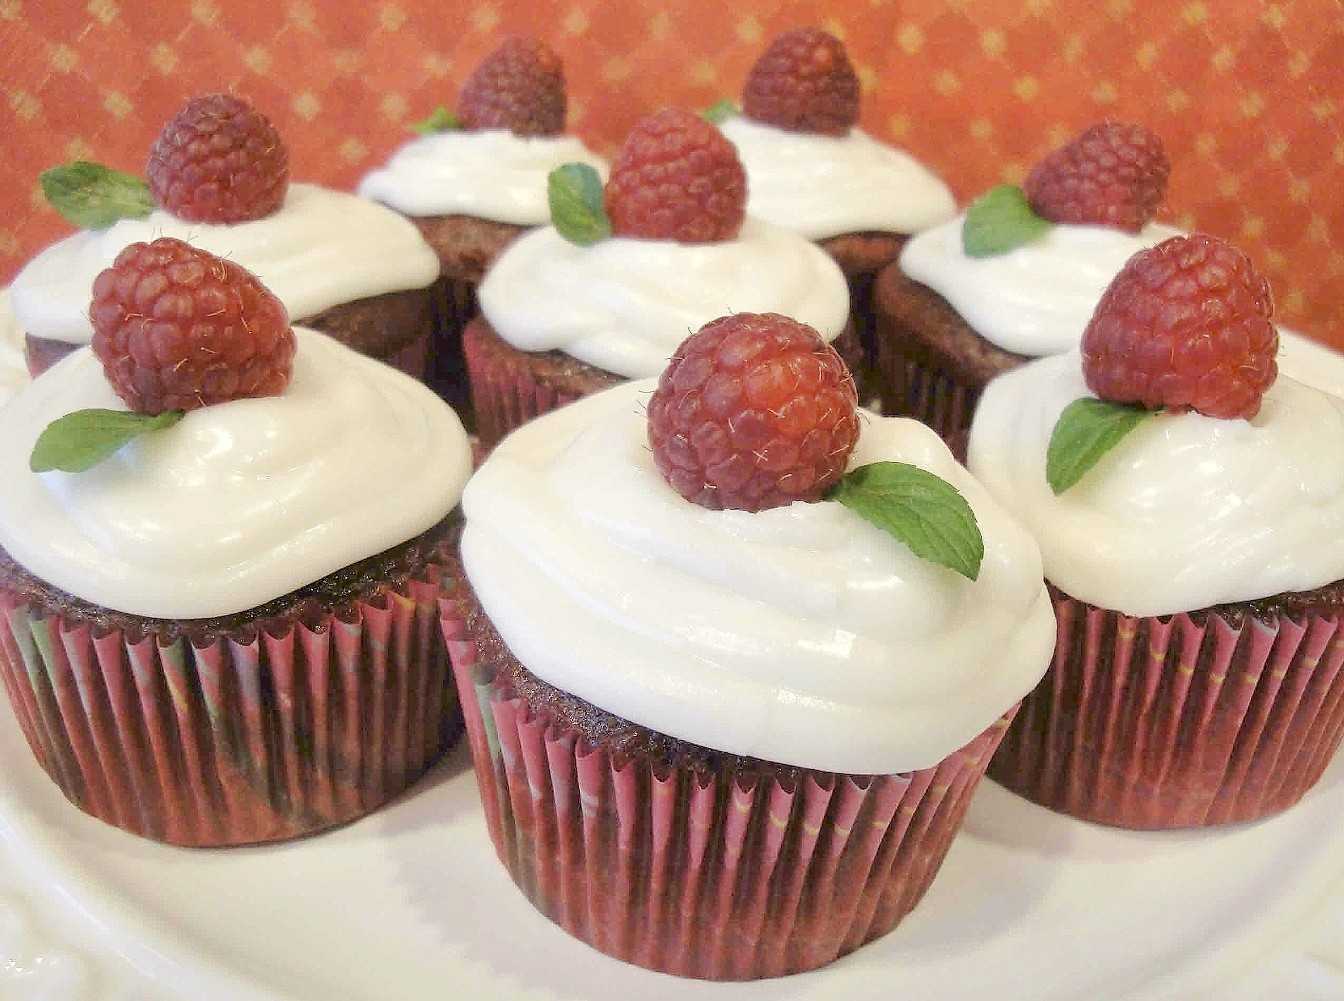
Red Velvet Cupcakes for Father’s Day.
Red Velvet Cupcakes
adapted from GfreeCuisine by from Carol Fenster, author of Gluten-Free 101: The Essential Beginner’s Guide to Easy Gluten-Free Cooking. This makes a gorgeous little red cupcake, perfect for your favorite frosting or the simple, plain vanilla frosting I use here. They make a special treat for Dad.
CUPCAKES
1 cup GF flour blend (see below)
2 tablespoons unsweetened cocoa
3/4 teaspoon xanthan gum
1/4 teaspoon baking soda
1/4 teaspoon table salt
3/4 cup sugar
1/2 cup melted butter or buttery spread, melted and cooled slightly
2 large whole eggs, at room temperature
1/2 cup water, at room temperature
1 teaspoon vanilla
1 tablespoon red food coloring
VANILLA POWDERED SUGAR FROSTING
2 cups powdered sugar
¼ cup melted butter or buttery spread
2 tablespoons milk of choice or water
½ teaspoon corn syrup
½ teaspoon vanilla extract
1/8 teaspoon salt
Preheat oven to 350°F. Line 12-cup standard nonstick (gray, not black) muffin pan with paper liners. These are especially cute if you can find “guy-or-masculine-themed” paper liners.
[1] In a small mixing bowl, whisk together flour blend, cocoa, xanthan gum, baking soda, and salt until well blended.
[2] In a medium bowl, beat the sugar and butter with an electric mixer on Low speed until well blended. Beat in the eggs, one at a time, until well blended. Add vanilla and food coloring to water. With the mixer on Low speed, beat in one-third of the dry ingredients alternately with the water, beginning and ending with the dry ingredients. Spoon ¼ cup of batter into each liner.
[3] Bake until the cupcakes until a toothpick inserted into center comes out clean, about 25 to 30 minutes. Remove cupcakes from oven and cool in pan on wire rack for 10 minutes. Transfer cupcakes to wire rack to cool completely.
[4] In a medium bowl, beat frosting ingredients together with electric mixer on Low speed until well blended and frost cupcakes. Makes 12 cupcakes.
Per cupcake: 345 calories; 2g protein; 19g total fat; 1g fiber; 44g carbohydrates; 42mg cholesterol; 190mg sodium
GF Flour Blend
1 ½ cups sorghum flour
1 ½ cups potato starch
1 cup tapioca flour
Whisk together and store in a dark, dry place.
June 1, 2015
More Foodie Literature for Your Reading Pleasure
As you know by now, I am a voracious reader. Whether in airports, waiting rooms, or my nightly “quiet-time” with a good book—I manage to read several per month. With Mother’s Day coming up and summertime not far off, here are some ideas for gift-giving or for you to enjoy for yourself in the backyard, under a tree, with a glass of iced tea at hand.
I have offered other reading lists in the past on this blog, so check them out:
Reading List #1
Reading List #2
Macaron Murder by Harper Lin

French Macarons are naturally gluten-free
A novel set in Paris, with a culinary murder to be solved. French native Clémence Damour returns to Paris after traveling around the world for two years. She’s dog-sitting for her parents in the posh 16th arrondissement and overseeing the family patisserie, a famous franchise known for their delectable gourmet pastries and sweets in Paris and around the world. Fun, not too heavy, with a glimpse of what it’s like to live in Paris. Recipes for Macarons, which are naturally gluten-free. For my own recipe for French Macarons —not to be confused with Coconut Macaroons—see here.
Growing Home by Heidi Freestone
This is a novel that reads like a memoir. Set in the rural fringes of Sonoma County, with garden wisdom and a few recipes woven into a tale of a life reconstructed through hard work, friendships and a strong desire to make sense of the world. With her heart broken and world view shattered, big-city refugee Sara immerses herself in learning how to grow her own food in rural Sonoma County, California. Wish it were a real memoir instead.
The Call of the Farm: An Unexpected Year of Getting Dirty, Home Cooking, and Finding Myself by Rochelle Bilow
A memoir of living and working on a CSA (Community-Support-Agriculture) farm. One summer, I subscribed to a CSA and now more fully understand what it takes to run such a farm. Bilow, a classically trained cook and aspiring food writer, is nursing a broken heart and frustrated with her yet-to-take-off career when she sets out to write a short profile of a CSA farm in central New York but instead finds temporary love (and lots of sex). She becomes the head cook for a year, with recipes for each season.
The Tastemakers: Why We’re Crazy for Cupcakes but Fed Up with Fondue by David Sax
Kale. Sriracha sauce. Honeycrisp apples. Cupcakes. Chia seeds. They are suddenly superfoods, but this book addresses what exactly is a “superfood.” It’s more of an academic-read, but entertaining nonetheless.
All the President’s Menus (A White House Chef Mystery) by Julie Hyzy
One of my favorite series of culinary mysteries. Chef Ollie (Olivia) helps solve yet another murder tied to the White House, with lots of insights into the food served to the First Family and special occasions. This time the staff is sequestered because of foreign visitors to the White House kitchen, which turn out to dangerous. Chef Ollie is a somewhat like Goldie in Diane Mott Davidson’s series of culinary mysteries. Pure fun, with a few recipes.
Leaving Before the Rains Come by Alexandra Fuller
I had never read anything by Alexandra Fuller before, but she writes beautifully so I quickly became engrossed in her memoir which became a New York Times bestseller. Little mention of food, but here’s the storyline: A child of the Rhodesian wars and daughter of two deeply complicated parents, Alexandra Fuller is no stranger to pain. But the disintegration of her own marriage leaves her shattered. Looking to pick up the pieces of her life, she finally confronts the tough questions about her past, about the American man she married, and about the family she left behind in Africa. It is a fascinating look into a culture (Africa) I know little about.
The Language of Food: A Linguist Reads the Menu
Did you know that the more words describing your dinner on the menu, the more expensive the dinner? A Stanford University professor examines the language of food by exploring the history and meaning foods such as ketchup, macaroni, and even salad. Why do we eat turkey for Thanksgiving (like we think the Pilgrims did?) when those birds are not native to North American and actually come from the Mediterranean. This book made me think!
Bitter: A Taste of the World’s Most Dangerous Flavor, with Recipes by Jennifer McLagan
What do coffee, IPA beer, dark chocolate, and radicchio all have in common? Other than the fact that I love them all, they are classified as bitter. We have recently seen a surge in the popularity of other bitter foods: craft beers; dark chocolate; coffee; greens like arugula, dandelion, radicchio, and frisée; high-quality olive oil; and cocktails made with Campari and absinthe—all foods and drinks with elements of bitterness. This book made me think about why I like certain foods. With recipes, too.
Burnt Toast Makes You Sing Good by Kathleen Flinn
A memoir from the author’s childhood, it’s full of Midwestern tales along with family recipes. Thoroughly enjoyable!
May 25, 2015
Chocolate Chocolate-Chip Cookies
“Tall soy cappuccino, please.” That’s my usual order at our local coffee shop. But, while I love lingering over that cappuccino, I wish I had a gluten-free cookie or bar to eat with it.
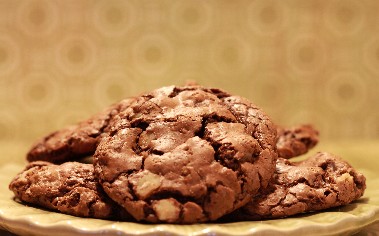
Chocolate Chocolate-Chip Cookies
Recently, I noticed that Starbucks offers “flourless” chocolate chip cookies but they are not labeled gluten-free so I don’t buy them. However, gazing at them in the display case made me want one, right now! So I went home and concocted my own gluten-free version. Here it is:
Chocolate Chocolate-Chip Cookies©
By Carol Fenster
This recipe is small since many people ask me for small-batch recipes because they live in small households. If you just want a few cookies, bake as many as you need and the keep the remaining dough refrigerated for another 3 days. Or, shape into balls and freeze. Then bake as needed. I love pulling these out of the freezer at a moment’s notice and having fresh-baked cookies in about as much time as it takes to heat up the oven. Enjoy!!
Makes 12 cookies
Preparation time: 10 minutes
Chilling time: 2 hours
Baking time: 10 to 12 minutes
1 cup (6 ounces) bittersweet chocolate chips (at least 60% cocoa), divided
1 tablespoon unsalted butter, buttery spread, or coconut oil
1 large egg
1/3 cup sugar
1/4 cup cornstarch
1/16 teaspoon baking soda
1/16 teaspoon xanthan gum
1/32 teaspoon salt
1/4 cup finely chopped walnuts or pecans
[1] In a small microwave-safe bowl, heat 1/4 cup of the chocolate chips and the butter on Low power in microwave oven for about 30 seconds, or until melted. Stir; set aside to cool.
[2] In a separate small bowl, beat the egg, sugar, cornstarch, baking soda, xanthan gum, and salt with an electric mixer on low speed until well blended. Beat in the melted chocolate mixture until no cornstarch streaks remain. Stir in the walnuts and remaining chocolate chips. Dough will be soft. Refrigerate, covered, 2 hours.
[3] Place a rack in the middle of the oven and preheat the oven to 375°F. Line a 9×13-inch baking sheet (not nonstick) with parchment paper. Shape dough into 12 walnut-sized balls and place on baking sheet, at least 1 ½-inches apart.
[4] Bake just until the crust starts to crack, about 10 to 12 minutes. Do not overbake. Cool cookies 2 minutes on baking sheet, then transfer to a wire rack to cool completely. Or, freeze balls up to 1 month and bake later.
Per cookie: 130 calories; 2g protein; 7 g total fat; 1g fiber; 17 g carbohydrates; 18 mg cholesterol; 18 mg sodium
NOTE: You probably noticed the extremely small measurements in this—, for example, 1/16 teaspoon. You can buy mini-teaspoons at kitchen stores or online and they usually contain 1/8, 1/16, and 1/32 measurements. They are good investment for your kitchen if you bake in small batches that require small measurements.
May 18, 2015
It’s Time to Plant Your Own Herbs

Two types of sage grow in Carol Fenster’s herb garden.
Some of us have had a really tough winter! Here in Denver, we had months of bitter cold, followed by unseasonably warm and dry days. Still, we can’t plant flowers and herbs until the danger of frost is over…and experts say that date is Mother’s Day. So, it’s time to plant herbs!!!
Some herbs are perennial and return every year, such as chives and sage, and mine are already 12-inches tall. But annual herbs such as basil, mint, and parsley must be replanted each year. Surprisingly, one of my thyme plants returned on its own this year, so I’ve been enjoying little sprigs since March.
Fresh Herbs are One of Life’s Joys!
You all know that I love my herb garden. To me, gathering fresh herbs and using them in cooking is one of life’s greatest pleasures. Herbs lend flavor and aroma to our gluten-free cooking and make a simple dish come alive with added pizzazz, plus many of them are just plain good for us. I use herbs in everything: rosemary sprinkled on potatoes, basil in homemade pesto, mint in Mojitos, dill in potato salad and homemade pickles, oregano and marjoram in Mexican stews, parsley in Chimichurri, chives in chive oil…the list goes on.
It is really rewarding to snip fresh rosemary or fresh basil or any of the other wonderful herbs and then cook with them immediately, without having to run to the store. And, it’s much less expensive. So, start planning which herbs you want to plant; choose the pots, get the potting soil, and decide on a good location. Then wait until the danger of frost is over before you buy and plant the herbs. Then enjoy! You will thank yourself throughout the summer!
Tips for Growing Your Own Herbs
Here are some tips to make the most of your herbs:
[1] Buy healthy plants. Look for the healthiest plants you can find with no signs of disease or blemish. Plant them soon after getting them home; I’ve had herbs die while waiting to plant them. What a waste!
[2] Choose a good location. My herbs prefer a patio on the northeast side of my house that gets mild morning sun, but is shaded from the harsh afternoon sun. You might experiment with different locations to see where your herbs grow best. I grow them in big pots rather than in the ground so the rabbits can’t eat them, or put them in your garden plot if you have one.
[3] Give herbs lots of TLC. Although most herbs are fairly forgiving for those who are green thumb-challenged, be sure to plant them in good potting soil and water them as directed. Some need lots of water; others don’t. Follow the instructions that come with the plant. If they start to flower at the top of the stem (called bolting), pinch the flower buds off right away or else the flavors may diminish and the plants may produce fewer leaves.
May 11, 2015
My Grandmother’s Whole-Grain Canadian Haystack Cookies
A sign in my kitchen says “Enjoy the little things, for one day you may look back and realize they were the big things.” Little do we realize how certain memories—no matter how ordinary—stay with us forever.

Canadian Cookies are whole-grain.
These cookies are one of those memories. For reasons I never fully understood, my grandmother referred to them as Canadian Cookies. They were always piled high in a green glass dish—like little chocolate haystacks—in the hutch in her dining room. She had 12 children and 40 grandchildren, most living nearby, so there were many little visitors who knew Grandma would have these cookies ready for us. Of all my childhood memories of Grandma, these cookies are my most vivid.
This recipe is from a tattered recipe card, written in my mother’s handwriting which I’ve cherished all these years. Mom continued to make these cookies for us after Grandma died, but I wish I had asked about their origins before Mom’s death only five years later. Now that I have grandchildren of my own that story —whatever it is—seems more important.
Whole Grain, No-Bake, Quick, and Delicious
Fast-forward to today, we would describe these cookies as “no-bake” and tout their ease and simplicity—plus the fact that they are made with whole grains. Rolled oats—even when are quick-cooking—qualify as a whole grain according to the Whole Grains Council. So, even though it a sweet dessert I see no reason not to indulge once in awhile. Enjoy!
No-Bake Canadian Haystack Cookies
Adapted with permission from 1,000 Gluten-Free Recipes by Carol Fenster (Houghton Mifflin Harcourt, 2008)
This was Grandma’s treat for us when we visited her. It is no-bake, whole-grain, and quick.
3/4 cup sugar
¼ cup (1/2 stick or 4 tablespoons) unsalted butter or buttery spread
¼ cup milk of choice (I used 1%)
1 1/2 cups gluten-free, quick-cooking oats*
½ cup +2 tablespoons sweetened shredded coconut
3 tablespoons unsweetened natural cocoa powder (not Dutch-process or alkali)
1/8 teaspoon salt
½ teaspoon pure vanilla extract
[1] Line a 9×13-inch baking sheet with wax paper; set aside.
[2] In a medium heavy saucepan, combine the sugar, butter, and milk over medium-high heat. Bring to a boil, reduce the heat to medium, and boil 1 minute.
[3] Remove the pan from the heat. In a medium bowl, whisk together the oats, coconut, cocoa, and salt until blended. Working quickly with a spatula, stir the oat until mixture into the saucepan until thoroughly combined. Stir in the vanilla. Drop by heaping tablespoons (or a #30 metal spring-action ice cream scoop) on the wax paper. The cookies will be quite soft, but will firm up as they cool to room temperature. Store in an airtight container for up 2 days. Makes 12 cookies.
*Check with your physician about whether gluten-free oats are right for you.
Calories per cookie: 140; 2g protein; 6g fat, 2g fiber; 21g carbohydrates; 27mg sodium; 11mg cholesterol
May 3, 2015
Grain-Free Almond, Flax, and Chia Muffins for Mother’s Day
Mother’s Day is next Sunday. For those of us without mothers, Mother’s Day is bittersweet.

Grain-free Muffins in paper tulip liners.
My own mother died quite young (age 54) and I wish she was here so I could shower her with love and attention. Instead, I treasure two dear elderly aunts who mean a great deal to me and are my connection to my mother. They live out-of-state, so I don’t see them often as I would like.
If you are lucky enough to have your mother in your life, why not bake these healthy muffins for her that say “I love you and I care about your health.” Or, bake them for yourself as a self-embracing hug or salute to your own health. Remember, May is National Celiac Awareness Month so that is another reason to bake… celebrate how far we’ve come!
These muffins feature several healthy ingredients such as almond flour, flax, and chia—ingredients that, ironically, were not widely available during my mother’s lifetime. But I know she would approve. Many of you want grain-free recipes on a Paleo diet or you simply can’t tolerate any grains so this muffin meets those needs. It is sweetened with apples and brown sugar. Choose versions of ingredients that suit your needs (such as grain-free baking powder).
Chia
One ingredient you may not be familiar with is chia, a nutrient-dense seed that comes from the desert plant Salvia hispanica. “Chia” means strength in the Mayan and Aztec cultures —probably because these seeds contain healthy omega-3 fatty acids, carbohydrates, protein , fiber, antioxidants, and calcium. You may find them in light or dark colors but either color works just fine. Plus, you don’t have to grind them first to get their nutritional benefits. I add chia seeds to smoothies for a protein boost.
These muffins are dense and filling, rather than light and airy so don’t expect them to raise super- high. Because of their density, they also travel well so stick a few in the freezer. See here for how to make your own “tulip” liners.
Grain-Free Almond, Flax, and Chia Muffins
By Carol Fenster, author of Gluten-Free 101: The Essential Beginner’s Guide to Easy Gluten-Free Cooking (Houghton Mifflin Harcourt, 2014)
Serve these hearty muffins when you want a healthy treat that fills your kitchen with a heavenly cinnamon aroma. And, you don’t have to save them for Mother’s Day; anytime is just fine. Any type of apple works well, and I prefer to leave the peel on but you can peel if you wish. These are best eaten the second day, so make them the day before and store at room temperature overnight, then refrigerate or freeze any leftovers.
1 cup apple juice
1/4 cup chia seeds
1 cup almond flour/meal
3/4 cup ground flax seeds or flaxmeal
1/2 cup brown sugar
2 teaspoons baking powder
2 teaspoons pumpkin pie spice or apple pie spice
1 teaspoon guar gum
3/4 teaspoon salt
1/4 teaspoon baking soda
2 large eggs, at room temperature
1 teaspoon pure vanilla extract
1 medium cored, grated apple
2 tablespoons raisins
[1] Place a rack in the lower third of the oven. Preheat the oven to 375⁰F. Generously grease a standard 12-cup non-stick (gray, not black) muffin pan or use paper liners.
[2] In a small bowl, soak the chia seeds in the apple juice for 15 minutes, stirring occasionally.
[3] In a large mixing bowl, whisk together the almond meal, flax, sugar, baking powder, pumpkin pie spice, xanthan gum, salt, and baking soda until well blended. With an electric mixer on low speed, beat in the apple juice-chia mixture, eggs, and vanilla until thoroughly blended. Increase the speed to medium-low and beat until the batter is slightly thickened, about 30 seconds. Gently beat in the apples and raisins. Divide the batter evenly in the muffin cups. (A 1 [½]-inch metal spring-action metal ice cream scoop helps ensure uniformly -sized muffins.)
[4] Bake until the muffin tops are firm and a toothpick inserted into the center of a muffin comes out almost clean, about 30 to 35 minutes. If the muffins start to brown too much, lay a sheet of foil over the top. Cool the muffins in the pan on a wire rack for 10 minutes and then remove the muffins from the pan and cool completely on the wire rack. These are best served the next day.
Per muffin: 175 calories; 8g protein; 8g total fat; 3g fiber; 20g carbohydrates; 31mg cholesterol; 274mg sodium
April 27, 2015
Celebrate a Gluten-Free Cinco de Mayo with Tortilla-Shell Salads
Here in the Southwest, we observe Cinco de Mayo (May 5), a day of celebrating Mexican heritage and pride. While it has some serious roots in the history of Mexico, this date is also a good excuse to indulge in Mexican food and drink and have a little fun.

Gluten-free flour tortillas made crispy tortilla shell salads.
In keeping with the Mexican theme, have you ever craved those cute little tortilla shells filled with salads? I have, and then I discovered the fluted tortilla shell pans (4 to a box, around $10-$12 per box) in my local Kroger grocery store and I just absolutely had to make my own crisp tortilla shells.
TO MAKE THE TACO SHELLS
[1] Place the tortilla shell pans on a rimmed 9×13-inch baking sheet for easier handling and to prevent sliding.
[2] Gently press the flour tortillas into each pan with your hands, taking care not to tear the tortillas. If the tortillas have been refrigerated or are stiff, steam each one on a splatter guard set over a skillet of simmering water, covered with a lid, until soft and pliable, about 5 to 10 seconds. Then press it into the pan while it is still pliable.
[3] I tried all of the brands of gluten-free flour tortillas and the brand that was easiest to work with was Rudi’s and the flavor of their tortillas that best complements the Mexican salad is Fiesta flavor, although I have used all 3 flavors (Spinach, Fiesta, and Regular) with great success. Also, Rudi’s tortillas are fairly pliable so you may not need to steam them.
[4] Bake, following the instructions on your package. The time varies depending on the size of the tortilla, but will be under 10 minutes. Let the shells cool in the pan and then remove them and fill with your favorite salad. I used a simple oil-and-vinegar salad dressing, with some extra cilantro tossed in because I love it, but you can use whatever you like. Ranch dressing would be also be great.

Gluten-free tortillas become crispy shells when baked in fluted pans.
FILLING
The salad in the photo contains lettuce, beans, tomatoes, black olives, cheddar cheese, avocado and some cilantro and a dollop of sour cream, but you could add chopped cooked chicken or cooked ground beef as well. Whatever makes a good Mexican filling is fine. Top with your favorite Mexican salsa and a wedge of lime and serve it with your favorite gluten-free beer. Here in Colorado, we’re partial to New Planet, brewed in Boulder, CO. If you prefer hard cider, you might try Angry Orchard.
The best part of this dish? You get to eat the shell so enjoy!!!
Happy Cinco de Mayo!
April 20, 2015
Carol Fenster on PBS-TV in 2015
When you watch cooking shows on TV, you probably don’t think about all the food preparation behind the scenes. Having taped several TV shows over the years, I have learned that appearing on TV is a lot of work. Here’s a behind-the-scenes peek at my latest experience:

Carol Fenster with hostess, Sheryl Borden, on “Creative Living with Sheryl Borden” on PBS-TV
Gluten-Free on PBS
Each year, I tape three segments for a show approaching its 40th year called “Creative Living with Sheryl Borden” on the Public Broadcasting System (PBS). It is taped in a lovely studio with a great kitchen on a university campus in New Mexico. Sheryl is a delightful hostess, always curious about how we prepare gluten-free food, and she is a joy to work with.
This year, I was promoting my latest cookbook, 100 Best Quick Gluten-Free Recipes (Houghton Mifflin Harcourt, 2014). The goal of the book is to prepare dishes in less than 30 minutes, though many are ready in far less time. Some TV stations provide a food stylist to prepare and plate the food attractively for the camera. However, at PBS, I do all the work to get the food ready.
How I Plan My Appearance
I selected a simple theme for each of the three segments each between 6 and 9 minutes long: [1] Coconut Flour, [2] Gazpacho, and [3] Black Quinoa. Despite simple themes, preparing for these tapings takes a lot of planning and preparation. You should see my “to-do” list! Before I leave, I write the script for each segment, emphasizing the main points that Sheryl and I will focus on.
I fly in the day before, do the grocery shopping, and get as much ready as possible such as chopping vegetables, measuring ingredients, and so on so we’re ready to tape when the studio opens the next morning. Then an assistant helps with last-minute details during taping. It is not like the Food Network, which has a huge cast and lots of people to help with the food preparation. But we have lots of fun and the staff—mostly students at the university—is terrific.
Segment 1: Coconut Flour
Of all the flours we use in gluten-free baking, I get the most questions about coconut flour. Perhaps because it is a flour with high protein and fiber? Maybe because it can be used for the Paleo baking, instead of grain-based flour? Or, perhaps because coconut simply tastes good? Or, all of the above!
After discussing how many foods are coconut-based (yogurt, waters, chips, desserts, etc.) I focused on how difficult it is to use coconut flour in baking and how important it is to use a recipe designed for coconut flour. This is because coconut flour soaks up far more liquid than other flours, so we use less of it. In fact, it takes about 4 times as much liquid to hydrate coconut flour as it does rice flour. And, most coconut-flour recipes call for many, many eggs.. perhaps an egg for every quarter-cup of flour.
In addition, in certain types of baked goods it is important to blend coconut flour with other flours for a more pleasing result. So, experimenting on your own can result in disaster unless you follow a recipe specifically designed for coconut flour. One of the more frequent distress phone calls I get is from bakers whose baked goods have failed while trying to adapt coconut flour in their own recipes.
I demonstrated how to make Coconut Macaroons, one of my favorite cookies. They have lots of yummy sweetened shredded coconut, plus coconut flour, and coconut-flavored extract and they are super-simple. For extra glitz, drizzle them with chocolate frosting.
Segment 2: Gazpacho
For the second segment, I focused on the Spanish soup known as Gazpacho. Gazpacho is really vegetables served in a tomato-based liquid. Tomatoes are an important source of lycopene and other nutrients, plus all of the other vegetables in this dish make it truly a nutritious dish.
Though it sounds innocent, traditional Gazpacho is often thickened with bread. But I think Gazpacho tastes better without it, so I showed how to make a quick and easy Gazpacho that serves two (since I get lots of requests for small-batch recipes to meet the needs of small households. See below for the recipe. One of the goals of 100 Best Quick Gluten-Free Recipes is to offer meals that can be ready in less than 30 minutes. With this recipe, it is only 10 minutes—plus some chilling time.
Quick and Easy Gazpacho for Two
Reprinted with permission from 125 Gluten-Free Vegetarian Recipes by Carol Fenster (Avery/Penguin, 2011)
This cool refreshing “liquid” salad is perfect for hot-weather dining because no cooking is required. I use canned tomato juice which contains salt, so if you use unsalted tomato juice just add salt to taste. Double the recipe to serve four.
Serves 2

Quick and Easy Gazpacho
Preparation time: 5 minutes
Chilling time: 1 hour
1 1/3 cups canned tomato juice, divided (two 5.5-ounce cans), divided
2 tablespoons chopped yellow onion
¼ to ½ small jalapeno, seeds and veins removed, coarsely chopped (or to taste)
1 small garlic clove, chopped
1 ½ teaspoons fresh lime juice
1/4 English cucumber, diced, plus very thin half-slices for garnish
½ celery rib, finely chopped
1 ½ tablespoons chopped fresh cilantro, divided
[1] In a food processor, puree ¾ cup of the tomato juice along with the onion, jalapeno, garlic, and lime juice.
[2] Transfer to a large bowl and stir in the cucumber, celery, 2 tablespoons of the cilantro, and the remaining tomato juice. Divide evenly among two soup bowls or goblets and chill for at least an hour to let the flavors meld. Serve chilled, garnished with a half-slice of cucumber and the remaining cilantro as garnish.
Segment 3: Black Quinoa Salad
I strongly believe that our gluten-free diets should include lots of gluten-free whole grains, so I always try to focus at least one segment focusing about whole grains. This year, my third segment focused on black quinoa which is related to regular, tan quinoa as well as reddish-brown quinoa.
What many people don’t realize is that we can treat cooked whole grains like mixed greens, add chopped vegetables, nuts, and fruit and toss them with salad dressing for a cold salad that tastes great anytime, but especially for hot weather. So, that is what I do in this flavorful recipe that is stunningly gorgeous, especially when served on a stark-white plate. There recipe for Black Quinoa Salad is here.
Where to Watch “Creative Living with Sheryl Borden “
“Creative Living with Sheryl Borden” airs in all 50 states in over 118 PBS stations in the U.S., Canada, Guam, and Puerto Rico. For more information, go to http://kenw.org/creative-living-home-.... The segments I taped will air during the 2015-2016 season and that is a long ways away, so check your local PBS station for air times. Send me an email at carol@carolfenster.com when you see it in your area.
April 13, 2015
Luscious Coconut Macaroons
Next to chocolate, coconut is my favorite flavor. My husband does not share my enthusiasm. However, I didn’t learn this little fact until we cut the cake at our wedding reception.
In the little Nebraska town where I grew up, the same lady made the wedding cakes for every single wedding. Back then, there were only white cakes and there were no “groom’s” cakes, either. One cake for everybody!!
And, it was her tradition to add coconut flavoring to the batter. I was accustomed to her cakes and thought all wedding cakes were white and tasted like coconut.
Imagine my husband’s surprise when he bit into our coconut-flavored wedding cake. He politely swallowed the first bite, but no more. To this day, we laugh about the wedding cake he hated.
Today, I am still enamored with all things coconut and that’s why I love these Coconut Macaroons, though they are obviously not my husband’s favorites. They are so easy that the kids can make them and they are virtually fool-proof. Serve them plain, or drizzle with chocolate frosting for added decadence. Leftovers? Crumble them on pudding or yogurt. Enjoy!
COCONUT MACAROONS©
Coconut lovers, this recipe is for you! They are super-simple and gorgeous as well.

Luscious Coconut Macaroons
Makes 8 small cookies
Preparation time: 5 minutes
Baking time: 20 to 25 minutes
2 large egg whites
1/4 cup sugar
1 tablespoon coconut flour or cornstarch
1/2 teaspoon vanilla or coconut extract
Pinch salt
2 1/2 cups sweetened shredded coconut (7-ounce package)
[1] Place a rack in the center of the oven. Preheat the oven to 350°F. Line a 9×13-inch rimmed baking sheet (not nonstick) with parchment paper.
[2] In a medium bowl, beat the egg whites with an electric mixer on medium speed until foamy and airy, about 1 minute. Add the sugar, coconut flour, vanilla, almond extract, and salt and beat just until blended. Add the shredded coconut and beat just until well blended. The dough will look somewhat coarse.
[3] With wet hands or a #30 spring-action ice cream scoop, drop 8 balls, about 1 [1/2] inches in diameter (about 2 ½ tablespoons of dough each), 2 inches apart on the baking sheet. For the prettiest look, don’t compress the balls too much so some coconut flakes poke out from the ball and brown prettily.
[4] Bake until the cookies are browned around the edges, 20 to 25 minutes. Cool the cookies on the baking sheet on a wire rack for 10 minutes. Then transfer the cookies to the wire rack and cool completely.
Per macaroon: 145 calories; 2g protein; 8g total fat; 1g fiber; 18g carbohydrates; 0mg cholesterol; 90mg sodium