Eric VanRaepenbusch's Blog, page 5
October 20, 2013
More "Lift and Find" -- Dot Patterns
One month ago I posted instructions on how to make a "Lift and Find" matching game by repurposing baby wipes packaging lids. (Click here to read that post).

The response to the post on Pinterest resulted in numerous repins (Thank you!!). One pinner said, "The possibilities are endless." This got me thinking about other ways to use the "Lift and Find" game board that I made.
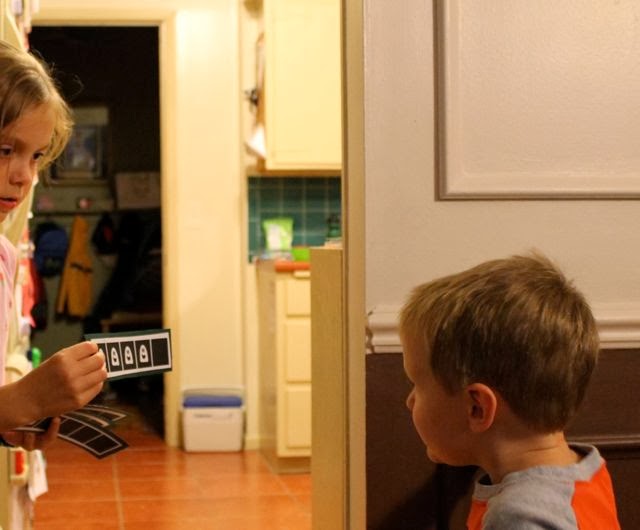
Two weeks ago, I attended a parent meeting at my son's school. My son is in kindergarten and I learned that he is being exposed to dot patterns in math class on a daily basis. I learned that the purpose of dot patterns is to build number sense by establishing a visual structure to keep track of objects in their head.
I thought it would be fun to make ghost dot patterns that could be used along with my "Lift and Find" game board. I hope you will find the printable activity sheets I have provided below useful for your classroom or home school.
 Included in the packet are three printable sheets of dot patterns. (One of the sheets is pictured above.) A child can open the lid, close it quickly, and then state how many ghosts they saw. A teacher or parent could also work with a child and open and close the lid quickly and ask, "How many ghosts did you see?"
If a child has advanced in their number sense, they could open two lids and add the numbers mentally in their head. A teacher or parent could guide their thinking by saying, "How many ghosts do you see here? How many there? How many all together?"
 Also included in the packet are three sheets of dot patterns and numbers. (One of the sheets is pictured above.) These sheets can be used as a matching game. Lift a lid on one side and then find the match on the other side of the game board.
CLICK HERE TO DOWNLOAD THE PACKET!!
(The packet includes 6 printable sheets.)
 How many ghosts to you see under this lid?
 "SIX!"
 "How many ghosts do you see?"
"I see five ghosts."
"Find the number five."
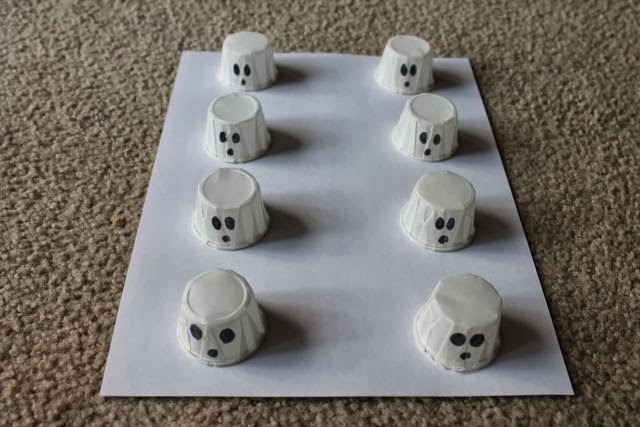
"5!"Don't have wipes container packaging? Try little paper cups...

 As soon as my son saw the game he had to try it!


October 18, 2013

October 14, 2013
The Story Behind....Three Ghost Friends: Learn About the ABCs - Halloween Edition
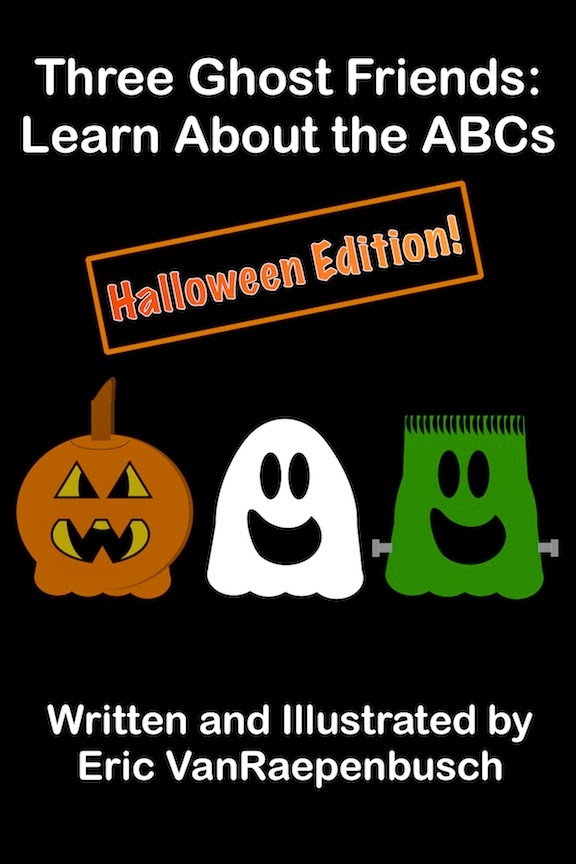
When I created the THREE GHOST FRIENDS, I honestly never saw them as Halloween characters. After writing the first three books in the series someone said to me, "These books are going to be great for Halloween!" I had been so focused on having the ghosts just playing and learning in the first three books that it never dawned on me to make a Halloween book. (Duh! Ghosts = Halloween!)
My best friend from elementary school and I were talking on the phone and he said, "You should have the ghosts dress up as ghosts. That would be funny!" I thought it was a genius idea and it was all the motivation I needed to starting working on my fourth book.
The question was, "How would I get the Three Ghost Friends to the climax of wearing ghost costumes?" What would they learn in this book? What concept would I teach to continue the series?
I love ABC books so I thought I would give it a try. (I am glad I did!)
 I started by making lists of costumes for each letter of alphabet and quickly noticed that I could group many of costumes into categories. It was then that I decided to go with the idea of "one of these things is not like the other" along with ABCs.
This proved harder than I thought. I needed each category to have three costumes plus a costume that didn't fit. Then, I needed everything to follow ABC order too! There was also the challenge that there are 26 letters in the alphabet and that is not divisible by three ghosts!
The obstacles actually helped make the book better. I had tons of traditional Halloween costumes listed and those became the costumes that "were not like the others". The alphabet helped change the pace of the book in the middle when the Three Ghost Friends decide to try on the same costumes. Overall, I was really pleased with how it all worked out!
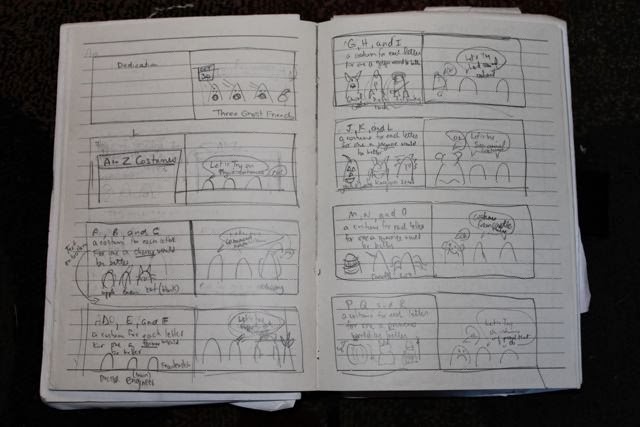 Next, I had to figure out how to organize the book. I remember this coming pretty easily because much of the organization was done with the order of the costumes. Also, the storyline had been rolling around in my head for quite some time. I sketched out the pages and only a few things changed from the sketchbook to the final layout.
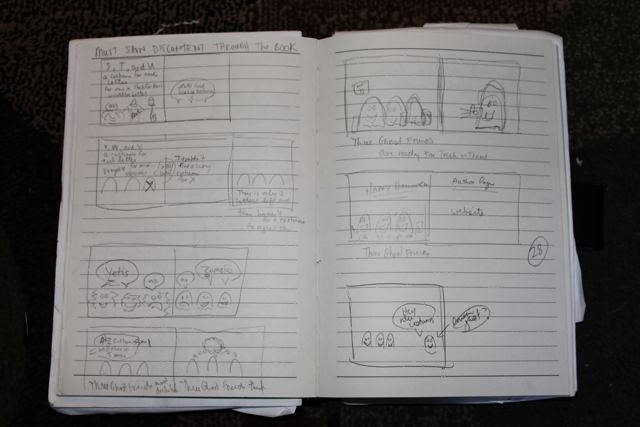 On the bottom of this page of my sketchbook I drew a "cousin ghost". My niece is the biggest fan of my books and she suggested that it would be a good idea to have a "cousin" ghost in one of my books. It was a great idea and it fit perfectly in this book with the THREE GHOST FRIENDS going to the "cousin ghost's" house for Trick or Treat.After the sketching was complete I went to the computer to create all the images. I used iDraw to make all the illustrations. It was a blast creating all the costumes for the ghosts. Initially, I remember feeling hesitant to start because I really didn't know if I could put costumes on my ghosts. Once I did the Apple and Banana ghosts I realized that I could indeed draw costumes on the Three Ghost Friends. From there, I finished one costume after another. Once I finished one costume I wanted to work on the next!
Which one is my favorite? I really like the narwhal and the manatee costumes.

Below is a video of me reading Three Ghost Friends: Learn About the ABCs - Halloween Edition to my 18-month-old daughter. It has been such a joy that she has been asking me to read my books to her each day. Today, I decided to flip on the video camera and share our story time with you!
This book is currently on sale on Amazon.com and available as an eBook on iTunes for only 99 cents:
October 13, 2013
TOP 10 FREE Halloween Activities from Three Ghost Friends
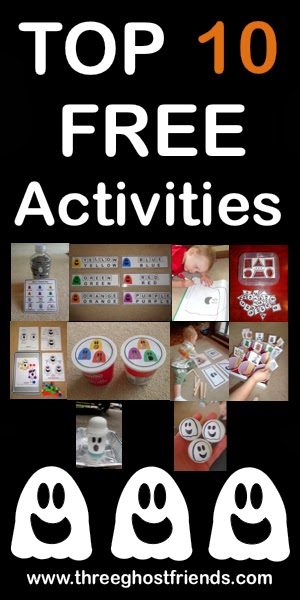
Below are the Top 10 FREE activities and printables that I made to accompany my THREE GHOST FRIENDS series of books. Children would love these activities all by themselves! But, I would love if purchased one of my books to read to your child before, during, and after your favorite activity!
Paperback books are available at Amazon.comeBooks are available for iPad and iPhone at iTunes
Thank you for stopping by and I hope your little ones enjoy these learning activities!
 1. Spell Your Color Words with the Three Ghost Friends -- FREE PRINTABLES!
 2. Toddler Busy Bag: Build a Ghost Shape - FREE PRINTABLES!
 3. Oozy, Foamy, Overflowy Ghost
 4. Toddler Busy Bag: Ghost Shape Tracing - FREE PRINTABLES!
 5. Boo! I Found You: Homemade Look and Find Game - FREE PRINTABLES!
 6. Three Ghost Friends Halloween Sort - FREE PRINTABLES!
 7. Three Ghost Friends: Ghost Shape Sort - FREE PRINTABLES!
 8. Three Ghost Friends Magnet Pom-Poms - FREE PRINTABLES!
 9. Three Ghost Friends Carnival Week
 10. Toddler Busy Bag: Feed the Ghosts - FREE PRINTABLES!
There are over 70 more Activity and Craft ideas - Click HERE!
October 11, 2013
Ghost T-Shirts
My family received many compliments on our ghost t-shirts during our time at the Earth Fare Community Block Party. I wanted to share with you how we made them so you could make your own ghost t-shirts for Halloween.
 First, draw a ghost on a piece of corrugated cardboard. I traced one of the Three Ghost Friends. It may not matter with your t-shirt design, but I had to keep in mind that I needed my image to be traced backward (mirror image) on the cardboard so that it was the right way once it was stamped on the t-shirt.
 Next, I used an x-acto knife to remove a layer of the cardboard from where I didn't want white paint to show up on my t-shirt. In this case I wanted the eyes and the mouth to be black, not white.
 We purchased white screen print ink and my son brushed it on the cardboard ghost stamp.
 Then, he flipped over the stamp and pushed it down on the t-shirt.
 We let the ink dry and then I ironed the image to make sure it was set in the fabric. When ironing, I placed a piece of blank paper to cover the image then ironed on top of the paper.
 Lookin' good!
 This is the best picture I have of my shirt. I splatted mine with colored screen print paint.
 It turned out pretty cool!Only 20 Days until Halloween!
October 10, 2013
Roll and Cover Ghosts
Mathematical imagery is all the rage right now.
I went to two parent meetings last week -- one meeting for my third grader and one meeting for my kindergartner. The teachers in both meetings were talking about developing number sense through imagery. They showed us five frames and ten frames and dot patterns. It was all really cool stuff.
I talked with my wife, a trained elementary math teacher, and I asked her to help me create one of the math imagery games featuring the THREE GHOST FRIENDS. I thought it would be fun for students to play during the weeks leading up to Halloween. But, I never expected that my three-year-old son would enjoy the game too!
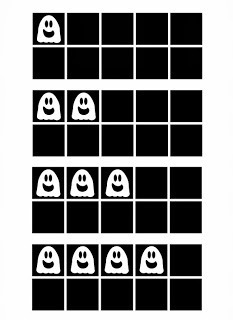
The game my wife suggested was Roll and Cover. The game is simple. Roll a die. Recognize the number of dots and cover the matching spot on the game board. The object of the game is to cover your whole game board.
We made multiple FREE printable game boards.
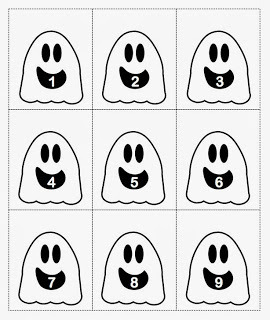
 This game board has ghosts in the same dot patterns as a die. The child rolls a die and finds the matching dot pattern on the game board. Parents or teachers can ask the child at any point during the game, "How many do you see?" This will encourage recognition over counting.
 This game board has numbers in the ghosts' mouths. The child rolls a die and finds the corresponding number on the game board. This game board is a higher level then the game board above.
 If your child masters the game boards above, then trying rolling two dice. This game board has numbers 2-12 in the ghosts' mouths.
Click Here to Download the ROLL AND COVER packet that includes instructions.
 My three-year-old needed little instruction to understand this game.
 He is still developing his imagery of numbers 4-6. Here he is counting 5 on the game board.
 With multiple exposures and time he will develop the image of 6 and then be able to recognize and state the number without counting.
 HE DID IT!
October 9, 2013
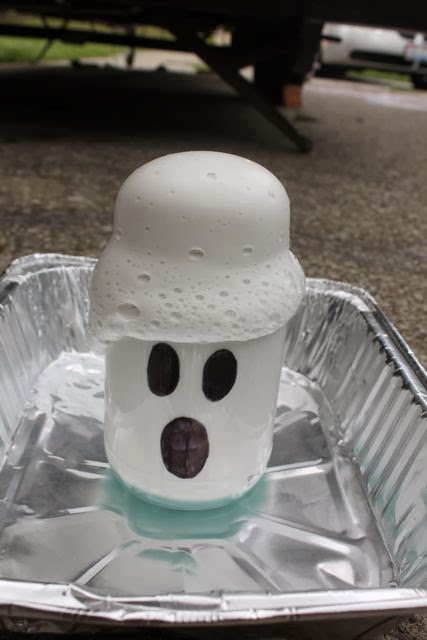
Light Bulb Ghosts
I started making a list over the summer of ghost crafts that I wanted to make this Halloween season. One of the first ideas I wrote down was "Light bulb Ghosts" after I had changed a light bulb in our house and couldn't throw it away. I thought, "There must be a way to turn this into a ghost."
Over 10 other ideas were crossed off my list but "Light bulb Ghosts" were still at the top. I couldn't figure our how I wanted to turn the light bulb into a ghost. Yesterday, I finally had an idea that I wanted to try. I was pleased with the results, but my wife and daughter thought they looked a little silly. (Let me know what you think!)
 An old light bulb and a paper cup. That is what I wanted to use to make my ghost.
 I cut off the bottom of the cup and then trimmed the height until it fit around the light bulb the way I wanted. Do not trim too much because the end of your light bulb will stick out the bottom.
 I cut slits all the way around the top of the cup.
 Then I taped the ends of a piece of fishing line to opposites sides of the inside of the cup. I did this so I could hang my light bulb ghost. You wouldn't need to do this if you just wanted your light bulb ghosts to sit on a table or a mantle.
 I ran hot glue around the edge and then pressed the light bulb into the cup. If you don't have hot glue you could just use clear tape.
 Then, I drew on the ghost faces with a Sharpie marker.
 Ooooooooo!
(I like them!!)
October 8, 2013
Ghost Five Frames
A five frame is a way to visually organize a set of objects. Five frames are used to teach children a visual image for a number in the range of 1-5 in Kindergarten classrooms by showing students how to create images of numbers. Students are asked different questions about what they see when they are shown the frame quickly, for 1-2 seconds.
Questions such as "How many ghosts did you see?" or "How many empty boxes?" require a student to have a quick image of the number they saw. Asking questions such as "How many more ghosts do you need to make 5?" requires them to know their facts to five, and to be able to combine two numbers to make a new number.
Five frames with the ghosts provide another setting for your child or students to practice their understanding of five frames.
You will need:1. Download and print ghost five frames printable (link to download is below)2. Scissors and glue3. Construction paper or card stock paper
 Five frames in black and white are included in the packet. Quickly show and hide the five frame to your child. Ask "How many ghosts did you see?"and "How many empty squares?" and "How many more do you need to make five?" Don't be afraid to mix up your questioning throughout the exercise.
"Making Five" (five frames with combination to 5) are also included in the packet. "How many red ghosts?" and "How many blue ghosts" and "How many all together?" Then, have students say a sentence like, "1 and 4 make 5." or "3 and 2 make 5."
 "Parts of five" (five frames with totals of 1-4) are also included in the packet. "How many red ghosts?" and "How many blue ghosts" and "How many all together?"
Click to Download the Packet!
Directions:1. Download and print the ghost five frame printables.2. Cut each five frame into a single frame.3. Glue single frames on a construction paper or card stock to make more sturdy.3. Make a pile of the five frames in random order.4. Sitting across from your chid or student, quickly show them the image of the five frame by flashing it to them. Ask them a variety of questions, including "How many ghosts did you see?", "How many were empty?", "How many all together?", "How many more to make five?", "How many blue ghosts?", "How many red ghosts?" 5. Practice these five frames until your child/student can answer all the questions about the cards automatically without counting or having to see the boxes again to check their answers.
 My third grade daughter working with her three-year-old brother on five frames.
Have your children mastered FIVE FRAMES?Check out Three Ghost Friends TEN FRAMES!!
Did your children enjoy using the ghosts to practice number sense? I bet they would enjoy reading the Three Ghost Friends books:
October 1, 2013
Boo! Berry Ghost Mini-Pies Dessert Recipe
Yesterday, my kids and I made the most delicious dessert. We called it Boo!Berry Ghost Mini-Pies. To make this dessert we adapted a recipe that we found on La Bella Cook.
 Yum!
Yum! Please Pin this to Pinterest and follow the THREE GHOST FRIENDS board.Ingredients:
2 1/2 cups all-purpose flour
1 tsp. salt + 1 pinch
1/2 cup sugar + 2 Tbs.
2 sticks of butter or 16 Tbs.
6 Tbs. ice water
1 1/2 Tbs. corn starch
2 cups of black raspberries (We used frozen ones but fresh would work too.)
1 tsp. vanilla
1 egg beaten with 1 tsp. water
Procedure:
 Add 2 1/2 cups flour, 1 tsp. salt, and 2 Tbs. sugar to your mixing bowl. Then, mix until blended.
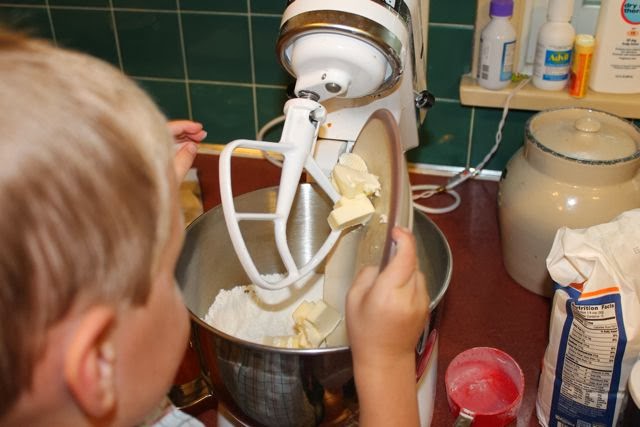 Cut the two sticks of butter into small chunks or slices. Then, added to mixing bowl with the flour mixture. Mix on low for about a minute so the flour doesn't fly all over the place. Then, increase the speed and mix for about 90 seconds or until you can't see the butter chunks any more.
 It should look like this. Then, add 6 Tbs. of ice water and beat on low for about 20-30 seconds.
 The dough should look like this. Scrap the dough off the mixing paddle into the bowl.
 Divide the dough in half on top of two pieces of plastic wrap and flatten. Then, wrap the dough completely and store in the refrigerator for at least 2 hours.
 Now comes the fun part! Roll out your dough and use flour when necessary.
While you kids are rolling the dough, you can to make your berry filling:
On the stove over medium heat, cook your black raspberries along with 1/2 cup sugar, 1 1/2 Tbs. corn starch, and a pinch of salt for about 10-15 minutes. Let your berry filling cool because you will be working with it and I don't want you to get burned. (I am sure you could use blueberries or strawberries instead of black raspberries. It is just what we had in the freezer!)
 You would think that a guy who writes children's books and blogs about ghosts would have a ghost cookie cutter. But, I don't! I improvised with pumpkin and dinosaur cookie cutters. I found that once you have the basic shape you can form the ghosts with your hands.
 The recipe makes about eight mini-pies. But, you will need a bottom ghost piece and a top ghost piece with eyes cut out. So, that is sixteen ghost cutouts.
 My little helper in the background working hard with his dough.
 I used a spoon to carve out the eyes on eight of the ghosts. Then, I formed the eye holes with my finger.
 Looking pretty spooky!
 I really don't think this is completely necessary, but I used a plastic container to give the bottom piece of the dough an indentation to place the berry filling.
 Then, I placed a dough piece with eyes on top.
 Carefully pinched the edges.
 I used a fork to crimp the edges.I forgot to take more pictures after this step. But, once I made all the ghost mini-pies I placed them in the freezer for 30 minutes. After 30 minutes, I removed them from the freezer and brushed them with the beaten egg and 1 Tbs. water.
 I baked them in a 400 degree oven for 15-20 minutes.
 I thought they turned out great!
 The kids loved them too!
 "Ooooooooooo! This is a yummy bedtime snack!"
This would be great paired with Ghost Vanilla Ice Cream!
Read the post here!

September 30, 2013
Halloween Countdown Calendars
October is here! My children will begin their countdown to Halloween! I made two different countdowns to help build their excitement to one of their favorite days of the year.
Countdown #1:
- Use this single sheet countdown and have your kids cross off each day leading up to Halloween.
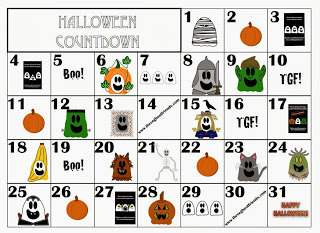 Click here to download!Countdown #2:
- This countdown will allow your kids to pull off a ghost each day leading up to Halloween. All you need is a piece of card stock paper to make a table tent and two brads to attach the countdown ghosts.

 Click Here to Download!