
Luisa Weiss's Blog, page 9
November 5, 2015
Rachel Roddy's Peperonata
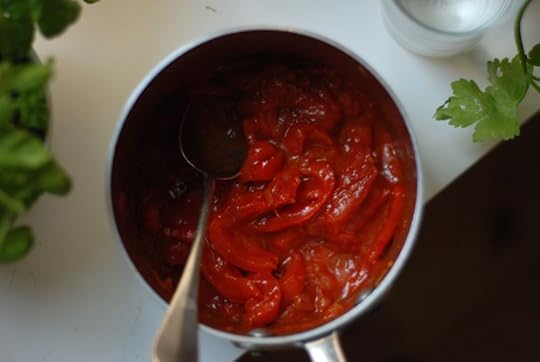
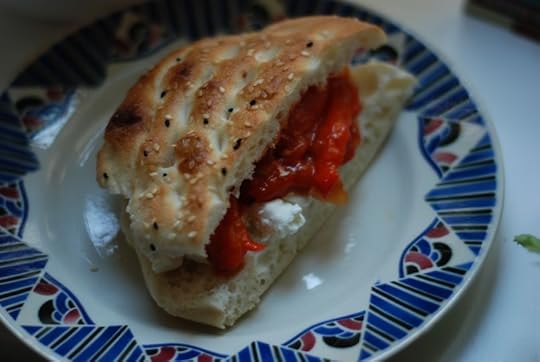
Rachel has a new column in the Guardian and if the first two are any indication, it is going to be a treasure trove for us home cooks. I read about her vinegar-spiked peperonata as soon as the link was up and was at the stove and cooking it not more than an hour later, if my memory serves correctly. Rachel has all kinds of nice suggestions for how to eat it (with a piece of frittata, for example, or dolloped next to boiled potatoes), but I was most taken with the thought of it on a sandwich. The day after I made it, since it gets better as it sits, I piled it onto a round of soft Turkish bread studded with sesame and nigella seeds, and added in a few pieces of feta here and there for good measure. Some sharp-tasting parsley leaves gave the sandwich a bit of pep and texture. Silky, salty, creamy, chewy - it was a very nice thing indeed.
The day after that, I steamed some cubed zucchini and mixed them with more peperonata, warmed up this time. Hey presto, we had our Sunday lunch pasta sauce. Predictably, Hugo turned his nose up at the cooked strips of peppers at first, but gobbled them up soon enough.
So often, my workday lunches at home are on the grim side: cold leftovers, because I'm too lazy (or busy) to heat them up, the long-lamented cheese sandwich, a plate of day-old rice with ketchup on top. (Proof.) But having a pot of peperonata to play with made me feel downright rich. Thanks, Rach.
Be forewarned: this is a messy sandwich. Two hands are needed to contain it as you eat and both will be dirty by the end of lunch. Still. Worth it.
Rachel Roddy's Peperonata
Serves 8
1kg red peppers
4 tablespoons extra virgin olive oil
A small piece of butter
1 large onion, peeled and finely sliced
1 clove garlic, peeled and pressed
Salt, to taste
450g peeled plum tomatoes
Red wine vinegar, to taste (optional)
1. Cut the peppers into strips, about 1cm wide and 6cm long, discarding the seeds, stalks and any pithy white bits.
2. In a heavy-based pan with a lid, warm the olive oil over a medium-low heat, then cook the onion and garlic until soft, translucent and fragrant (they should not brown), which usually takes about 10 minutes. Add the peppers and a pinch of salt, stir, then cover and cook for 15 minutes, stirring every now and then.
3. Add the tomatoes, stir and then leave, uncovered, at a lively simmer for 30-40 minutes. Stir occasionally, gently pressing the tomatoes against the side of the pan, so they break up.
4. The peperonata is ready when the peppers are soft and everything has come together into a thick stew. Taste, season generously, and add a dash of vinegar to sharpen things up.


November 4, 2015
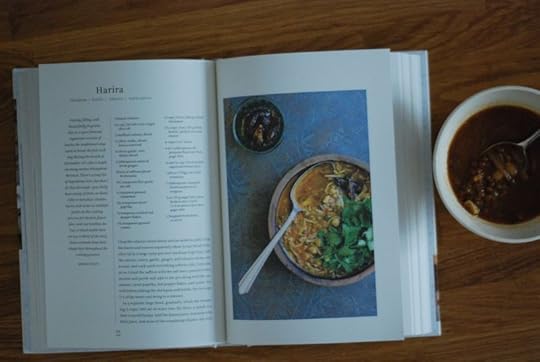
Heidi Swanson's Harira
So as not to bore you to tears, I will summarize my current mood with regards to technology as such: CROTCHETY ANGRY OLD LADY WITH COKE BOTTLE GLASSES SHAKING HER FIST AT THE RAINBOW SPINNING WHEEL OF DEATH WHILE CLUTCHING A WALKER WITH WIZENED KNUCKLES, the spinning wheel of death being a stand-in for several other things, in addition to the actual spinning wheel.
But! One does not want to dwell. One wants to remain positive in the face of adversity (although, really, Apple software updates, you are flirting dangerously with my blood pressure, you nasty little jerks). So I'd like to focus on someone who has always managed to make forward movement in work and technology seem effortless, Heidi Swanson of 101 Cookbooks. She was at the forefront of food blogging over a decade ago, of course, but her ongoing productivity and creativity as the field gets ever noisier and more crowded is awesome to behold.
Her latest cookbook, Near & Far, is an idiosyncratic collection of recipes that she assembled and developed on her travels throughout Japan, Morocco, Italy, France and India, with a lovely little chapter dedicated to food she makes for the actual traveling part, too (including savory chive dumplings and strongly flavored gingersnap cookies, against travel sickness - brilliant!). Settling in with Near & Far on the couch has been the most soothing time I've spent with myself lately, with those soft, smooth pages, the quietly luscious photography, and Heidi's calm, quiet tone.
Heidi slips millet into madeleines, makes granola with nori and cashews and shichimi togarashi and bakes oatmeal with plums and kefir, but she also has a knack for simple soups that steal the show, like this vegetarian Moroccan harira, blazing with spices, nubby with lentils and chickpeas, and rib-sticking in the very best way. When I made the soup, it filled my biggest soup pot to the very top. After feeding a bunch of my girlfriends for dinner, I figured I'd have leftovers for lunch the next day. I had left out the angel hair noodles broken in at the end, and the dates, which I didn't have, and so I served it with slices of bread for wiping our plates. By the end of the evening, there was nothing left but a bare scraping of soup at the bottom of the pot.
I left out the cilantro, because I didn't have any, and the marjoram/oregano and celery leaves, because I forgot, but I'd urge you to make sure to include all of those, if only because these kinds of bright pops of additional flavor are part of what Heidi does so well.
And now I'm off to plump up my pantry with some of Heidi's brilliant inventions, like hazelnut spice (a blend of orange zest, salt, toasted hazelnuts, sugar, cinnamon and poppy seeds), and the aforementioned nori granola. I can't wait to see what she comes up with next.
Heidi Swanson's Harira
Adapted from Near & Far
1 bunch cilantro
1/4 cup | 120 ml extra-virgin olive oil
2 medium onions, diced
3 celery stalks, diced, leaves reserved
6 cloves garlic
2 tablespoons minced fresh ginger
Pinch of saffron (about 30 threads)
2 1/2 teaspoons fine-grain sea salt
1/2 teaspoon ground cinnamon
2 1/2 teaspoons sweet paprika
1/2 teaspoon crushed red pepper flakes
2 1/2 teaspoons ground cumin
2 cups | 10 oz | 280 g cooked chickpeas
1 1/2 cups | 9 oz | 255 g dried lentils, picked over and rinsed
6 cups | 1.5 L water
4 to 5 tablespoons all-purpose flour
Scant 1/4 cup | 50 ml freshly squeezed lemon juice
1 (28-oz | 795g) can whole tomatoes
2 tablespoons chopped fresh marjoram or oregano
3 oz | 55 g angel hair pasta, broken into 1-inch | 2.5cm pieces
Chopped fresh dates, to serve
1. Chop the cilantro stems finely and set aside in a pile. Chop the leaves and reserve separately. Heat 1/3 cup | 80 ml of the olive oil in a large soup pot over medium-high heat. Add the onions, celery, garlic, ginger, and cilantro stems, stir to coat, and cook until everything softens a bit, 5 minutes or so. Grind the saffron with the salt into a powder with a mortar and pestle and add to the pot along with the cinnamon, sweet paprika, red pepper flakes, and cumin. Stir well before adding the chickpeas and lentils. Stir in 4 cups | 1 L of the water and bring to a simmer.
2. In a separate large bowl, gradually whisk the remaining 2 cups | 500 ml of water into the flour, a splash at a time to avoid lumps. Add the lemon juice, tomatoes with their juice, and most of the remaining cilantro. Stir well, breaking up the tomatoes somewhat. Add this mixture to the soup and bring to a simmer, stirring often. Once at a simmer, cook for another 15 to 20 minutes, stirring occasionally, until the lentils are cooked through. When you have about 5 minutes left, stir in the marjoram and pasta. Once the pasta is cooked, adjust the seasoning and serve topped with dates, the remaining cilantro, the remaining olive oil, and the reserved celery leaves.
October 4, 2015
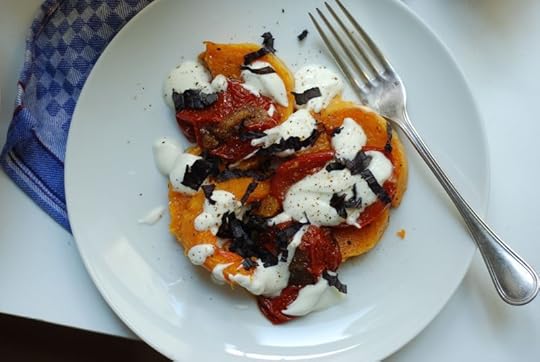
Yotam Ottolenghi's Butternut Squash with Ginger Tomatoes and Lime Yogurt
I'm here, I'm here! I've just been in a book-finishing tunnel for the past 6 weeks, recipe testing like a house on fire and finishing up the writing of the German baking book. I still have about 3 days of work to cram into the next 24 hours, so I'm not entirely ready to bust out the champagne just yet, but I am ready to start making something other than cake again.
We've been subsisting on the simplest food in this phase, because I just can't face spending any more time than I already do in the kitchen. So it's been a lot of pastas and simple sauces, steamed fish and boiled vegetables, you know, and every once in a while, my mother shows up with a pot of soup or some roast chicken and I don't have to cook at all. Mothers!
Yesterday, though, with Max and Hugo off at friends' for the umpteenth time in the past month (sob) and me growing square-eyed in front of the computer, I just couldn't handle another sad, solo cheese sandwich. So I made this gorgeous-looking mess, cutting every possible corner I could have possibly cut, and had one of the best meals I've had in a while.
It's an Ottolenghi recipe, from his new book, so you know it's insanely fussy. If you follow all the steps, though, I'm sure it's insanely good. If you are a lazy, lazy lazybones like me, whacking both squash and tomatoes in the oven at the same time, at the same temperature (insert horrified face emoji), squeezing lime juice and dolloping yogurt over the plate instead of making a nice little sauce, running out to the balcony for basil and hacking that up instead of using fresh cilantro and skipping all the other doodads (ground cardamom! roasted cashews! fried onions!) that make this dish restaurant-worthy, the good thing is that it is still REALLY GOOD. And sometimes REALLY GOOD is enough.
Yotam Ottolenghi's Butternut Squash with Ginger Tomatoes and Lime Yogurt
Serves 4
1 butternut squash, peeled and cut in half lengthwise, seeds removed
3 tablespoons olive oil
Sea salt and black pepper
6 plum tomatoes, halved
1-inch piece of ginger, peeled and grated
1 small red chili, finely diced
2 garlic cloves, grated
2 tablespoons dark brown sugar
1/2 cup/120 grams plain whole milk yogurt
1/4 teaspoon ground cardamom
Juice and finely grated zest of 1 organic lime
Handful fresh cilantro or basil leaves
2 tablespoons roasted, chopped cashews
1 tablespoon fried shallots, optional
1. Preheat the oven to 465 F/240 C. Cut the squash in 1-inch slices and toss with two tablespoons of the oil, two teaspoons of salt and a good grind of black pepper. Spread out on a large, parchment-lined baking tray and roast for 35-40 minutes, until golden-brown. Set aside to cool.
2. Turn down the oven to 340 F/170 C. Put the tomato halves skin-side down on a parchment-lined baking tray, sprinkle with a quarter teaspoon of salt, drizzle with the remaining tablespoon of oil and roast for 80 minutes, until softened.
3. Put the ginger, chilli, garlic, sugar and a quarter teaspoon of salt in a medium bowl. Mix to a paste, then spoon on top of the tomatoes and cook for 40 minutes more, until caramelized, then set aside to cool.
4. Put all the ingredients for the lime yoghurt in a small bowl, add half a teaspoon of salt and a good grind of pepper, mix well and put in the fridge until ready to serve.
5. Spread out the squash on a large platter and arrange the tomatoes in between. Drizzle over the yoghurt, sprinkle over the cilantro, cashews and shallots, if using, and serve.
August 19, 2015
Riso al Forno alla Siciliana
We are in the final days of our vacation, when things get sort of panicky and weird. The temperature has dropped and it's now colder here than in Berlin, which is no good at all. I'm wearing a very strange mish-mash of clothing (palm-frond leggings! a stained t-shirt! my mother's cardigan! white Birks!) from the vacation closet to stay warm. And in a minute, I'm heading downstairs to make our third crostata this vacation so far. But! I know what you're making for dinner tonight! Or tomorrow. Or this weekend. WHENEVER. You're making this.
I found it in yet another of my mother's cookbooks, you know, the ones with no author, the ones you'd normally see in a grocery store instead of a bookstore and pass on by without a second glance. This particular one was published by La Repubblica, the newspaper, and is part of a series on regional Italian cooking. The region in this case, Sicily.
I paged through it the other day and found about seven hundred and thirty things I wanted to make right away, but this baked rice dish stood out because it didn't require much of anything exotic, besides maybe caciocavallo cheese (which I substituted with provolone.)
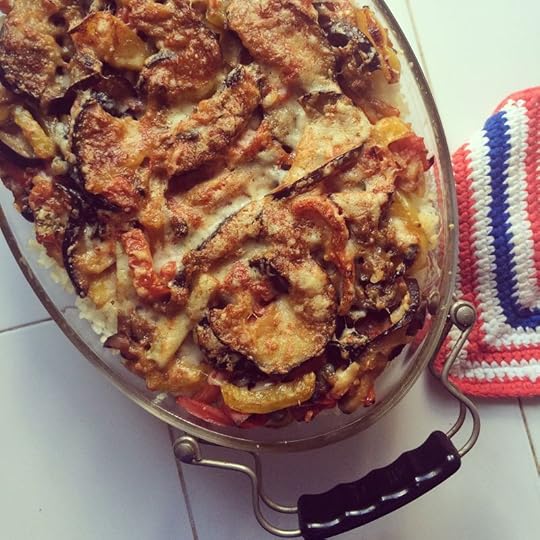
You par-cook Arborio rice and dress it with olive oil and grated cheese. Then you stew together garlic, onions, bell peppers, eggplants and tomatoes and season them with basil, some red pepper flakes, salted capers and cured black olives. This mixture is layered with the par-cooked rice and more of that grated cheese and baked in the oven until the top is good and melty and brown.
It sounds sort of fussy, but the payoff is huge. We loved how elaborate it looked and tasted and yet I slapped the whole thing together just before lunchtime. Vacation lunchtime, but still - this could totally be a weeknight dinner. (I'd even go so far as to say it could be dinner party fare, but it falls apart on the plate in a way that might not be quite what you're going for when you have guests. But I don't know your life, so do whatever the spirit tells you to do.)
150 grams of cheese sounds like a lot of cheese, but it's spread out throughout the dish and seasons the rice really nicely. Plus, when you dig out a scoop of the rice, tiny filaments of cheese hang off the spoon and wiggle. YESSSSS.
Riso al Forno alla Siciliana
Serves 6
320 grams Arborio rice3 tablespoons olive oil, plus more for the dish
150 grams caciocavallo or provolone, grated
1 garlic clove, thinly sliced
2 small onions, thinly sliced
1 yellow bell pepper, sliced into thin strips
1 red bell pepper, sliced into thin strips
2 small eggplants or 1 large one, halved and sliced
3 plum tomatoes, cored and sliced into thin strips
2 tablespoons salted capers, soaked and rinsed
1/4 cup cured black olives, pitted
Red pepper flakes, to taste
8 basil leaves
Salt
1. Bring a large pot of salted water to the boil. Add the rice and lower the heat. Simmer for 10 minutes, then drain the rice. Place the rice in a bowl and drizzle with 1 tablespoon olive oil. Stir in 50 grams of grated cheese. Set aside.
2. Place the remaining olive oil in a large saut�� pan over medium heat. Add the garlic and cook for a minute or two, then add the onions, peppers and eggplant. Cook over medium-high heat, stirring, for about 5 minutes. Then lower the heat to low, cover and stew for 10 minutes.
3. Remove the lid and add the tomatoes. Stir well, then cover again and cook for an additional 10 minutes.
4. Remove the lid, raise the heat to medium-high, add the capers, olives, red pepper flakes and basil leaves. Stir well and cook for a few minutes. Taste and adjust for seasoning.
5. Preheat the oven to 350 F/180 C. Oil a baking dish.
6. Place half the rice in the dish evenly. Distribute half the vegetable mixture over the rice evenly. Top with half of the remaining grated cheese. Repeat with the remaining rice, vegetables and cheese. Place the dish in the oven and bake for 25 minutes, until the top is a deep golden brown. Remove from the oven and let cool for 5 minutes before serving.
August 6, 2015
Focaccia ai Quattro Sapori
I am in Italy at my mother's house for three weeks. It is beautiful here, and hot, and I am stuck indoors most of the time, writing recipe headnotes for the German baking book, which is due to the publisher on October 1st.
Gulp.
The good thing is that this means that soon - soon! - we shall have a title. Maybe even a subtitle. I am so ready to give this baby a name. Also to stop baking cake every other day, but that is a story for another time.
Back to Italy: As I have mentioned too many times to count, my mother is not a big fan of, um, cooking. She mostly just endures it, though a few recipes have managed to rouse some enthusiasm out of her, like Deb's carrot-harissa salad that I think she makes at least once a month. With gusto! Go figure.
Since we are here for three whole weeks and both Max and Hugo require more at mealtimes than a green salad snipped from the garden and the closest grocery store is a 15-minute car ride and every time one of us mentions having to leave the inflatable kiddie pool because we need more groceries another certain someone starts screeching and yelping like some sort of mortally wounded small mammal and it's just easier for everyone to keep that kind of nonsense to a minimum, I started meal planning when we got here. I work 4 to 5 days in advance. We're not talking complicated stuff here - oftentimes meals are just pasta with a sauce (spaghetti with clams, or gnocchi with butter and sage, for example) and a boiled vegetable, but it helps so much to have it written all down and shopped for. In fact, I'm not sure who's more pleased with this development, me or my mother.
To fill in a few holes here and there in the menu planning (we can't, after all, eat pasta every day, though my husband and child would be thrilled if we did), I went through a few of my mother's random recipe booklets that she tucks inside a cupboard. In one of them, I found a very promising recipe for something called Focaccia ai quattro sapori. I promised the good people on Instagram that if it turned out to be any good that I'd blog about it. And guess what.
IT'S REALLY, REALLY GOOD.
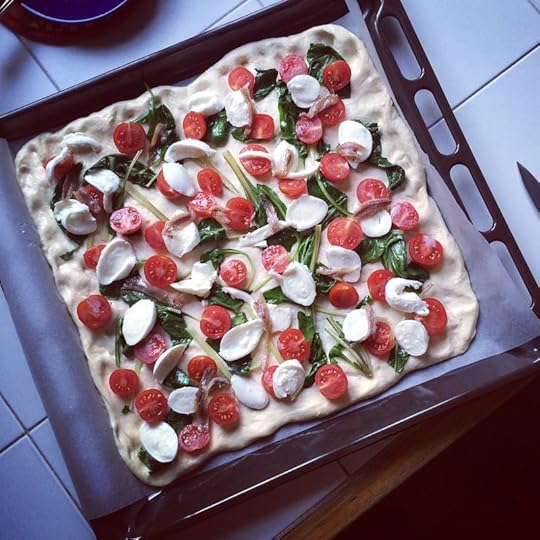
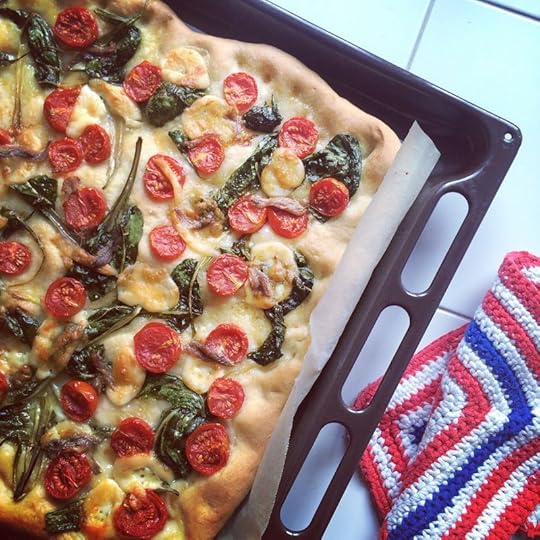
What it is is a big square piece of plain dough topped with saut��ed Swiss chard, halved cherry tomatoes, sliced mozzarella and anchovies. It helps, of course, that the chard came from the garden and the tomatoes taste like candy and the mozzarella is soft and funky and the anchovies rich and meaty, but something tells me that even with less-than stellar ingredients, this will still taste pretty darn good.
So here you go, no more dilly-dallying:
Focaccia ai quattro sapori
Serves 6 as an appetizer or 4 as a meal with a salad
1 batch pizza dough*
Olive oil
Salt
2 big handfuls Swiss chard (unless the stalks are quite thin, strip the leaves from the stalks and use the stalks for something else)
1 ball of mozzarella, halved and sliced
2 handfuls cherry tomatoes, halved
4-5 anchovies in oil, halved
1. Line a baking sheet with parchment paper. Pat and pull the prepared dough out onto the sheet until relatively even and thin. I made a crust, but next time I wouldn't. Do as you like.
2. Heat the oil in a small saut�� pan and saut�� the Swiss chard leaves until dark and wilted, 3-5 minutes. Season with salt.
3. Distribute the saut��ed chard evenly over the crust. Distribute the mozzarella evenly over the chard. Distribute the cherry tomatoes and then the anchovies evenly over the pizza. Drizzle with a little extra olive and sprinkle with two small pinches of salt. Set aside while you preheat the oven to 190C/375 F.
4. Bake for 30 minutes. Remove and let cool at least 5 minutes before slicing into squares and serving. My mother and I liked this best as an aperitivo before dinner and ate a couple squares apiece. My husband liked it best as dinner and basically housed the rest.
*If you are lucky enough to live near a pizzeria or store that sells freshly made pizza dough, just buy that. Otherwise, make your favorite pizza dough. If you don't have a favorite pizza dough, try this: Measure out 300 grams of flour (about 2 1/2 cups) and put in a bowl. Add 1 teaspoon instant yeast (not active dry!). And about a 3/4 teaspoon of salt. Then add about 2/3 cup of water (160 ml) and stir with your fingers. Add 1-2 tablespoons of oil and keep stirring. You may need a little more flour or a little more water, it sort of depends on where you are. When the dough is shaggy but holding together, dump it out onto your work surface and knead. You can use some flour to keep the dough from sticking too much as you knead, but try not to add too much, which will make the dough stiff. It's always best to make a slightly looser dough than a too-tight one. When the dough is no longer sticky and is nicely smooth, put a drop of oil in the bowl, return the dough to the bowl, rub with a little more oil and cover with a cloth. Set it aside in a warm, draft-free spot for an hour. Then proceed with the recipe above.
July 28, 2015
The Language of Food
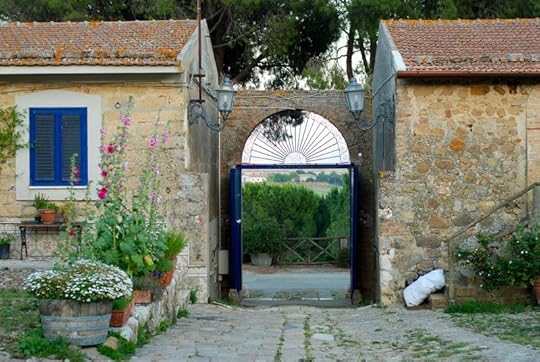
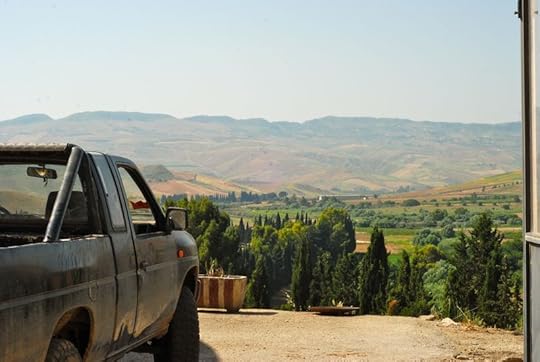
Finally, friends, a little report on my magical week in Sicily in early June. Rachel and I were there to teach a week-long writing workshop at the Anna Tasca Lanza Cooking School. The school was founded 26 years ago by the Marchesa Anna Tasca Lanza, on the grounds of her family's winery, Regaleali. The Marchesa - an accomplished and ambitious cook - endeavored to teach people about the incredible depth of Sicilian cookery, from the rustic (think gallons of pur��ed, dry-farmed tomatoes drying in the sun to a thick rust-colored paste for days in this very courtyard) to the sublime (like a multi-layered, complex cassata draped with glassy wedges of candied fruit). She ended up collaborating with food world luminaries like James Beard and Jullia Child, and established herself as the authority on Sicilian cooking. Anna's daughter Fabrizia Lanza now runs the school and in addition to the traditional cooking classes also offers things like annual food-styling and photography workshops with B��atrice Peltre and an upcoming illustration and story-telling week with Maira Kalman (!).
After the school's 25th anniversary party last summer, I was beyond honored to be asked to join Rachel in hosting the school's inaugural food writing workshop. We arrived in Sicily a few days before our students did. The Regaleali estate is in the interior of the island, far away from the petrol-colored sea and stunning coastline. The rolling hills there don't look dissimilar to the ones in the Marche, which I know so intimately, but the vegetation was wilder and more Seussian, the light harsher and brighter. Right in front of my bedroom window were two enormous trees populated by a large number of doves and swifts. Each morning, just around 6:00, I'd open the heavy, blue, wooden shutters to the sound of the birds cooing and chirping in the branches, while the wind rustled through the leaves so loudly that it sounded almost like a car coming around the corner.
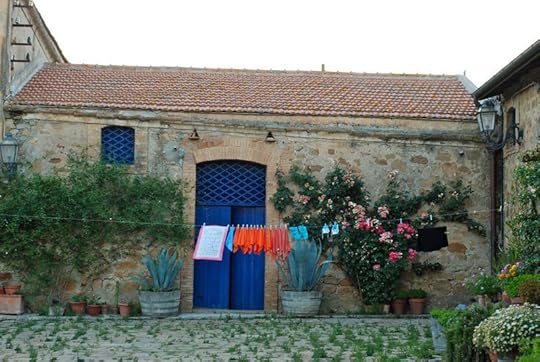
One of the many things that is so special about the school is how you immediately feel like you are part of a large family gathering whilst there. This is mostly due to Fabrizia's warmth, ease and generosity. It just all feels so natural. The horseshoe-shaped compound of the school holds not only the kitchen and dining room in which we spent so much time, but the rooms where we slept and where Fabrizia and her family stay when they are there, as well as the living quarters of the school's longtime caretaker and her family. There was enough space for us all to be able to retreat quietly to our rooms when needed, but we were all knitted together as well, right from the beginning.
Just on the other side of the entrance, in the photo above, are the gardens that Anna planted, divided by a sloping set of stairs, into the more utilitarian rows of vegetables plants and a fragrant and active compost pile, and the gloriously appointed decorative garden, punctuated by fruit and nut trees, low bushes of lavender, every kind of herb under the sun and great bushes of oleander, pink and white. Before our students arrived, we spent a couple days familiarizing ourselves with the grounds, getting to know Mario Traina, the school's recently appointed chef - and one of the kindest, funniest human beings I've had the pleasure of knowing - and hashing out the final details of the week's curriculum.
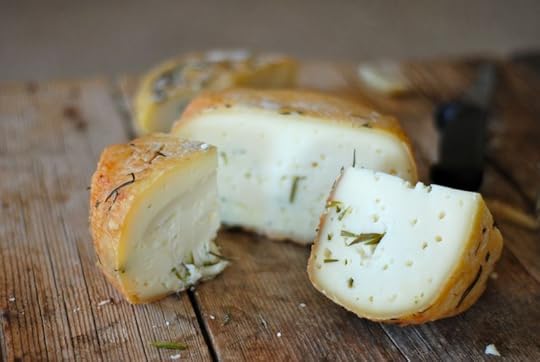
We hoped that the week would give the attendants not only the mental and physical space, but also the inspiration needed to kickstart a writing regime. We started with a visit to Filippo Privitera, a local shepherd who supplies the school as well as local vendors with the most incredible sheep's milk ricotta. He has a flock of 500 sheep, which he milks twice a day by hand, aided by his son and an additional employee in the busy season. Filippo transforms the milk into tuma, a fresh, still-squeaky cheese, pecorino, an aged cheese, and quivery ricotta, which ends up being used in everything from pasta dough to sauces to desserts. The hot sun shone down on us as we squinted at some of the sheep returning from the pastures while Filippo explained his grueling daily schedule and the methods he uses in his cheese-making. Then we beat a grateful retreat into the cool, dark aging room lined with rounds of ricotta salata and pecorino.
There were pre-dinner walks in the vineyard, a wine tasting up at Regaleali's grand headquarters, writing sessions in the cloth-topped pavilion in the garden, and a collaborative tasting table in which the workshop students sampled herbs and fresh green things from the garden as well as products from Fabrizia's Natura in Tasca line, like the pungent sundried tomato paste I mentioned above, meaty anchovies and fat, salty capers, before talking about the technicalities of food writing. (Like how, exactly, do you describe the rich, savory smell of Greek oregano?) We walked through the Valley of the Temples in Agrigento and ate a picnic lunch in the gardens of Colymbetra. Much later that evening, after we'd all said good night and gathered up books for the night's reading, the orange earth from Agrigento left ocher stains on the bathmat after I washed my feet in the bathroom's bidet.
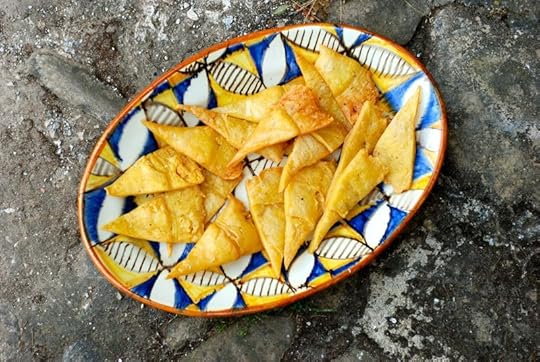
Fabrizia taught us how to make crisp panelle, fritters made with chickpea flour and fried in the dark green Regaleali oil, a spectacular cassata made with sponge cake and homemade almond paste, filled with Filippo's ricotta cream, squid stuffed with breadcrumbs and olives, and homemade cavatelli. We ate breakfast, lunch and dinner together, like a family, simple soups made with fuzzy, fresh green chickpeas, elegant plates of pasta topped with crisp and savory breadcrumbs, and an enormous and regal tranche of swordfish marinated in fresh herbs and aromatics and cut with a spoon before being served. My favorite part of mealtimes was gathering in the courtyard at dusk, just before dinner, eating some of the kitchen's expert fritte like anchovies and artichokes, with a glass of cold wine beading in my hand.
It was an incredible week, also for us instructors. Inspiring, rejuvenating, interesting and just plain fun. We read and workshopped and talked, about everything: books, families, creativity, heartbreak and, yes, food. It was, at times, a surprisingly emotional week. Intense and close. And when it ended, I found myself wishing that we could all just stay on for a little while longer. Case Vecchie is one of those special, special places. I felt so lucky to have been there and having the privilege of being reminded just how much I love what I do.
Happily, Rachel and I will be teaching the workshop again next June. The plan is all drawn up and we are thrilled to be returning again to a place that feels so much like home. If you are interested in joining us, save the week of June 20-25, 2016 and go here for more information. We are so looking forward to meeting our next group of writers.

And if you're interested in knowing more about Sicily, its history and food traditions, or about the school and Anna, or Fabrizia's story, here are a few book suggestions, all of which are also on the running bibliography I kept for the participants in the class (the links are all affiliate):
Coming Home to Sicily by Fabrizia Lanza
The Land Where Lemons Grow by Helena Atlee
Pomp & Sustenance by Mary Taylor Simeti
Herbs & Wild Greens from the Sicilian Countryside by Anna Tasca Lanza
The Heart of Sicily by Anna Tasca Lanza
July 6, 2015
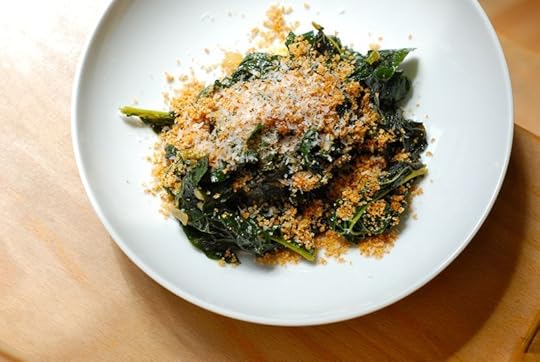
Ruth Reichl's Spicy Tuscan Kale
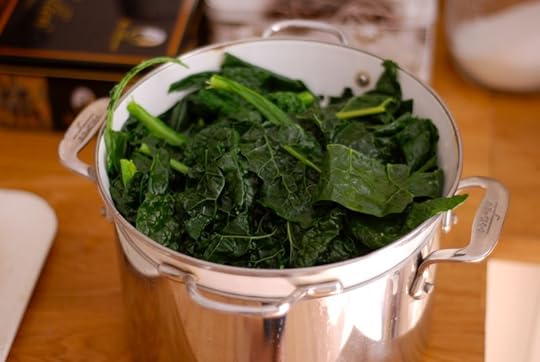
Thrilling the hearts of American immigrants all over Berlin, lacinato kale (also known as Tuscan kale or dinosaur kale) has recently been spotted in grocery stores throughout the city. According to my unscientific polling, we Yankees are also single-handedly responsible for it no longer being available, because we buy up every single bundle of it once spotted. So, yay on the one hand and apologies on the other?
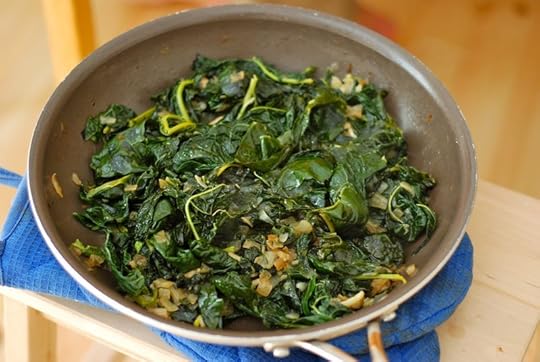
I gleefully bought the three massive bunches for sale at an organic grocer in Mitte last week and then begrudgingly gave one bunch to my mother, who had never even heard of the stuff before. (Behold those famed Italian regional differences in action!) The rest I blanched and then stewed with anchovies, onions, garlic and red pepper flakes, as per Ruth Reichl's brilliant instructions.
Though some people would have you eat kale raw, either massaged into a salad with a Caesar dressing or blended with nut milk and ice into a refreshing and verdant morning beverage, I am not one of those people. I like to eat my dark green leafy vegetables good and cooked, limp and tender. This recipe, which has you first blanch the tough greens and then stew them for another 10 minutes, results in greens that are sweet and tender, savory and delicious, and almost black in color. And after putting them on the plate, you top them with some toasted, crunchy breadcrumbs and grated Parmesan cheese, which brightens them right up again.
(SEEKRIT: THIS IS BETTER THAN ANY RAW KALE SALAD EVER WILL BE, I SWEAR TO YOU.)
Even if you think you are not an anchovy-lover, I would urge you to try this recipe as written, because the anchovies are there as a seasoning element, working overtime to give this homely dish of vegetables the kind of deep, funky richness the plant world simply can't provide. The end result doesn't taste remotely fishy. Also, whatever you do, do not skip the crunchy breadcrumb bit. I'm starting to think that every vegetable in the world could use more crunchy breadcrumbs.
The first time I made this, I served it with some boiled pasta (and wished I'd had just a few spoonfuls of ricotta to bind the two together, just so you know). The second time, we ate it piled on toasted, oiled bread. Both times, it was out-of-this-world delicious.
And now for something completely different. For reasons I cannot get into at the moment, I am the current owner of one head of iceberg lettuce. I believe this may be the first time in my 37 years. What do I do with it? Use it as a football? Turn it into mulch for my newly planted balcony? Use it to make some incredible salad that you are dying to tell me about? I'm hoping you go for option 3.
Ruth Reichl's Spicy Tuscan Kale
Serves 3-4
Note: To toast breadcrumbs, heat 1-2 tablespoons olive oil in a small pan and add the breadcrumbs and a pinch of salt. Cook, stirring, over medium-high heat, until the breadcrumbs have turned several shades darker and are fragrant and nutty. Do not let them burn. When they are done, immediately scrape them into a serving bowl.
3 bunches lacinato Kkale, (about 3 pounds), stems and ribs discarded, leaves torn into large pieces and washed
3 tablespoons extra virgin olive oil, divided
4 flat filet anchovies in olive oil, preferably jarred variety
3/4 teaspoon red chili flakes
2 medium onions, large dice, (about 2 cups)
�� teaspoon sea salt
�� teaspoon freshly ground pepper
4 garlic cloves, peeled and smashed
�� cup grated parmesan cheese
�� cup toasted breadcrumbs (see Note)
1. Bring 4-6 quarts of water and 1 teaspoon of salt to boil in a large pot. Plunge the kale into the water and cook for one minute. The color will become a vibrant green within this time. Remove the kale to a colander under cold running water to stop the cooking. Drain and set aside.
2. Heat two tablespoons of olive oil in a medium-large skillet over medium heat and add the anchovies, pressing and stirring them into the oil until they disintegrate. Add the onions, red pepper flakes, salt, and pepper, and stir over medium-high heat for 8-10 minutes until they become translucent and soft. Add the kale to the onions along with the garlic and the last tablespoon of olive oil. Stir occasionally until everything comes together in a soft mass for about 10 minutes. Remove from the heat and toss with breadcrumbs and parmesan cheese.
Ruth Reich's Spicy Tuscan Kale
Thrilling the hearts of American immigrants all over Berlin, lacinato kale (also known as Tuscan kale or dinosaur kale) has recently been spotted in grocery stores throughout the city. According to my unscientific polling, we Yankees are also single-handedly responsible for it no longer being available, because we buy up every single bundle of it once spotted. So, yay on the one hand and apologies on the other?
I gleefully bought the three massive bunches for sale at an organic grocer in Mitte last week and then begrudgingly gave one bunch to my mother, who had never even heard of the stuff before. (Behold those famed Italian regional differences in action!) The rest I blanched and then stewed with anchovies, onions, garlic and red pepper flakes, as per Ruth Reichl's brilliant instructions.
Though some people would have you eat kale raw, either massaged into a salad with a Caesar dressing or blended with nut milk and ice into a refreshing and verdant morning beverage, I am not one of those people. I like to eat my dark green leafy vegetables good and cooked, limp and tender. This recipe, which has you first blanch the tough greens and then stew them for another 10 minutes, results in greens that are sweet and tender, savory and delicious, and almost black in color. And after putting them on the plate, you top them with some toasted, crunchy breadcrumbs and grated Parmesan cheese, which brightens them right up again.
(SEEKRIT: THIS IS BETTER THAN ANY RAW KALE SALAD EVER WILL BE, I SWEAR TO YOU.)
Even if you think you are not an anchovy-lover, I would urge you to try this recipe as written, because the anchovies are there as a seasoning element, working overtime to give this homely dish of vegetables the kind of deep, funky richness the plant world simply can't provide. The end result doesn't taste remotely fishy. Also, whatever you do, do not skip the crunchy breadcrumb bit. I'm starting to think that every vegetable in the world could use more crunchy breadcrumbs.
The first time I made this, I served it with some boiled pasta (and wished I'd had just a few spoonfuls of ricotta to bind the two together, just so you know). The second time, we ate it piled on toasted, oiled bread. Both times, it was out-of-this-world delicious.
And now for something completely different. For reasons I cannot get into at the moment, I am the current owner of one head of iceberg lettuce. I believe this may be the first time in my 37 years. What do I do with it? Use it as a football? Turn it into mulch for my newly planted balcony? Use it to make some incredible salad that you are dying to tell me about? I'm hoping you go for option 3.
Ruth Reichl's Spicy Tuscan Kale
Serves 3-4
Note: To toast breadcrumbs, heat 1-2 tablespoons olive oil in a small pan and add the breadcrumbs and a pinch of salt. Cook, stirring, over medium-high heat, until the breadcrumbs have turned several shades darker and are fragrant and nutty. Do not let them burn. When they are done, immediately scrape them into a serving bowl.
3 bunches lacinato Kkale, (about 3 pounds), stems and ribs discarded, leaves torn into large pieces and washed
3 tablespoons extra virgin olive oil, divided
4 flat filet anchovies in olive oil, preferably jarred variety
3/4 teaspoon red chili flakes
2 medium onions, large dice, (about 2 cups)
�� teaspoon sea salt
�� teaspoon freshly ground pepper
4 garlic cloves, peeled and smashed
�� cup grated parmesan cheese
�� cup toasted breadcrumbs (see Note)
1. Bring 4-6 quarts of water and 1 teaspoon of salt to boil in a large pot. Plunge the kale into the water and cook for one minute. The color will become a vibrant green within this time. Remove the kale to a colander under cold running water to stop the cooking. Drain and set aside.
2. Heat two tablespoons of olive oil in a medium-large skillet over medium heat and add the anchovies, pressing and stirring them into the oil until they disintegrate. Add the onions, red pepper flakes, salt, and pepper, and stir over medium-high heat for 8-10 minutes until they become translucent and soft. Add the kale to the onions along with the garlic and the last tablespoon of olive oil. Stir occasionally until everything comes together in a soft mass for about 10 minutes. Remove from the heat and toss with breadcrumbs and parmesan cheese.
July 1, 2015
Janet Fletcher's Ayran

When I was in high school, the year between junior and senior year, I had a job scooping ice cream at an ice cream shop on old West Berlin's main drag, the Kurf��rstendamm. Did you know that Germans eat more ice cream than, well, most people? I scooped - and tasted - a lot of ice cream that summer. So much so that for about a decade afterwards, I couldn't even smell ice cream without feeling slightly nauseous.
This summer, as we race through the final recipe testing before the manuscript for the German baking book is due, is shaping up to be the same kind of summer. The fug of butter and sugar that hangs in the air every other day here - once so cozy and wonderful a scent! - is making me want to run for the hills.
But I cannot run! Baking is my duty! So instead, I cook up green and leafy lunches for Maja, my incredible co-baker, and me on testing days, and I take refuge in cold and salty drinks, which feel like the only thing quenching my thirst right now. I buy sauerkraut juice at my local discount grocery store (no joke - if you're a pickle juice lover, THIS IS EVERYTHING). I am planning a weekly gazpacho production cycle for as long as it stays hot and the oven is on. I'm still heavily into shrubs, inspired by one of my Harper's Bazaar columns from the spring. And then there's ayran: cool, creamy and refreshing ayran.
Ayran, a salted and sparkling Turkish yogurt beverage, is available on almost every street corner in Berlin, which boasts the largest Turkish community in the world outside of Turkey. But it's a cinch to make your own ayran at home - you simply mix a few spoonfuls of yogurt with a bit of salt and water (I like sparkling, which has the added benefit of making the drink foamy, but you can use still) and, if you like, a pinch of mint for some added zhuzz. I have really fragrant dried mint that works beautifully in ayran, but right now I'm really loving the very pure, clean flavor of plain ayran.
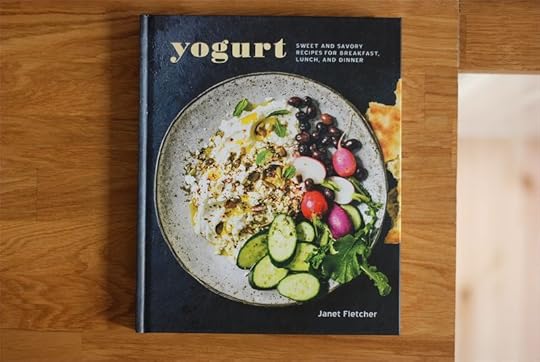
I got the inspiration for making ayran at home from Janet Fletcher's new book, Yogurt, which was recently published by Ten Speed Press. It's a slim little book packed with easy recipes that I want to subsist on all summer long, like tomato and bulgur soup with yogurt, and grated carrot and cumin salad with yogurt, and Turkish-spiced green beans with, wait for it, yogurt. In fact, I've earmarked almost every page in the chapters on soups, salads, and vegetables.
Oh, and the one for "Lamb Meatballs in Warm Yogurt Sauce with Sizzling Red-Pepper Butter." Because lamb meatballs! In warm yogurt sauce! With sizzling red-pepper butter! I mean, really.
But first, back to baking. Honeyed gingerbread, to be exact. Ayran in hand.
Janet Fletcher's Ayran
Adapted from Yogurt: Sweet and Savory Recipes for Breakfast, Lunch and Dinner
Serves 1
Note: The author calls for drained or Greek yogurt. I used regular whole-milk yogurt, which is very smooth and creamy here in Germany, and it worked beautifully, but if you can't find such creamy yogurt to start with, you should probably follow Fletcher's recommendation.
1/2 cup plain whole-milk yogurt
1/2-3/4 cup still or sparkling water
Salt, to taste
Ice cubes, optional
1. Place the yogurt in a glass. Whisk in just enough water to thin the yogurt to the consistency of buttermilk. A word of caution: if using sparkling water, the foam will rise quite quickly. Whisk in salt to taste. Add ice cubes, if desired. Drink.
June 24, 2015
Marisa McClellan's Cherry Butter
I came into a glut of cherries this week, picked by a friend from the tree in his mother's garden. He and his wife ate themselves silly while standing on ladders leaned against the tree for picking, then pitted and preserved a whole bunch more, and still had a bucket or two left over after that. Did I want some, they asked. DID I EVER, I replied.
We drove to their place to pick up our loot. Hugo's just learning how to eat around a cherry pit, so we gave him a handful to celebrate with in the backseat while we drove home. "Chays!" he calls them.
The rest I pitted with my thumb and forefinger. These were small cherries and already past their prime. They were easy to pit like this, though my nail beds now look like I've been dabbling in the dark art of butchery. If you have fresher, bigger cherries, you would probably do better by using a cherry pitter, as canning and preserving expert Marisa McClellan says.
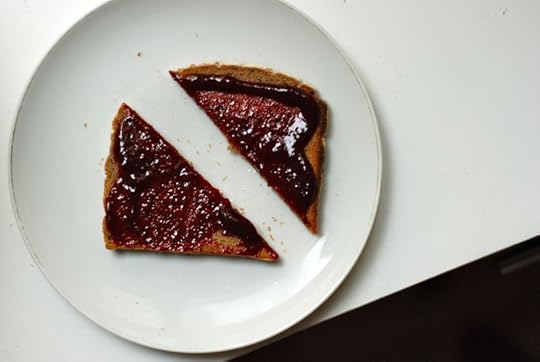
It's from Marisa's first book, Food in Jars, that I got the recipe for what I made with those cherries: dark and velvety cherry butter. Don't think of actual butter, though. Think of cherries and sugar cooked down into a thickish, wine-colored mixture, then pur��ed until as creamy and smooth as, well, butter.
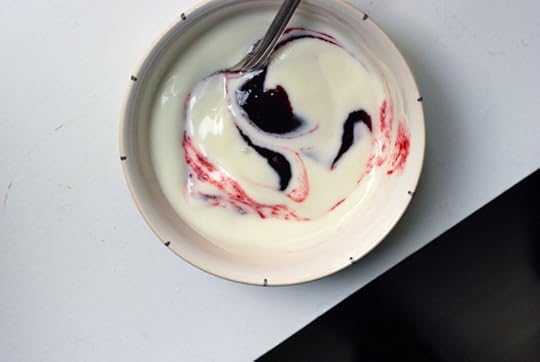
Did you know that I have strong feelings for fruit butters? (Exhibit A: this apple butter, one of the best things on this here website. Exhibit B: the roasted plum butter recipe in My Berlin Kitchen.) I do. I love them: their smooth yet faintly nubby texture, how they manage to be simultaneously tangy and almost toasted in flavor, and the way the fruit used always ends up tasting so concentrated, so deeply of itself, if you know what I mean. I like fruit butters on buttered toast, I like they way they swoop through yogurt (especially if the yogurt is swoopy itself), and I like them spread in a crostata or layered with cream and rolled up in a jelly roll (recipe forthcoming in the German baking book!).
General wisdom around here is that sour cherries are the cherries you want for jam-making, while sweet cherries are the ones you want for eating out of hand. And, you know, if the sweet cherries you can find are so plump and fresh that they crunch when you bite into them, then you should definitely just buy them by the pound and eat them all out of hand, spitting the pits out if possible. That's one of life's great pleasures, full stop.
But. If your sweet cherries are a little old and dented, or if you share my intensity of feeling for silky fruit butters that drop luxuriously from a spoon, then you should try this recipe.
Marisa McClellan's Cherry Butter
Adapted from Food in Jars: Preserving in Small Batches Year-Round
Makes 3-4 8-ounce jars
Note: As the subtitle of Marisa's book says, this is small batch canning - the recipe yields just a few small jars of precious cherry butter, which seems like very little indeed until you consider how long it took you to pit three pounds of cherries. If you can rope someone into helping you, I suggest doubling the recipe below.
3 pounds (1.4 kilos) sweet cherries
2 cups (400 grams) sugar
Juice of 1 lemon
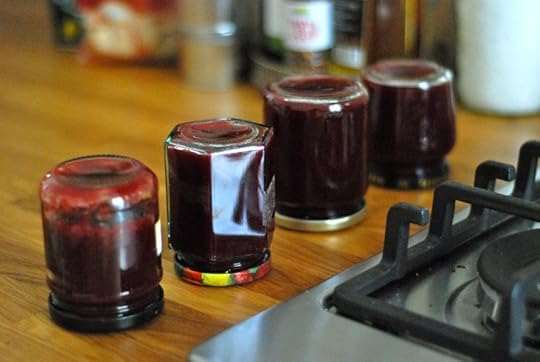
1. Pit the cherries. Wash four small jam jars and their lids in hot soapy water and rinse well. Set aside to air dry.
2. Place the cherries and 1 1/2 cups (300 grams) in a large pot. Set over medium-high heat and bring to a boil, stirring occasionally. Reduce the heat so that the mixture simmers and let the mixture cook for 60 minutes, stirring every 15 minutes or so.
3. After an hour, the mixture will be reduced and a deep wine color. Take off the heat and pur��e thoroughly (taking care not to burn yourself with any splatters) with an immersion blender. When the mixture is velvety smooth, taste it - if it needs more sugar, add some of the reserved sugar and stir well. Then stir in the lemon juice.
4. Return the pot to the stove and place over medium heat. The butter will start sputtering pretty quickly. Let it cook for another minute or so, until the butter is thick and spreadable (remember that it will thicken and set more as it cools).
5. Pour the boiling hot butter into the prepared jars, filling them up as far as you can. Wipe the rims, if necessary, then screw on the lids and turn the jars upside down to cool completely. The jam will keep, unopened, for at least 6 months.


