
Luisa Weiss's Blog, page 3
March 11, 2021
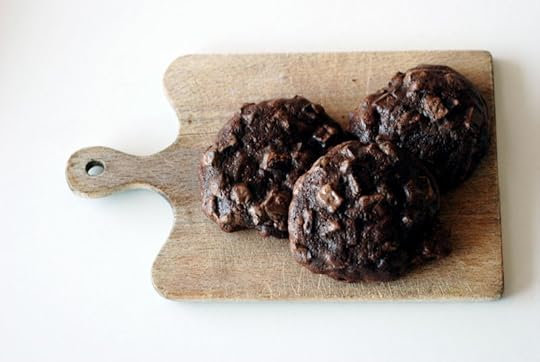
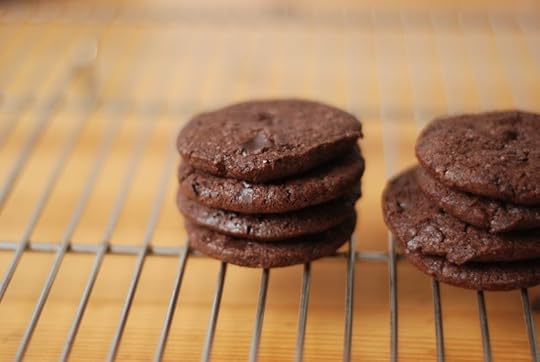
Ovenly's Flourless Salted Peanut Butter Chocolate Chip Cookies

As you may know from following me on Instagram, I am now the proud mother of a gluten-free brown rice sourdough starter. The recipe comes from Aran Goyoaga's truly incredible cookbook Cannelle et Vanille, which she so kindly sent to me a few weeks ago. I've used it to make my first loaves of delicious gluten-free sourdough bread and a batch of gluten-free sourdough waffles. It's total gold. As soon as I get my hands on some metal rings, I'm making sourdough English muffins from this book, which I'm also enjoying immensely. What this means, though, is that I've been up to my eyeballs in gluten-free flours and cookbooks and have had my hands full with very project-y baking lately. I haven't had much time leftover for the random batch of cookies-for-when-the-mood-strikes-you.
And sometimes you need to make a random batch of cookies just because the mood strikes you, you know?
I had one of those moods yesterday and these cookies made with just one handful of ingredients (peanut butter, brown sugar, eggs, vanilla, salt) very much fit the bill. They're whipped up in minutes, bake up in no time and manage to scratch that very particular itch for something chewy, sweet-salty and delicious. They're best made with commercial peanut butter, not natural. They're flourless, making them perfect for that gluten-avoidant person in your life, but also just as delicious if you're not avoiding gluten. I added chocolate chips because I saw Chika do it and while I rarely attain any level of Chika-ness in my baked goods, this was one triumphant moment where I could. And the sprinkle of flaky salt on top is a must must must because without the salt, they veer too much into peanut butter cup territory, whereas the salt sort of slaps them into a slightly more grown-up posture. (Slightly.)

I made a half-batch and I made pretty small cookies, just two inches, really, and I'm very glad I did so - these cookies pack a punch and I think they're best enjoyed in small amounts. But the recipe is easily doubled if you need a larger quantity or larger cookies. This recipe is hugely popular online, so maybe most of you already know about it! If so, forgive me! This is for the ten people out there who haven't yet. Much gratitude goes to Deb, who did the arduous work of converting the original recipe to grams. Eagle-eyed readers among you will notice that in the recipe below there are only gram measurements and not cups. This is because it is a hassle and a half to measure out peanut butter and I would like to encourage you to use your scale more often! This is the perfect example of a recipe in which a scale is far preferable to other forms of measurement.
Also! If you have an ice cream scoop for scooping cookies, this is a good time to use it! It will make your cookies look prettier than my misshapen little lumps up there.
Finally! One final note! Before you go! Of course, these cookies are lovely when still eaten warm, and it is hard to resist, I know. The whole point of the recipe is to make cookies quickly so you can have them in your belly quickly, right? But believe me when I tell you that the completely cooled cookies are MORE DELICIOUS than the warm ones! I don't know why! They get caramelly and fudgy and the chew is more irresistible and the salt notes hit differently and I'm telling you, if you can, WAIT to eat these. Or eat them warm, fine, but save some for the next day because you'll be so happy you did.
Note: This post includes affiliate links and I may earn a commission if you purchase through them, at no cost to you. I use affiliate links only for products I love and companies I trust. Thank you.
Ovenly's Flourless Salted Peanut Butter Chocolate Chip Cookies
Yield: About 18 small cookies
Note: These can be made with different nut butters, but won't hold their shape as well. The recipe is easily doubled.
Print this recipe!
170 grams light brown sugar
1 large egg, at room temperature
1/4 teaspoon vanilla extract
225 grams smooth peanut butter (processed, not natural)
Handful semisweet chocolate chips (optional)
Coarse-grained sea salt, to finish
1. Preheat the oven to 350��F/180��C. Line a rimmed baking sheet with parchment paper.
2. In a medium bowl, whisk together the light brown sugar and egg until smooth. Whisk in the vanilla extract, then the peanut butter until smooth and completely incorporated. The dough will thicken up as you whisk. Stir in the chocolate chips.
3. Scoop or spoon the dough into mounds and place on prepared sheet. Sprinkle the cookies lightly with coarse-grained sea salt. Bake cookies for 14 to 15 minutes or until the edges are just golden. Remove from the oven and place the sheet on a cooling rack for 10 minutes to let them firm up. Then transfer the cookies directly onto the rack. The cookies will keep in an airtight container for a few days.


March 8, 2021
Ali Slagle's Cheesy Black Bean Bake
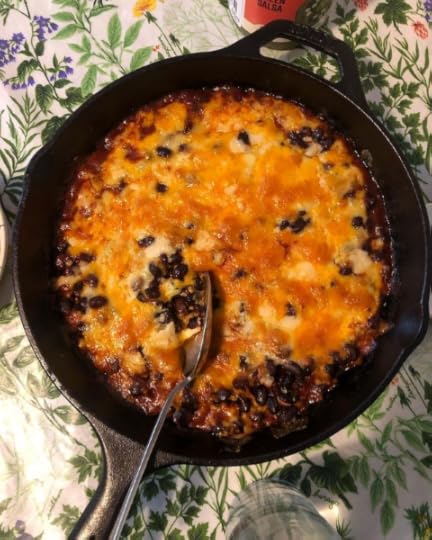
Some days you have the time to leisurely cook a sack of dried beans the way they did in the olden days, linen apron blowing in the gentle breeze, the faraway shout of children tumbling down the heather-topped hill echoing faintly back to your gorgeously rustic, yet well-appointed kitchen; other days, you are so frantic and stressed that even the MERE IDEA of turning on the flame to get dinner started is enough to give you a nervous breakdown. On those days, you need this cheesy black bean bake in your repertoire, because it barely counts as cooking and yet delivers a pretty bang-up meal in basically seconds, PLUS you get to eat it with rice if it's not the worst absolute day of your week OR tortilla chips if it is the worst absolute day of your week. And it is so satisfying and delicious that it'll make you feel just fine about dialing it in.
You probably have all the ingredients for it in your pantry/fridge as we speak, but truly the most essential ingredient is one that isn't listed here and that is the cold beer that you must must must have on hand to drink with dinner. It makes the bean bake all the more delicious, PLUS if you're having the kind of day that warrants this meal for dinner, then the cold beer is even more important. (Alternatively, a margarita; I don't know your life.)
Hugo, as I may have mentioned in the past���and forgive me if I continue to harp on it in the future, but I reserve the right to complain about certain aspects of my children's characters and disliking melted cheese DEFINITELY counts as a (slight) character flaw in my book���dislikes melted cheese. The melted cheese on top of these beans is absolutely crucial, I find, but if you simply scoop the beans out from under the cheese, you can procure cheeseless beans for these kinds of picky eaters, as well as having extra cheese for the rest of you who are sane enough to realize that melted and burnished cheddar should be its own food group.
If you're organized enough to have a ripe avocado on hand, you could do worse than slicing it up and serving it with the beans and chips or beans and rice. Pickled onions would also be a lovely touch! Neither of them ever happen in my house, because I reserve this bake for the days when I AM LOSING MY MIND and those days do not include the possibility of pickled onions or cubed avocado. But maybe you are more capable than me.
As I write this, International Women's Day is drawing slowly to a close. A couple years ago, Berlin's government declared this day a holiday and I am still not over how furious this makes me. As my bestie Marguerite Joly succinctly puts it:
"My wish list for International Women's Day is so long and does not feature a state-mandated holiday. How about equal pay, legal access to abortion, tax-free hygiene products and a side of acknowledgment of women's mental load for starters?!! I do not want [gratitude] or flowers or a gd holiday; I want immediate inclusion and equality, justice and equity for all women of all colors, socio-economic backgrounds and all sexual orientations and abilities."
Amen, sister. With that I leave you to go chill my beer for tonight's viewing of an American actress and Diana's heir taking down the British monarchy.
Ali Slagle's Cheesy Black Bean Bake
Serves 3 to 4
Print this recipe!
3 tablespoons extra-virgin olive oil
5 garlic cloves, peeled and sliced
4 tablespoons tomato paste
1 �� teaspoons smoked paprika
�� teaspoon red-pepper flakes (can be left out if you're cooking for heat-sensitive palates)
1 teaspoon ground cumin
2 (14-ounce/400 gram) cans black beans, drained and rinsed
�� cup/120ml boiling water
Salt and black pepper
1 �� cups/170 grams grated Cheddar cheese
1. Heat the oven to 475 degrees. In a 10-inch ovenproof skillet, heat the olive oil over medium-high. Fry the garlic until lightly golden, about 1 minute. Stir in the tomato paste, paprika, red-pepper flakes and cumin (be careful of splattering), and fry for 30 seconds, reducing the heat as needed to prevent the garlic from burning.
2. Add the beans, water and generous pinches of salt and pepper, and stir to combine. Sprinkle the cheese evenly over the top then bake until the cheese has melted, 5 to 10 minutes. If the top is not as browned as you���d like, run the skillet under the broiler for 1 or 2 minutes. Serve immediately.
March 5, 2021
Samin Nosrat's Olive Oil Refried Beans
Friends! What a week. It started off okay? Bruno returned to a few hours of Kita on Monday and things should have been looking up. But on Wednesday he had the sniffles and by yesterday morning both boys were feeling sick and we were running around town trying to get them both tested for the coronavirus. To add insult to injury, my phone bit the dust! Thankfully I had backed up most of it to the motherflipping cloud, so it's not quite as catastrophic as the loss of my laptop's files was a few weeks ago, but I definitely feel somewhat, shall we say, PERSECUTED by big tech these days.
I mentioned feeling full of constant rage on Instagram the other day, and it's true. Between the disastrous vaccine rollout in Germany, the fact that we didn't qualify for childcare for Bruno until this week, the insane schedule of driving Hugo back and forth to school for 150 minutes of school each day, everything described in that first paragraph and middle-aged PMS, which in my case has gone from me feeling blue for a few days a month to me feeling homicidal a few days a month, I was practically incandescent all week.
Today, the mood has lifted, for which I am very grateful. The sun came out and I got to stand in it for a few minutes at the playground. My children, who do not have the coronavirus, are safe to visit my mother this afternoon again so that I can think straight. And I am the proud owner of a new phone. (I also definitely have a few more strands of gray, but that's okay because going gray is A POWER MOVE.) Last night at the kitchen sink, as I felt the mood lift, I realized that my heart was aching like it does after a break-up. I told Max how I felt and his response was a very kind well, duh.
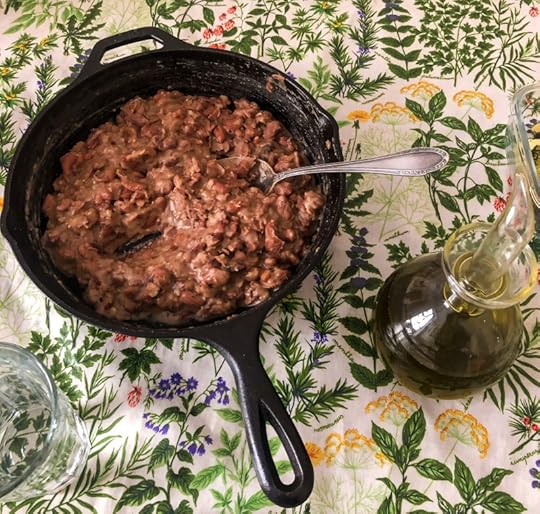
All the more reason we need comfort food right now. Our meals this week were an absolute mess, as I'm sure you can imagine. I was nearly throwing things on the table most nights. No rhyme or reason and nothing that gave me any pleasure while I cooked. Except for these beans, these lovely, cozy, long-cooking beans, which were so delicious and worth every single minute they spent on the flame.
The recipe comes from Samin Nosrat's last column for the New York Times before she moves on to her new television show Waffles & Mochi (!!!!) and although the point of that column was to explain Samin's dislike for the Instant Pot and although I love my Instant Pot so much that I sometimes wish I could have more Instant Pots, I made her beans the old-fashioned soak-and-simmer-in-a-heavy-pot-for-hours way and they were very, very, very, very good.
We ate them just as Samin instructs, on toasted bread, with a good drizzle of olive oil, with a little tangle of pungent veg alongside. They were rich and velvety and creamy and rib-sticking. (The leftovers I turned into pasta e fagioli, which the children mostly liked.) The bay leaf, chile and garlic were all just right in terms of flavoring and mashing the beans in the frying pan was fun. From start to finish, these beans were the most calming meal of this week from hell and sometimes that is precisely what a recipe needs to be, nothing more, nothing less. Just in case you too might be in need some calm.
Now it's the weekend ("weekend") and there were skinless, boneless chicken thighs (!) at the organic grocery store today and in a little while we're going to make popcorn in the Whirlypop and pile on the couch and watch a movie together and after that my husband is seeing his friends on Zoom so I have the rest of the evening to myself and while I probably should be meditating all that toxic energy out of my poor tired body, I will instead fritter away the evening in front of the television and I have at least progressed this far in my journey through life that I can wholeheartedly say that I deserve it.
Samin Nosrat's Olive Oil Refried Beans
Serves 4-6
For the beans:
2 cups dried beans of any variety
Fine sea salt
A generous pinch of baking soda
4 fresh or dried bay leaves
10 garlic cloves, peeled
1 small dried chile of any variety
��� cup extra-virgin olive oil
For serving:
4 thick slices country-style bread, grilled or toasted
1 garlic clove, peeled
Calabrian chile paste, for garnish
Small handful of fresh basil leaves, torn (optional)
Freshly grated Parmesan (optional)
1. The night before cooking, remove any debris from beans. Rinse them, then place them in a 4-quart Dutch oven or pot of similar size. Add 6 cups water, 1 teaspoon salt and the baking soda. Cover and set aside in a cool place for 8 to 12 hours.
2. To cook, add bay leaves, garlic and chile to the beans and bring the pot, uncovered, to a boil. Taste the cooking water and adjust seasoning as needed; it should taste pleasantly salty. Reduce heat to a gentle simmer, partly cover with a lid and cook until beans are completely tender and just beginning to fall apart. Depending on the variety and age of your beans, this can take anywhere from 1 to 3 hours. Throughout the cooking time, monitor the pot to ensure the beans are always submerged, adding more water as needed. When you suspect the beans might be done, taste five of them. If they are not all creamy through to the center, keep on simmering.
3. To fry the beans, remove the bay leaves and chile from the bean pot. Discard the bay leaves, and mince the chile. Set a large cast-iron or similar frying pan over high heat, and add about half the oil. Add the minced chile. Use a slotted spoon or sieve to add beans and garlic ��� but not their cooking liquid ��� to the pan. Reduce heat to medium, and, with a potato masher or wooden spoon, stir and mash the beans into a silky paste, constantly stirring and scraping to keep them from sticking to the bottom of the pan. Add about 1/4 cup bean cooking liquid to loosen the mixture, then gradually add remaining oil. If the bean paste is too thick, continue adding cooking liquid as needed, being mindful that it is seasoned with salt. When the mixture is rich and velvety, taste, and adjust seasoning with salt.
4. To serve, lightly rub warm toasts with raw garlic, then slather with a generous amount of bean paste. Garnish with chile paste and, if desired, torn basil and a heap of grated Parmesan. Serve immediately.
March 2, 2021
Nik Sharma's Ground Beef Pulao
As any close observer of my daily meals or longtime reader of this blog can attest, we don't eat a lot of meat. My husband was traumatized by gristle as a child, and by parents who made him clean his plate, no matter how long it took. In my family, where some form of Italian cooking mostly reigned supreme, vegetables and vegetarian meals were always the stars of the show. Roast chicken was the special occasion dish at my mother's house; brisket was the counterpart at my American grandmother's house. These days, there's the environmental factor to consider, which is huge, and also the cost: good-quality meat in Germany is expensive. We simply can't afford to cook meat that frequently if we insist on buying organic meat or even just sustainably raised local meat. It's just as well that my family would almost always prefer a meatless meal.
These days, the meat that ends up on our table most often is (organic) ground beef. Max will never understand the appeal of a rare steak, but give the man a hamburger or a meatball and he's in seventh heaven. The children love the meat rag�� that I make on a weekly basis, but they're hot and cold on burgers and meatballs, which is insane, but these are the same children WHO DON'T LIKE PIZZA I AM SERIOUS SEND HELP. Since I am the only cook in the house and I will die of boredom (or become extremely resentful and grumpy) if I can't try new recipes, I'm always thrilled to have a new way to try and get ground beef into their bellies.
(A brief interjection here to rail against the fact that it is still nearly impossible to find ground poultry in Germany. Butchers consider it a hazardous substance and almost all of them refuse to prepare it���only one that I know in western Berlin will grind it for you on the condition that you buy no less than 5 kilos of it. Recently, the grocery store on the corner has started occasionally selling packages of ground (conventional, not organic) turkey, but it's seasoned and...I....just refuse to buy it. For a while, I thought I'd just be resourceful and make my own. I bought a meat grinder attachment for my KitchenAid mixer years ago only to have it languish in my cupboards until...I resold it a few months ago. Sigh. So beef, pork and lamb are our only options.)
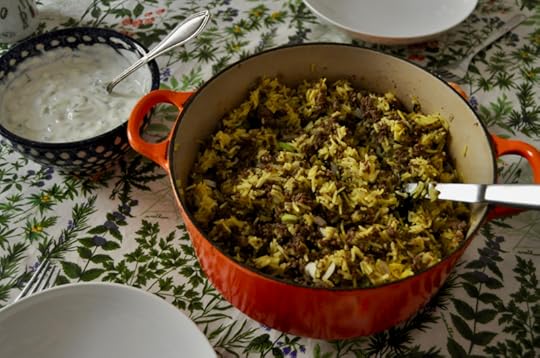
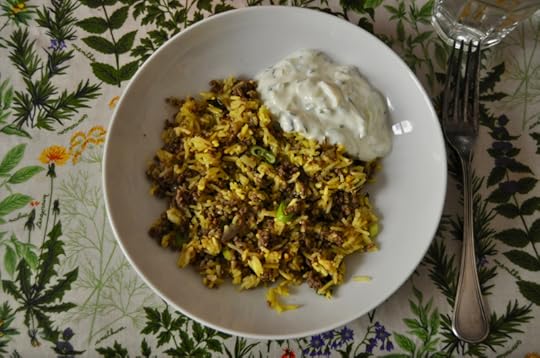
One way, of course, is Fuchsia Dunlop's celestial spicy celery with ground beef, but it is too spicy for the boys at their ages now. (I shake my fist at their northern European taste buds!) Another way is in this one-pot meal that has you cook ground meat with spices and aromatics, then mix that with turmeric-colored rice that you cook in the same pot (don't bother washing it out). Fresh mint and scallions folded in at the end give the dish a little lift, though it's the cool bowl of cucumber raita alongside that really makes this a pleasingly complete meal.
The recipe as written was originally meant for lamb, which is far fattier than ground beef, so Nik Sharma has you cook the lamb first to get the excess fat out before you continue with the spices. I made it as he wrote, but since the ground beef had less fat to give off, I actually think you could move steps around a little to get a more aromatic result. In other words, cook the ginger and garlic first, then add the spices and salt and cook until fragrant, then add the beef and cook until slightly browned. Lime juice on top, scrape out of the pan, proceed with the rice. If you do it this way, then I think you should also add a chopped onion together with the garlic and ginger. My adjustments to the recipe are below.
Either way, when the pulao's finished, be sure to make raita to dollop on top. The one in the photo I made by pouring plain whole-milk yogurt into a smallish bowl and seasoning it with salt and ground cumin to taste, then grating in a small Persian cucumber. I love the cooling feel the raita gives against the piping hot rice and meat, plus, if you've actually made the pulao with red chile powder, you'll be happy for the respite from the heat. (I left out the chile powder because I wanted the children to eat the pulao for lunch. And Bruno obliged happily, a minor miracle. Hugo, on the other hand, was unimpressed and left half behind. As I scraped his portion into the trash at the end of lunch, I thought to myself hey, at least our parenting has progressed so far that we don't make our kids clean their plates anymore, right?)
Serenity now.
Ground Beef Pulao
Serves 4
2 cups basmati rice
1 tablespoon extra-virgin olive oil
1 �� pounds ground beef
4 garlic cloves, peeled and grated
2 tablespoons grated fresh ginger
1 medium yellow onion, finely diced
1 �� teaspoons garam masala
�� teaspoon red chile powder
�� teaspoon black pepper
2 teaspoons kosher salt
3 tablespoons lime juice, divided
�� teaspoon ground turmeric
1 bunch scallions (about 6), trimmed and thinly sliced
�� cup loosely packed fresh mint leaves
1. Check the rice and discard any debris. Place the rice in a fine-mesh sieve and rinse under running water until the water runs clear. Place the rice in a bowl, cover with water by 1 inch, and soak for 30 minutes. Heat the oven to 250��F/120��C.
2. As the rice soaks, cook the beef: Place a medium saucepan with a heavy lid or a Dutch oven over medium heat. When the saucepan is hot, add the olive oil, garlic, ginger, and onion and saut�� for 1 minute. Add the garam masala, chile powder, black pepper and 1 teaspoon salt and saut�� until the spices are fragrant, 1 minute. Add the beef and cook, breaking it up with a wooden spoon, until cooked through and slightly browned. Add 1 tablespoon lime juice and stir well. Scrape the mixture into an oven-safe bowl or pan and keep warm in the oven.
3. Drain the soaked rice. Add to the same pot and cover with water by 1 inch. Stir in 1 tablespoon lime juice, the turmeric and the remaining 1 teaspoon salt. Bring to a boil over medium heat, then cover, and reduce heat to simmer until the rice absorbs all the water, about 10 minutes. (Do not stir the rice as it cooks, or the grains might break.) Remove the saucepan from heat, and let sit, uncovered, for 5 minutes.
4. Fluff the rice and combine with the cooked meat, then drizzle with the remaining 1 tablespoon lime juice. Fold the scallions and mint into the rice, and serve immediately.
Print this recipe!
February 26, 2021
Yossy Arefi's Simple Sesame Cake
I've been baking my way through Yossy Arefi's Snacking Cakes, a cookbook which came out last year. It's an excellent book, the kind that should just take up residence on your kitchen counter because it'll get used so much. The cakes are modest, one-bowl, one-pan affairs, but they're drop-dead delicious. Buckwheat Banana Cake. Pumpkin Olive Oil Cake. Buttermilk Spice Cake. Seeded Zucchini Cake. Minty Chocolate Malt Cake. You'll want to make every single one.
To qualify as a snacking cake, I believe it must be easy to make, with ingredients you mostly already have in your pantry, and requiring only one bowl. Maybe two. You want the making of the cake to soothe you as much as the eating of the cake. Nothing to mess up. No fussy preparation. Just the best kind of mindless baking where you're guaranteed something delicious in an hour or two.
I love this book's extremely narrow focus paired with its impressive breadth of offerings. There's a cake for every mood, every season, every occasion. (I was going to say short of a wedding, but the truth is I would happily eat one of these as a wedding cake, especially if it was a chic City Hall wedding or a crazy Vegas one. Case in point: Grapefruit White Chocolate Cake? Strawberry-Glazed Passion Fruit Cake? Sticky Whiskey Date Cake? I mean.)
Seeing as very few of us have "occasions" to bake for at the moment, I would like to underline the fact that I believe that it is very, very important to have cakes like this in your house at all times right now. They are for breakfast, they are for tea, they stand in for breakfast or as a special dessert���when dessert is usually fruit���they are good eaten standing up and they are good eaten sitting down. The Germans have a word for the food you eat when you're stressed and that word is Nervenfutter (nerve chow) (it's pronounced NAIR-fenn-foot-er). Snacking cakes are the quintessence of Nervenfutter.
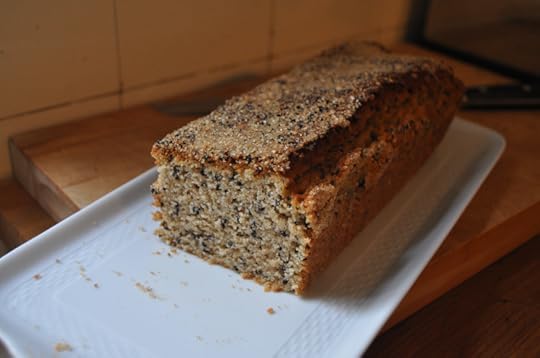
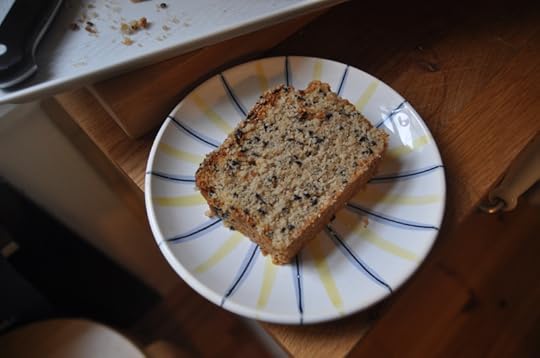
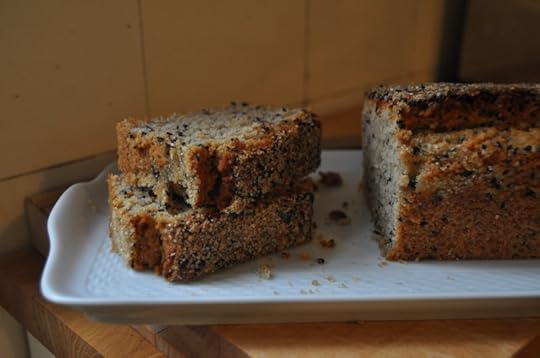
Now to this particular cake, the Simple Sesame Cake. It's made with tahini and two kinds of sesame seeds (which I had in my pantry anyway; if you only have regular sesame, not black, just do the cake with those). I substituted 1/4 cup oat flour and 1 cup gluten-free all-purpose flour blend for the all-purpose flour (in fact, have done so in every recipe from this book that I've tried) and the results were velvety and perfect. Max can't stop marveling over the crumb. There's the faintest hint of bitterness from the tahini, and it's so lovely against the almost creamy crumb punctuated with all those tiny little sesame seeds.
If you're a cake pan butterer, then you can strew some of the sesame seeds onto the sides of the pan to truly encrust the entire cake in sesame, but I am an avowed non-butterer of pans, so I just scattered them thickly on top. I love the effect of the black and white sesame together and the gorgeous little crunch from the raw sugar on top. Up until now, the children have competed with us for pieces of each snacking cake I've made. For whatever reason, this one is a little too grown-up for them (it's like a grown-up peanut butter flavor), so we get to eat all of it ourselves.
All hail the snacking cake!
Note: This post includes affiliate links and I may earn a commission if you purchase through them, at no cost to you. I use affiliate links only for products I love and companies I trust. Thank you.
Yossy Arefi's Simple Sesame Cake
Adapted from Snacking Cakes
Makes one 9-inch loaf cake
To make this cake gluten-free, replace the all-purpose flour with 1/4 cup oat flour and 1 cup gluten-free all-purpose flour blend.
Print this recipe!
6 tablespoons (50 grams) sesame seeds (white, black or mixed), divided
3/4 cup (150 grams) granulated sugar
1 large egg
1/2 cup (120 milliliters) whole milk
1/2 cup (120 milliliters) well-stirred tahini
1/4 cup (60 milliliters) neutral vegetable oil, such as canola or grapeseed
1 teaspoon vanilla extract
3/4 teaspoon kosher salt
1 1/4 cups (160 grams) all-purpose flour
1 1/2 teaspoons baking powder
1/4 teaspoon baking soda
1 teaspoon raw sugar, optional
1. Position a rack in the middle of the oven and preheat to 350 degrees. Line a standard-sized loaf pan with parchment paper, letting the sides hang over to create a sling.
2. In a large bowl, whisk the granulated sugar and the egg until pale and foamy, about 1 minute. Add the milk, tahini, oil, vanilla and salt. Whisk until smooth. Add the flour(s), 3 tablespoons of the sesame seeds, the baking powder and baking soda. Whisk until well combined.
3. Pour the batter into the prepared pan, tap the pan gently on the counter to release any air bubbles, and smooth the top with a spatula. Sprinkle the remaining 3 tablespoons of sesame seeds on top of the cake and, if using, the raw sugar.
4. Bake for 40 to 50 minutes, or until the cake is puffed and golden, and a cake tester or skewer inserted into the center comes out clean.
5. Transfer the cake to a wire rack and let cool for about 15 minutes. Use the parchment overhang to lift the cake out of the pan and let cool completely before slicing and serving.
February 25, 2021
Tejal Rao's Khichdi
Thank you all very much for the commiseration on the loss of my digital photos and manuscript. I have spent a week licking my wounds and I am starting to feel better. The truth is, I already feel deeply oppressed by the masses of photos that clog every device I own. The sudden loss of thousands when I have so many more to deal with might be kind of a blessing? That's how I've decided I'm going to look at it. As for the manuscript, I had a big realization this fall that I wasn't happy with the existing structure of the book. I decided to change it substantially, but the only way to do that was to start over. So the fact that I lost those few weeks of summer work is annoying (and stupid), but I probably was going to trash those pages anyway. (The fact that I still don't have the kind of childcare that allows me to get started on draft three IS kind of the end of the world, but let's not dwell on that or I'll pull my hair out.)
After two months of lockdown, Hugo returned to in-person instruction this week. It's a very limited kind of school, just 2 1/2 hours daily, fully masked with only half his class. But it is school and it is not in my house and I am exceedingly grateful even just for this. Bruno, however, isn't allowed to return to Kita yet, so I actually have less time than I did before, because as everyone with multiple children knows, the child who only knows life with a sibling, when suddenly left alone without the sibling, is a lot more work. I am doing my best to keep my exasperation at the entire situation at bay, but sometimes, yes, I want to scream into a pillow. Or from the balcony, like a diva being murdered at La Scala.
Lunchtime still rolls around every day like an unwelcome flea-bitten guest. Except now the lunch hour is interrupted by me having to get in the car and drive an hour round-trip to pick Hugo up from school. He doesn't get a school lunch, so he's grumpy as hell at pickup. At home, he either eats leftovers from our lunch or I scramble him some eggs and butter some toast. As much as the daily meal prep drives me up the wall, I feel lucky that the act of cooking still brings me satisfaction. And Bruno is very understanding about lunchtime. While I cook, he comes and keeps me company in the kitchen, drawing pictures or staring into my pots, and it is a fleeting moment of the kind of quiet beauty you used to believe motherhood was full of until you actually became a mother and realized it was mostly a whole lot of everything else.
Anyway.
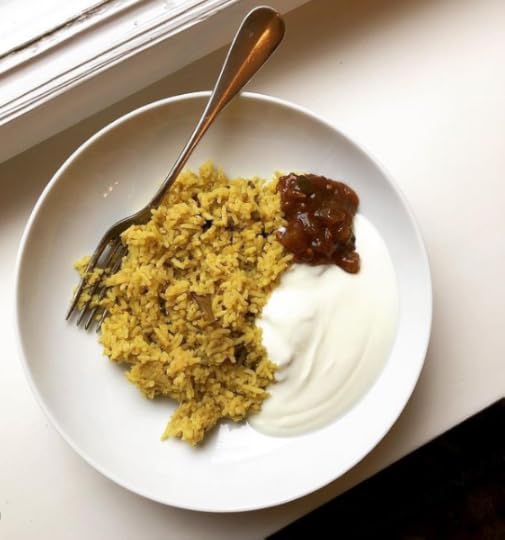
My kingdom for comforting one-pot meals, like this absolutely delicious khichdi from Tejal Rao. It is a doddle to make���just bang rice and split yellow moong beans and spices into a pot together, then let time and steam do their work���but produces the most fragrant, wonderful and spicy one-pot meal. You complete it with some hot Indian pickle (we're obsessed with my friend Kavita's homemade garlic achar, but any Indian pickle will do) and an extremely necessary pool of cool yogurt. Sometimes, if I'm feeling fancy, I doctor that pool of yogurt with salt and ground cumin and a grated Persian cucumber. Sometimes, I just dollop a spoonful on each plate. Khichdi is the kind of food that bolsters you, makes you feel just a bit more settled than you were before you ate it. Just the thing for these unsettling days.
Tejal Rao's Khichdi
Serves 3 to 4
Note: If you are cooking for small children, leave the chile powder out of the khichdi and just add it to your plate, but be careful, it's easy to overdo.
Print this recipe!
��� cup long-grain white rice, such as jasmine
��� cup yellow split moong beans
2 tablespoons ghee
�� teaspoon mustard seeds
1 small cinnamon stick
2 green cardamom pods
2 whole cloves
1 sprig curry leaves (optional)
�� teaspoon red chile powder
�� teaspoon turmeric powder
�� teaspoon kosher salt, plus more to taste
1. Combine the rice and beans and rinse several times. Drain and place in a heavy-bottomed pot with 1 3/4 cups water, and set over medium-high heat.
2. In another small saucepan, heat the ghee and mustard seeds. When the seeds start to pop, lower the heat and add the remaining ingredients, swirling them in the pan. Let the spices sizzle for under a minute, then carefully pour into the rice pot, along with the ghee. (Careful: The fat may splatter).
3. When the water comes up to a rolling boil, give it a good stir, scraping at the bottom of the pot, then cover tightly and turn the heat down to low. Cook for 15 minutes, then turn off the heat and let the rice rest for 10 minutes before opening the lid. Fluff gently with a spatula. Taste, season with salt to taste and serve.
February 19, 2021
Samin Nosrat's Kimchi Pancake

Everything is terrible, but this kimchi pancake, this chewy, spicy, wonderful kimchi pancake was a bright light in this shit basket of a week. I made it on Shrove Tuesday, the same day that I attempted a software update on my laptop without backing it up first. Cardinal sin, I know, I am aware! I have wrapped myself up so tightly in the shroud of my mistake that I am completely numb!
The recipe comes from Samin Nosrat's favorite Korean restaurant, a restaurant in Oakland called Pyeong Chang Tofu House and it is perfect perfect perfect. I followed the recipe almost exactly (substituting a gluten-free all-purpose flour blend for the all-purpose flour), using a 12-inch non-stick skillet so that I could just make one enormous pancake instead of two slightly smaller ones. The kimchi I used comes from Korea and was a particularly pungent batch, almost too pungent for our straight-up consumption. But in this pancake, the other ingredients smoothed out some of the kimchi's aggressive bite and made it delectable.
I made a batch of English pancakes for the boys, whipped the kimchijeon up as they ate their pancakes with applesauce and cinnamon sugar, and then the two of us demolished the kimchi pancake all by ourselves. We loved the crisp edges, the funky flavor, and especially the gorgeous chew punctuated by the crackling sesame seeds in the dipping sauce.
To sum up my week, I have lost six years of photos and the revisions of my manuscript that I worked on this summer, as well as untold other things that I can't allow myself to list here, but I also learned how to make delicious kimchijeon at home, so really, what's there to complain about?
(Sob.)
Kimchi Pancake (Kimchijeon)
Makes one 12-inch pancake
Print this recipe!
For the dipping sauce:
�� cup citrus ponzu sauce
1 tablespoon toasted white sesame seeds
1 scallion, thinly sliced
For the batter:
�� cup potato starch
�� cup all-purpose flour or gluten-free all-purpose flour
1 teaspoon garlic powder
�� teaspoon baking powder
Pinch of sea salt
1 heaping cup kimchi (about 10 ounces), plus 1/4 cup kimchi juice
2 scallions, chopped
2 tablespoons gochujang
1 tablespoon granulated sugar
1 teaspoon fish sauce
3 tablespoons neutral oil, such as canola
1. Make the dipping sauce: In a small bowl, combine ponzu sauce, sesame seeds and scallion. Set aside.
2. Prepare the batter: In a large bowl, whisk together potato starch, flour, garlic powder, baking powder and salt. Set aside.
3. Dice kimchi into 1/2-inch pieces. In a medium bowl, stir together kimchi and kimchi juice, scallions, gochujang, sugar, fish sauce and 1/2 cup water. Add kimchi mixture to flour mixture, and stir to combine.
4. Set a 12-inch non-stick skillet over medium heat and add 1 1/2 tablespoons oil. When the oil shimmers, add the batter and spread it from the center out to the edges of the pan. After a minute or two, when the pancake is setting, shake the pan a little to make sure the pancake isn't sticking. When the bottom of the pancake is brown and the top fades from glossy to matte, after another 30 to 60 seconds, carefully flip the pancake or slide the pancake onto a rimless plate and flip it back into the pan. Continue cooking for another 60 to 90 seconds on second side until set, then carefully slide pancake onto a plate.
5. Cut into wedges, and serve hot with dipping sauce.
February 16, 2021
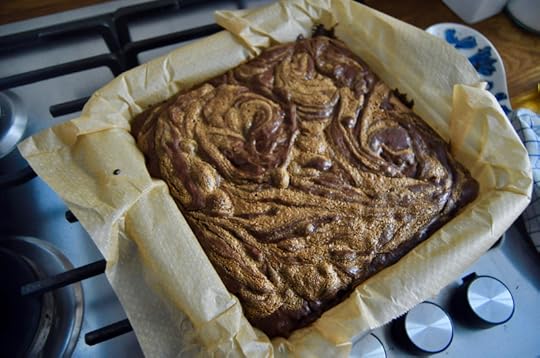
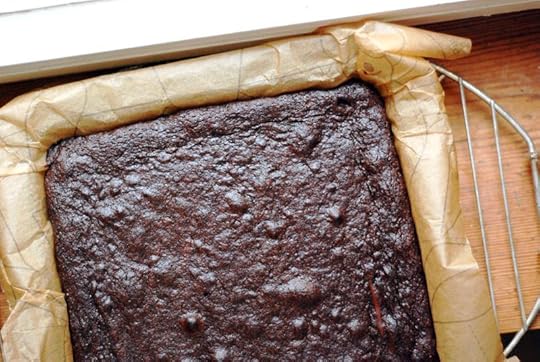
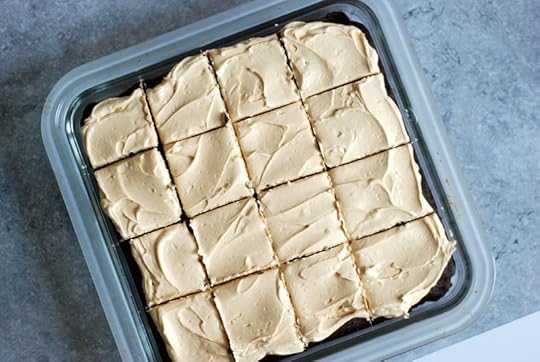
David Lebovitz's Gluten-Free Chocolate Tahini Brownies
Beep. Boop. Hello. I thought maybe you could use a panful of brownies today. Couldn't we all?
I have been looking forward to telling you about these brownies. For a very long time, I am more than chagrined to admit, I couldn't quite grasp the concept of tahini in baked goods. Tahini, in my limited mind, just wouldn't budge from its savory pedestal, where I associated with falafel or grain salads or maybe a nice little yogurt sauce, but nothing more. How terribly basic, I know!
Luckily, one day this past fall, a friend brought me a tahini chocolate chip cookie and who knows why this particular cookie flipped the switch, but it did. I ate it, the nutty richness flooded my mouth, the heavens opened, angels sang, etc etc. Oh, it was a wonderful moment. (2020 was also the year I finally learned to love halva, so who knows, I guess I'm a late sesame bloomer.)
In case you are still looking for a gateway into the world of baking with tahini, you must start with these brownies, which are a combination of these two recipes: David Lebovitz's and Bon App��tit's. They are gluten-free, yes, made with cornstarch instead of flour, which makes them fudgy and chewy as can be, and you will love them even if you're not avoiding gluten, pinky promise. A tablespoon of tahini is beaten into the batter, bolstering the texture a bit, and then the remaining tahini is mixed with syrup and marbled throughout.
I am usually agnostic when it comes to nuts in brownies, but I feel quite strongly that they are non-negotiable here. You can use walnuts, pecans or almonds, but they must be toasted. Must! The recipe below calls for 1/2 cup of nuts, for those who are just dipping their toes into nutty brownie territory, but if you like nuts in your brownies, you can bump it up to a full cup.
Once baked, the sandy tahini swirl, the warm crunch of the toasted nuts and the deliciously fudgy crumb of the brownie all add up to create a spectacular treat that is surprisingly sophisticated for something as crowd-pleasing as a brownie. I never cut these babies larger than 16 little squares, because they pack quite a punch. Even Hugo, who is a purist and a traditionalist when it comes to brownies, loves them. I hope you do too.
Next up, miso cookies?
Gluten-Free Chocolate Tahini Brownies
Makes 16 brownies
Print this recipe!
6 tablespoons (85 grams) unsalted butter
8 ounces (225 grams) bittersweet or semisweet chocolate, chopped
3/4 cup (150 grams) sugar
2 large eggs, at room temperature
1/4 teaspoon salt
4 tablespoons tahini, divided
3 tablespoons (30 grams) cornstarch
1/2 cup (70 grams) almonds or walnuts, toasted and coarsely chopped
1 tablespoon brown rice syrup or agave syrup
1. Line an 8-inch (23 cm) square pan with parchment paper and let the paper come up to the rim of the pan to function as a sling after baking. Preheat the oven to 350�� (180��C).
2. Melt the butter and chocolate in a small saucepan over very low heat on the stove top, stirring constantly until smooth.
3. In a medium-sized bowl, beat together the sugar, eggs and salt. Whisk in 1 tablespoon of tahini and the cornstarch.
4. Scrape the chocolate mixture into the bowl and whisk vigorously until completely smooth, for about a minute.
5. Fold in the nuts, if using, then scrape the batter into the prepared pan and smooth the top.
6. In a small bowl, whisk together the remaining 3 tablespoons tahini with the brown rice or agave syrup. Dollop this mixture over the top of the brownie batter, then swirl through the batter with a knife or skewer.
7. Place the pan in the oven and bake for 30 minutes, or until the brownies feel just set in the center. Do not overbake. Remove from oven and let cool completely before removing from the pan and cutting into squares. The brownies will keep in an airtight container for up to 4 days.
February 14, 2021
Homemade Chocolate Treats for Valentine's Day

Happy Valentine's Day!
In case you might still be looking for a last-minute treat to bake for your darlings, here's a little round-up of my favorite chocolate delights that are, for the most part, easy to whip up with what you've got in your pantry already (or that you could get on an emergency run to the store or gas station, if you live in Germany where stores are closed on Sunday).
I'm still undecided on what to make, though I'm leaning heavily towards these tahini brownies. Better get cracking!

Evelyn Sharpe's French Chocolate Cake - This is the best nearly flourless cake I know. Rich and intense, it's definitely for grown-ups.

Karen DeMasco's Devil's Food Cupcakes - Gorgeous little cupcakes with a thin cap of chocolate icing and a cream middle. A lovely baking project and sure to please your littlest Valentines.

Jane Hornsby's Malted Chocolate Birthday Cake - This may be labeled birthday cake, but if you bake it in a heart-shaped pan instead, hey presto, you've got an easy, totally satisfying chocolate Valentine's cake. Don't skip the frosting!

Barbara Fairchild's Chocolate-Toffee Cookies - Imagine a brownie-like cookie, but stuffed with bits of crunchy toffee and walnuts. I know.
Bret Thompson's Double Chocolate Cookies - These excellent cookies call for a whopping 1 1/4 pounds of chocolate.
Deb Perelman's Intensely Chocolate Sabl��s - Easy to whip up with what are probably staples in your pantry. I recommend adding a drop of peppermint extract to the dough to make Thin Mint facsimiles.
Le Pain Quotidien's Belgian Brownies - These tender, almost creamy little cakelets come from the way-back depths of the blog, but have definitely held up over time.
Alice Medrich's Best Cocoa Brownies - This is basically the only brownie recipe we ever use, because it's easy and classic and reliable and never fails to satisfy everyone.
Ashley Rodriguez's Bittersweet Brownies with Peanut Butter Frosting - The brownies are good on their own, but the silky swaths of peanut butter frosting on top take these into total romance territory.
February 12, 2021
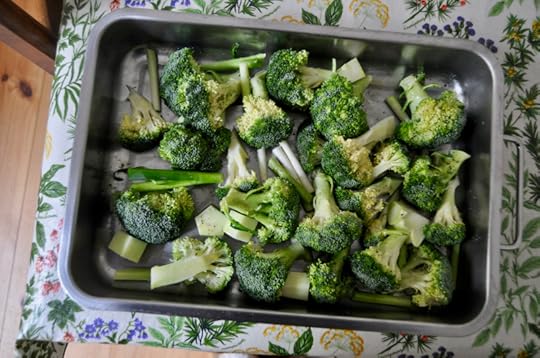
Colu Henry's Roasted Broccoli and Scallions with Thai-Style Vinaigrette
Oof, friends. Just, oof. The pandemic wall has been hit again and again this past week. The despondency sits bone-deep. And it feels so terrible to even mention it, because we are so lucky, we are so fortunate, none of us are sick, we have a roof over our heads, the vaccine is starting to enter the bloodstreams of people we love, hey, the sun even came out today, and yet. And yet. And yet. I feel so tired and sad that I could cry. Oof.
Let me distract you with more frivolous things, yes?
On April 4th, 2019, I left you all hanging with a promise to be back soon with a broccoli recipe so delicious it caused my father, upon first ingestion of it, to say, and I quote, WHAT IS THIS WITCHCRAFT THIS IS THE BEST BROCCOLI I HAVE EVER EATEN. The fact that it took me nearly two years to then follow up with the recipe gives me no pleasure. In fact, I feel like one of those people who get up lazily one night from the dinner table and say, yawning languidly, listen, I'm just going to take one more walk around the block to stretch my legs and then they just never return and 20 years go by before one day they turn up at your wedding with a grizzled face, a stringy ponytail and a sheepish look, asking for your forgiveness.
Too harsh?
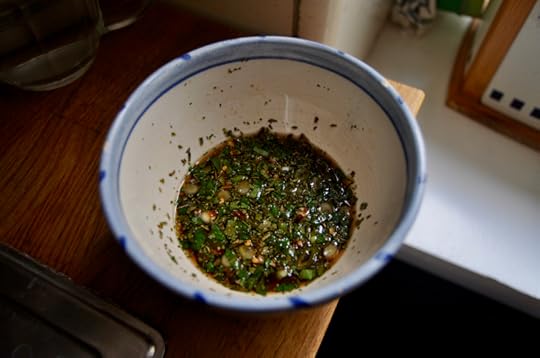
In preparation for this post, I made the magical broccoli again. What if it wasn't as good as I remembered? What if I built up your expectations so high that this broccoli couldn't possibly do them justice? I needn't have worried. It really is delicious (phew!). The preparation is nothing especially new: you simply roast broccoli until they're singed and tender, but you add scallions to the roasting pan, which add sweetness and flavor, and then, once the vegetables are finished roasting, you douse them in a sweet-salty, spicy vinaigrette that is redolent with the funk of fish sauce, and shower punchy herbs on top. It gives roasted broccoli a whole new spin and it is addictively good. I could have eaten the entire head of broccoli as my meal, but luckily, I had eaters at my table who saved me from an untimely death by cruciferous vegetable. I might not be so lucky next time.
I think it's important to increase the number of scallions from the original, because they're one of the best parts of this salad (can we call it a salad? I'm not quite sure I'm comfortable with that). The original recipe also says to only serve this fresh from the oven, "otherwise, the vegetables get soggy." Turns out I quite like soggy vegetables? Or maybe I wouldn't call them that to begin with? Yes, this is delectable when the broccoli is still hot and crisp, but it's really still very wonderful after it has cooled to room temperature. So proceed as you like.
And if you have any leftover vinaigrette sloshing at the bottom of the bowl, save it and pour it over some plain rice for your supper. (You could, of course, do what my husband does and simply tip the bowl against your lips and drink the dressing straight, but I'm going to assume you are more refined than he is.)
So there you have it! The miraculous broccoli is yours. May it bring a little sparkle to your day.

Roasted Broccoli and Scallions with Thai-Style Vinaigrette
Serves 4 as a side dish
Print this recipe!
For the broccoli and scallions:
1 �� pounds/680 grams broccoli (about 2 good-sized crowns and their stems), cut into florets
8 scallions, cut into 2-inch pieces
3 to 4 tablespoons olive oil
Salt and pepper
For the vinaigrette:
�� cup freshly squeezed lime juice (from 1 to 2 limes)
1 scallion, finely chopped
1 �� teaspoons light brown sugar
1 small fresh red chile, minced, or �� teaspoon red-pepper flakes, plus more to taste
2 tablespoons fish sauce
1 tablespoon finely chopped cilantro
1 tablespoon finely chopped mint
1. Heat the oven to 425��F/220��C. Place the broccoli and scallions in a large roasting or sheet pan and drizzle with the olive oil. Season well with salt and pepper and toss. Roast until crisp and browned, about 15 to 20 minutes, tossing halfway through to ensure even cooking.
2. While the vegetables roast, make the vinaigrette: In a small bowl, whisk all the ingredients until the brown sugar is dissolved. Taste and adjust seasoning if needed.
3. Place the broccoli and scallions in a serving bowl and toss with the vinaigrette. Serve immediately or at room temperature.


