
Marisa McClellan's Blog, page 143
January 22, 2013
Potluck Salad Kit #2
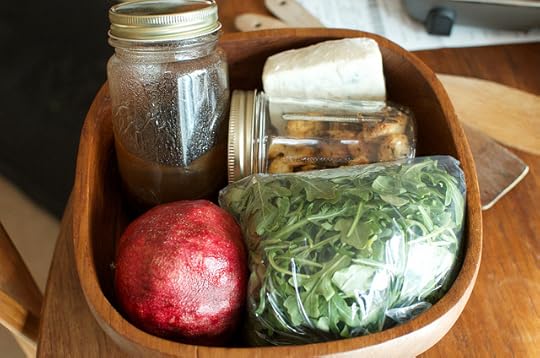
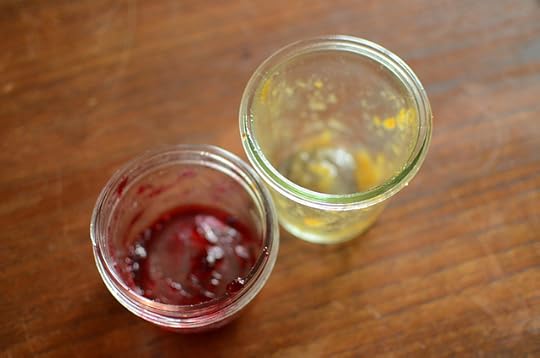
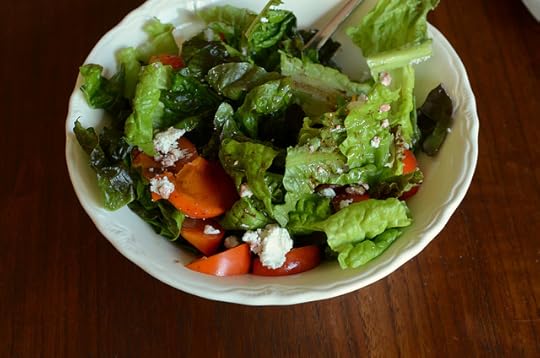
Last spring, I shared a little salad kit I’d put together to take to a potluck. This Sunday morning, I found myself filling that same salad bowl with greens, jars and other tasty bits for another shared meal. I thought some of you might like a peek.
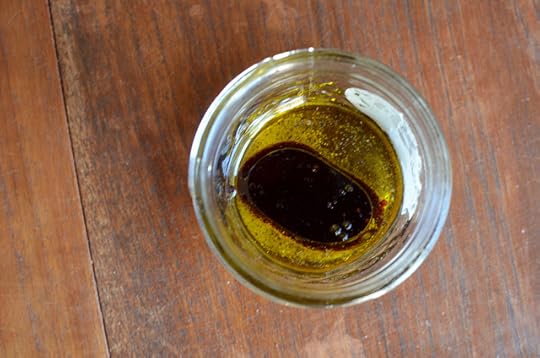
Much like that salad last spring, this one also used baby arugula as the base (it’s one of my very favorite greens). I added some homemade croutons for crunch. Maytag blue cheese was there for a hint of funk and softness. And a pomegranate offered sweetness and a different texture. The vinaigrette was equal parts balsamic vinegar and olive oil, a spoonful of honey, and salt. Shake to combine.
If you read this post and the one from eight months ago, you’ll start to see that there’s a formula to my potluck salads. They all begin with greens. I love baby arugula, but will also use spring mix, torn red leaf or Bibb lettuce, or tender spinach. Then I pick something crunchy, something creamy, and, if I think the audience will approve, something sweet (when I make salads for my husband, I always omit the something sweet. While he has a healthy sweet tooth, he doesn’t like it in his greens). Dressings are simple and most often are made right in a jar.
My favorite crunchy things are toasted nuts, homemade croutons, small cubes of roasted vegetables (like in this salad) or pickles. The creamy things can be cheese, caramelized onions, avocados or morsels of chopped egg. If you’re adding a sweet thing, try pickled fruit, slivers of apple, pear or persimmon, currants, or segmented bits of oranges.
How do you like to build your salads?
Related Posts:
Red Leaf, Goat Cheese and Fuyu Persimmon Salad
Potluck Salad Kit and Dear Friends
Pickles and Potlucks


January 21, 2013
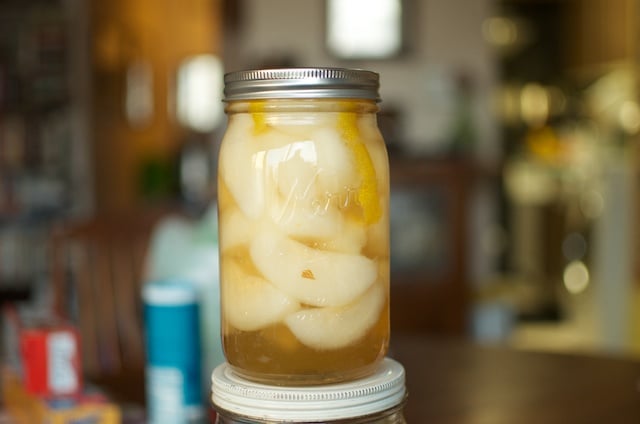
Karen Solomon’s Pickled Asian Pears with Lemon
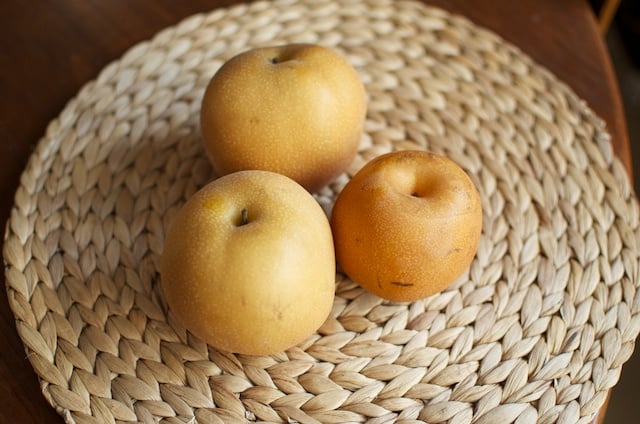
Asian pears are a tough ingredient for preservers. So much of their charm is in their clean flavor and snappy texture and those are qualities that don’t translate well in a jam or butter. They’re also really quite low in acid and so have be to acidified aggressively in order to be safe for canning. Sometime ago, I determined to save myself the heartache of wasted asian pears and simply kept them far away from my jars.
But then, I got a copy of Karen Solomon’s new e-book, called Asian Pickles: Japan . Her publisher is doing this brilliant thing, in which they’re releasing sections of the book electronically in advance of the physical publication. These e-versions include audio enhancements and give you a chance to preview some of the content that the print edition will include (coming in Spring 2014).

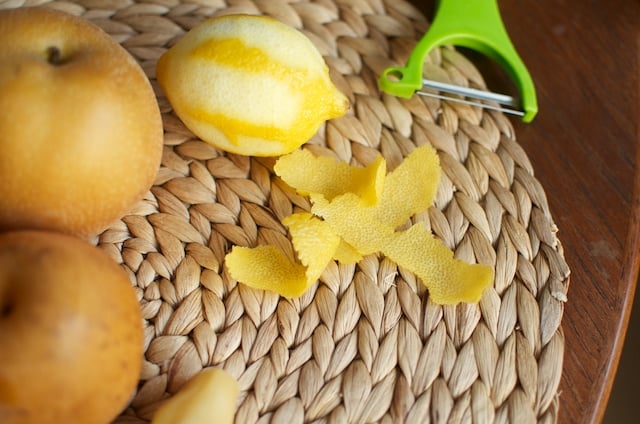
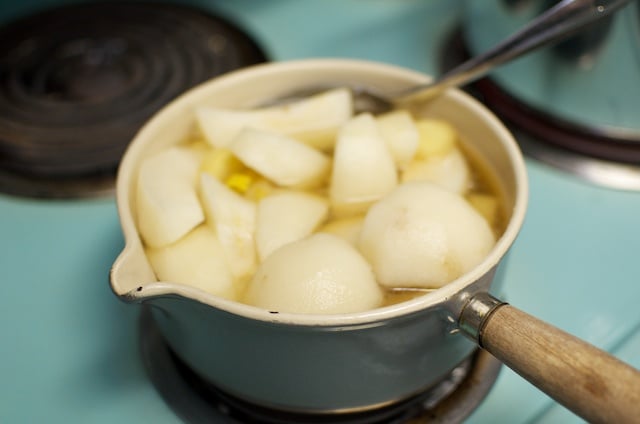
Included in this lovely little e-book was a recipe for Pickled Asian Pear with Lemon. You lightly poach asian pear wedges and then float them in a brine made from white wine vinegar, sugar, and lemon juice. Strips of lemon zest and slivers of ginger add flavor (the recipe calls for pickled ginger, but not having any in my kitchen, I substituted a few peeled slices of fresh).
This recipe neatly dealt with all my asian pear preserving issues. It handles the acid issue with a generous application of undiluted vinegar. You do lose the crunch of the raw pear, but in its place is a silky, tender portion of fruit. I’ve taken to eating bits of these pickles pears with blue cheese over torn Bibb lettuce. With persimmons slowly fading from the seasonal fruit array, I’m happy to have a different fruit to heap onto my lunchtime salads.
You should know that Karen’s e-book isn’t simply easy little pickles like this one (though there are others that can be made with relative quickness). She goes into a great, useful depth about traditional Japanese pickling and offers details about the various techniques (including how to start and maintain a pickling bed), carefully explains the steps required to pull off the trickier ferments, and offers lots of helpful suggestions about how to incorporate these new-to-you pickles into your meals. For $2.99, it’s a serious score.
Print
Pickled Asian Pears with Lemon
Ingredients
2 pounds Asian pears, or any other sweet, firm pear (3-4 pears)4 (2-inch) pieces of lemon zest
Juice of 1 lemon
4 slices pickled ginger (or several slices of fresh ginger if you don't have pickled)
11⁄2 cups sugar
11⁄2 teaspoons kosher salt
1 cup white wine vinegar
2 tablespoons mirin
Instructions
Select pears that are firm and on the small side. Peel them, cut them into quarters, and core them.Combine the lemon zest, lemon juice, ginger, sugar, salt, vinegar, and mirin in a medium nonreactive saucepan off-heat; don’t worry that the sugar is not yet dissolved.
Add the cut pears to the pan to coat them in the acidic brine.
Meanwhile, fill a second medium saucepan with water and bring it to a simmer.
Using a slotted spoon, transfer the pears to the simmering water, leaving behind as much of the brine as possible.
Simmer the pears until they turn white and are just cooked through but still quite firm, about 6 minutes.
The pears should be pierced easily with a fork, but you don’t want them to overcook and get mushy.
Drain the pears and transfer them to 2 clean pint jars (I used a single quart jar), packing them tightly and tucking them under the curved “shoulders” of the jar.
Bring the brine pot to a boil, uncovered, stirring to dissolve the sugar, about 2 minutes.
Once it’s boiling, turn off the heat. Divide the ginger and lemon zest between the two jars.
Pour the brine over the pears in the jars to cover completely (reserve the leftover brine).
Tighten the lids on the jars immediately and let them rest on the countertop for 1 day before moving them to the refrigerator.
The pears are ready to eat in 3 days, but taste even better after 5.
They will keep their flavor for about a month in the refrigerator, but the color will begin to change after 2 weeks.
Notes
This recipe is reprinted from Karen Solomon's e-book, Asian Pickles: Japan, published by Ten Speed Press.
Schema/Recipe SEO Data Markup by ZipList Recipe Plugin2.2http://www.foodinjars.com/2013/01/karen-solomons-pickled-asian-pears-with-lemon/Related Posts:
Can It, Bottle It, Smoke It Winner
Can It, Bottle It, Smoke It + Giveaway
Jam It, Pickle It, Cure It Giveaway
January 20, 2013
Links: Milk Jam, Savory Granola, and Coconut Butter
A few links I’ve had stashed away. I found a draft post with some links from late November and early December that are too good not to share.
Milk jam! Not something you can preserve in a boiling water bath canner, but certainly delicious (and keeps in the fridge for a very long time).
I’ve long had homemade coconut butter on my list of things to make, but this toasted version looks better than anything I’ve contemplated.
in place of the cream. I imagine it’s an amazing combination of sweet and salty.
Gluten-free sesame crackers, made with advice from cracker master
 Ivy Manning.
Savory coconut curry granola. These are great for adding crunch to creamy soups or salads.
This galette filled with sauteed winter vegetables has totally captured my attention.
As a ginger love, a dessert called ginger crunch sounds like something I must add to my repertory immediately.
Talk about preserves in action! Brownies with a swirl of raspberry jam and buckwheat scones with marmalade rolled up inside them.
Here’s what I’ve written elsewhere recently…
I tried my hand at homemade pretzels. I did both hard and soft and found that the soft pretzel is where it’s at. Absolutely worth making at least once in life.
I’ve started a year-long project over on Table Matters that has me finding 12 delicious takes on the whole chicken. In January, I wrote about my favorite slow-cooked method.
Over on the FN Dish, I’ve written about Paula Deen’s Irish Lamb Stew (seriously delicious), Giada’s farfalle with chicken and Swiss chard (good, but know that making it with red chard makes for a muddy looking dish), and Rachael Ray’s Pork Goulash (Scott at it three times over, so it must have been good).
I also rewrote my grapefruit jam for the Etsy blog. It’s the perfect preserve for this time of year and it so bright tasting.
Related Posts:
Upcoming Classes, Events and a Few Favorite Links
Early January Links + Eat Real Food Calendar Winner
Links: Savory Granola, Pickled Chard Stems, Quick Pickles + Winners
January 18, 2013
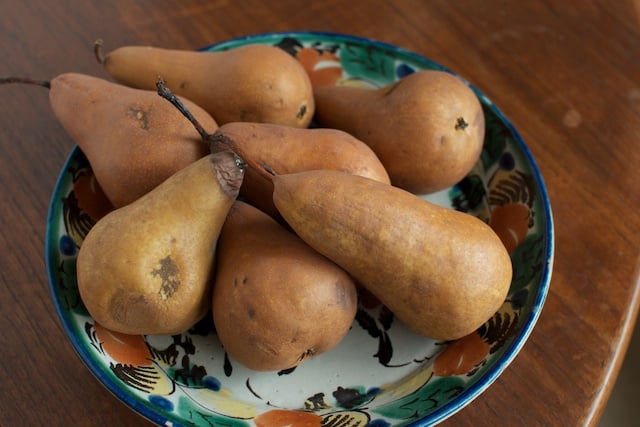
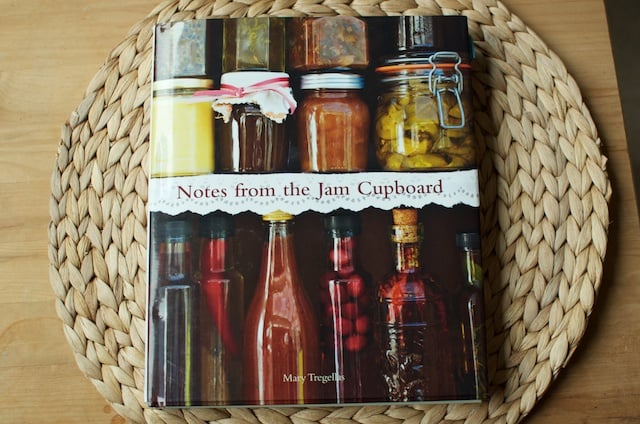
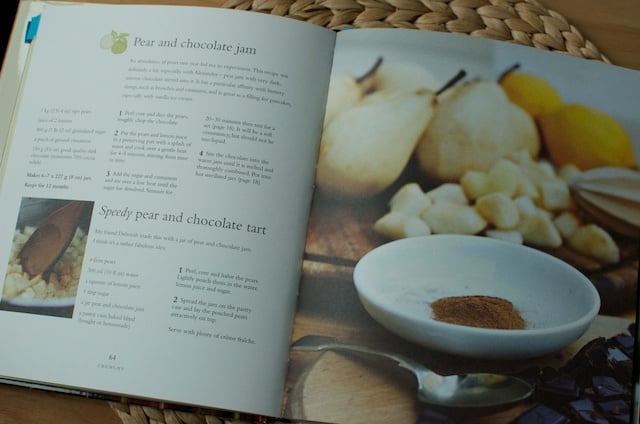
Pear and Chocolate Jam
Sometime last fall, I bought a copy of a British preserving book called Notes from the Jam Cupboard . I discovered its existence while skimming a list of recent cookbook imports and, justifying it as an important research material, promptly added it to my ever-growing canning and preserving library. I read through it as soon as it arrived and marked more than half a dozen recipes to try immediately (of course, immediately turned out to mean “sometime in the next six months”).
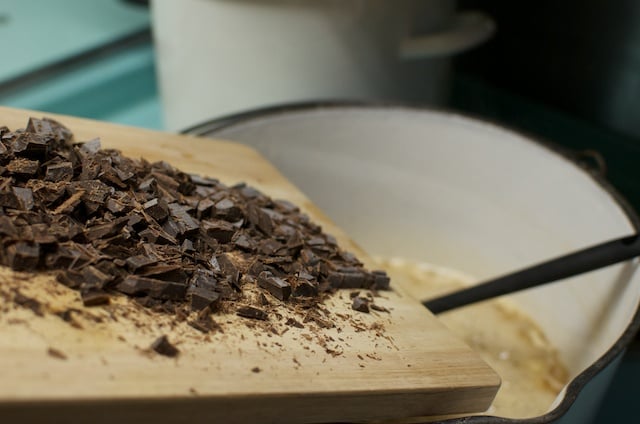
Of all the possible preserves and dishes I marked, there was one that stuck particularly fast in my memory. Pear and chocolate jam. As we all know, I have something of a weakness for pear jams (cardamom. vanilla. cinnamon. lavender.). I had to try a jam that has you melt nearly two bars of dark chocolate into a pot of pear jam that you’ve gently spiked with cinnamon. Truly, I couldn’t imagine how anything could sound more divine.
I’ve spent more time than is rational thinking about this jam and have twice bought pears with the intention of making it. Finally, earlier this week, my stars aligned and I made a batch of this jam, exactly as written. It cooked up beautifully and made me realize that a jam made from peeled pears is slightly more refined and elegant than the ones I’ve often made (not that I’ll be peeling all my pears from here on out, but there are moments when it can be nice).
In her head note, Mary Tregellas says that this is a jam that “has a particular affinity with buttery things, such as brioche and croissants.” Having made a batch, I understand why she said this. This is an incredibly sweet jam. There are four parts sugar to five parts fruit, and then you add a mountain of dark chocolate.
This is not something you’ll probably want to smear on toast for breakfast each morning, but it would make an amazing glaze for a dense, barely-sweet chocolate cake or as a filling layer in an elegant tart (there’s even a tart recipe included in the book).
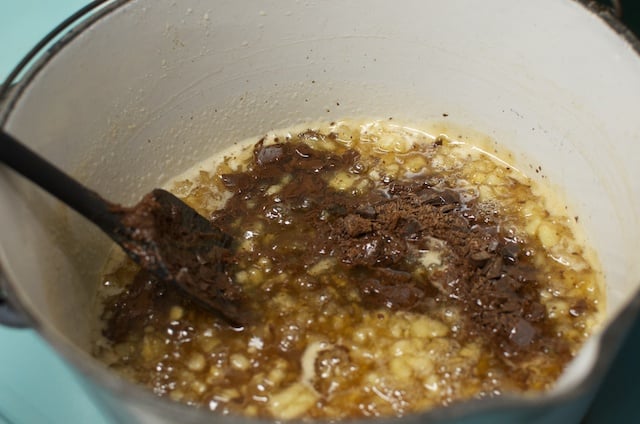
I’m certain that this jam will raise some safety flags for some of you out there, but according to the reading I’ve done, I believe it is safe for canning (I added a boiling water bath step that isn’t included in the book). Good dark chocolate (which is what I used) is made without the addition of milk solids, so there’s no dairy in this product. The amount of sugar in the recipe will help keep it safely preserved for some time.
There is some reason for caution on the pH front, though. Chocolate is quite low in acid. However, most pear varieties have enough acid for safe canning (though not asian pears) and the recipe includes the juice of two lemons. If using fresh lemons for acid balancing makes you uncomfortable, you can substitute bottled lemon juice (a medium lemon averages 3 tablespoons of lemon juice). When I made my batch, I added the juice of 2 1/2 lemons, which gave me a full half cup.
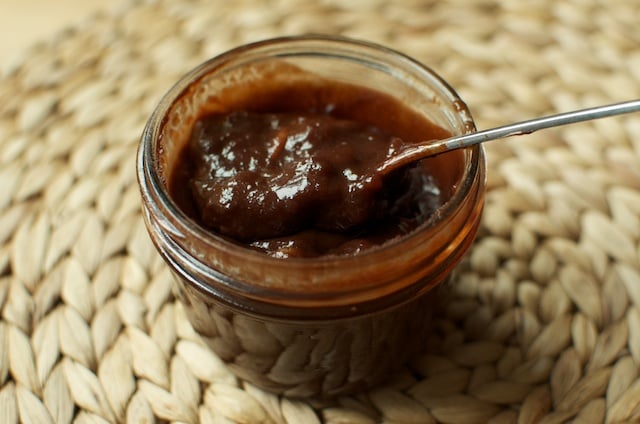
All that said, this is a lovely jam. It tastes a great deal like a slice of pear dipped into chocolate fondue. It’s a treat I’m happy to welcome into my pantry and I’ll be looking for ways to best use it going forward.
Print
Pear and Chocolate Jam
Yield: 5-6 half pints (batches vary)
Ingredients
2 1/2 pounds ripe pears (approximately 7-8 pears)2 lemons, juiced
3 1/2 cups granulated sugar
1/2 teaspoon ground cinnamon
5 1/2 ounces good quality dark chocolate (70% minimum, higher is better)
Instructions
Prepare a boiling water bath canner and 5-6 half pint jars.Peel, core and chop pears. Place them in a wide, non-reactive pan with the lemon juice and 2 tablespoons water.
Bring to a simmer over medium heat, stirring occasionally, until pears begin to soften and break down.
While pears cook, chop chocolate and set aside.
Once pears are quite soft, add sugar and cinnamon. Increase heat to medium-high. Cook, stirring regularly, until the jam reached 220 degrees F.
Remove the pot from the heat and scrape in the chocolate. Stir until it is fully melted.
Funnel into prepared jars. Wipe rims, apply lids and rings and process for 10 minutes.
When time is up, remove jars from canner and place on a folded kitchen towel to cool.
Once jars are fully cooled, test seals. Any unsealed jars should be refrigerated and used promptly. Sealed jars can be stored jars can be stored at room temperature for up to one year.
Notes
Adapted from "Notes From the Jam Cupboard" by Mary Tregallas.
Schema/Recipe SEO Data Markup by ZipList Recipe Plugin2.2http://www.foodinjars.com/2013/01/pear-and-chocolate-jam/Related Posts:
January 15, 2013
Preserves in Action: Pureed Preserved Lemons
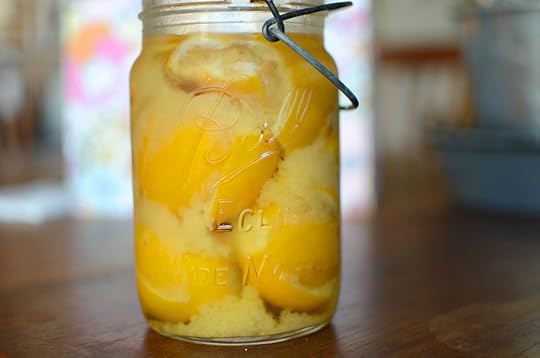
For the last several years, one of my mid-winter traditions has been to treat myself to a box of Meyer lemons from an orchard in California. It’s my favorite way to bright my days and ward off the gloom of January on the east coast.
When the lemons arrive, I make marmalade, jelly, dehydrated citrus slices, curd, and salt preserved lemons. It’s a joy to spend those hours squirreling away all the different lemon preserves, knowing that it will be another year before I make them again.
In a typical year, I have no problem using up the things I’ve made from my stash of Meyer lemons. This time though, I just didn’t manage to work through 2012′s jar of salt preserved lemons. It got scooted to the very back corner of the fridge and there it stayed, for most of the last 12 months.
I did remember that it was tucked back there. What’s more, there have even been many moments when I knew that a little dose of preserved lemons would go nicely in a dish I was making. I just couldn’t deal with the game of reverse-Tetris that it would have required to put hands on those lemons.
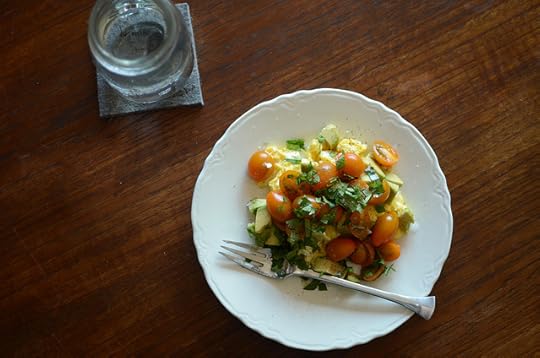
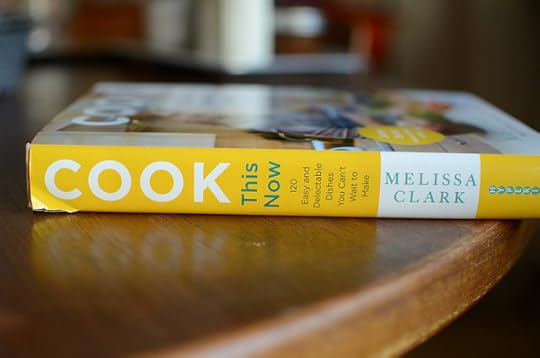
About a week ago, on the hunt for some January dinner inspiration, I pulled my copy of Melissa Clark’s book, Cook This Now , down off the shelf. While leafing through, I spotted an absolutely brilliant idea. She suggests plucking the seeds out of a preserved lemon and then running it through a blender, in order to make an easy-to-use pulp.
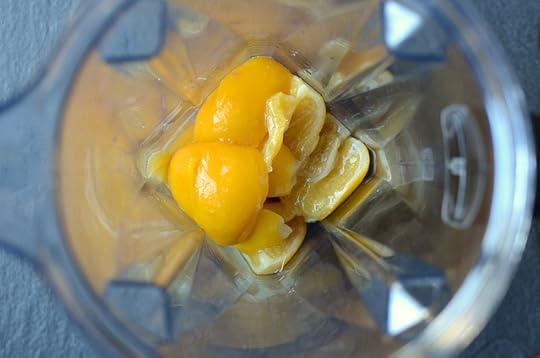
Instead of having a giant jar of inaccessible lemons, I could have a very accessible (smaller) jar of preserved lemon puree.
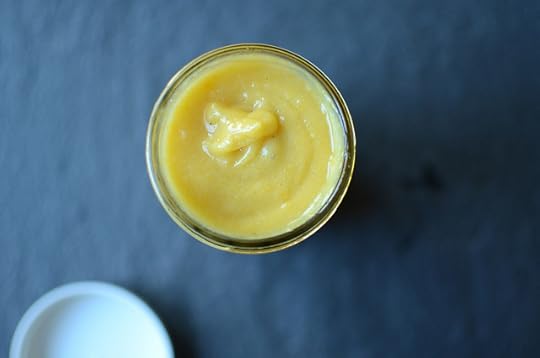
Once managed to unearth the jar of lemons from behind the maple syrup, I was in business. I pulled the seeds from half my stash and plopped them into the blender. It took less than a minute in the Vitamix to work them into a very sunny paste. Now, whenever I want to add that funky, tangy, salty, tart preserved lemon flavor to a dish, all I have to do is dip a clean spoon into a jar that now lives on the door of the fridge. Preserved lemons, redeemed!
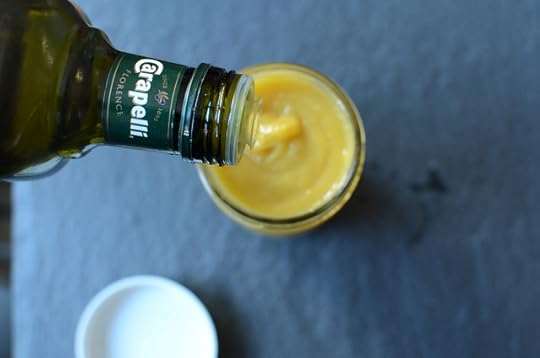
Melissa Clark recommends that you cover the puree with a generous layer of olive oil, to keep it from spoiling. A very sensible idea, if you ask me!
The best thing about blending the lemons is that once you’ve scraped what you can out of the blender pitcher, you’re already halfway to a great salad dressing. Because it’s inevitable that you won’t be able to get every last bit out of the blender, instead add a little water and honey. Put the pitcher back on the blender base, run the motor on low and drizzle in a little olive oil as it works. As soon as it develops a thick consistency, you’re done.
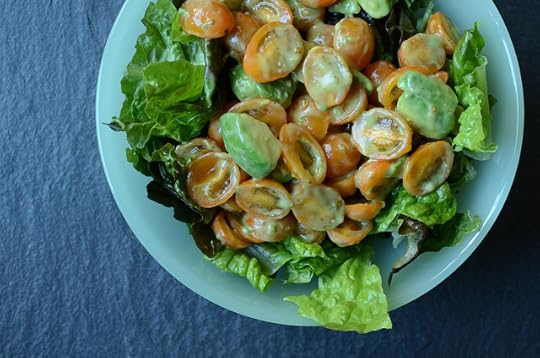
The finished dressing is wonderfully creamy and tart, but without the throat-catching acidity that a vinegar-based dressing can have. I made a not-so-seasonal salad of halved grape tomatoes and avocado that I heaped on a pile of torn lettuce.
If you have a stash of preserved lemons tucked away in your fridge, how are you using them?
Related Posts:
Preserving Lemons
January 9, 2013
Hachiya Persimmon Oatcakes
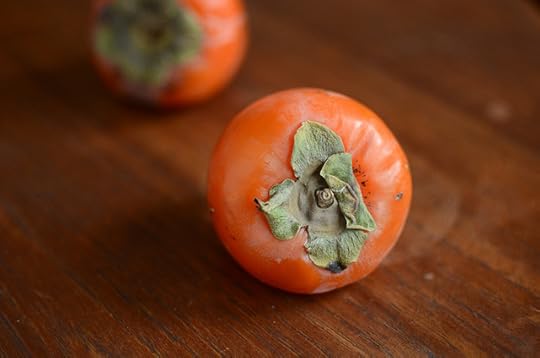
I’m having a bit of a fling with persimmons this winter. First, there was the chutney included in this pretty project. Next came that red leaf and fuyu persimmon salad (I ate it again today). Today, I took very ripe hachiya persimmons and made a batch of hearty, not-too-sweet oatcakes.
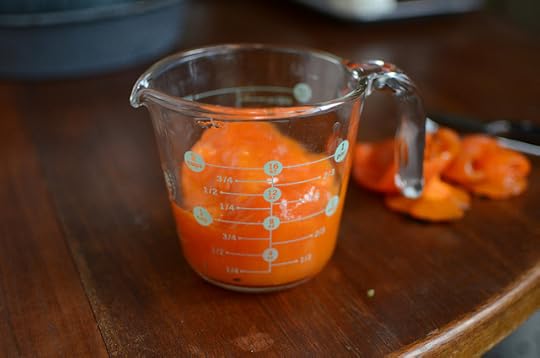
When I bought this pair of hachiya persimmons, my plan was to make a batch of cookies. I have a recipe from my grandma Bunny’s little file box that I’ve long intended to make (she died when I was 15 and cooking her dishes brings her back a little). But when I pulled the card out to see what I’d need, I realized that I wanted something just a little more virtuous than a cookie made with two sticks of butter and lots of white sugar.
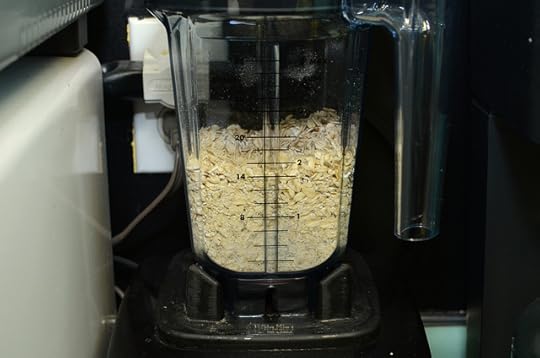
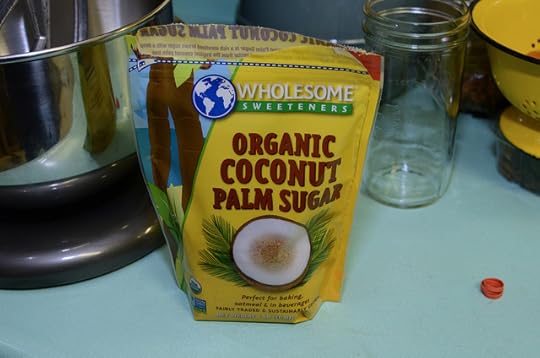
And so, I took the recipe and started rewriting. I cut the butter in half (who needs two sticks when you’ve got all that luscious persimmon pulp to lend moisture?). I used a little coconut palm sugar to sweeten (if your pantry doesn’t run to such things, use sucanat or brown sugar). I added some toasted pecans for protein and crunch. And I used a combination of rolled oats and oat flour for backbone (make your own oat flour in your food processor or blender. Takes 90 seconds and keeps things simple).
Unlike the salad I wrote about last week, this recipe uses the pointy-ended persimmons. This variety is incredibly astringent when firm, but when ripe, becomes super sweet and perfect for baking. I let mine soften on the counter for more than a week, until they felt soft, heavy and a little like a full-to-bursting water balloon. To use them, you simply cut off the stem end and scoop out the flesh with a spoon.
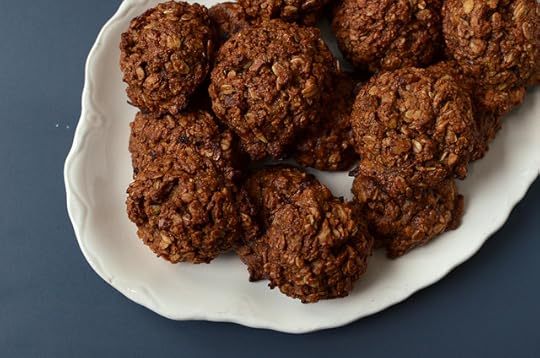
The finished oatcake is tender and moist, but still manages to hold its shape nicely. I used a 1/4 cup disher to portion the dough into little mounds, but you can also grab a couple soup spoons and scoop the old-fashioned way. These guys are nice toasted for breakfast, tucked into packed lunches or gobbled in front of a computer with a cup of tea as a late afternoon snack.
A couple notes:
If you don’t have easy access to persimmons, you could also make these with a cup of mashed banana.
If you use gluten-free oats, these oatcakes become gluten-free. A nice feature these days.
If pecans are too pricey, use toasted walnuts. Or skip the nuts entirely. Sometimes I substitute toasted millet for nuts in baked goods, when I want some crunch but I know someone in my eating audience is allergy.
Because these oatcakes are quite moist, they should be tucked into an airtight container and kept in the fridge or freezer within a day or so of baking.
Print
Hachiya Persimmon Oatcakes
Yield: 22-24 oatcakes
Ingredients
3/4 cup coconut palm sugar or sucanat1/2 cup butter
1 cup hachiya persimmon puree
2 eggs
1 teaspoon orange zest
1 1/2 cups oat flour
1 1/2 cups rolled oats
1 teaspoon baking soda
1 teaspoon ground cinnamon
1/2 teaspoon kosher salt
1/2 teaspoon grated nutmeg
1/2 cup chopped pecans, toasted
Instructions
Preheat oven to 350 degrees F. Line two rimmed baking sheets with silicone baking mats or parchment paper.Cream the butter and sugar together (do this in the bowl of a stand mixer, in a regular mixing bowl with a hand mixer, or with a wooden spoon and elbow grease).
Once they're incorporated, add persimmon puree, eggs, and orange zest. Stir until combined.
In a small bowl, whisk the oat flour, rolled oats, baking soda, cinnamon, salt, and nutmeg together. Add to wet ingredients and mix until incorporated.
Stir in the nuts.
Scoop dough onto prepared baking sheets.
Bake for 12-15 minutes, until the oatcakes are browned. Rotate sheets halfway through baking, so that they cook evenly.
When time is up, remove oatcakes to a rack and let them cool.
Store oatcakes in an airtight container and keep in the refrigerator for up to 5 days. They can also be frozen for longer storage. Schema/Recipe SEO Data Markup by ZipList Recipe Plugin2.2http://www.foodinjars.com/2013/01/hachiya-persimmon-oatcakes/
Related Posts:
Weddings, Winners and Chocolate Cake
January 7, 2013
Early January Links + Eat Real Food Calendar Winner
It’s taking me longer to get situated into the new year than it has in the past. Normally, I leap into January with both feet, excited for the clean slate. This time, I feel uncertain and a off-balance (it doesn’t help that I’m currently writing at a wobbly coffeeshop table). While I gather myself and clear out the mental fog, here are some good things that other people have written and published lately.
This kale frittata in a millet crust is everything I want to be eating right now, in a single, compact package. Leafy greens! Whole grains! Protein-packed eggs!
I make a lot of chicken broth, but this piece reminded me that I should add beef bone broth to my regular repertory. Healthy, delicious, and cannable.
It’s citrus season. If you can get your hands on some bergamot, make this marmalade.
Squash jam (for fridge or freezer storage). What a good way to brighten winter days!
A fancy, make-your-own grilled cheese bar. Can you imagine a more fun way to throw a party and use up those open jars?
A vintage Vera canning pattern, brought back by Crate & Barrel and printed on dish towels and aprons. I adore it.
This is the time of year to start eating all that fruit you canned and froze during the summer. Julia suggests doing it with fruit leathers and I couldn’t agree more!
If you resolved to cut back on sweets and refined grains in the new year, check out the Carrot/Banana/Orange Muffins that Rebecca made.
A useful reminder from Autumn to label homemade things with masking tape, to help cut down on food waste.
If you’re in the mood for a cooking challenge in 2013, join up with Meg from Grow and Resist and Briggs from Oh Briggsy for their Cook the Books 2013 Cookbook Challenge. First up is Dorie Greenspan’s Around My French Table.
* * * * * * * *
One of my hopes for 2013 is to get back into the habit of answering canning questions and writing helpful tutorials (like I’ve done in the past under the heading Canning 101). If you have a question related to canning, preserving or anything jar-related, please send it my way and I’ll do my best to answer. Leave it in the comments on this post, or shoot me an email!
* * * * * * * *

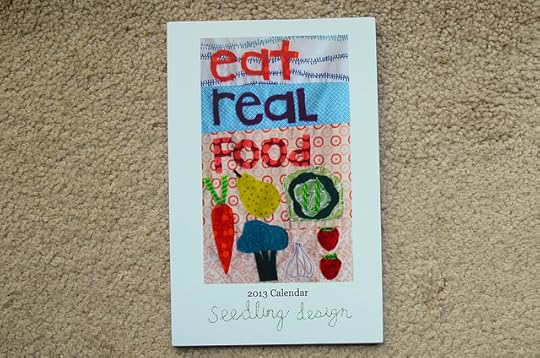
The winner of the Eat Real Food 2013 Calendar is Alyson (commenter #19) from The Hasty Quilter. If you didn’t win and you’re pining after the calendar, there’s still a handful of them available for purchase at Seedling Design.
* * * * * * * *
I’m taking the month of January off from giveaways and product-centric posts. They’ll be back after a fashion in February, but I just need a break from the focus on stuff.
Related Posts:
Links: Savory Granola, Pickled Chard Stems, Quick Pickles + Winners
Links: Rose Hip Syrup, Deep-Fried Turkey & Crispy Pickles + EcoJarz Winners
Links: Sauerkraut, Sesame Candy and Congee + Preservation Kitchen Winner
January 4, 2013
Red Leaf, Goat Cheese and Fuyu Persimmon Salad

Of all the things I love the potlucks (seeing friends, sharing food, only having to make a single dish instead of an entire meal), I think my favorite aspect is the opportunity to try food from other home cooks.
While I like my own cooking, I find it woefully easy to fall into flavor and ingredient ruts. Eating food made by friends and neighbors is can be an opportunity reset weary taste buds and get excited about cooking again (of course, this all depends on the people who are attending your potluck. It can certainly be hit-or-miss).
Oops. Sorry for the artless blur. I ate lunch late this day and the light was fading.
This salad is an example of inspiration delivered via potluck. A couple winters back, I was at one and towards the end of the evening, someone brought a metal mixing bowl filled with tender lettuce, slivers of onion and wedges of persimmon. Dressed simply and very lightly salted, it knocked my socks off. I went back for thirds and made plans to imitate it immediately. Since that night, this salad goes into steady rotation the moment persimmons arrives.
My current version consists of a large bowl of red leaf lettuce*, a whole Fuyu persimmon (click here to see a illustrated piece on the different kinds of persimmons) cut into wedges and a couple tablespoons crumbled chevre. Some days, I’ll add shaved red onion and some toasted nuts, too. I put a little olive oil, fruity vinegar, salt and pepper into a quarter pint jar, shake until combined and drizzle over everything. Makes for a delicious lunch!
*I always buy a head and wash it myself. Makes for much fresher tasting salads than the pre-washed and bagged stuff, and it’s cheaper, too. Tear, wash and dry a whole head (I love my salad spinner for this). Bag it up and eat from it for 2-3 days. It’s one of those tasks that is easy to dread, but ends up taking less than ten minutes if you’re quick about it.
Have you discovered a new dish at a potluck that you’ve made your own?
Related Posts:
Potluck Salad Kit and Dear Friends
Pickles and Potlucks
January 2, 2013
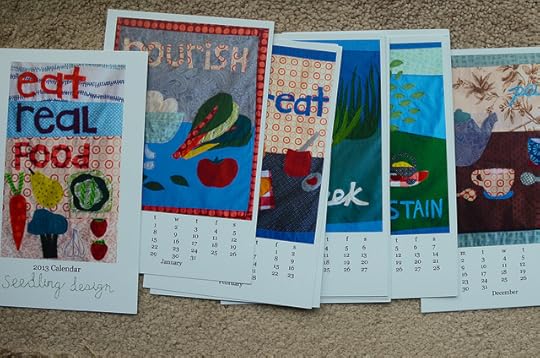
Eat Real Food 2013 Calendar Giveaway
When I was growing up, there was always a calendar hanging on the side of refrigerator. Secured by a hooked magnet up top and two clippy ones along the edges, it was the repository for sleepovers, school plays, and the dates when were assigned to bring snacks for choir practice. Our lives were simple enough back then that a month of small boxes held a family’s worth of commitment without strain.
Up until last January, I still used a paper planner (though it was a whole lot more detailed than the old fridge calendar method). But as life expanded, there wasn’t enough space to hold all my to-do lists, deadlines, and reminders. I switched to a Google calendar and have breathed more easily since.
I’ve missed having a paper calendar, though. I like having a physical thing that helps me measure the days and weeks. And at the turn of each month, it’s fun to have a new picture to keep me company.
When Anna Hewitt from Seedling Design emailed, offering to send me a copy of her Eat Real Food calendar, I jumped at the chance to have a physical calendar in my life again. Printed on sturdy card stock, this monthly calendar isn’t bound together. That means you can arrange it in a grid on a cork board, or you can prop a single month on a bookshelf or stick it to the fridge with a magnet.
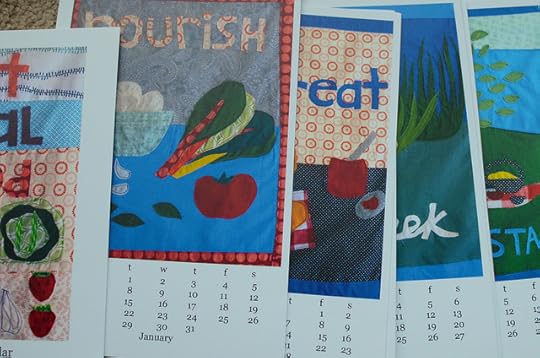
Each month features an image of a sewn design (handmade by Anna) that represents some different aspect of food and community. It is quietly charming and such a good reminder that we all need allow ourselves the time to nourish, sustain, and grow in this new year.
Thanks to Anna, I have a second calendar to give away to one of my readers. If you’d like to enter for a chance to win it, here’s what to do.
Leave a comment on this post and share how you track and measure your days. Paper planner? Calendar on the fridge? Online datebook?
Comments will close at 11:59 pm on Saturday, January 5, 2013. Winners will be chosen at random and will be posted to the blog on Sunday.
Giveaway open all.
One comment per person, please. Entries must be left via the comment form on the blog at the bottom of this post.
If you don’t want to wait to see if you win, you can also click over to Seedling Design and pick up a calendar for yourself today (before the new year too far underway). It’s just $20, which isn’t too much for a year’s worth of art and helpful reminders!
Disclosure: Seedling Design sent me two calendars, one to keep and one to give away. They did not pay for inclusion in this post and my opinions are entirely my own.
Related Posts:
Spiced Apple Butter + Giveaway
Giveaway: Eat Boutique Breakfast Gift Box
Giveaway: New West KnifeWorks Chef’s Knife
January 1, 2013
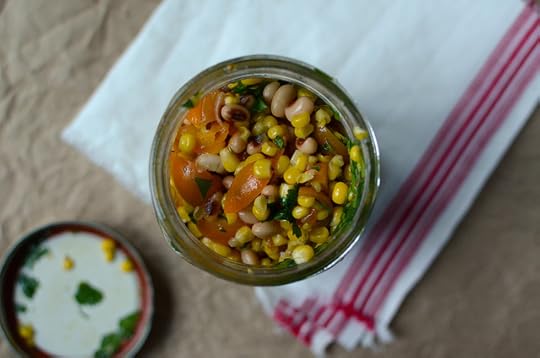
Happy New Year + Black-Eyed Pea Salsa
I hope everyone had a good holiday season! I spent Christmas out in Portland, Oregon with family and got plenty of quality time with my parents, uncle, sister, brother-in-law, and my newly walking nephew (he’s in that sponge stage, where he’s learning as fast as you can say the words. It’s incredible).
I got back to Philadelphia a few days ago and promptly came down with Emmett‘s cold (13 month olds cough in any direction they’re pointed, including straight into your face). Other than an exploratory mission on Sunday to Costco to use our new membership cards, Scott and I have barely left the apartment in days. Oh, how I’m tired of this tradition of mine to end the year mucus and congestion.
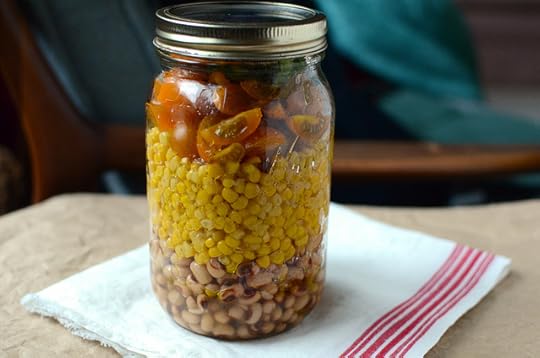
In the hopes of forging different New Year traditions that have nothing to do with NyQuil, kleenex or throat lozenges, I made a very simple take on a classic “good luck for the New Year” dish. Black-eyed pea salsa.
It’s essentially Texas Caviar, but a version that omits bottled salad dressing and is scaled to fit into a quart jar (because who doesn’t like a salsa that can be made straight into a jar?). It’s good with tortilla chips and even better on top of salad greens and a little crumbled feta (if you’re trying to inject a little bit of healthier eating into your new year).
As far as New Year’s hopes and resolutions go, my plan is to keep the year simple. To find a little peace where I am instead of always having my eye on the next thing. To stop tying myself into knots of struggle and let things move in flow and at their own pace. And to remember how incredibly lucky I am to have such a vibrant community of friends and readers out there across the world (thank you all for being part of that!).
And on to the recipe…
Print
Black-Eyed Pea Salsa
Ingredients
1 15-ounce can black-eyed peas, rinsed and drained1 15-ounce can corn kernels, rinsed and drained
1 handful grape tomatoes, cut into quarters
2 tablespoons minced onions
1 tablespoon chopped cilantro
2-3 pickled jalapenos, minced
1 tablespoon olive oil
1 tablespoon sherry vinegar
1 teaspoon kosher salt
1/4 teaspoon freshly ground pepper
Instructions
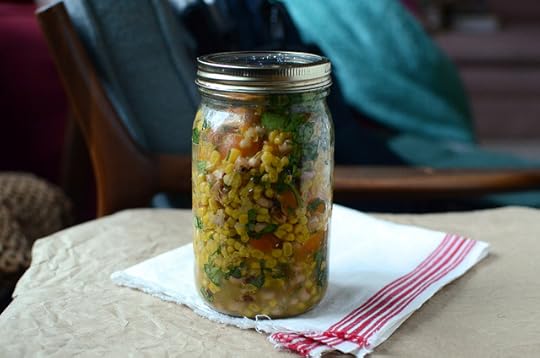
Layer all ingredients into a wide mouth quart jar.Apply lid and shake to integrate.
If there's not enough room for ingredients to combine well, let the jar stand for a few minutes, until everything has slumped enough for the shaking to help.
Let salsa sit at room temperature for at least 10-15 minutes before serving so that the flavors can mellow and marry.
Eat around the New Year for good luck and any time of year for general deliciousness. Schema/Recipe SEO Data Markup by ZipList Recipe Plugin2.2http://www.foodinjars.com/2013/01/happy-new-year-black-eyed-pea-salsa/
Related Posts:
Roasted Tomatillo Salsa


