Mandi Ehman's Blog, page 43
October 8, 2014
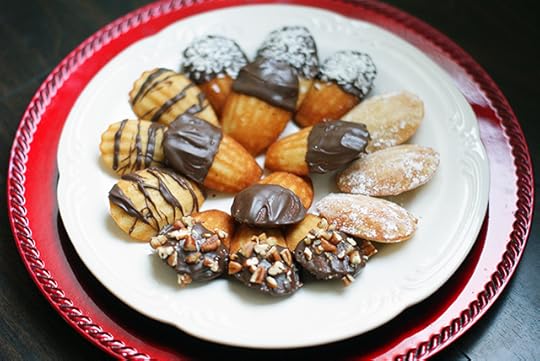
Madeleines {101 Days of Christmas}

Madeleines, or French tea cakes, are really more cake than cookie, although we tend to think of them as a cookie anyway. These light and fluffy sponge cakes are baked in a shell-shaped pan to give them their distinctive shape, and they can be made with a variety of flavored extracts or decorations for a fun addition to your cookie collection.
I’ve seen madeleines referred to as tricky to make, but following the King Arthur recipe, I thought they were simple and easy. (And that’s saying something coming from me!) They’re also elegant and perfect for serving at a Christmas brunch or as a treat in a coffee or tea gift basket.
Ingredients:
10 tablespoons (1 1/4 sticks) unsalted butter 2/3 cup sugar 3 large eggs, room temperature 1/2 teaspoon salt 1 tablespoon vanilla extract 1 cup King Arthur Unbleached All-Purpose Flour, sifted or whisked to aerate baking chocolate, unsweetened coconut, confectioners’ sugar, chopped nuts, etc. (optional)
Directions:
In a small saucepan, melt the butter and then remove from heat and allow to cool to room temperature.
In a medium bowl, beat the sugar, eggs and salt until they’re light yellow and very thick. Stir in the vanilla. Alternately fold in the flour and melted butter, being gentle to help the batter keep as much volume as possible. Refrigerate the batter for 30-45 minutes until it’s thick.
While you wait, preheat your oven to 375 degrees F and lightly grease your madeleine pan.
Scoop a slightly rounded tablespoon of batter into each well of the pan. Put the remaining batter back in the refrigerator.
Bake for 7-8 minutes, until they’re light brown at the edges. Let cool in the pan for several minutes before transferring to a rack.
Dust with a light coating of confectioners’ sugar. Or melt chocolate in a small saucepan over low heat and carefully dip one end of each madeleine in the chocolate. Sprinkle with coconut or nuts and set on parchment paper to harden.
Store madeleines in an airtight container, although they’re best when eaten fresh!
Yield: 2 1/2 dozen
Variations:
Use a different flavored extract, such as almond or fiori de sicilia. Use lemon or orange extract and add zest from the same fruit to the batter. Mix chocolate shavings into the batter. Discover even more variations in the We Love Madeleines cookbook!Click here to add this recipe to your Plan to Eat account.
Recipes from the archives:

Join us as we celebrate 101 Days of Christmas with new DIY projects, gift ideas, traditions and more every day from now through Christmas!
 Mandi Ehman is the blogger behind Life Your Way. She and her husband have four beautiful girls plus one baby boy, and together they live, work and homeschool on a little slice of heaven in wild, wonderful West Virginia. Mandi loves coffee, chocolate, easy meals, beautiful things and minimalist spaces.
 Meet the 101 Days of Christmas sponsors:
Plant Therapy Essential Oils: 100% pure, undiluted oils you can trust at a price you can afford
King Arthur Flour's Baker's Hotline: free professional help with any holiday baking challenge
World Vision Gift Catalog: share a full life with children in need by giving unique, life-changing gifts
Life Your Way Christmas Shop: get your 2014 Christmas planner today
Madeleines {101 Days of Christmas}
© 2010-2014 Purple Martin Press, LLC | All rights reserved


October 7, 2014
Cinnamon-scented pine cones {101 Days of Christmas}
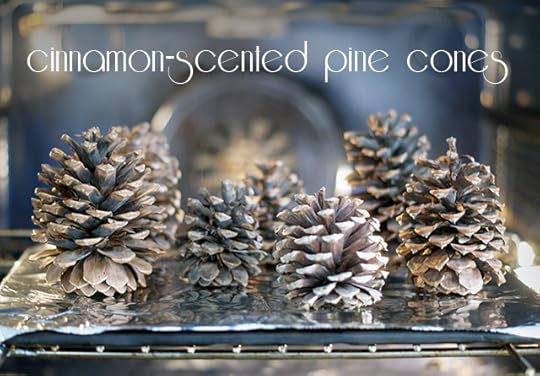
I love to decorate with pine cones from the first chill of fall to the last day of winter, and we always incorporate them as part of our Christmas decor as well, hanging them on the tree or piling them in a bowl.
I’ve purchased the big bags of scented pine cones before, but this year I wanted to collect my own now that my parents live in beautiful North Carolina! It turns out that it’s easy to scent them yourself, as long as you have a little bit of time.
Supplies:
fresh pine cones cinnamon essential oil water spray bottle large plastic bag

Directions:
Wash all of your pine cones thoroughly in soapy water. Rinse and air dry.
Place on a foil-covered tray and bake at 200 degrees F for 45 minutes. This helps them open fully, dries them out, kills any bugs, and melts the sap. (Important: Stay close by while they’re baking and watch for smoke!)
Put the pine cones in a large ziploc baggie.
In a small spray bottle, mix 1 ounces of water and 20-30 drops of cinnamon essential oil. Spray the pine cones in the bag until your water is gone.
Seal the bag and let sit for 5-7 days. If you open it sooner, you’ll still have scented pine cones, but the scent may not last as long!
Variations:
Use different combinations of essential oils.Projects from the archives:
Join us as we celebrate 101 Days of Christmas with new DIY projects, gift ideas, traditions and more every day from now through Christmas!
Mandi Ehman is the blogger behind Life Your Way. She and her husband have four beautiful girls plus one baby boy, and together they live, work and homeschool on a little slice of heaven in wild, wonderful West Virginia. Mandi loves coffee, chocolate, easy meals, beautiful things and minimalist spaces. Meet the 101 Days of Christmas sponsors:
Plant Therapy Essential Oils: 100% pure, undiluted oils you can trust at a price you can afford
King Arthur Flour's Baker's Hotline: free professional help with any holiday baking challenge
World Vision Gift Catalog: share a full life with children in need by giving unique, life-changing gifts
Life Your Way Christmas Shop: get your 2014 Christmas planner today
Cinnamon-scented pine cones {101 Days of Christmas}
© 2010-2014 Purple Martin Press, LLC | All rights reserved

Apple Oatmeal Crumb Muffins
The following post is from Shaina of Food for My Family and Olmanson Photography:
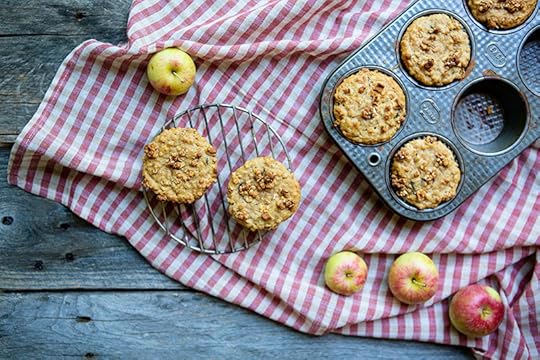
Warm from the oven, this recipe for maple-sweetened and cinnamon-spiced apple muffins makes for a hearty fall breakfast.
Last night I went out in the afternoon with a bowl and picked all the ripe tomatoes off the vines. Then I carefully wrapped the plants and the green orbs in old sheets, securing them in place with clamps. Then the wind howled all night, whipping the sheets back and forth against the plants, but protecting them from the icy mix that fell while we slept.
Summer is a thing of the past, and the fallen leaves that collect in the gutters and are whipped to and fro in the yard are the new normal. At the market the apples are out, filling the vendor tables in mass numbers and in an array of colors. There are Ginger Golds, kissed by the sun, Honeycrisp with their shiny red skins, and dark, ruby red Cortlands.
My kids all gather around the tables, snitching samples and pointing at the overflowing baskets, always choosing the largest one. Their eyes are never bigger than their heads, though; no matter how many apples I buy, they seem to devour them all by the midweek.
If I can hide a few away, though, I’ll chop the last two into tiny bites and mix them into the muffins for Saturday morning. Their sweet, juicy bits explode as you bite in, pockets of fruit, the final farewell of fall before the snow sets in.
Apple Oatmeal Crumb Muffins Print Author: Shaina Olmanson Recipe type: Breakfast Serves: 12 Ingredients 2 cups rolled oats 1 cup milk 3 tablespoons melted butter ⅓ cup + 2 tablespoons maple syrup 1 large egg, lightly beaten 1 teaspoon vanilla extract 1 cup + 1 tablespoon all-purpose flour 1 tablespoon baking powder 1 teaspoon cinnamon ¼ teaspoon grated nutmeg ¼ teaspoon cardamom, optional ¼ teaspoon salt ¾ cup diced apple Directions In a large bowl, measure out 1¾ cups of rolled oats. Add the milk and stir to coat. Allow to rest for 30 minutes. Preheat the oven to 350ºF. Line 12 muffin cups with paper liners. To the soaked oats, stir in the butter, ⅓ cup maple syrup, egg, and vanilla. In a separate bowl, stir together 1 cup flour, baking powder, cinnamon, nutmeg, cardamom, and salt. Add the flour mixture to the wet ingredients, stirring just until mixed. Add in the apples, and stir to combine. Fill muffin cups ⅔ full. Mix together the remaining oats, maple syrup, and flour. Sprinkle the mix over the top of the muffins. Bake for 20-25 minutes, until muffins are golden brown on top and the centers are set. Cool slightly before serving. #version#
What fall foods do you look forward to?
 Shaina Olmanson is the freelance writer, photographer, and home cook behind Food for My Family. Cooking daily with and for her four kids and husband, Ole, drives her desire to inspire other families to do the same. Shaina is also the author of Desserts in Jars and contributes regularly to a variety of online sites and traditional print magazines.
 Meet the 101 Days of Christmas sponsors:
Plant Therapy Essential Oils: 100% pure, undiluted oils you can trust at a price you can afford
King Arthur Flour's Baker's Hotline: free professional help with any holiday baking challenge
World Vision Gift Catalog: share a full life with children in need by giving unique, life-changing gifts
Life Your Way Christmas Shop: get your 2014 Christmas planner today
Apple Oatmeal Crumb Muffins
© 2010-2014 Purple Martin Press, LLC | All rights reserved

October 6, 2014
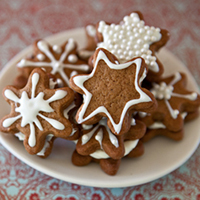
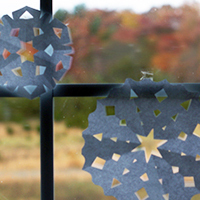
Design-your-own-snowflake cookies for kids {101 Days of Christmas}
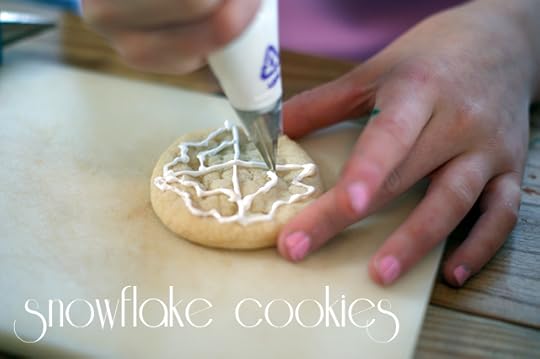
Last week I shared a recipe for royal icing with the promise that I would show you what we used the icing for. This project wasn’t even on my list for this year’s series, but it turned out so cute that I had to share!
Our oldest daughter turned 10 last Friday, and she has been begging to make Frozen snowflake cookies for a month. I really wasn’t sure what she had in mind, but I obediently baked the cookies (confession: they came from a package) and made the royal icing before handing them over to her.
She pulled out a page from her notebook with several snowflake designs and immediately began copying them onto her cookies. Such a cute idea!
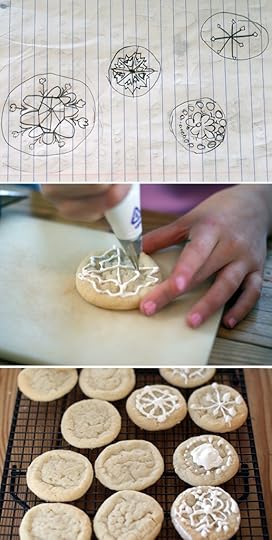
After about 8 cookies, she was struggling to come up with more unique designs (no two snowflakes are alike after all!), but she managed to finish enough for her Essentials class before turning over the decorating tubes to her sisters, who had just as much fun designing their cookies.
We ended up sprinkling the cookies with blue sugar crystals (because Frozen), but I loved them in pure white best.
When it comes to Christmas traditions, I’m a fan of simple, and these would be such a fun playdate or snow day activity!
Projects from the archives:
Join us as we celebrate 101 Days of Christmas with new DIY projects, gift ideas, traditions and more every day from now through Christmas!
Mandi Ehman is the blogger behind Life Your Way. She and her husband have four beautiful girls plus one baby boy, and together they live, work and homeschool on a little slice of heaven in wild, wonderful West Virginia. Mandi loves coffee, chocolate, easy meals, beautiful things and minimalist spaces. Meet the 101 Days of Christmas sponsors:
Plant Therapy Essential Oils: 100% pure, undiluted oils you can trust at a price you can afford
King Arthur Flour's Baker's Hotline: free professional help with any holiday baking challenge
World Vision Gift Catalog: share a full life with children in need by giving unique, life-changing gifts
Life Your Way Christmas Shop: get your 2014 Christmas planner today
Design-your-own-snowflake cookies for kids {101 Days of Christmas}
© 2010-2014 Purple Martin Press, LLC | All rights reserved
 CommentsI love cookies and those are super cute! by Bethany
October 5, 2014
50+ traditions to inspire your holidays {101 Days of Christmas}
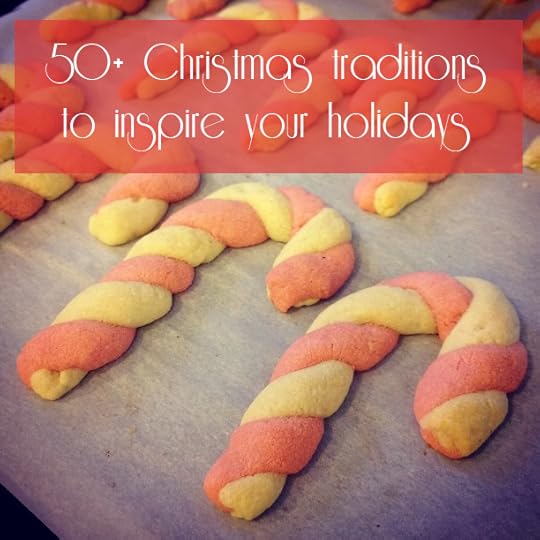
In our house, we always say it’s not really Christmas until the candy cane cookies have been made!
Our family is big on traditions. We believe that traditions — things you do again and again and look forward to each year with anticipation — build the strongest memories and carry the most meaning. Whether those traditions are simple, such as sipping hot chocolate while you decorate the tree, or a big deal, like participating in a local production of the Nutcracker, they reflect your family’s values and priorities during the holiday season. They can be meaningful because they offer a life lesson or a chance to step outside of yourself or simply because they’re a fun memory for your family to share.
I meant what I said a couple of weeks ago about Christmas and Pinterest. The point of this list is not to encourage you to do all the things; it’s to inspire you as you create your own traditions, and to remind you that even the simple things can be traditions that your kids will remember for a lifetime.
Celebrate with an advent wreath in December. Ring the Salvation Army bell. Pick out and send a gift to a family in need through the World Vision Gifts Catalog. Drive to see Christmas lights. Get an Elf on a Shelf. Sleep under the Christmas tree. Write stocking letters. Open a gift on Christmas Eve. Give everyone new Christmas pajamas.P.S. Many thanks to the people on Facebook who shared their traditions with me as I was writing this post. Be sure to comment and tell me about your family’s favorite traditions!
Join us as we celebrate 101 Days of Christmas with new DIY projects, gift ideas, traditions and more every day from now through Christmas!
Mandi Ehman is the blogger behind Life Your Way. She and her husband have four beautiful girls plus one baby boy, and together they live, work and homeschool on a little slice of heaven in wild, wonderful West Virginia. Mandi loves coffee, chocolate, easy meals, beautiful things and minimalist spaces. Meet the 101 Days of Christmas sponsors:
Plant Therapy Essential Oils: 100% pure, undiluted oils you can trust at a price you can afford
King Arthur Flour's Baker's Hotline: free professional help with any holiday baking challenge
World Vision Gift Catalog: share a full life with children in need by giving unique, life-changing gifts
Life Your Way Christmas Shop: get your 2014 Christmas planner today
50+ traditions to inspire your holidays {101 Days of Christmas}
© 2010-2014 Purple Martin Press, LLC | All rights reserved

October 4, 2014
Weekend Reading: October 4, 2014

From Instagram: Morning conversations.
Twelve years ago (tomorrow), in a simple spaghetti strap gown, with a veil over my face and 7 kids leading the way, I walked down the aisle toward the cute boy across the street who had stolen my heart in a girlhood crush that grew into a love that lasts a lifetime.
Eleven years ago, we were on the other side of the country, making a home for ourselves in St. George, Utah as we tried to figure out this whole adulthood and marriage thing.
Ten years ago, we were cuddling our first newborn baby, surrounded by family and head over heels with the newest member of our family.
Nine years ago, we were living in my parents’ basement in Maryland after moving back east to be closer to family.
Eight years ago, we were working our tails off, living in a cute little townhouse in Virginia, trying to decide what our plan was for the future, and enjoying life with our two little girls.
Seven years ago, we were once again cuddling with a newborn, enjoying our three-under-three in our brand new home on a little slice of heaven in West Virginia.
Six years ago…I’m pretty sure we were just wishing for more sleep.
Five years ago, we celebrated our favorite way: with one more brand new baby girl, bringing the total to four-under-five.
Four years ago, we were halfway through our first year as an “at-home” family after Sean sold his business to stay home so I could focus on mine.
Three years ago, we were emerging from the fog of two very hard years with our youngest daughter.
Two years ago, we were headed to South Carolina to celebrate our 10th anniversary for our first big trip without the girls.
One year ago, we were waiting for Jackson’s arrival and trying to remember what it was like to have a new baby in the house.
This year, with no babies or moves on the horizon, we’re just celebrating all of the amazing blessings in our life!
Clearly we mark time by the houses we live in and the babies we welcome. But one thing is for sure: I’m so, so thankful that the cute boy across the street finally called that spring day just before my 17th birthday. He’s my best friend, my better half, my encourager and my love. I fell in love with him over babysitting dates and long country drives to West Virginia and back, and there’s no one I’d rather do life with.
What I’m reading: Scarlet (The Lunar Chronicles Book 2) by Marissa Meyer
What I’m cooking: creamy chicken & rice, ham & cheese puff pancake, crockpot enchiladas
What I’m pinning: spiced pear baked oatmeal, caramel apple bars, pumpkin baked oatmeal squares
What I’m thinking about:
For parenting How American parenting is killing the American marriage | Quartz On Humility, Parenting, and Being Teachable | life{in}grace Sexy Times Are Here Again: A Primer For Parents Who Aren’t Getting Any | The Happiest Home For blogging When Blogging Becomes a Slog | NYTimes.com Being thrilled for someone else’s beautiful effort. | K. Elizabeth Fleck Producers and consumers | Seth’s Blog For life But… what if I need 12 towels today? | Slow Your Home What I Learned From a Funeral I Haven’t Attended Yet | StorylineHave a great weekend!
Mandi Ehman is the blogger behind Life Your Way. She and her husband have four beautiful girls plus one baby boy, and together they live, work and homeschool on a little slice of heaven in wild, wonderful West Virginia. Mandi loves coffee, chocolate, easy meals, beautiful things and minimalist spaces. Meet the 101 Days of Christmas sponsors:
Plant Therapy Essential Oils: 100% pure, undiluted oils you can trust at a price you can afford
King Arthur Flour's Baker's Hotline: free professional help with any holiday baking challenge
World Vision Gift Catalog: share a full life with children in need by giving unique, life-changing gifts
Life Your Way Christmas Shop: get your 2014 Christmas planner today
Weekend Reading: October 4, 2014
© 2010-2014 Purple Martin Press, LLC | All rights reserved

Homemade royal icing {101 Days of Christmas}
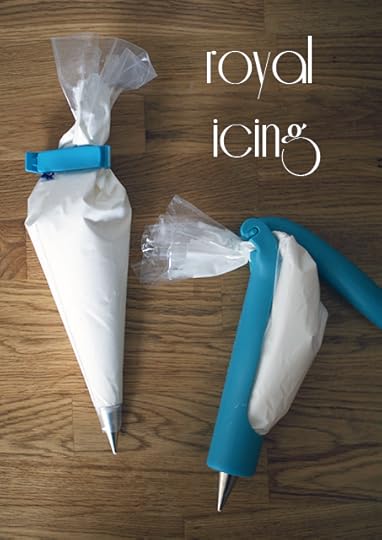
Royal icing is an icing that dries hard and is perfect for decorating cookies or putting together gingerbread houses. Traditionally made with egg whites, it’s easy to make your own royal icing using meringue powder to avoid the worry of raw eggs in your treats.
Come back next week and I’ll show you what we decorated with our royal icing!
Ingredients:
1/4 cup meringue powder 1/2 cup water 4 cups powdered sugar food coloring (optional)Directions:
In a medium bowl, beat meringue powder and water until stiff peaks form.
Add powdered sugar and continue beating until the icing is stiff and shiny. (Start on low and work your way up or you’ll have a big mess!)
Divide icing into separate bowls and stir in food coloring a couple drops at a time until you get the color you want!
Transfer to a piping bag to decorate your cookies or gingerbread house. Add 1/8 teaspoon water at a time to thin it out or 1 tablespoon powdered sugar at a time to thicken it.
Store in an air-tight container with a tight lid for up to two weeks. Note, however, that it will begin to separate over time, so you will need to beat it again if that happens. The consistency may also change with time, so if you find that it’s too stiff add more water, a teeny bit at a time; if it’s too runny, add more powdered sugar.
Join us as we celebrate 101 Days of Christmas with new DIY projects, gift ideas, traditions and more every day from now through Christmas!
Mandi Ehman is the blogger behind Life Your Way. She and her husband have four beautiful girls plus one baby boy, and together they live, work and homeschool on a little slice of heaven in wild, wonderful West Virginia. Mandi loves coffee, chocolate, easy meals, beautiful things and minimalist spaces. Meet the 101 Days of Christmas sponsors:
Plant Therapy Essential Oils: 100% pure, undiluted oils you can trust at a price you can afford
King Arthur Flour's Baker's Hotline: free professional help with any holiday baking challenge
World Vision Gift Catalog: share a full life with children in need by giving unique, life-changing gifts
Life Your Way Christmas Shop: get your 2014 Christmas planner today
Homemade royal icing {101 Days of Christmas}
© 2010-2014 Purple Martin Press, LLC | All rights reserved

October 3, 2014
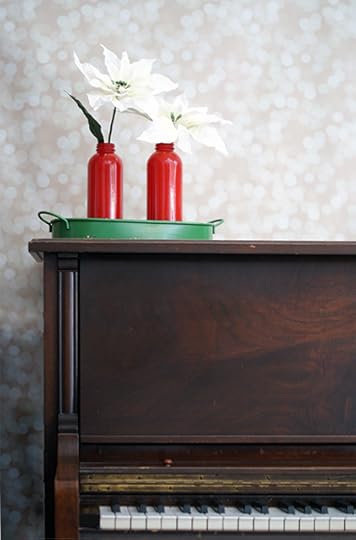
Enamel painted glass vases {101 Days of Christmas}
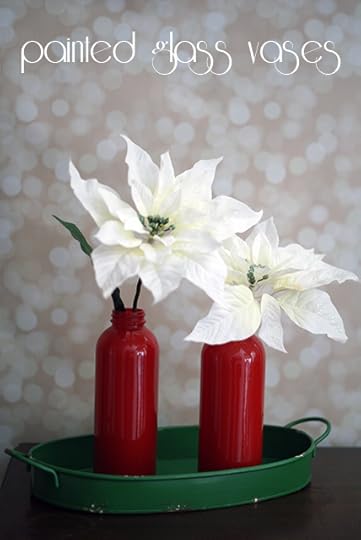
I love these painted glass vases!
Mine are made from kombucha bottles, which has two benefits: not only are these bottles a great shape and size, but it also gave me a good excuse to buy more kombucha since I just recycled my collection of bottles. (Darn!)
While some DIY painted vases are painted on the outside, these are painted on this inside, which not only protects the paint from getting bumped or scratched but also gives it a really nice gloss. And they’re so easy to make, whether you want to add them to your own decor, give them as gifts or use them for a holiday party!
Supplies:
glass jars/bottles/vases enamel acrylic paint for glass cardboard or newspaper
Directions:
Wash each jar/bottle/vase in hot soapy water. Rinse well and let dry.
To prepare the surface for paint: Pour a little rubbing alcohol in each one and swirl it around. Dump and let dry.
Squirt a generous amount of paint in the bottom of each container and swirl it until the sides are completely covered.
Turn upside down and let drain for 24 hours.
Continue to air dry for 21 days to completely cure the paint. For quick curing: Place in a cool oven and heat to 350 degrees. Bake for 30 minutes. Let cool in oven.*
These are waterproof once cured but should not have any direct contact with food!
*Check your bottle for brand-specific curing directions.
Projects from the archives:
Join us as we celebrate 101 Days of Christmas with new DIY projects, gift ideas, traditions and more every day from now through Christmas!
Mandi Ehman is the blogger behind Life Your Way. She and her husband have four beautiful girls plus one baby boy, and together they live, work and homeschool on a little slice of heaven in wild, wonderful West Virginia. Mandi loves coffee, chocolate, easy meals, beautiful things and minimalist spaces. Meet the 101 Days of Christmas sponsors:
Plant Therapy Essential Oils: 100% pure, undiluted oils you can trust at a price you can afford
King Arthur Flour's Baker's Hotline: free professional help with any holiday baking challenge
World Vision Gift Catalog: share a full life with children in need by giving unique, life-changing gifts
Life Your Way Christmas Shop: get your 2014 Christmas planner today
© 2010-2014 Purple Martin Press, LLC | All rights reserved

October 2, 2014
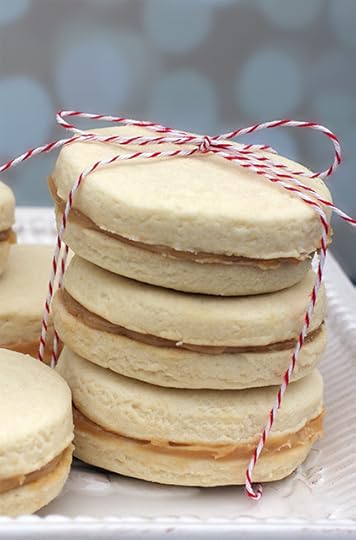
Dulce de leche-filled alfajores {101 Days of Christmas}
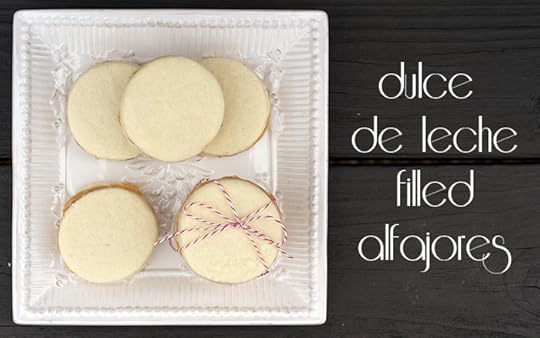
Similar to the French macaron, alfajores are a South American treat. While the specifics vary by region and country, the basic idea is a sandwich cookie with a sweet filling in the middle. This version incorporates a rich dulce de leche between two melt-in-your-mouth cornstarch cookies!
These cookies are easy to make, using just a few ingredients and an easy-to-work-with dough. Next time (and there will be a next time!), I will roll my cookies even thinner and put even more dulce de leche in the middle.
Be sure to read to the end for a ton of variations of this classic South American cookie!
*Adapted from Nook & Pantry.
Ingredients:
Dulce de leche
1 can sweetened condensed milkCookies
2-1/2 cup King Arthur Unbleached All-Purpose Flour 1 cup corn starch 1/2 teaspoon baking powder 1/2 teaspoon salt 1 cup (2 sticks) butter 1/2 cup sugar 2 eggs 1 teaspoon vanilla extract
Directions:
Dulce de leche
Split the can of sweetened condensed milk between two jars. Fill a medium saucepan with water and place the jars inside. (The jars should be taller than the pan; we don’t want water to spill into them.)
Bring the water to a boil, stirring the jars every 30 minutes and adding more water to the saucepan as necessary.
The sugar in the sweetened condensed milk will begin to carmelize, and it will get thicker and darker over time. Cook for at least an hour-and-a-half or up to three hours. The longer it cooks, the richer the filling will be!
Cookies
Preheat oven to 350 degrees F.
In a medium bowl, whisk together the flour, corn starch, salt and baking powder.
Using a mixer, cream the butter and sugar together. Add eggs and vanilla and beat well.
Slowly add the dry ingredients to the wet ones, stirring gently until fully incorporated.
Lay dough on a lightly floured surface and roll out to 1/8″ thick, flouring your rolling pin as needed. Using a 2″ cookie or biscuit cutter (or glass or jar rim!), cut circles from the dough and transfer them to a cookie sheet or stone. Repeat with remaining dough.
Bake for 13-15 minutes, until the edges are just starting to brown. Let sit for 5 minutes before transferring to a cooling rack.
Once your dulce de leche is done, add a spoonful to the center of a cookie and then press a second cookie on top. Repeat until they’ve all been filled.
Variations:
Fill with jam, Biscoff spread or Nutella instead Roll the edges in coconut or sprinkles Dust with powdered sugar, as is traditional in Peru Dip the finished cookies in white or semisweet chocolate Customize with your own sugar cookie or flavored doughClick here to add this recipe to your Plan to Eat account.
Recipes from the archives:
Join us as we celebrate 101 Days of Christmas with new DIY projects, gift ideas, traditions and more every day from now through Christmas!
Mandi Ehman is the blogger behind Life Your Way. She and her husband have four beautiful girls plus one baby boy, and together they live, work and homeschool on a little slice of heaven in wild, wonderful West Virginia. Mandi loves coffee, chocolate, easy meals, beautiful things and minimalist spaces. Meet the 101 Days of Christmas sponsors:
Plant Therapy Essential Oils: 100% pure, undiluted oils you can trust at a price you can afford
King Arthur Flour's Baker's Hotline: free professional help with any holiday baking challenge
World Vision Gift Catalog: share a full life with children in need by giving unique, life-changing gifts
Life Your Way Christmas Shop: get your 2014 Christmas planner today
Dulce de leche-filled alfajores {101 Days of Christmas}
© 2010-2014 Purple Martin Press, LLC | All rights reserved

October 1, 2014
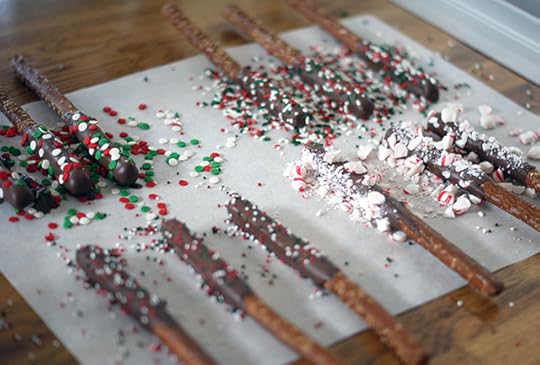
Chocolate-dipped pretzel rods {101 Days of Christmas}
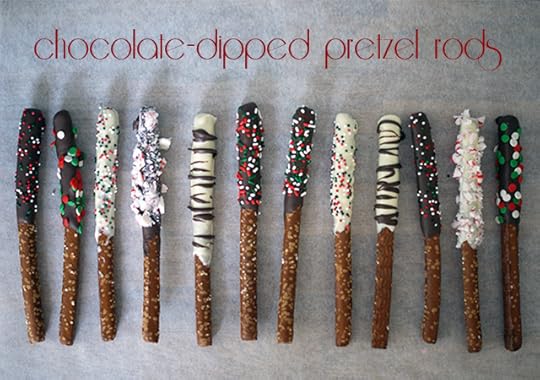
I’ve made some version of chocolate-covered pretzels or pretzel treats every year for at least a decade, but I’ve never made chocolate-dipped pretzel rods until this year. These are definitely going into the rotation!
In some ways, these are a lot easier than small chocolate-covered pretzels just because they’re so much bigger, which means less work. They’re also really fun to customize with a variety of sprinkles and designs.

Ingredients:
Directions:
Lay out a piece of parchment paper and spread sprinkles, crushed candy canes or other decorations in a smooth layer.
Melt chocolate according to directions on package and pour into a tall, skinny jar or glass.
Carefully dip each pretzel, turning the glass to cover at least two-thirds the length of the pretzel in chocolate (mine didn’t have quite enough chocolate this time around!).
Shake in the glass to remove excess chocolate and then lay on top of the sprinkles. Sprinkle more on top.
Let harden completely before transferring to treat bags or a tin.
Store in an air tight container at room temperature.
Recipes from the archives:

Join us as we celebrate 101 Days of Christmas with new DIY projects, gift ideas, traditions and more every day from now through Christmas!
Mandi Ehman is the blogger behind Life Your Way. She and her husband have four beautiful girls plus one baby boy, and together they live, work and homeschool on a little slice of heaven in wild, wonderful West Virginia. Mandi loves coffee, chocolate, easy meals, beautiful things and minimalist spaces. Meet the 101 Days of Christmas sponsors:
Plant Therapy Essential Oils: 100% pure, undiluted oils you can trust at a price you can afford
King Arthur Flour's Baker's Hotline: free professional help with any holiday baking challenge
World Vision Gift Catalog: share a full life with children in need by giving unique, life-changing gifts
Life Your Way Christmas Shop: get your 2014 Christmas planner today
Chocolate-dipped pretzel rods {101 Days of Christmas}
© 2010-2014 Purple Martin Press, LLC | All rights reserved