
Chidi Okonkwo's Blog, page 23
January 4, 2017
CUSTOM TRANSFORMERS: BUMBLEBEE, TURBO BLITZ, BRAINSTORM, HARDHEAD [THE MEXICAN STAND-OFF]
Happy New Year to all the DSNG Fans!!!!!
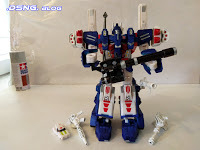
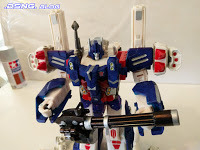
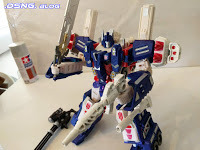
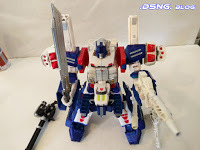
[image error] Today I'll show a group of five Transformers [with two different Bumblebee molds], in a Mexican standoff. I've shown most of them before, except for Hardhead [the green guy] and Brainstorm [the blue jet-looking guy]. They've all been customized in one form or another. My custom metallic blue guy, Turbo Blitz, was a repaint and a heavy modification of the Fall Of Cybertron Sideswipe. And I posted that article over Here.
Brainstorm was fully recolored, while Hardhead had a host of silver accents added to his frame, along with the custom cannon mounted on his back. And I drilled a hole in the left side of his backpack, allowing him to hold an extra upright cannon that was borrowed & recolored from the TF Generations Roadbuster. The two handguns held by Hardhead were from a guy at Shapeways.com.
The red & black Striker Bumblebee [a repainted model] was from the Robots In Disguise toyline and the former article on him is over Here.
And the yellow Beast Hunters Bumblebee was touched up with silver and black paint. His two heavy guns are from The "Dr. Wu" line of Optimus Prime blasters. I actually like this guy and he has a way of shinning amidst his peers; so he was used as a center piece for the Mexican standoff.
Per their size and layout, the last four pics can be used as custom Transformers toy wallpapers.
Now check out the cool gallery!
[image error] [image error] [image error] [image error]
[image error] [image error] [image error] [image error]
[image error] [image error] [image error] [image error]
[image error] [image error] [image error] [image error]
#####- Article written by the artist & author of the DSNG Sci Fi Series
[http://dsngsfm.blogspot.com]


December 20, 2016
CUSTOM TRANSFORMERS: GENERATIONS LEADER CLASS JETFIRE REPAINT!
He has some extra Gundam fin-wings [red and white colored], added to his regular wings on his back. He did come with several weapons and the twin shinny-red blaster cannons attached on his back, in the center. But I also added several Gundam weapons [the long black back-cannons], plus compact gatling gun weapons from some of the third party Iron Factory sets. The gun in his left hand is a custom combo of various weapons. I often tag these kitbash / custom toys with the tag of Gundamformers, and this is why....
[image error] [image error] [image error] [image error]
[image error] [image error] [image error] [image error]
[image error] [image error] [image error] [image error]
That last pic shows a comparison between this Jetfire toy and the custom Leader Class Battle Mode Ultra Magnus, from the TF Combiner Wars line. I've done an article on the Battle Magnus toy before. I gave him some custom weapons and repainted him from his powder-blue and white form... and that article is over Here!- Article written by the artist & author of the DSNG Sci Fi Series
[http://dsngsfm.blogspot.com]

December 12, 2016
CUSTOM TRANSFORMERS: FROM NIGHT OPS BUMBLEBEE TO STRIKER BUMBLEBEE!
Anyway, this simple yellow toy, the Night Ops Bumblebee that costs like $12 on ebay, came from the RID toyline. And it looked a bit too short, for my tastes, so I decided to cut it in half and make it taller with putty and other plastic layers. Of course that modification altered his transformation ability, but I usually don't care about that stuff; I make my customs for display as upright figures in their robot modes, so it was all right in my mind. And it turned out to be better than I thought!
I recolored him with a candy / gloss red from the Tamiya X27 paint bottle, and I also used black sharpies to create a gloss layer upon his dark panels. Plus a silver metallic sharpie was used for his torso / gut, his feet and his thighs. And I used a lot of white-colored cut-out 0.040-inch-thick plastruct styrene pieces to enhance his body armor, before coloring those panels red. And the pointless four holes placed by the toymakers on his crotch area was covered by a small cut-out panel, which I also painted silver.
The yellow "vehicle headlight" emblems found on his left and right upper biceps were also made of white colored plastic, before I painted them yellow. And his blue sword was painted white as an undercoat [with white paint bought from Home Depot, which comes with an in-mixed Primer], before I started coloring the sword with silver, gold and bronze sharpie markers.
Additionally, I made an arm-blade for him [using the same plastruct material that I mentioned above], while copying the concept of the blade from Optimus Prime. And his hefty blaster cannon came from the Combiner Wars Leader Class Skywarp toy [which comes with roughly 6 weapons that can be used in a variety of ways with other TF toys].
Check out the cool pics of Striker Bumblebee below!
[image error] [image error] [image error] [image error] [image error]
[image error] [image error] [image error] [image error] [image error]
[image error] [image error] [image error] [image error]
[image error] [image error] [image error] [image error] [image error]
[image error] [image error]
#####- Article written by the artist & author of the DSNG Sci Fi Series
[http://dsngsfm.blogspot.com]

December 8, 2016
CUSTOM TRANSFORMERS: FROM SIDESWIPE TO TURBO BLITZ, HOW TO CUSTOMIZE TRANSFORMERS - PART 2
Honestly, I did not have to fuse two or more toys together for this build [which I often do]. But in that case, always make sure that your toys are roughly the same height, before you try to swap limbs [because that will mean that they're roughly in the same class; like the Legion class, Leader class, Deluxe class, Voyagers etc]. And unfortunately, all the TF toys made over the past 20 years do not all have compatible joints, so you may try to fuse & kitbash a guy with "clicky sounding" ratchet-joint legs with a guy that has fluid balljoint legs, and that can be a hassle unless you know how to unscrew / cut the ratchet-joints open carefully...
Plus, large balljoints can be sanded down, so that they work better with the limbs that you are attaching. And putty can be smoothly added to a balljoint's head, to make it larger, if necessary.
Also, I added two arm-mounted weapons from one of the Iron Factory third-party toys, as well as two more laser handguns from the Combiner Wars Leader Class Skywarp toy [that toy comes with like six weapons]. Thus, in some pics, my custom toy has two weapons; while in others, he has four. And the former Transformer toy had skinnier legs void of the outer wheels, and no doors attached at his back.
Anyway, check out the front view, side view, back view and top views of the new Turbo Blitz:
LASTLY, MY BRIEF TOY MODEL CUSTOMIZING AND PAINTING TIPS:
Honestly, I did not utilize a base paint coat or any primer for this job... The thing is, those base coats that lie under the paint can be either good or bad, depending on what you want to do.
So if you utilize a paint spray as the base coat / primer, you need to let it dry for maybe 36 hours or more; and then you should get a surface paint linked to the brand of the primer that you used, if possible. But even then, if your new paint is too "thick", then due to the base coat you applied first, the eventual color of your toy model will look lumpy and the underlying details of the toy will be fully overshadowed by the surface paint + the base primer's color tone. To reduce the thickness of the final surface paint that is used as your top-coat, you should use a thinner... perhaps even rubbing alcohol, which you can buy for less $2 at a grocery store... or if you choose to buy a professional thinner from a prominent Japanese brand like Tamiya, they will sell you something really small for a large price.
Note: Always let paint fry for over 24 hours at least, before you start fiddling with the toy.And as far as paint type goes, if you are a humble beginner, go with sharpie markers or acrylic paints [from a brand like Deco Art or Tamiya] for your toy models. Try out the paints on some cheap / used toys from ebay, to get a feel for what you are doing. When you've been doing it for several years and you've learned advanced blending tricks by trial and error, then you should switch to enamel paints.... I've heard that they are brighter and they last longer, but they require special base coats, or else they will melt / weaken your plastic toy. But I believe that the Enamels are better on metal toys.
And remember, Part 1 of this article with more pic & details on customizing Transformers is over HERE!- Article written by the artist & author of the DSNG Sci Fi Series
[http://dsngsfm.blogspot.com]

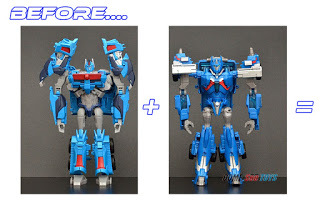
CUSTOM TRANSFORMERS: FROM SIDESWIPE TO TURBO BLITZ, HOW TO CUSTOMIZE TRANSFORMERS - PART 1
The base model that I utilized was the FOC - Fall of Cybertron - Sideswipe toy, released roughly 4 years ago. It was red and it had a rather bulky chest, which drooped over the gut / central torso of the toy. And I didn't like the skinny legs of the robot, so that was definitely one of the complaints that I had with the design. Additionally, there were no flaring doors mounted upon his back, which would remind you of the other Transformer Deluxe toys like Jazz, Prowl or Bumblebee. Therefore, I bought a small model toy car for like $7 from ebay [Kinsmart Diecast Red Mercedes Benz ML Class SUV, 1:36 scale]. And it's so small that it can fit in your hand... that would be the item that I butchered for spare parts, as shown in the pics below.
To begin, I took the Sideswipe toy apart. And then I started adding putty to his legs, since I wanted to make them bulkier. I also had to shape and cut out some 0.040-inch-thick white styrene plastic sheets [from the Plastruct brand,which you can find on ebay]. And when painted over, those white plastic sheets will look like metallic plates. The front wheel axle of the small Benz had to be cut as well, so that I could get the tires and glue them to the feet of the renamed toy, Turbo Blitz. I also had to cut the Sideswipe toy in half, in order to lift his torso and make him a bit taller, while I filled his inner body with putty and glued him back together.... and no, he can't transform anymore, since I cut him up LOL. Plus I didn't like his kneepads or his feet, so I had to mold new ones for him, as shown below. And I used quite a lot of Scotch Mounting Putty on this job.
Note 1: after putty is molded and added to a limb, you can put the molded limb under a bright light / lamp, which will cause it to harden quicker.
Note 2: How to tighten Transformers toys joints... if your toy joint is ever loose, just add some drops of nail polish, and rotate the joint a bit, just to get the slim coating all over the joint. Let it dry for an hour [but it will probably take less time than that], and then the limbs should be tighter again.
And here are the pics to show the work done to the re-assembled limbs and the body of the robot. Even the toy's face needed a new face-mask, like the one that Optimus Prime uses. So I made that from some slim plastic, like the kind that you find at Publix or Kroger - it is used to package fresh cookies for sale, or doughnuts ;)
All right, the next blog article will show the final product, fully painted and assembled - and those who follow me on Instagram have already seen some teaser photos... so stay tuned!
Update: Part 2 of this article is now live, over HERE!- Article written by the artist & author of the DSNG Sci Fi Series
[http://dsngsfm.blogspot.com]

November 28, 2016
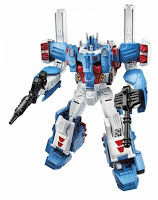
CUSTOM TRANSFORMERS: WARLORD ULTRA MAGNUS, BEFORE AND AFTER PICS!
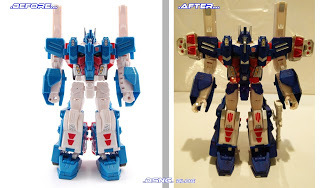
Another one of my fav custom toys. I had to utilize two "Transformers Prime Ultra Magnus Voyager Class" toys to build this one... and you can see them in that pic shown on the right.
 Both of those Ultra Magnus toys were light-blue / powder-blue, so I had to mix and match their limbs for the kitbash. And I chose the best-looking head, while I repainted him ultramarine-blue. I added the extra left-and-right shoulder missiles from a Gundam weapons kit, while the classic missiles that point upwards were repainted. And stationed upon his back is the large blaster cannon from "Transformers Titans Return Hardhead". The las-rifle affixed on his back horizontally was also taken from that same toy. And those two weapons were painted black and silver, to change them from their original green and smokey light-gray colors. There was a central hole presented in the back of the Voyager Magnus with the crazy legs, the one shown on the right. But I had to drill a second lower hole in his back for the las-rifle, which is shown in one of the pics below with none of the back-weapons attached.
Sigh - speaking of Mr. Crazy Legs shown on the right above, that tough sonvabitch has some of the worst legs and thighs that I've Ever seen... I took him apart and studied it... and I really think he was fabricated with two left thighs, or two right hips above his thighs... his damn legs are just... crazy.... just look at him... he's bow-legged damn it!!! LOL And his freakin' thighs are waaaay too small, while his knees are too high and his boots / lower legs are too long. And his hefty warhammer mechtech thingy sucks!! So I broke it!! [while trying to take it apart to fix it].
And now my rant is over :)
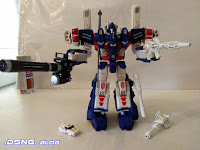
For the rest of the custom toy's coloring, I used blue sharpie marker pens and acrylic paint; and I added lots of white paint, silver and also a few silver stickers to him... but you probably can't tell by looking at it. The sniper laser cannon amended to his outer right forearm was taken from an old TF G1 toy and I customized it, adding the larger scope barrel and thus making it longer - which gives the weapon a slight Megatron vibe. He is holding that weapon, in the last pic of the second row below.
And attached to his left forearm is... The Legendary CLAW of Justice!!! LOL
Those familiar with the Transformers Prime Animated series will recall that Ultra Magnus was presented as a no-nonsense lieutenant of Optimus Prime, and at one point, his right hand was broken during one of the Season 3 battles against the Predacons... and it was replaced with a damn ugly claw.
I never liked that damn claw. But the TF Movie Decepticon Crankcase Claw-gun that I added looks pretty damn cool.
Honestly in the TF Prime animated series, there should have been spare parts stored inside the spaceship of Wheeljack or even within Ultra Magnus' dropship, in order for a new hand, like a badass power-glove, to be created for Magnus by the Autobot medic Ratchet.... come to think of it, I never liked Ratchet, because he was presented as a grumpy old pessimistic fart, who was too traditional for his own good in the animated series ;)
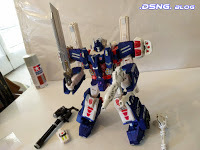
Additionally, I gave my custom toy Warlord Magnus some new shoes... heftier feet created with painted putty, which can carry more weight and help to balance him more readily. And I like the final comparison pic, which shows Warlord Ultra Magnus and Mega Optimus Prime, side by side. Their weapons are interchangeable, and they utilize the 5mm pegs that a lot of the TF toys currently use as a standard.
[image error] [image error] [image error] [image error] [image error]
[image error] [image error] [image error] [image error] [image error]
[image error] [image error] [image error] [image error]
[image error] [image error] [image error]
Check out the former article that shows the pics of Mega Optimus Prime over HERE!- Article written by the artist & author of the DSNG Sci Fi Series
[http://dsngsfm.blogspot.com]
Sigh - speaking of Mr. Crazy Legs shown on the right above, that tough sonvabitch has some of the worst legs and thighs that I've Ever seen... I took him apart and studied it... and I really think he was fabricated with two left thighs, or two right hips above his thighs... his damn legs are just... crazy.... just look at him... he's bow-legged damn it!!! LOL And his freakin' thighs are waaaay too small, while his knees are too high and his boots / lower legs are too long. And his hefty warhammer mechtech thingy sucks!! So I broke it!! [while trying to take it apart to fix it].
And now my rant is over :)
For the rest of the custom toy's coloring, I used blue sharpie marker pens and acrylic paint; and I added lots of white paint, silver and also a few silver stickers to him... but you probably can't tell by looking at it. The sniper laser cannon amended to his outer right forearm was taken from an old TF G1 toy and I customized it, adding the larger scope barrel and thus making it longer - which gives the weapon a slight Megatron vibe. He is holding that weapon, in the last pic of the second row below.
And attached to his left forearm is... The Legendary CLAW of Justice!!! LOL
Those familiar with the Transformers Prime Animated series will recall that Ultra Magnus was presented as a no-nonsense lieutenant of Optimus Prime, and at one point, his right hand was broken during one of the Season 3 battles against the Predacons... and it was replaced with a damn ugly claw.
I never liked that damn claw. But the TF Movie Decepticon Crankcase Claw-gun that I added looks pretty damn cool.
Honestly in the TF Prime animated series, there should have been spare parts stored inside the spaceship of Wheeljack or even within Ultra Magnus' dropship, in order for a new hand, like a badass power-glove, to be created for Magnus by the Autobot medic Ratchet.... come to think of it, I never liked Ratchet, because he was presented as a grumpy old pessimistic fart, who was too traditional for his own good in the animated series ;)
Additionally, I gave my custom toy Warlord Magnus some new shoes... heftier feet created with painted putty, which can carry more weight and help to balance him more readily. And I like the final comparison pic, which shows Warlord Ultra Magnus and Mega Optimus Prime, side by side. Their weapons are interchangeable, and they utilize the 5mm pegs that a lot of the TF toys currently use as a standard.
[image error] [image error] [image error] [image error] [image error]
[image error] [image error] [image error] [image error] [image error]
[image error] [image error] [image error] [image error]
[image error] [image error] [image error]
Check out the former article that shows the pics of Mega Optimus Prime over HERE!- Article written by the artist & author of the DSNG Sci Fi Series
[http://dsngsfm.blogspot.com]
November 22, 2016
CUSTOM TRANSFORMERS: MEGA OPTIMUS PRIME, BEFORE AND AFTER PICS!
 This customized toy model is one of my favs. It was made from the Arms Micron Optimus Prime and the TF Prime Ultra Magnus; both were Voyager Class models, and they were the Hasbro versions.... The legs, arms and torsos were mixed, while Gundam parts were added as the extra smoke stacks of Mega Optimus Prime, giving him a total of six smoke stacks [four on his back, and two more glued onto his shoulders].
He has some Gundam missiles added to his shoulder-pads as well, thus resembling Ultra Magnus. I also customized the regular double-barrel handguns that are made by third-party company Dr. Wu, thus making them longer and sturdier with some household items [such as the parts taken from clicky pens and spare Gundam parts]. And I colored those new handguns, painting them black and silver. And I had to put some putty into the mouths of the new barrels, before coloring their cores gold, within the nozzle.
Additionally I gave Prime some new shoes... heftier feet created with painted putty, which can carry more weight and help to balance him more readily. A ton of nail polish was added to his legs at the hip joints, which were initially super-loose.
His standard articulation remains, but he cannot transform, since I had to glue some of his chest portions, in order to ensure that the toy would stay in position while I was tweaking it. Two shades of red were added to his upper body, and the new ultra-marine blue of his legs was also added to re-color his borrowed light-blue legs. His chest, upper arms and thighs were colored silver as well, and I also colored the circular lights on his chest. And I had to fill the core of his hollow chest with putty, before placing a plastic crest on top and coloring it silver, like a blank Superman logo placed beneath his windshields.
This guy looks very tough and rugged; and he has two extra & recolored arm-blasters added to his outer arms [one large cannon placed on the right side and and a laser rifle on the left], which both came from the "Transformers Titans Return Hardhead". Those two extra weapons were colored stone-gray and green respectively, but you'd never know by just looking at them, unless you're also a TF toy collector ;)
[image error]
I decided to call him Mega Optimus Prime, since Ultra Prime sounded too generic, and his disciplined Commander, Magnus, already has that "Ultra" tag.
And since I had extras, I've also added a "before and after" comparison of some of his custom-made weapons, specifically the double-barrel arm-blasters from Dr. Wu and the classic warhammer [The Forge of Solace Prime], to show the customization results. Honestly, Prime cannot hold that new huge silver hammer. Instead, it is now fit for the hands of the Leader Class toys, which are bigger in size [as shown above]... or at least Voyager Class toys with hand articulation, so that their wrists can open up to receive the large weapon.
BTW, the former article on the guy weilding the hefty warhammer, Battle-Mode Ultra Magnus, is over HERE- Article written by the artist & author of the DSNG Sci Fi Series
[http://dsngsfm.blogspot.com]

November 17, 2016
CUSTOM TRANSFORMERS: SIXBLADE WINDBLADE, BEFORE AND AFTER PICS!
There were actually 3 fembot Transformers sacrificed to create the final product [two Windblades "red" and one Chromia "blue"], in addition to Gundam parts and a borrowed heavy blaster cannon from Generations Leader Jetfire.
And for those who care about base-model details / specs, there are two different Windblade toys that have been released by Hasbro [in the US] and Takara Tomy [over in Japan]. One is the "Transformers Generations 2014 model", while the other is the "Transformers 2015 Robots in Disguise model". I used the former [the first one, which has super-horrible legs that can't really stand up for the cool poses]. Thus I had to buy some new cool rear heels from the Shapeways.com website, where 3D models are printed by TF fans for other fans.
And I had to buy some extra swords [the fancy samurai blades] from China via a kind seller on ebay [the stuff almost got lost in the mail, and the Chinese guy was willing to send me a fresh set, for free... but luckily they arrived a few days late].
I honestly did not like the Windblade toy when I first saw her. But after the custom kitbash job, she became one of my favs. And for those who are curious: no, she can't transform. She is a cool display piece, and that's what I wanted to make. Also, I didn't give her a golden face, since it just didn't look right per my tests... but now, the blue gem in the sword matches her blue face and the top of her rear motorcycle wheel. The colors used for the paint job were two shades of gold, two shades of red, brown and black. And the rear windshield on her back, which was fully transparent like glass [made from white plastic] had to be painted fully black, inside and outside.
Her former slightly transparent sword was colored fully purple, and I had two of them from the two Windblade base models [they are now holstered at her hips].
At one point, during the lengthy photoshoot, she fell over backwards.... but she instantly balanced herself, via all the sword sheaths sticking out of her rear, so I just kept taking the damn photos while she held herself in position! LOL
Also, I thought of adding a ninja-like golden Optimus Prime mouth-guard to her... I dunno if I'll still do it. Such small things can easily be created from the plastic case that comes with the toy, when you utilize a curved corner and cut it down to size and then glue it onto her face, to cover her mouth... I got that tip from another veteran toy customizer. Over the course of this year, I've also learned to use other small household items to customize TF weapons [making hem bigger or longer], and that sort of endeavor is quite cool and takes some creative thinking ;)
Check out the pics of SixBlade Windblade below and the last image shows her with her buddy, Battle-Magnus, who was posted in the former blog article HERE
Thanks for looking and stay tuned for more!- Article written by the artist & author of the DSNG Sci Fi Series
[http://dsngsfm.blogspot.com]

CUSTOM TRANSFORMERS: BATTLE MODE ULTRA MAGNUS [BATTLE-MAGNUS], BEFORE & AFTER PICS
All right guys, I've finally transported the Transformer pics from my smart phone to my PC. And after adding the watermarks and adjusting the lighting, I can now share them. But to appreciate the custom transformer, you have to know what it looked like before the new paint job and the added accessories [I've built and added the Gatling gun and extra shoulder missiles from some Gundam toys to this customized Transformer, while the Star-saber was bought online as well. Plus there is a side blaster cannon added to his left leg].
 The original base model was the Combiner Wars Leader Class Ultra Magnus toy; it has a powder blue / Easter blue color, and... it almost looks like he's not wearing any pants, or undies...
Anyway, I had to color him all over, with silver, ultramarine blue, red and some white... and even his shoes got some silver paint [shown in the side view]. Plus the back of his pants were colored blue, after adding some putty to fill in the hollow spaces back there. The two black weapons that he came with, shown in the before pic, had to be colored white as well. Honestly, I've never transformed this guy. And I probably won't... but yeah, he isn't glued tight, so he can change to a hefty vehicle carrier-truck thingy. Its just that I had no interest in the mack-truck mode, for the customization that I had in mind.
Often I drill holes into the Transformer, for the small weapon / missile peg insertions, so that extra guns can be attached to the toy; and other times, I just glue them on, when I know that it won't hinder mobility / articulated movements. And sometimes, luckily, the toy comes with extra holes for the insertion of weapons.
This Ultra Magnus toy came with a tiny headmaster, the little white car, which transforms into a small robot pilot that can sit inside his chest. I don't really care about it, but I show it off anyway ;)
This was my first TF kitbash model, and I've done about 8 of them so far this year... I don't know if I will post all of them in this blog; only time will tell. But so far, this Battle-Magnus and the SixBlade Windblade fembot that was teased at the DSNG Instagram and Tumblr pages will be added, one after the other.


Stay tuned for more, and the article on the SixBlade Windblade fembot has been posted HERE!- Article written by the artist & author of the DSNG Sci Fi Series
[http://dsngsfm.blogspot.com]
 The original base model was the Combiner Wars Leader Class Ultra Magnus toy; it has a powder blue / Easter blue color, and... it almost looks like he's not wearing any pants, or undies...
Anyway, I had to color him all over, with silver, ultramarine blue, red and some white... and even his shoes got some silver paint [shown in the side view]. Plus the back of his pants were colored blue, after adding some putty to fill in the hollow spaces back there. The two black weapons that he came with, shown in the before pic, had to be colored white as well. Honestly, I've never transformed this guy. And I probably won't... but yeah, he isn't glued tight, so he can change to a hefty vehicle carrier-truck thingy. Its just that I had no interest in the mack-truck mode, for the customization that I had in mind.
Often I drill holes into the Transformer, for the small weapon / missile peg insertions, so that extra guns can be attached to the toy; and other times, I just glue them on, when I know that it won't hinder mobility / articulated movements. And sometimes, luckily, the toy comes with extra holes for the insertion of weapons.
This Ultra Magnus toy came with a tiny headmaster, the little white car, which transforms into a small robot pilot that can sit inside his chest. I don't really care about it, but I show it off anyway ;)
This was my first TF kitbash model, and I've done about 8 of them so far this year... I don't know if I will post all of them in this blog; only time will tell. But so far, this Battle-Magnus and the SixBlade Windblade fembot that was teased at the DSNG Instagram and Tumblr pages will be added, one after the other.
Stay tuned for more, and the article on the SixBlade Windblade fembot has been posted HERE!- Article written by the artist & author of the DSNG Sci Fi Series
[http://dsngsfm.blogspot.com]
November 8, 2016
HOBBY SCHMOBBY... CUSTOMIZING TRANSFORMERS
It has been over two months since I updated this blog... so I thought, what the hell, I might as well dust it off and put something new in this place! [although I've been posting art at Facebook, so check out the Facebook link on the left of this blog page].
Everyone needs a hobby, whether it's making music, DJing, art, sewing, vid-games, LARPing, working out, or a sport. FYI... "malling" / shopping is not a hobby... its a damn addiction! :D
Anyway the hobby keeps your mind active and frankly, it can make you a lot of money, when you have perfected your craft and the right doors open.
Earlier in the year, I joined an underground group of skilled people from all over the world, who secretly do things; very strange things, and dangerous things.... no, it's not a cult, they're a group of Transformer fans, who literally transform their toys, thus making them better.
 It's a time consuming hobby. And while an older generation from the 50s and 60s would buy and paint little trains, spitfire jets and toy ship models, those born in the 80s and 90s will be more familiar with the nostalgia created by the Robots In Disguise that they beheld as giant weekend titans on the TV screen, in their childhood days.
And now, I collect some of those TF toys and I Kitbash the hell out of a few of them.
I'll briefly explain what Kitbashing is; this refers to the mixing and matching of TF toys, and some people call it modding or customization.
You can Google "Customized transformer toys", and you'll see all kinds of stuff.
Personally, I prefer to mix Transformers with Gundam parts, using the weapons / wings from the Japanese plastic models to make the Transformers look cooler. In this process, you can glue things together, add putty to enlarge the mismatched joints, or often just sand them down or reattach them.
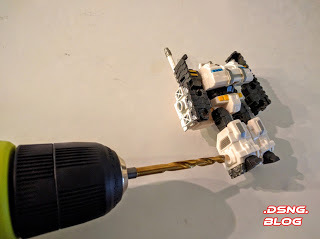
And when you buy a Power Drill for your stuff, then trust me folks, that goddamn hobby just got serious!!!
This article really isn't a comprehensive "How to customize transformers"; instead, it is more of a teaser with some tips for this hobby interest.
But for those who want to know, the drill bit recommended for use with drilling holes into your TF toys is the 13/64 in. drill bit, which is the equivalent of the 5mm drill bit size. This is the size for the pegs of most of the handheld weapons that the TFs use... and the attachment pegs of the items from the Gundam models are actually smaller than that, hence you need to drill smaller holes in your TF model, before you attach certain Gundam weapons / wings to them.
And after fixing up the toy, you can re-color them with Acrylic paint or Sharpie markers. Yet you must never use Enamel paints for coloring plastic toys, because that stuff will literally corrupt / melt / weaken your plastic toy's joints, and then the limbs will start snapping without much pressure. Trust me, I had to research that stuff. And I also learned about the intriguing world of 3rd party transformers.... they're super-cool, but also quite expensive.
And please beware; not all TF toys are compatible, per their joints and limbs. So you have to know which ones are placed in the warrior class, versus the commanders, deluxe, leader, legends, voyagers, etc.
Hopefully I will post more pics later. But this post was just a teaser... stay tuned...
- Article written by the artist & author of the DSNG Sci Fi Series
[http://dsngsfm.blogspot.com]
Everyone needs a hobby, whether it's making music, DJing, art, sewing, vid-games, LARPing, working out, or a sport. FYI... "malling" / shopping is not a hobby... its a damn addiction! :D
Anyway the hobby keeps your mind active and frankly, it can make you a lot of money, when you have perfected your craft and the right doors open.
Earlier in the year, I joined an underground group of skilled people from all over the world, who secretly do things; very strange things, and dangerous things.... no, it's not a cult, they're a group of Transformer fans, who literally transform their toys, thus making them better.
And now, I collect some of those TF toys and I Kitbash the hell out of a few of them.
I'll briefly explain what Kitbashing is; this refers to the mixing and matching of TF toys, and some people call it modding or customization.
You can Google "Customized transformer toys", and you'll see all kinds of stuff.
Personally, I prefer to mix Transformers with Gundam parts, using the weapons / wings from the Japanese plastic models to make the Transformers look cooler. In this process, you can glue things together, add putty to enlarge the mismatched joints, or often just sand them down or reattach them.
And when you buy a Power Drill for your stuff, then trust me folks, that goddamn hobby just got serious!!!
This article really isn't a comprehensive "How to customize transformers"; instead, it is more of a teaser with some tips for this hobby interest.
But for those who want to know, the drill bit recommended for use with drilling holes into your TF toys is the 13/64 in. drill bit, which is the equivalent of the 5mm drill bit size. This is the size for the pegs of most of the handheld weapons that the TFs use... and the attachment pegs of the items from the Gundam models are actually smaller than that, hence you need to drill smaller holes in your TF model, before you attach certain Gundam weapons / wings to them.
And after fixing up the toy, you can re-color them with Acrylic paint or Sharpie markers. Yet you must never use Enamel paints for coloring plastic toys, because that stuff will literally corrupt / melt / weaken your plastic toy's joints, and then the limbs will start snapping without much pressure. Trust me, I had to research that stuff. And I also learned about the intriguing world of 3rd party transformers.... they're super-cool, but also quite expensive.
And please beware; not all TF toys are compatible, per their joints and limbs. So you have to know which ones are placed in the warrior class, versus the commanders, deluxe, leader, legends, voyagers, etc.
Hopefully I will post more pics later. But this post was just a teaser... stay tuned...
- Article written by the artist & author of the DSNG Sci Fi Series
[http://dsngsfm.blogspot.com]


![[image error]](https://2.bp.blogspot.com/-5LE3cQB0AG8/WG0GxJLloFI/AAAAAAAAO1U/_teQCp9xUIwhBW3MBvbvk_pJDWDK2vNYQCLcB/s1600/Brainstorm%2BSideswipe%2Bbeast%2Bhunters%2Bdeluxe%2Bwarrior%2Bclass%2Bbumblebee%2BHardhead%2Bfuros%2BTurbo%2Bblitz%2Bblue%2Byellow%2Bgreen%2Bred%2Bautobot%2Brid%2Btransformers%2Bfront%2Bdsng%2Bblog%2Bcustom%2Bcustomized%2Btoys%2Bplasticcrack%2B1.jpg)
![[image error]](https://3.bp.blogspot.com/-EFB3Jx8KU0o/WG0GrfgM3II/AAAAAAAAO1Q/H4k8d5E9wsIMhH0KJmBa5RWqSybxbhBCACLcB/s1600/Brainstorm%2BSideswipe%2Bbeast%2Bhunters%2Bdeluxe%2Bwarrior%2Bclass%2Bbumblebee%2BHardhead%2Bfuros%2BTurbo%2Bblitz%2Bblue%2Bdsng%2Bgreen%2Bred%2Bautobot%2Brid%2Btransformers%2Bcustom%2Bmexican%2Bstandoff%2B%2Bcustomized%2Btoys%2Bplasticcrack%2B9.jpg)
![[image error]](https://3.bp.blogspot.com/-op0KgxW6ZCY/WG0Gjxd5XWI/AAAAAAAAO1I/OTxGS6ctCb0dZ9i65cfxI7V4qZrmgb2dACLcB/s1600/Brainstorm%2BSideswipe%2Bbeast%2Bhunters%2Bdeluxe%2Bwarrior%2Bclass%2Bbumblebee%2BHardhead%2Bfuros%2BTurbo%2Bblitz%2Bblue%2Bdsng%2Bgreen%2Bred%2Bautobot%2Brid%2Btransformers%2Bcustom%2Bmexican%2Bstandoff%2Bcustomized%2Btoys%2Bplasticcrack%2B8.jpg)
![[image error]](https://1.bp.blogspot.com/-ZxIyD4q8KOo/WG0GlMtInfI/AAAAAAAAO1M/UFhlRjQYlBQHG7KhciEIrkf_4eOfb9opwCLcB/s1600/Brainstorm%2BSideswipe%2Bbeast%2Bhunters%2Bdeluxe%2Bwarrior%2Bclass%2Bbumblebee%2BHardhead%2Bfuros%2BTurbo%2Bblitz%2Bblue%2Bgreen%2Bred%2Bautobot%2Brid%2Btransformers%2Bfcustom%2Bmexican%2Bstandoff%2Bdsng%2Bcustomized%2Btoys%2Bplasticcrack%2B10.jpg)
![[image error]](https://4.bp.blogspot.com/-d3Y4Zcfbrao/WG0Gyt7DLZI/AAAAAAAAO1Y/RWX9pMXJLw8Az6zunX0peaGkBH0TtXOfQCLcB/s1600/Brainstorm%2BSideswipe%2Bbeast%2Bhunters%2Bdeluxe%2Bwarrior%2Bclass%2Bbumblebee%2BHardhead%2Bfuros%2BTurbo%2Bblitz%2Bblue%2Byellow%2Bgreen%2Bred%2Bautobot%2Brid%2Btransformers%2Bcustom%2Bmexican%2Bstandoff%2Bcustomized%2Btoys%2Bplasticcrack%2B7.jpg)
![[image error]](https://1.bp.blogspot.com/-_6EvpzR0p-Q/WG0HTkOyi4I/AAAAAAAAO1o/rN80nZ2A22serDEvxrlONLw-OxkCQZ_dwCLcB/s1600/Brainstorm%2BSideswipe%2Bbeast%2Bhunters%2Bdeluxe%2Bwarrior%2Bclass%2Bbumblebee%2BHardhead%2Bfuros%2BTurbo%2Bblitz%2Bblue%2Byellow%2Bgreen%2Bred%2Bautobot%2Brid%2Btransformers%2Bfront%2Bdsng%2Bblog%2Bcustom%2Bcustomized%2Btoys%2Bplasticcrack%2B5.jpg)
![[image error]](https://1.bp.blogspot.com/-F1ctXdQva34/WG0HYd4O3RI/AAAAAAAAO1s/_w2ubJTrM-cFHCuGPFekPAHWI12rrIPegCLcB/s1600/Brainstorm%2BSideswipe%2Bbeast%2Bhunters%2Bdeluxe%2Bwarrior%2Bclass%2Bbumblebee%2BHardhead%2Bfuros%2BTurbo%2Bblitz%2Bblue%2Byellow%2Bgreen%2Bred%2Bautobot%2Brid%2Btransformers%2Bfront%2Bdsng%2Bblog%2Bcustom%2Bcustomized%2Btoys%2Bplasticcrack%2B6.jpg)
![[image error]](https://2.bp.blogspot.com/-7z930sKP-UQ/WG0HKi0iOfI/AAAAAAAAO1c/PiTCp_y4knIKVsgoOAcnvAC7_YCb0FWsgCLcB/s1600/Brainstorm%2BSideswipe%2Bbeast%2Bhunters%2Bdeluxe%2Bwarrior%2Bclass%2Bbumblebee%2BHardhead%2Bfuros%2BTurbo%2Bblitz%2Bblue%2Byellow%2Bgreen%2Bred%2Bautobot%2Brid%2Btransformers%2Bfront%2Bdsng%2Bblog%2Bcustom%2Bcustomized%2Btoys%2Bplasticcrack%2B3.jpg)
![[image error]](https://4.bp.blogspot.com/-zkmz-XvnJvI/WG0HQc-QgxI/AAAAAAAAO1k/zFtfa5A7FesVsvi1m0BDHh71-dOrh_EcwCLcB/s1600/Brainstorm%2BSideswipe%2Bbeast%2Bhunters%2Bdeluxe%2Bwarrior%2Bclass%2Bbumblebee%2BHardhead%2Bfuros%2BTurbo%2Bblitz%2Bblue%2Byellow%2Bgreen%2Bred%2Bautobot%2Brid%2Btransformers%2Bfront%2Bdsng%2Bblog%2Bcustom%2Bcustomized%2Btoys%2Bplasticcrack%2B2.jpg)
![[image error]](https://1.bp.blogspot.com/-Hi_XEwDHvMw/WG0Mfl0wseI/AAAAAAAAO2g/EqnmxIWgDCUOPQLUOiZkHRRocH0vPraewCLcB/s1600/Foc%2BSideswipe%2Bdsng%2Bbeast%2Bhunters%2Bdeluxe%2Bwarrior%2Bclass%2Bbumblebee%2BHardhead%2Bfuros%2BTurbo%2Bblitz%2Bblue%2Byellow%2Bgreen%2Bautobot%2Btransformers%2Bfront%2Bview%2Bblog%2Bcustom%2Bcustomized%2Btoys%2Btoy%2Bphotography%2Bplasticcrack%2B2.jpg)
![[image error]](https://3.bp.blogspot.com/-J3oWApQAe84/WG0MespaDCI/AAAAAAAAO2c/FXqCYxLbGyIJpZW2202z7KJSN1G3Bym0ACLcB/s1600/Foc%2BSideswipe%2Bdsng%2Bbeast%2Bhunters%2Bdeluxe%2Bwarrior%2Bclass%2Bbumblebee%2BHardhead%2Bfuros%2BTurbo%2Bblitz%2Bblue%2Byellow%2Bgreen%2Bautobot%2Btransformers%2Bfront%2Bview%2Bblog%2Bcustom%2Bcustomized%2Btoys%2Btoy%2Bphotography%2Bplasticcrack%2B3.jpg)
![[image error]](https://2.bp.blogspot.com/-T1kqSaDt_VE/WG0MdqlFcKI/AAAAAAAAO2Y/J4i3l94l9jkYsIl6dWJk0DBRsvC1SXDTgCLcB/s1600/Foc%2BSideswipe%2Bdsng%2Bbeast%2Bhunters%2Bdeluxe%2Bwarrior%2Bclass%2Bbumblebee%2BHardhead%2Bfuros%2BTurbo%2Bblitz%2Bblue%2Byellow%2Bgreen%2Bautobot%2Btransformers%2Bfront%2Bview%2Bblog%2Bcustom%2Bcustomized%2Btoys%2Btoy%2Bphotography%2Bplasticcrack%2B4.jpg)
![[image error]](https://3.bp.blogspot.com/--qD3iNK9blI/WG0Mh3ZWa4I/AAAAAAAAO2k/GUlRgflvxYY91McCqwDkKEXcCUei8E67gCLcB/s1600/Foc%2BSideswipe%2Bdsng%2Bbeast%2Bhunters%2Bdeluxe%2Bwarrior%2Bclass%2Bbumblebee%2BHardhead%2Bfuros%2BTurbo%2Bblitz%2Bblue%2Byellow%2Bgreen%2Bautobot%2Btransformers%2Bfront%2Bview%2Bdsng%2Bblog%2Bcustom%2Bcustomized%2Btoys%2Bkitbash%2Bplasticcrack%2B2.jpg)
![[image error]](https://3.bp.blogspot.com/-n5FaLT8Nso0/WG0HniLwrdI/AAAAAAAAO10/GkYij_qU2DcdzeimahWedlWZv5IJ0CHiQCEw/s1600/Brainstorm%2BSideswipe%2Bbeast%2Bhunters%2Bdeluxe%2Bwarrior%2Bclass%2Bbumblebee%2BHardhead%2Bfuros%2BTurbo%2Bblitz%2Bblue%2Byellow%2Bgreen%2Bred%2Bautobot%2Brid%2Btransformers%2Bfront%2Bdsng%2Bblog%2Bcustom%2Bcustomized%2Btoys%2Bplasticcrack%2B11.jpg)
![[image error]](https://4.bp.blogspot.com/-e0omxrD8iXU/WG0HrxVGlNI/AAAAAAAAO14/m2WwOcrRptMR6wXNbkoN2PWTx2UBv-2FACEw/s1600/Brainstorm%2BSideswipe%2Bbeast%2Bhunters%2Bdeluxe%2Bwarrior%2Bclass%2Bbumblebee%2BHardhead%2Bfuros%2BTurbo%2Bblitz%2Bblue%2Byellow%2Bgreen%2Bred%2Bautobot%2Brid%2Btransformers%2Bfront%2Bdsng%2Bblog%2Bcustom%2Bcustomized%2Btoys%2Bplasticcrack%2B13.jpg)
![[image error]](https://1.bp.blogspot.com/-UlxlMp0jIbM/WG0HvJylcdI/AAAAAAAAO18/dtUr8wNxz_AZouk5s_gw67Of680hU-pvACEw/s1600/Brainstorm%2BSideswipe%2Bbeast%2Bhunters%2Bdeluxe%2Bwarrior%2Bclass%2Bbumblebee%2BHardhead%2Bfuros%2BTurbo%2Bblitz%2Bblue%2Byellow%2Bgreen%2Bred%2Bautobot%2Brid%2Btransformers%2Bfront%2Bdsng%2Bblog%2Bcustom%2Bcustomized%2Btoys%2Bplasticcrack%2B14.jpg)
![[image error]](https://4.bp.blogspot.com/-X-C2LWyD_CY/WG0ISHsA7nI/AAAAAAAAO2I/aVQpAW44HM89j90P3FXdjGuBwbZVKtNxACLcB/s1600/Brainstorm%2BSideswipe%2Bbeast%2Bhunters%2Bdeluxe%2Bwarrior%2Bclass%2Bbumblebee%2BHardhead%2Bfuros%2BTurbo%2Bblitz%2Bblue%2Byellow%2Bgreen%2Bred%2Bautobot%2Brid%2Btransformers%2Bfront%2Bdsng%2Bblog%2Bcustom%2Bcustomized%2Btoys%2Bplasticcrack%2B12.jpg)
![[image error]](https://3.bp.blogspot.com/-M0aFdQYK6-s/WFm-bPSb2TI/AAAAAAAAOsw/oPxyptTDYOsxFIeu26OkULgc3JNrkNioACLcB/s1600/Jetfire%2Bleader%2Bclass%2BTransformers%2B5%2Bmovie%2BTF%2Bcustom%2Btoys%2Bgundamformers%2Bguns%2Bcaptain%2Bamerica%2BF22%2Bautobot%2Btoy%2Bphotography%2Bcustomizer%2Bkitbash%2Bdsng%2Bblog%2Brobots%2Bin%2Bdisguise%2Bplastic%2Bcrack%2Bgenerations%2Bfront%2Bview%2B4.jpg)
![[image error]](https://3.bp.blogspot.com/-Z9VfWpy_enY/WFm-ZqN2X6I/AAAAAAAAOss/I-NBNxDgoNI0av8gtSO7QsZj-H_2uxjIwCLcB/s1600/Jetfire%2Bleader%2Bclass%2BTransformers%2B5%2Bmovie%2BTF%2Bcustom%2Btoys%2Bgundamformers%2Bguns%2Bcaptain%2Bamerica%2BF22%2Bautobot%2Btoy%2Bphotography%2Bcustomizer%2Bkitbash%2Bdsng%2Bblog%2Brobots%2Bin%2Bdisguise%2Bplastic%2Bcrack%2Bgenerations%2Bfront%2Bview%2B8.jpg)
![[image error]](https://1.bp.blogspot.com/-mGYNH_SqHPE/WFm-gwVqzNI/AAAAAAAAOs8/LFybY-ylUGY7SXj_gYS2WRx7eJfLnZkrQCLcB/s1600/Jetfire%2Bleader%2Bclass%2BTransformers%2B5%2Bmovie%2BTF%2Bcustom%2Btoys%2Bgundamformers%2Bguns%2Bcaptain%2Bamerica%2BF22%2Bautobot%2Btoy%2Bphotography%2Bcustomizer%2Bkitbash%2Bdsng%2Bblog%2Brobots%2Bin%2Bdisguise%2Bplastic%2Bcrack%2Bgenerations%2Bfront%2Bview%2B9.jpg)
![[image error]](https://3.bp.blogspot.com/-zSrYy7B0NVg/WFm-5r3d0uI/AAAAAAAAOtQ/WtSm8sr2SME0qWtrFTs63sulAE2mWu-TgCLcB/s1600/Jetfire%2Bleader%2Bclass%2BTransformers%2BTF%2Bcustom%2Btoys%2Bgundamformers%2Bguns%2Bcaptain%2Bamerica%2BF22%2Bautobot%2Btoy%2Bphotography%2Bcustomizer%2Bkitbash%2Bdsng%2Bblog%2Brobots%2Bin%2Bdisguise%2Bplastic%2Bcrack%2Bgenerations%2Brear%2Bback%2Bview%2B1.jpg)
![[image error]](https://2.bp.blogspot.com/-Lq2oHJ8mYH4/WFm-gkGCweI/AAAAAAAAOs4/N5RQRjBhRIUyZkdENIHkdUphvWs8ymaRgCLcB/s1600/Jetfire%2Bleader%2Bclass%2BTransformers%2B5%2Bmovie%2BTF%2Bcustom%2Btoys%2Bgundamformers%2Bguns%2Bcaptain%2Bamerica%2BF22%2Bautobot%2Btoy%2Bphotography%2Bcustomizer%2Bkitbash%2Bdsng%2Bblog%2Brobots%2Bin%2Bdisguise%2Bplastic%2Bcrack%2Bmarvel%2Bgenerations%2Bfront%2Bview%2B11.jpg)
![[image error]](https://2.bp.blogspot.com/-sylc1yHD8-Q/WFm-cVk46oI/AAAAAAAAOs0/F5kD2yRuups8clmEp2POhy-VOR2d_xi4gCLcB/s1600/Jetfire%2Bleader%2Bclass%2BTransformers%2B5%2BTF%2Bcustom%2Btoys%2Bgundamformers%2Bguns%2Bcaptain%2Bamerica%2BF22%2Bautobot%2Btoy%2Bphotography%2Bcustomizer%2Bkitbash%2Bdsng%2Bblog%2Brobots%2Bin%2Bdisguise%2Bplastic%2Bcrack%2Bgenerations%2Bfront%2Bmarvel%2B10.jpg)
![[image error]](https://3.bp.blogspot.com/-OYJea1mnO3M/WFm-0H8ma9I/AAAAAAAAOtI/HfSNeLbvTmY2duzQMS6SzMrS56M3A93ZgCLcB/s1600/Jetfire%2Bleader%2Bclass%2BTransformers%2BTF%2Bcustom%2Btoys%2Bgundamformers%2Bguns%2Bcaptain%2Bamerica%2BF22%2Bautobot%2Btoy%2Bphotography%2Bcustomizer%2Bkitbash%2Bdsng%2Bblog%2Brobots%2Bin%2Bdisguise%2Bplastic%2Bcrack%2Bgenerations%2Bfront%2B3d%2Bview%2B2.jpg)
![[image error]](https://4.bp.blogspot.com/-HeosdDqz8Bg/WFm_kH1HE9I/AAAAAAAAOtg/fbwsImwPgg8zC_ZwUJkalWqKESWwSg8ggCLcB/s1600/Jetfire%2Bleader%2Bclass%2BTransformers%2BTF%2Bcustom%2Btoys%2Bgundamformers%2Bguns%2Bcaptain%2Bamerica%2BF22%2Bautobot%2Btoy%2Bphotography%2Bcustomizer%2Bkitbash%2Bdsng%2Bblog%2Brobots%2Bin%2Bdisguise%2Bplastic%2Bcrack%2Bgenerations%2Brear%2Bback%2Bview%2B7.jpg)
![[image error]](https://3.bp.blogspot.com/-jeThv2sZnL8/WFm-wFp1UOI/AAAAAAAAOtA/SktM9kNPtuAjnKH_vIbHY5atG4g--irDQCLcB/s1600/Jetfire%2Bleader%2Bclass%2BTransformers%2BTF%2Bcustom%2Btoys%2Bgundamformers%2Bguns%2Bcaptain%2Bamerica%2BF22%2Bautobot%2Btoy%2Bphotography%2Bcustomizer%2Bkitbash%2Bdsng%2Bblog%2Brobots%2Bin%2Bdisguise%2Bplastic%2Bcrack%2Bgenerations%2Bmarvel%2Bfront%2B3d%2Bview%2B3.jpg)
![[image error]](https://2.bp.blogspot.com/-Zz2jsVibw7s/WFm-35pg_3I/AAAAAAAAOtM/WV0zCTlhzVsMuDNE6mETjGueEfu__ehcQCLcB/s1600/Jetfire%2Bleader%2Bclass%2BTransformers%2BTF%2Bcustom%2Btoys%2Bgundamformers%2Bguns%2Bcaptain%2Bamerica%2BF22%2Bautobot%2Btoy%2Bphotography%2Bcustomizer%2Bkitbash%2Bdsng%2Bblog%2Brobots%2Bin%2Bdisguise%2Bplastic%2Bcrack%2Bgenerations%2Brear%2Bback%2Bview%2B6.jpg)
![[image error]](https://1.bp.blogspot.com/-NsXLaKDnJIM/WFm-xX74KUI/AAAAAAAAOtE/YzoHWyXpajIGpo_pxWoSz10JKAS5d_FnwCLcB/s1600/Jetfire%2Bleader%2Bclass%2BTransformers%2BTF%2Bcustom%2Btoys%2Bgundamformers%2Bguns%2Bcaptain%2Bamerica%2BF22%2Bautobot%2Btoy%2Bphotography%2Bcustomizer%2Bkitbash%2Bdsng%2Bblog%2Brobots%2Bin%2Bdisguise%2Bplastic%2Bcrack%2Bgenerations%2Bfront%2Bback%2Bview%2B5.jpg)
![[image error]](https://2.bp.blogspot.com/-dH4zRUdADTY/WFm-8gMBCcI/AAAAAAAAOtU/CuSdBP5KxJAfGtWwoM03A8dhczSKcHC3QCLcB/s1600/Jetfire%2Bultra%2Bmagnus%2Bcompare%2Bleader%2Bclass%2BTransformers%2BTF%2Bcustom%2Btoys%2Bgundamformers%2Bcaptain%2Bamerica%2BF22%2Bautobot%2Btoy%2Bphotography%2Bcustomizer%2Bkitbash%2Bdsng%2Bblog%2Brobots%2Bin%2Bdisguise%2Bplastic%2Bcrack%2Bcombiner%2Bwars%2B12.jpg)
![[image error]](https://2.bp.blogspot.com/-TrfzbtEA0Js/WE7wjOVthOI/AAAAAAAAOhM/92rAHLkgwtU0R6kFYBKz_v09lafaXWaogCLcB/s1600/Bumblebee%2BStrikerbee%2BTransformers%2BTF%2Bcustom%2Bmade%2Btoys%2Bweapons%2Bsword%2Bblaster%2Bgun%2Bautobot%2Bred%2Bblackops%2Bnight%2Bstrike%2Bcustomizer%2Bkitbash%2Bdsng%2Bblog%2Bart%2Brobots%2Bin%2Bdisguise%2Brid%2B%2Bgenerations%2Bdeluxe%2Bwarrior%2Bclass%2B5.jpg)
![[image error]](https://2.bp.blogspot.com/-9er_ybvhX7Q/WE7wfL0x4EI/AAAAAAAAOhE/GnUqMbeTaMkHwn54-_vyo3b-ZHVbcRvEACLcB/s1600/Bumblebee%2BStrikerbee%2BTransformers%2BTF%2Bcustom%2Bmade%2Btoys%2Bweapons%2Bsword%2Bblaster%2Bgun%2Bautobot%2Bred%2Bblackops%2Bnight%2Bstrike%2Bcustomizer%2Bkitbash%2Bdsng%2Bblog%2Bart%2Brobots%2Bin%2Bdisguise%2Brid%2B%2Bgenerations%2Bdeluxe%2Bwarrior%2Bclass%2B1.jpg)
![[image error]](https://4.bp.blogspot.com/-XFrU8TLm-6k/WE7wcsD4j8I/AAAAAAAAOg8/SeuBD6WClQIrHiyrjbc-gkQb1GEBGuuRgCLcB/s1600/Bumblebee%2BStrikerbee%2BTransformers%2BTF%2Bcustom%2Bmade%2Btoys%2Bweapons%2Bsword%2Bblaster%2Bgun%2Bautobot%2Bred%2Bblackops%2Bnight%2Bstrike%2Bcustomizer%2Bkitbash%2Bdsng%2Bblog%2Bart%2Brobots%2Bin%2Bdisguise%2Brid%2B%2Bgenerations%2Bdeluxe%2Bwarrior%2Bclass%2B2.jpg)
![[image error]](https://3.bp.blogspot.com/-b1x6rzTyQu4/WE7wdrKXIfI/AAAAAAAAOhA/p5L8eAWD554TqP2XIFHe2WAMMW738HhXwCLcB/s1600/Bumblebee%2BStrikerbee%2BTransformers%2BTF%2Bcustom%2Bmade%2Btoys%2Bweapons%2Bsword%2Bblaster%2Bgun%2Bautobot%2Bred%2Bblackops%2Bnight%2Bstrike%2Bcustomizer%2Bkitbash%2Bdsng%2Bblog%2Bart%2Brobots%2Bin%2Bdisguise%2Brid%2B%2Bgenerations%2Bdeluxe%2Bwarrior%2Bclass%2B3.jpg)
![[image error]](https://2.bp.blogspot.com/-EWYptl7Ot2w/WE7whU5Z6NI/AAAAAAAAOhI/Yz4DY83Vfy8n_tWVgQbbULwGOZWxCbm9ACLcB/s1600/Bumblebee%2BStrikerbee%2BTransformers%2BTF%2Bcustom%2Bmade%2Btoys%2Bweapons%2Bsword%2Bblaster%2Bgun%2Bautobot%2Bred%2Bblackops%2Bnight%2Bstrike%2Bcustomizer%2Bkitbash%2Bdsng%2Bblog%2Bart%2Brobots%2Bin%2Bdisguise%2Brid%2B%2Bgenerations%2Bdeluxe%2Bwarrior%2Bclass%2B4.jpg)
![[image error]](https://1.bp.blogspot.com/-W-bdKRepfsI/WE7x8VpKV_I/AAAAAAAAOhs/Aczcx94v6H0PqYlYB3aGTTfdDz-j2MoMwCLcB/s1600/Bumblebee%2BStrikerbee%2BTransformers%2BTF%2Bcustom%2Bmade%2Btoys%2Bweapons%2Bsword%2Bblaster%2Bgun%2Bautobot%2Bred%2Bblackops%2Bnight%2Bstrike%2Bcustomizer%2Bkitbash%2Bdsng%2Bblog%2Bart%2Brobots%2Bin%2Bdisguise%2Brid%2B%2Bgenerations%2Bdeluxe%2Bwarrior%2Bclass%2B8.jpg)
![[image error]](https://2.bp.blogspot.com/-MFQg49wA7Rw/WE7x9e-dLRI/AAAAAAAAOhw/Vb3DONjmk7IRudD3sllgLXwDg0UAvLRkgCLcB/s1600/Bumblebee%2BStrikerbee%2BTransformers%2BTF%2Bcustom%2Bmade%2Btoys%2Bweapons%2Bsword%2Bblaster%2Bgun%2Bautobot%2Bred%2Bblackops%2Bnight%2Bstrike%2Bcustomizer%2Bkitbash%2Bdsng%2Bblog%2Bart%2Brobots%2Bin%2Bdisguise%2Brid%2B%2Bgenerations%2Bdeluxe%2Bwarrior%2Bclass%2B9.jpg)
![[image error]](https://4.bp.blogspot.com/-Az6keFv0eYk/WE7x49tc7zI/AAAAAAAAOhk/6SWdWKDbWz8NKqqOC9lZQ7ibCnPui2SgQCLcB/s1600/Bumblebee%2BStrikerbee%2BTransformers%2BTF%2Bcustom%2Bmade%2Btoys%2Bweapons%2Bsword%2Bblaster%2Bgun%2Bautobot%2Bred%2Bblackops%2Bnight%2Bstrike%2Bcustomizer%2Bkitbash%2Bdsng%2Bblog%2Bart%2Brobots%2Bin%2Bdisguise%2Brid%2B%2Bgenerations%2Bdeluxe%2Bwarrior%2Bclass%2B10.jpg)
![[image error]](https://1.bp.blogspot.com/-Efw6fPnkMr4/WE7x1mh4xPI/AAAAAAAAOhc/WTQBpS9AZWURgH3Wnwc0KGJs5yeERXRWQCLcB/s1600/Bumblebee%2BStrikerbee%2BTransformers%2BTF%2Bcustom%2Bmade%2Btoys%2Bweapons%2Bsword%2Bblaster%2Bgun%2Bautobot%2Bred%2Bblackops%2Bnight%2Bstrike%2Bcustomizer%2Bkitbash%2Bdsng%2Bblog%2Bart%2Brobots%2Bin%2Bdisguise%2Brid%2B%2Bgenerations%2Bdeluxe%2Bwarrior%2Bclass%2B11.jpg)
![[image error]](https://1.bp.blogspot.com/-e-aHqzVZolM/WE7wlxIa8HI/AAAAAAAAOh4/lQDhJnjuXNETU82U3_VrTK-HGpzAXHXUACEw/s1600/Bumblebee%2BStrikerbee%2BTransformers%2BTF%2Bcustom%2Bmade%2Btoys%2Bweapons%2Bsword%2Bblaster%2Bgun%2Bautobot%2Bred%2Bblackops%2Bnight%2Bstrike%2Bcustomizer%2Bkitbash%2Bdsng%2Bblog%2Bart%2Brobots%2Bin%2Bdisguise%2Brid%2B%2Bgenerations%2Bdeluxe%2Bwarrior%2Bclass%2B7.jpg)
![[image error]](https://4.bp.blogspot.com/-5B7edGjI2SM/WE7zesLCqBI/AAAAAAAAOiA/fGVEnQkomzYuefeoiPGq18dTwylu7XpFQCLcB/s1600/Bumblebee%2BStrikerbee%2BTransformers%2BTF%2Bcustom%2Bmade%2Btoys%2Bweapons%2Bsword%2Bblaster%2Bgun%2Bautobot%2Bred%2Bblackops%2Bnight%2Bstrike%2Bcustomizer%2Bkitbash%2Bdsng%2Bblog%2Bart%2Brobots%2Bin%2Bdisguise%2Brid%2B%2Bgenerations%2Bdeluxe%2Bwarrior%2Bclass%2B15.jpg)
![[image error]](https://1.bp.blogspot.com/-W_Ue5JKTxBc/WE7wkVj-HyI/AAAAAAAAOhQ/77W9K0xRfhEr20u13KZI4Yh5WhESEwtwwCLcB/s1600/Bumblebee%2BStrikerbee%2BTransformers%2BTF%2Bcustom%2Bmade%2Btoys%2Bweapons%2Bsword%2Bblaster%2Bgun%2Bautobot%2Bred%2Bblackops%2Bnight%2Bstrike%2Bcustomizer%2Bkitbash%2Bdsng%2Bblog%2Bart%2Brobots%2Bin%2Bdisguise%2Brid%2B%2Bgenerations%2Bdeluxe%2Bwarrior%2Bclass%2B6.jpg)
![[image error]](https://3.bp.blogspot.com/-7v8ZE9AYuyc/WE7x3eOZVRI/AAAAAAAAOhg/XTXc5uHZ2GYdOFNzuPRLyM04TaezQhuagCLcB/s1600/Bumblebee%2BStrikerbee%2BTransformers%2BTF%2Bcustom%2Bmade%2Btoys%2Bweapons%2Bsword%2Bblaster%2Bgun%2Bautobot%2Bred%2Bblackops%2Bnight%2Bstrike%2Bcustomizer%2Bkitbash%2Bdsng%2Bblog%2Bart%2Brobots%2Bin%2Bdisguise%2Brid%2B%2Bgenerations%2Bdeluxe%2Bwarrior%2Bclass%2B12.jpg)
![[image error]](https://3.bp.blogspot.com/-qKN-XlFrs6Y/WE7x607VZrI/AAAAAAAAOho/Ywl7bbnGiVIRB-FJZMxVuYaHWVfz0rcmQCLcB/s1600/Bumblebee%2BStrikerbee%2BTransformers%2BTF%2Bcustom%2Bmade%2Btoys%2Bweapons%2Bsword%2Bblaster%2Bgun%2Bautobot%2Bred%2Bblackops%2Bnight%2Bstrike%2Bcustomizer%2Bkitbash%2Bdsng%2Bblog%2Bart%2Brobots%2Bin%2Bdisguise%2Brid%2B%2Bgenerations%2Bdeluxe%2Bwarrior%2Bclass%2B13.jpg)
![[image error]](https://4.bp.blogspot.com/-RyVMreS6fSU/WE7zfdgjWSI/AAAAAAAAOiE/JlBOJd9tC_EPgmm5F24BMPpLpHWPu7EjgCLcB/s1600/Bumblebee%2BStrikerbee%2BTransformers%2BTF%2Bcustom%2Bmade%2Btoys%2Bweapons%2Bsword%2Bblaster%2Bgun%2Bautobot%2Bred%2Bblackops%2Bnight%2Bstrike%2Bcustomizer%2Bkitbash%2Bdsng%2Bblog%2Bart%2Brobots%2Bin%2Bdisguise%2Brid%2B%2Bgenerations%2Bdeluxe%2Bwarrior%2Bclass%2B14.jpg)
![[image error]](https://2.bp.blogspot.com/-H4pZ0yInxfw/WE7zdjR9m2I/AAAAAAAAOh8/a4fJ_OHBBJ49Ul6P7hS2UYBIYEpPLI_lACLcB/s1600/Bumblebee%2BStrikerbee%2BTransformers%2BTF%2Bcustom%2Bmade%2Btoys%2Bweapons%2Bsword%2Bblaster%2Bgun%2Bautobot%2Bred%2Bblackops%2Bnight%2Bstrike%2Bcustomizer%2Bkitbash%2Bdsng%2Bblog%2Bart%2Brobots%2Bin%2Bdisguise%2Brid%2B%2Bgenerations%2Bdeluxe%2Bwarrior%2Bclass%2B16.jpg)
![[image error]](https://1.bp.blogspot.com/-7DLyOKdz4uE/WE7ziUgJgiI/AAAAAAAAOiI/NZZvqIUUjUQeUV__-KwSNLkfeBroW1NIQCLcB/s1600/Bumblebee%2BStrikerbee%2BTransformers%2BTF%2Bcustom%2Bmade%2Btoys%2Bweapons%2Bsword%2Bblaster%2Bgun%2Bautobot%2Bred%2Bblackops%2Bnight%2Bstrike%2Bcustomizer%2Bkitbash%2Bdsng%2Bblog%2Bart%2Brobots%2Bin%2Bdisguise%2Brid%2B%2Bgenerations%2Bdeluxe%2Bwarrior%2Bclass%2B17.jpg)
![[image error]](https://2.bp.blogspot.com/-DFVSDa0RK0E/WE77jxU_Y1I/AAAAAAAAOjI/iglbHtC720EhCk36x6DYO0BQtfyLzCPMgCLcB/s1600/Bumblebee%2BStrikerbee%2BTransformers%2BTF%2Bcustom%2Bmade%2Btoys%2Bweapons%2Bsword%2Bblaster%2Bgun%2Bautobot%2Bred%2Bblackops%2Bnight%2Bstrike%2Bcustomizer%2Bkitbash%2Bdsng%2Bblog%2Bart%2Brobots%2Bin%2Bdisguise%2Brid%2B%2Bgenerations%2Bdeluxe%2Bwarrior%2Bclass%2B24.jpg)
![[image error]](https://2.bp.blogspot.com/-ePU31-sarVw/WE7zlLN4dfI/AAAAAAAAOiM/AxapRB8Hg8MAznmt6ME3BCy5YeB7-iiAwCLcB/s1600/Bumblebee%2BStrikerbee%2BTransformers%2BTF%2Bcustom%2Bmade%2Btoys%2Bweapons%2Bsword%2Bblaster%2Bgun%2Bautobot%2Bred%2Bblackops%2Bnight%2Bstrike%2Bcustomizer%2Bkitbash%2Bdsng%2Bblog%2Bart%2Brobots%2Bin%2Bdisguise%2Brid%2B%2Bgenerations%2Bdeluxe%2Bwarrior%2Bclass%2B18.jpg)
![[image error]](https://1.bp.blogspot.com/-s0qXzd_N6Mk/WE77aCZ6-II/AAAAAAAAOjE/1sh14yfGBVAImCzm4oLYTd_-OYm4B-wxQCLcB/s1600/Bumblebee%2BStrikerbee%2BTransformers%2BTF%2Bcustom%2Bmade%2Btoys%2Bweapons%2Bsword%2Bblaster%2Bgun%2Bautobot%2Bred%2Bblackops%2Bnight%2Bstrike%2Bcustomizer%2Bkitbash%2Bdsng%2Bblog%2Bart%2Brobots%2Bin%2Bdisguise%2Brid%2B%2Bgenerations%2Bdeluxe%2Bwarrior%2Bclass%2B21.jpg)
![[image error]](https://2.bp.blogspot.com/-XiKUUgIf31g/WE77Y8b_ByI/AAAAAAAAOjA/hCeczMzBQcArsJfIlH20oXeWATnatgWAgCLcB/s1600/Bumblebee%2BStrikerbee%2BTransformers%2BTF%2Bcustom%2Bmade%2Btoys%2Bweapons%2Bsword%2Bblaster%2Bgun%2Bautobot%2Bred%2Bblackops%2Bnight%2Bstrike%2Bcustomizer%2Bkitbash%2Bdsng%2Bblog%2Bart%2Brobots%2Bin%2Bdisguise%2Brid%2B%2Bgenerations%2Bdeluxe%2Bwarrior%2Bclass%2B23.jpg)
![[image error]](https://1.bp.blogspot.com/-ApDDoO3wNrk/WDytGgDbpBI/AAAAAAAAN9E/BVADjdeogI82-gH0nvHe7V2YjI0KmkJlACLcB/s1600/Warlord%2BUltra%2BMagnus%2BTransformers%2BTF%2Bcustom%2Btoys%2Bweapons%2Bblaster%2Bgun%2Bguns%2Bdr%2BWu%2Bdr.%2Bforge%2Bof%2Bsolace%2Bprime%2Bultra%2Bmagnus%2Bhammer%2Bcustomizer%2Bkitbash%2Bdsng%2Bblog%2Bgundam%2Bgenerations%2Bleader%2Bvoyager%2Btfsource%2Bclass%2B2.jpg)
![[image error]](https://2.bp.blogspot.com/-v-GUIwLwMGw/WDytMtCchUI/AAAAAAAAN9Q/85rtbVNkbYIgLSQ_NKa5p4Aa2utFYKWbgCLcB/s1600/Warlord%2BUltra%2BMagnus%2BTransformers%2BTF%2Bcustom%2Btoys%2Bweapons%2Bblaster%2Bgun%2Bguns%2Bdr%2BWu%2Bdr.%2Bforge%2Bof%2Bsolace%2Bprime%2Bultra%2Bmagnus%2Bhammer%2Bcustomizer%2Bkitbash%2Bdsng%2Bblog%2Bgundam%2Bgenerations%2Bleader%2Bvoyager%2Btfsource%2Bclass%2B5.jpg)
![[image error]](https://1.bp.blogspot.com/-6msU6AaUd0k/WDytUlsYq8I/AAAAAAAAN9Y/3S2rw2VcaCACkgTmlwW02BA8lzC4vZSWACLcB/s1600/Warlord%2BUltra%2BMagnus%2BTransformers%2BTF%2Bcustom%2Btoys%2Bweapons%2Bblaster%2Bgun%2Bguns%2Bdr%2BWu%2Bdr.%2Bforge%2Bof%2Bsolace%2Bprime%2Bultra%2Bmagnus%2Bhammer%2Bcustomizer%2Bkitbash%2Bdsng%2Bblog%2Bgundam%2Bgenerations%2Bleader%2Bvoyager%2Btfsource%2Bclass%2B8.jpg)
![[image error]](https://3.bp.blogspot.com/-ROq2wZjqBxk/WDytbUlHyMI/AAAAAAAAN9g/wk4wQJqD578BBxa3EPVGu_LCMcoe7cY0ACLcB/s1600/Warlord%2BUltra%2BMagnus%2BTransformers%2BTF%2Bcustom%2Btoys%2Bweapons%2Bblaster%2Bgun%2Bguns%2Bdr%2BWu%2Bdr.%2Bforge%2Bof%2Bsolace%2Bprime%2Bultra%2Bmagnus%2Bhammer%2Bcustomizer%2Bkitbash%2Bdsng%2Bblog%2Bgundam%2Bgenerations%2Bleader%2Bvoyager%2Btfsource%2Bclass%2B9.jpg)
![[image error]](https://4.bp.blogspot.com/-sJJw-wPX9Qw/WDytI9Xef3I/AAAAAAAAN9I/V50XYMeE858RvxOZwAZR_UXm061vZCMWQCLcB/s1600/Warlord%2BUltra%2BMagnus%2BTransformers%2BTF%2Bcustom%2Btoys%2Bweapons%2Bblaster%2Bgun%2Bguns%2Bdr%2BWu%2Bdr.%2Bforge%2Bof%2Bsolace%2Bprime%2Bultra%2Bmagnus%2Bhammer%2Bcustomizer%2Bkitbash%2Bdsng%2Bblog%2Bgundam%2Bgenerations%2Bleader%2Bvoyager%2Btfsource%2Bclass%2B20.jpg)
![[image error]](https://4.bp.blogspot.com/-_bCeXzxi6Ms/WDytPbECppI/AAAAAAAAN9U/cs_xovMkwHcfzAD69Eq176hHIYlXVtPWACLcB/s1600/Warlord%2BUltra%2BMagnus%2BTransformers%2BTF%2Bcustom%2Btoys%2Bweapons%2Bblaster%2Bgun%2Bguns%2Bdr%2BWu%2Bdr.%2Bforge%2Bof%2Bsolace%2Bprime%2Bultra%2Bmagnus%2Bhammer%2Bcustomizer%2Bkitbash%2Bdsng%2Bblog%2Bgundam%2Bgenerations%2Bleader%2Bvoyager%2Btfsource%2Bclass%2B6.jpg)
![[image error]](https://3.bp.blogspot.com/-xnn1BeRm1c0/WDysuxW53FI/AAAAAAAAN8k/tmYXy-4Y_NcDH0ydWROnfx7i9ZacXya5gCLcB/s1600/Warlord%2BUltra%2BMagnus%2BTransformers%2BTF%2Bcustom%2Btoys%2Bweapons%2Bblaster%2Bgun%2Bguns%2Bdr%2BWu%2Bdr.%2Bforge%2Bof%2Bsolace%2Bprime%2Bultra%2Bmagnus%2Bhammer%2Bcustomizer%2Bkitbash%2Bdsng%2Bblog%2Bgundam%2Bgenerations%2Bleader%2Bvoyager%2Btfsource%2Bclass%2B10.jpg)
![[image error]](https://4.bp.blogspot.com/-lzH96WiXD78/WDytEd3NL0I/AAAAAAAAN9A/GaUN_cSqddARSGavsJF568k2BEA90-WjgCLcB/s1600/Warlord%2BUltra%2BMagnus%2BTransformers%2BTF%2Bcustom%2Btoys%2Bweapons%2Bblaster%2Bgun%2Bguns%2Bdr%2BWu%2Bdr.%2Bforge%2Bof%2Bsolace%2Bprime%2Bultra%2Bmagnus%2Bhammer%2Bcustomizer%2Bkitbash%2Bdsng%2Bblog%2Bgundam%2Bgenerations%2Bleader%2Bvoyager%2Btfsource%2Bclass%2B17.jpg)
![[image error]](https://4.bp.blogspot.com/-MuZEoOtHRf4/WDysxlE2NXI/AAAAAAAAN8s/0YnGqunKJY8BuQrQ7kyxyZjXNkxrJdFsACLcB/s1600/Warlord%2BUltra%2BMagnus%2BTransformers%2BTF%2Bcustom%2Btoys%2Bweapons%2Bblaster%2Bgun%2Bguns%2Bdr%2BWu%2Bdr.%2Bforge%2Bof%2Bsolace%2Bprime%2Bultra%2Bmagnus%2Bhammer%2Bcustomizer%2Bkitbash%2Bdsng%2Bblog%2Bgundam%2Bgenerations%2Bleader%2Bvoyager%2Btfsource%2Bclass%2B11.jpg)
![[image error]](https://1.bp.blogspot.com/-iNnpBN5dI88/WDy7NqV5HJI/AAAAAAAAN-Q/KoOOUpeb9PkJaV-DGEAQH52p_B7Xk9wPQCLcB/s1600/Warlord%2BUltra%2BMagnus%2BTransformers%2BTF%2Bcustom%2Btoys%2Bweapons%2Bblaster%2Bgun%2Bguns%2Bdr%2BWu%2Bdr.%2Bforge%2Bof%2Bsolace%2Bprime%2Bultra%2Bmagnus%2Bhammer%2Bcustomizer%2Bkitbash%2Bdsng%2Bblog%2Bgundam%2Bgenerations%2Bleader%2Bvoyager%2Btfsource%2Bclass%2B22.jpg)
![[image error]](https://2.bp.blogspot.com/-IOr63mnC95A/WDys3cMaDHI/AAAAAAAAN8w/S8S7kfKPfz8ncymVMiW1g0VQA211xhjhwCLcB/s1600/Warlord%2BUltra%2BMagnus%2BTransformers%2BTF%2Bcustom%2Btoys%2Bweapons%2Bblaster%2Bgun%2Bguns%2Bdr%2BWu%2Bdr.%2Bforge%2Bof%2Bsolace%2Bprime%2Bultra%2Bmagnus%2Bhammer%2Bcustomizer%2Bkitbash%2Bdsng%2Bblog%2Bgundam%2Bgenerations%2Bleader%2Bvoyager%2Btfsource%2Bclass%2B13.jpg)
![[image error]](https://2.bp.blogspot.com/-dCYnAEcIfuQ/WDysvZxVeYI/AAAAAAAAN8o/jLbx3_yQJXYvWGbjLX-rLIkaELZV5wNJACLcB/s1600/Warlord%2BUltra%2BMagnus%2BTransformers%2BTF%2Bcustom%2Btoys%2Bweapons%2Bblaster%2Bgun%2Bguns%2Bdr%2BWu%2Bdr.%2Bforge%2Bof%2Bsolace%2Bprime%2Bultra%2Bmagnus%2Bhammer%2Bcustomizer%2Bkitbash%2Bdsng%2Bblog%2Bgundam%2Bgenerations%2Bleader%2Bvoyager%2Btfsource%2Bclass%2B12.jpg)
![[image error]](https://2.bp.blogspot.com/-2j6hcYkLgiU/WDys3w5cn7I/AAAAAAAAN80/fJhy7kRdRVENuiEniF_oFDse5yx33tLVQCLcB/s1600/Warlord%2BUltra%2BMagnus%2BTransformers%2BTF%2Bcustom%2Btoys%2Bweapons%2Bblaster%2Bgun%2Bguns%2Bdr%2BWu%2Bdr.%2Bforge%2Bof%2Bsolace%2Bprime%2Bultra%2Bmagnus%2Bhammer%2Bcustomizer%2Bkitbash%2Bdsng%2Bblog%2Bgundam%2Bgenerations%2Bleader%2Bvoyager%2Btfsource%2Bclass%2B14.jpg)
![[image error]](https://2.bp.blogspot.com/-i5P8msu7bl8/WDytCp3Yq5I/AAAAAAAAN84/UsyRsqVReHcFv2RkxQ69lPtwinsq-9k4wCLcB/s1600/Warlord%2BUltra%2BMagnus%2BTransformers%2BTF%2Bcustom%2Btoys%2Bweapons%2Bblaster%2Bgun%2Bguns%2Bdr%2BWu%2Bdr.%2Bforge%2Bof%2Bsolace%2Bprime%2Bultra%2Bmagnus%2Bhammer%2Bcustomizer%2Bkitbash%2Bdsng%2Bblog%2Bgundam%2Bgenerations%2Bleader%2Bvoyager%2Btfsource%2Bclass%2B16.jpg)
![[image error]](https://4.bp.blogspot.com/-sAuJdDcCFw4/WDytLhzzzHI/AAAAAAAAN9M/1vO9x7ntSlAU3_dtJHw57L41eT7w6q4GgCLcB/s1600/Warlord%2BUltra%2BMagnus%2BTransformers%2BTF%2Bcustom%2Btoys%2Bweapons%2Bblaster%2Bgun%2Bguns%2Bdr%2BWu%2Bdr.%2Bforge%2Bof%2Bsolace%2Bprime%2Bultra%2Bmagnus%2Bhammer%2Bcustomizer%2Bkitbash%2Bdsng%2Bblog%2Bgundam%2Bgenerations%2Bleader%2Bvoyager%2Btfsource%2Bclass%2B3.jpg)
![[image error]](https://1.bp.blogspot.com/-DIjazEwnLCA/WDytDpcCTfI/AAAAAAAAN88/4oW0CwaJiss8UcSEKjkzNpY4xevVDzTGQCLcB/s1600/Warlord%2BUltra%2BMagnus%2BTransformers%2BTF%2Bcustom%2Btoys%2Bweapons%2Bblaster%2Bgun%2Bguns%2Bdr%2BWu%2Bdr.%2Bforge%2Bof%2Bsolace%2Bprime%2Bultra%2Bmagnus%2Bhammer%2Bcustomizer%2Bkitbash%2Bdsng%2Bblog%2Bgundam%2Bgenerations%2Bleader%2Bvoyager%2Btfsource%2Bclass%2B18.jpg)
![[image error]](https://3.bp.blogspot.com/-qpQLar_EY5I/WDyshGCZWTI/AAAAAAAAN8g/dNExd1fx3OATywGzjUhiBQjT9om4lfw5wCLcB/s1600/Mega%2BOptimus%2BPrime%2BWarlord%2BUltra%2BMagnus%2BTransformers%2BTF%2Bcustom%2Btoys%2Bweapons%2Bguns%2Bdr%2BWu%2Bdr.%2Bforge%2Bof%2Bsolace%2Bprime%2Bultra%2Bmagnus%2Bhammer%2Bcustomizer%2Bkitbash%2Bdsng%2Bblog%2Bgundam%2Bgenerations%2Bvoyager%2Btfsource%2Bclass%2B1.jpg)
![[image error]](https://3.bp.blogspot.com/-icAwxkOaBtg/WDS38RXuHUI/AAAAAAAANxk/9CyYGR--Dqw2bjM5pBvvY2JyKiBdDjRjACPcB/s1600/Mega%2BOptimus%2BPrime%2B%2BTransformers%2BTF%2Bcustom%2Btoys%2Bweapons%2Bcustomizer%2Bkitbash%2Bscracthbuild%2Bdsng%2Bblog%2Bgundam%2Bgundamformer%2Bgenerations%2Bleader%2Bvoyager%2Bclass%2Barms%2Bmicron%2Btakara%2Bhasbro%2B14.jpg)
![[image error]](https://3.bp.blogspot.com/-I2X85KvwNzc/WDS34tpheTI/AAAAAAAANxg/w7kIuEfqggc6rKbSCxHCCYt3Stqg7MjZACPcB/s1600/Mega%2BOptimus%2BPrime%2B%2BTransformers%2BTF%2Bcustom%2Btoys%2Bweapons%2Bcustomizer%2Bkitbash%2Bscracthbuild%2Bdsng%2Bblog%2Bgundam%2Bgundamformer%2Bgenerations%2Bleader%2Bvoyager%2Bclass%2Barms%2Bmicron%2Btakara%2Bhasbro%2B13.jpg)
![[image error]](https://3.bp.blogspot.com/-Jw3fDAZhbYg/WDS32GHdQtI/AAAAAAAANxc/XjV4m62PE784k4q8Q9ljT4jT8QSATVlhQCPcB/s1600/Mega%2BOptimus%2BPrime%2B%2BTransformers%2BTF%2Bcustom%2Btoys%2Bweapons%2Bcustomizer%2Bkitbash%2Bscracthbuild%2Bdsng%2Bblog%2Bgundam%2Bgundamformer%2Bgenerations%2Bleader%2Bvoyager%2Bclass%2Barms%2Bmicron%2Btakara%2Bhasbro%2B10.jpg)
![[image error]](https://3.bp.blogspot.com/-XqgM_OTR8sM/WDS4CCIa81I/AAAAAAAANxw/HMhhfJbxQFMdBN5RksvTmdl_ed5khclbACPcB/s1600/Mega%2BOptimus%2BPrime%2B%2BTransformers%2BTF%2Bcustom%2Btoys%2Bweapons%2Bcustomizer%2Bkitbash%2Bscracthbuild%2Bdsng%2Bblog%2Bgundam%2Bgundamformer%2Bgenerations%2Bleader%2Bvoyager%2Bclass%2Barms%2Bmicron%2Btakara%2Bhasbro%2B9.jpg)
![[image error]](https://4.bp.blogspot.com/-93H0WW9YRNM/WDS3-beGXGI/AAAAAAAANxo/3yxVBHRrjrAHOUa5HwG88YF2E0JP0X3nwCPcB/s1600/Mega%2BOptimus%2BPrime%2B%2BTransformers%2BTF%2Bcustom%2Btoys%2Bweapons%2Bcustomizer%2Bkitbash%2Bscracthbuild%2Bdsng%2Bblog%2Bgundam%2Bgundamformer%2Bgenerations%2Bleader%2Bvoyager%2Bclass%2Barms%2Bmicron%2Btakara%2Bhasbro%2B15.jpg)
![[image error]](https://3.bp.blogspot.com/-5AFM6ebcQzY/WDS59ihPOkI/AAAAAAAANyI/Jq7p6pfWMCMU3V5RTFrwjpz4b_U1FgW2QCPcB/s1600/Mega%2BOptimus%2BPrime%2B%2BTransformers%2BTF%2Bcustom%2Bmade%2Btoys%2Bweapons%2Bblaster%2Bgun%2Bguns%2Bdr%2BWu%2Bdr.%2Bforge%2Bof%2Bsolace%2Bprime%2Bultra%2Bmagnus%2Bhammer%2Bcustomizer%2Bkitbash%2Bdsng%2Bblog%2Bgundam%2Bgenerations%2Bleader%2Bvoyager%2Bclass%2B20.jpg)
![[image error]](https://4.bp.blogspot.com/-cRjHti_MgaY/WDS6AaCNRPI/AAAAAAAANyM/HcWHYGPe2akNfzWbkK2Co2KJo9EU6ARmACPcB/s1600/Mega%2BOptimus%2BPrime%2B%2BTransformers%2BTF%2Bcustom%2Bmade%2Btoys%2Bweapons%2Bblaster%2Bgun%2Bguns%2Bdr%2BWu%2Bdr.%2Bforge%2Bof%2Bsolace%2Bprime%2Bultra%2Bmagnus%2Bhammer%2Bcustomizer%2Bkitbash%2Bdsng%2Bblog%2Bgundam%2Bgenerations%2Bleader%2Bvoyager%2Bclass%2B16.jpg)