
Heather Solos's Blog, page 89
April 5, 2011
Broccoli Rabe with Garlic and Ginger
 Heather says:
Broccoli rabe, also called rappini or broccoli raab -pronounce it rob, not rab- is a new-to-me vegetable. I know it's sort of common and in some areas it has been available for years. There's no reason that I haven't tried it. Broccoli rabe just never jumped into my cart saying, "I'm delicious," the way so many other foods do.
Do NOT eat broccoli rabe raw. Just don't. Broccoli rabe must be cooked properly or it will be extremely bitter. Thankfully the bitterness reducing step is as simple as boiling pasta, so if you can make mac and cheese, you have no excuse. Tim wandered by, snatched a bud, thinking it was plain old broccoli and boy was he surprised and unpleasantly at that. Learn from him, folks. Be aware, if you have young children who are extremely sensitive to bitter flavors that some bitterness will remain. Some people enjoy this aspect, others will not. If you are extremely adverse to bitter flavors you may have better luck with broccolini, which I'll experiment with in the future.
This recipe is quick and makes an excellent side dish for meals with Asian flavors. It's a great accompaniment to my garlic and soy chicken thighs. While I preferred the broccoli rabe with a sprinkling of soy sauce, Tim enjoyed it as is. If you want, this technique can be used with a variety of different seasonings. Try skipping the ginger and adding a pinch of crushed red pepper or go for a flavor that would compliment many dishes from the US by omitting the ginger and tossing with bacon crumbles. Thinly sliced onion or shallots would be a great addition, too. The goal is to flavor the oil in which the broccoli rabe is sauteed, giving the the vegetable flavor that is complementary to your meal.

Ingredients:
1 bunch broccoli rabe, thoroughly washed1 large pot of salted, boiling water2 tbsp olive oil2 garlic cloves, minced1 tsp, fresh ginger peeled and mincedsalt to tasteRoughly chop the rabe into 2″ pieces. You want them large enough to spear with a fork, but not too awkward for eating.
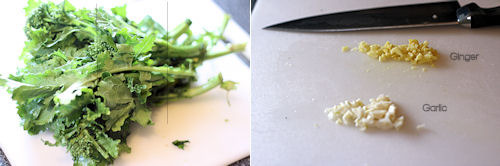
It doesn't have to be perfect, I just drew the lines as an example.
Toss the washed and chopped broccoli rabe into the boiling, salted water and allow to cook for 2 minutes, maybe a little more. You want the broccoli rabe to become bright green and fork tender, but not mushy.
While the broccoli rabe is boiling. Make sure you have a colander or strainer ready. In a skillet or wok heat the olive oil over medium heat. Add the garlic and ginger, stirring so they begin to cook but be careful not to burn the garlic.
Drain the broccoli rabe, shake it to be sure most of the water is gone, then add it to the olive oil, garlic, and ginger. Stir to coat with the flavored oil and saute for 2 – 3 minutes.
Salt to taste and serve immediately.
Enjoy!
Broccoli Rabe with Garlic and Ginger is a post from: Home Ec 101 ©Home Ec 101.com 2007 - 2011


April 4, 2011
Home Ec 101 Menu and Shopping List #14
Heather says:
Spring is here, despite a rather mean prank by Mother Nature on our North Eastern friends, it is time to start revamping the menu and focusing on spring vegetables and fewer starches. Over on the forums I mentioned that I'm fighting off an emotional funk. One of the signals was I have almost completely abandoned my camera, I have no interest in experimenting in the kitchen. You'll notice the last recipe I added was on March 4, Country Fried Steak. Last week I focused on getting back into a healthy routine (getting enough sleep, was a big part of that) and this week, I'm going to force myself to do the things I really do enjoy, but have avoided.
In the vegetable crisper I have swiss chard and broccoli rabe, two new-to-me vegetables. Whether or not I "feel like it" I'll be experimenting and hopefully I'll get back into my routine of at least one recipe per week. I do miss that. My husband and I are both going to be eating lower carb over the next few weeks, so I'm hoping to get more recipes focused on vegetables posted in the near future. Just as a side note, it's not the Atkins Diet. Diabetes runs in my family and I'm hoping to not carry on that legacy. I'll still be making the side dishes for the kids, we'll just generally stick to the main + extra vegetables. (I don't feel I owe you guys an explanation of our choices, I'm just trying to be "transparent" and explain why the recipes will probably lean in that direction for the foreseeable future). There will be occasional splurges and treats, don't worry.
The menu below does not reflect those changes.
Tell me, Home Eccers, what are you having this week?
Here is another week's menu and printable shopping list courtesy of SayMmm.com.
Monday – Two Bean Tamale Pie, Tossed SaladTuesday – Jap Chae -Korean beef stir fry -may not be the technical explanationWednesday – Albondigas, Guacamole, Tortilla ChipsThursday – Clean Out Refrigerator NightFriday – Spanish Baked Cod with Olive Tapenade, Asparagus -broiled instead of grilled, but same conceptSaturday – Chicken Fingers, Stove Top Macaroni and Cheese, Broccoli with Bell PeppersSunday – Turkey Cutlets with Onions and Bell Peppers, Rice and Peas (you can certainly substitute chicken breasts if turkey cutlets aren't available)
Home-Ec 101: Skills for Everyday Living is now in bookstores like Barnes and Noble & Books-A-Million.
You can find it in the home reference section.
It is also available on Amazon.
Home Ec 101 Menu and Shopping List #14 is a post from: Home Ec 101 ©Home Ec 101.com 2007 - 2011


April 1, 2011
How to Remove Detergent Build Up in a Washing Machine
Dear Home-Ec 101,
I've recently noticed a layer of scum around the agitator. If I were able to get my head in there I'd probably find it throughout. Is there a way to get this out without scrubbing the thing?
Signed,
Build Me Up Buttercup
Heather says:
This response focuses on top loading clothes washers, but the same problem often occurs in front loading washing machines, too. Front loading clothes washers do not have an agitator.
What you're looking at is most likely a layer of detergent build up that occurs when suds are splashed onto the agitator or other parts of the wash basin not normally under the water line. Just like soap scum build up in your shower, the water evaporates leaving behind a residue that we often refer to as soap scum. In areas with hard water, the problem is exacerbated by lime scale which refers to mineral deposits also left behind.
The best way to deal with build up situations like detergent and lime scale is prevention. Regularly cleaning your clothes washer will keep the build up from becoming significant and difficult to deal with. Once a month run an empty, large load, with 2 – 4 cups of white vinegar, depending on the capacity of the machine. The acidity of the vinegar helps dissolve the detergent and lime scale build up that may accumulate on the agitator and wash tub of a washing machine.
For safety's sake, do not use this cleaning method immediately following a load in which chlorine bleach has been used, bleach and vinegar should not be mixed.
Do not add vinegar through the bleach dispenser.
If you want to be extra cautious add water, through the bleach dispenser, to the load prior to the cleaning cycle.
In your case, it sounds like the detergent build up has been accumulating for some time, one load may not be enough. If this is the case, it is more efficient to apply some elbow grease to the situation. Again, making sure that no bleach is present in the machine, spray the agitator and wash tub with a dilute solution of white vinegar (usually 50:50 works) give the vinegar some time to dissolve the build up and then attack the area with either a scrub brush or sturdy sponge. Thinking about it, it seems as though a NEW -never used- toilet scrub brush may help those of you on the shorter side reach some areas of the wash tub. Again, I stress the NEW toilet brush aspect of the suggestion. Scrubbing will help remove what has been loosened by the vinegar.
What you're doing with the dilute vinegar is dissolving and removing the top layer of scum. Only so much of the build up can go into solution -your vinegar mix- before it is saturated -unable to dissolve anymore. Once this happens, just rinse it away and spray again. Yay for chemistry! Science can be cool when it is working for you.
To help prevent this problem for reoccurring use a simple test to see if perhaps you've been using too much detergent or overloading your machine.
Take a clean, dry towel and place it in the empty wash tub. Set the washer for a small load on hot. Allow the towel to agitate for a few moments. Open the lid and look in, if you see suds, you have detergent build up in your laundry. This is caused by one of two problems, 1) using too much detergent or 2) overloading the machine so it cannot be rinsed properly. Check your manual to determine if you have been over stuffing the machine and experiment with using less detergent if that is the prime suspect.
Happy laundering!
Send your questions to helpme@home-ec101.com.
Home-Ec 101: Skills for Everyday Living is now in stores, buy it today!
How to Remove Detergent Build Up in a Washing Machine is a post from: Home Ec 101 ©Home Ec 101.com 2007 - 2011


March 31, 2011
Sofrito for Dummies
[image error]Brian says:
Tapping into my pseudo-Puerto Rican roots, I felt it necessary to expose you to one of the most flavorful melange of spices, vegetables and meat ever devised: sofrito. Sure, you have your run-of-the-mill roux, but there's something very emotional and spiritual about sofrito that only a select few can really relate to. Luckily, I am one of them. I recommend putting this sauce into your arsenal as soon as possible to jazz up everything from rice and beans to pork, beef and chicken.
Here's what you'll need:
1 bunch of culantro leaves (visit your local Latin store to get you hands on some)1 large white onionRed and yellow sweet peppers, one each, diced (remove the seeds)1 whole garlic head3 large tomatoes (very important)1 tbsp of olive oil3-4 Aji dulce peppers (also found at Latin groceries)Optional:
1/2 pound salted pork, chopped or 1 1/2 tbsp of lard (I prefer adding at least one or the other)Once all ingredients are chopped and diced, place them (except for the olive oil), into a food processor or blender. Blend into a finely chopped mixture, adding in the olive oil slowly; anything thing more will turn your sofrito into a liquefied mess and it has to have body in order to withstand hours of slow cooking. Once blended, you can either store your sofrito in the fridge for later use (about one to two weeks) or freeze it up to six months.
If you'd like to use it immediately (duh!), then place the freshly made sofrito into a medium-sized skillet, on medium heat, for about 1 1/2 hours. Once everything has cooked down to a beautiful sienna color, depending on how much onion you used, you can then add it to basically anything. Some of the best options I've had it on roasted chicken, fish and pork, served over rice and beans, and had it topped over mofongo.
No matter how you serve it, sofrito is a staple in all Puerto Rican kitchens and I promise you'd be doing yourself a favor if you follow suit.
Brian Wilder is a writer for Home Ec 101. You can also find him at Things My Grandfather Taught Me.
If you have a question you'd like Brian to answer send it to Brian@home-ec101.com.
Don't forget to stop in and say hello on the brand new Home-Ec101 Forums.
Sofrito for Dummies is a post from: Home Ec 101 ©Home Ec 101.com 2007 - 2011


March 30, 2011
Braised Kale Recipe
 Bobbie says:
Come on over to the dark side* – dark, leafy greens are good for you, and can be quite tasty. It's time to leave the relative comfort zone of the mild-mannered spinach. This easy Braised Kale recipe is an excellent choice for venturing into greens unknown. It's quick to prepare, even for a newbie cook, and I've found kale to be one of the less bitter of the darker greens. Also, kale is often a bargain choice – my local markets had them for under a dollar per pound many times this winter.

I'd never even considered eating kale until I a gourmet-cooking friend gave me a most interesting gift consisting of a magazine with a bookmarked recipe and all the ingredients to prepare said recipe, all neatly arranged in a reusable shopping tote. Sticking out the top of the bag was a gigantic bunch of kale which, at the time, intimidated more than excited me. But, Adventure is my middle name** so I plunged right in and ended up with the realization that I liked kale even more than spinach. This discovery lead me to try collard greens, turnip greens and even dandelion greens. I still like spinach as a salad veggie, but as for cooked greens, I prefer these stronger flavored choices, by far.
Kale (sometimes called Borecole) is a member of the cabbage family, but unlike cabbage, it does not form a head. Instead, the closely curled leaves grow on clusters of thick stems Kale can be found in colors from dark green to bluish-green to bronze, depending on variety.
Nutrition-wise, kale is a good source of manganese, copper, and potassium and a very good source of vitamins A and C. Kale is also an EXCELLENT source of vitamin K, providing 286% of the daily recommended allowance PER OUNCE of cooked greens.
Kale is simple to prepare and cook. The hardest part may be the washing, and it's the most important, because nothing will turn someone off from eating greens quicker than grit in their mouth from poorly washed greens. Kale has tight, curly leaves have many places to hold onto sand and dirt, so a quick rinse may not be enough, and several changes of water may be needed. If the greens look dirty, then start by rinsing them well under running water, to wash off the obvious dirt. Then fill a (CLEAN!) sink or very large bowl or stockpot with cold water, and carefully wash the leaves. If you use a bowl or stockpot, be sure to lift the leaves up out of the water, rather than pouring through a colander to drain. This way, any sand or dirt that has been washed off won't be re-deposited onto the produce, undoing all your efforts.
 Easy Braised Kale
Look over the kale leaves and remove any wilted, withered or otherwise unpleasant bits you aren't keen on eating. Then it's time to remove the stems. I used to do this by cutting the stem all the way out of each leaf, but now I just grab a leaf and kind of pull it in half.

The bit of the stem that stays with the leaf is usually tender enough that it'll be fine. Pull off any leafy parts that remain on the stem. Set the stem aside and coarsely tear the leaf into pieces about 1 ½ to 2 inches in size. Do this with each leaf of kale. Then, with a large, sharp knife, slice the stems into pieces no more than ½ inch long, shorter if they're very thick. If the ends of the stems seem fibrous or are hard to cut, you might want to toss those parts in the trash – they'll likely be stringy, which is not pleasant and will only help to reinforce a child's opinion that they hate green foods. Of course, if you'd prefer, you can just discard the stems completely. I use them because I hate to pay for something by the pound and throw part of it away.
Choose a heavy-bottomed stockpot or saucepan large enough to hold all the kale at once, and make sure it has a tight-fitting lid. Set pot over medium heat and add the chicken stock, garlic, butter and seasonings. Once the butter or bacon grease is melted, add the sliced stems, stir and bring to a boil.
Cover, reduce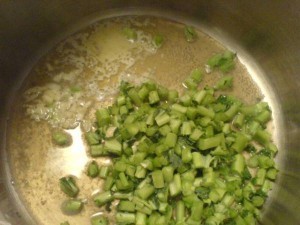 heat and simmer about 5 minutes or until stems are almost tender. Add the torn kale leaves to the pot all at once, stir well to coat with the chicken stock/butter mixture, then cover and cook over very low heat about 15 minutes longer, or until the greens and stems are cooked to the tenderness you want.
Watch carefully near the end of the cooking time, as there is not much liquid in the pan and it could burn. You want all (or at least, most) of the liquid to cook away, but you may want to add a touch more chicken stock or water if you're concerned about burning. Taste a bit to check the seasoning, and add more salt and/or pepper if desired. Add a bit more butter, too, if you like. Remove to a serving dish that you've pre-warmed. (Which I generally do by filling it with the hottest water that comes from my tap, then dumping the water and wiping the dish dry just before serving time.)
Serves 3 or 4 people. (Serves one if you're me. Hey, I like my greens and have, on occasion, chosen to eat only greens for supper.)
Variations:
Add a tiny pinch of crushed red pepper or dash of cayenne with the other seasonings. Not enough to make it hot, just a bit for flavor.
If you have bacon on hand, consider garnishing with some crumbled bacon if you want it crispy, or adding it during the cooking time if you want the flavor throughout (or both, if you're splurging).
Chopped bits of ham would also give some nice flavor – add that at the same time as the kale stems. Some folks like to season their greens with a bit of vinegar. I'm not one of them. I didn't hate it, but I didn't love it, either. If you'd like to give it a go, I'd suggest white wine or champagne vinegar, and just a teaspoon or two on this amount of kale.
In addition to being a nutritious side dish, I personally find kale to be amazing*** in chicken soup, either a creamy one or the thin, brothy kind, but without noodles. After I finished cooking the kale and taking the pictures, I pulled 3 items from my freezer and whipped up this chicken and kale stew. It took me less than 15 minutes and was even more delicious than it looked.

And I think it looks rather delicious.
Amazing, even.
Don'tcha think?
Bobbie Laughman is a freelance writer who keeps her stuff in a house in Gettysburg so it doesn't get lost while her mind flies around where it will.
You can follow her mind on twitter (@notoriousTGB) or head to Gruntled and Sheveled and Whelmed if you'd like to get to know her in more than 140 characters at a time.
** **Amazing? Really, Bobbie? Amazing? Yes, amazing, but maybe that's just me. If I'd been Marie Antoinette, the line would have been, "Let them eat kale."
Braised Kale Recipe is a post from: Home Ec 101 ©Home Ec 101.com 2007 - 2011


March 29, 2011
Bleach Spots Appearing on Khaki Shorts
Dear Home-Ec 101,
I have been puzzled by this mysterious pink / red stains on my khaki shorts for years. Whenever I get new khaki shorts, it will get these red / pink stains on them whenever I wash them. I don't use bleach or fabric softener. I only use powdered detergent, cold/warm water and that's it. Whatever I do, it will only create new red/pink marks across the khaki shorts. What is truly bizarre is that I tried not washing one of my new khaki shorts I bought and the stains still appeared! It looks like it has something to do with the water in the home I live in. It only occurs on my khaki shorts and not anywhere else. I need help with this as I have google searched for months without any answer. I'm afraid to buy new khaki shorts now.
Signed,
Shorted on the Shore
Heather says:
The stains you describe sound like bleach stains. Bleaching agents -not necessarily chlorine bleach- can appear in many innocuous forms in our modern lives. However, acne creams, whitening toothpaste and mouthwash are the usual culprits. Some dyes are less able to resist these bleaching products, which is why you will only notice this on some fabrics. After giving this some thought, my guess is splatter from vigorous toothbrushing landing on the bathroom counter or the shorts, themselves. Then, all it takes is a lean in for a close look in the mirror and voila, bleach stains on khaki shorts. The would appear either as a dot or a smear depending on the contact method.
In all likelihood you wouldn't notice the tiny spatter or rub for several hours until that pink / orange / reddish spot appeared.
To prevent bleaching stains like these in the future, be extra careful with your bleaching products. Try to get in the habit of wiping off your bathroom counter and washing your hands thoroughly after applying acne creams or medication.
For what it's worth, some people's sweat seems to oxidize the dyes of some fabrics leaving mysterious stains. However these stains would be in very specific areas, prone to sweating. Since you mentioned spots rather than blotches -these would appear where the shorts crease when sitting- my money is on one of the previously mentioned products.
On an unrelated note, getting to the bottom of these mysterious bleach stains has felt like an episode of House the Domestic Edition and heck, I've been cranky enough to play the lead.
Submit your questions to helpme@home-ec101.com.
Bleach Spots Appearing on Khaki Shorts is a post from: Home Ec 101 ©Home Ec 101.com 2007 - 2011


March 28, 2011
Review: Clutter Rehab by Laura Wittman
Heather says:
It's no secret that I'm a fan of OrgJunkie.com. I had the pleasure of meeting the site's author, Laura Wittman, last October and let me tell you, she is just as lovely as person as one could hope. Recently her publisher Ulysses Press sent me a copy of Laura's book, Clutter Rehab 101 Tips and Tricks to Become an Organization Junkie and Love It!¹.
It's a a very quick read, ringing in just over a hundred pages and seems like it would be a great thinking-of-you type gift.
Caveat!
Gentlemen, as with many books on organization, housekeeping, and cooking -including my own- it is wise to consider how it might be received. What you may see as solving a problem could be interpreted as, you saying "You're a slob, here's how to fix it." Context is KEY. This has been a public service message from Home-Ec 101. You're welcome.
Then again, if you are living with a packrat and about to lose your mind, maybe you should just hand them the book. It's cheaper than moving out, right?
What can you expect from this book?
Great tips like #34: Color-code the Kids
This tip is popular with large families, but it can certainly work no matter what your family size. Color-coding socks, cups, school supplies, towels, and toothbrushes helps reduce disagreements and uncertainty over what belongs to whom. This is a simple solution that packs an organizational punch.
I could be biased, I've used this tip for years with our kids. Although once they get a bit older you do sometimes have to hear, "Why does Marky always get the red one?" Well, you may not hear Marky, but you get the idea.
Many of the tips also include practical applications. Sure getting organized is a nice thought. If it weren't hard work, everyone would be organized. Laura does a great job of sprinkling in encouragement and tips for breaking big organizational jobs into manageable tasks. I would recommend this book for those readers needing inspiration to dig out from under a pile of clutter
Ulysses Press was also kind enough to offer a copy of Clutter Rehab: 101 Tips and Tricks to Become an Organization Junkie and Love It! for one of you lucky readers.
Entering is simple, just share your favorite organizing tip. Make sure you fill in the email field of the comment form so I can contact you.
Comments will close at 9pm Eastern on Sunday April 3, 2011 and the winner chosen by random drawing and will be announced on the Home Ec 101 Facebook Fan Page on Monday morning.
Review: Clutter Rehab by Laura Wittman is a post from: Home Ec 101 ©Home Ec 101.com 2007 - 2011


Home Ec 101 Menu and Grocery List #13
Heather says:
Here's another week of menus with recipes and a complete shopping list, courtesy of SayMmm.com.
Click for the printable shopping list.
Monday – Black Bean Burritos, Spanish Rice, Fried Green Corn (use frozen)Tuesday – Chili Honey Chicken Thighs, Lentil Pilaf, Roast BroccoliWednesday – Clean Out Refrigerator NightThursday – Grilled Ham and Cheese Sandwiches, Cream of Broccoli SoupFriday – Fisherman's Pie, Wilted SpinachSaturday – Pork Chops with Raspberry Sauce, roast vegetables, tossed saladSunday – Stewed Chicken, Rice and PeasDo you menu plan? What are you having for dinner this week?
Do you want to get started with menu planning? If so, I've written a four part menu planning primer.
Do you need help getting motivated in other areas? Lately I do, too. Head over to the Home Ec 101 Forums and let's work our way through this.
Home Ec 101 Menu and Grocery List #13 is a post from: Home Ec 101 ©Home Ec 101.com 2007 - 2011


March 26, 2011
Retro Saturday March 26, 2011
Heather says:
Each week I dive into the archives to share the best of the Home-Ec 101 past.
In 2007:
How to Prevent Mildew in a Front Loading Washing Machine
2008 brought:
How to Clean Stainless Cookware – What is it about March and people wanting to know how to get rid of polymerized fat?
Ivy explained how she does Spring Cleaning in a Bedroom.
2009:
Ivy wrote How to Go Back to Frugality After the Budget has been Blown.
I was in Myrtle Beach and shared some safety tips for vacationing with kids.
2010:
I shared one of my favorite recipes – Marinated Fried Chicken and I added to the Meal Planning Primer with Part IV Choosing Sides.
I hope you have a wonderful weekend.
Retro Saturday March 26, 2011 is a post from: Home Ec 101 ©Home Ec 101.com 2007 - 2011


March 24, 2011
Pressure Cooking for Vegetarians
Dear Home Ec 101,
I am coverting to Lacto-ovo vegetarian diet and several books suggest using a pressure cooker as a good tool in the kitchen. My questions are:
1. Are the European models better than the American ones? That was suggested in one book.
2. Are they safe now? My grandmother never had an accident with one. When I was a kid, I do remember seeing a lady covered in burns from a pressure cooker accident and I have been quietly terrified of them since.
3. Are pressure cookers only good for beans? What other use would they have in the kitchen? I don't mind investing in a good one if it is not a uni-tasker.
Signed,
Veggie in Virginia
Heather says:
This is a great question for the Home Ec 101 community, as I'm still learning. As an aside, I have been using my pressure cooker a lot lately. I have somehow fallen out of the habit of remembering to soak my beans, but I can make up for that lost time by firing up the pressure cooker.
As I am still relatively new to pressure cooking, I'll leave style suggestions open to the readers.
I want to remind everyone that the number one cause of accidents in the kitchen is carelessness and complacency. I'll do a whole post on this in the near future, but specifically concerning pressure cookers there are a few things you must do before each use. These are not optional. You must check any vents for blockages, ensure the safety valve moves freely, and you must check the condition of the seal. If the seal is pliable, the valve can move, and the vent is clear there is no reason for the pressure cooker to malfunction -provided you follow the instructions and do not overfill or cook very foamy foods. It is always worth the thirty seconds or so it takes to peek through the vent and check the seal. Always. Got it?
 Pressure cookers are good for far more than beans. I'm ordering Great Vegetarian Cooking Under Pressure by Lorna J. Sass to review and for my own educational purposes.
After receiving your question I began to search and it seems as though people use their pressure cookers for many more vegetarian friendly items than just beans. Grains, including rice, and other vegetables seem to be popular choices. Unless I shell out for smaller pressure cooker, I'm not sure that I will be lugging it out just to do some green beans, but know that it is an option.
Be aware if you have an electric stove that you may want to move the pressure cooker from one burner to another if the recipe calls for a fast reduction in heat. (Switching from high to low, for example). Electric burners, especially on smooth top stoves -lift don't slide- retain heat and don't respond as quickly as a gas flame.
Ok Home Eccers, share your best vegetarian friendly pressure cooker resources.
Pressure Cooking for Vegetarians is a post from: Home Ec 101 ©Home Ec 101.com 2007 - 2011


Heather Solos's Blog

- Heather Solos's profile
- 12 followers

