
Terry Laughlin's Blog, page 21
December 28, 2014
Not Right? Make It Better – Continual Improvement
When you are working on something difficult, do you keep doing it wrong? Does this leave you frustrated and ashamed?
Such an emotional storm surrounding your learning process makes progress even more difficult than it needs to be.
Make progress much easier by replacing judgment with a continual improvement mindset.
**
Click here to read more of this post…
To view 300+ articles of TI technique and training please visit TI Coach Mat Hudson’s Smooth Strokes blog.
The post Not Right? Make It Better – Continual Improvement appeared first on Total Immersion.


December 12, 2014
Breathing, It’s Overrated!
The most frequent request I get from swimmers is: “I just want to be able to breathe”. This is for good reason, since clearly if you rotate to breathe and inhale more water than air this will completely interrupt your stroke and prevent the swimmer from progressing.
We are humans after all, we breathe with the top of our head higher than our chin 99% of the time. Put us horizontal in water and the instinct to lift the head and rotate more is how a human is driven to breathe in an aquatic environment. The more we rotate the less stable the body is and begins to sink. The higher the head lifts, the more the hips (and chin) sink. That’s no secret, just physics.
Lifting head and rotating more to breathe instinctively triggers the lead arm to push down and legs to splay wide to maintain stability. Once air is found and face is back in the water, body position resembles nothing like freestyle and looks more like the Flying Spaghetti Monster (FSM). Breathing like this on two’s (every other stroke) you may as well be a Freestyle Spaghetti Monster – drag profile increases exponentially, effort and the need for a lot more air.
In order to breathe easily, head and spine must be in alignment, body needs to be level – or more precisely characterized in TI and is priority #1 – “Balance”. It’s counterintuitive, really counter-instinctive to keep head low and rotate less to easily find air, but this is central to seamless breathing.
Timing is critical too. If breath is late and/or long, human FSM instincts will take over. Allow the shoulders to do the timing. When rolling to breathe, chin should follow shoulder to air. Empty the lungs when rolling to breathe to allow for immediate inhale when nose and mouth breach surface. If you exhale and inhale after mouth breaches surface, the breathing cycle is too long and you will be sucking on more water than air. Also, if breath is late or has slight hesitation (i.e, chin doesn’t follow shoulder to air), similar to the “long breath” you will only find more water than air.
Breathing in the Bow Wave: When rolling to breathe, keeping head low and aligned with spine, the water in front of your head will be higher and lower near your chin. I refer to this as “the pocket” or “finding the pocket” near chin which allows for an easy breath. A more scientific definition of the “bow wave”, select this link: Bow Wave Physics.
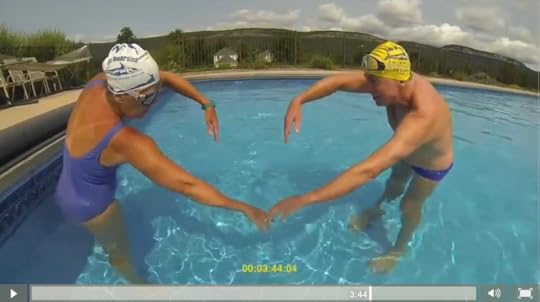
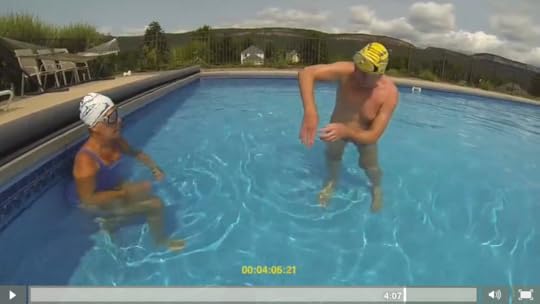
Experiment by creating a bow-wave with the palm of your hand so you have a good visual. Stand in the shallow end of pool, extend right arm out, palm facing forward (thumb up) – now sweep hand forward in circular arc. Notice the water in front of hand (palm side) is higher and lower at the back or knuckle side of hand. The low water zone is the pocket next to chin that allows you to breathe easy. No lifting of head, altering stroke, rhythm, or body position to gasp for air. Just get your air quickly in the low pocket. See illustration below
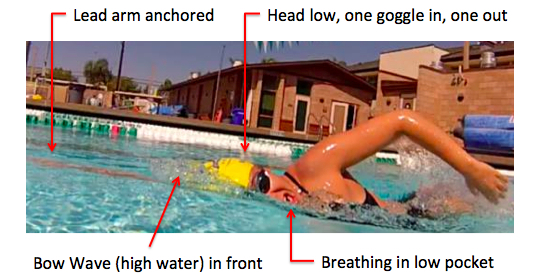
In the illustration, notice swimmer is: 1. Stable, rotated just enough to get air, 2. head and spine are in alignment, head is low with one goggle in and one out, 3. chin follows shoulder getting a full breath (inhale) early in low pocket as recovery arm has just exited water, and 4. lead arm is anchored in front holding clean edge at breath – pulling not required. This swimmer is not altering stroke or body position to breathe – thus maintaining balance, a low drag profile and forward momentum.
Simple steps to “Breathe Easy”:
1. Remove the breathing component and practice the timing lifting just one goggle above the surface. Take a few long strokes, then when ready/stable, chin follows shoulder until one goggle breaches the surface. In TI this is called the “Whale Eye”. Once you see air, return head back to neural position – “goggles down”. Peeking one goggle above the surface allows you to feel the head and spine in alignment, head doesn’t need to lift to to see air. In shallow lanes, take a few strokes peeking on two’s or every other stroke. When you need air stop, stand up, get your air then repeat the “Whale Eye” process.
2. Once you feel confident and comfortable peeking one goggle above surface, head and spine in alignment (no lifting of head), now bring in the timing of exhale. As chin follows shoulder to peek one goggle above the surface, exhale continuously and quickly – empty the lungs. Done correctly, you will feel the ending last burst of air on exhale clearing the way when mouth breaches surface. Stop stand up get a full tank of air, repeat the goggle peek and timing of exhale.
3. Now integrate the new position head and spine alignment, timing of exhale and try to take a breath. But first, start off with three to four strokes keeping head neutral (no breathing), then on next stroke, only peek one goggle; on next stroke, exhale as chin follows shoulder to air, quickly inhale (in low pocket) when mouth breaches the surface. However – if you find more water than air, LET IT GO and try to breathe again on the next stroke. If no success getting air, stop, stand up and breathe – repeat the “peek first then breathe second” process. Your mission is to break the instinct of lifting head and rotating more to breathe, and discover the low pocket where easy breathing happens. The air is the same five inches above the surface as it is in the low pressure pocket.
Breathing and Buoyancy: One important part of breathing is the amount of air in your lungs. A common message, especially advice given to triathletes, is to start emptying lungs of air immediately when face enters water. Although the spirit and intentions of this advice are good, your body position can drop a couple of inches and never find “the pocket” due to lack of buoyancy (not enough air in the lungs). You don’t want to hold your breath, but rather have a slow controlled exhale – exhale quickly emptying lungs as chin follows shoulder to air. See this breathing in freestyle video from Coach Mandy McDougal. She demonstrates body position with air in the lungs and emptying lungs too early: SwimVICE: Breathing Comfortably in Freestyle
Breathing in freestyle really is overrated. It’s only us humans adding instinctive movements and complexity that make breathing difficult and overly frustrating. Once the human, land based instincts to breathe have been removed is when you will find that stable, easy breath in the low pressure pocket of the bow wave. Whether swimming in pool or in lumpy open water conditions, the breathing process is the same. Learning to breathe easy in freestyle takes time, be patient and trust the process. The air is free, take all you need.
Happy Easy Breathing!
The post Breathing, It’s Overrated! appeared first on Total Immersion.
November 28, 2014
Weight Training For Swimming?
An excerpt from my blog post on ‘Weight Training For Swimming?’
I would tend to be cautious about weight-training that does not mimic the range of motion and conditions those muscles and joints will be functioning in while swimming. Strength that actually converts into swimming speed and endurance is not directly about getting more muscles to fire – it is about getting the right muscle groups to fire together, in the right sequence and right timing, with just the right amount of force. Swimming strength has to develop in union with movement precision. All movement is training the brain, yes, but what the author of that article did not point out is that the brain is memorizing and strengthening the specific motor control circuits for a ‘push-up’ or a ‘pull-up’ or ‘bicep curl’ not the motor-control circuits needed for the unique assembly and choreography of the swimming stroke (or a particular part of the stroke cycle). Swimming effort is done against an unusual medium (water) that is explicitly unlike any materials used and forces resisted in dry-land weight training (gravity, elastic bands, friction resistance, solid surfaces, etc). Building muscle cells can be generic to a degree, but training better neuro-motor control must be extremely specific.
**
Click here to read more of this post…
To view 300+ articles of TI technique and training please visit TI Coach Mat Hudson’s Smooth Strokes blog.
The post Weight Training For Swimming? appeared first on Total Immersion.
November 21, 2014
Mindfulness In/Out Of Water
I’ve written a series of posts on Mindfulness In/Out Of Water (Part 1, Part, 2, and Part 3) in response to some inquiries from students. An excerpt below…
**
Out of all the obstacles and limitations I’ve seen in my students (over 20 years of teaching, and most of that in fields other than swimming) the most dangerous thing to their progress are negative judgments against themselves – against their body, their age, their mind, their capacity for knowledge, their perceived slowness or difficulty in learning, etc. This judgment creates what I call an emotional storm of anxiety, anger, fear, or other similarly troublesome mixture of emotions. This emotional – and therefore electro-chemical – storm in the brain is possibly the biggest hindrance to progress.
And this simple, though profound skill has the potential to blow a great deal of that away: mindfulness.
Click here to read more of this post…
To view 300+ articles of TI technique and training please visit TI Coach Mat Hudson’s Smooth Strokes blog.
The post Mindfulness In/Out Of Water appeared first on Total Immersion.
November 2, 2014
Stroke Correction By Yourself
An excerpt from my post “Stroke Correction By Yourself”
In order to ‘not practice something wrong’ these are the two things to let sink into your mindset:
1) Your goal right now is to do the movement better than you were doing it previously.
You use the ideal image or example to help you decide on a change to aim for, then you use ‘yesterday’s habit’ as a reference point for your progress today.
2) In every mindful practice you are increasing your ability to make self-improvements more easily.
As important, if not more so, than making the movement itself better, you are practicing the skill for making changes to your own stroke. If you can change it once, you can do it again. And the more you do it, the easier it will be to detect and correct deficiencies in your own stroke.
**
Click here to read more of this post…
To view 300+ articles of TI technique and training please visit TI Coach Mat Hudson’s Smooth Strokes blog.
The post Stroke Correction By Yourself appeared first on Total Immersion.
October 30, 2014
When We’re Mindful, We’re Alive.
Ellen Langer, at age 67, is the longest-serving psychology prof at Harvard. What she is best known for is studies which have shown that people can make marked physical changes, improving health, reversing aging effects, etc. in response to mental suggestions, which she calls primes.
The New York Times Magazine just published an article about Langer’s work What If Age Is Nothing But a Mindset This excerpt from that article describes mindfulness in a way that applies exceptionally well to improvement-oriented swimming practice.
“If people could learn to be mindful and always perceive the choices available to them, Langer says, they would fulfill their potential and improve their health. Langer’s technique of achieving a state of mindfulness is different from the one often utilized in Eastern “mindfulness meditation” — nonjudgmental awareness of the thoughts and feelings drifting through your mind — that is everywhere today.
“Her emphasis is on noticing moment-to-moment changes around you, from the differences in the face of your spouse across the breakfast table to the variability of your asthma symptoms.”
When we are “actively making new distinctions, rather than relying on habitual” categorizations, we’re alive; and when we’re alive, we can improve.
A key goal of TI Focal Point Practice is precisely as Langer defines it–to replace habitual perception by pursuing new distinctions.
For instance, the first step in improving Balance is to get the head into an aligned and buoyancy-neutral (‘weightless’) position. But muscle memory can impede this change. To make the change we need to be able to make finer distinctions between when the head is slightly elevated, exactly in equilibrium, or slightly depressed.
Or as Langer says, “actively making new distinctions.”
We do that in TI practice by combining three kinds of focus–internal, external, and visualization.
For head position these are
Internal: Release your head’s weight by relaxing neck and upper back muscles.
External: Feel the water’s density as a ‘pillow’ cushioning the weight of your head.
Visualization: Visualize a laser projecting forward from your head-spine line.
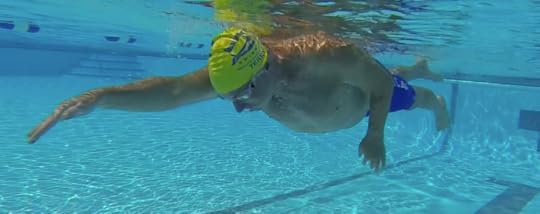
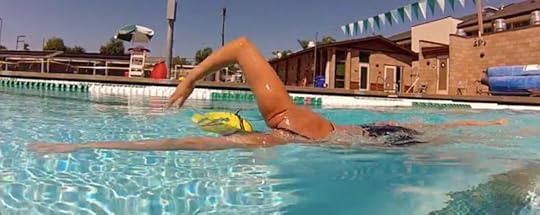
And by using Focal Points like these, you should be able to achieve head position as aligned as this.
The post When We’re Mindful, We’re Alive. appeared first on Swim For Life.
The post When We’re Mindful, We’re Alive. appeared first on Total Immersion.
October 13, 2014
Why Swim Symmetrical?
Here is an excerpt from my post “Why Swim Symmetrical?”
Should we work on a symmetrical stroke?
Bernardo: As TI swimmers do we have to work to equalize both side of the stroke and both kinds of strokes (breathing and non-breathing) despite the difficulty to achieve it? ( I think we do).
Short answer: Yes. I too think it is so clear that we should work on building a consistent symmetrical stroke. Our bodies will hold up the best, over intense efforts, and over many years when we load our bodies symmetrically. Breathing too can be mastered to where it is hardly any different from the non-breathing stroke.
Consider Sun Yang- the fastest human in the world at 1500 meters. He is stunningly fast, but there is obvious room to improve even more. (Is there any flawless champion?)…
**
Click here to read more of this post…
To view 300+ articles of TI technique and training please visit TI Coach Mat’s Smooth Strokes blog.
The post Why Swim Symmetrical? appeared first on Total Immersion.
October 11, 2014
How to Swim Faster . . . and Pain Free
Is there a technique that allows you to swim much faster–while also minimizing the potential for shoulder pain? There is! And it’s one that nearly all coaches and swimmers overlook.
Most people treat the recovery portion of the crawl stroke as incidental. Since it’s not involved in propulsion, they figure, it serves only to get the arm back to where it can resume pushing water back—the part they consider all-important.
But Total Immersion—virtually alone in the swim world—considers the recovery phase consequential. We know that small errors in recovery can create large problems elsewhere–increasing drag and reducing propulsion.
The Rag Doll (aka Marionette) Recovery—the name we initially gave the focal point for suspending a fully relaxed forearm from the elbow during recovery—is one of three essential elements of an efficient recovery. (Swinging the elbow away on exit—not lifting it—and cleanly entering hand before forearm are the others.)
Origins
Like Balance, Streamlining and most TI technique fundamentals, the Rag Doll Recovery emerged from a problem-solving process.
In Oct 2004, I ruptured the biceps tendon in my right shoulder while lifting weights. It was an almost crippling injury. Normally undemanding actions –like donning a seat belt, or pouring water from a kettle–were too painful to perform with my right arm.
Despite this, I continued swimming. My health insurer required five months of therapy before approving surgery, and I knew that I was likely to regain strength and function more quickly post-surgery if I remained active.
Three Techniques for Pain-Free Swimming
Within a week or two following the injury, I began seeking stroke modifications that would allow me to swim with minimal pain. I discovered that I could minimize discomfort by doing the following:
‘Turning off’ arm muscles as I lifted it from the water–relying on a highly-mobile shoulder blade to bring the arm forward.
Dropping my hand in earlier and steeper on entry.
Letting my arm sink until my shoulder was in a highly stable position, and I felt natural—even effortless–leverage, before applying pressure.
To my great surprise I was soon swimming pain-free. Then, within weeks, I was stunned to find myself swimming slightly faster than before the injury.
Even with my right biceps detached from my shoulder—and despite still being unable to pour tea without searing pain!
I was so struck by the advantage I seemed to have gained through pain-avoidance that these three modifications eventually became standard TI crawl techniques. You know them today as the Rag Doll (or Marionette) Recovery, Mail Slot Entry, and Patient Catch.
Why It Works
Though the Rag Doll Recovery emerged as a workaround to a painful injury, I was intensely curious why this combination of technique adjustments allowed me to swim faster with what would have been a disabling injury for the vast majority of swimmers.
Thinking about anatomy, physics, and stroke mechanics, I recognized several critical advantages in the Rag Doll Recovery:
It provided a rest break for arm muscles that had work to do during propulsion–maintaining a firm hold on the water. Turning off muscles when they’re not needed saves energy and eliminates a common source of muscle fatigue.
Suspending a relaxed forearm from the elbow during recovery—instead of swinging it stiffly through the air eliminates ballistic forces that would destabilize the core or divert momentum sideways. (This evolved into a core TI efficiency principle: Any body part which leaves the water should move in the direction of travel.)
It moves the hand from exit to entry by the shortest possible path. This enables higher strokes rates with no loss of length. I.E. You swim faster efficiently.
How I’ve Used It
In the years since I made the Rag Doll Recovery a core element of technique, I’ve discovered it provides distinct advantages in several challenging situations:
Because my arms never tire, I’ve been able to swim great distances—8+ hours in the Manhattan Island Marathon and nearly 12 hours in the Tampa Bay Marathon—on quite moderate training and with minimal fatigue.
A compact recovery lets me swim in undisturbed comfort and control in the congested conditions of pack swimming in open water
Because my forearm is so relaxed, my core remains stable in rough water. My forearm yields when waves or chop hit it, instead of communicating the impact to my core body.
But even more important, these techniques are so biomechanically sound that it’s been nearly 10 years since I experienced any swimming-related shoulder pain.
The post How to Swim Faster . . . and Pain Free appeared first on Swim For Life.
The post How to Swim Faster . . . and Pain Free appeared first on Total Immersion.
October 7, 2014
Feel For The Water? Discover How Subtle the ‘Feel’ Is
How do you find your “feel for the water”, especially wearing a wetsuit in triathlon? Discover your “feel” and speed happens.
This is a very popular topic and is almost a swimming cliche’ or mantra – you hear and read it everywhere. Just do a Google search and you will find hundreds of articles, dozens of videos – each seem to hold the secret sauce to finding your “feel for the water”. Whatever feeling you may have acquired training in the pool is largely masked when wearing a wetsuit racing in triathlon.
Websites and swim articles discussing “feel for the water” - most or all refer to the feeling or finding the feeling for the water from only the pulling hand or palm moving back, little regarding the forearm, and nothing about the feeling in areas of the body that move forward. It’s as if no other area or limb can have or should have a feel for the water even when most of the body is submerged IN the water – go figure.
There are plenty of conventional sculling drills found on the web, each emphasize the feeling of pressure on the palm, twisting the wrist hinging about the elbow. And more often than not, the sculling drills are executed with the swimmer in a position that is nowhere near what they would experience in freestyle, or any other stroke.
There are so many areas of body to acquire a feel for the water – head, face, shoulders, top and bottom of forearm, chest, legs and feet – not just the palm. Areas of the body that move forward and not necessarily back. Do you feel the recovery arm slice in fingertips first, wrist then elbow; or do you feel more of a flop on the bottom of forearm when the arm lays flat and/or crosses over in front of the head? Do you feel the water pressure on the crown of your head or on the side of your face and low ear when rolling to breathe? Can you distinguish pressure differences on either the inside or outside of arm, as well as the palm and top of hand at the “catch” phase of your stroke?
Regardless of the area or part of the body for the swimmer to get a feel for the water, it’s all very subtle whether it’s from different pressures around the body moving forward or the arm catching and pressing back. Each take razor sharp focus and certainly a swimmer must have good balance and solid foundation to feel these subtle pressures. If arms are spinning and busy legs kicking to remain stable, feel for the water and its pressure are masked by staying afloat, surviving the set or the swim leg in a triathlon.
On the streamline side, reducing drag profile:
A great aid to feel the water and feel the flow is with the aid of long fins. Long fins will increase speed and magnify pressure/drag areas — areas that may or could be reduced through correcting body position and/or stroke timing. But most importantly you will discover these pressure zones that you might not be aware of swimming without fins. Work on one area at a time, i.e. pressure on the crown of the head, slice in vs flopping arm, pressures on top and bottom of arm at forward extension sliding into the “catch”, pressure on shin and top of foot as you kick down, etc. Reducing drag profile = faster swimming and decreased effort. That’s no secret, just laws of physics.
On the catch side:
1. Start your feel for the water by gently closing your hands (like you’re holding a butterfly), aka “the fist drill”. This removes the pulling palm that wants to take over, and allows you to feel the water on the (palm side of) forearm. The more vertical your forearm, the more pressure you will feel – pressure on forearm should remain constant to the belly button. An excellent set is to do is 4×50 (closed to open hand): 1st 50 closed hand, 2nd 50 open (point) index finger, 3rd open index and pinky fingers, 4th open hand using palm but still feeling constant pressure on forearm. Don’t let the palm take over and allow elbow to drop.
2. Swim sets of 3 x 50′s feeling feather-light, medium, and firm pressures on forearm and palm pressing back. Swim the 1st 50 with feather-light pressure, 2nd 50 medium pressure, and 3rd 50 firm pressure. When you get this right SPL (strokes per length) should be slightly higher with light pressure than with firm pressure. For example: A swimmer may swim the first 50 at 18 SPL with feather light pressure, 2nd 50 at 17 SPL with medium pressure, and the 3rd 50 at 16 SPL with firm pressure. If you swam the same SPL with light, medium and firm pressures – then you haven’t discovered this feel for the water yet. Keep trying, you will eventually feel how subtle the differences between light, medium and firm pressures really are. But when you discover/feel feather-light, medium and firm pressures – you will have a whole new sensation of “feel for the water” than you ever had, or thought you had before. Feeling consistent pressure on the arm pressing back = traction and grip, less slipping.
Wearing a wetsuit?
Unless water temps rise above 78 degrees, most or all triathletes wear wetsuits in triathlon. If you wear a wetsuit, how do you maintain your feel for the water when most of your body is wrapped in neoprene? Neoprene over the shoulders/arms and below the knees doesn’t keep you any warmer, but only restrict movement and buffer any feel for the water you may have acquired without. I opt for the sleeveless suits and cut the legs at mid calve or above. However, some wetsuit manufacturers are now making sleeveless shorty suits (cut above the knees). These are excellent, 1/3 the buoyancy of a full suit – shoulders, arms and legs are free to feel the water and move naturally allowing you to swim with the stroke you’ve honed in pool sessions, not a modified stroke adjusting to a ‘corky’ and restrictive wetsuit. Also, no more wasting energy trying to strip off the ‘neoprene octopus’ in transition. Refer to a previous blog - Wetsuits: Friend or Foe?
There is so much to flow and ‘feel for the water’ that is not limited to the hand/arm moving back. You will yield much greater results discovering the feeling of flow and feel for the water improving the 95% of your body that moves forward than you will from the 5% that presses back. Remove neoprene where it is not needed, buffers feel and restricts movement.
The post Feel For The Water? Discover How Subtle the ‘Feel’ Is appeared first on Total Immersion.
Feel For The Water
This is a very popular topic and is almost a swimming cliche’ or mantra – you hear and read it everywhere. Just do a Google search and you will find hundreds of articles, dozens of videos – each seem to hold the secret sauce to finding your “feel for the water”.
Interesting, of the web sites and articles I poured over discussing “feel for the water” - all refer to the feeling or finding the feeling for the water from only the pulling hand or palm moving back, little regarding the forearm, and nothing about the feeling in areas of the body that move forward. It’s as if no other area or limb can have or should have a feel for the water even when most of the body is submerged IN the water – go figure.
There are plenty of conventional sculling drills found on the web, each emphasize the feeling of pressure on the palm, twisting the wrist hinging about the elbow. And more often than not, the sculling drills are executed with the swimmer in a position that is nowhere near what they would experience in freestyle, or any other stroke.
One article I found characterized “feel for the water” more precisely as a ‘feeling of flow’ from the catch phase to the release phase: Swim expert explains how to manipulate flow of the water. This article goes into greater detail than most, but still one dimensional focusing on the pulling hand/arm moving back. Others discuss “finding still water” from sculling as the hand moves back, but don’t distinguish what ‘still water’ is or feels like – and if you happen to find it [still water], what do you do with it after it has been discovered? This phrase has been around for years too, is more conjecture with little substance, but seems like great advice when coming from a pro or elite swimmer.
There are so many areas of body to acquire a feel for the water – head, face, shoulders, top and bottom of forearm, chest, legs and feet – not just the palm. Areas of the body that move forward and not necessarily back. Do you feel the recovery arm slice in fingertips first, wrist then elbow; or do you feel more of a flop on the bottom of forearm when the arm lays flat and/or crosses over in front of the head? Do you feel the water pressure on the crown of your head or on the side of your face and low ear when rolling to breathe? Can you distinguish pressure differences on either the inside or outside of arm, as well as the palm and bottom forearm vs the top of the hand and forearm at the “catch” phase of your stroke? These feel for the water sensations are subtle too and are primarily about streamlining/reducing drag which represent 95% of your body.
Regardless of the area or part of the body for the swimmer to get a feel for the water, it’s all very subtle whether it’s from different pressures around the body moving forward or the arm catching and pressing back. Each take razor sharp focus and certainly a swimmer must have good balance and solid foundation to feel these subtle pressures. If arms are spinning and busy legs kicking to remain stable, feel for the water and its pressure are masked by staying afloat and/or finishing the set. Even swimmers with great balance and a solid foundation need to slow stroke down to discover these areas and find that feel for the water.
On the streamline side:
A great aid to feel the water and feel the flow is with the aid of long fins. Long fins will increase speed and magnify pressure areas, areas that may or could be reduced through correcting body position and/or stroke timing. But most importantly you will discover these pressure zones that you might not be aware of swimming without fins. Work on one area at a time, i.e. pressure on the crown of the head, slice in vs flopping arm, pressures on top and bottom of arm at forward extension sliding into the “catch”
On the catch, propulsive side:
1. Start your feel for the water by gently closing your hands in whole stroke, aka “the fist drill”. This removes the pulling palm that wants to take over, and allows you to feel the water on the (palm side of) forearm. The more vertical your arm, the more pressure you will feel – pressure on forearm should remain constant to the belly button. An excellent set is to do is 4×50 (closed to open hand): 1st 50 closed hand, 2nd 50 open (point) index finger, 3rd open index and pinky fingers, 4th open hand using palm but still feeling constant pressure on forearm. Don’t let the palm take over and allow elbow to drop.
2. Swim sets of 3 x 50′s feeling feather-light, medium, and firm pressures on palm and forearm pressing back. Swim the 1st 50 with feather-light pressure, 2nd 50 medium pressure, and 3rd 50 firm pressure. When you get this right SPL (strokes per length) should be slightly higher with light pressure than with firm pressure. For example: A swimmer may swim the first 50 at 18 SPL with feather light pressure, 2nd 50 at 17 SPL with medium pressure, and the 3rd 50 at 16 SPL with firm pressure. If you swam the same SPL with light, medium and firm pressures – then you haven’t discovered this feel for the water yet. Keep trying, you will eventually feel how subtle the differences between light, medium and firm pressures really are. But when you discover/feel feather-light, medium and firm pressures – you will have a whole new sensation of “feel for the water” than you ever had, or thought you had before.
There is so much more to ‘feel for the water’ and flow that is not limited to the hand/arm moving back. You will get far more ‘bang for the buck’ feeling of flow and feel for the water improving the 95% than you will from the 5%, not to mention the 95% is much more engaging and rewarding, both mentally and physically.
The post Feel For The Water appeared first on Total Immersion.
Terry Laughlin's Blog

- Terry Laughlin's profile
- 17 followers

