
Nancy Zieman's Blog, page 68
February 5, 2019
More of Nancy Zieman’s Favorite Scarves to Sew
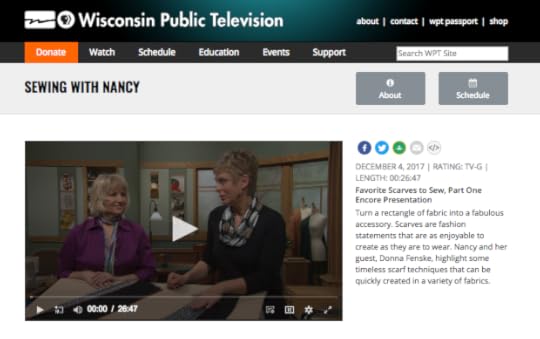
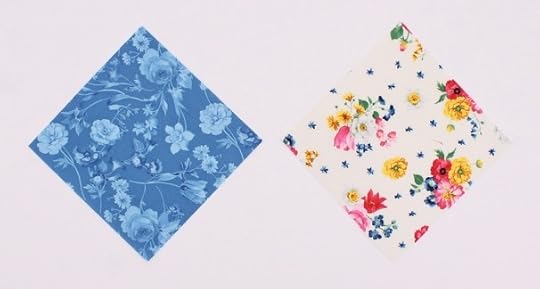
 Over the years, Nancy recorded at least six programs on sewing scarves. Going through the Sewing With Nancy archives and revisiting those techniques reminded us that most scarf styles are timeless. Today Team Nancy Zieman spotlights the second episode of Favorite Scarves to Sew, where you’ll see videos, showcasing scarf techniques that have stood the test of time.

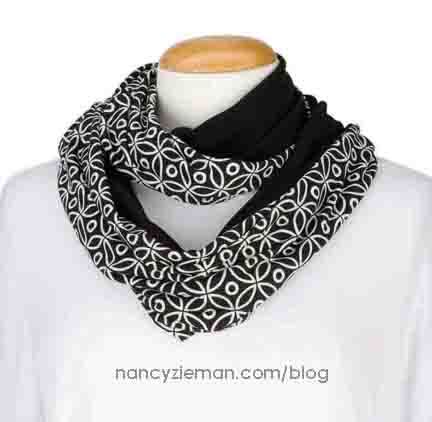
Loop & Tuck Scarf
Whether you’re a newcomer or seasoned viewer of Sewing With Nancy, we’re certain there’s a scarf style that will pique your interest. Let’s start with the Loop & Tuck Scarf. With only a yard of fabric and a little sewing time, you can easily create an accessory that always stays in place. The essential ingredient can be found in the way the pattern is designed; there will be no slipping or sliding of the scarf once it’s looped and tucked!

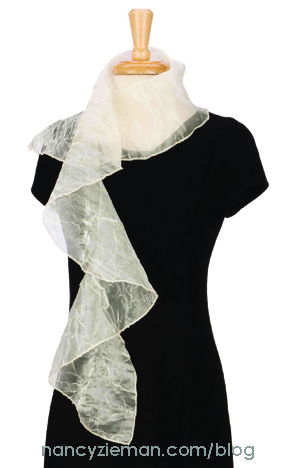
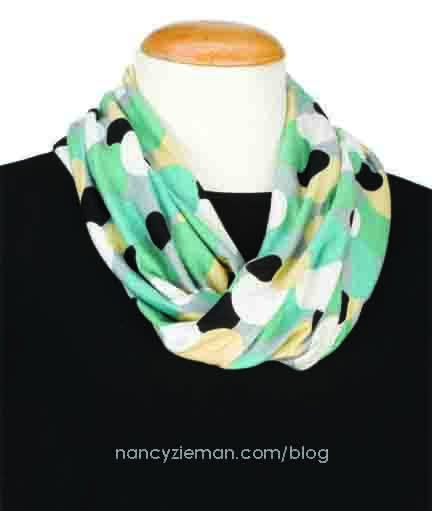
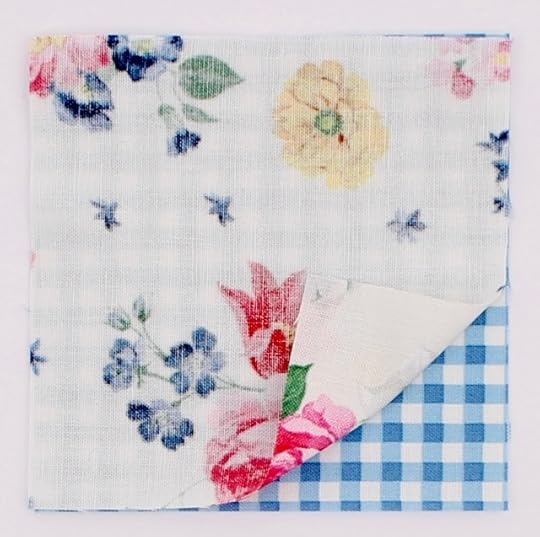
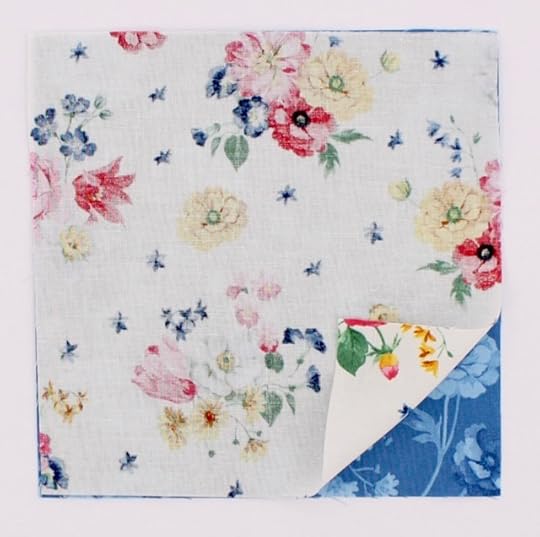
S-Curve Scarf
Different fabrics, different looks—that statement couldn’t be more obvious when looking at these two scarf options. Even though the same pattern was used, the edge finish plus the fabric choice change this scarf from elegant to casual. It’s called an S-Curve Scarf. The scarf pattern pieces resemble two large donut shapes—it must seem odd, but the results are anything but! Wonder how it’s made? Just watch. We think you’ll be surprised!
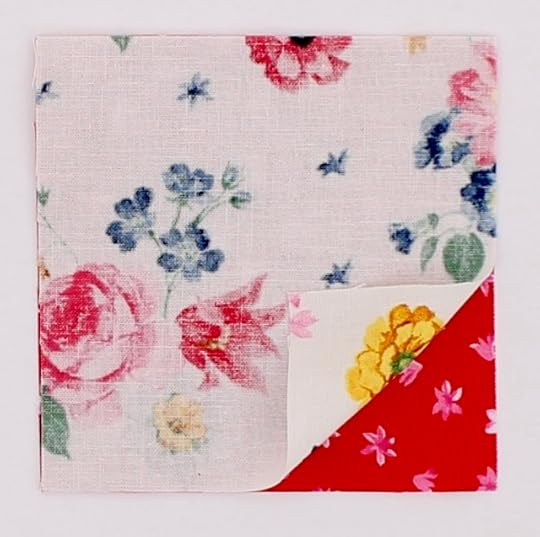
Knot Your Average Scarf
If you’ve been itching to sew, but hesitate because you don’t think you have the time, make a “Knot Your Average Scarf.” In fact, this scarf can be made in a little over an hour.
Featured is a knit version of the scarf in two coordinating colors—you could also select woven fabrics if you’d like. The first step is to sew tubes, and Nancy will show you how to create the knot. Then, a little more sewing and presto, a completed scarf. It’s creativity with instant success!
Convertible-Ride Scarf
On set, Nancy joked, “If I owned a convertible, I’d choose a hot pink number, buy a big floppy hat, and wear this scarf cavalierly around my neck!” She settled for wearing this scarf while driving her mini van. If you’re in need of a mental getaway, choose a pretty print organza, a coordinating solid, and a touch of ribbon. This easy-to-sew scarf has daydreaming possibilities.
Double De-Lite Scarf
If you own a serger, the Double De-Lite Scarf is for you. Choose two compatible lightweight fabrics such as organza or organdy, cut bias strips, serge the edges, and after stacking and sewing the layers together, you’ll find that you’ve created a flowing, graceful neck wrap.
Make it long as featured, or shortened as your taste guides you—you’re the designer, so make it your own. The sewing and serging processes are extremely enjoyable and the finished scarf creates a stunning frame for your face.
Team Nancy Zieman’s goal in presenting clips from previous Sewing With Nancy programs showcasing scarves, is to tell the story that the techniques of sewing scarves are almost timeless yet fulfill our need to be creative.
With instructions for over 40 different scarf variations, find the design that is perfect for your wardrobe. Fleece, rayon batiks, interlock knits, jersey, and homespun—these fabrics, plus many more, are candidates for your next scarf creation. Scarves can be created with a minimum of time and monetary investment. The best part is turning a rectangle of fabric into a fashionable accessory!
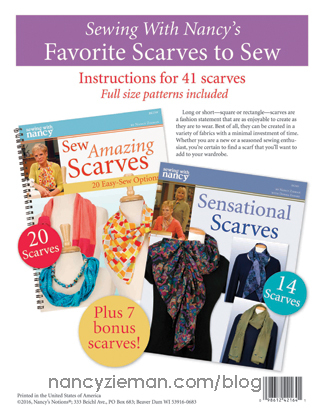 Here’s a sample of what you’ll find in the Favorite Scarves to Sew book:
Infinity Scarf
Cowl Infinity Scarf
Fleece Scarf
Chenille Scarf
Ribbon Scarf
Big Pocket Scarf
Shirred Scarf
Bejeweled Scarf
Pendant Scarf
Embroidered Scarf
Spiral Scarf
Lettuce-Edge S-Curve Scarf
Two-Toned Scarf
Ruffled Scarf
Fringed Scarf
Watch Favorite Scarves to Sew (Part One and Part Two) on Sewing With Nancy online.


For a chance to win a copy of the book, Sewing With Nancy’s Favorite Scarves to Sew from Nancy’s Notions, let us know what scarf you’re planning to sew and freshen up your winter wardrobe.
Happy Sewing,
Team Nancy Zieman
Nancy Zieman Productions, LLC.

Content in this feed is © copyright 2019 by Nancy Zieman Productions, LLC and may not be republished without written permission. You’re welcome to forward the email to a friend or colleague but it’s not okay to add the RSS feed automatically as content on a blog or other website.
The FTC requires us to tell you that Nancy Zieman Productions, LLC has provided products by other companies in the course of doing business. The FTC requires us to advise you to take this information into consideration when reading this posting.
Make sure you are subscribed to Nancy Zieman Productions, LLC enews mailing list so you won’t miss a thing. Sign up here . Join us on Facebook , plus a host of other social media channels. Connect With Nancy and Friends today!


February 4, 2019
2019 National Embroidery Month Stitch-Along Blog Tour and NZP Project Reveal
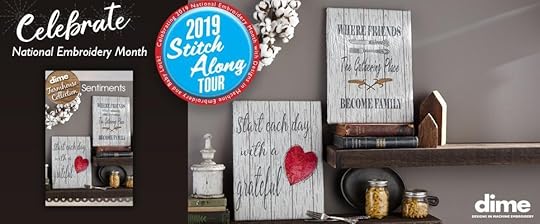

Team Nancy Zieman is pleased to join Baby Lock and Designs in Machine Embroidery (dime) for the 2019 National Embroidery Month Stitch-Along and Blog Tour! Team NZP and 13 additional talented bloggers received a set of the Farmhouse Collection—Sentiments, “Gather” and “Grateful” from dime. The Farmhouse Collection—Sentiments, “Gather” and “Grateful” are 20″ x 38″ pre-printed fabric panels that may be adorned with one or more of 10 embroidery designs—created by embroidery expert Eileen Roche. Each panel can be quilted with the included woodgrain quilting designs and/or embellished—in any fashion you’d like!
Follow along with the 2019 National Embroidery Month Stitch-Along and Blog Tour! The Tour begins today! View the Stitch Along Blog Tour Listing over at Eileen’s Machine Embroidery Blog! There will be prizes given away on each participant’s blog as well as beautiful inspiration on how to use Eileen’s newest collection, The Farmhouse Collection— Sentiments, “Gather” and “Grateful.”
Take a look at the schedule and be sure to mark your calendars! And, comment below for a chance to win your very own The Farmhouse Collection—Sentiments, “Gather” and “Grateful!”
New! Farmhouse Collection—Sentiments, “Gather” and “Grateful”
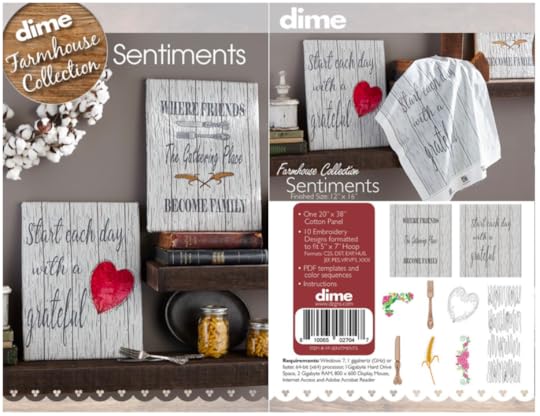
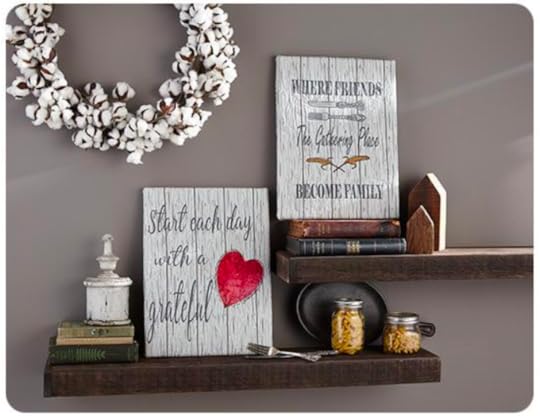
The Farmhouse Collection—Sentiments, “Gather” and “Grateful” package includes two 20″ x 38″ pre-printed fabric panels.
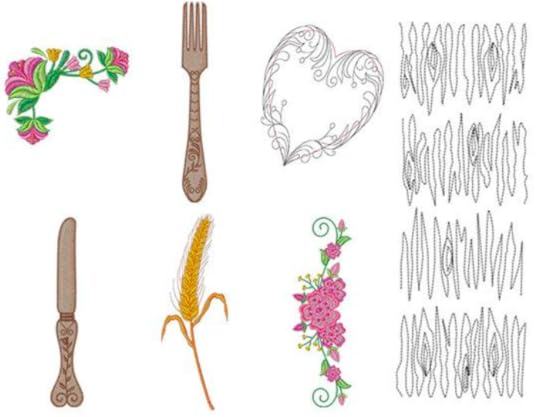
The Farmhouse Collection—Sentiments, “Gather” and “Grateful” includes 10 embroidery designs (sized to fit 5″ x 7″ hoops) including two floral motifs, fork, knife, wheat sprig, four woodgrain quilting designs, and a heart motif to embellish your fabric panels in any fashion you’d like!
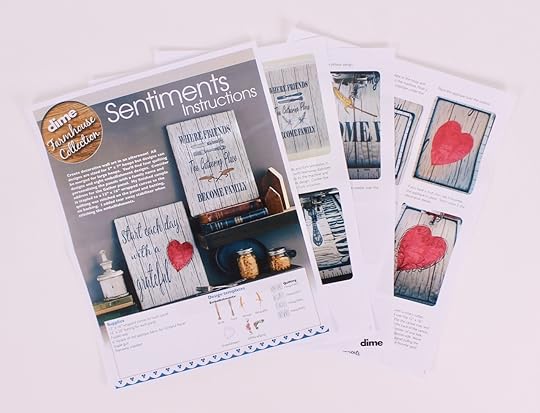
The Farmhouse Collection—Sentiments, “Gather” and “Grateful” includes printable templates and instructions!
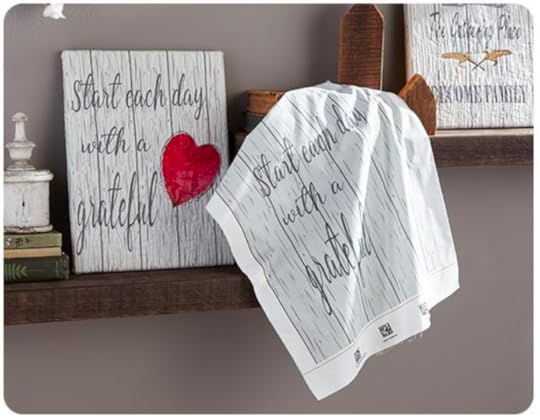
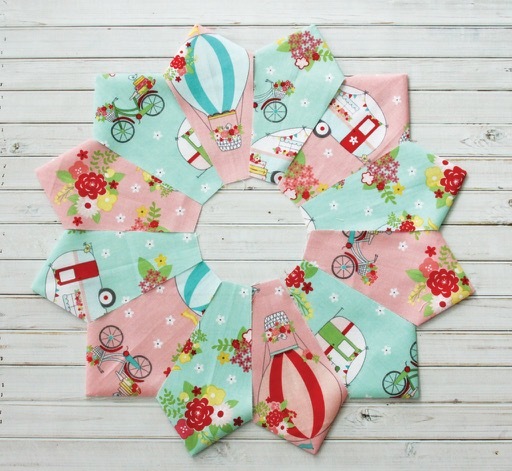
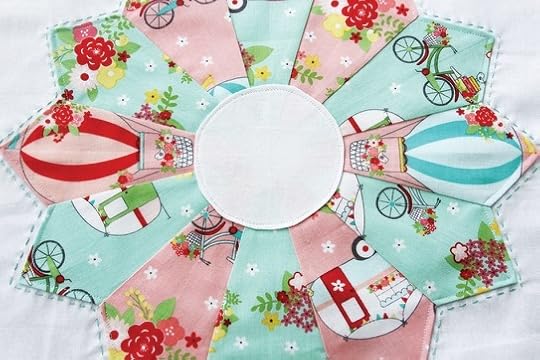
Grateful Heart Wall Hanging Tutorial
by Deanna Springer and the Nancy Zieman Team
Approximate finished size: 29-1/2″ x 26″
When Eileen Roche at Designs in Machine Embroidery (dime) invited Team NZP to participate in the 2019 National Embroidery Month Stitch-Along and Blog Tour, we knew exactly what we’d create with Eileen’s New! Farmhouse Collection—Sentiments, “Gather” and “Grateful!” We selected two of our favorite Nancy Zieman’s Farmhouse Floral Fabrics and designed a quilted wall hanging stitched with our Baby Lock Destiny II.
Grateful Heart Wall Hanging Supplies
New! Farmhouse Collection—Sentiments, “Gather” and “Grateful”
1 yd. NZP’s Farmhouse Floral Red Shiplap for heart appliqué inner borders and binding
5/8 yd. NZP’s Farmhouse Floral Blue Floral for outer borders
3/4 yd. fabric for quilt backing
3/4 yd. Pellon Fleece Batting
Pellon Lite EZ-Steam II Fusible Web
Helpful Notions:
Madeira Rayon Embroidery Thread
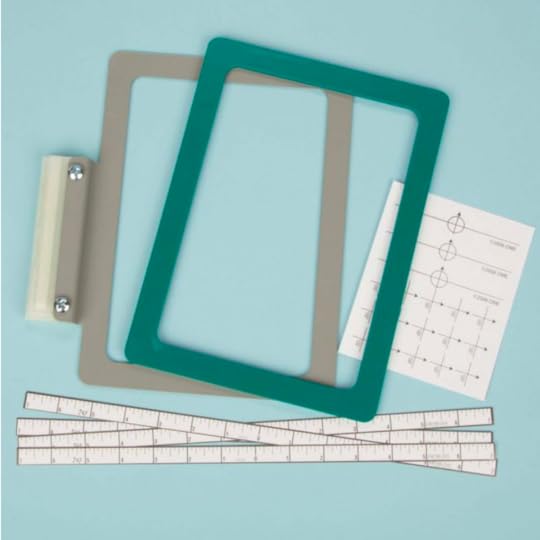
The Ultimate Quilt ’n Stitch Presser Foot
Prepare Heart Appliqué
Following Eileen’s instructions for the New! Farmhouse Collection—Sentiments, “Gather” and “Grateful,” apply Pellon Lite EZ-Steam II Fusible Web to the wrong side of 11″ x 14″ Red Shiplap appliqué fabric. Hoop the prepared appliqué fabric in a 5″ x 7″ hoop, and attach to your machine.

Be sure to leave paper backing applied to wrong side when hooping the prepared appliqué fabric. The paper backing will act as an embroidery stabilizer!

Select and stitch color change one of the Grateful Heart appliqué shape. Remove hoop from machine and remove stitched fabric from hoop.


Cut out heart shaped appliqué on the stitched line, slicing right into the stitched line.


This Grateful Heart Wall Hanging project is the perfect project to stitch with Eileen’s Monster Snap Hoop!
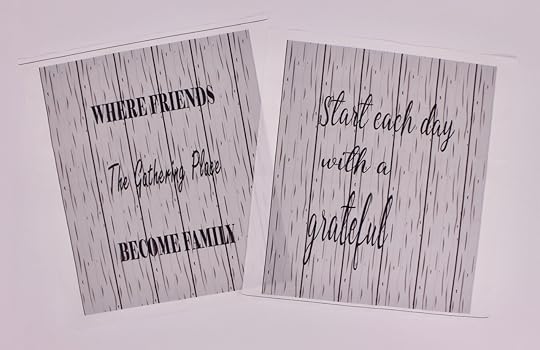
Print, cut out, and place the Grateful Heart paper template on the pre-printed Farmhouse “Grateful” fabric panel . “Nest” the heart embroidery placement close to the printed text. Center template within hoop. Attach hoop to machine. Float a piece of tear-away stabilizer under the hoop. Align the needle with the template’s crosshair. Verify the template is square in the hoop and remove the template. Stitch thread color two, the placement guide.


Remove hoop from machine. However, be sure to keep fabric within the hoop for the next few steps!

Remove paper backing from the heart appliqué, and center the appliqué within the stitched outline. Press.
The Clover Wedge Iron fits within the hoop for ease in pressing the appliqué in place!

Reattach hoop to machine. Stitch thread color three, the decorative details!


Remove panel from hoop. Cut away, or tear away excess stabilizer.


Add Inner Borders
Cut two 1-1/2″ crosswise strips of Red Shiplap fabric.

Measure the length of panel sides.
Subcut two 1-1/2” wide strips the length determined above for side borders.
Align inner border strips with long edges of panel, right sides together. Pin and stitch.


Press seams flat then press seams toward borders.

Measure the top and bottom of the quilt top. Cut two 1-1/2″ border strips that length.
Align the inner border strips with the top and bottom of the quilt top, right sides together. Pin and Stitch.

Press seams flat; then press seams toward borders.

Add Outer Borders
Cut four 4-1/2″ crosswise strips from Blue Floral.

Measure the length of the quilt top sides.
Subcut two 4-1/2″ wide strips the length determined above for side borders.
Align the inner borders with the long edges of the quilt top, right sides together. Pin and stitch.

Press seams flat then press seams toward borders.
Measure the top and bottom of the quilt top. Cut two 4-1/2″ border strips that length.
Align the inner border strips with the top and bottom of the quilt top, right sides together. Pin and stitch.

Press seams flat; then press seams toward borders.
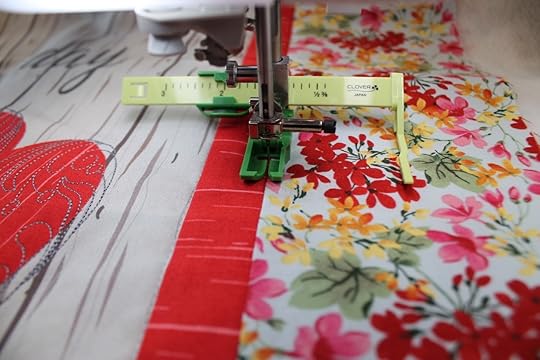
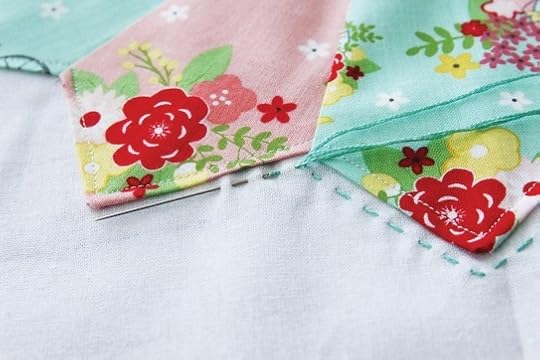
Layer, Quilt, and Bind
Layer finished quilt top on batting and backing fabric. Machine quilt layers using the four woodgrain quilting embroidery designs included with The Farmhouse Collection—Sentiments, “Gather” and “Grateful.” And/or, use your favorite quilting techniques.
Edgestitch quilt layers around four outside edges with a scant 1/4″ basting stitch.
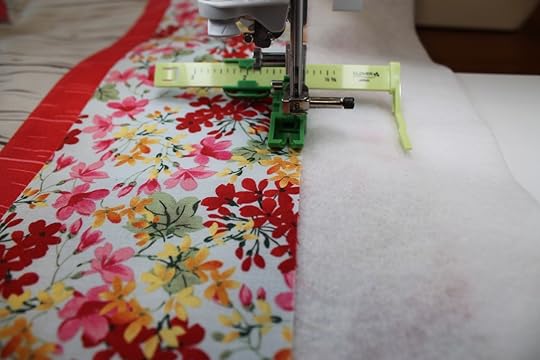
We used NZP’s Ultimate Quilt ’n Stitch Presser Foot—from Clover to “stitch in the ditch” and machine quilt layers together. This all-new presser foot features a built in stitch alignment ruler for guiding rows of parallel stitching. We set the alignment ruler at 1″—to guide along the inner border!
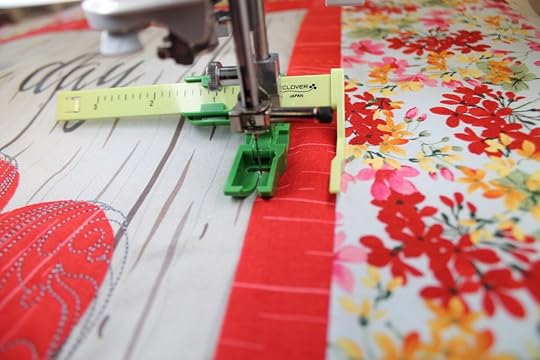
When not in use, stitch alignment guide acts as a “third hand”—for smoothing layers (below).
Bind quilt using your favorite binding technique, or try our French Twist Binding technique, below!

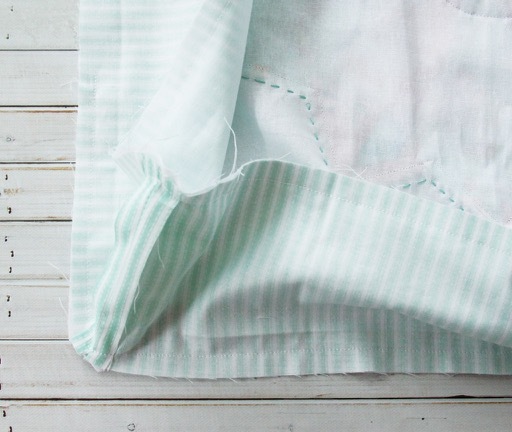
Adding a French Twist Binding
Finish the raw edges of the quilt by binding the edges. This French Twist Binding technique, developed by Gretchen Hudock, is a time saver. It not only finishes the edges; it also creates a rod pocket for hanging the quilt!
Prepare the binding
Cut three 5″ crosswise strips from Red Shiplap fabric. Length should equal the outer measurement of the quilt plus several additional inches for joining strips.

Join strips to create a continuous binding: Overlap two strips and create a right angle, having selvages extend beyond each edge. This overlap helps identify beginning and ending points for stitching.

Mark a diagonal stitching line from corner to corner on outside edges.

Stitch along the marked line; trim and press open seam. Trim small triangles which extend beyond the edges of the strip.

Trim off a 45-degree angle at the beginning edge of the binding, using a quilting ruler and rotary cutter.
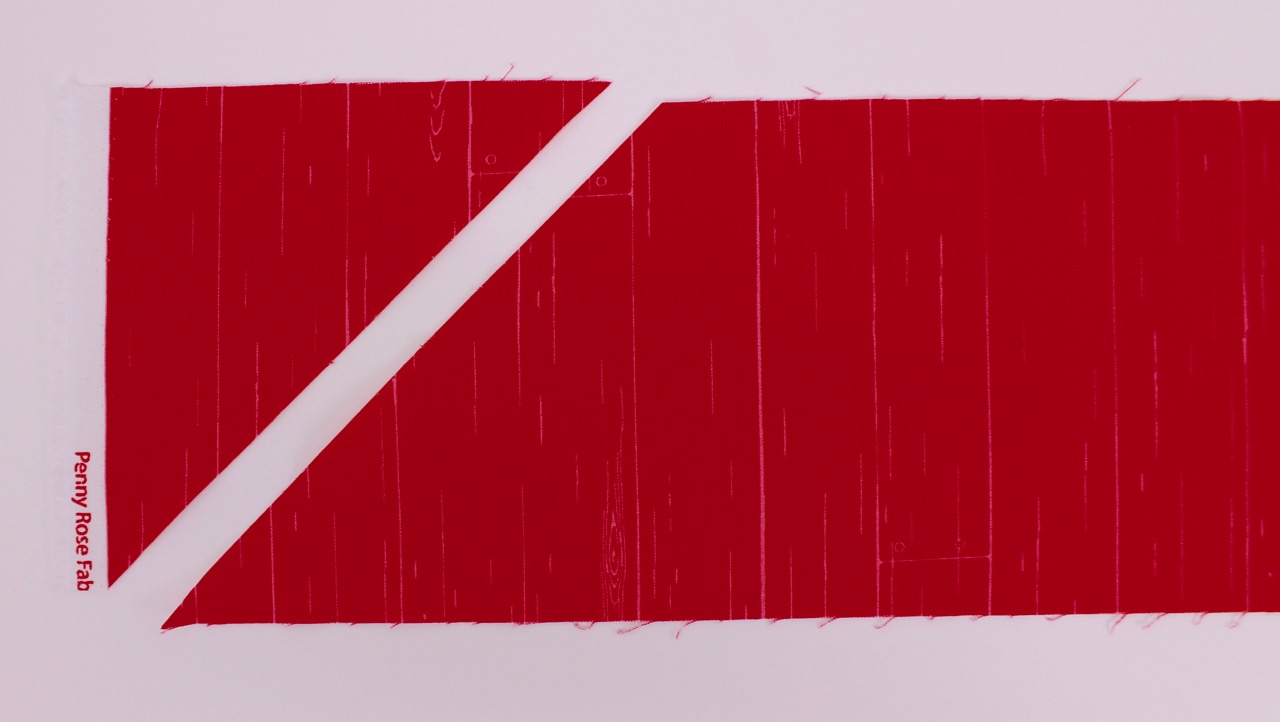
Fold the binding, meeting wrong sides of the lengthwise edges, forming a 2 1/2″ strip. Press.

Stitch the binding to the quilt
Pin raw edges of binding to raw edges of one side of the quilt, meeting right sides and starting two-thirds of the way along one side.
Place a pin in the binding 1/4″ from the next corner of the quilt.

Stitch binding to quilt using a 1/4″ seam allowance, starting about six inches from the end of the binding and stopping at the pin. Backstitch to secure threads.
Remove quilt from the machine; fold binding back forming a 45 degree angle, with outer edges of strip aligned with adjacent cut edge of quilt.

Next, fold the binding down, aligning the fold with the top of the first side of the quilt and the lengthwise edge with the adjoining cut edge.

Pin binding to the next edge of the quilt, beginning at the fold and placing a pin 1/4″ from the next corner.
Begin stitching at the fold and stitch to the 1/4″ pin mark. Backstitch.
Repeat with remaining corners and sides.

Join the ends of the binding
Stop stitching at least 8″ from the beginning stitching point.

Overlap bindings. Trim any excess, making certain bindings overlap approximately 2″.
Place beginning binding inside ending binding.
Using pins, mark starting and ending points on ending strip.

Open binding and draw a diagonal line between pin marks. Draw a second line toward the cut edge, 1/2″ away from the first line. This provides for a 1/4″ seam allowance in joining the strips.

Trim away the excess fabric.

Meet binding ends, right sides together, offsetting them 1/4″. Stitch; press seam open.


Refold binding. Finish stitching binding in place.

Complete the binding and rod pocket
Press the binding away from the quilt.
Fold the binding on the two side edges of the back of the quilt, wrapping binding around the seam allowances; pin.

Fold top and bottom bindings to the back; pin.


Tuck the corners to form miters.
Stitch in the ditch, sewing along the seamline on the front of the quilt where the binding joins the quilt.
Hand stitch remaining edge of the binding to the back of the quilt, sewing side edges first. Then stitch top and bottom edges, forming a rod pocket.


Follow along the 2019 National Embroidery Month Stitch-Along and Blog Tour! The Tour begins today! View the Stitch Along Blog Tour Listing over at Eileen’s Machine Embroidery Blog! There will be prizes given away on each participant’s blog as well as beautiful inspiration on how to use Eileen’s newest collection, The Farmhouse Collection—Sentiments, “Gather” and “Grateful.”
Take a look at the schedule and be sure to mark your calendars! And comment below for a chance to win your very own The Farmhouse Collection—Sentiments, “Gather” and “Grateful!”

For a chance to win your very own Farmhouse Collection—Sentiments, “Gather” and “Grateful!” from dime, please leave a comment below sharing your creative ideas for the Farmhouse Sentiments panels!
Happy Machine Embroidery Month!
Deanna Springer and The Nancy Zieman Team
Nancy Zieman Productions, LLC.
Content in this feed is © copyright 2019 by Nancy Zieman Productions, LLC and may not be republished without written permission. You’re welcome to forward the email to a friend or colleague but it’s not okay to add the RSS feed automatically as content on a blog or other website.
The FTC requires us to tell you that Nancy Zieman Productions, LLC has provided products by other companies in the course of doing business. The FTC requires us to advise you to take this information into consideration when reading this posting.
Make sure you are subscribed to Nancy Zieman Productions, LLC enews mailing list so you won’t miss a thing. Sign up here . Join us on Facebook , plus a host of other social media channels. Connect With Nancy and Friends today!
February 2, 2019
NEW! Afternoon Picnic Fabric and Pattern by Team Nancy Zieman

Afternoon Picnic
Dreamy thoughts of warm summer afternoons are the inspiration for Nancy Zieman’s gorgeous NEW! fabric collection. Pretty pale prints honor delicate blooming flowers that arrive only in the warm sunny days of summer. A sprinkling of flower petals adorns soft floral coordinates. Tonal prints read as solids yet showcase floral elegance. Subtle placement of a few white dots brings playfulness while black floral prints add drama. The addition of gingham prints are the perfect compliment and add a playfulness to this sweet floral collection. Enjoy a relaxing afternoon picnic on a warm sunny day while surrounded by the beauty and splendor of summer’s delicate blooms.

Introducing the NEW! Afternoon Picnic Fabric Collection—A beautiful new floral fabric collection from Nancy Zieman Productions, LLC and Riley Blake Designs. Nancy very much enjoyed designing this new fabric line featuring 16 pretty floral prints plus three fresh gingham prints in shades of blues, reds, pinks, yellows, and black. All fabrics are 100% Cotton.
What will you make with NEW! Afternoon Picnic Fabric Collection? If you don’t have a project in mind, jump onto NZP’s FREE 2019 Block of the Month Program. Complete block sewing tutorials release on the third Saturday of each month. The program is absolutely free and there’s no need to RSVP. Simply, sign up for the NZP E-news and the directions are delivered straight to your email inbox.

A few months ago, Team NZP designed four beautiful quilt designs to showcase our NEW! Afternoon Picnic Fabric Collection by Nancy Zieman. Designers often work months in advance for big releases. Take a peek! We’re pleased to introduce you to the beautiful new NEW! Afternoon Picnic Quilt Pattern and Fabric Line!
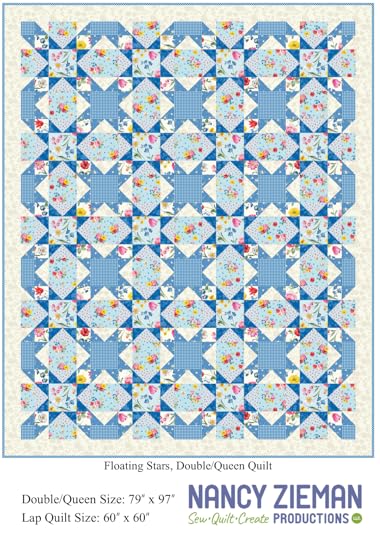
Afternoon Picnic Quilt Pattern Includes 4 NEW! Quilt Designs
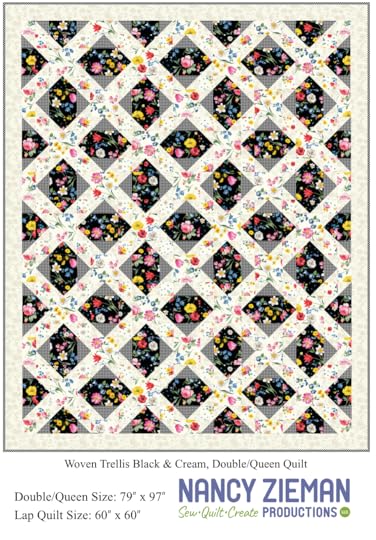
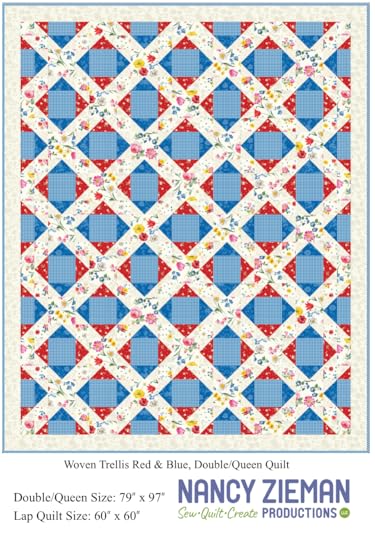
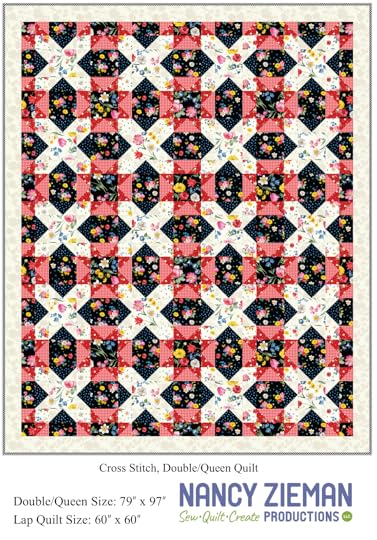
The NEW! Afternoon Picnic Quilt Pattern features simple half-square blocks that create sweet and traditional one-block quilt patterns. Change up fabric placement and make completely different quilt designs—all from the same 18-inch block!
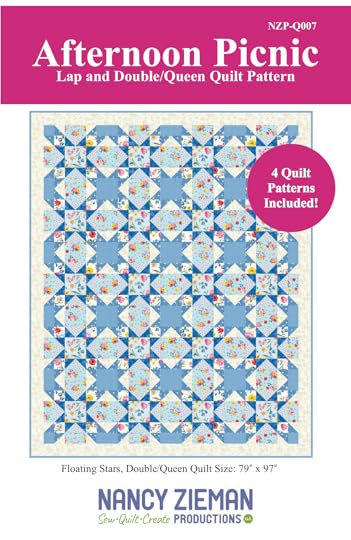
Afternoon Picnic Floating Stars
Woven Trellis Black & Cream
Woven Trellis Red & Blue
Cross Stitch
Team NZP’s easy directions and step-by-step techniques are included within the NEW! Afternoon Picnic Quilt Pattern!
For more sewing inspiration, watch Sewing With Nancy online and on any TV.
 For a chance to win Nancy Zieman’s NEW! Afternoon Picnic Quilt Pattern and Afternoon Picnic Fat Quarter Pack please leave a comment below letting us know which quilt design you’d like to make!

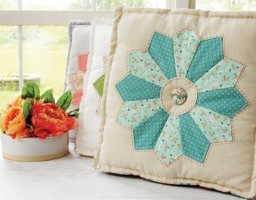
The randomly selected winner of a copy of the NEW! Vintage Home Sewing book from Nancy’s Notions is Jane E. Todd.
Her comment is: LOVE the Dresden pillows…perfect for my bedroom!!
Happy Quilting,
Team Nancy Zieman
Nancy Zieman Productions, LLC.
Content in this feed is © copyright 2019 by Nancy Zieman Productions, LLC and may not be republished without written permission. You’re welcome to forward the email to a friend or colleague but it’s not okay to add the RSS feed automatically as content on a blog or other website.
The FTC requires us to tell you that Nancy Zieman Productions, LLC has provided products by other companies in the course of doing business. The FTC requires us to advise you to take this information into consideration when reading this posting.
Make sure you are subscribed to Nancy Zieman Productions, LLC enews mailing list so you won’t miss a thing. Sign up here . Join us on Facebook , plus a host of other social media channels. Connect With Nancy and Friends today!
January 31, 2019
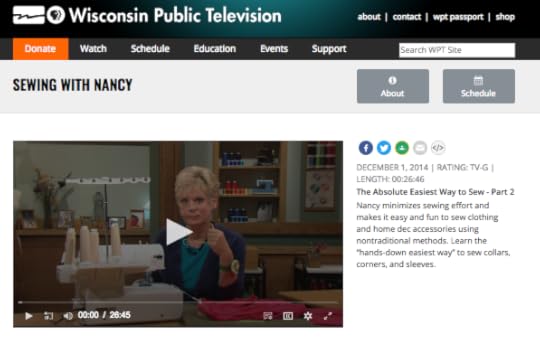
Sew an Invisible Zipper the Absolute Easiest Way

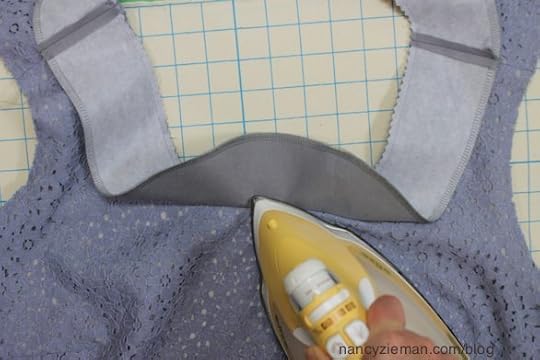
Sew it simple. Sew to have fun. How? It’s straightforward after you learn The Absolute Easiest Way to Sew! This time, learn how to insert an invisible zipper. To seamlessly—pun intended—insert an invisible zipper into the seam use this modified approach, attaching the facing before sewing the zipper. It’s a new approach and one of Nancy Zieman’s absolute easiest sewing tips.
How to Insert an Invisible Zipper
Stitch the shoulder seams of the top or dress.
Fuse interfacing to the front and back neckline facing fabrics.
Stitch the shoulder seams of the facing pieces.
Do not stitch the center back seam at this point.
Align the facing to the garment, right sides together, matching notches.
Stitch the facing to the neckline.

Grade the seam allowances, using a pinking blade with a rotary cutter for the fastest and easiest results.

Press the seam allowances toward the facing.
Understitch, stitching the seam allowances to the facing. Use a multizigzag.

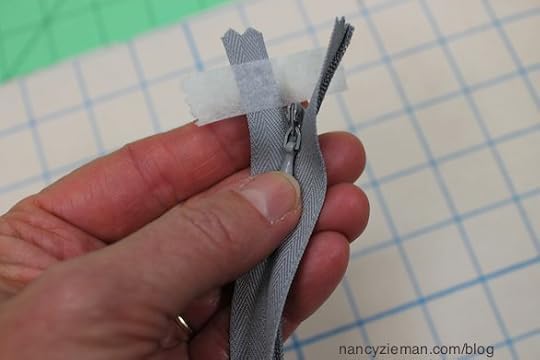
Flatten out the zipper tape, pressing the teeth to the outside.
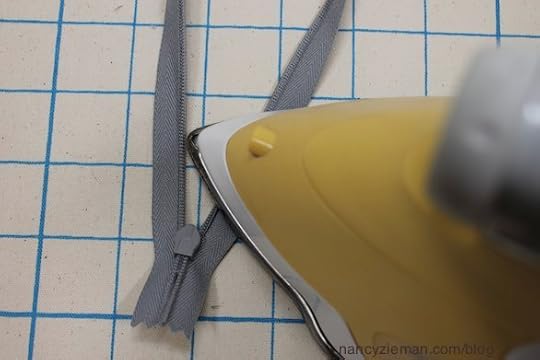
Place a piece of tape or a pin above the zipper stop on one side of the zipper.
Mark the 5/8″ seam allowances along both sides of the center back seam. Begin marking at the neckline seam, and continue marking the length of the zipper opening.
Align one side of the zipper tape to the corresponding side of the dress, meeting the zipper teeth to the 5/8″ marking and placing the zipper top slightly below the neckline seam.
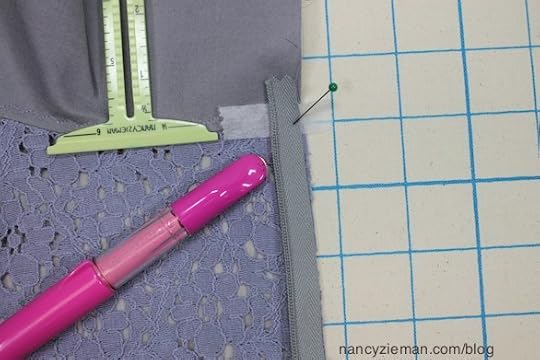
Pin one side of the zipper to the fabric.
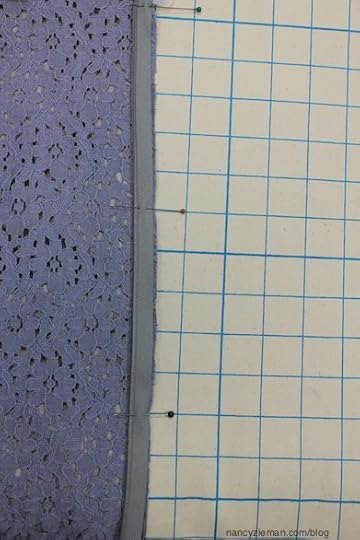
Attach the I nvisible Zipper Foot . Starting at the neckline seam, position the presser foot on top of the zipper tape with the needle stitching along side of the zipper teeth.
After stitching, close the zipper to check that the zipper stop is directly below the neckline seam.
Align the second half of the zipper at the top of the neckline, placing the remaining side of the zipper at the same distance from the top of the neckline.
Align the zipper teeth to the marking; pin. Then, stitch the zipper to the remaining side of the dress/top.

After stitching, check to make certain the neckline edges align.
Fold the facing over the zipper tape; hand stitch.

Pin the lower portion of the seam from the hem to the end of the zipper.
Move the invisible zipper foot completely to the left of the needle. Stitch from the zipper stopping point to the hem.

Ta dah!

The Invisible Zipper technique, plus much more is printed in The Absolute Easiest Way to Sew.

Kudos to Diane Dhein, the editor, and Laure Noe, the illustrator, for making this book possible.
All of Nancy’s favorite sewing tips are in one book.
The Absolute Easiest Way to Sew chapters include:
Sewing Notions
Sewing Machine Confidence
Serger Spotlight
Patterns
Fabric Facts
Sewing Basics
Beyond the Basics

Watch Absolute Easiest Way to Sew (Part One, Part Two, and Part Three) on Sewing With Nancy online.
For your chance to win a copy of The Absolute Easiest Way to Sew from Nancy’s Notions, leave a comment sharing your most common sewing challenge.
Happy Sewing,
Team Nancy Zieman
Nancy Zieman Productions, LLC.
Content in this feed is © copyright 2019 by Nancy Zieman Productions, LLC and may not be republished without written permission. You’re welcome to forward the email to a friend or colleague but it’s not okay to add the RSS feed automatically as content on a blog or other website.
The FTC requires us to tell you that Nancy Zieman Productions, LLC has provided products by other companies in the course of doing business. The FTC requires us to advise you to take this information into consideration when reading this posting.
Make sure you are subscribed to Nancy Zieman Productions, LLC enews mailing list so you won’t miss a thing. Sign up here . Join us on Facebook , plus a host of other social media channels. Connect With Nancy and Friends today!
January 29, 2019
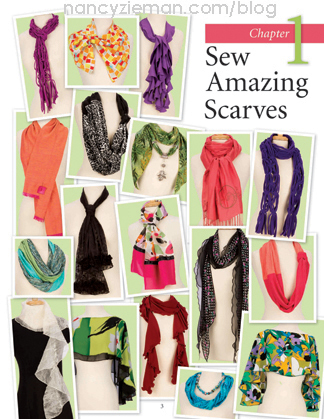
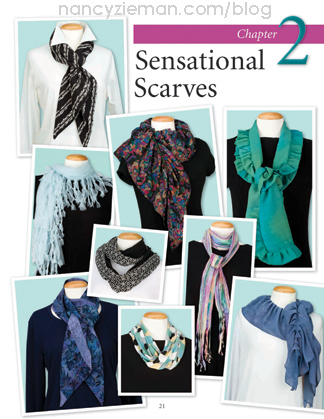
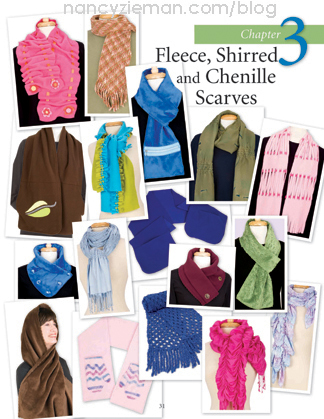
Nancy Zieman’s Favorite Scarves to Sew
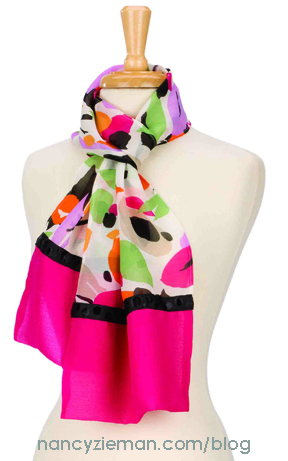
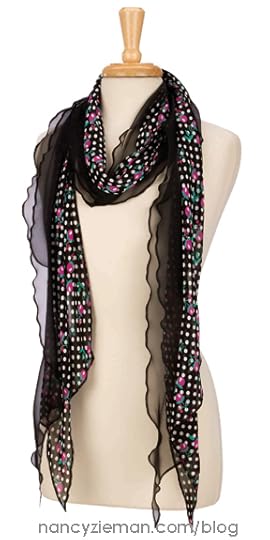
 Sew a Scarf in an evening or less! Long or short—square or rectangle—scarves are fashion statements that are as enjoyable to create, as they are to wear. Best of all, they can be created in a variety of fabrics and a minimal investment of time.
Throughout the seasons of Sewing With Nancy, you’ve seen Nancy demonstrate an array of scarf options. During this new two-part series, Favorite Scarves to Sew, Nancy Zieman Productions, LLC selected a few favorite episodes that feature Nancy’s favorite scarf techniques.
 The first scarf feature was—hands down—Nancy’s most favored scarf technique—the spiral scarf. Donna Fenske, one of the Sewing With Nancy designers, joins Nancy during this first episode. They begin with a long strip, make an important fold, and then sew. Magically the scarf turns from a long rectangle into a bias tube. Use rayon batiks for this technique; the fabric gracefully drapes around the neckline. The sewing description may seem contrary to logic, but with a little sewing savvy a crosswise length of fabric easily turns into a bias scarf.
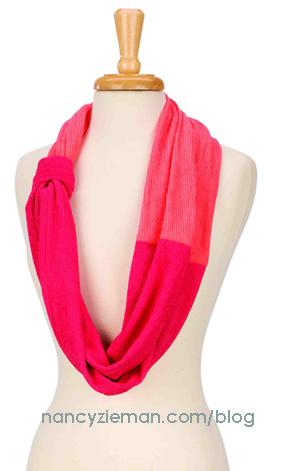
Knits are the fabrics of choice when creating a continuous looped scarf. Like infinity rings or bracelets, the design cleverly includes one twist to give the scarf great shape and style. During this segment from the past, learn the secret to turning a tube into an infinite continuous loop. You’ll also learn how to create a two-toned version, as featured, or a one-color option—it will be easy to stitch-up a wardrobe of scarves.
The next scarf featured is the Chenille Scarf—first showcased in 2005, but it is as important of a style today as it was when initially introduced. Select a little over a yard of fabric, creatively cut into strips, stack the layers, stitch rows down the center, and then cut. After washing and drying, the fabric blooms and the boutique-style scarf is ready to wear.
 The last scarf project of this episode features the ever-popular polyester fleece. Donna Fenske again joins Nancy to share how a fleece scarf is something you can make for the kids in your life or a project that you can sew in tandem. The scarf is functional while sporting a unique pocket shape that showcases felting accents. You’ll soon see that the felting step is a perfect how-to project for any age. It’s another favorite scarf projects that is a palette for creativity.
With instructions for over 40 different scarf variations, find the design that is perfect for your wardrobe. Fleece, rayon batiks, interlock knits, jersey, and homespun—these fabrics plus many more are candidates for your next scarf creation. Scarves can be created with a minimum of time and monetary investment. The best part is turning a rectangle of fabric into a fashionable accessory!
Here’s a sample of what you’ll find in the Favorite Scarves to Sew book:
Infinity Scarf
Cowl Infinity Scarf
Fleece Scarf
Chenille Scarf
Ribbon Scarf
Big Pocket Scarf
Shirred Scarf
Bejeweled Scarf
Pendant Scarf
Embroidered Scarf
Spiral Scarf
Lettuce-Edge S-Curve Scarf
Two-Toned Scarf
Ruffled Scarf
Fringed Scarf
Watch Favorite Scarves to Sew (Part One and Part Two) on Sewing With Nancy online.
For a chance to win a copy of the book, Sewing With Nancy’s Favorite Scarves to Sew from Nancy’s Notions, let us know what scarf you’re planning to sew to freshen up your winter wardrobe.
The randomly selected winner of a copy of The Best Sweatshirt Makeovers book, is Jennifer Mead.
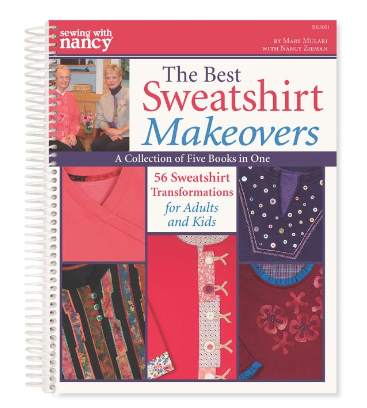
Her comment is: The denim do-over is my absolute favorite project, although I love them all.
Happy Sewing,
Team Nancy Zieman
Nancy Zieman Productions. LLC.
Content in this feed is © copyright 2019 by Nancy Zieman Productions, LLC and may not be republished without written permission. You’re welcome to forward the email to a friend or colleague but it’s not okay to add the RSS feed automatically as content on a blog or other website.
The FTC requires us to tell you that Nancy Zieman Productions, LLC has provided products by other companies in the course of doing business. The FTC requires us to advise you to take this information into consideration when reading this posting.
Make sure you are subscribed to Nancy Zieman Productions, LLC enews mailing list so you won’t miss a thing. Sign up here . Join us on Facebook , plus a host of other social media channels. Connect With Nancy and Friends today!
January 26, 2019
Nancy Zieman Original Giclée Canvas Landscape Art Prints
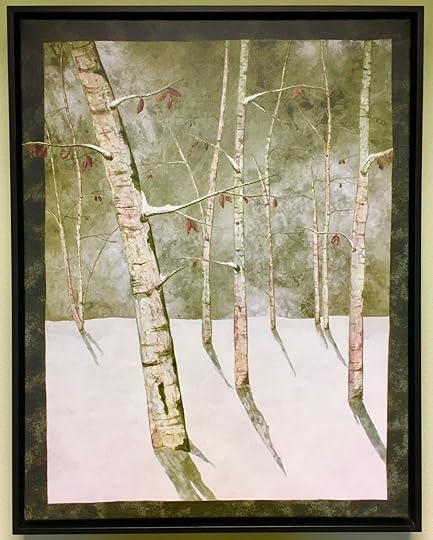
Now Available! Original Framed Giclée Canvas Print Reproduction of Artwork by Nancy Zieman, using only the highest quality Giclée printing techniques.
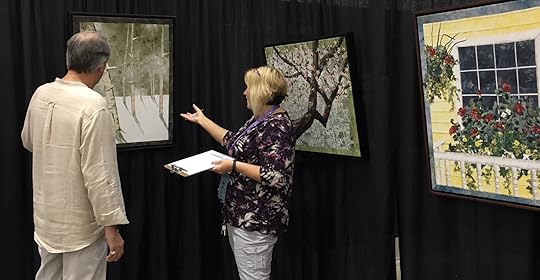
Now you can have your very own Landscape Quilt Art Print by Nancy Zieman—enjoy in your home or give as a gift.
Moon Lit Birches – 31″ x 24″ $239
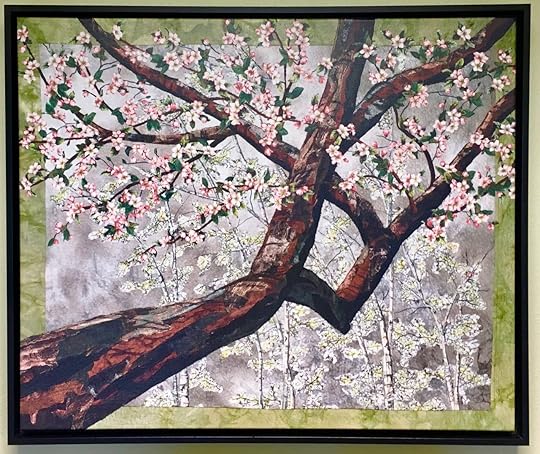
Out on a Limb – 25″ x 30″ $239
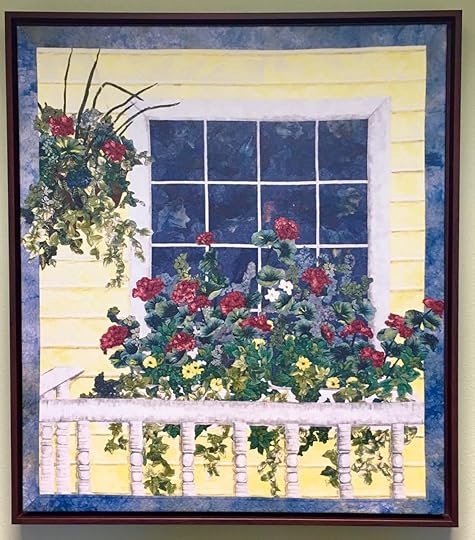
Front Porch – 31″ x 27″ $249
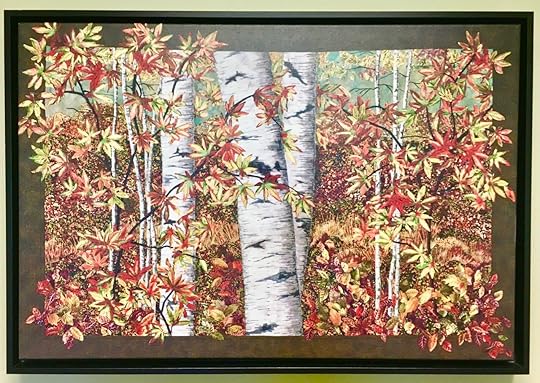
Peak Color – 21″ x 31″ $229
To purchase your Landscape Quilt Canvas Print Reproduction of Landscape Quilt Artwork by Nancy Zieman, please mail the completed order form and check or money order to Nancy Zieman Productions, LLC.
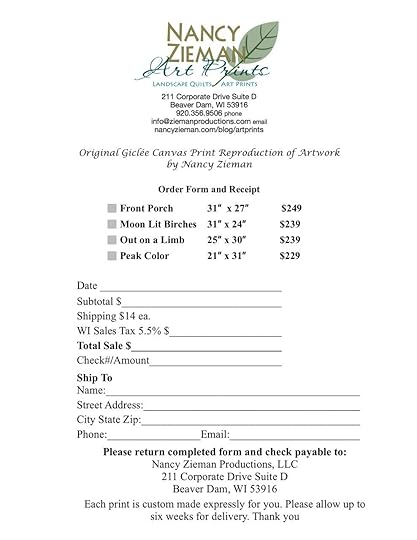
Print the Order Form—and Order Today!
You will receive a certificate of authenticity with each purchase of Original Giclée Canvas Print Reproduction of Artwork by Nancy Zieman.

Each print is made expressly for you. Please allow up to six weeks for delivery.

For a chance to win a set of eight Landscape Quilt Note Cards by Nancy Zieman, please leave a comment below and tell us which Original Giclée Canvas Print Reproduction of Artwork by Nancy Zieman is your favorite.


The randomly selected winner of the Nancy Zieman’s NEW! Afternoon Picnic Fat Quarter Pack is Julie Kopp.
Her comment is: Using your great instructions, I started and finished the first block of this quilt. It went together very easily and looks like the picture. I’m looking forward to the block next month.
Happy Sewing,
Team Nancy Zieman
Nancy Zieman Productions. LLC.
Content in this feed is © copyright 2018 by Nancy Zieman Productions, LLC and may not be republished without written permission. You’re welcome to forward the email to a friend or colleague but it’s not okay to add the RSS feed automatically as content on a blog or other website.
The FTC requires us to tell you that Nancy Zieman Productions, LLC has provided products by other companies in the course of doing business. The FTC requires us to advise you to take this information into consideration when reading this posting.
Make sure you are subscribed to Nancy Zieman Productions, LLC enews mailing list so you won’t miss a thing. Sign up here . Join us on Facebook , plus a host of other social media channels. Connect With Nancy and Friends today!
January 25, 2019
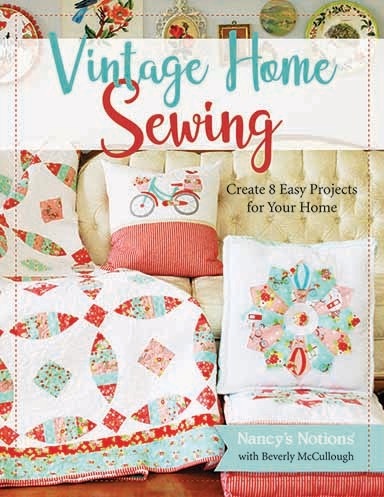
NEW! Vintage Home Sewing Book and Blog Hop
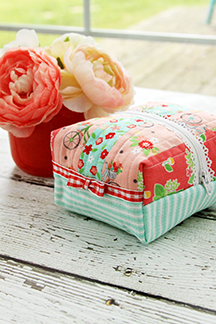
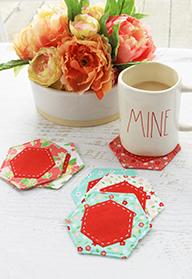
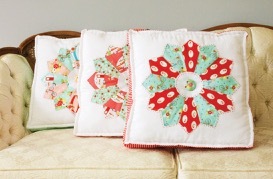
It’s a fun day here at Nancy Zieman Productions! We’re excited to be part of The Vintage Home Sewing Book Blog Hop hosted by our friend Bev McCullough over at Flamingo Toes. Bev’s NEW! Vintage Home Sewing book from Nancy’s Notions features a colorful collection of eight vintage-inspired projects to sew for your home.
View all eight vintage-inspired projects from the NEW! Vintage Home Sewing book over at the Nancy’s Notions web site!
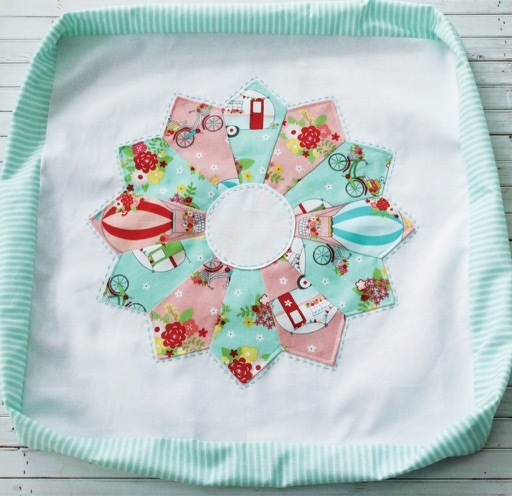
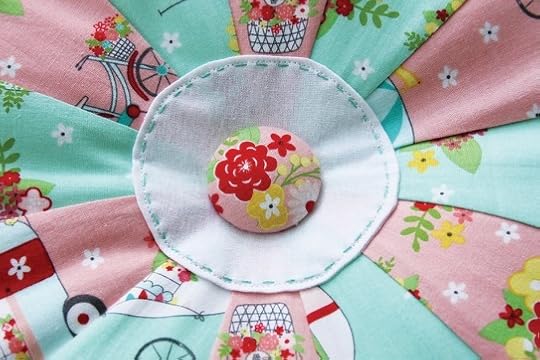
All eight projects are beautifully laid out in this soft-cover 44 page book. Bev’s Colorful Dresden Floor Pillows, on page 17, especially caught Team NZP’s attention! These sweet Dresden floor pillows look complicated, but they are quick and easy to make with Bev’s easy directions. Nancy Zieman’s Trace ’n Create Dresden Template from Clover is the perfect tool for this project.
Plus the step by step photography in the NEW! Vintage Home Sewing book from Nancy’s Notions is beautiful!

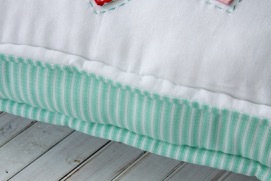
BONUS! All the projects are sewn and shown in the book in two colorways! One set is made in Bev’s bright red/pink/aqua fabric collection, Vintage Adventure from Riley Blake Fabrics. The second set of projects are sewn in a more muted/farmhouse style fabric collection. It’s fun to see Bev’s eight vintage-inspired projects take on new looks in the NEW! Vintage Home Sewing book from Nancy’s Notions.
Team NZP is enjoying Bev’s beautiful book of sewing projects. We know you’ll enjoy it, too. Thank you Bev for including The Nancy Zieman Blog in The Vintage Home Sewing Book Blog Hop!

For a chance to win a copy of the NEW! Vintage Home Sewing book from Nancy’s Notions please view Bev’s project photos over at the Nancy’s Notions site, then leave a comment below sharing which of the eight vintage-inspired projects you’d sew for your home, or for a gift!
Happy Sewing,
Team Nancy Zieman
Nancy Zieman Productions, LLC.
Content in this feed is © copyright 2019 by Nancy Zieman Productions, LLC and may not be republished without written permission. You’re welcome to forward the email to a friend or colleague but it’s not okay to add the RSS feed automatically as content on a blog or other website.
The FTC requires us to tell you that Nancy Zieman Productions, LLC has provided products by other companies in the course of doing business. The FTC requires us to advise you to take this information into consideration when reading this posting.
Make sure you are subscribed to Nancy Zieman Productions, LLC enews mailing list so you won’t miss a thing. Sign up here . Join us on Facebook , plus a host of other social media channels. Connect With Nancy and Friends today!
January 24, 2019
Nancy’s Absolute Easiest Way to Sew Collars
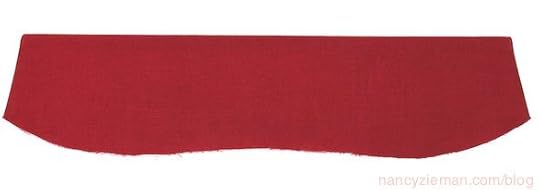
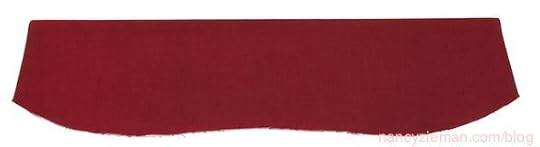
We are going to make a rather bold statement: Collars are so easy to sew that even a first time stitcher will have success. That kind of statement is out of character for us, but it’s true. Let us show you . . .
The Absolute Easiest Way to Sew Collars
In the second episode of this Sewing With Nancy series and companion book, Nancy Zieman shared her favorite absolute easiest way to sew techniques. The collar being Nancy’s signature speedy sewing tip. Here goes!
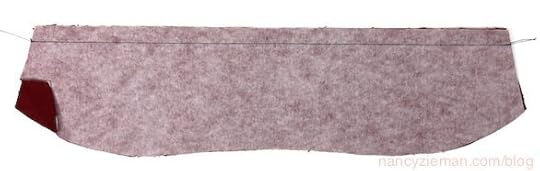
Interface the collars. Cut out two collar shapes from lightweight fusible interfacing and fuse one to the wrong side of each collar. One of our favorite fusible interfacings is Pellon’s Sof Shape .
Meet collars right sides together. Stitch the outer collar seam.
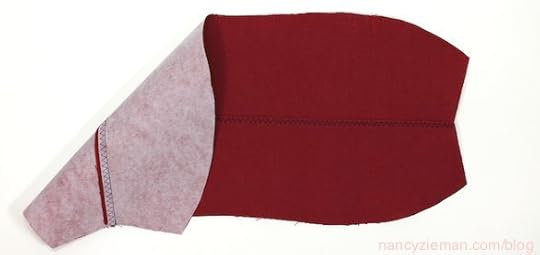
Grade the seam, trimming the under collar seam allowance narrower than the upper collar.

Press the seam flat; then press toward the under collar.
Understitch, stitching the seam allowance to the under collar. We like to use a multizigzag. Or, you could use a straight stitch.
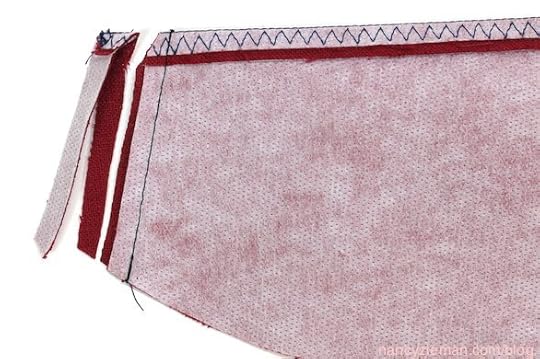
Fold the collar along the first stitching line, right sides together. Meet the collar front edges. Notice the outer collar seam allowance is already graded (trimmed) and completely understitched. This wrapped-corner sewing technique is what makes it the absolute easiest way to sew collars!

Stitch both collar front seams.
Grade the seam allowances, and angle cut the corners.
Turn the collar right side out and press. That’s it!
All of Nancy’s easiest sewing tips are in one book.
The Absolute Easiest Way to Sew chapters include:
Sewing Notions
Sewing Machine Confidence
Serger Spotlight
Patterns
Fabric Facts
Sewing Basics
Beyond the Basics
Watch The Absolute Easiest Way to Sew (Part One, Part Two, and Part Three) on Sewing With Nancy online.
For your chance to win a copy of The Absolute Easiest Way to Sew from Nancy’s Notions, leave a comment sharing your most common sewing challenge.
Happy Sewing,
Team Nancy Zieman
Nancy Zieman Productions, LLC.
Content in this feed is © copyright 2019 by Nancy Zieman Productions, LLC and may not be republished without written permission. You’re welcome to forward the email to a friend or colleague but it’s not okay to add the RSS feed automatically as content on a blog or other website.
The FTC requires us to tell you that Nancy Zieman Productions, LLC has provided products by other companies in the course of doing business. The FTC requires us to advise you to take this information into consideration when reading this posting.
Make sure you are subscribed to Nancy Zieman Productions, LLC enews mailing list so you won’t miss a thing. Sign up here . Join us on Facebook , plus a host of other social media channels. Connect With Nancy and Friends today!
January 22, 2019
More of The Best Sweatshirt Makeovers
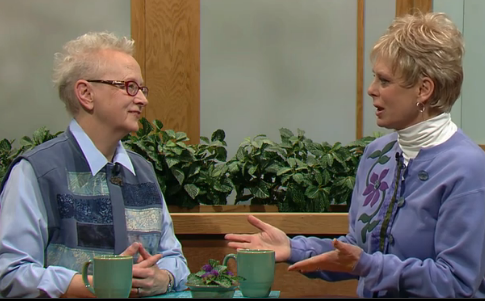
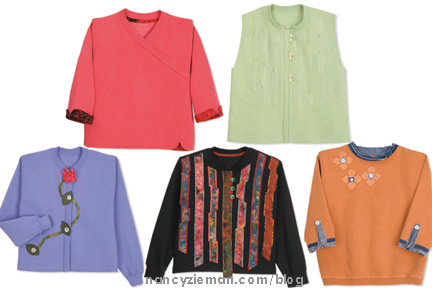 Restyling, revising, and repurposing are trending terms. When you tag on the word sweatshirts, you might think of Nancy’s friend and frequent Sewing With Nancy guest
Mary Mulari
. Since the early years of Nancy’s program being on TV,
Mary Mulari
has been the resident sweatshirt makeover expert, whose ideas are timeless. During this repurposed Sewing With Nancy series, Mary and Nancy decided to revisit some of their favorite transformations.
Restyling, revising, and repurposing are trending terms. When you tag on the word sweatshirts, you might think of Nancy’s friend and frequent Sewing With Nancy guest
Mary Mulari
. Since the early years of Nancy’s program being on TV,
Mary Mulari
has been the resident sweatshirt makeover expert, whose ideas are timeless. During this repurposed Sewing With Nancy series, Mary and Nancy decided to revisit some of their favorite transformations.
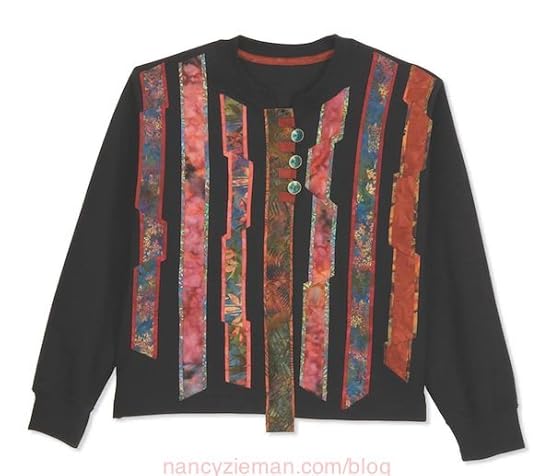
Stripes in Motion
A sweatshirt is an ideal palette for expression. Start with a collection of 2-1/2″ fabric strips. With creative stitching, turning, and pleating they’ll show you how to convert a pullover into a cardigan that has visual motion. This sweatshirt makeover is called Stripes in Motion.
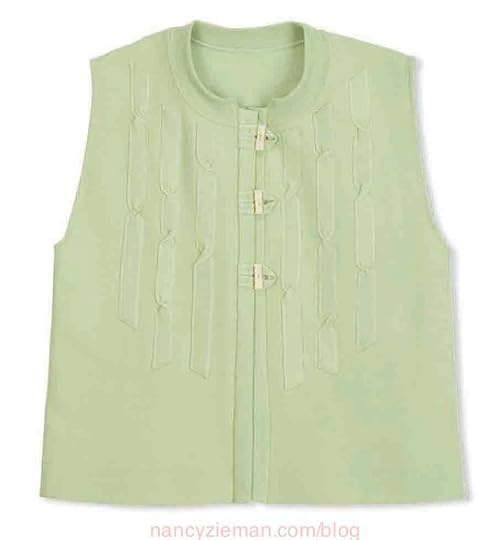
Serge and Twist Sweatshirt
Not all sweatshirts, when restyled, end up as shirts! Take a bolder stance and remove the sleeves of a sweatshirt to create an upcycled vest. The Serge and Twist Makeover features 1″ strips cut from the sleeve fabric with serging along the edges. The idea of serging and then twisting the strips before topstitching to the vest front makes for a subtle, yet crafty embellishment.
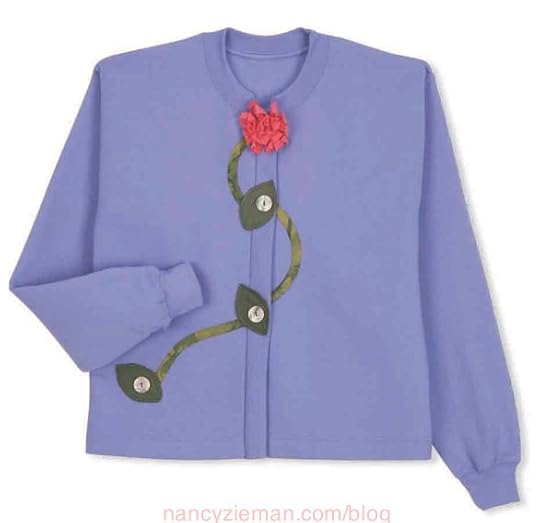
Pink Blossom Cardigan
Adapt one of Mary’s innovative techniques to repurpose a pullover into a cardigan. Then add a colorful blossom and a graceful vine with leaves to the sweatshirt front. It’s a simple addition with great impact and one of our favorite sweatshirt makeovers.
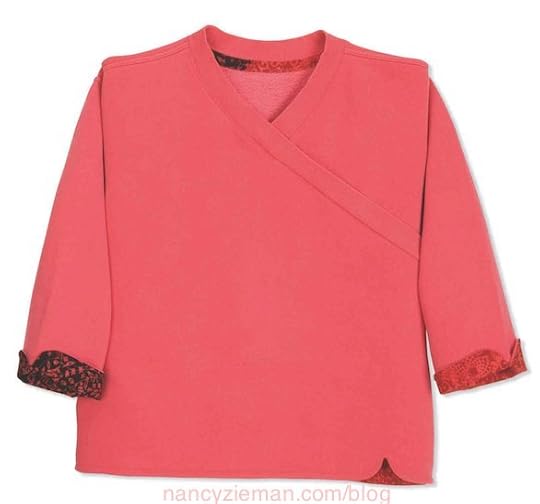
Orient Expression Sweatshirt
Now it’s time for an asymmetrical styling of a sweatshirt. It’s called the Orient Expression Sweatshirt. Start with a typical sweatshirt and remove the original neckline and hemline. Throwing tradition out the window, use the bottom ribbing to transform the shape of the neckline ribbing. Curious as to how it all comes together? The solution is—watch online.
Denim Do-Over Sweatshirt
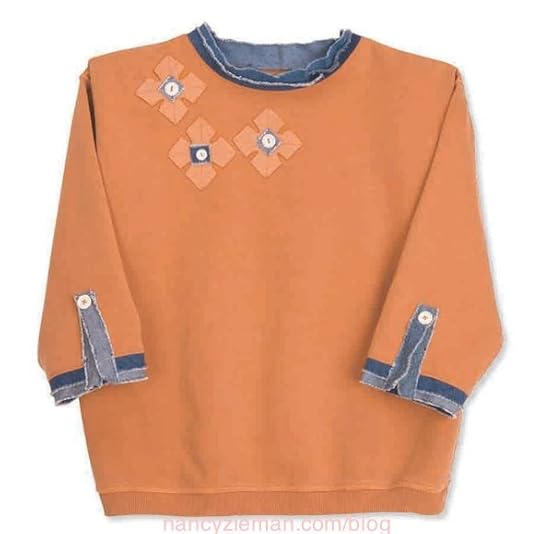
Make a casual sweatshirt even better with the addition of another favorite fabric—denim. Bias strips cut from old jeans trim the neckline, sleeves, and the centers of floral appliqués. A sweatshirt and a beloved pair of worn jeans are all you need to create this Denim Do-Over Sweatshirt!
We hope you’ve enjoyed taking a journey through a few of the Sewing With Nancy archives, highlighting our favorite sweatshirt makeovers. As always, thank you Mary for adding your insights on how to upcycle, transform, and repurpose cozy sweats!
Watch Best Sweatshirt Makeovers (Part One and Part Two) on Sewing With Nancy online.

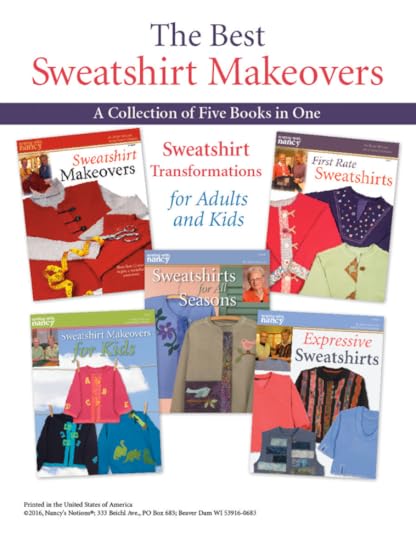
A Collection of Five Books in One— The Best Sweatshirt Makeovers book
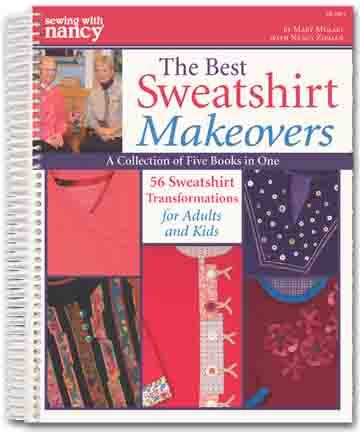
 Add plackets, zippers, simple appliqués, and so much more. This collection of five books in one boasts 56 sweatshirt transformations for adults and kids. As an added bonus, the book also features a Sweatshirt Gallery with over a dozen designs chock-full of even more fresh ideas! Full-color photos and illustrations accompany step-by-step instructions and full-size pattern pieces. Soft cover, 116 pages. Only $19.99.
Tell us your favorite sweatshirt makeover featured in this blog for a chance to win a copy of The Best Sweatshirt Makeovers book.

Happy Sewing,
Team Nancy Zieman
Nancy Zieman Productions. LLC.
Content in this feed is © copyright 2019 by Nancy Zieman Productions, LLC and may not be republished without written permission. You’re welcome to forward the email to a friend or colleague but it’s not okay to add the RSS feed automatically as content on a blog or other website.
The FTC requires us to tell you that Nancy Zieman Productions, LLC has provided products by other companies in the course of doing business. The FTC requires us to advise you to take this information into consideration when reading this posting.
Make sure you are subscribed to Nancy Zieman Productions, LLC enews mailing list so you won’t miss a thing. Sign up here . Join us on Facebook , plus a host of other social media channels. Connect With Nancy and Friends today!
January 19, 2019
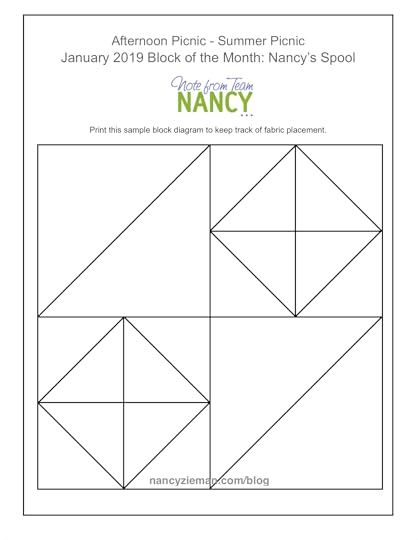
January 2019 Block of the Month: Nancy’s Spool
Afternoon Picnic—Summer Picnic
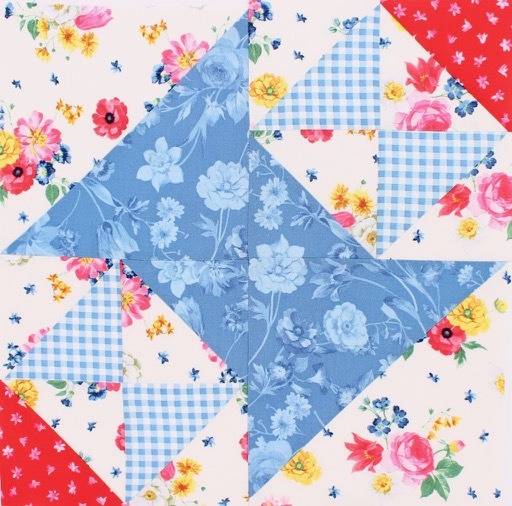
2019 Block of the Month January: Nancy’s Spool
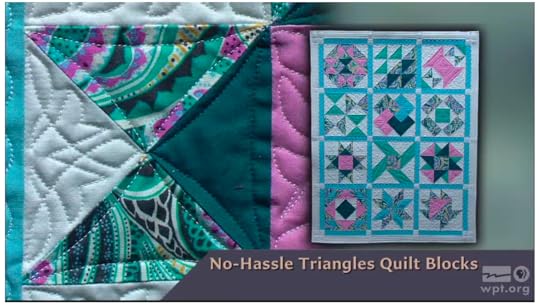
Introducing the first of 12 blocks for the New! Afternoon Picnic—Summer Picnic, Nancy’s Spool. This block is originally featured in Nancy Zieman’s own book, No-Hassle Triangles Quilt Blocks along with Nancy Zieman’s No-Hassle Triangle Gauge by Clover. Team Nancy Zieman thinks this is a great start to the new year and new block of the month!
Dreamy thoughts of warm summer afternoons are the inspiration for Nancy Zieman’s gorgeous NEW! fabric collection. Pretty pale prints honor delicate blooming flowers that arrive only in the warm sunny days of summer. A sprinkling of flower petals adorns soft floral coordinates. Tonal prints read as solids yet showcase floral elegance. Subtle placement of a few white dots brings playfulness while black floral prints add drama. The addition of gingham prints are the perfect compliment and add a playfulness to this sweet floral collection. Enjoy a relaxing afternoon picnic on a warm sunny day while surrounded by the beauty and splendor of summer’s delicate blooms.
Each month, we will feature one block design. The blocks are created using Nancy Zieman’s NEW! Afternoon Picnic Fat Quarter Pack from Riley Blake Designs * (18″ x 22″ fabric rectangles) plus border fabrics. Follow along as we demonstrate how to create January’s block, Nancy’s Spool.
Keep your fabric choices sorted using this handy Fabric Planner diagram. Download the planner HERE. Make notes or pin swatches to remind you of the fabric placements.
2019 Block of the Month Afternoon Picnic January PDF
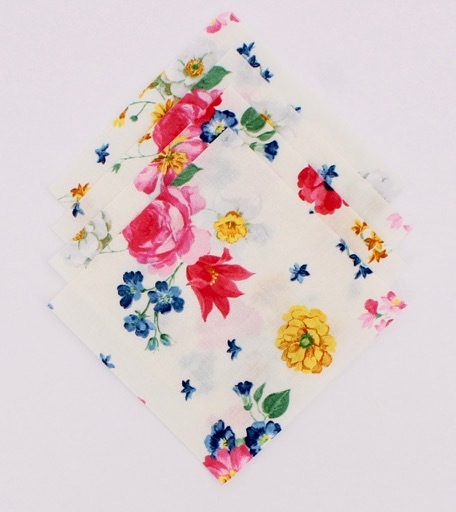
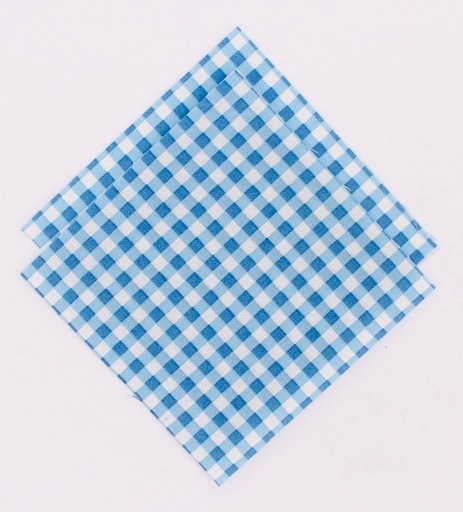
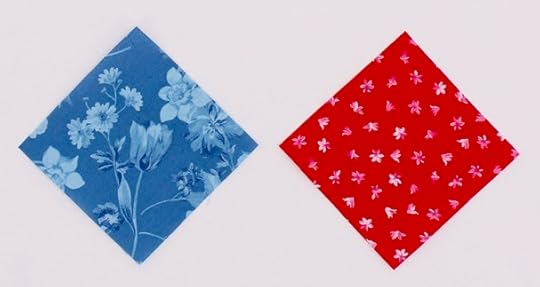
Choose the Fabrics
For the Afternoon Picnic—Summer Picnic, Nancy’s Spool block, select the following fabrics from your Nancy Zieman’s NEW! Afternoon Picnic Fat Quarter Pack from Riley Blake Designs and a Nancy Zieman’s No-Hassle Triangle Gauge by Clover.

Nancy’s Spool
Instructions: (Each block is a 12″ finished square. Finished quilt measures approximately 44-1/2″ x 57-1/2″)
1. Create a modified 16-patch block with two different sizes of finished 1/2-square triangle fabric combinations: 3-1/2″ and 6-1/2″.
Cut Fabric for Block
Cut four 3-7/8″ squares of Afternoon Picnic Cream Floral
Cut two 3-7/8″ squares of Afternoon Picnic Blue Gingham
Cut one 3-7/8″ square of Afternoon Picnic Blue Tonal
Cut one 3-7/8″ square of Afternoon Picnic Red Flower
Cut one 6-7/8″ square of Afternoon Picnic Blue Tonal
Cut one 6-7/8″ square of Afternoon Picnic Cream Floral
Construct The Units
All seam allowances are scant 1/4″ unless otherwise stated.
The step-by-step photos illustrate construction of the block.
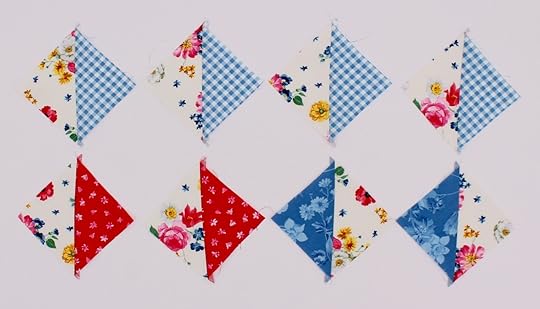
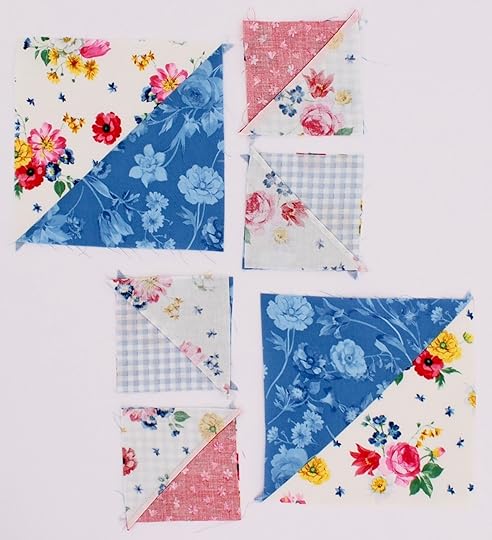
Half Square Triangles (HSTs)
Make two 3-7/8″ block sets of Afternoon Picnic Cream Floral and Afternoon Picnic Blue Gingham
Create four 1/2-square triangle blocks of Afternoon Picnic Cream Floral and Afternoon Picnic Blue Gingham
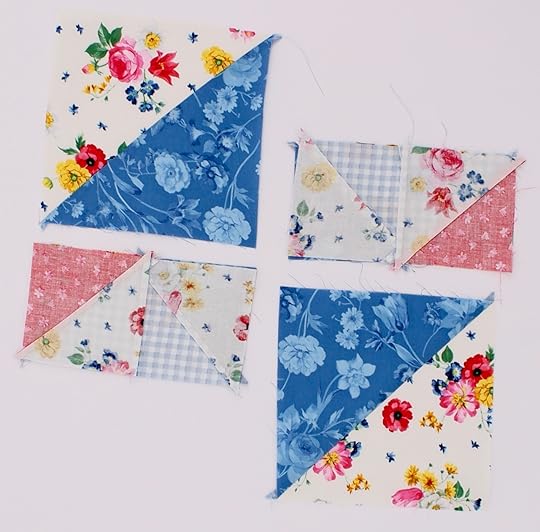
Make one 3-7/8″ block set of Afternoon Picnic Cream Floral and Afternoon Picnic Blue Tonal
Create two 1/2-square triangle blocks of Afternoon Picnic Cream Floral and Afternoon Picnic Blue Tonal
Make one 3-7/8″ block set of Afternoon Picnic Cream Floral and Afternoon Picnic Red Flower
Create two 1/2-square triangle blocks of Afternoon Picnic Cream Floral and Afternoon Picnic Red Flower
Make one 6-7/8″ block set of Afternoon Picnic Cream Floral and Afternoon Picnic Blue Tonal
Create two 1/2-square triangle blocks of Afternoon Picnic Cream Floral and Afternoon Picnic Blue Tonal
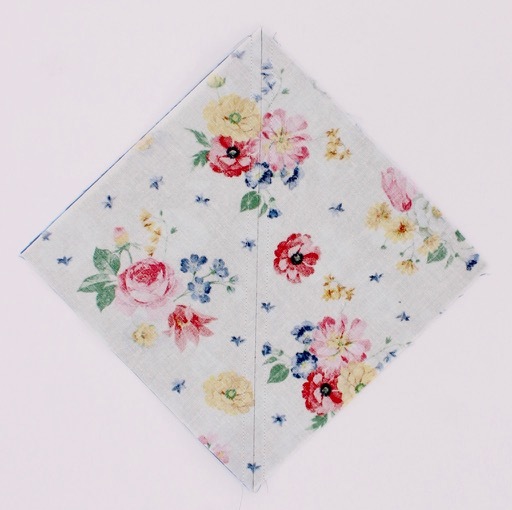
Mark each block set diagonally from corner to corner, using a fabric marking pen and ruler.
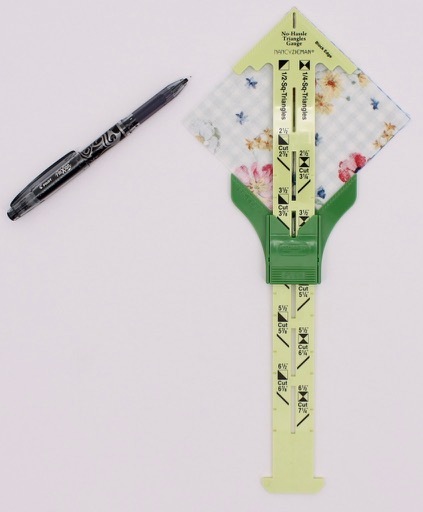
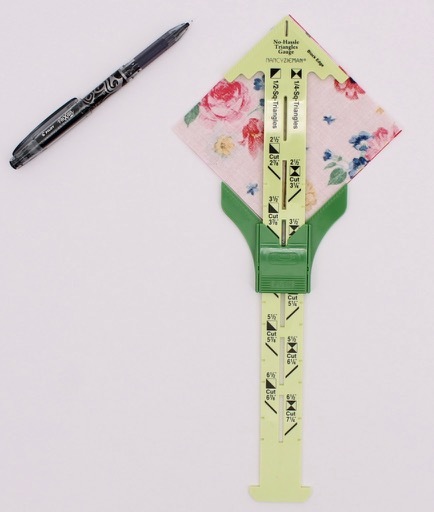
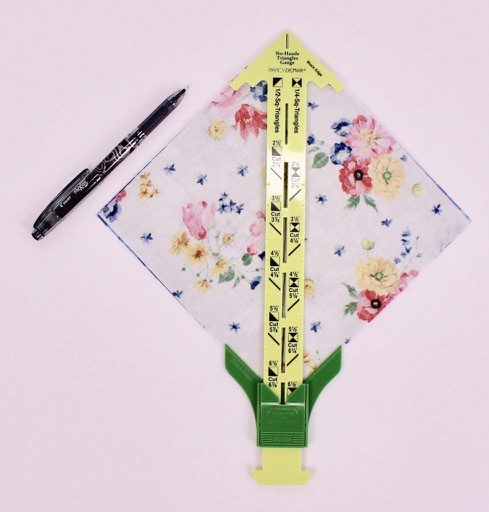
For greatest accuracy, use a No-Hassle Triangle Gauge . The left side of the gauge is designed to create the 3-1/2″ HST blocks.
Depress the button on the sliding portion of the gauge and move to the 3-1/2″ HST icon on the left side of the gauge for the 3-7/8″ squares. Depress the button on the sliding portion of the gauge and move to the 6-1/2″ HST icon on the left side of the gauge for the 6-7/8″ square.
Place gauge on the block set, corner to corner. Match corner marks of gauge with corner of block sets. Mark fabric through center of gauge with a fine-point, fabric-marking pen.
 The advantage of using the No-Hassle Triangle Gauge is accuracy. It’s easy to double check that the block set fits within the confines of the gauge. If the block set extends beyond or is shorter, trim or cut another block.

Stitch Half-Square Triangle Blocks
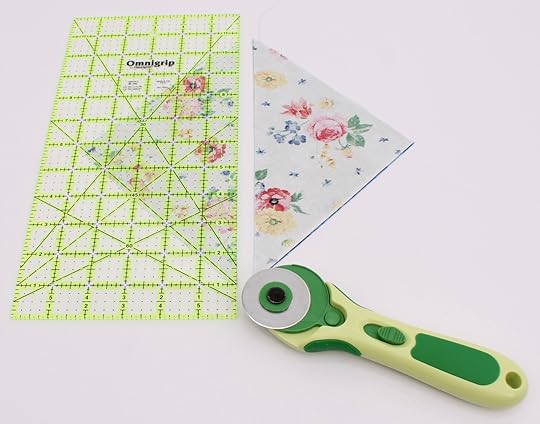
Attach a 1/4″ Patchwork/Quilting Foot to your machine.
Set machine for a straight stitch, 2.0–2.5 mm in length.
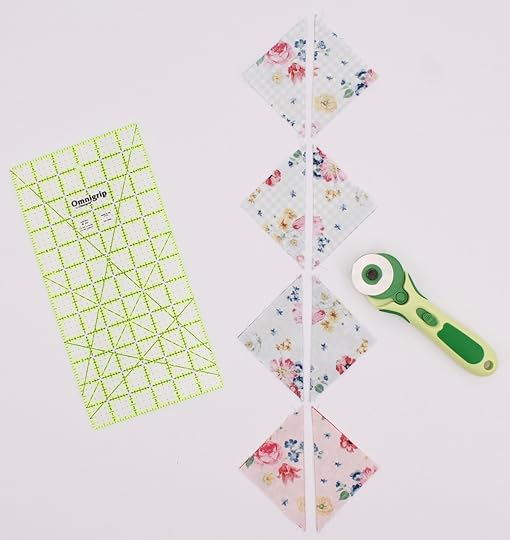
Align foot along one side of the center marked line; stitch a scant 1/4″ from center marked line. Do not cut the threads.
Kiss the next block set to the stitched block and chain stitch from one block to the other.
Clip threads between chain stitched blocks. Rotate blocks 180-degrees.
Align foot along second side of center marked line; stitch. Clip threads between chain stitched blocks.
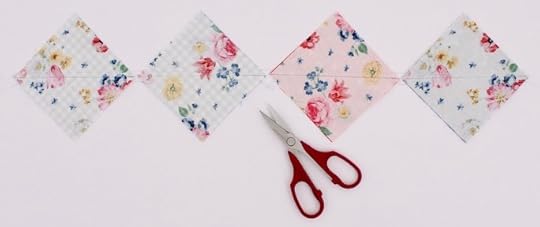
With a rotary cutter, mat, and ruler, cut the blocks apart along centerline markings.
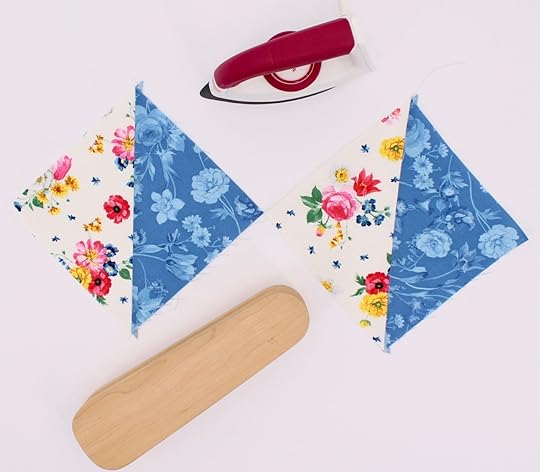
Press seam allowances toward the darker fabric.
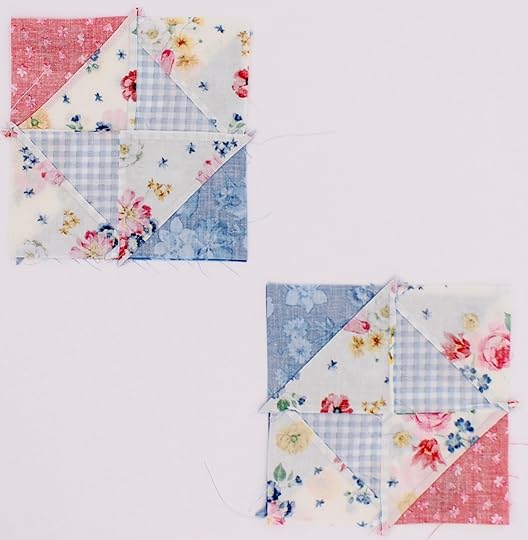
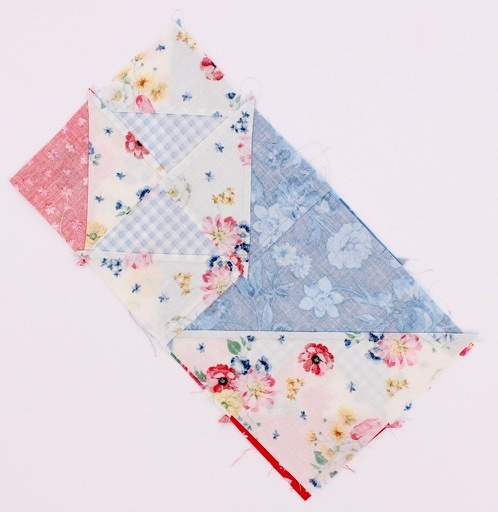
Create a total of ten HST units.
Construct The Blocks
Arrange the Blocks
2. Lay out Nancy’s Spool block as follows rotate squares as necessary.
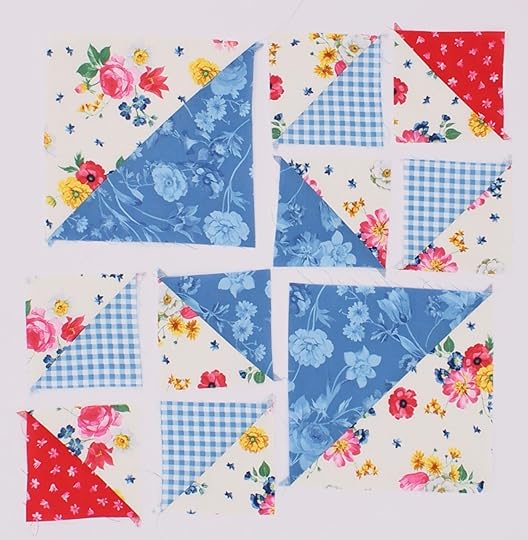
3. Join squares to form a block.
Place the 3-1/2″ squares from upper right and lower left column, right sides together.
Chain stitch from one block set to the next. Clip threads between blocks.
Press seams open, or press seams to alternate sides.

Stitch rows together to create two 6-1/2″ squares upper left and lower right.
Press seams open, or press seams to alternate sides.
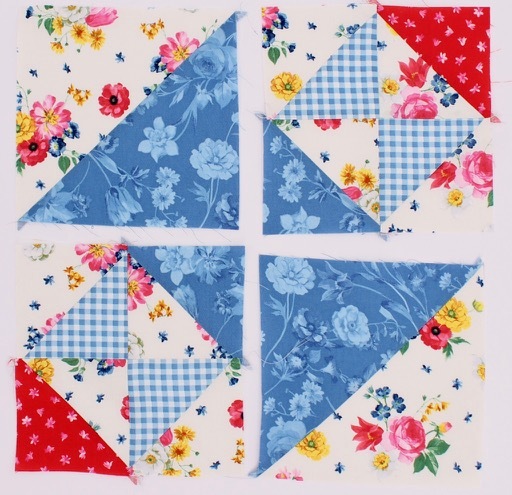
Stitch squares, right sides together
Press seams open, or press seams to alternate sides.

Stitch columns together
Press seam to one side.
The No-Hassle Triangles Quilt Blocks book shows exactly how to create this block and 11 others. For best results, use the No-Hassle Triangle Gauge.

Watch No-Hassle Triangles Quilt Blocks (Part One and Part Two) on Sewing With Nancy online.

The randomly selected winner of a copy of the book Sew Simple with Rectangles & Squares from Nancy’s Notions, is Jacqueline Samford.
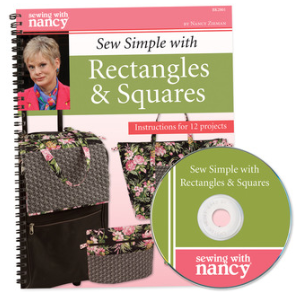
Her comment is: You know, I could use plastic bins for organizing….but since when does plastic have personality?
We are colorists! We choose the look and feel of fabric because it feeds our need to create something of real value.
These fabric bin ideas are inspiring us to do what we love! Great ideas!
Happy Sewing,
Team Nancy Zieman
Nancy Zieman Productions, LLC.
Content in this feed is © copyright 2019 by Nancy Zieman Productions, LLC and may not be republished without written permission. You’re welcome to forward the email to a friend or colleague but it’s not okay to add the RSS feed automatically as content on a blog or other website.
The FTC requires us to tell you that Nancy Zieman Productions, LLC has provided products by other companies in the course of doing business. The FTC requires us to advise you to take this information into consideration when reading this posting.
Make sure you are subscribed to Nancy Zieman Productions, LLC enews mailing list so you won’t miss a thing. Sign up here . Join us on Facebook , plus a host of other social media channels. Connect With Nancy and Friends today!
Nancy Zieman's Blog

- Nancy Zieman's profile
- 21 followers

