Elizabeth Minchilli's Blog, page 7
April 29, 2021
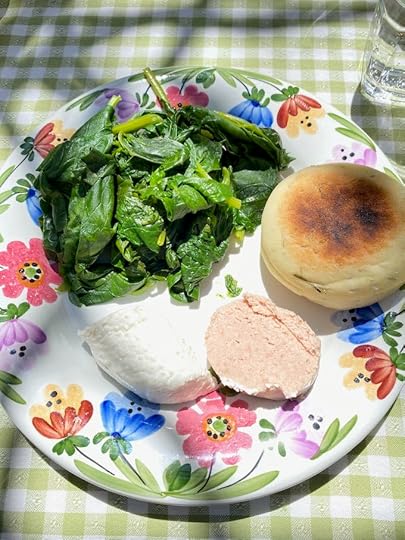
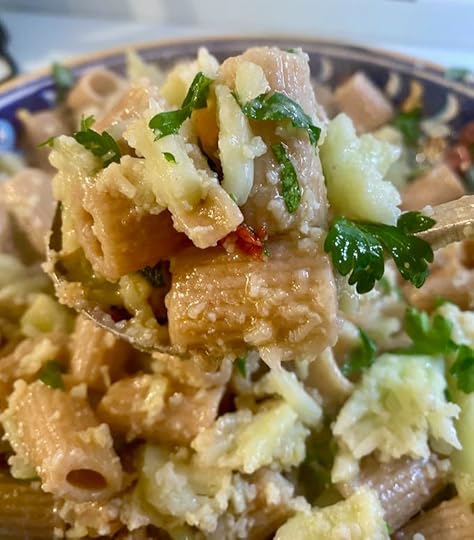
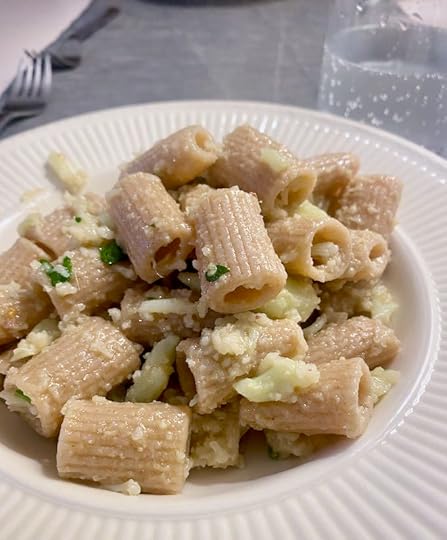
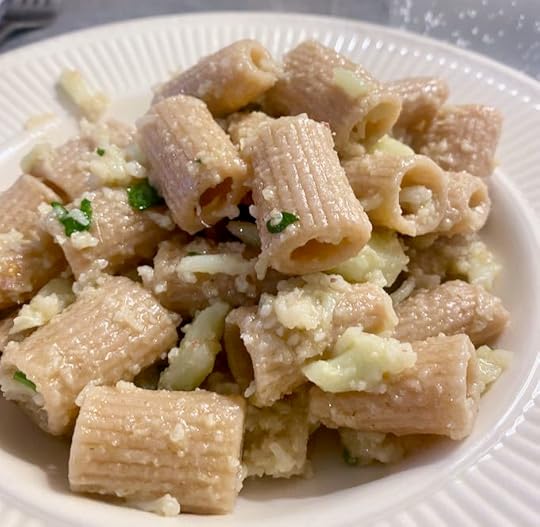
Mortadella Butter + Tigelle
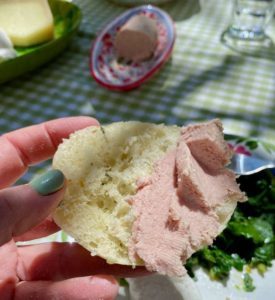
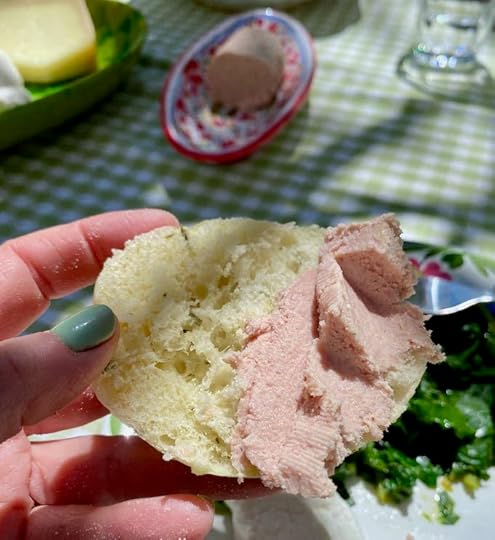
Just when you think you’ve seen and tasted everything, the world brings you Mortadella Butter.
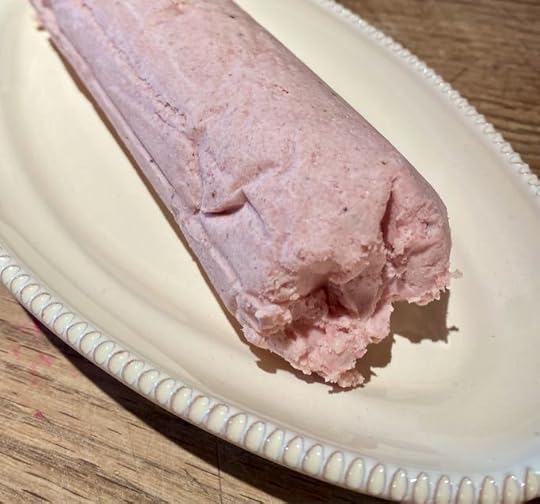
Actually, it wasn’t the world, but our friends and neighbors up in Umbria, Lisbeth and Thomas. This Danish couple had a restaurant in Copenhagen for 12 years, and now run an adorable B&B in Todi. They came over the other evening for dinner and brought us an entire log of what may now be my favorite food: Mortadella Butter.
This stuff is so good it should be illegal. Especially since it’s so easy to make and WAY too easy to eat.
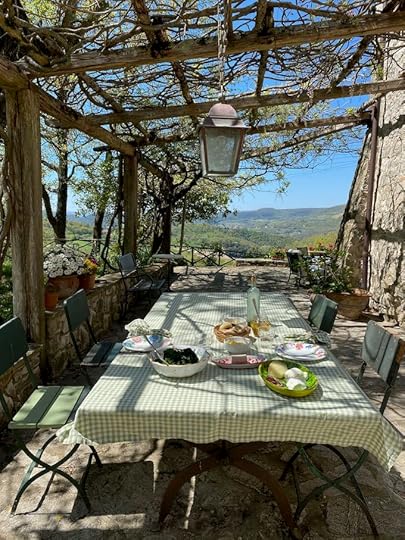
Here follows Lisbeth and Thomas’s recipe for Mortadella Butter, along with one for Tigelle, little buns that are perfect when warmed and schmeared with a thick layer of this delicious stuff. Not only did they bring enough for the four of us for antipasto on Saturday night, but we also had the leftovers for lunch the next day.
And if you make this and can’t stop eating it don’t blame me. I warned you it should come with a warning.

Place the butter in a small pan and place over medium heat. As the butter melts, it will start to foam. Once the foam subsides, the butter will start to turn golden. When it is toasty brown (this happens very quickly) take off heat and immediately transfer to heat proof bowl to stop cooking and make sure it doesn’t burn.
Place the mortadella and Parmigiano in a food processor and process until smooth. Add the still warm butter and continue processing until silky.
Taste and adjust for seasoning, adding a bit of nutmeg and/or black pepper if you’d like.
Place in a small bowl, or form into a log using parchment paper.
*Although not part of the original recipe I got from Lisbeth and Thomas, I’m thinking that the addition of some shaved truffles into the warmed butter would be a good idea!!
PrintTigelleYield 10
A classic little bread from Emilia Romagna. Sorry if this recipe is all in grams, but this is the way European chefs work and this is their recipe!
Ingredients75 gr water75 gr milk10 gr beer yeast10 gr olive oil5 gr salt250 grams all purpose (or 00) flourChopped herbs (like chives or parsley) optionalSemolina flourInstructionsPour the milk and water into a small pan and heat until lukewarm. Pour into a large bowl and add the yeast and stir to dissolve. Add the oil and salt, stir and then add the flour and herbs.
Stir to mis and then turn out onto a board and then knead with your hands until smooth and elastic. About 10 minutes.
Return to the bowl, cover, and let rise 2 hours.
Flip the risen dough onto a floured work surface and roll out to about .5 cm thick.
Using a round cutter (8 cm) cut out small rounds, placing on a tray covered with semolina flour.
Gather the scraps, knead them together and repeat the cutting process.
Cover and set aside to proof for another hour.
Heat a heavy pan, preferably a cast iron skillet. Place the tigelle in the pan, and cook for about 4 minutes before flipping them over. Then another 4 minutes on the other side. They are done when they sound hollow when you tap them.
Enjoy right away, or else reheat them (easily done in a toaster) before serving.
For the full menu and recipes from our full meal make sure you’re signed up for the Premium version of my newsletter.
And for more delicious recipes from Thomas and Lisbeth make sure you’re signed for their quarterly Kitchen Notes (send an email to subscribe) and follow them on Instagram. Or better yet? Book a room and cooking class at Il Ghiottone Umbro, their darling hotel.
Want to join us to eat like this in Umbria? You can! See our full schedule of current tours in Umbria, Sicily, Puglia, Parma and Abruzzo here.
The post Mortadella Butter + Tigelle appeared first on Elizabeth Minchilli.


April 15, 2021
porchetta at home

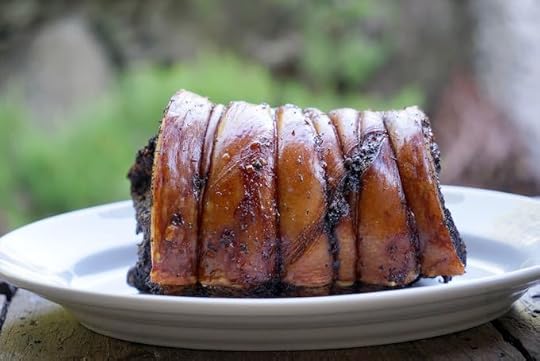
The other day when I stopped by the market and took a video of the man in the porchetta truck hand slicing thick slices of fatty pork into a waiting panino I got a LOT of message about how it wasn’t fair of me to share such deliciousness. Especially since at the moment you can’t get here. While I wouldn’t suggest that you buy an entire pig and make a traditional porchetta in a fire fueled oven at home, I do have the next best thing.
Traditional porchetta is a thing of beauty: an entire pig, seasoned with rosemary and sage and roasted slowly in a wood burning oven. Most people eat porchetta either at a road side stands or markets. Making it at home is usually not an option since A) not many people have the crowds necessary to devour an entire pig and B) even if you did, you probably don’t have an oven big enough.
The following recipe is my home version. A true porchetta contains the loin as well as the belly, but this recipe is pure belly. This not only ensures a tender, tasty outcome, but it also means that the entire roast will be cooked through, without any part drying out or remaining undercooked.
When ordering your pork belly make sure you tell your butcher you would like yours with the skin on please. And if you can get him to score the skin, in a diagonal diamond pattern, all the better. If not, you can always jab yours with the point of your knife. This part is essential though, since it allows the fat from the skin to leak out during cooking, so that the skin turns into crisp crackling.
The pork belly needs to marinate for a day before cooking and then it takes about seven hours to complete the process, so be sure to leave yourself plenty of time. And don’t worry too much about timing: in most parts of Italy porchetta is served at room temperature. So if you can let it cool off completely, or cool it and serve it it the next day even better!

Yield 8-10
The pork belly needs to marinate for a day before cooking and then it takes about seven hours to complete the process, so be sure to leave yourself plenty of time. And don’t worry too much about timing: in most parts of Italy porchetta is served at room temperature. So if you can let it cool off completely, or cool it and serve it it the next day even better!
Ingredients7 pounds of pork belly with skin attached1 cup of sage leaves1 cup of rosemary leaves6 garlic cloves, peeled1 tablespoon of fennel seedszest from 1 lemon3 teaspoons of salt1 teaspoons of freshly ground black pepper (or more to taste)5 tablespoons of olive oilInstructionsWash and pat dry your pork belly. Lay on a flat surface, with the skin side up. If the butcher has not scored the skin you can try to do it yourself (it is rather hard) or else use a very sharp knife to poke a lot of holes in the skin.
Place the remaining ingredients in a food processor and process until finely chopped.
Rub about half of the ingredients over the inside of the belly. Roll the roast up as tightly as you can, and using twine, secure it evenly along the entire length of the roast. If you’ve never done this before, you may need someone else to help hold it together.
When you have tied your roast, rub the rest of the seasoning all over the outside and both ends, as well as getting some into the slits on the skin.
Place the roast in a glass pan and cover tightly with plastic wrap. Let sit in the refrigerator for 24 hours.
Take the roast out of the refrigerator 3 hours before you are ready to cook it.
Preheat oven to 350°F.
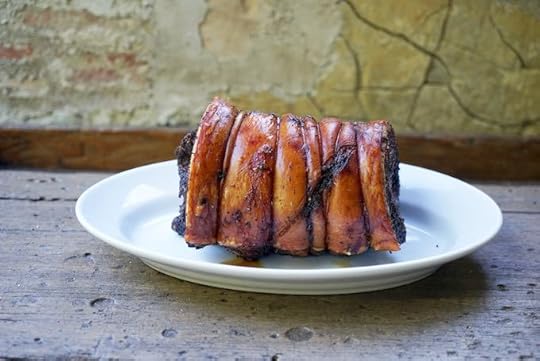
Place the porchetta on a V-shaped rack in a pan and place in the oven. Let cook, undisturbed for three and a half hours.
Take the porchetta out of the oven and let cool at least 2 hours before cutting and serving. In most parts of Italy (Abruzzo excepted) porchetta is served cool or at room temperature. So if you can let it cool off even more, or cool it and serve it the next day, even better.
To cut the porchetta use a slightly serrated knife, which will help you cut through the skin. I’ve actually used an electric knife, which works quite well or a bread knife. Cut into half inch slices.
This recipe is from my book The Italian Table, where you’ll find more recipes and meal plans.
If you’d like to join me in Umbria to eat some porchetta at a road side stand, you can! Our full list of tours is here. We’ll be heading to Umbria, Sicily, Puglia and Abruzzo in 2022 and 2023.
The post porchetta at home appeared first on Elizabeth Minchilli.

April 9, 2021
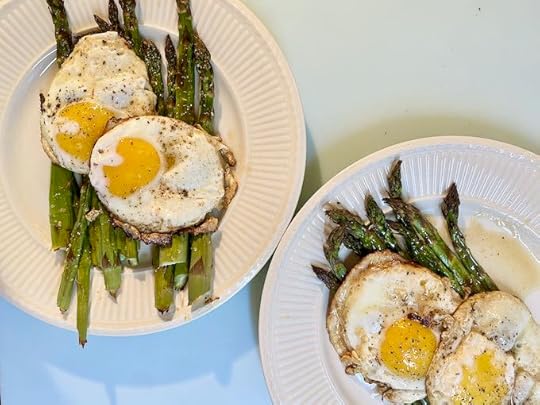
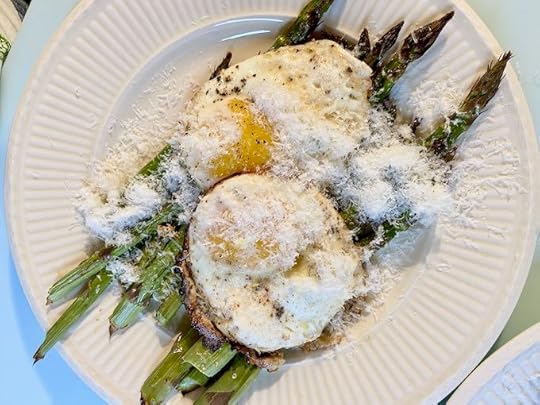
Asparagus Bismarck

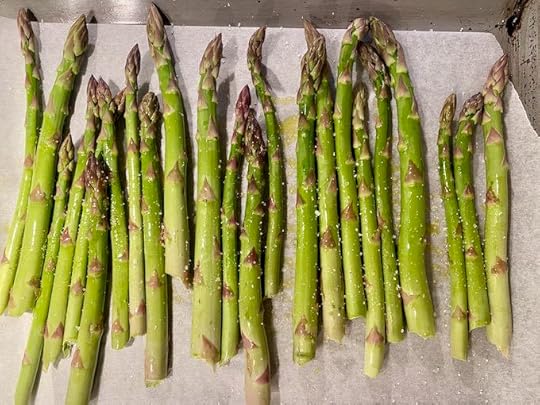
Asparagus Bismarck is something we eat at least once a week this time of year. I’m always shocked that simply putting an egg on top of some asparagus can turn two ingredients into a somewhat fancy and thoroughly satisfying dinner.
My method for making this simple meal has changed a bit over the years. While I used to steam the asparagus, I now roast them since it’s about a 100 times easier to do. Also, I never really liked how waterlogged the asparagus would get when steamed.
As for the name – Asparagus Bismarck – I’m not really sure how this simple dish got this fancy name. But is it one of my favorite things to order in old fashioned restaurants all over Italy. Or, these days, to make at home.
If you’d like it as a starter, use about 4 stalks per person, topped with one egg. As a main course, 6 to 8 stalks topped with 2 eggs should do it. The most important thing is not to let the eggs over cook. The pool of butter and grated parmigiano — with the broken and runny egg yolk — made the most luscious sauce imaginable. Bread goes without saying but I’ll say it anyway.
PrintAsparagus Bismarck
Prep 10 mins
Cook 20 mins
Total 30 mins
Yield 2
Ingredients10-12 stalks of asparagus4 eggs, room temperatureAbout 1/2 cup grated parmigiano reggiano4 tablespoons butterolive oilsaltpepperInstructionsPreheat the oven to 350F/ 180CTrim the asparagus by snapping off the tough ends. Wash pat dry, leaving them a bit damp. Place on an oven tray and drizzle with olive oil, and use your hands to make sure they are covered. Sprinkle with salt and place in preheated oven. Cook until tender, about 10 minutes. I don’t really like mine browned for this recipe, but to remain green.Remove from oven, but leave on the warm tray while you prepare the eggs.Place the butter in a medium frying pan and place over medium/high heat.Crack the eggs into the pan. Season the eggs with salt and pepper and cook until the whites are set but the yolk is still runny. Using a spoon, spoon the hot butter over the whites to speed up their cooking.Divide the asparagus onto two plates, and then, using a spatula, gently place the eggs on top. Pour the extra butter from the pan over the asparagus, letting it run onto the plate. Sprinkle generously with the grated parmigiano.
This recipe first appeared in my book Eating My Way Through Italy. For more recipes from Italy see my books The Italian Table and Eating Rome.
And we’d love to have you join us here in Italy to eat, cook and have fun. Our current list of Week Long Food Tours are here.
The post Asparagus Bismarck appeared first on Elizabeth Minchilli.

March 30, 2021
Italian Easter Cake – Ciaramicola


The other day on Instagram I asked if anyone had any Easter questions about Italy. One of the most interesting questions I received was from an Italian who lives here in Umbria. She asked: Will you be sharing some Umbrian Easter specialties? Like Ciaramicola Easter Cake?
Ciara-what?
I’ve been living in Umbria for 30 years now, and I’d never heard of Ciarmicola. I had to google it to find out that it was a cake that I had never ever seen anywhere. When I asked my neighbors, they were very vague and definitely didn’t have any recipes to share.
As it turns out Ciaramicola a recipe that is specific to Perugia, a city about a half hour north of us. And no one in my little town knew about it. That shows you just how regional Italian cooking is, especially when it comes to holiday sweets.
I decided to make it, and made this video so you can follow along if you’d like to try. The recipe is below, but with one big difference: I didn’t want to use the liqueur that is normally used to both flavor and color the cake. Alchermes is a very old fashioned, spiced, deep red liqueur. And I hate it. So instead I used lemon juice and zest to flavor it, and red food coloring to tinge it red.
The other distinctive aspect of this cake is that it is topped with meringue and sprinkles. The red of the cake, and the white of the meringue are the same colors as the coat of arms of Perugia. The cake, so legend has it, was made by young women and given to their boyfriends. I think it makes the perfect pretty springtime gift to anyone you love. Let me know if you make it!
PS: If my cake looks kind of orange instead of red it’s because I ran out of red food coloring and so didn’t have quite enough. And the egg yolks I used were so deep orange that the color turned orange. Next time I’ll try for more red!

Yield 8
This cake is traditionally flavored and colored with Alchermes, and old-fashioned liqueur. I made mine with lemon juice and red food coloring , which is definitely not traditional.
Ingredients2 eggs150 grams / 3/4 cups sugar60 grams / 4 tablespoons of butter, melted60 ml / 4 tablespoons lemon juice (or alchermes )red food coloring if not using the Alchermes. Enough to make the cake red. )250 grams 1 3/4 cups all purpose flour16 grams / 3 tablespoons baking powderzest of one lemon, gratedMeringue
2 egg whites150 grams / 3/4 cups sugarsprinklesInstructionsButter and flour a tube or bundt pan.
Preheat oven to 160c/ 320F
Put the 2 whole eggs in a stand mixture, and mix until fluffy. Add the sugar and beat for several minutes until well mixed. Add butter, lemon juice and mix. Then add the flour, baking power and lemon zest and mix until blended.
Pour the batter into the pan, using a spoon to level it out. Place in oven and bake for 30 minutes.
In the meantime make the meringue:
Place the two room temperature egg whites in the bowl of a stand mixer. Using the whisk attachment beat until fluffy. Slowly add the sugar and continue beating until stiff peaks form.
After 30 minutes take the cake out of the oven. Turn the oven down to 100C/ 200F, leaving the door of the oven open to get it down to the low temperature.
While the cake is still warm, turn it out onto a baking sheet.
Spread the meringue over the top. Sprinkle the top with the colored sprinkles.
Place back into the oven and bake until the meringue sets, about 20 to 25 minutes. Make sure you don’t over cook it, since you don’t want the meringue to over cook and turn golden. Take it out of the oven and let cool before cutting.
Courses Dessert
Cuisine Italian

If you’re looking for some more Easter inspiration see my recipe for Pastiera
And if you’re looking for an entire Easter Lunch Menu make sure you’re signed up for the Premium version of my newsletter.
The post Italian Easter Cake – Ciaramicola appeared first on Elizabeth Minchilli.

March 12, 2021
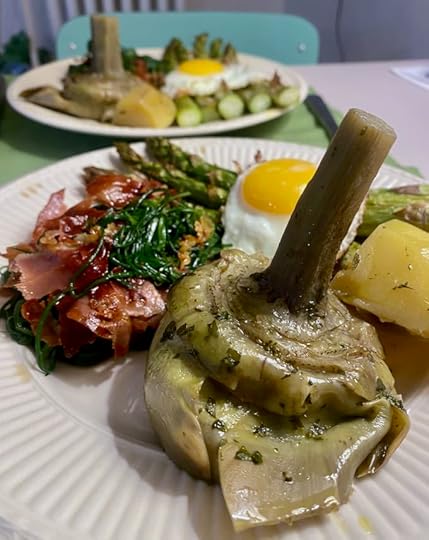
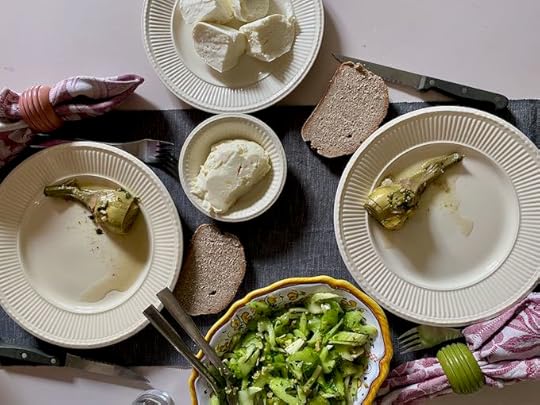
Instant Pot Artichokes
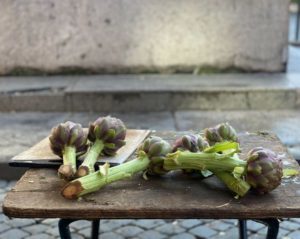
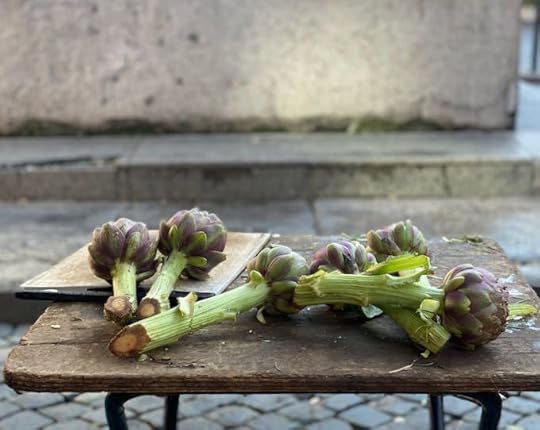
It’s artichoke season and this year we are eating artichokes even more than usual. Last year during this period we were in lockdown in Umbria. While we definitely ate our fair share of local artichokes, the best ones are definitely from the area around Rome, and so we have a year to make up for.
Another reason we’ve upped our artichoke consumption is because I’ve discovered a new – and dare I say improved? – way to prepare one of the most traditional recipes this time of year. Carciofi alla Romana are local artichokes trimmed and then braised whole with garlic, wild mint, parsley and a good glug of olive oil. It’s an easy enough recipe, but because you don’t want to use too much water (the artichokes will get over cooked) I’ve often forgotten about things and have had to throw away ruined pots a couple of times. At the other extreme, I err on the side of not over cooking (or burning) and end up with artichokes that are sometimes just a tad tough.
Enter my new best friend when it comes to cooking artichokes: the Instant Pot.
I’ve mostly been using this electric pressure cooker for cooking beans and other legumes. I also love it for turning tough cuts of meat into tender stews. And nothing can beat it for making brodo.
Up until now I’ve avoided using it for vegetables because mostly, why bother? By time the instant pot got up to pressure, and cooked any vegetable, I could have long since cooked it in the traditional way on top of the stove or in the oven
But with artichokes I’ve found that Goldilocks moment. The artichokes are cooked just right. Not too soggy, not too tough. Just silky smooth and tender.
If you’re not sure how to trim an artichoke see this blog post and this video.
Yield 4
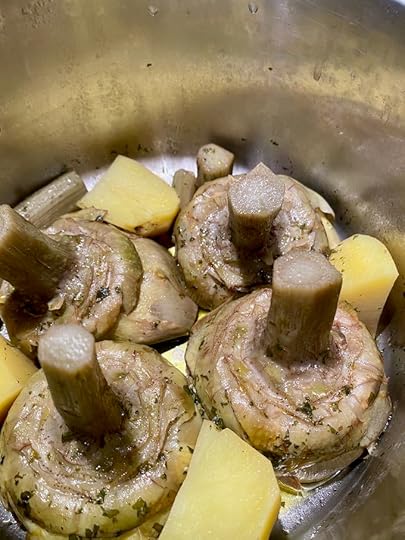
Ingredients4 Large artichokes1 lemon4 cloves garlic, chopped1/4 cup chopped parsleyA few sprigs of mint1/3 cup olive oil1/2 teaspoon saltFreshly ground black pepper1 1/2 cups water1-2 potatoes (optional) peeled and cut into large chunksInstructionsTrim the artichokes like this, rubbing them with lemon as you go. Place in a bowl of water, with some lemon juice, until all of the artichokes are done. This prevents them from turning brown.
(In Rome the first artichokes are from the top of the plant and are prized. The stems are very thick and also edible once trimmed)
If the artichokes are rather large, and you don’t know if they are the first of season, cut them in half, through the root, and carefully remove the choke with a small knife or spoon.
Place the artichokes in the instant pot, stem side sticking up if whole. Tuck the potato chunks in if using.
Pour in the water. The pour olive oil over them, and add salt, pepper, garlic and herbs.
Close and seal Instant Pot. Set on high heat for 8 minutes (7 minutes if you have cut them in half). When done, fast release.
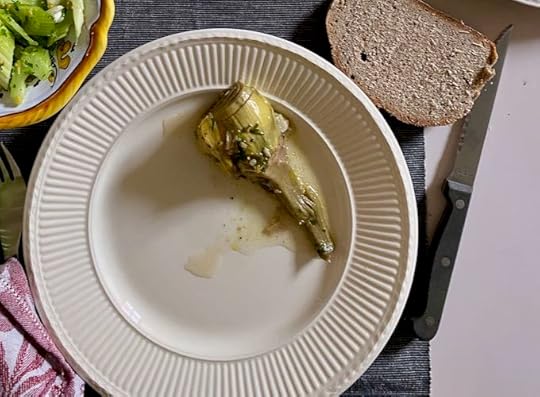
They are best when served at room temperature, with a bit of the cooking liquid poured on top. It’s delicious to dip bread into!
For more about Roman traditions, like artichokes, see my book Eating Rome.
And if you’d like to us for a tour of Rome’s markets, piled high with artichokes, contact Sophie.
The post Instant Pot Artichokes appeared first on Elizabeth Minchilli.

March 10, 2021
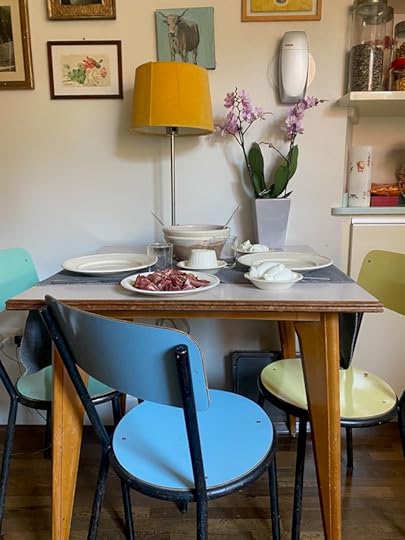
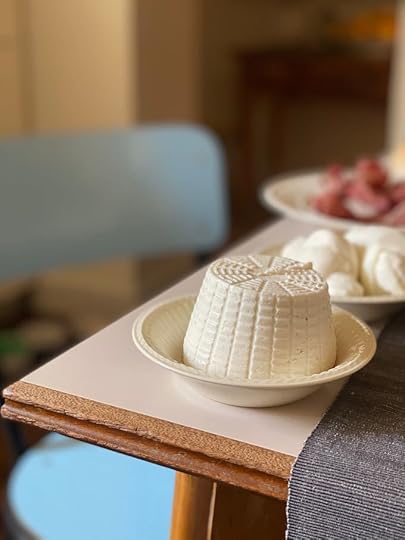
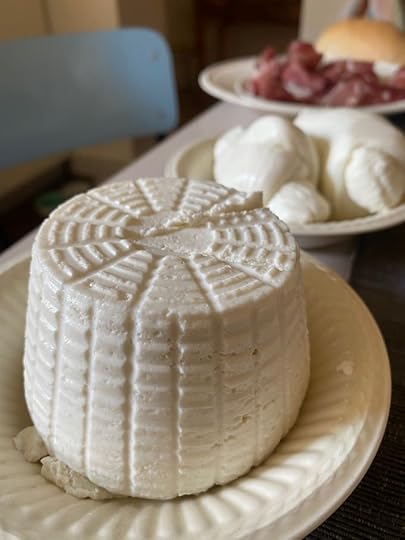
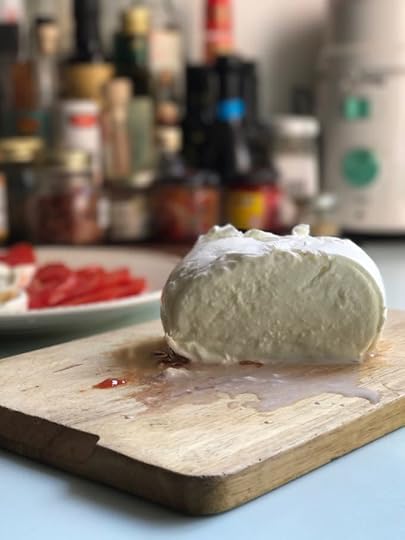
How to Eat Mozzarella
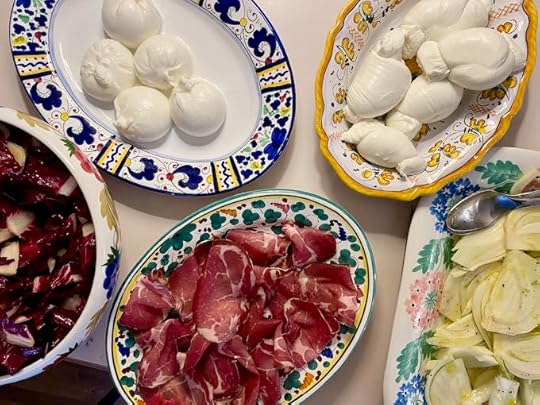
I have a confession to make. Sometimes we just have cheese for lunch or dinner. While it might seem like a quick and/or indulgent kind of menu choice (and it is) it’s actually a menu born of necessity. In this case the need comes from the fact that my refrigerator is full of cheese and if I don’t do something (eat it?) it will go to waste.
Although I am admittedly an over-buyer when it comes to stocking up, this situation is NOT MY FAULT. The cheese in question is – at least 80% of the time – brought in by Sophie. Her excuses include:
My fridge is too small. (true)Daddy will eat it. (Also true)Just put it in your fridge when the delivery arrives and I’ll pick it up later. (A blatant lie)And so the cheese piles up. Where is it coming from you ask? Farmers for the most part. Cheese makers. The kind of folks that have lots of cows and goats and call Sophie their friend. And who, evidently, like to send her cheese.
I can’t lay all of the blame on Sophie. I have farmer friends too, who are equally generous. And in the last few weeks Sophie and I have visited a few farms outside of Rome and our current cheese inventory is out of control.
And so cheese for dinner. Or lunch or even breakfast.
As you know I tend to photograph everything I eat, and so receive a lot of questions. One of the most surprising questions I get about these cheese meals has been: ‘how do you eat that?’
My knee jerk response is: ‘Well, I cut it into pieces and put it in my mouth.’
But since I get this question I LOT I thought it was worth devoting a post to it.
I think the confusion comes when we are eating fresh cheeses like mozzarella, burrata and ricotta. I have a feeling that a lot of people think of these fresh, milky cheeses as being ingredients in another, more complicated dish? For instance I know many people in the states think that if they have a big ball of fresh mozzarella the best, or even only, thing to do is serve it with tomatoes and call it a Caprese. Even if it’s the middle of winter and the tomatoes taste like golf balls. Or else they use it to make lasagna, eggplant parmigiana or in some other melty way.
But really, the way fresh cheeses like mozzarella, ricotta and burrata are eaten and enjoyed in Italy, is on their own. Just put them on a plate, and serve with bread. If it’s summer, then by all means bring out the tomatoes. But if not? Any other kind of salad will do. And if you can’t be bothered to make a salad like this one or this one? This is when I break out my jars of preserved vegetables, like giardiniera or eggplant or zucchini preserved in olive oil.
Another point of confusion I see is how to eat the cheese with bread. In Italy you simply use a fork and knife to cut a piece of mozzarella, then put it in your mouth, followed by a bite of bread if you’d like. American’s tend to put the cheese on top of the bread then take a bite, making a kind of sandwich. Somehow putting the cheese directly into your mouth without bread or a cracker underneath is just not something most Americans do?
The bread you serve is up to you. If you have freshly made focaccia, that is perfect.
With fresh cheeses you don’t really need any condiments, but a drizzle of your best olive oil won’t hurt. PLEASE don’t let balsamic anywhere near these delicate cheeses since it will totally overwhelm them.
I hope this answers some of your cheese-eating questions. Here are some photos that I hope help you get the idea. But if you have any more question, leave a comment below. I’ll come out of my current avalanche of cheese to answer them.
If you’d like to join Sophie and me as we visit farms and eat cheese all over Italy, we’d love to have you. For our current list of Week long tours see this page. Also, contact Sophie to arrange a day trip from Rome to one of her favorite farms.
The post How to Eat Mozzarella appeared first on Elizabeth Minchilli.

March 9, 2021
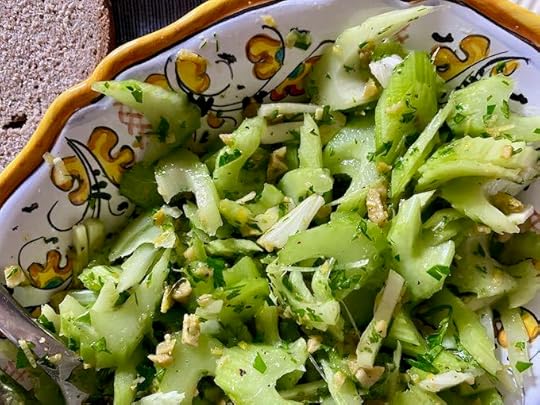
Celery & Olive Salad

I bet you didn’t realize that celery had a season. I know its something you take for granted. It seems to be always available in the produce section and/or forgotten at the back of your crisper drawer in your fridge, right?
But celery does in fact have a season and when I see it at my farmer’s market I stock up. Because it’s often the crunch that I crave about now as we are just coming out of winter. Celery is a plant that loves the cool weather and with spring almost here, I’m trying to fit in as much celery before the season ends.
I’ve always been a big celery salad fan. But this past weekend I wanted something a bit different. I didn’t want it fruity like this recipe. And I definitely didn’t want it to have cheese like this recipes since the rest of the meal was already full of cheese. I did want it bright, and somehow extra green, if that means anything?
The dressing I came up with used a big bunch of parsley and also a handful of chopped green olives. Lemon zest and lemon juice brightened it all up and I chose a particularly fruity olive oil from Sicily that smelled of freshly cut grass. It was the perfect side to a meal that was basically one big mozzarella fest.
Yield 2-4
Try to buy a full head of celery for this salad. If the leaves are still attached, all the better, since then you know it’s super fresh. If the outside stalks look tough or are a bit hollow, save them for cooking. It’s hard to say how many this dish serves, since it depends on how big your head of celery is.
Ingredients1 head of celery10-12 big green Castelvetrano olives1 small bunch of flat leaved parsley (about 1 cup of loosely packed leaves)1 lemon, untreated if possiblefruity extra virgin olive oil (like this one)salt & pepperInstructionsChop the celery into diagonal slices, about 1/8 inch thick, and place in a bowl.
Using the back of a heavy knife, or a meat pounder, whack each olive to smoosh it. This will make it easier to remove the pit.
Finely chop the olive meat, parsley and zest from half the lemon. Put into a small bowl and add olive oil (about 1/4 cup) and lemon juice to taste. Season with salt and pepper
Pour the dressing over the celery and toss. Taste and adjust for seasoning.
For more recipes from Italy see my book The Italian Table.
And if you’re not signed up yet for my monthly newsletter you should be! If you opt in for the premium version ($5/month $50/year) you’ll also get my podcast, special discounts, Sunday meal plan and more. Sign up now.
The post Celery & Olive Salad appeared first on Elizabeth Minchilli.

February 12, 2021
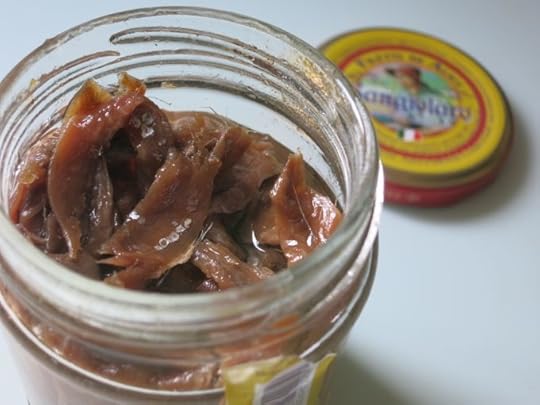
Cauliflower + Anchovy Pasta


This is a very quick pasta I make all winter long. I almost ALWAYS have the ingredients on hand. The pantry items are:
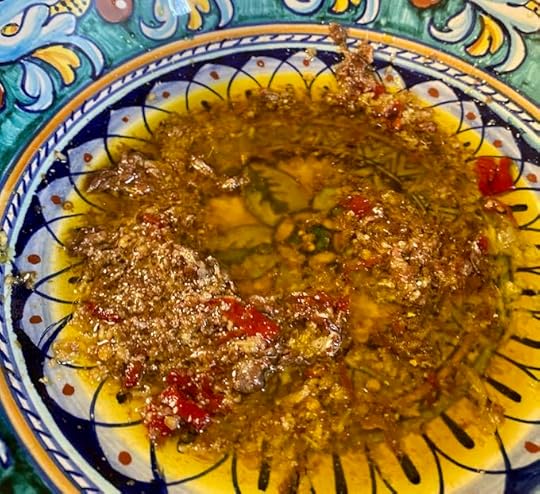
-Pasta (of course)-Anchovies (in the fridge but you get the idea)-Red pepper flakes-Olive oil (buckets of it in our house)-Cauliflower (it’s my emergency-lasts-forever-in-the-back-of-the-fridge vegetable)I’m almost embarrassed to publish this recipe since it’s such a ‘non’ recipe. This is definitely the pasta I make most when I’m on my own, starving, but also trying just a bit to cut back on things like cheese and pasta. Because the charm of this pasta (besides tasting great) is that it can be as healthy as you’d like it to be.
First of all the ‘no cheese’ part of things. This dish gets its zing from an abundance of anchovies. This means that:
If you don’t like anchovies, please move on to another recipeThe Italians will put you in jail if you put cheese on your anchovy-laden pastaAlso, the other part of this recipe that kind of puts it in the healthy eating side of the menu is that you can play around with the ratio of vegetable to pasta. The standard portion of pasta per person is 100 grams (3 oz) but with this recipe you can cut it back by half and I swear to god you’ll never miss it. (on the other hand, if you’re on team more, double the amount of pasta and you’re still getting at least one of your daily servings of vegetables while ALSO having as much pasta as you want.)
And if all this doesn’t convince you, it’s pretty much a one pot dish. So minimal clean up.
If you do end up making more than you can eat (when does that ever happen with pasta?) you can heat it up the next day by putting in the oven topped with breadcrumbs and a bit of olive oil.
For this dish I always use short pasta, usually rigatoni if I have it, but also penne or even wheels or bow ties. And this is one of the few occasions where I actually prefer some type of whole grain pasta. Since so much depends on the quality of your anchovies, please try to use your best here.
Yield 4
Note: I love the pairing of cauliflower with anchovies, but it works well with other vegetables. Fennel cut in chunks or broccoli are good options.
Ingredients1 large head of Cauliflower, but in small florets400 grams / 14 oz short pasta (whole grain rigatoni if you have it)1/4 cup olive oil4 cloves garlic, crushedRed pepper flakes to taste8 – 10 anchovies, chopped1/2 cup chopped parsleyInstructionsBring a large pot of salted water to boil. Add the pasta and then, after 3 minutes add the cauliflower. If you’re using pasta that takes a long time to cook, you may want to wait 5 minutes to add the cauliflower. You definitely want the cauliflower to be well cooked.In the meantime in a large bowl pour the olive oil. Add the garlic, red pepper and anchovies. Using a wooden spoon, break the anchovies up, mixing them with the oil and garlic to form a kind of ‘dressing’.When pasta is cooked al dente , drain, reserving a cup of the cooking water. Add the drained pasta and cauliflower to the bowl, mixing well. If it seems too dry, add a bit of the cooking water. But you probably won’t need to, since the cauliflower is wet already. Add the parsley and serve with more hot pepper for those that want it.
For more Italian meal ideas see my book The Italian Table.
And if you’d like to join me in Italy, eating food like this, you can. See this page for our upcoming Week in Italy Tours.
The post Cauliflower + Anchovy Pasta appeared first on Elizabeth Minchilli.

February 10, 2021
Campari Mocktail


I had very good intentions to do a dry January. But then the daily news just kept getting worse and worse and my vow to not drink lasted for about 10 minutes.
But now it’s February (actually the month is almost half over) and I’m having another go at it. This time around though, I’m being a bit easier on myself. I’ve decided that instead of going cold turkey, I’ll limit my cocktails to the weekend (I’m not a monster.) During the week I’ll fix myself a ‘fake’ cocktail. Because I realized it’s not just the alcohol that’s doing it for me at the end of the day, it’s also the ritual that I love.
Just like any good housewife from the ’50’s I wait for my husband to come home from work. I hand him his drink and we sit in our ‘cocktail corner’ on our pink chairs for an aperitivo. We chat. We look at our phones. We drink. We nibble. And then I go get dinner ready (I told you this was a story from the ‘50s.).
I thought I’d share my current favorite drink. I don’t think I can legally call it a mocktail because the cocktail police might be angry. It does have a bit of alcohol in it. But 1 tablespoon of Campari does not a cocktail make.
Since there’s not a lot of Campari in here, the bitters really do make a difference. I chose to use Angostura Orange Bitters because they are aromatic and add a bit of spice. I realize that not everyone has access to my liquor cabinet, nor to my extensive bitters collection, so if all you have or can find is regular Angostura, that is just fine. And if you have Peychaud? Even better. I’m in love with Fee Brothers that makes a wide range of bitters I use all the time, including this Orange one
Feel free to play around with the citrus. I used Meyer Lemon last week, which was great. But I have to say I prefer the increased sourness of lemon.
And while I used Campari (I love the taste and the pretty pink hue it gives which matches my chairs and usually my flowers if I’m lucky) I’m thinking that I’ll probably move into using an Amaro next week. But if you’re looking for a Valentine-hued drink, this one should work perfectly.
And if you’re wondering why I’m limiting cocktail consumption? Calories first of all. And also I realize I sleep better.
And if you’re wondering what that darker red cocktail lurking in the background is, it’s a Negroni. And it’s for Domenico.
Do you have a favorite Mocktail? I’m open for suggestions.


Yield 1
Ingredients1 Tablespoon Campari1/2 cup chilled sparkling water or club sodaPeychaud Orange Bitters1 Lemon wedgeIceInstructionsPour the Campari in a highball or rocks glass. Add the sparkling water. Squeeze the lemon wedge into the glass and add it. Top with ice and add a few drops of bitters.
Enjoy!

The post Campari Mocktail appeared first on Elizabeth Minchilli.

February 1, 2021
Amatriciana by Sophie
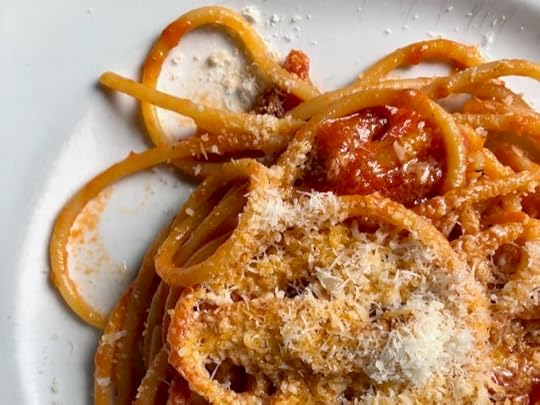
When it comes to pasta, I’m very strict and very loyal. Since I was born and raised in Rome, I absolutely adore the three holy Roman pastas: Carbonara, Cacio e Pepe and Amatriciana.
While you might of heard of the first two, Amatriciana is somehow less popular abroad. This is a shame, because I personally think it’s the best pasta sauce in the whole wide world. What’s so special about it? It has all my favorite ingredients: Tomatoes, cheese, pork and naturally, pasta.
Much like the other two pasta sauces I mentioned, Amatriciana has always been cause of ‘fights’ between Rome’s people, because of the various additions and substitutions you are allowed and not allowed to make. I am all for people being able to experiment with cooking, but there are certain traditional recipes that are considered holy, and so should not be interfered with. Amatriciana is one of those.
I’ve cooked it hundreds of times, and eaten it in almost every restaurant in Rome, so I now have a very clear idea of what my perfect Amatriciana must look and taste like. I recently spoke about it on KCRW’s Good Food podcast with Evan Kleiman. Even though we had one conflicting ingredient choice (onions), we both agreed it is an amazing pasta sauce and one of our favorites.
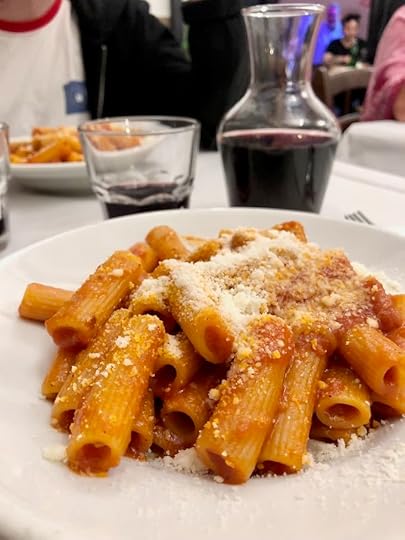
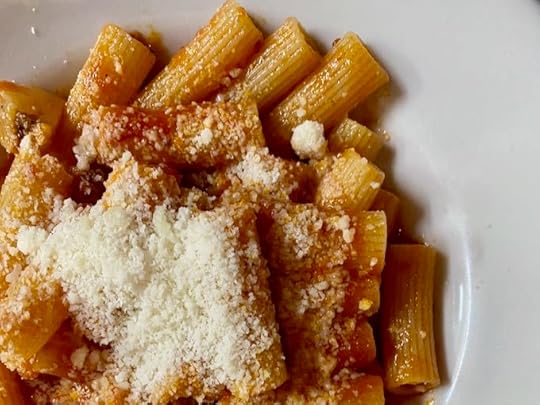
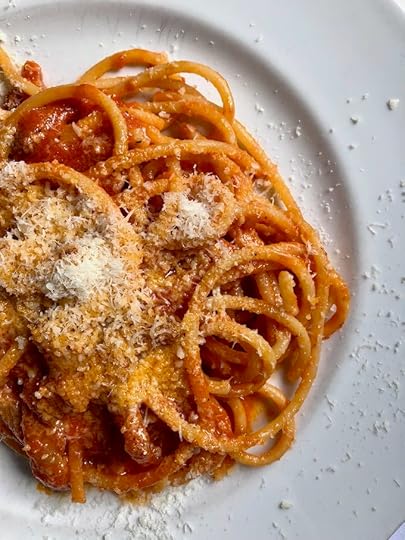
Another thing we discussed was the preferred pasta shape to go with the sauce. Traditionally it’s supposed to be Bucatini (Evan is on team bucatini) , but most people in Rome (including me) will ask to have it served with rigatoni. Not only due the rigatoni hold the sauce a lot better but they are more manageable to get from the plate to your mouth (bucatini are so slippery people end up getting frustrated, splattered or both). I personally think rigatoni is the only option, and won’t have it any other way. If you visit Amatrice, the town known for inventing Amatriciana, you will find it served with spaghetti, which is also my second best choice after rigatoni.
But since you can’t get to Rome, much less Amatrice, at the moment, here’s my recipe for making it at home. But when you do finally make it to Rome? I’ll be happy to share a plate of my favorite Amatriciana with you!
Author Sophie Minchilli
Yield 4
Please keep in mind that the sauce doesn’t have to cook very long at all, just enough time for the pasta to cook in the boiling water. Another reason why Amatriciana is the best pasta in the world: It’s quick and easy!
Ingredients3 thick slices of Guanciale (about 300 gr)1 can tomatoes (do not use fresh tomatoes it won’t taste the same, just use the best possible canned tomatoes you can find)400 gr Rigatoni or Spaghetti (do not use fresh pasta, only dry)150 gr grated Pecorino RomanoInstructionsStart by putting a pot of water to boil. In the meantime, cut your guanciale in small ribbons (or cubes if you prefer that size)
Add the guanciale to a pan with NO olive oil (the pork already has enough fat) and let cook on medium-low heat until it releases all of its fat and starts to become crispy (make sure it doesn’t burn). Add a splash of white wine and let evaporate. Once it evaporates, add the can of tomatoes to the pan and let cook.
Salt the water, then add the pasta to the boiling water . Cook until al dente, then drain.
Add the pasta to the pan with the sauce and mix it well, adding some of the grated cheese (save some for later) as you mix.
Plate and sprinkle with some more grated cheese on top
NotesVARIATIONS AND SUBSTITUTIONS:
If you don’t have access to guanciale, use the best possible cured pancetta (bacon) you can find.Do not used smoked pancetta or bacon.If you like spicy food, you are welcome to add some hot pepper flakes to the tomato sauceIf you can’t find Pecorino Romano, use any other aged sheets milk cheese. It’s important that it have a ‘sheepy-salty’ flavour.
If you’d like to join Sophie to try her favorite Amatriciana in Rome the next time you are here, join her on one of her tours.
For more recipes and stories from Italy see Elizabeth’s book The Italian Table.
The post Amatriciana by Sophie appeared first on Elizabeth Minchilli.