Elizabeth Minchilli's Blog, page 17
August 6, 2018
eggplant + tomatoes

I don’t cook eggplants as often as I should. I think I was traumatized by eggplants earlier in my cooking life. Whenever a recipe called for them, they just seemed like too much trouble. Salting them first which didn’t seem to make much sense because I never quite understood what happened to all that salt. Blotting it away with too many paper towels just seemed wasteful.
Then there was the whole frying thing. Eggplants always seemed to absorb WAY too much expensive olive oil. And for what? The result was always kind of greasy, limp, mushy disks or cubes of grayish vegetable.
There was a brief period when I discovered frozen eggplant, one of the few things in the frozen food aisle at the Italian supermarket that was both useful and tasted good. I’d use them to make a quick eggplant parmigiana or even through them into tomato sauce to sneak vegetables into Sophie and Emma’s otherwise pasta-centric meals.
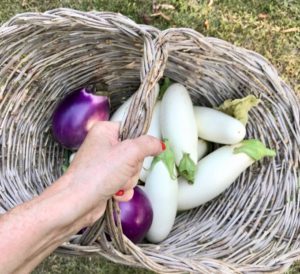
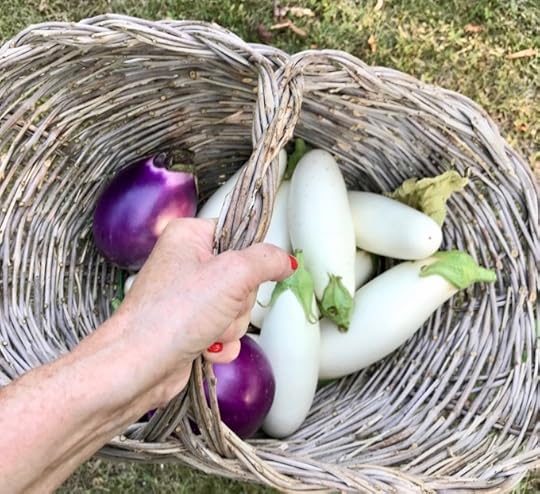
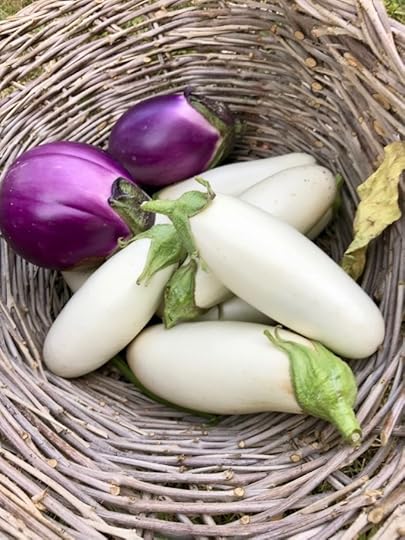
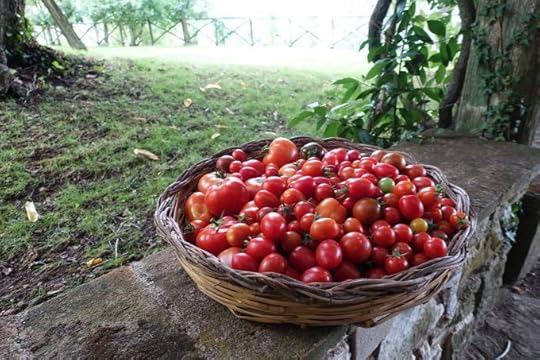
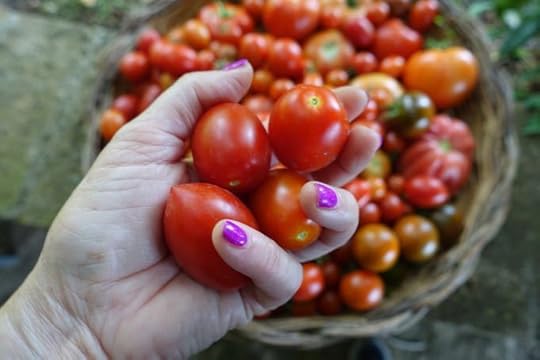
But for the most part eggplants haven’t been part of my go-to repertoire until this summer. Because this is the summer of our magnificent vegetable garden. While we usually have a so-so to good harvest all summer long (heavy on tomatoes and zucchini) this is the year when EVERYTHING is on overdrive. Including eggplants. Because of the wet winter and even damper spring, followed by a coolish June our entire orto is like an enchanted garden. We’re finally coming out from under the zuchini tsunami and are currently experiencing a flash flood of tomatoes.
And even our usually meager and sad patch of eggplants are getting into the act. While in past years I’ve usually harvested 3 to 4 miserable, dry, and bitter purple orbs, this year they are plump, sweet and just keep coming. And they have definitely cured me of my eggplant-phobia.
A few things I’ve come to realize this summer when it comes to me and my eggplants:
Fresher is better: when they eggplants are this fresh you don’t really have to salt them.
Baked is better: I’ve given up on frying eggplant. It’s just too much trouble and even if, when done correctly (which I’ve long since learned how to do) they still use a ton of oil. Also? Who wants to be standing over hot oil on an August afternoon?
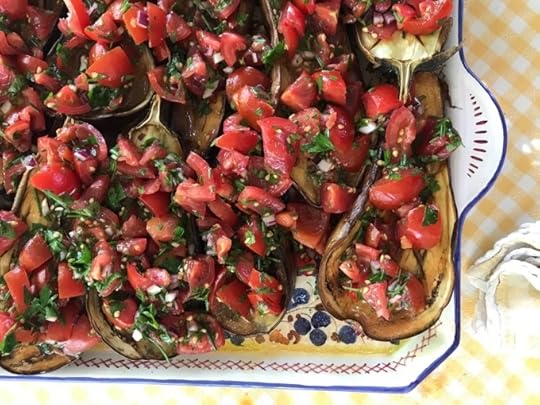
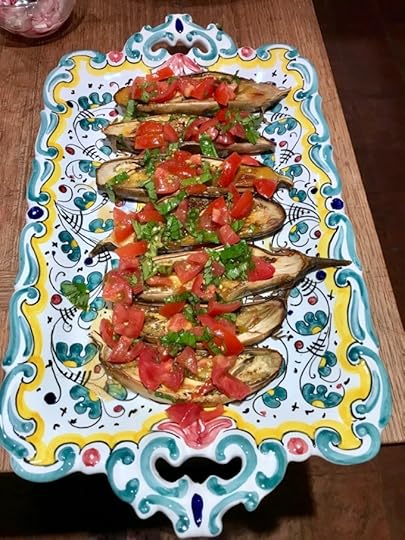
Eggplants and tomatoes are the perfect pairing: I know this may seem obvious, but rather than go the eggplant parmigiana route, which pairs cooked down tomatoes and cheese, I’ve lightened things up, and have been pairing copious amounts of chopped fresh tomatoes with any eggplant that will stay still
The following recipe has been on lunch rotation for the last few weeks and is extremely easy. I’ve used any kind and size of eggplant, including small white ones that Domenico planted. They get cut in half, stuffed with garlic, brushed with olive oil and then baked till soft and silky. Once out of the oven they get topped with chopped tomatoes which you can season any way you’d like. Salt and olive oil are givens, but I’ve also been using all sorts of fresh herbs including basil and parsley. I’d use fresh coriander if I had some. A few times I’ve also added a chopped red onion or shallot.
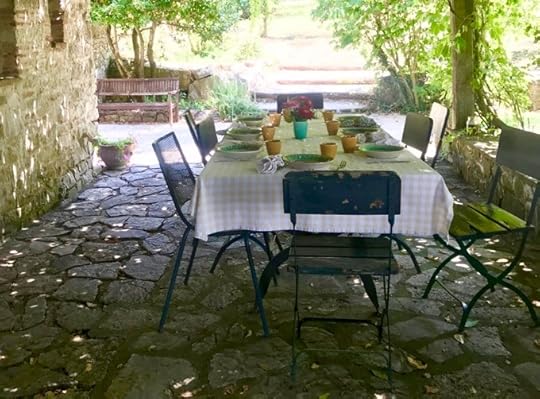
We’ve been eating this all summer long, for lunch, with some crusty bread and either mozzarella or goat cheese. I said the recipe serves six, and you can figure on either one small eggplant per person, or a half of a larger one. And while we’ve been eating them as a main course, I think they would also make a nice antipasto for a bigger meal.

eggplant + tomatoes
Yield 6
Ingredients
Six small or 3 medium eggplants
3 cloves garlic, peeled and thinly sliceds
Extra virgin olive oil
1 pound / 1/2 kilo of tomatoes
fresh herbs (basil, parsley or coriander
Instructions
Preheat the oven to 350F/ 180C
Line a baking sheet with parchment paper.
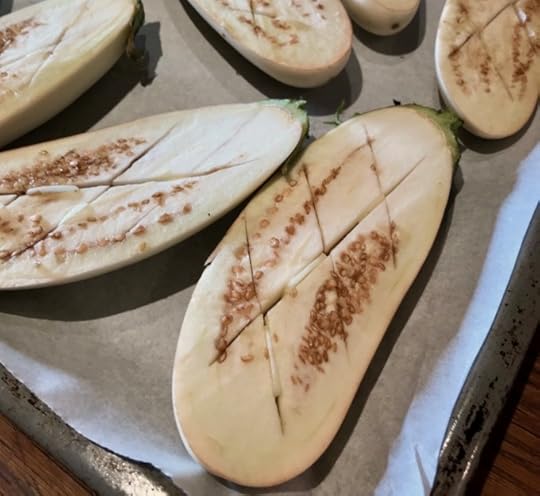
Slice the eggplants in half, lengthwise. If the eggplant still have their stem end attached, leave them, just slicing through them.
Using a sharp knife, cut into each eggplant, on the cut side, in a cross hatch pattern, being very careful not to cut all the way through to the skin. You are making slits to stick the garlic into.
Gently insert the garlic slices into the slits of the eggplant. How much garlic you use is up to you. I like it pretty garlicky!
Lay the eggplant on the baking sheet, cut side up. Drizzle with olive oil, rubbing it around with your hands. Season the eggplant liberally with salt, and place in oven. Cook until eggplant is very tender and golden. This can take up to one hour. ( a bit less for smaller eggplant.) A fork inserted into the eggplant should go in very easily.
Remove and let cool to room temperature.
In the meantime chop the tomatoes into bite sized pieces and place in a medium sized bowl. Add 1 teaspoon salt and 2 to 3 tablespoons of extra virgin olive oil. Add the chopped herb and stir. Let sit for at least 20 minutes.
When ready to serve place the eggplant on a serving platter and cover each one with heaping spoonfuls of tomato, drizzling the accumulated juices as well.
If preparing ahead of time you can roast the eggplant and store, covered, in the refrigerator. Bring to room temperature before serving and don’t perpare the tomatoes until 20 minutes before serving.
The post eggplant + tomatoes appeared first on Elizabeth Minchilli.


July 31, 2018
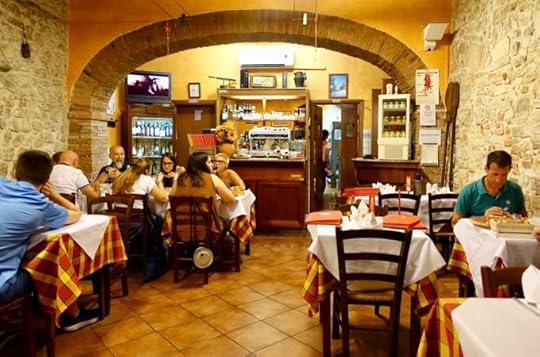
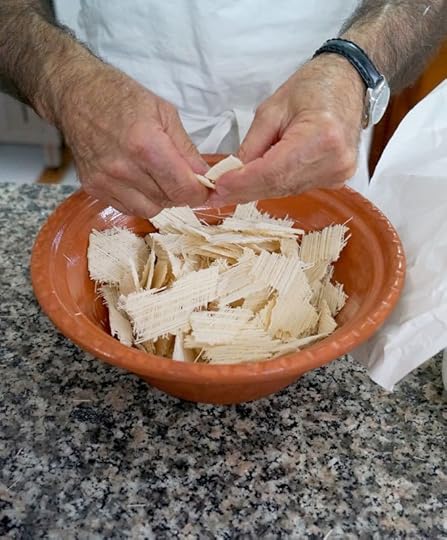
Trattoria Da Piero e Silvana {Umbria}


Sometimes the place where you live is the place you know the least. I wouldn’t say that Umbria, where we have had a home for almost 30 years, remains unknown to me. In fact, in at least 4 of my 8 books Umbria plays a starring role. But like most people I tend, after a while, to go back to places I know and love. Same restaurants, same stores, even the same museums and farms. But for the next few weeks Sophie and I have decided to go beyond our comfort zone and finally get to many of the places we’ve saving for the last few years on our wish lists.
The reason? Beyond pure curiosity, we also have 5 week-long tours coming up in Umbria in the next 9 months and we thought it would be nice to change things up a bit. One of the tours is based in Perugia, so we’ll be eating our way through that town, checking out restaurants. And two of the tours are based in Todi, where – we have realized – there are a handful of restaurants that have remained off our radar.
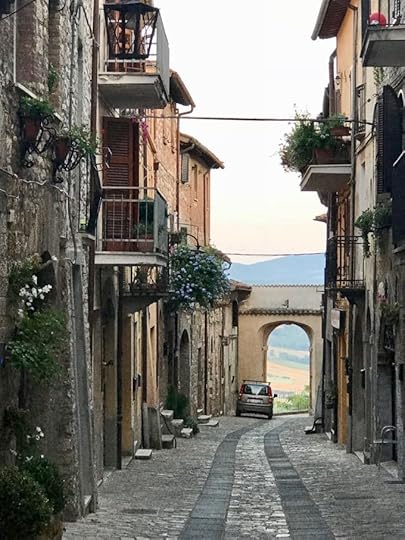
Usually, when we ‘go into town’ (Todi is the biggest town near our home) we have a tired and tested routine. We park at bottom of the hill, then take the funicular up to the top. We get out, marvel at the view out over the Tiber valley from the Giardini, then have a little passegiata up towards the main square. Most of our favorite places – restaurants, pizzerie, linen store – as well as things like pharmacies and banks – are right along this short but incredibly beautiful route. And while we always talk about wandering the alleys leading in other directions, since it involves steep climbs (Todi is a hill top village) we tend to just keep it as a future goal as we sip Negronis in the piazza.
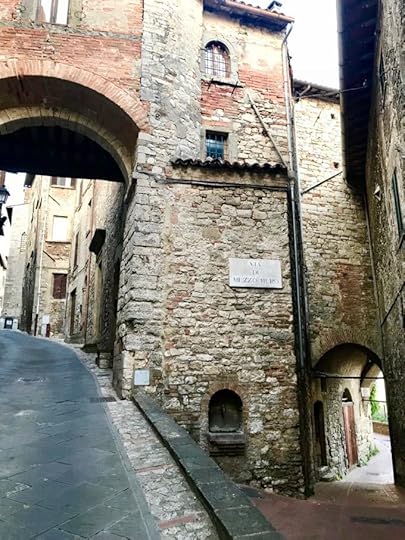
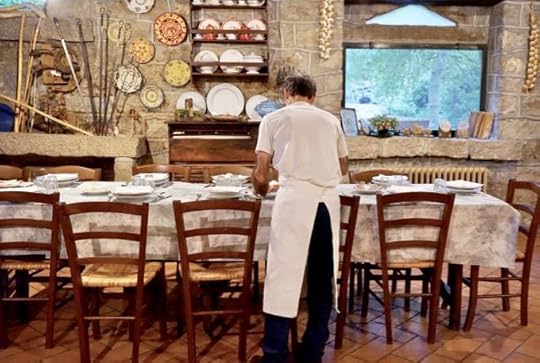
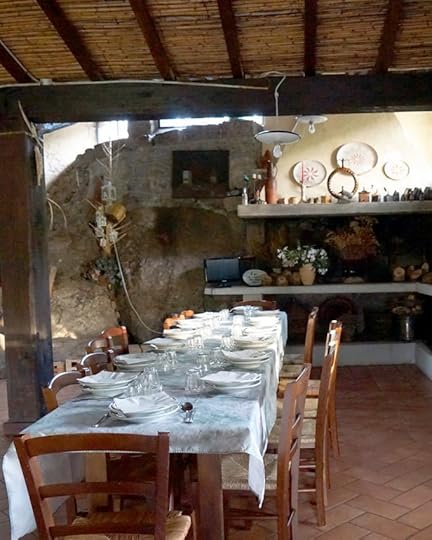
But last night we ventured out on new paths. We parked at the foot of the hill, next to Bramante’s Consolazione, and wandered along narrow medieval alleys towards our destination: Trattoria Piero e Silvana.
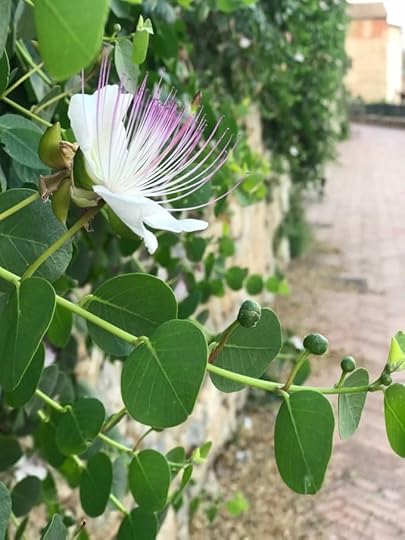
Along the way we discovered a magnificent walk way above the medieval walls with views out over the other side of town. And those walls? Covered in caper plants that Sophie and I are planning on going back to pick.
We sat outside at Piero e Silvana’s and had, I think, the best table in the house. Perched on the corner of the outside terrace, our table looked across the street and had a picture perfect view down Via del Porto Nuovo where – at the end – the ancient archway framed the pristine valley below.
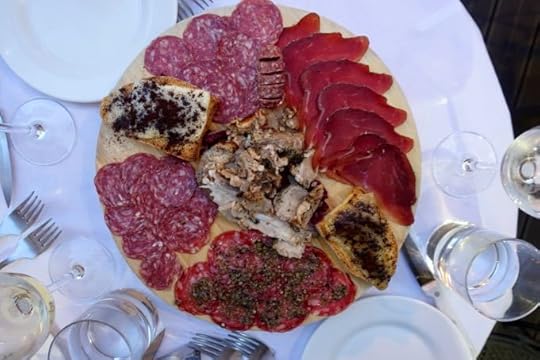
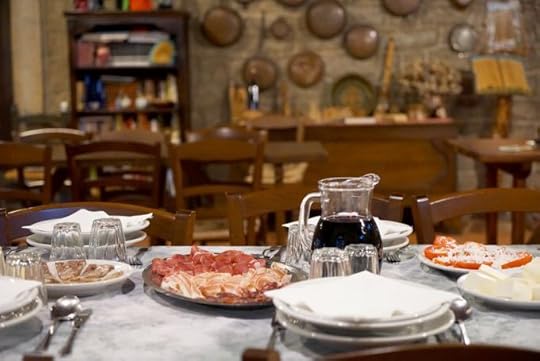
Our meal was as perfect as the view. Nothing fancy, which is just the way we like things. Rustic home cooking by the family that owns the place. We started with a charcuterie board (Sophie was craving salami) which included truffle topped pork salami, wild boar salami, deer prosciutto and some of the best home made porchetta I’ve had in a while. The platter also included two crostini topped with bubbling pecorino cheese that had been drizzled with honey and scattered with toasted coffee grounds which was fantastic.
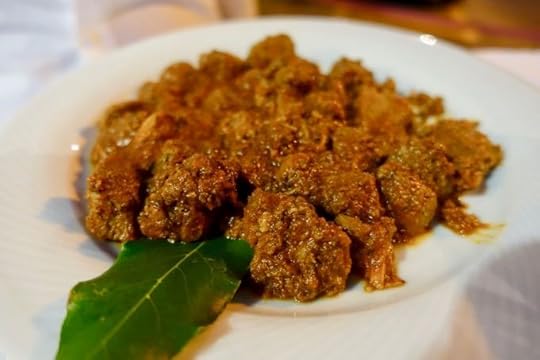
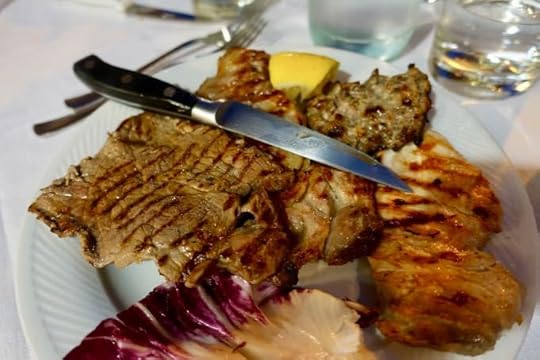
Believe it or not, we were still feeling very meaty and so Domenico ordered stewed boar, which was in a rich and spicy sauce. Sophie and I, instead, order the mixed grilled meats which included a pork chop, a veal chop, chicken breast and a sausage. All perfectly seasoned and grilled, but WAY too much, so we ended up getting a doggie bag. (which actually made Pico quite happy).
Unfortunately we were too full for dessert, which I saw when I went inside to pay our bill. Cute jars full of tiramisu and panna cotta that we’ll just have to save to look forward to the next time we go.


Trattoria Piero e Silvana
Via Giacomo Matteotti 91
Todi, PG
Tel: 075.894.4633
Open Lunch and dinner, Thursday – Tuesday. Closed Wednesday.
For more information about eating in Umbria and elsewhere download my app, EAT ITALY, available for iPhone or Android.
And for more culinary and travel inspiration please buy my books:
The post Trattoria Da Piero e Silvana {Umbria} appeared first on Elizabeth Minchilli.

July 25, 2018
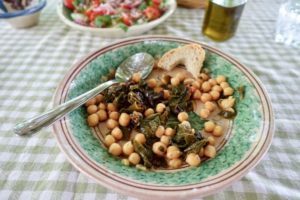
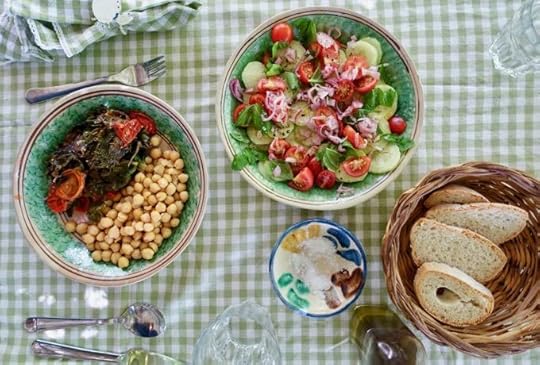
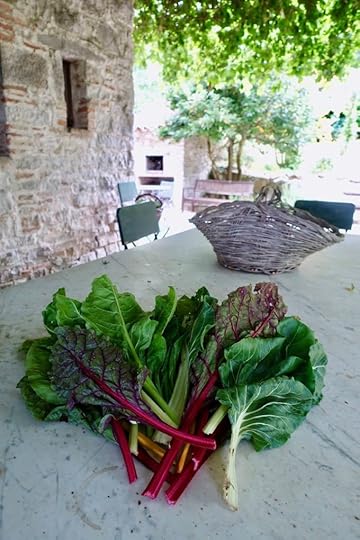
swiss chard + chickpeas
One of my favorite sources of recipes is taking to people at markets. The people there are either shopping for the next meal (and so thinking of cooking) or else selling ingredients (and so thinking of cooking). In a country that is obsessed with their next meal, the markets of Italy are the epicenters for getting advise on how to best deal with what’s in season.
What really cracks me up is how passionate people are about recipes. I can’t tell you the number of times, as I was paying for, say a kilo of small white eggplants or a bag of fresh shelling beans, and asked the vendor how he or she would cook them, that a fight has started. Just as the vendor would begin to tell me a recipe, someone in back of me would elbow their way to the front to add their two bits. While others in the back would start shouting at me, things like “no, not garlic, onions!” or “you have to use lemon juice, never use vinegar!”.
More often than not I go home with a basket full of ingredients and a notebook full of recipes.
The main thing that I take away from these sessions, though, is a ‘way’ of cooking, more than a specific recipe (although I get those too). For instance, one of the first recipes I learned while visiting Domenico’s mother in Bari was the traditional Fave e Cicoria. A seemingly simple (dare I say boring?) plating of boiled greens on one side of the plate and puree of dried fave beans on the other. When made correctly (with bitter, winter chicory and fave cooked to silky perfection) it is heaven on a plate.
Over the years though, I’ve taken this ‘idea’ of greens and beans, and run with it. I”m not sure if the ladies in the market of Bari would agree with my changes. They probably wouldn’t yell at me or anything. But I have a feeling they would, at the very least, shrug their shoulders in mild dissaproval.
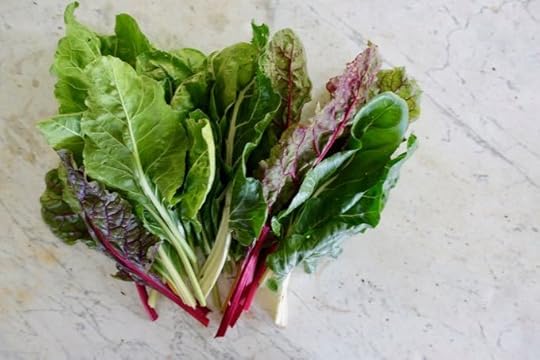
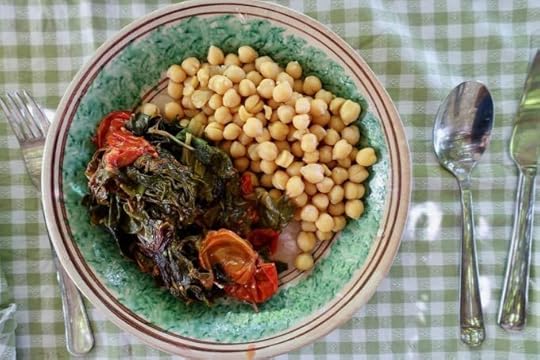
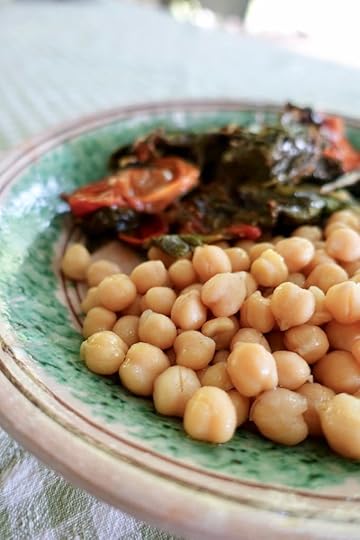
This past weekend up in Umbria I harvested a huge bunch of Swiss chard from the vegetable garden, and ‘stewed’ it, following one of my mother in laws Pugliese recipes for broccoli greens. On the other side of the plate? Simply cooked chickpeas. It wasn’t the same as Fave e Cicoria. There wasn’t the strong contrast of bitter and bland. I didn’t even have the contrast of smooth and rough. But it was still a perfect pairing, and makes a delicious (and meatless) main course.
Also? I love the way the dark greens and light legumes look on a plate.
Here follows my recipe, but feel free to improvise. Any greens will do, really. The trick is that you really do want to cook them. This is not the dish for slightly wilted greens. You want them good and cooked. Broccoletti would be perfect, as would spinach. Chicory is obviously traditional. On the legume side of the plate you could substitute almost any bean, but do try to go for quality. (and yes, I mean starting out with dried beans, not canned). If you want to go the pureed route and can’t find shelled dried fave beans, you can even use split peas.
Traditionally, in Puglia, they use the semi dried, thick skinned tomatoes that are thrown in almost everything for a whammy of umami. I used cherry tomatoes from our garden because we were drowning in them (don’t hate me). If it’s not tomato season, and you don’t have a rope full of semi dried tomatoes hanging from your ceiling, then use canned tomatoes. Imported canned cherry tomatoes if you can find them, but regular san marzano will be fine too. If you do use canned tomatoes, then also use the juice from the can.

Yield 4
Ingredients
1 1/2 cup dried chickpeas
2 bay leaves
1 medium yellow onion, peeled and cut in half
3 cloves garlic (you can leave the peel on)
1 teaspoon kosher salt
1/4 cup extra virgin olive oil
2 cloves of garlic, chopped
1/4 teaspoon hot pepper flakes
1/2 pound cherry tomatoes, split in half
1/2 teaspoon salt
1 1/2 pounds Swiss chard, trimmed of tough stalks
Instructions
Place the dried chickpeas in a big bowl of water for at least 6 hours or over night.
Drain the chickpeas, rinse them, and place them in a large heavy bottomed pot, and cover by 2 inches with water.
Bring to a simmer. The chickpeas will give off their starch in the form of foam. Using a spoon, scoop this up and discard. Once the foam stops forming, add the bay leaves, onion, garlic and salt. Let simmer over very low heat until the chickpeas are very tender. This will usually take at least an hour, or even more if your chickpeas are older. When they are finished cooking, let cool in their water.
In the meantime prepare the greens.
Pour the olive oil into a large, saute pan with high sides or pot and add the garlic and red pepper flakes. Over medium heat cook until garlic begins to become fragrant (about 4 minutes). Add the tomatoes and salt, and continue cooking about 10 minutes, until the tomatoes have begun to break down. Add the greens. They will fill the pot, but just mash them down and cover. After a few minutes uncover and give them a good stir. They should have reduced quite a bit. Add 1/4 cup of water, cover and let stew for at least 30 minutes. You want the greens to be really good and cooked.
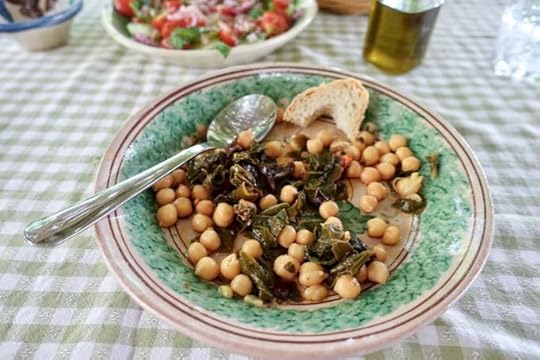
To serve: Place some of the greens and some of the chickpeas in each person’s dish (a pasta bowl). I use a slotted spoon to scoop up the chickpeas, and use tongs to get the greens. What you are aiming for is a dish that is half beans and half greens. Serve with olive oil on the table, which should be swirled abundantly on top.
The plates I used during this meal are made buy Giacomo Alessi, who has a studio in Caltigirone in Sicily. I bought them from both Alessi and also, more recently, a small shop in Noto, Angolo di Nina.
Giacomo Alessi
Via Francesco Schiciano 10
Caltagirone , Sicily
+39.0933.316.94
International Customer Service: +32.470.2520.16
Angolo di Nina SantoroCorso Vittorio Emanuele 154
Noto, Sicily
+39.0931.574.055
For more information about eating in Italy download my app, EAT ITALY, available for iPhone or Android. (Sicily is coming soon!)
And for more culinary and travel inspiration please buy my books:
Eating My Way Through Italy
Eating Rome
The post swiss chard + chickpeas appeared first on Elizabeth Minchilli.

July 16, 2018
granarium


From my house in Umbria I’ve been able to see the changes in farming first hand. One by one the fields have become fallow as my older neighbors pass away and the new generation either lacks the skills or will to farm, or just sells the entire farm.
That said, there are still farms that manage to make a go of it. And these farms usually have some sort of retail business attached to them, which makes them both easy, and delicious, to visit.
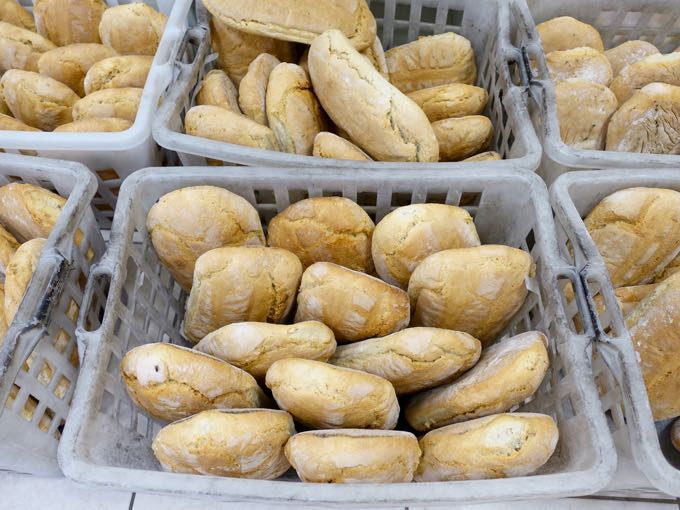
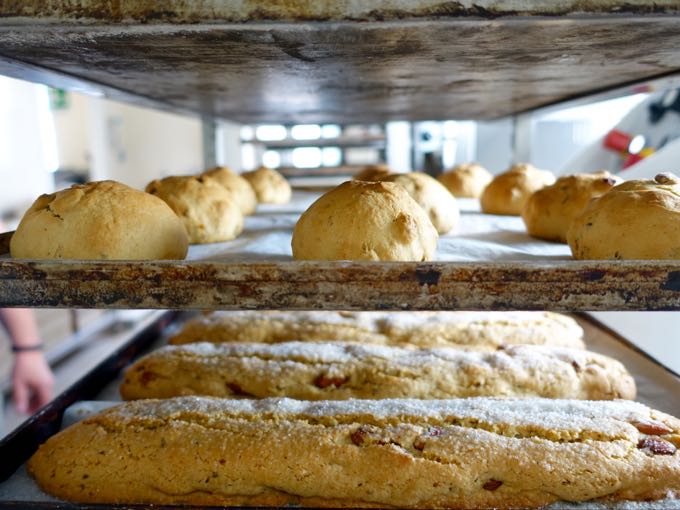
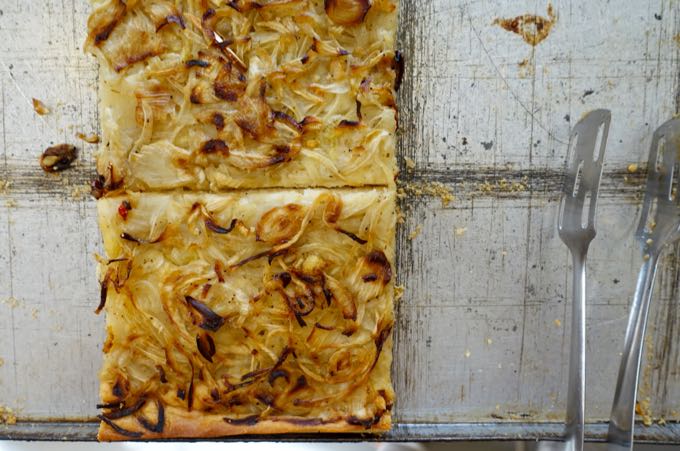
It’s hard enough to find a good bakery these days, but when you find one that also grows their own wheat, mills it, and then bakes it into delicious breads, cakes and savory treats, it seems like a small miracle.
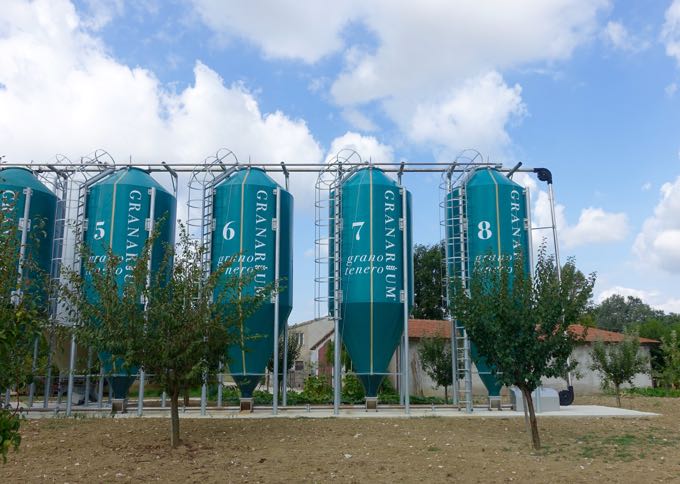
Granarium, created by the Lucarelli family, is located in the plains near Bevagna, in the middle of fields full of wheat. The wheat from the farm is threshed into grain that is stored in silos behind the mill. The only means of preservation is movement and air: there is no refrigeration involved. As the grain is needed, it is brought inside and stone mills grind it into various grades of flour. Then, in the room next door, natural yeast is added and the loaves of bread are formed and baked in wood fired ovens. Finally, the bread reaches the public in the darling store in the front. The entire cycle — from field to table — takes place on one estate.
This type of set up is extremely rare, and is the only one I know of in Umbria, and I actually don’t know of any other place that goes from seed to bread, organically, by one family. In fact, it was extremely difficult to obtain the permits to even open this type of operation, since Granarium is not simply a farm, or just a mill, or only a bakery. But the Lucarelli family persisted and managed to create something completely unique.
Their aim was to reconnect the links along the broken chain. “Up until 100 or even 50 years ago, a baker would buy his flour directly from a mill, and so know what flour he was getting and how it changed from year to year. Just as the miller dealt directly with the farmer who grew the wheat, dealing with the vagaries of weather and able to adjust. And the person at the end of the chain, the consumer, would buy their bread from the same baker for most of their lives. They would have long discussions about the bread itself: how long it took to rise, if there was any problems, or if a batch came out particularly good. All of these personal contacts and interactions were an integral part of the loaf of bread which came to the table. Our hope is to recapture that essential fact of life before it is too late.”
The owners are very proud of what they have created, and very generous with their hard earned knowledge. The entire farm, mill and bakery is open to visits. In addition to selling bread, and other baked goods, they also sell their flours as well as legumes all grown on their farm.
This post is an excerpt from my new book, Eating My Way Through Italy.


Granarium
Via Madonna della Pia 14
06031 Bevagna PG
tel: 0742.361114
Open daily 7am to 1:30pm
For more information about eating in Umbria and elsewhere download my app, EAT ITALY, available for iPhone or Android.
And for more culinary and travel inspiration please buy my books:
Eating My Way Through Italy
Eating Rome
And for my design oriented followers: Italian Rustic: How to Bring Tuscan Charm into Your Home.
The post granarium appeared first on Elizabeth Minchilli.

July 8, 2018
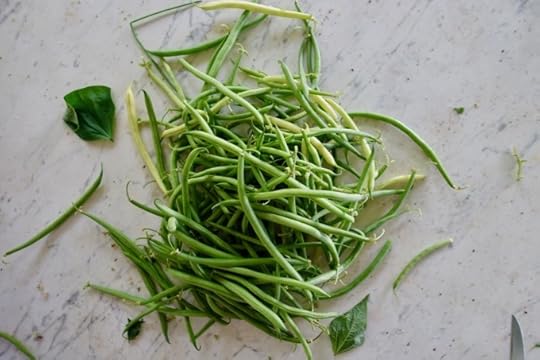
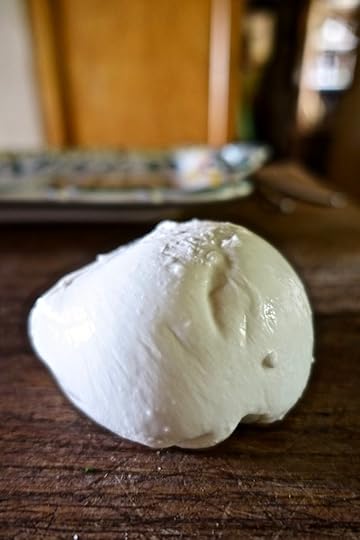
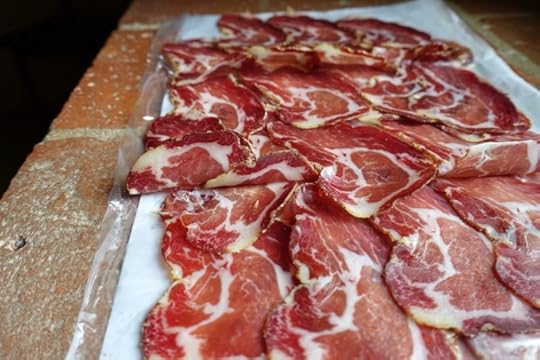
green bean + mozzarella salad
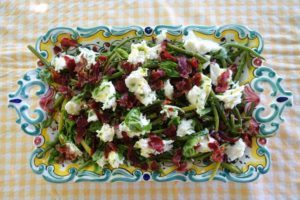
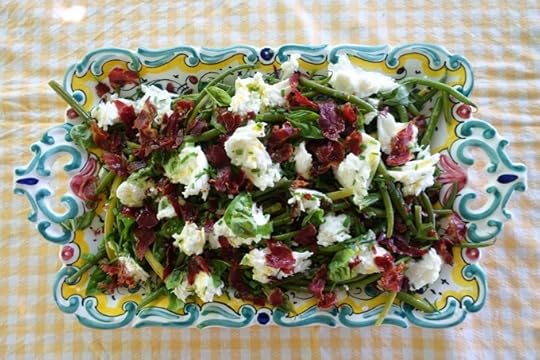
My favorite way of eating in the summer is to serve a salad or two, along with some fresh mozzarella or ricotta, and maybe some sliced prosciutto. Even better (and easier) is to combine the salad with the cheese or cured meat on one platter. The typical way down this road leads to a Caprese (tomatoes and mozzarella) or else Prosciutto and Melon. But over the years I’ve managed to finagle all sorts of vegetables into mixtures that combine cheese and/or pork into salads that are hearty enough to satisfy everyone but still light enough to be called a salad.
This past weekend, faced with an over abundance of green beans in our garden I decided to combine them with some of the way-too-much mozzarella I had bought. Also? When I was at the cheese store I some how came home with a 1/4 pound of capocollo. So I needed to use that as well.
This is an easy salad to pull together and open to infinite variations. One thing to keep in mind is that you want to cook your green beans thoroughly. They should be soft and tender to the bite, not firm. Dress them with olive oil and vinegar. And then top them with cheese and/or pork. I’ve used everything from fresh goat cheese to crumbled aged blue cheese. And while I used crispy fried pieces of capocollo this time, I’ve also used pancetta, prosciutto and even bresaola when I’ve got non-pork eater. Skip the meat part entirely for a vegetarian version.
One more important tip: keep it pretty. Don’t just dump the entire salad into a big bowl and toss. Layering your salad as you go on a pretty platter makes it more appetizing. Also? All the good bits (cheese and meat) don’t sink to the bottom!

Ingredients
1/2 kilo / 1 pound of green beans, trimmed
1 small red onion or shallot, finely chopped
4 tablespoons of red or white wine vinegar
1/4 teaspoon of fine sea salt
4 tablespoons of extra virgin olive oil
3-4 oz of fresh mozzarella
6 slices of capocolla
1/4 cup or so of fresh basil leaves
2 tabelspoons chopped fresh chives
Instructions
Place the chopped onion in a small bowl and add the vinegar and salt. Stir and let sit for at least 15 minutes.
Steam the string beans until very tender, drain and let come to room temperature.
Heat a medium sized frying pan to medium high heat. Add the slices of capocolla in one layer, with no oil, and let cook. They will start to sizzle and should get dark and start to shrink a bit. Turn them over as they start to crisp up. When they start to turn brownish at the edges, remove them from the pan to a paper towel-covered plate to drain. It should take about 8 minutes tops. As they cool they should get crisp.
To assemble the salad:
Place the cooked beans in a medium sized bowl and toss with the marinated onion and the vinegar, along with the olive oil. Taste and adjust for salt and pepper.
Mound the beans on a medium sized serving platter. Using your hands, rip the mozzarella into bit sized pieces and scatter on top. Using your hands again, break up the capocollo into bits and scatter over top.
Scatter herbs over the whole thing and drizzle with a bit more of your best extra virgin olive oil. Serve.

The post green bean + mozzarella salad appeared first on Elizabeth Minchilli.

July 2, 2018
making + eating su filindeu pasta {sardinia}
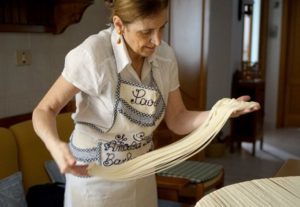
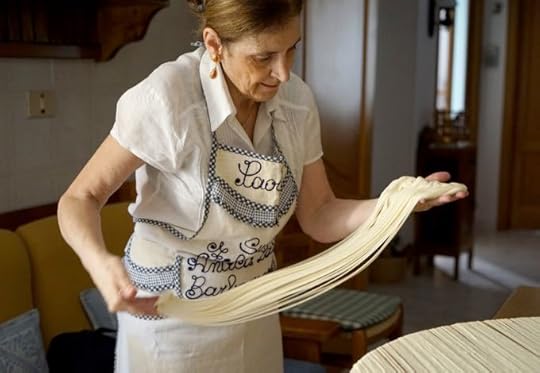
During an otherwise tedious Sardinian Tourism Board press conference about 4 years ago, I discovered one of the rarest pasta in Italy: su filindeu. In a far corner of the room, crowded with journalists, a lone woman had set up a table, where flour, water and salt were magically being pulled into the thinnest strands of pasta I had ever seen. I stood mesmerized, made a short video, and vowed I would somehow make it back to Sardinia one day to find out more about this pasta. When I started working on my latest book Eating My Way Through Italy, I decided that this was the time. My search eventually led me to one of the most remote and isolated areas of Sardinia where I tracked down Paola Abraini, one of only a handful of women who know how to make this pasta.
By the time I arrived at Paola’s apartment, I had been thinking about su filindeu, and reading about it, for about two years. In the meantime there had been a Jamie Oliver video floating around Facebook and so I assumed it was not that much of a secret thing any more. But as I drove around Sardinia the two days before my appointment with Paola, I had a curious reaction from any Sardinian I mentioned su filindeu to. They had no idea what I was talking about. At all. I’d start to explain that it was thin pasta that was stretched by hand and then eaten in broth. Still a blank stare. So rare was this pasta that not even people who lived an hour away from the village had even heard of it.
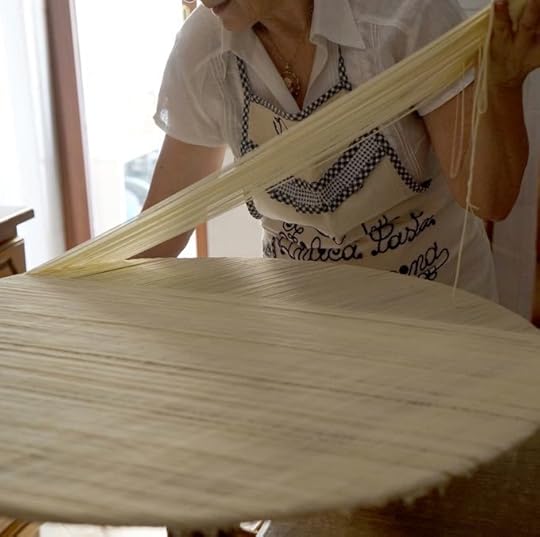
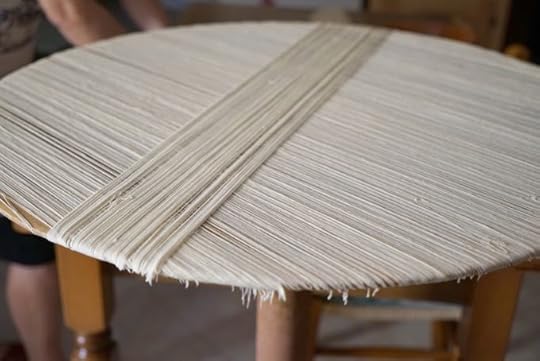
Paola lives in the city of Nuoro, located in the central part of Sardinia, far from the sea. She had invited me to her home, an apartment on the 3rd floor of a modern building, and into her small kitchen, where — over the course of a few hours — I had a crash course in stretching dough.
The pasta (which is made for a religious holiday) is rarely served in restaurants, and only very locally. And if you do find some where that serves it, it is certain that either Paola, or one of her relatives, has made it. Paola apologized that day that she couldn’t serve me a bowl of soup, but explained that her apartment is very small, she had other things to do, and besides “It’s quite time consuming to make.” Although making a bowl of broth seemed pretty simple after the acrobatic and slightly magical feat of stretching the noodles.
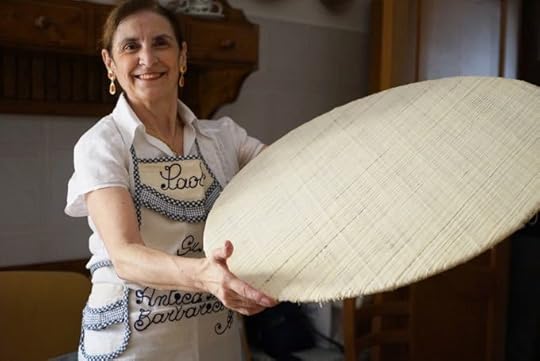
But Paola didn’t leave me high and dry, since she had put me in touch with an agriturismo (farm hotel) where she promised they would make it for me. And in fact, as I left, she handed me a pack of su filindeu she had made the previous day, already dried up, cut into manageable sheets, and ready to go. “Give these to Bastiano, he is expecting them.”
Here below is the video I made of that special day in Sardinia. And if you’d like to know more, there is an entire chapter about my adventures leaning about Su Flindeu in my book Eating My Way Through Italy.

And if you’re curious about my adventures in Sardinia and the rest of Italy you can buy my newest book, Eating My Way Through Italy : Heading Off the Main Roads to Discover the Hidden Treasure of the Italian Table.
For more of my favorite places to stay and eat in Italy make sure you download my app EAT ITALY. , Eat Italy is a free app, with many cities and regions available as in-app purchases (Venice, Rome and Florence) or completely free (Puglia, Umbria, Torino, Naples, Milan and more coming). EAT ITALY is available to iPhone or Android.
I also lead week long tours in Umbria, Rome and Puglia. I’d love it if you could join me!
The post making + eating su filindeu pasta {sardinia} appeared first on Elizabeth Minchilli.

June 25, 2018
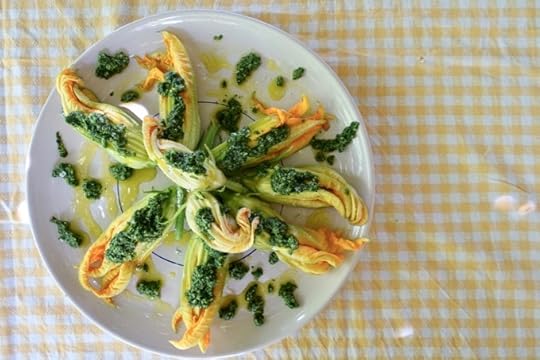
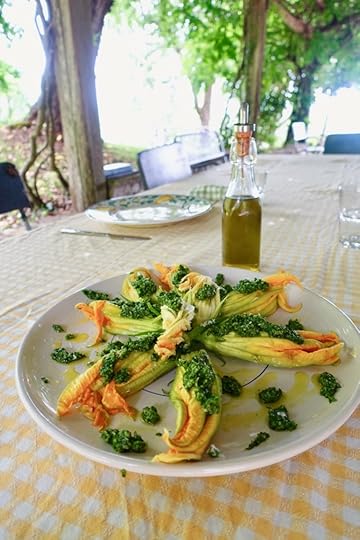
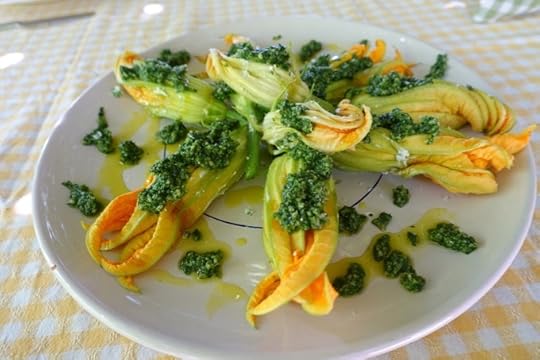
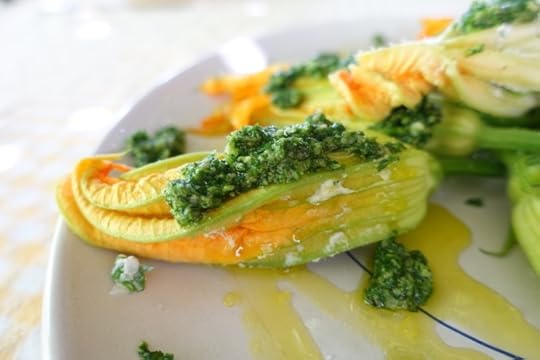
Ricotta Stuffed Zucchini Blossoms

Over the last 20 years or so of having my own vegetable garden, I pretty much thought I’d shared all the variations on the theme of having way too many zucchini. But it is the plant that literally cannot stop giving. This year our vegetable garden in Umbria is in over drive. After last year’s disaster of late frost followed by heat wave of deadness, this year’s early sun and tons of rain means that we have a jungle filled with not only early and abundant zucchini, but also baskets full of string beans, salad, and even some WAY early tomatoes.
But let’s get back to zucchini business. Faced with a refrigerator full of perfect zucchini that our neighbor had kindly picked for us while we were gone this week, Friday night I whipped up a batch of zucchini risotto which I realized I’d never shared on the blog before!! (that will be coming soon). Then on Saturday I made Aglio, Olio Pepperoncino e Zucchini. Another non-shared recipe (also coming soon). But the winner of the weekend by far was something that I’d never made before: raw zucchini blossoms stuffed with fresh ricotta and drizzled with arugula pesto.
Although I’ve stuffed many a zucchini blossom in the past, I’ve usually dipped them in batter to be fried to a crisp. This time I decided to take a cue from a dish I’ve been enjoying at Casa Bleve, in Rome, for most of my life: Ricotta Stuffed Zucchini Blossoms.
To answer your first question before you’ve even asked it: Yes, you can eat the blossoms raw. Chopped into salads they at a burst of color, and you can also use them as my friend Rolando does to top a summer frittata.
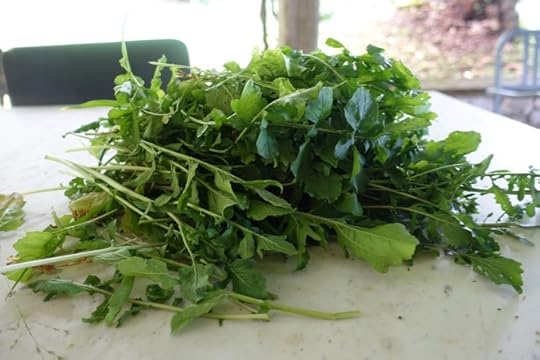
But if you’ve got just opened, fresh as can be, zucchini blossoms then I encourage you to follow this recipe. The delicate taste of the blossoms – which hovers somewhere between flower and vegetable – is both earthy and herby at the same time. To increase the herby factor, I add tons of chives and arugula to the mix. And since the entire taste is so ethereal and delicate, I like the drizzle of pesto on top, to add a bit of zing.
Some comments on the ingredients:
Zucchini Blossoms: if you are lucky enough to have your own vegetable garden, then pick your blossoms early in the morning, when they are wide open (later they will close and start to wilt by the next day). What you want are the male blossoms, attached only to a stem. The female blossoms are attached to the end of the zucchini. If you are buying your blossoms from the market look for perfect bright orange flowers. They should be sold in a bunch, with stems attached. But if you see baby zucchini with perky looking female blossoms you can certainly use them, by trimming them carefully off the end of the zucchini.
Pesto: I’ve provided a recipe for a very delicate Arugula Pesto (with no added cheese). But if you happen to have a bit of other pesto on hand, by all means use that.
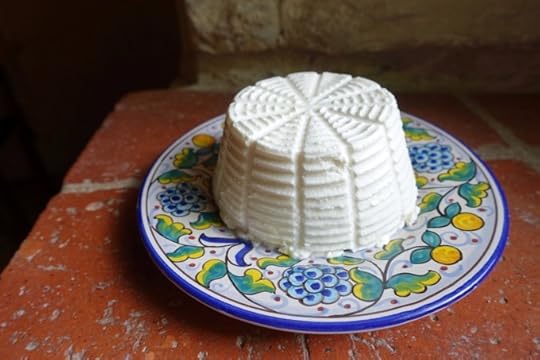
Ricotta: Over the course of editing my next book, The Italian Table, I’ve had to struggle through terms I use to refer to ricotta versus what is easily available in the USA. I never knew I had to say ‘Fresh Ricotta’ to refer to what in Italy is just plain ricotta. So while I use farm fresh ricotta in this recipe (made from sheep roaming the hills not far away) I realize you may not be so lucky. No fear. You can easily substitute fresh (and local?) goat cheese.

Ricotta Stuffed Zucchini Blossoms
Ingredients
For the Stuffing
1 1/4 cup fresh ricotta
1/4 cup chopped arugula
1/4 cup chopped chives
For the Pesto
3/4 cup chopped arugula
1/2 clove garlic
1/8 tsp salt
1/8 tsp freshly ground black pepper
1/3 cup olive oil
1/4 cup pine nuts
Instructions
To prepare your blossoms take a peek inside and make sure you’ve removed any stray bugs. Mine are usually teaming with ants. Next gently pinch out the stamen (that nubby yellow thing at the base)
Prepare the stuffing by putting the ricotta in a small bowl, and adding the herbs. Use a fork to whip it smooth.
To fill the blossoms: Using your fingers gently open up one side of the blossoms so that you can gently spoon in about 2 tablespoons of ricotta per flower. It’s hard to give precise amounts, because each flower is different. Pinch the flowers closed and lay it on a serving plate, seam side down. Repeat for the rest of the blossoms.
To make the pesto: place all the ingredients in a small blender and pulse until blended. Scrape out into a small bowl.
To serve: drizzled a bit of pesto over each filled blossom (about a teaspoon or so each) and a bit more on the plate around it.
For more details about my adventures in Umbria and elsewhere see my newest book, Eating My Way Through Italy.
And if you’re traveling and want to know exactly where to eat, please download my app, Eat Italy. Available on iTunes and Android too!
Want to join me for a Week in Italy? Find out more here.
The post Ricotta Stuffed Zucchini Blossoms appeared first on Elizabeth Minchilli.

June 15, 2018
EAT ITALY for android + update

I’ve been so focused on celebrating the publication of my latest book, Eating My Way Through Italy, that I haven’t had a minute to tell you about my other big news. EAT ITALY, my best-selling app is now available for Android!!
I first published my app over 8 years ago. At first there was Eat Rome, which was the first English language guide to eating in Italy. This soon lead to Eat Florence and Eat Venice. In 2016 I relaunched them under the umbrella app EAT ITALY, adding regions and cities like Umbria, Puglia, Torino and Milan. From the very beginning these apps have been a top seller on iTunes, and it’s been a way for me to share my favorite places to eat throughout Italy with all of you. Well. Almost all of you.
From the beginning I have received messages asking me to please, please, please make the app available for Android devices. Since the last update of the iPhone OS meant I had to completely revamp the software anyway (thanks a lot Apple), it made it feasible to finally offer Eat Italy at the google play store.
In case you are curious, the way the app works is that I am ALWAYS updating the content. That part is easy and somewhat painless. But behind the scenes the software needs updating too, and that I leave to trusted professionals (thank you Gokul and James!). And so while this email is mainly about the launch of EAT ITALY for Android, I am also happy to tell you that the software for the iOS version has been completely retooled as well. Better mapping, easier filtering and a lot more nifty tools to make eating your way through your next trip to Italy even easier.
Also? I will be adding 8 new regions and cities in the next several months. While working on my most recent books I traveled all over Italy and the restaurants I discovered in places like Naples, Positano, Sicily, Trieste and more will be making their way into the app. If you already have Eat Italy installed in your phone, the new guides will appear magically.
Did I mention that most of the app is completely free? You can download Eat Italy for free. Then you can decide which cities you would like to download onto your device. Rome, Venice and Florence cost a few dollars each. But the rest of the cities and regions are, and will remain, completely free.
Eat Italy is available on iTunes here.
Eat Italy is available for Android here.
Enjoy!!
The post EAT ITALY for android + update appeared first on Elizabeth Minchilli.

June 3, 2018
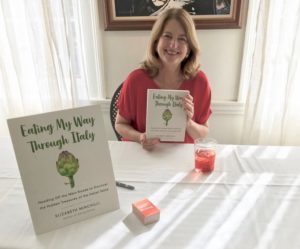
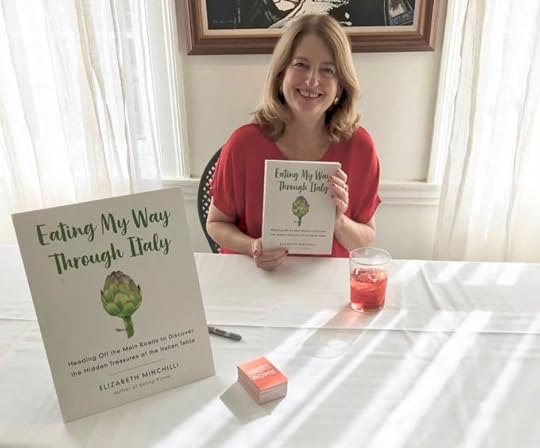
Eating My Way Through Italy is here!
I’ve been so busy traveling around the USA on book tour that I had completely forgotten to mention this big news here on the blog.
Eating My Way Through Italy is out!!! The official publication date was May 29 and so many of you have already written to me to tell me that your copies have arrived. Thank you so much for pre-ordering!! And I’d love to hear back from you once you’ve had a chance to read it. (And if you’ve bought your copy through Amazon, reviews are always appreciated!!)
I’m currently writing this post while curled up in my bed at my friend Evan’s home in Los Angeles. While I rest up from midway through a very busy, but extremely fun, tour Evan is in the next room whipping up a big batch of Orecchiette with Spring Pesto that we are bringing later today to a book signing at Now Serving here in LA. I’ve still got a few stops left on the tour, both here in LA and in San Francisco. (you can read the details here: all of the last stops in San Fransisco are open to the public so please come by!)
Thanks to all of you who have been coming to these events. It is beyond wonderful to meet you in person and know that you appreciate what I do. THANK YOU!!!!
For those of you who are just tuning in, here is a description of Eating My Way Through Italy:
Divided geographically, Eating My Way Through Italy looks at all the different aspects of Italian food culture. Whether it’s pizza in Naples, deep fried calamari in Venice, anchovies in Amalfi, an elegant dinner in Milan, gathering and cooking capers on Pantelleria, or hunting for truffles in Umbria each chapter includes, not just anecdotes, personal stories and practical advice, but also recipes that explore the cultural and historical references that make these subjects timeless.
And I’d also love to take a moment to say mille grazie to Lidia Bastianach for her lovely blurb which appears on the back cover:
“Discovering Italy is all about traveling through the back roads and sitting down at the table with Italians. That is exactly what Elizabeth has done in her new book; she takes you to beautiful hidden gems all over Italy. She guides you regarding what not to miss and what to locally eat and where to eat it. On top of that, she scattered delicious regional recipes throughout the book. Eating My Way Through Italy is a savory book on Italy, one that you will take with you on your next trip to Italy AND to your kitchen when you long for those Italian flavors at home.”
―Lidia Bastianich, chef/restaurateur and host of Public Television’s Lidia’s Kitchen.
You can pick up a copy of Eating My Way Through Italy at your local book store, or click here for links to where to buy it online. It’s also available in ebook version!
And if you are traveling to Italy don’t forget to download my app Eat Italy. I’ll be adding LOTS more entries in the next few months to cover a LOT more regions. Also: Android version coming any minute now.
The post Eating My Way Through Italy is here! appeared first on Elizabeth Minchilli.

May 21, 2018
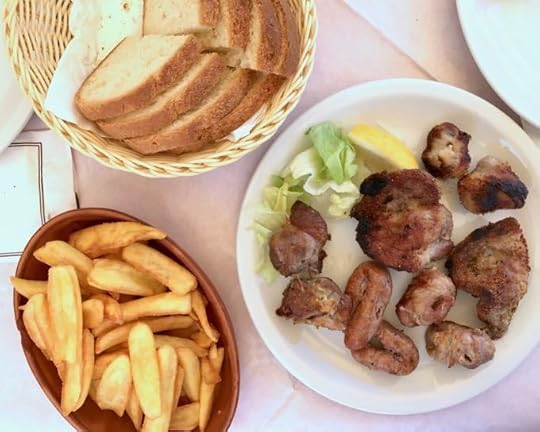
bombette {grilled pork} for memorial day

Are you looking to up your grilling game for Memorial Day weekend? Are you surprised to hear me talking about Memorial Day? I usually wouldn’t be so tuned into such an American holiday, since I live in Italy and unless someone actually tells me it’s Memorial Day, Labor Day or even Thanksgiving, I tend to forget. From over here it’s just another Monday. Or Thursday.
But this year I’m in the States celebrating the publication of my new book, Eating My Way Through Italy. And since I’m pretty sure it’s the first Memorial Day I’ve spent in the States for over 30 years, I”m taking full advantage of the holiday weekend by heading up to my friends house in Maine, to stuff myself with lobster and probably drink way too many martinis.
But if you’re like 99% of the people I read about on social media then you may be grilling? Am I right? And if you are, I thought you might enjoy this sneak peak at one of the recipes from the book (it’s due out May 29). These are delicious pork roll ups, meant to be grilled, and of course they have a personal story behind them.
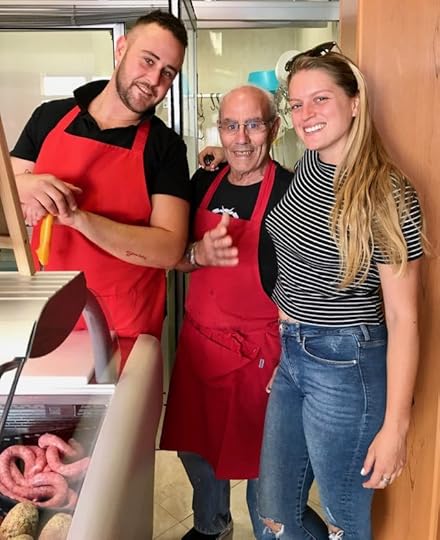
One summer, while hanging out on the beach in southern Puglia with some of her friends while on a camping trip, Sophie met some boys. While most blond-haired, blue-eyed girls would end up going to a club or bar, Sophie somehow wrangled herself an internship in a butchers shop belonging to Michele in a small town in Salento. While stand alone butchers are a dying breed in bigger cities like Florence, Rome and even Bari, in the small towns of Puglia they were thriving. In fact, they were so busy that they needed help. And so Sophie became, for two summers, a butcher’s apprentice.
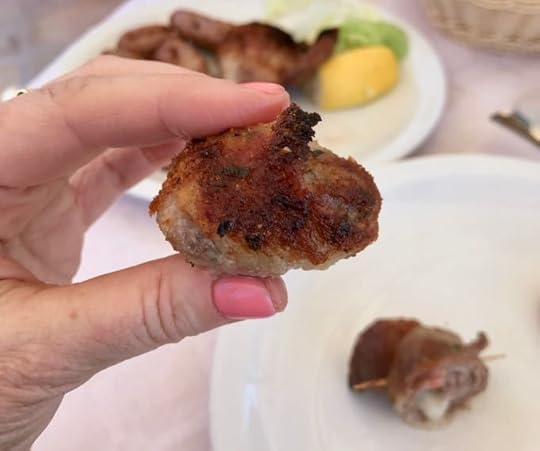
One of Sophie’s tasks was preparing the bombette, which are the porky version of involtini. They are thinly sliced pieces of fatty pork, which are rolled around a piece of cheese, some even fattier pancetta, seasonings and secured with a toothpick. Customers stop by to pick them up prepared at the butchers, to finish cooking at home. They are usually meant to be grilled and are often served at street fairs, where the butcher will actually set up a grill on the street. The bombette are cooked on a skewer, to keep them in place, but are then slid off into a paper cone, to be eaten while walking.
Everyone has their own special version of bombette, but the basic recipe is as follows: A thin slice of neck muscle (collo) seasoned with spices, filled with cheese and pancetta, rolled up and secured with a toothpick. They are often covered in breadcrumbs, which I love (but makes for more delicate attention at the grill) Each butcher is known not only for the quality of his meat, but also for the special, inventive, fillings. Here follows Michele’s basic recipe, with some of his filling variations.


Bombette
While pancetta and cacio cavallo are the traditional fillings, Michele, has his own special fillings:
-pancetta, caciocavallo and mushrooms*
-Radicchio* and gorgonzola
-Arugula and grated parmigiano
-Mortadella and provolone
*The mushrooms and radicchio should be cooked first, in a pan, with oil and garlic.
If you don’t have your grill going you can either cook them in a 200C/400F oven for about 30 minutes, or even in a pan on top of the stove.
Ingredients
1 pound/ 1/2 kilo pork neck, cut into very thin slices. You should get about 20-24 slices.
6. 5 oz/ 200 grams pancetta, sliced very thinly
3 oz / 100 grams cacio cavallo cheese
Parsley
Salt
Black pepper
toothpicks
Instructions
Cut the cheese into small cubes and set aside.
Remove the parsley from the stems and set aside the leaves.
Prepare the meat by pounding each steak, using a meat pounder, until the meat is about 1/8 inch thin. Then cut each steak into 2, so that you are left with pieces measuring about 5 x 5 inch square.
To assemble:
Place one of the slices of pork on a flat surface. Season with salt and pepper. Lay a slice of pancetta on top, and then add a few cubes of cheese, followed by a few leaves of parsley. Roll up tucking the sides in so that the cheese can’t melt out. Secure it with a toothpick, set aside, and repeat for the rest.
Bombette are almost always grilled, and this is most easily done by placing 3 or 4 bombette on a skewer. Grill over low to medium heat until cooked through, and browned on the outside.
Traditionally the bombette are slipped off the skewer and tipped into a paper cone, so that you can eat them while walking around. If you are preparing these for a party, it’s a great idea to serve them this way as an appetizer before you get to the table. (If you are throwing a party anywhere near Cutrofiano, in Salento, Sophie’s friend Michele will come by with his own grill. )
For more details about my adventures in Puglia and elsewhere see my newest book, Eating My Way Through Italy.
(I’m actually in the USA for the next few weeks – May 22-June 7 2018 -, on book tour, so please check my events page and see if I’ll be in a city near you.)
And if you’re traveling and want to know exactly where to eat, please download my app, Eat Italy. Available on iTunes and (in a few weeks) on Android too!
And if you happen to be in need of meat in Cutrofiano, just head to:
Macelleria Antica Tradizione di Fuso Michele
Viale della Costituzione, 40B
Cutrofiano, LE Puglia
The post bombette {grilled pork} for memorial day appeared first on Elizabeth Minchilli.