Carrie Vitt's Blog, page 41
July 21, 2015
Squash Fritters (Grain-Free, Paleo)
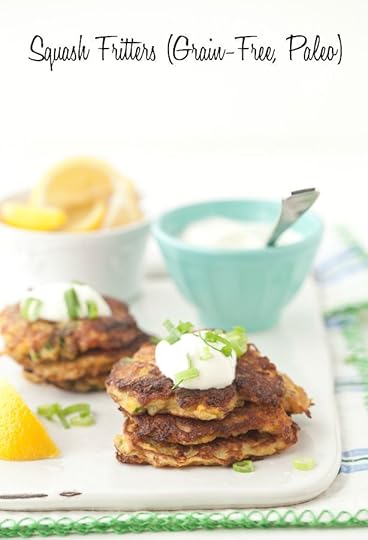
Squash Fritters are an easy side dish that use an abundant summer vegetable in a fun way. They’re a combination of yellow squash, egg, grain-free flour, jalapeño and a bit of sea salt. These fritters take just minutes to prepare and provide a fantastic complement to a large salad or grilled meat.
If you want to try a wonderfully flavorful zucchini variation, check out my Zucchini Fritter recipe on page 124 of The Grain-Free Family Table.
PrintSquash Fritters (Grain-Free, Paleo)
Serving Size: Serves 4
Ingredients
For the Fritters:2 cups shredded yellow squash (about 2-3 large squash)
2 large eggs, beaten
3 tablespoons coconut flour
2 tablespoons arrowroot flour
1 jalapeño, minced
1/2 teaspoon Celtic sea salt
2 teaspoons baking powder (make sure it’s grain-free! For my grain-free baking powder recipe, see page 272 of The Grain-Free Family Table)
2 tablespoons butter or ghee
1 tablespoon olive oil
For the Topping:
1/2 cup sour cream
3 green onions, chopped
1 lemon, quartered
Instructions
Place the squash, eggs, coconut flour, arrowroot flour, jalapeño, salt, and baking powder in a large mixing bowl. Stir until combined. Let mixture sit for 5 minutes.
Heat a large sauté pan over medium heat for 1 minute. Add the butter and olive oil and swirl to coat the bottom of the pan. Spoon 1/4 cup portions of the squash mixture into the sauté pan (I like to use a large ice cream scoop and press the fritters down so they are flat and about 3/4-inch thick. Fry the fritters until golden brown on the bottom, about 2-3 minutes. Using a spatula, flip the fritters and continue cooking until they're golden brown on the second side. Serve with sour cream, green onion and lemon juice.
Note: I only test the recipes on my site with the listed ingredients and measurements. If you would like to try a substitution, you are welcome to share what you used and how it turned out in the comments below. Thanks!
3.1Copyright 2013 Deliciously OrganicPosts may contain affiliate links. If you purchase a product through an affiliate link, your costs will be the same but Deliciously Organic will receive a small commission. This helps cover some of the costs for this site. We appreciate your support!
The post Squash Fritters (Grain-Free, Paleo) appeared first on Deliciously Organic.


July 17, 2015
Chipotle Chicken Burrito Bowl (Grain-Free)
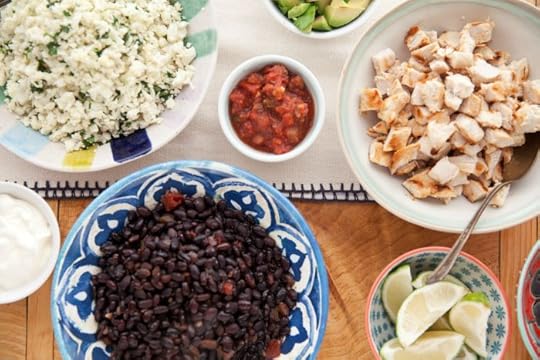
We’re big fans of the Chipotle Chicken Burrito Bowl when we are traveling or need a quick bite to eat. One thing that I do miss is the rice, so every once in a while I’ll make grain-free chicken burrito bowls at home. It’s a nourishing and colorful meal to make when friends are over and is super fun for the kids to pick out which toppings they’d like. This recipe is more of a method and you can change up the flavors to your liking!
PrintChipotle Chicken Burrito Bowl (Grain-Free)
Ingredients
For the "Rice":2 tablespoons ghee or palm shortening
1 head "riced" cauliflower*
1 head cilantro, chopped
1 teaspoon Celtic sea salt
For the Beans:
2 cups black beans, soaked overnight in water and drained
4 cups chicken stock (aka: bone broth)
1/2 cup salsa
1 teaspoon Celtic sea salt
For the toppings:
4 chicken breasts, grilled and chopped
1/2 cup sour cream (optional)
1 cup grated raw cheddar cheese
1 lime, cut into slices
1/2 cup salsa (here's a great homemade recipe)
1 avocado, chopped
Instructions
For the Rice - Heat the ghee in a large saute pan over medium heat. Swirl the pan to coat. Add the riced cauliflower and cook, stirring occasionally until hot, about 5-7 minutes. Stir in the cilantro and the sea salt. Cook for about 1 minute until the cilantro is just wilting.
For the beans - Place the beans, chicken stock and salsa in a large stock pot. Bring to a boil. Lower the heat to medium-low and simmer for 4-5 hours until tender. Season with salt. (You can also place all of these ingredients in the slow cooker and cook on low for 8 hours until tender)
To serve - Place a spoonful or two of the "rice" and beans in the bottom of the bowl and top with chicken and other toppings listed above.
Note: I only test the recipes on my site with the listed ingredients and measurements. If you would like to try a substitution, you are welcome to share what you used and how it turned out in the comments below. Thanks!
*To rice cauliflower: Cut cauliflower into bite-size pieces and place half of the pieces in the bowl of a food processor. Pulse 12-15 times until cauliflower is the size of rice. Repeat. As an alternative you can grate the cauliflower with a cheese grater or chop finely with a large chef's knife.
3.1Copyright 2013 Deliciously OrganicPosts may contain affiliate links. If you purchase a product through an affiliate link, your costs will be the same but Deliciously Organic will receive a small commission. This helps cover some of the costs for this site. We appreciate your support!
The post Chipotle Chicken Burrito Bowl (Grain-Free) appeared first on Deliciously Organic.
July 14, 2015
2 Things I Wish I’d Known When I was Diagnosed with Thyroid Disease
Thyroid disease has many layers and involves multiple systems in the body. The diagnosis comes from looking at a TSH or antibody level, but finding a solution isn’t as simple as that. The reason why the immune system is attacking the body is different for each person. Looking back, here are two things I wish I’d known when I was diagnosed with thyroid disease.
1. It’s important to figure out your root cause
My husband was the one who figured out my root cause. We were sitting at home one evening after I’d been having health issues for 18 months and just a few months after I started working with my holistic nutritionist. He said, “Carrie, none of this makes sense. You were totally fine and then suddenly your health went downhill.” He got out a calendar and started tracing back. He backtracked to the day I had an amalgam filling (improperly) removed and said, “Look! This was the day it all started.” I took this information to my practitioner, we did some testing, and what do you know? We discovered an overabundance of heavy metals! From that point on, we focused on gentle heavy metal detox to aid the natural healing process.
I suggest you begin by going back to a time when you were well and then creating a timeline that links life events with the appearance of symptoms. Get out your calendar and backtrack. Talk to your friends and family about your health history. Scroll through pictures on your phone. Use whatever you have available to start putting the pieces together.
Some questions to ask yourself:
– What were my first symptoms? When did they begin? (This may involve going back to your early childhood.)
– What health issues have I dealt with in the past? Surgeries? Infections?
– Were there periods in my life where I was dealing with chronic stress?
– What medications have I taken in the past and what prescriptions am I taking now? What are the side effects of these medications?
– What physical, environmental, and emotional factors may be contributing to my illness?
Some reasons your thyroid might not be working at the optimum level:
Viral, bacterial, or fungal infection
Poor gastrointestinal health
Nutrient deficiencies
Chronic stress
Too much radiation for your body (from cellular phones, wifi, etc.)
Toxicity
2. Be prepared for a long recovery – plan for a “marathon”
When my nutritionist told me to eat a grain-free diet and put me on a protocol of gentle detox and whole food supplements, I thought it would be cleared within a matter of months. Years before, I’d reversed my chronic migraines in a matter of weeks (by simply switching to an organic diet) and my IBS and eczema cleared easily when I made the change to real, unprocessed foods. Based on my past experiences, I thought it would be a pretty quick fix. I didn’t know it at the time, but it was going to take years to reverse the damage, and heal the underlying cause of my disease.
Healing from a chronic illness like thyroid disease is complex and often requires a long-term commitment to getting well.
And what about the game plan? Well, you have to have the right information to make a game plan and I’ve got some great tools to get you going!
The Grain-Free Family Table
Grain-Free, Nutrient-Dense Meal Plans
50 Tips and Resources to Help You Reverse Autoimmune Disease
Hashimoto’s Thyroiditis:Lifestyle Interventions for Finding and Treating the Root Cause
The Thyroid Cure
Hypothyroid Mom
Thyroid Pharmacist
And, here’s a limited-time offer from my friend, Dr. Izabella Wentz! She’s brought together 30 top thyroid experts and has curated an essential resource for those struggling with thyroid problems.

Here’s some of the info included in the Thyroid Bundle:
Optimizing Thyroid Medications
Overcoming Fatigue
The Roadmap to Remission
Mapping your Thyroid Signs and Symptoms
Detoxing Your Body to Balance Estrogen
Micronutrients and Thyroid Health
Hyperthyroidism and Grave’s Disease
… and much more!
I wish I’d had this collection of information many years ago! The Thyroid Bundle is only available until July 22nd, be sure to check it out!
Posts may contain affiliate links. If you purchase a product through an affiliate link, your costs will be the same but Deliciously Organic will receive a small commission. This helps cover some of the costs for this site. We appreciate your support!
The post 2 Things I Wish I’d Known When I was Diagnosed with Thyroid Disease appeared first on Deliciously Organic.
July 7, 2015
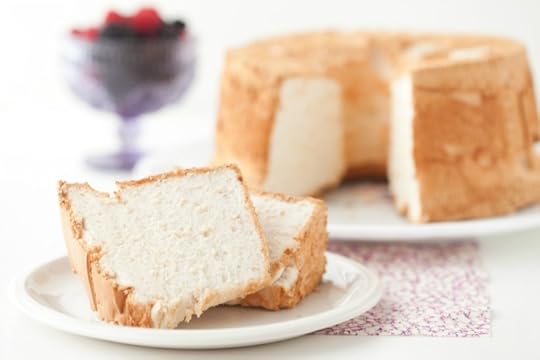
Angel Food Cake (Grain-Free, Paleo)

I haven’t been this excited about a recipe in a long time! I sought out a slice of light and airy Grain-Free Angel Food Cake for years and now, I’m thrilled to share it with you.
Angel Food Cake is worth the time investment and provides a fun activity for kids to join in, especially since you need to cool it upside-down!
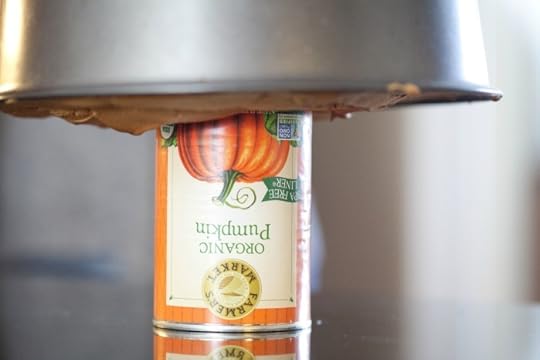 Here’s a pic of the cake cooling upside-down
A few things to help you out – I tried the cake with coconut sugar as well as maple sugar and both versions turned out fantastic. It’s really important that you bake this in an angel food cake pan, as it will spill out over a regular cake or Bundt pan and end up a burned mess on the bottom of your oven. Lastly, a can of some sort is necessary (if your bundt pan doesn’t have feet), because you’ll need to cool the cake upside-down while sitting on the can.

The cake is wonderful on its own, but I couldn’t resist a dollop of whipped cream and berries on top!
PrintAngel Food Cake (Grain-Free, Paleo)
Serving Size: Serves 12
Ingredients
For the Cake:12 large egg whites, room temperature
1 teaspoon fresh lemon juice
1/4 teaspoon Celtic sea salt
1 1/4 teaspoons cream of tartar
1 tablespoon pure vanilla extract
3/4 cup maple or coconut sugar
1 cup arrowroot flour (the arrowroot flour prices over at Thrive Market are the best I've seen anywhere!)
1 1/2 cups heavy cream, whipped (or whipped coconut cream for Paleo), optional
1 pint berries (optional)
Instructions
Preheat the oven to 350ºF and adjust the rack to the middle position.
Place the egg whites and lemon juice in the bowl of a standing mixer. Whisk the egg mixture on medium-high until foamy, about 30 seconds. Add the salt, cream of tartar and vanilla. Whisk the mixture on medium-high until soft peaks form, about 1-2 minutes.
With the mixer on medium-high, slowly add 1/2 cup of the maple sugar, 1 tablespoon at a time. Sift the remaining 1/4 cup maple sugar and arrowroot flour into a small bowl. With the mixer on medium, slowly add the arrowroot mixture. Turn the speed up to medium-high and whip until smooth (there might be some tiny little lumps from the sugar, but it will melt in the oven while baking).
Pour the batter into a clean (and NOT oiled), 12-cup angel food cake pan (I'm still on the look-out for a glass or stainless steel angel food cake pan. If you know where to purchase one, please let me know!). Bake for 40-45 minutes, until cake is puffed and the top is just turning golden brown.
Remove the cake from the oven. Carefully turn the cake upside-down and place on top of a can. Let cool completely, about 1 hour. Run a knife around the outside of the cake and invert onto a cake platter (you might need to shake the cake a little to get it to separate from the center tube of the cake pan). Serve alone or with whipped cream and berries.
Note: I only test the recipes on my site with the listed ingredients and measurements. If you would like to try a substitution, you are welcome to share what you used and how it turned out in the comments below. Thanks!
Posts may contain affiliate links. If you purchase a product through an affiliate link, your costs will be the same but Deliciously Organic will receive a small commission. This helps cover some of the costs for this site. We appreciate your support!
The post Angel Food Cake (Grain-Free, Paleo) appeared first on Deliciously Organic.
July 2, 2015
Oven BBQ Chicken (Grain-Free, Paleo)

I love grilled meats and vegetables, but when my husband isn’t around to fire up the grill, I prefer to oven-roast my BBQ chicken. Why? Because I’m scared of the grill! I’ve had one too many flare-ups that singed my eyelashes, so I leave the grilling to my husband!
Most barbecue sauces contain ingredients that I prefer not to serve at the dinner table, so today I’ve got a homemade BBQ sauce for you as well as an easy method for oven-roasted barbecue chicken.
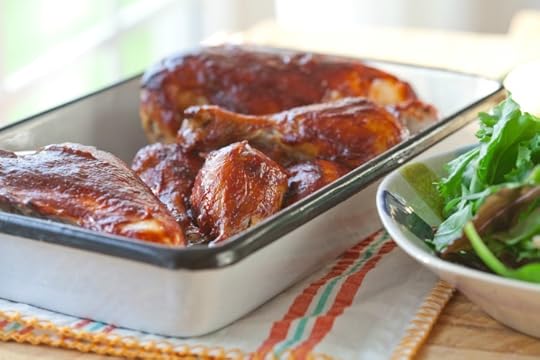
You can use thighs, drumsticks or breasts for this recipe. It’s best to use meat with the skin on, as it holds in the moisture and produces a juicer piece of meat. The sauce can be made a few days ahead of time and stored in the fridge until you’re ready to cook.
PrintOven BBQ Chicken (Grain-Free, Paleo)
Serving Size: Serves 4-6
Method inspired by Pioneer Woman
Ingredients
For the BBQ Sauce:1 cup ketchup (I used the homemade recipe from my cookbook, The Grain-Free Family Table)
1 teaspoon maple syrup
1 tablespoon apple cider vinegar
1 tablespoon molasses
2 teaspoons Worcestershire (here's a great homemade recipe)
1 teaspoon Dijon mustard
1 teaspoon Celtic sea salt
1 teaspoon powdered garlic
3/4 teaspoon liquid smoke
2-4 dashes of hot sauce
For the chicken:
1 whole chicken cut into 8 pieces
Instructions
Place all of the BBQ sauce ingredients in a medium saucepan and whisk until incorporated. Heat over medium-low for about 5 minutes, until hot. Remove from heat.
Preheat oven to 400ºF and adjust rack to middle position. Line a large baking sheet with parchment paper. Place the chicken on the baking sheet skin-side down. Roast for 30 minutes. Remove the chicken from the oven and using a pair of tongs, flip each piece of chicken. Using a pastry brush, baste each piece of meat (top and bottom) with the BBQ sauce. Roast for another 15 minutes. Remove from the oven and baste the tops with more BBQ sauce. Roast for another 10 minutes and baste again with the BBQ sauce. Repeat the process of roasting for 10 minutes and basting until the chicken is cooked through and the skin is starting to turn brown on the edges. Serve warm.
Note: I only test the recipes on my site with the listed ingredients and measurements. If you would like to try a substitution, you are welcome to share what you used and how it turned out in the comments below. Thanks!
3.1Copyright 2013 Deliciously OrganicPosts may contain affiliate links. If you purchase a product through an affiliate link, your costs will be the same but Deliciously Organic will receive a small commission. This helps cover some of the costs for this site. We appreciate your support!
The post Oven BBQ Chicken (Grain-Free, Paleo) appeared first on Deliciously Organic.
June 29, 2015
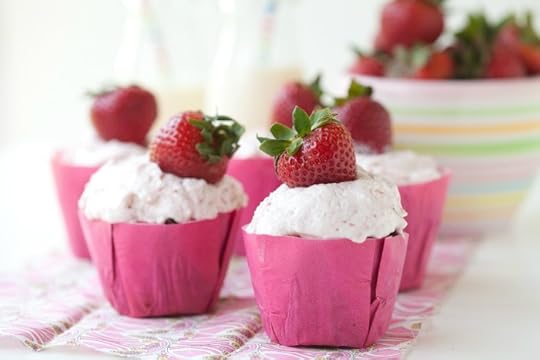
Chocolate Cupcakes with Strawberry Frosting (Paleo, Nut-Free) and a Virtual Baby Shower
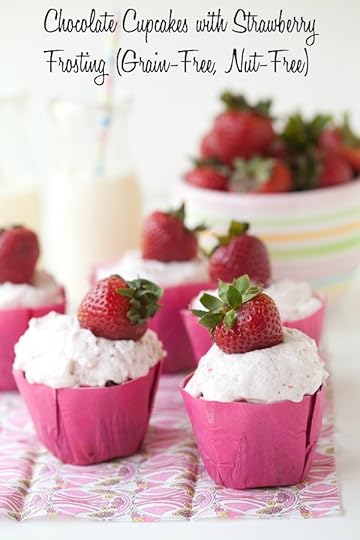
Chocolate cupcakes with strawberry frosting provide a wonderfully fun indulgence during strawberry season. Many of you have requested a nut-free version of my reader-favorite Grain-Free Chocolate Cake, so Iâm excited to give you a new nut-free and grain-free chocolate cake recipe you can use for cupcakes or as a layer cake!

Today Iâm joining with friends across the blogosphere to honor my friend Catherine from Weelicious and celebrate her new bundle of joy. Catherine creates some of the cutest colorful meals for her kids, so we put together a colorful celebration for her. I think youâre going to love all the fantastic recipes weâve lined up!
Mini Strawberry Rosewater Pavlovas from Beard and Bonnet
Pink Lemonade Thumbprint Cookies from Fifteen Spatulas
Skillet Cherry Pie from FoodieCrush
Roasted Blueberry and Lemony Yogurt Popsicles from Tasty Yummies
Frozen Lemonade with Rose Water from The Lemon Bowl
Grilled Carrots with Mint Almond Pesto from Heather Christo
Persian Saffron Pudding from Tori Avey
S’more Brownies from What’s Gaby Cooking
Jicama Pops from ¡Hola! Jalapeño
Roasted Broccoli Pesto on Pumpernickel from Bev Cooks
Peachy Pineapple Green Smoothie from 100 Days of Real Food
Rainbow Smoothie from Daisy At Home
Chocolate Beet Cake from I Am Baker
PrintChocolate Cupcakes with Strawberry Frosting (Grain-Free, Nut-Free)
You can double this recipe to make a 2-layer chocolate cake. I made this for my daughter's 13th birthday party and the kids loved it (and they had no idea it was grain-free)! Makes about 12-14 cupcakes
Ingredients
For the Chocolate Cake:1 cup coconut flour
1/2 teaspoon Celtic sea salt
1 teaspoon baking soda
1/3 cup cocoa powder
8 ounces semisweet chocolate chips (I used Enjoy Life), melted
6 tablespoons butter (or 5 tablespoons coconut oil for dairy-free), melted
1/2 cup maple syrup
8 eggs
1/2 cup plain whole yogurt (use coconut milk yogurt for dairy-free)
1 teaspoon vanilla extract
For the Frosting:
1 cup palm shortening
1/2 cup raw honey
2 teaspoons vanilla extract
2 tablespoons arrowroot flour
2 tablespoons coconut butter
1/2 teaspoon unflavored, grass-fed gelatin
1/4 cup pureed strawberries (about 3 large strawberries)
12 whole strawberries
Instructions
Preheat the oven to 350 degrees F and adjust the rack to the middle position. Place muffin liners in a muffin pan. Place the coconut flour, sea salt, baking soda, and cocoa powder in a large mixing bowl and whisk until incorporated. In another large mixing bowl, whisk the melted chocolate, butter, maple syrup, eggs, yogurt and vanilla extract. Pour the wet ingredients into the dry ingredients and whisk until smooth. Let the batter sit for 10 minutes. Divide the batter evenly amount the muffin tin and fill each muffin cup 3/4 full. Bake for 25-30 minutes, until cake tester inserted in the middle of a cupcake comes out clean. Cool completely.
Whisk together all of the frosting ingredients for about 2 minutes with a mixer until soft peaks form. Place the frosting in the refrigerator for 30 minutes (this helps the gelatin set a bit more and give the frosting more structure).
To frost: Spoon a few tablespoons of frosting on a cupcake (I like to use a cookie scoop so that I have an even amount of frosting on each cupcake) and then even out with an off-set spatula. Top with a whole strawberry. If you need to make these ahead of time, it's best if they are stored in the fridge and then set out for 20 minutes before serving.
Note: I only test the recipes on my site with the listed ingredients and measurements. If you would like to try a substitution, you are welcome to share what you used and how it turned out in the comments below. Thanks!
3.1Copyright 2013 Deliciously OrganicPosts may contain affiliate links. If you purchase a product through an affiliate link, your costs will be the same but Deliciously Organic will receive a small commission. This helps cover some of the costs for this site. We appreciate your support!
The post Chocolate Cupcakes with Strawberry Frosting (Paleo, Nut-Free) and a Virtual Baby Shower appeared first on Deliciously Organic.
June 18, 2015
Healthy Frozen Treats and a Summer Fun Giveaway
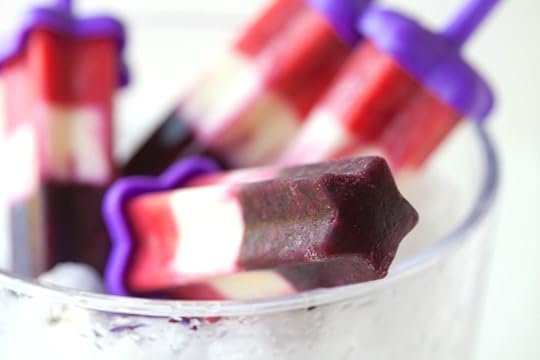
When the heat kicks in, it’s always fun to have some healthy frozen treats on hand! Today, I’ve got some fun recipes for you including: Homemade Firecracker Pops, Orange Creamsicle Pops, and Cherry Limeade Pops.
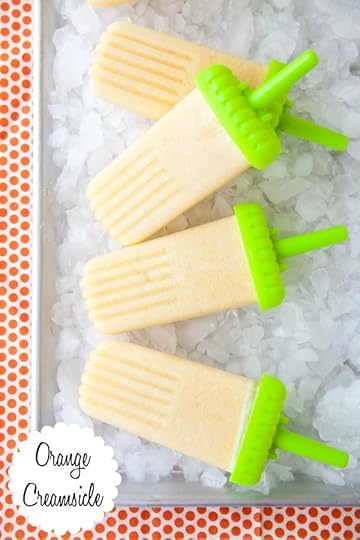
I like to use fresh fruit and raw juice because it increases the nutrient value and makes the pops more flavorful. The Firecracker Pops are made with fresh blueberries, strawberries, lime juice, raw honey and a bit of yogurt. The Orange Creamsicles contain a combination of fresh orange juice, coconut milk and vanilla. Lastly, the Cherry Ice Pops contain fresh pureed cherries, lots of lime and a bit of raw honey.
All these recipes are incredibly refreshing!
Mighty Nest – a long-time sponsor of Deliciously Organic – has some fantastic popsicle molds that are safe for the entire family. While I usually like to stick with glass or other natural materials, I’m ok with using safe plastic to freeze frozen treats because the molds stay cold. That makes it much less likely anything odd will leach into the food.

To kick summer off with a bang, Mighty Nest is offering a summer fun pack that I personally hand-picked. One lucky winner will receive all of the items below. See the widget below to enter!
Here’s the list:
Groovy molds
Twin Pops
Star Popsicle molds
Freezypop Stainless Molds
Freezable picnic bag
Stainless Cups
Badger sunscreen
Badger Bug Balm
Print Recipe
Firecracker Pops
Makes 6 frozen popsicles
For the Blue Layer:
2 cups blueberries
1 tablespoon raw honey
1 tablespoon fresh lime juice
For the White Layer:
1 cup plain yogurt (use coconut milk yogurt for Paleo)
1 tablespoon raw honey
1 tablespoon fresh lime juice
For the Red Layer:
2 cups strawberries
1 tablespoon raw honey
1 tablespoon fresh lime juice
Place the blueberries, honey and lime juice in a food processor or blender and blend until smooth. Divide evenly among the Star Popsicle molds, filling only 1/3 of the way up (you might have just a tad bit leftover, but you can use this in a fruity drink or over yogurt). Freeze for 30 minutes.
Place the yogurt, honey and lime juice in the now clean food processor or blender and blend until smooth. Pour on top of the frozen blueberry filling, filling another 1/3 of the way up the mold. Freeze for 30 minutes.
Place the strawberries, honey and lime juice in a food processor or blender and blend until smooth. Pour on top of the frozen yogurt filling and fill to the top. Freeze for 4 hours. Serve frozen.
Print Recipe
Orange Creamsicle Pops
Makes 6-8 creamsicles (depending on the size of the molds)
3 cups fresh orange juice
1 cup canned coconut milk
1 teaspoon vanilla extract
Whisk all ingredients together until blended. Pour into molds and freeze for 4 hours. Serve frozen.
Print Recipe
Cherry Limeade Pops
Makes about 5-6 pops (depending on the size of the molds)
4 cups fresh cherries
3 tablespoons fresh lime juice
3 tablespoons raw honey
Place the cherries, lime juice and honey in the bowl of a food processor or blender and blend until smooth. Pour into molds and freeze for at least 4 hours. Serve frozen.
Note: I only test the recipes on my site with the listed ingredients and measurements. If you would like to try a substitution, you are welcome to share what you used and how it turned out in the comments below. Thanks!
Posts may contain affiliate links. If you purchase a product through an affiliate link, your costs will be the same but Deliciously Organic will receive a small commission. This helps cover some of the costs for this site. We appreciate your support!
The post Healthy Frozen Treats and a Summer Fun Giveaway appeared first on Deliciously Organic.
June 12, 2015
Thyroid Disease 101: The Symptoms, Tests to Ask for and the First 5 Steps to Take

Many of you, your friends, or your family members are dealing with thyroid disease. It’s a growing epidemic that’s quickly becoming one of the most health problems in America. Over the last several years, the wonderful Nutritional Therapy Practitioners (NTPs) at Biodynamic Wellness have given me a wealth of information so I asked them to write a series of guest posts. They’ll help us understand more about thyroid disease including the symptoms, what tests to get, steps to take, foods to eat, and other ways to help bring the body back into balance.
Today, Anna Penick NTP, a new addition to Biodynamic Wellness, answers questions about the basics of thyroid disease. In the coming months, we’ll continue looking at many different aspects of this disease, so make sure to sign up for my email list, so you don’t miss any of these informational posts!
What are some of the most common symptoms of thyroid disease?
Temperature fluctuations – cold hands and feet or feeling hot
Weight fluctuations or difficulty losing or putting weight on
Depression
Fatigue
Trouble sleeping
Muscle and joint pain
Swollen neck
Hair and skin changes
Bowel disturbances
Hormonal changes
What tests should you ask your doctor for?
The short list:
TSH
TPO
TAA
Free T3
Free T4
Reverse T3
T3
T4
T3 uptake
Total T3
The Long List (if your doctor or insurance allows, this list will give a complete picture of what’s going on in your system):
Lipid Panel: Cholesterol, Triglycerides, LDL, HDL, Cholesterol/HDR Ratio
Thyroid Panel: TSH, Free T4, T4, T3 Uptake, Total T3, Free T3, Reverse T3, Anti-TPO antibodies, Anti-Thyroglobulin Antibodies
Iron Panel: Iron, TIBC, Ferritin, Serum Iron, Iron Saturation
Liver: SGOT (AST), SGPT (ALT), GGTP, Alk. Phosphate, Total Bilirubin, Total Protein, Total Globulin, Albumin / Globulin Ratio, Albumin
Electrolytes Panel: Glucose, Sodium, Potassium, Chloride, Carbon Dioxide, BUN, Creatinine, Bun/ Creatinine Ratio, Calcium, Phosphorous, Uric Acid
Additional: 25 OH Vitamin D (inactive Vitamin D), Homocysteine, CRP (C-reactive protein), Magnesium, LDH, Fibrinogen, Hemoglobin A1
CBC with Differentials: HGB, HCT, RBC, MCV, MCH, MCHC, RDW, WBC, Neutrophils, Lymphocytes, Monocytes, Eosinophils

What are the first 5 steps one should take if they find out they have thyroid disease?
1. Seek a health practitioner that is willing to work with the root of your condition and not just use medication to manage the disease.
Here’s a good place to start:
Biodynamic Wellness (they do in office, phone and skype sessions)
To find a Functional Medicine Doctor
To find an Integrative Medicine Doctor
To find a Nutritional Therapy Practitioner
2. Run blood work (see the list above).
3. Cut out all gluten.
4. Make dietary changes depending on what your practitioner has suggested – these will vary depending on what thyroid condition you have.
5. Get lots of rest and cut back on stress-related activities.
Sometimes the significance of a healthy thyroid can be difficult to understand. Here’s a great video to help clarify the role the thyroid plays in your body. Of course, I wish they’d mentioned that nutritional support and other holistic therapies can help instead of just recommending medicated disease management, but you can’t win them all!
Click here to view the embedded video.
Posts may contain affiliate links. If you purchase a product through an affiliate link, your costs will be the same but Deliciously Organic will receive a small commission. This helps cover some of the costs for this site. We appreciate your support!
The post Thyroid Disease 101: The Symptoms, Tests to Ask for and the First 5 Steps to Take appeared first on Deliciously Organic.
June 9, 2015
How to Cook and Eat an Artichoke

Steamed artichokes with butter are an occasional indulgence in our home and are fun to serve when guests come over. In today’s cooking video I’m going to teach you How to Cook and Eat an Artichoke. Enjoy!
Click here to view the embedded video.
Print Recipe
How to Cook an Artichoke
Serves 4
4 artichokes
Cut the artichoke stems so they are flat. Place the artichokes, stem side up in a large pot. Pour in about 2-inches of water. Place the lid on the pot and cook on low heat for about 40 minutes, until the stems are tender. Using a pair of tongs, remove the artichokes and place on individual plates. Serve with melted butter, garlic, lemon juice, aioli, etc.
Posts may contain affiliate links. If you purchase a product through an affiliate link, your costs will be the same but Deliciously Organic will receive a small commission. This helps cover some of the costs for this site. We appreciate your support!
The post How to Cook and Eat an Artichoke appeared first on Deliciously Organic.
June 2, 2015
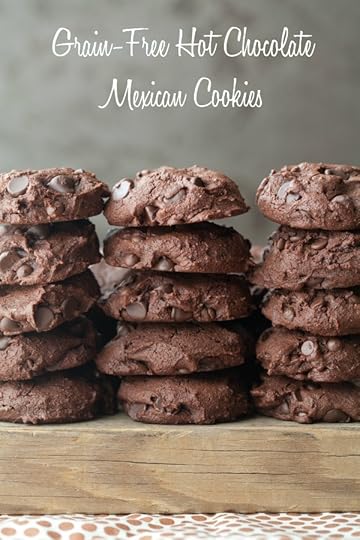
Mexican Hot Chocolate Cookies (Grain-Free, Paleo)
Last week my daughter Abby got into a conversation with a classmate about who could make the best cookies. They decided to do a bake-off and bring the cookies to the end-of-school party, letting their classmates vote on their favorite. The teacher handed them this recipe and told them both to use it for the contest.
The recipe featured white flour, so we had to make a few adjustments. First, we reduced the sugar by 1/2 cup. It just seemed like too much sugar! Then we replaced the white flour with our favorite nut-free blend: 1/3 cup coconut flour, 1/3 cup tapioca flour and 1/3 cup arrowroot flour (for my full chart on adaptations, check out Chapter 2 of The Grain-Free Family Table). We also left out the chili powder since we didn’t have any on hand.
I suggested Abby not tell anyone they were grain-free since many people have the impression that grain-free baking doesn’t taste good. Abby baked her cookies and proudly served them to her classmates. Guess what? The kids voted her grain-free cookies as the favorite.
This exercise provides a good reminder that we can proudly offer allergy-free or grain-free food, without apologies, and you never know – everyone might think it’s better than the original!
When we have guests over for dinner, I’ve stopped telling anyone if it’s grain-free, dairy-free, etc. I want them to enjoy some food good and company. Some friends came last week and I served them apple blueberry skillet pie. The kids raved and no one even knew it was made with grain-free ingredients. That’s a win in my book!

I think you’re going to love these Mexican Hot Chocolate cookies. They’re rich and chocolaty with a hint of heat. I usually use coarsely ground Celtic Sea Salt in my baking for a nice salty-sweet combo.
PrintMexican Hot Chocolate Cookies (Grain-Free, Paleo)
Yield: Makes about 18 cookies
Adapted from The Cooking Channel.
Ingredients
8 tablespoons unsalted butter (or 6 tablespoons coconut oil)4 ounces semisweet chocolate
1 cup coconut sugar
2 teaspoons vanilla extract
2 large eggs
1/3 cup coconut flour
1/3 cup tapioca flour
1/3 cup arrowroot flour
1/2 cup cocoa powder
1/2 teaspoon Celtic sea salt
1/2 teaspoon baking soda
2 teaspoons ground cinnamon
4-5 dashes cayenne pepper
1 cup Enjoy Life chocolate Chips
Instructions
Preheat oven to 325 degrees F and adjust the rack to the middle position. Place the butter and chocolate in a bowl over a double boiler over medium heat. Let the chocolate melt and then cool for 10 minutes.
Place the coconut sugar, vanilla and eggs in a large mixing bowl. Whisk until smooth. Whisk in cooled chocolate mixture.
Sift the coconut flour, tapioca flour, arrowroot, cocoa, salt, baking soda, cinnamon and cayenne over a medium mixing bowl. Add the dry mixture to the wet mixture and stir until combined. Stir in the chocolate chips.
Using a 1 1/2" cookie scoop, scoop cookie dough onto a baking sheet lined with parchment paper. Bake for 11 minutes.
Note: I only test the recipes on my site with the listed ingredients and measurements. If you would like to try a substitution, you are welcome to share what you used and how it turned out in the comments below. Thanks!
3.1Copyright 2013 Deliciously OrganicPosts may contain affiliate links. If you purchase a product through an affiliate link, your costs will be the same but Deliciously Organic will receive a small commission. This helps cover some of the costs for this site. We appreciate your support!
The post Mexican Hot Chocolate Cookies (Grain-Free, Paleo) appeared first on Deliciously Organic.