
David Petersen's Blog, page 72
March 6, 2012
Mythbusters:Next week I'm going to see the Mythbusters Li...
 Mythbusters:
Next week I'm going to see the Mythbusters Live show in Detroit! I'm a big fan of the show and for what Adam & Jamie (and Tori, Kari, & Grant) have done to inspire kids to be more interested in science and math. I've made no secret at San Diego that one of my biggest goals is to meet Adam Savage. Anyhow, I'm getting off track from the artwork...I'm a fan, you knew that...time for me to move on. I did this piece a while back, when I had marionettes on the brain from designing the cover and interior story for the Mouse Guard Free Comic Book Day story.
 I drew the sketches while hanging out with Nate Pride. We were the only two to show up to an event at my house, so I wrote it off as a lost work night and decided to draw for fun. The pencil sketches are much larger than I normally work each figure is about 12" tall. I looked at pictures of Adam and Jamie to try and capture a carved wooden caricature of them both. I scanned these in and combined them into one smaller piece. I also made edits in photoshop, I altered the scale of their heads as well as the marionette Busters. I also dropped in a stock photo of their logo.
 Using a printed version of my photoshoped collage of the corrected doodles and logo photo, I inked the piece on a sheet of 12" x 12" strathmore bristol. The inkwork is all done with Copic MultiLiner pens (mostly using the 0.7 nib). I debated inking in the strings on the piece itself or inking them on an overlay so I could easily establish color holds on them later. I opted to get the stings in the original art, so that if I ever get the chance to give this to them, it will look complete.
 The last step was to scan my inks and color them. The largest part of this job as editing in what areas of my inkwork would be a color instead of black. The rest of the work was in getting the subtle colors I wanted for the puppets so they looked like they were painted wooden puppets that have been dented and dinged around a bit. I was already looking forward to the show this weekend, and sharing this piece with you has only made me more excited.
I also think it would be a lot of fun to make these puppets....but that is for another day when Mouse Guard pages aren't calling...
2012 Appearances:
Emerald City: March 30-April 1
C2E2: April 13-15
Boston Comic Con: April 21-22
FCBD: Jetpack Comics: May 5th
Heroes: June 22-24
San Diego Comic Con: July 11-15
Baltimore Comic Con: Sept 8-9
New York Comic Con: Oct 11-14
Detroit Fanfare: Oct 26-28


February 28, 2012
2012 BookplateThis year I'm starting a tradition of print...
 2012 Bookplate
This year I'm starting a tradition of printing a limited signed & numbered bookplate for the year. I debut these at the London Super Comic Con and have them with me for the rest of my 2012 convention schedule. For now I'm limiting these as convention items. At the end of the year, if I have any left, I will offer them online. I'm not trying to punish fans who can't make it to conventions or trying to drive up their post-con ebay value...I just don't want to run out before I finish my 2012 convention circuit. This year's print is a colored version of a relief print (like a woodblock)
 I started with a sketch in my sketchbook that I scanned, tweaked, and printed out at the scale I needed it. I also mirrored the image so that when it is carved and printed, it will un-mirror. Using a stick of graphite, I coated the backside of the printed paper. I taped this down to my block (in this case a piece of Speedball Speedy Carve) and traced my lines with a ball point pen. When I removed this sheet of paper, anyplace I had pressed down with a ball point pen transferred the graphite from the back of the paper to the surface of the Speedy Carve.
 Unfortunately, I didn't snap a photo of the speedy carve with the graphite transfer, I only got this one before I started the process. Speedball's website says that you can transfer printed artwork onto the Speedy Carve material using an iron, but I couldn't get that process to work. With the image transferred I used the carving knives shown here to carve away any area I needed to NOT print (ie: white areas). This type of printmaking is called Relief printing because you are carving away an image in relief.: the areas that protrude are the positive shapes (the areas that will print).
 Once the image was fully carved, I used a ink stamping pad to ink up the surface of the block. Usually when relief printing with wood or linoleum you need to ink the surface with a thicker ink and a roller called a brayer, but this Speedy Carve is more forgiving like a rubber stamp, so I'm able to use an inking pad and then place the paper on the surface of the block. It took a few tries to pull a good print, There were a few where I hadn't inked the block evenly, and a few others where I moved the paper and got a double registration.
Here is a scan of the straight pulled print. I carved the hatching into the trees in the background to help push them back into the background of the image. All of the simulated stippling was done by carving patches of cross-hatching only leaving little nubs sitting alone like tiny flat-topped desert mesas. For a bookplate though, I wanted the image to be more than a monochromatic relief print though, so I set to coloring it digitally.
 Using the scan of the print, I started flatting the areas. I broke the inked lines into different areas (since I wanted the trees, the moon pendant, and the sword & hilt details to be a different color than the rest of the outlines. The colors seen here were chosen to be clashy & ugly on purpose. This way I can easily see if I got any color in the wrong area (ie: did I stay in the lines) The layer menu on the right of the screen-grab shows that not only are the colors differentiating different areas, but I've made separate layers fro them all (all labeled to make life easier).
 The last step in getting the image ready for the bookplate was to correct and render all the color areas. I did so as I've discussed in past posts using a textured brush and the dodge (lighten) and burn (darken) tools.
The bookplate will be limited to 500 copies, all signed, and sold at conventions for $5.
2012 Appearances:
Forbidden Planet London signing: March 1
Comics & Graphics Berlin signing: March 3
Comic Combo Leipzig signing: March 5
Emerald City: March 30-April 1
C2E2: April 13-15
Boston Comic Con: April 21-22
FCBD: Jetpack Comics: May 5th
Heroes: June 22-24
San Diego Comic Con: July 11-15
Baltimore Comic Con: Sept 8-9
New York Comic Con: Oct 11-14
Detroit Fanfare: Oct 26-28

February 21, 2012
Drawing like yourself:Yesterday on Twitter I posted an im...
 Drawing like yourself:
Yesterday on Twitter I posted an image of the first Mouse Guard drawings I ever did back in 1996. I followed that tweet with the statement:
"The artwork moved away from that style...I needed to develop my own work, & not copy the style of someone I admired. When I learned to 'draw like myself' better things happened"
In 2003 I was at a family bbq, and drawing the mice. I did the drawings in ink & fell onto my etching techniques to make grey tones and interesting patterns. Instead of mimicking my favorite artists and illustrators, I was drawing like myself, and building on work & techniques of my own to push the drawing out somewhere new.


These drawings were also part of the very very first Mouse Guard sketchbook that pre-dated my self-published black and white issue of Mouse Guard in 2005. The first time I set up at the Motor City Comic Con was in October of 2004. I was going to be an artist at an artist alley table, with no book and no previous working experience. All I had were pieces of artwork I made as a fan, for fun, and my own concepts and ideas. Using my home printer, I printed out samples of pieces I'd done. Everything from watercolors of superheroes to pencil drawings of fantasy characters, and of course, some Mouse Guard images.


I've posted and talked about these c.2003 Mouse Guard drawings before, but never in the context of them having been printed in a sketchbook. I printed 2 versions of the same book through my home printer. One was 1 character wide and rather tall, the other (after realizing it was a pain to trim every page by hand) was 2 characters wide so that the width matched the paper size. I added some text to the backgrounds of each character (most of the text was a description of the character or their name's meaning). In total I printed between 4 and 7 of them for that convention, and I have none left now.


I mention this sketchbook because a fan came out of the woodwork having recently acquired one and couldn't find any information online about what it was, when it came from, or how many were printed. Now I really hope that me typing this up doesn't lead to a few going up on ebay and other fans getting milked (I posted all the images from that sketchbook here so that no one would have to pay top dollar to see the contents) However, I know I can't stop a free market with driven completist comic book collecting fans. I merely wanted to share a bit of history, that, up to this point, I have never publicly mentioned.


 I'd also like to echo what I said in the opening of this post, when I stopped trying to draw like the people I admired, and just used their work to inspire me to do better (instead of doing knock-off attempts at their work) better things happened for me, and these drawings represent that. I'm not done trying to be better and learn about my own process. I review recent work of mine to see what was working and what wasn't so that I can build off of the successes and keep making things better. It's advice I think that works no matter what creative field you are in. Be yourself.
2012 Appearances:
London Super Con: Feb 25-26
Forbidden Planet London signing: March 1
Comics & Graphics Berlin signing: March 3
Comic Combo Leipzig signing: March 5
Emerald City: March 30-April 1
C2E2: April 13-15
Boston Comic Con: April 21-22
FCBD: Jetpack Comics: May 5th
Heroes: June 22-24
San Diego Comic Con: July 11-15
Baltimore Comic Con: Sept 8-9
New York Comic Con: Oct 11-14
Detroit Fanfare: Oct 26-28

February 14, 2012
Hand Inking FontsWhen I need to include text into a page ...
 Hand Inking Fonts
When I need to include text into a page of Mouse Guard (or for other pieces) that isn't dialogue or a sound effect, I ink it in by hand. This text is meant to exist within the world of the story itself, the characters can see it and read it, it's part of their world. I'm often pulled out of comic stories when signs, newspapers, even handwriting is done by the letterer. The font rendering rarely matches the look of the artwork well enough. That isn't to say I don't use computer lettering to help me in this task. With the Mouse Guard illuminated manuscript pages (as well as most any other lettering I ink) I lay out all the text on the computer using one or several fonts.
 I then print the text and use a lightbox to trace the rough shapes of the letters. This helps me keep the baseline staright (the invisible line the bottom of the text rides on), the kerning correct (the space between letters), and the leading even (the space between lines of text). That isn't to say that I want to keep those things, straight, correct, and even...I don't even want all the 'o's to match...or any other letter for that matter. I can shift the printed sheet as I need to distort the baseline, kerning, and leading. I can distress each letter as I ink leaving gaps and inconsistencies.
 Depending on the scale of the lettering, I can make it less legible and out-of-focus. I can also play with the lettering's texture helping to signify what surface it is on (paper, glass, stone) or what it's written in (ink, paint, or even carved into a surface). Making the text with the same hand, the same pen, and in the same scale as the drawing it will appear in, all factors toward the image looking cohesive and believable. Sure my sound effects and dialogue are computer generated fonts digitally insterted on top of my artwork, but you never see someone's voice coming out of their mouth or see the word 'BOOM' floating in the sky when there is a loud noise...its already abstracted to have those shown as text, so I let them float away from my artwork a bit.
 A recent example of this technique I'd like to share was for the Free Comic Book Day hardcover of Archaia's. This wasn't ultimately used, but I was asked to do a few re-designs of the FCBD logo that might tie in with the artwork for the cover. I started by with a few digital fonts, typing up 'FREE COMIC BOOK DAY' and playing with the letter size and spacing. I printed these and using a lighbox I inked them in, sometimes more than once using different inking techniques to simulate paint or ink or embroidery thread.
 Here is a scan of both the inked text samples and the 'frames' they would be on top of (some were themed to go with the styles of text, others just designs I thought I could play with). I paired up the text and frames several times over with different combinations sometimes with different color schemes. I narrowed my choices for the logo down to four of these designs, but as I said, ultimately, the new logo was abandoned from the cover and Archaia went with the existing logo.
Fan Art:
 The Folks over at the Sindicate (a weekly group sketch blog) dedicated a week to Mouse Guard (the Last week of Dec. 2011). Here I'm sharing the contribution by David Lafuente, but I encourage you to also take peeks at the pieces by James Harren, Ryan Ottley, Coleen Coover, and Jorge F. Muñoz
 2012 Appearances:London Super Con: Feb 25-26
Forbidden Planet London signing: March 1
Comics & Graphics Berlin signing: March 3
Comic Combo Leipzig signing: March 5
Emerald City: March 30-April 1
C2E2: April 13-15
Boston Comic Con: April 21-22
FCBD: Jetpack Comics: May 5th
Heroes: June 22-24
San Diego Comic Con: July 11-15
Baltimore Comic Con: Sept 8-9
New York Comic Con: Oct 11-14
Detroit Fanfare: Oct 26-28

February 7, 2012
Page Process:The last time I wrote a blog post showing my...
 Page Process:
The last time I wrote a blog post showing my full page process was when I was working on the 2010 FCBD story and before that was this process post about a Winter 1152 page. I thought it was time again to explain my process for any newcomers, but to also show how some of it has changed since those write-ups. I'm using page 11 from Black Axe #3. There are not any spoilers on this page if you haven't read the issue, but if you haven't read it and still don't want to see the page out of context, here is your warning to turn back now.
 Script: With Black Axe, I'm writing full scrips before I draw the issue (I've progressed to this point having started with Fall 1152 and no scripting until the issue was completed). I still use an outline for each issue, and I don't write the script for a given issue until I need to start that issue. As before, I make tick marks along side of the outline guessing how many pages I think I'd need to tell that part of the story. The script is written keeping those ticks in mind, knowing where I can be more verbose and where I need to tighten up the dialogue. On this page's script, you can see I've made all sorts of notes on my typed sheet for where the page starts and stops and also what dialogue I think should go in which panels (A,B,C & D). I make these notations in pencil after I've written the script because I don't want to disrupt my flow to think about those breaks when I'm writing the story.
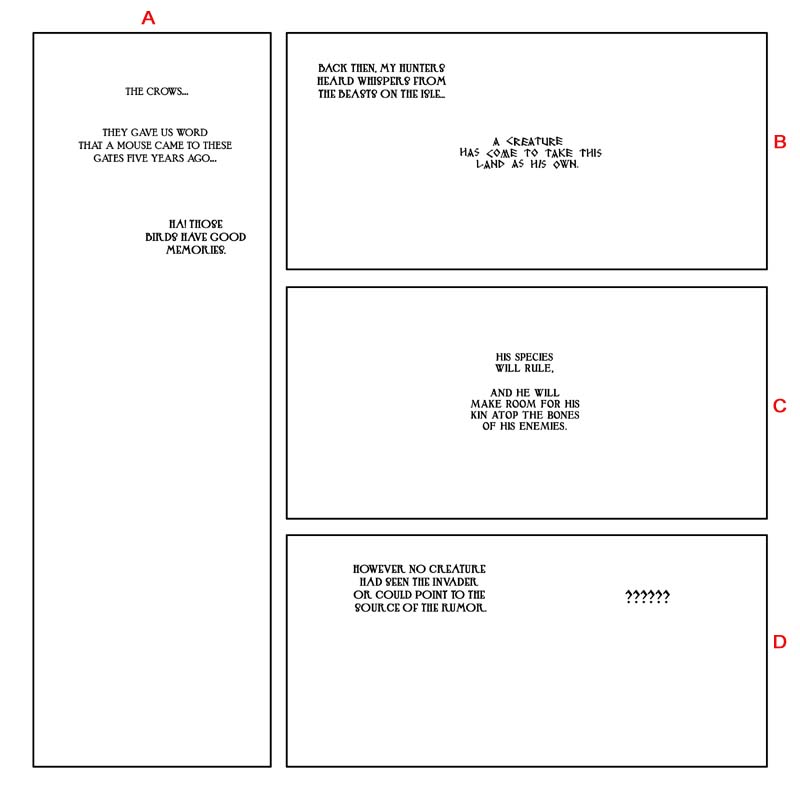 Text Layout: To help me shape the page and figure the panel arrangements I'll place the text into a page template. With my notated script I may know how many panels are on the page, but not know their shape. Placing the text can help me figure how big a panel needs to be or if I can combine text into one panel or break it up into two. Here I've deviated from my script a bit. Instead of having all that text as narration, I've re-worded some of it to be flashback dialogue. With the 'E: shape of this panel arrangement, the three panels on the right will be flashbacks and the first panel will be Em & Luthebon's dialogue that cues the flashback. This also gave me a time to play with font choices. I try and have different species have different fonts for their dialogue to help push the idea that the species all have different sounds, like the text equivalent of accents.
 Sketching: I've combined a few pages of sketches into this image, but the idea is the same, if you flipped through my sketchbook. I'll draw the various characters and elements for each panel scatted over several sheets. Often they are not in relation to each other. I'm just thinking about the shapes I'll need to fit each piece into each panel. The visuals I'm working toward here are Panel A: Em making a statement, B-D: various animals being overheard by Ferret hunters. You can see I made a note at the top of the page for which animals I might use to deliver the dialogue in the flashback. I settled on a wild boar, a hedgehog, and some cranes (I wrote 'birds' in my note).
 Layout: I don't fuss with the drawings in the sketchbook too much. Sometimes I'll realize I've drawn something too big or small or that the piece is out of proportion with itself. I leave that fixing for once I've scanned these sketches and I'm placing them in the template. I tint the different drawings different colors to help me see where one drawing ends and the next begins. I am able to rotate and re-size any drawing, sometimes flip them left to right, and make any corrections. I'll take some care to re-position the text here too. That way I know it will all fit and not cover any important part of the image.
 Inks: I print out a full-sized version of my layout and tape it to the back of the Strathmore 300 series bristol board I use for the final inks. On a lightbox I can ink the page using my layout as a guide. If I haven't drawn something tight enough in the layout, I'll pencil some on the page, but I mainly just tighten up the details ink ink as I go. This saves me a step and worry of erasing. Too often I have smeared ink, lightened ink lines, and even scrunched paper when erasing final art, so the less of it I have to do, the safer for the page. I'm using Copic Multiliner pens (0.7 mainly) for the linework and a brush & ink for the larger fill-in areas.
 Flats: In this stage I have scanned my inks and I'm preparing the file for color. The goal is to establish what areas are what colors. I tend to group color areas on different layers in Photoshop: Fur, Cloak 1, Cloak 2, Skin, etc. I have also established the color holds (previous tutorial) at this stage. They may look off at the moment (as well as some of the color choices) but all I'm trying to do is get the various areas established and not focus on the color selections themselves.
 Rendering: To get the painterly feeling of Mouse Guard and to add shadows and highlights to the flat colors, I use the Burn/Dodge tools (previous posts about them 1 & 2) In short, Burn darkens whatever the base color is and Dodge will lighten it. I use a brush called 'Drybush' that came standard with Photoshop 7. It's a bit uneven in it's application of either tool and that ads a nice mottling and texture that I like. The entire page, every part, every layer, is rendered, adding the depth to make the characters and settings seems as real as I can.
Final: Once I've completed the rendering on the full page, I make minor color adjustments and add any effects (like the overall lightened tone over the flashback panels). The text all gets tweaked a bit again and the balloons and boxes are placed around them.
2012 Appearances:London Super Con: Feb 25-26
Forbidden Planet London signing: March 1
Comics & Graphics Berlin signing: March 3
Comic Combo Leipzig signing: March 5
Emerald City: March 30-April 1C2E2: April 13-15
Boston Comic Con: April 21-22
FCBD: Jetpack Comics: May 5th
Heroes: June 22-24
San Diego Comic Con: July 11-15
Baltimore Comic Con: Sept 8-9
New York Comic Con: Oct 11-14
Detroit Fanfare: Oct 26-28

January 31, 2012
UK & German Appearances:As I mentioned in a past post...
 UK & German Appearances:
As I mentioned in a past post, I will be attending the London Super Comic Con as well as making at least one shop appearance in London (Forbidden Planet). I've had enough requests, that the image I did for the LSCC program guide (left) will also be available as a limited print at the convention and the store signing(s). My German publisher heard I was coming to Europe and kindly invited me to come to Berlin & Leipzig to promote the upcoming release of German edition of Legends of the Guard. The signing times and locations for the Germany trip are still being finalized, but will occur slightly after the London events. (I have also updated the list of all my 2012 appearances below)

The image to the right is a print image I made for the German signings. I kept in theme with the UK piece featuring a Guardmouse with heraldic animal imagery and the nation's flag. The Black eagle is a symbol of Germany, and I based the mouse's armor on designs of German Saxon armor. At this point, I do not intend to have copies of these prints available outside of these events and locations, though both images are slated to be in this year's sketchbook.
 Winter 1152 Black & White Edition??? This book is long overdue, and I have a small update on it. If you had ordered it ages ago when Archaia originally solicited it, you may be getting a notice from your local comic shop or online retailer that Archaia has canceled the order and the book. The orders have been canceled in part due to how old the solicitation was for them and that the book will need to be re-solicited to get current and accurate orders. The book is a tricky one to publish because of it's limited nature, it's costly overlay sheets, and it's larger size. We still have every intention to publish the book, IT has not been canceled, only the past orders. I will be talking to Archaia very soon and nailing down a new plan for release and try to get you all current information as soon as I can.
 Fan Art:
Casey Crowe writes: "Was just rereading the third issue of Black Axe and, damn, those thorn bushes are ominous looking in the last panel! Anyway, felt inspired to give'em a shot myself and so I did this little drawing - hope ya dig it!" ---I do dig it Casey, I do indeed!
2012 Appearances:
London Super Con: Feb 25-26
Forbidden Planet London signing: March 1
German Appearances: Location/Date/Time TBD
Emerald City: March 30-April 1C2E2: April 13-15
Boston Comic Con: April 21-22
FCBD: Jetpack Comics: May 5th
Heroes: June 22-24
San Diego Comic Con: July 11-15
Baltimore Comic Con: Sept 8-9
New York Comic Con: Oct 11-14
Detroit Fanfare: Oct 26-28

January 24, 2012
TMNT Leo Cover:This is the last of my 4 Turtle covers for...
 TMNT Leo Cover:
This is the last of my 4 Turtle covers for IDW (though I may do some more TMNT covers & work for them in the future). I had a melancholy feeling as I was working on this one. Bittersweet to be getting the chance to draw the Turtles (something I only dreamed of doing as far back as age 11) while at the same time finishing the job (at that point I didn't know if I was going to get the opportunity to do any more). To show Leo's commitment to his "work" I thought it would be good to show him in a rotten alley full of garbage. Someplace that would be uncomfortable for him, not only because he is above ground where he could be seen, but someplace even filthier than his sewer home.
 The piece started with two sketches in my sketchbook that I compiled in photoshop. One was of Leo, the other the alley. I found a photo online to use as reference for the details of buildings and fire escapes and ladders and clothes lines and sketched it out with omissions and the addition of trash (though you can see I added quite a bit more in the final art). The section missing out of Leo's leg and his one sword were altered in photoshop. The sketch was a bit off (his one leg was too short and his sword was at the wrong angle and making an unfortunate tangent line with his head). The sewer cover I lightboxed from a photo of a NYC manhole cover I distorted in photoshop to match the angle and perspective of the alley.
 The folks at Nickelodeon, who have approval over the comic line, were worried about the background seeming boring (they were also the ones to point out the tangent between the sword and Leo's head). To hedge my bets with them I added a great deal more trash to the alley. I filled up both sides and made some of the items recognizable (like a small mattress or couch cushion, florescent light bulbs, garbage bags, a pallet, & fruit crates) while making the rest of the bulk just shapes that are obviously junk. This was all done in the inking stage.
 I also thought the scene would have more intensity (and make Leo more miserable) if it was raining. I placed my finished inked linework on my lighbox with a sheet of drawing paper over top. On the drawing paper I inked in rain falling, splashing, and running down the various objects in the alley. The inked rain is later scanned and adjusted to become semi-transparent light colored rain in the color file. This is the same method I use when creating rain and snow in Mouse Guard.
 With the inked work scanned, I started flatting in the shapes. Flatting is the part of coloring where you distinguish color areas from one another: the green of his skin stops at the edges of his body, the red bandanna is different from his eye color, etc.. I have said in the past that the color choices are not even important, and here I used the wrong colors as I was flatting the garbage on purpose. Using these garish colors it's easier for me to see as I'm going that I have all those bits differentiated from one another and that I didn't miss any or that I didn't color outside the lines.
The final color art is ready when I have done all the textures and shading and highlights. I've color corrected all the color choices, and dropped in the rain overlay.

Upcoming Appearances:
London Super Con: Feb 25-26
Forbidden Planet London signing: March 1
Emerald City: March 30-April 1C2E2: April 13-15
Boston Comic Con: April 21-22
FCBD: Jetpack Comics: May 5th
Heroes: June 22-24
San Diego Comic Con: July 11-15

January 17, 2012
Papercraft Lieam:Want your own Lieam papercarft to make, ...
 Papercraft Lieam:
Want your own Lieam papercarft to make, display and/or play with? Now you can! I've provided the file on the mousemuard.net website crafts section. I started designing this papercraft about a year ago. I then handed the final design tweaking and file making to the talented Deanna Piotrowski. My goal is to provide several more characters over time for you to download and build: Saxon, Kenzie, Sadie, Bastian, Elymis, Sienna...(so that you can have a army of papercraft guard mice on your shelf...just like you always wanted!) Here is the direct link for the printable .pdf
Fan Art:
 Christian is a fan who sent me this link to a video file he made for his college final. He was instructed to make a mock-movie intro. He chose Fall 1152 as the subject for this intro. Watch the credits he's lined up for this mock-movie...Christian has some high hopes for the folks who would make a Mouse Guard movie! Even as a fantasy, it was fun to watch. Thanks Christian
Upcoming Appearances:
London Super Con: Feb 25-26
Forbidden Planet London signing: March 1
Emerald City: March 30-April 1
C2E2: April 13-15
Boston Comic Con: April 21-22

January 10, 2012
London Super Comic ConIn February, I will be a guest of t...
 London Super Comic Con
In February, I will be a guest of the London Super Comic Con's inaugural show. This will be my first UK convention! For the convention I'll be doing commissions a bit differently than I have in the past. I'm taking a pre-order list by email. The pieces will be inked 7" x 7" on 12" square bristol for £130. I will get these done before arrving at the LSCC, so I will need to cut off the list once I have the number of requests I can handle before we depart for the UK.You MUST be at the convention in person to pick up the piece (no proxy picker-uppers please). Email me to get on the list (payments will be handled through paypal in advance). At the convention I will be signing books, selling prints, and doing much smaller commissions that are limited to 1 mouse + 1 profession/ with 1 weapon or tool for £40 (these will be limited and as time permits).
In addition to the convention, I'll also be doing a signing March 1st at the London Forbidden Planet. And perhaps another London signing I'm waiting forconfirmation on.
LSCC Program artwork:
 I was asked to contribute a piece of artwork for the convention's program book. This is the final artwork I turned in, and the organizers have decided to make it the back cover of the program guide! The original inked artwork used to make the image is up for grabs too! To enter to win it, you MUST have purchased a ticket for the LSCC. Email creator@londonsupercomicconvention.com with the subject line Petersen London Super Comic Convention. Include your name and your order number from your ticket receipt. Cut off for entries is Feb 6th. The winner's name will be announced February 7th on the LSCC site
 Process
The process of this piece started with me wanting to do something very specific to the UK. I toyed with doing a mousey version of a few London architectural icons, but decided instead to do a piece that paid more respect to the UK than that. Using the heraldry of the countries that make up the UK (Lion: England, Unicorn: Scotland, Elk & Lion: Northern Ireland, and the Dragon: Wales) I figured a mouse could pay homage to the animal icons of the UK. I sketched out the animals looking at reference for the animals as I drew.

The sketches were all scanned and assembled in photoshop. I grouped the animal heraldry into a big mass with the idea of it forming something like a UK Patronus for the Guard Mouse. I resized and rotated my sketches as I came up with the final composition. The tinting was a way for me to easily see which lines belong to which animal. I pasted in a Union Jack flag and distorted the perspective to become the setting of the image.
 I printed out the layout and placed it behind the 300 series Strathmore bristol board I do my final art on. Using a lightbox I was able to use the layout as a guide to ink the piece. Most of my time inking this piece was to get the animal manes and fur and scales to all swirl together so that it was hard to tell where one ended and the next began. For the Union Jack, I distressed the surface texture as I inked...even making the flag seem to be disolving or being disturbed by the supernatural force of the summoning of the heraldic animals.
To color the piece I scanned in my inks, and worked in my traditional way in photoshop 7. Most of the work here was in establishing the various color holds. Color holds are areas where I choose to have the black inkwork display as a color instead of the original black. Here I have a color hold on the heraldic animals, the red and blue of the Union Jack and a few small ones on the details of the mouse's sword. The holds help push the animal figures back and to make them otherworldly. It also helped make the flag read more as the Union Jack instead of just shapes.
I printed out the layout and placed it behind the 300 series Strathmore bristol board I do my final art on. Using a lightbox I was able to use the layout as a guide to ink the piece. Most of my time inking this piece was to get the animal manes and fur and scales to all swirl together so that it was hard to tell where one ended and the next began. For the Union Jack, I distressed the surface texture as I inked...even making the flag seem to be disolving or being disturbed by the supernatural force of the summoning of the heraldic animals.
To color the piece I scanned in my inks, and worked in my traditional way in photoshop 7. Most of the work here was in establishing the various color holds. Color holds are areas where I choose to have the black inkwork display as a color instead of the original black. Here I have a color hold on the heraldic animals, the red and blue of the Union Jack and a few small ones on the details of the mouse's sword. The holds help push the animal figures back and to make them otherworldly. It also helped make the flag read more as the Union Jack instead of just shapes.Upcoming Appearances:
London Super Con: Feb 25-26
Forbidden Planet London signing: March 1
Emerald City: March 30-April 1
C2E2: April 13-15
Boston Comic Con: April 21-22

January 3, 2012
Art Nouveau Mice:A few weeks ago I was inspired to do a d...
 Art Nouveau Mice:
A few weeks ago I was inspired to do a decorative piece of Mouse Guard artwork, perhaps to be used as this year's Sketchbook cover. We have a print in our hallway by French artist Paul Berthon. I thought it would be fun to do a piece completely in homage of this print. Berthon was a printmaker. So this piece (c.1900), while a print (a lithograph) isn't like owning a print of a painting, it was always meant to be a print. The subject is also of two women examining wallpaper they have just printed on a press. As a printmaking major, I like the piece for these reasons in addition to the aethetics of it.
 I started with some very rough sketches in my sketchbook, and then scanned it knowing I would have to adjust a great deal in photoshop to get the mice in scale with one another where their ears didn't obstruct each other's faces, the arms were in proportion and still interacting with the wallpaper they are examining. Unfortunately, as I was doing this as a "quick evening project", I didn't save the photoshop file with the adjusted sketch. But if you look back at previous posts, it looked a great deal like the others with a border pre-sized and the mouse figures tinted different colors to help me distinguish the lines between them
 I printed the adjusted digital mock up and using a lightbox inked in the mice in a more stylized manner than I normally do. I focused on the outer contour line, making it thicker than any interior contours, which I kept to a minimum (other that decorative patterning). It felt unusual to be inking a Mousey piece like this and not doing any hatching or stippling or texture. The patterns on the dresses and in the background were all drawn onto the bristol as I looked at the Berthon original for reference.
 The piece didn't come alive until I scanned my inks and colored it. I inked in so many of the patterns dark and thick, that in ink it looks too heavy and clumsy. I color held all of the linework (meaning I used a color overtop of my inkwork to change the lines to a color instead of their original black). This way I was able to soften the dress and background patterns and get a closer sense of the original.
 Papermodeling Large Scale:
I've done several posts about the models I build out of scrap cardboard and paper to make Mouse Guard locations and sets. Yesterday I decided that my Sister-In-Laws dog Olive, who is staying with us, needed a little indoor dog house. A past dog of ours, Augie, liked having a little place to hide, so I had made that dog a little box house. I wanted to make something nicer for Olive though (we also didn't want a taped up cardboard box in the livingroom as part of our decor).
 The house is made of one box with another box or two cut up for the gable roof, the shingles, and the siding. I pre-painted sheets of cardboard before cutting it into strips for the siding. The shingles on the otehr hand, I pre-cut and then painted each one. For the shingle paint I poured a few similar colors into a tray and as I painted changed the color mix on the brush as I went so the shingles would look more random. and patchwork, as real shingles can. The benifit of this house, it that it's incredibly light and easy to move if we decide to relocate the house or for cleaning.
 It took a little convincing to get Olive into her new house, but Autumn, our big dog, was ready to move in for her. Autumn is very curious (where Olive tends to be nervous) and seemed rather jealous that I made such a thing for her little cousin. I suppose I'll have to make one for Autumn, though I shudder to think of how big it will be and how many slats of siding and individual shingles I'll need to cut and paint. But it will be a fun project that is a change of pace for my hands from penciling, inking, and coloring.
 Fan Art:
Since this feels like a crafting post, I figured this piece of fan art by Kate Buike seemd fitting. Kate wrote telling me she had just read the Mouse Guard books in December and enjoyed them so much she wanted to make her own plush of Kenzie. The Mouse Pattern she says comes from Carol's Zoo. Thanks Kate!!
Upcoming Appearances:
London Super Con: Feb 25-26
Emerald City: March 30-April 1 Boston Comic Con: April 21-22

David Petersen's Blog

- David Petersen's profile
- 339 followers
David Petersen isn't a Goodreads Author
(yet),
but they
do have a blog,
so here are some recent posts imported from
their feed.

