
David Petersen's Blog, page 74
November 1, 2011
Yesterday's Halloween piece step-by-step: ...
 Yesterday's Halloween piece step-by-step:
 For Halloween I wanted to do a spooky Mouse Guard-ish piece which also became a gift owed to one of my nieces (I used commissions as rewards this summer to get them to try new things like different foods and tall water slides). I started this piece with a sketch on some copy paper of skeleton mice sitting on a pumpkin.
 Then I took that drawing and scanned it to re-size it and correct some mistakes. The proportions were off on some of the skeletons and I drew the one mouse floating in air, knowing I'd shift him around digitally until I found a good place for him to rest.Like on other pieces I have shown, I'll sometimes tint the mice different colors from the backgrounds or each other. This helps me when the drawing is still light & sketchy to be able to see what lines belong to what subject. This is then printed so I can ink it on the light box...but something wasn't right...
[image error] The skeletons, while cool, just didn't have enough life to them. I wanted them to be more otherworldly than just what could have been posed bones. I took my printout from above and a sheet of copy paper and on the lightbox I sketched ghostly mice. I used the bone drawings on the printout as a guide so the ghosts would match the pose and scale of the skeletons perfectly.
[image error]
The next step was inking. I first inked the piece just like my printed rough, with only the skeletons. I used Strathmore 300 series bristol, and Copic Multiliners for the linework. I was focused on line thickness, texture, and pattern as I inked. Another downside of the skeletons was how easy they are to loose if the background behind them has any detail (the sitting one's legs get a bit lost in the vine and the walking one is hard to make out through all the ground cover.)
 I inked my ghostly versions of this trio on the copy paper itself. The copy paper lets the ink bleed a little if the pen sits too long in one place. I used this as motivation to ink these guys more gesturally and less detailed than I normally would. They are spirits after all, I didn't want there to be too much detail to focus on. I added the idea of them evaporating or part of their apparitions to be pulling away from them
[image error] I scanned all the inked materials and assembled them as I flatted the piece for color. The flats weer overall quite easy: a sky, the ground, the pumpkin, the vine & leaf, and the skeletons & ghosts. I used a color hold on the ghost & skeleton linework. Trying to get the mice to appear less than solid where you can still see their outlines as well as their skeletons was an exercise in patience and subtle contrasts as I colored the piece.
[image error] Without going into too much detail about the ghost process, the ingredients to my solution were color holds, setting a few layers to 'screen' mode, making a few layers with a healthy Gaussian blur, and a subtle outter glow on the linework. The rest of the piece was rendered in my traditional way using the dodge & burn tools to render my flat color areas.The end result was a piece that I think is spooky and fun and will surely make it in to next year's sketchbook (as well as the original making it into my youngest niece's art collection)
Upcoming Appearances:
2012
London Super Con: Feb 25-26
Emerald City: March 30-April 1Boston Comic Con: April 21-22


October 31, 2011
Happy Halloween!I'm planning on posting the Mouse Guard c...
Happy Halloween!

I'm planning on posting the Mouse Guard costume photos next week to give some last minute crafters a few extra days to snap photos.
Upcoming Appearances:
2012
London Super Con: Feb 25-26
Emerald City: March 30-April 1Boston Comic Con: April 21-22

I'm planning on posting the Mouse Guard costume photos next week to give some last minute crafters a few extra days to snap photos.
Upcoming Appearances:
2012
London Super Con: Feb 25-26
Emerald City: March 30-April 1Boston Comic Con: April 21-22
October 25, 2011
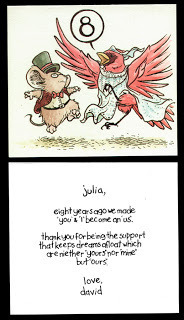
Happy Anniversary to my amazing wife:
Happy Anniversary to my amazing wife:


World Building Q&A:Last week Jeremy Bastian & I p...
 World Building Q&A:
Last week Jeremy Bastian & I posted our video presentation about worldbuilding AND had a live Ustream on Monday Q&A where we answered questions about the video and techniques for creating a fictional world. We recorded the Ustream for those who couldn't make the live program to watch later. Here is that video:
Video streaming by Ustream
Upcoming Appearances:
2012
London Super Con: Feb 25-26
Emerald City: March 30-April 1Boston Comic Con: April 21-22

October 18, 2011
World Building Video:Jeremy Bastian & I presented a s...
 World Building Video:
Jeremy Bastian & I presented a slideshow and discussion on world building at Detroit Fanfare this year. We showed examples in our work about how we tackle the idea of creating a fictional world for our readers that is believable and cohesive. We had a fair amount of people asking if the presentation would be available online. So Jeremy and I recorded a new version of the presentation for the web. I think if you are a creator working on a fictional world (or aspire to be) or are a fan of fictional worlds and our books, that you will enjoy the video.
Posting this presentation felt a bit static though. At a panel we can interact with the audience and leave plenty of room for Q&A. So next Monday (10-24-2011) at 8pm EST, Jeremy and I will do a live Ustream (link: http://www.ustream.tv/channel/davidpetersen) to answer your questions about creating, writing, & drawing a fictional world. (we plan to record this as well so if you can't make it, you can watch it later)
So enjoy the video below, and catch us this Friday on Ustream for the follow-up!
World Building with Bastian & Petersen from David Petersen on Vimeo.
Upcoming Appearances:
2012
London Super Con: Feb 25-26
Emerald City: March 30-April 1Boston Comic Con: April 21-22

October 11, 2011
Recent Commissions:7" x 7" commissions for fans (I only t...
Recent Commissions:
7" x 7" commissions for fans (I only take requests for these at conventions, sorry, no email orders.) I colored a few for upcoming sketchbooks:

[image error]
[image error]

[image error] Upcoming Appearances:
2011:
New York Comic Con: Oct. 13-16
2012
London Super Con: Feb 25-26
Emerald City: March 30-April 1Boston Comic Con: April 21-22
7" x 7" commissions for fans (I only take requests for these at conventions, sorry, no email orders.) I colored a few for upcoming sketchbooks:

[image error]

[image error]


[image error] Upcoming Appearances:
2011:
New York Comic Con: Oct. 13-16
2012
London Super Con: Feb 25-26
Emerald City: March 30-April 1Boston Comic Con: April 21-22
October 4, 2011
TMNT: Michelangelo Cover:I have been very fortunate to be...
 TMNT: Michelangelo Cover:
I have been very fortunate to be asked by IDW to do the 4 one-shot micro series covers for the TMNT relaunch. A few months ago I shared the Raphael cover, and now I can share the Michelangelo cover. The final cover appears to the left. I wanted to draw something with more action than the Raph cover for Mike. With Raph, I went for the brooding vigilante look, for Mike I wanted him more outgoing without being silly or a "party-dude" (I want to avoid the caricature-ization the turtles got after the cartoon hit...and bring them back to subtle personality distinctions)
Pencils:
 I drew the figure on one page in my sketchbook with the background on another. My original idea was to have Mike jumping down a sewer tube, but I couldn't get it to work how I had it in my head, so I switched to another New York staple: a tenement building (the Raph cover had the classic rooftop water tower). I found some photo reference to help me with the details of the building and did a quick sketch. I merged the two pages of my sketchbook into this image to send off to IDW for approval. I added the tinting to help me visualize some of the final palette, which would also help IDW understand where I was going with the image.
 Inks:
Inks:Once IDW approved the pencils, I printed them out (had to fit it on 2 sheets of paper and then trim & tape them together) and taped it to the back of my Strathmore Bristol 300 series paper to do the final inks. On my lightbox I'm able to see the pencils through the bristol and ink overtop of them without making a mess of pencils lines that I need to erase in the end. I tried eyeballing the details and perspective on the building using the photos I had and my sketch as a guide, but after I inked a few parts of the building, I realized it was getting wonky-er by the minute. I set up a tripod off to the side of my desk and tied a string to it and was able to locate a vanishing point that would be a good splitting of the difference in the lines I already had inked.
 Color Flats:
I scanned my inks and layed in the colors. This process is called 'flatting' and means that I'm establishing where the various colors start and stop...think of it like a kid learning to color in a coloring book within the lines and using colors that are correct for the image. To make Michelangelo more of a focus, I pushed the building back by choosing colors that were darker and more muted than I may have in other circumstances. And while I'm already thinking about the shading and lighting effects, I'm just trying to get an overall palette and make sure that details already can be differentiated from each other with color choices (like the carved stone being different from the brick being different from the limestone.)
 Rendering & texture
Then I rendered the image (seen in full above) adding all the shading and texture. I wanted to give a bit of a street glow coming up on the underside of Mike and the lower part of the building. I also needed to make the nunchucks look like they were spinning. and I used a few smearing techniques along with a color-hold on the lines. Lastly I added a texture to the final image to emulate the feel of the original zip-a-tone shading the black &; white Eastman & Laird books had. (left image shows closeup of my colors next to a closeup of an image from Eastman & Laird's first issue)
I feel VERY lucky to be doing these covers. Still have Donatello & Leanardo to do for 2012!
 Mouse Guard Costume photos:
I tweeted a request, but figured I should repeat it here. For Haloween this year, I'd love to do a post of all the Mouse Guard costumes you awesome fans have done. I have a folder of ones sent to me in the past, but if you have a new photo or one you have not sent, or you plan on having a Mouse Guard costume this year, please send me photos! Follow the contact info on mouseguard.net to send in photos, cut off is Oct. 29th.
(These ladies dressed up as Lieam, Saxon, & Kenzie at Dragon*Con a few years back)
 Fan Art:
This week's fan art was sent in by Emil Friis Ernst, a 17 year old from Denmark. He writes: "Coming from a house half consumed by a big forest, nature has been my playground since childhood and your detailed and feral-like environments bring back memories...I have made this little piece to celebrate Mouse Guard! It's my character Ferdin...He's an intrepid yet also slightly jumpy (jittery?) tunneler, exploring abandoned tunnel systems left by other animals." Thanks Emil! You have a great sense of mood going here!

September 27, 2011
Darkheather Model pt.3Over the last few weeks I have been...
 Darkheather Model pt.3
Over the last few weeks I have been sharing photos and info about the models I built to help me design, visualize, and draw Darkheather in Winter 1152 (pt1, pt2).This week I'm showing the location of one of the most emotinally important scenes in Winter 1152. Once Saxon climbs down the pile of bones in the bone chamber, he finds a maze of prisons...or at least, that was my intent. I tried to come up with an idea for the shapes and designs of the prisons beyond the chamber, where Saxon ultimately has a very emotional discovery, but with little success.
 In one of those magic moments as I was going to sleep (or waking up, I don't recall which it was now) I envisioned a floorplan that would resemble a repeating design like the tilework of the weasels'. It would start with a hexagonal hub that leads out to triangular columns and stone archways repeating the shapes from the bone chamber to connect it all. This image with digital help over-top a photo of the model you can see that even though the geometry isn't perfect, you can imagine the floorplan repeating all around the bone chamber.
 The model itself started with the hexagonal center and the six triangular columns from my half dreaming floorplan idea with archway pieces cut with a stencil many, many, many times over to be used as connecting pieces between the columns. I wasn't as precise as I should have been, and the bristol had more flex that I wished, so the model became unsymmetrical and warped as I built. The wood strapping accross the tops of the arches were glued on in hopes of correcting that as much as possible. At the bottom of this photo you can see I tried to match the shape and angles of the entry archways from the bone room.
 These prisons are only seen for a few brief pages in Winter 1152, and I may have over thought the design of the prison, but when my mind was blank, I thought I'd have the quickest and best success for design by assembling a model. This way if I ever need to revisit this or any other Darkheather location, I can dust off the model and get the characters right back in there. To the right you can see a few panels of Saxon's journey through there.
 Fan Art:
Morgan Bilicki (who, with her friends, sent in painted fan art previously) recently emailed a photo of her knit fan art. She writes: "I'm a knitter, so it was only a matter of time before I made my own mouse with yarn. I designed the pattern myself and knitted him up. So, here's Kenzie of the Mouse Guard"
Upcoming Appearances:
2011:
New York Comic Con: Oct. 13-16
2012
London Super Con: Feb 25-26
Emerald City: March 30-April 1Boston Comic Con: April 21-22

September 20, 2011
Darkheather Model pt. 2:Time to continue from the model p...
 Darkheather Model pt. 2:
Time to continue from the model post I did a few weeks back. In the 4th Issue (chapter) of Winter 1152 Saxon plummets through a hole in the Darkheather tunnels into a room piled with the bones of weasel victims/meals long past. In a past blogpost I quickly showed and mentioned the model I made for the room, but wanted to go into more detail here.
 Sometimes I find that trying to build a physical model helps me design a space much quicker than if I tried sketching out ideas. I had a few photos of various arches & architectural details I thought appropriate for the architecture of Darkheather. In photoshop I stacked two arch patterns on top of each other and made the overall shape a wedge. I printed out several copies of the image, pasting them to bristol board and then attaching their sides to each other in what would be a octagon (but I left 4 sides off so I could see into the model.) In this photo you can see I've highlighted one section of the photo-collage so you can see how it was assembled.
 This idea of repeating a section of something to make a bigger something seem like the sum of more than its parts was something I learned in 2D Design class (one of the most important classes I ever took). The room was glued to a piece of cardboard which I cut a hole into so I could view the model from below. To help the bristol board walls to keep their shape and not distort, I added the cardboard arch wings. Building a model like this only took an hour or so, but it saved me a lot of time in design and in imagining the way it would look in various angles and perspectives.
Below you can see some panels from the book of the bone chamber.

Where those lower arches lead will be the subject of next week's blog: Darkheather model pt.3

Fan Art:
This work by Isaac Montalbano (7) was sent to me by his mother Sarah. She writes: "By some chance our local library put Fall 1152 in the children's section on display. Even though the book is usually upstairs in the Young Adult section. If this hadn't happened I never would have seen it next to the water fountain. I myself love pretty much anything to do with the medieval time period and I have been picking up Brian Jaques books at Goodwill or tag sales and they wait on the shelf for my three sons to become full fledged readers. Anyway, when I brought Mouse Guard home we knew it was love. A while ago Isaac was inspired to draw his own version of The Black Axe, The green part is the cloak, and the reason one arm is super long is that the other arm is folded and also his head is turned to look at the axe which is why he only has one eye."
Upcoming Appearances:
2011:
Detroit Fan Fare: Sept. 24-25
New York Comic Con: Oct. 13-16
2012
London Super Con: Feb 25-26
Emerald City: March 30-April 1Boston Comic Con: April 21-22

September 13, 2011
Inspiration photos:For the last four days Julia and I hav...
 Inspiration photos:
For the last four days Julia and I have been visiting at my Dad & his wife's place in Ludington, MI. Ludington has long been a wellspring of inspiration for me and has served as a reference point for a great deal of Mouse Guard artwork & locations. I went for a walk yesterday along one of my favorite paths up on a wooded bluff that occasionally overlooks Lake Michigan. These photos I took then will be added to a folder at home I use to recharge the creative spark when working on my books. I wanted to share this place with my blog readers.
 I love seeing these critter holes and imagining what kind of houses they would build if these were their front entryways. I suppose the tall grass acts like what would be a decorative tree or bush outside a human home.
Here is another one of those openings that could serve as a gate to a hidden city of mice, or chipmunks, or voles. I love the lumpy and organic shapes trees can have, and it's fun to imagine how that could effect the shape of the inner dwelling.

I did a spot illustration trying to capture the feel of looking up at light dancing through a canopy of leaves in the RPG hardcover. It looked odd in black & white, but started to resemble a leafy light filter when I gave it some color.
 Using focused bits of nature like this not only help me set the mood and atmosphere of Mouse Guard, but it also sets up the idea of scale...instead of showing a full forest floor, I can show the details of a few berries and leaves so the audience starts to think in terms of mouse-size.
 In this photo overlooking the bluff & lake, I tried to show the inspiration for the shift from water to sand to grass to dark tree cover in Black Axe issue 1 when Celanawe leads Em away from the shoreline.
 Like the berries above, these mushrooms shown from the undersize go a long way to explain scale and point of view. I also think mushrooms are just visually cool.
 Erroded sand has left half of this tree's root system exposed. This path is littered with them and they always remind me of Ringwraiths from Lord of the Rings. Not only is the setting pretty well suited for the hobbits to use this as a hiding place when they are hunted, but also the dark exploring finger-ey roots remind me of the wraiths themselves. I set Celanawe & Em's own hiding place here in Black Axe 1.
 Lastly, because I'm a texture & pattern guy I like focusing on things like bark.
 I hope you enjoyed a glimpse of the place I retreat to when I need to get back to the soul of childhood exploration and wonder. I camped near there when I was a kid, swam right in those waves since I was three, read the first Harry Potter book to Julia outside the woods there, proposed to Julia on the beach, and have been making wonderful new memories with my nieces the past few years. It's special to me and I hope you enjoyed my indulgence in sharing it with you.
NEXT week I'll do part 2 of the Darkheather models
Upcoming Appearances:
2011:
Detroit Fan Fare: Sept. 24-25
New York Comic Con: Oct. 13-16
2012
London Super Con: Feb 25-26
Emerald City: March 30-April 1Boston Comic Con: April 21-22

David Petersen's Blog

- David Petersen's profile
- 339 followers
David Petersen isn't a Goodreads Author
(yet),
but they
do have a blog,
so here are some recent posts imported from
their feed.


![[image error]](http://3.bp.blogspot.com/-qrTwRJj7O3k/Tq5Albj-jsI/AAAAAAAACsE/EbS6SOTBntY/s1600/hghosts+pencils.jpg)
![[image error]](http://3.bp.blogspot.com/-qO8VQpiI4vg/Tq5Al8qVvoI/AAAAAAAACsM/fO04R3VHIbU/s1600/hinks.jpg)
![[image error]](http://1.bp.blogspot.com/-YX-iBJUdh2A/Tq5AlBBCyVI/AAAAAAAACr0/4T8IRT4bD4E/s1600/hflats.jpg)
![[image error]](http://1.bp.blogspot.com/--AxJl5HcrI0/Tq5AkZotAwI/AAAAAAAACrk/VB9lsXM-TDA/s1600/ghost+pumpkin.jpg)
![[image error]](http://2.bp.blogspot.com/-93WlVN3Dchw/TpTUWjpHWXI/AAAAAAAACpU/HjlfiAf9E6M/s1600/4th+dr+mouse.jpg)
![[image error]](http://4.bp.blogspot.com/-s7HKCOqJM5E/TpTUX1fdbFI/AAAAAAAACpk/8fSzLEppOdY/s1600/gonzo+camilla.jpg)
![[image error]](http://3.bp.blogspot.com/-oa7YbXJog-s/TpTUZ8XR6qI/AAAAAAAACp8/IcxGkd0ZN-A/s1600/thane+%2526+Sadie.jpg)