
David Petersen's Blog, page 44
June 27, 2017
Sparrow 5x7 Print Process
 For 2017 I'll be introducing a lot of new 5"x7" matted prints to my convention appearances and in my online store. Fans have been enjoying the Saxon, Gwendolyn, Sadie, and Kenzie prints in the same format, so in addition to adding more guardmouse characters for 2017, I'm also adding more animals/scenes.
In this post, I'll be sharing the process of creating the sparrow and banner artwork to the left from concept to finished colors.
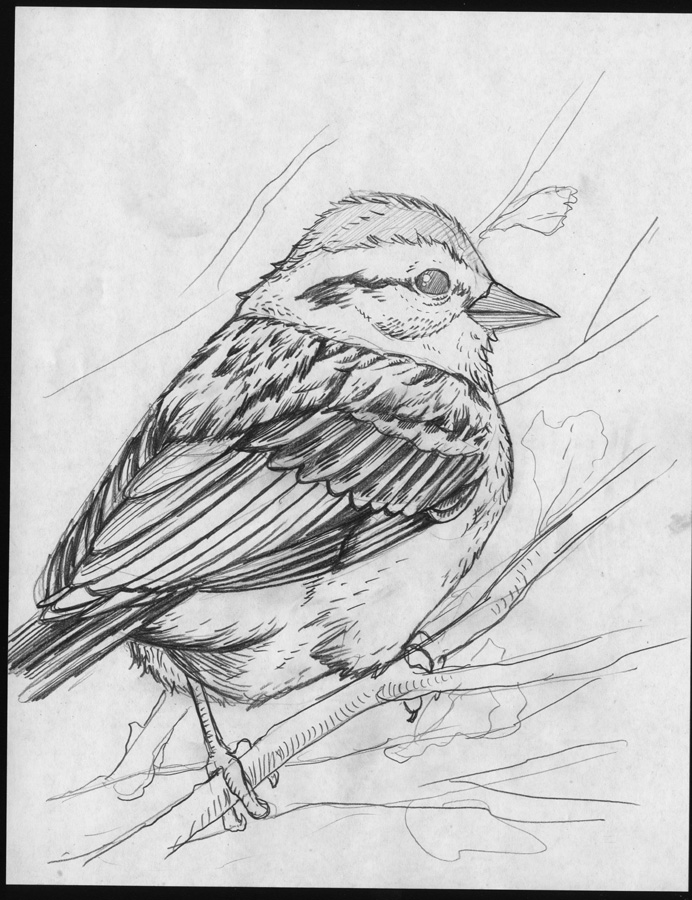 Julia likes when I draw birds. So for one of the more animal-centric prints I decided to focus on a sparrow. But as I was drawing it, I really didn't want to add a mouse. So, I just kept looking at reference and doing a tight detailed pencil drawing of the sparrow. This is much more detailed and tight than my pencils are usually, but with all the delicate feathers, the way the tuck and the different textures of them around the neck and head and belly, I wanted my sketch to have all the info I needed when I'd get to the inking stage. Somehow, adding a mouse to this just felt like a stunt, not necessary to the drawing.
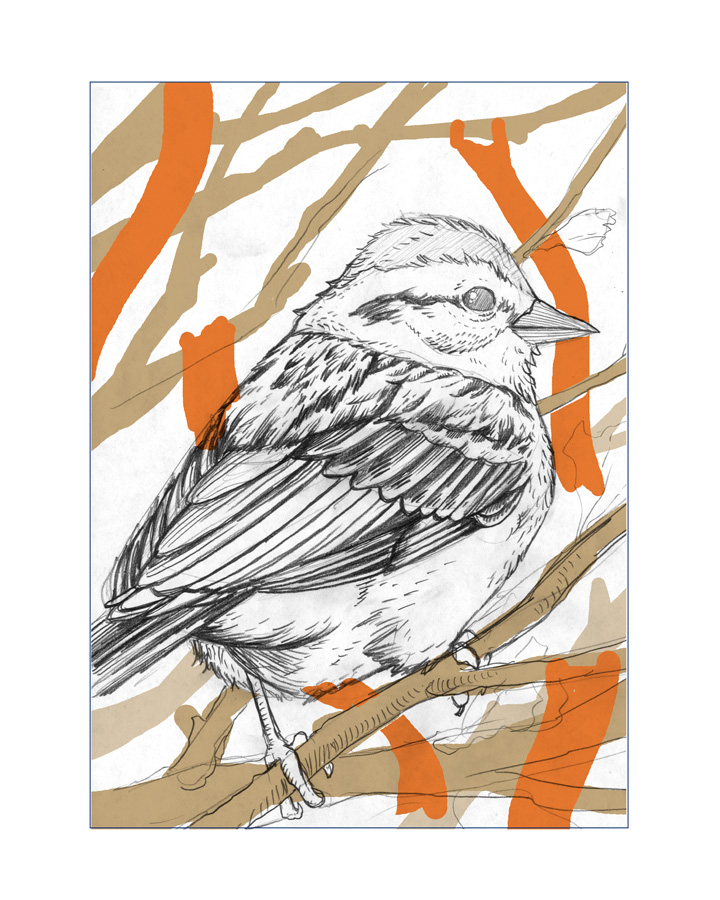
In photoshop I placed the sparrow pencils in the format template for my prints and painted in the tree branches to help me visualize if the piece really did need a mouse. Turns out it needed something, but instead of a mouse, I opted for banners streaming from the branches. Are these mouse flags? are they sparrow? or some other tree-canopy animal? It's not clear...though I'd bet on mouse.
I'd also considered making some kind of tall design, text, or symbol on the flags, but again decided to let the sparrow be the focus.
 I printed out the photoshop assembled layout and taped it to the back of a sheet of Strathmore 300 series bristol and inked on a lightpad. I use a Huion lightpad that allows me to see the printout through the surface of the bristol. This means that on the surface of the bristol will only be my inks, no pencil lines to erase (though sometimes, I do tighten up the pencils a bit as I work if the layout sketch is too loose). For pens I used Copic Multiliners, the 0.7 & 0.3 nibs. After finishing inking what was in the rough, I decided to silhouette more branches in the background, but was careful not to have them intersect any of the existing linework to make them easier to isolate for color holds later. .
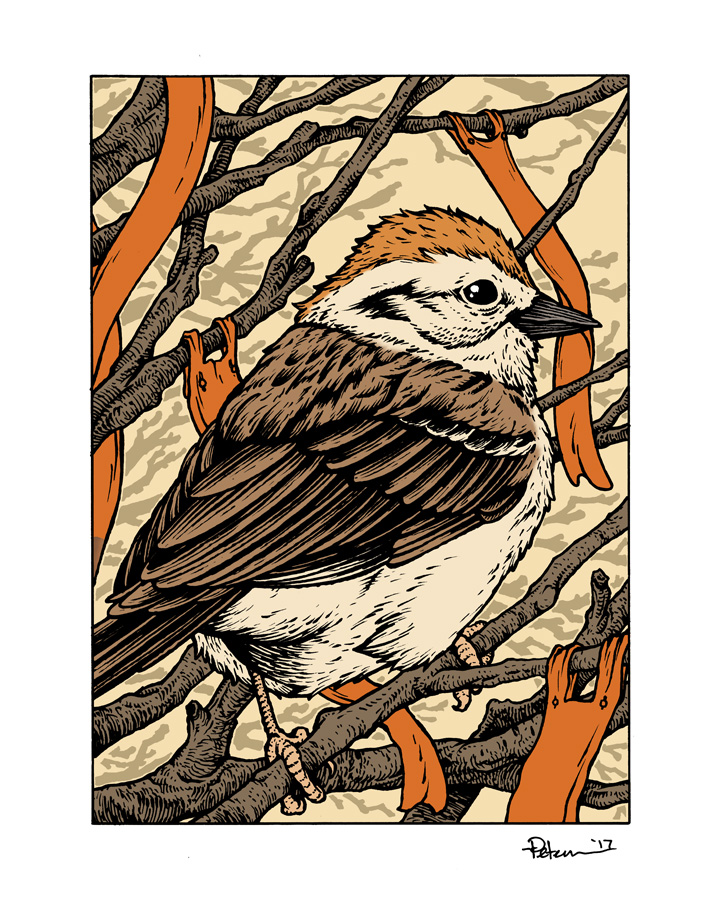
Once the inks are scanned, I start the process of flatting the piece for color. This means laying in flat color (no concerns with shading or texture) to establish that areas like the sparrow's various feather tones, the branches and banners.
Once the flat colors are in I start rendering each area using the dodge and burn tools (lighten and darken) with a textured brush. I also added a color hold on all the branches in the background.
Here again is the finished colored artwork. This print and many more will be available at any of my convention appearances this year was well as in my online store.
For process posts on previous prints:http://davidpetersen.blogspot.com/search/label/Print
2017 Appearances: San Diego Comic Con: July 19-23Baltimore Comic Con: Sept. 22-24New York Comic Con: Oct. 5-8


June 20, 2017
Mouse Guard Model Video: A Ship of Shell & Timber Scrap
 For the fifth issue/chapter of The Black Axe, I built a model of a junk boat made of mouse-salvaged materials. With the fan excitement over the video of Adam Savage talking to me about my models on Tested.com I wanted to do some videos where I talk about a specific model, how I built it, what the materials were, and why I built it in the first place.
Below you can watch as I explain how I made the model modular to protect my initial craftwork on it:
For another Blogpost on this model : http://davidpetersen.blogspot.com/2012/08/black-axe-5-boat-model-in-black-axe.html
2017 Appearances: San Diego Comic Con: July 19-23Baltimore Comic Con: Sept. 22-24New York Comic Con: Oct. 5-8
June 13, 2017
Heroes-Con 2017 Auction 20" x 32" process
 Each year HEROES Con has an art auction on Saturday night.
The proceeds go to help fund next year's HEROES CON, which is one of the last remaining independently owned comic-centric conventions. Shelton Drum & Co. Do a fantastic job of making everyone (exhibitors & attendees alike) feel at home & welcome. Some folks do their piece for the art auction up on a live art-stage at the convention (where attendees can watch the process). I prefer to do my piece at home in the studio where I can take more time, assure a level of quality, and not take away any table time for fans at the convention. For today's blogpost, I'll be sharing my process from start to finish:
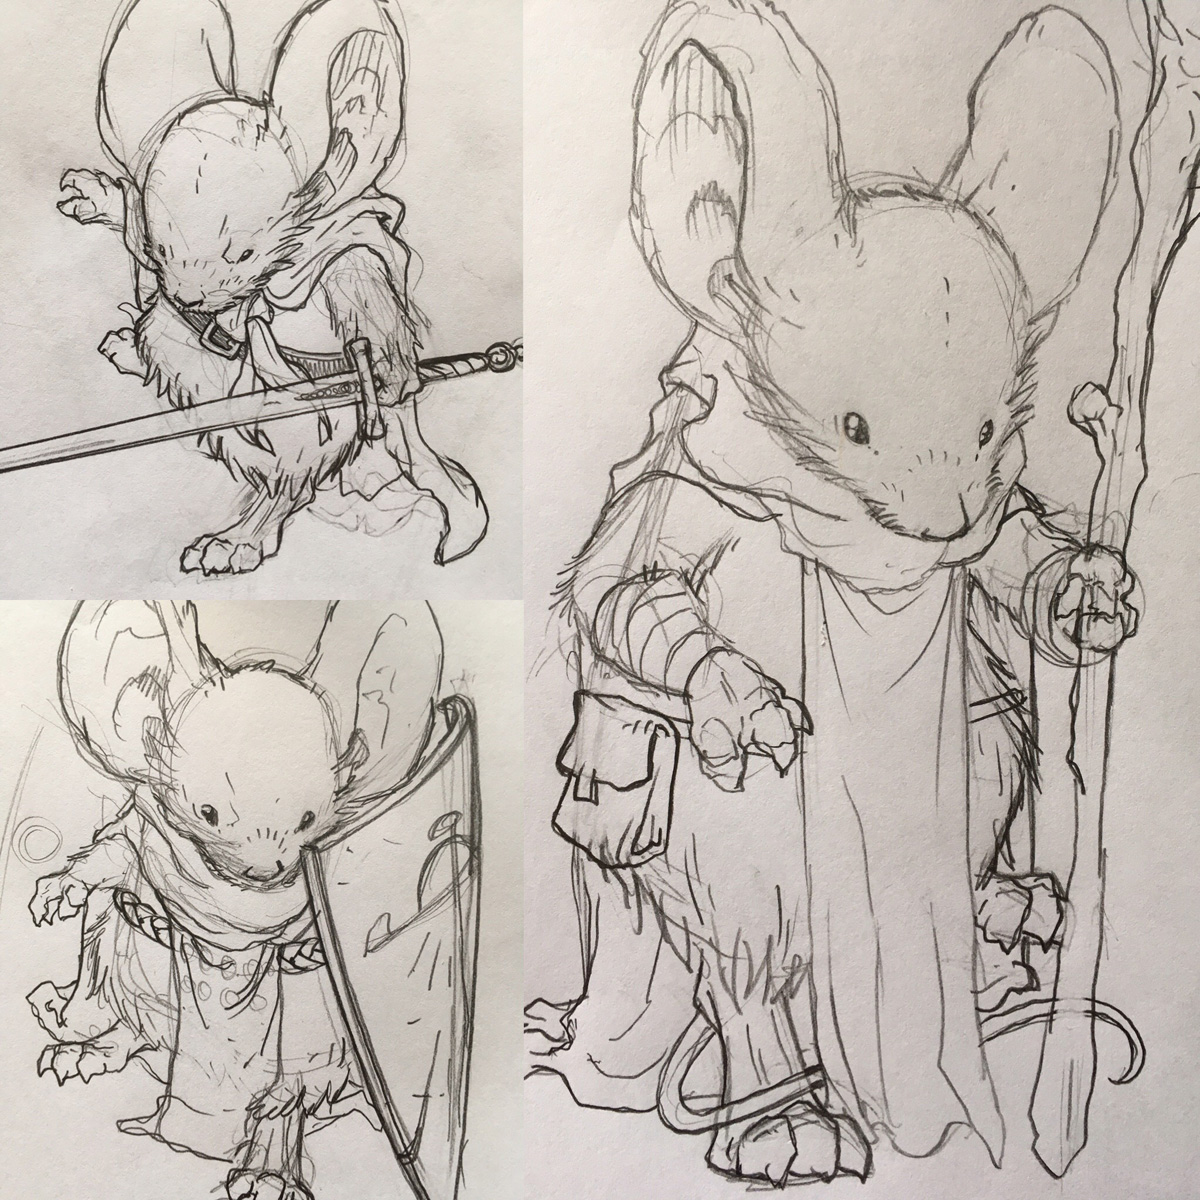 Pencil sketches on copy paper of Saxon, Rand, & Kenzie. I then scanned these and arranged them into a composition on a mossy tree branch in Photoshop...
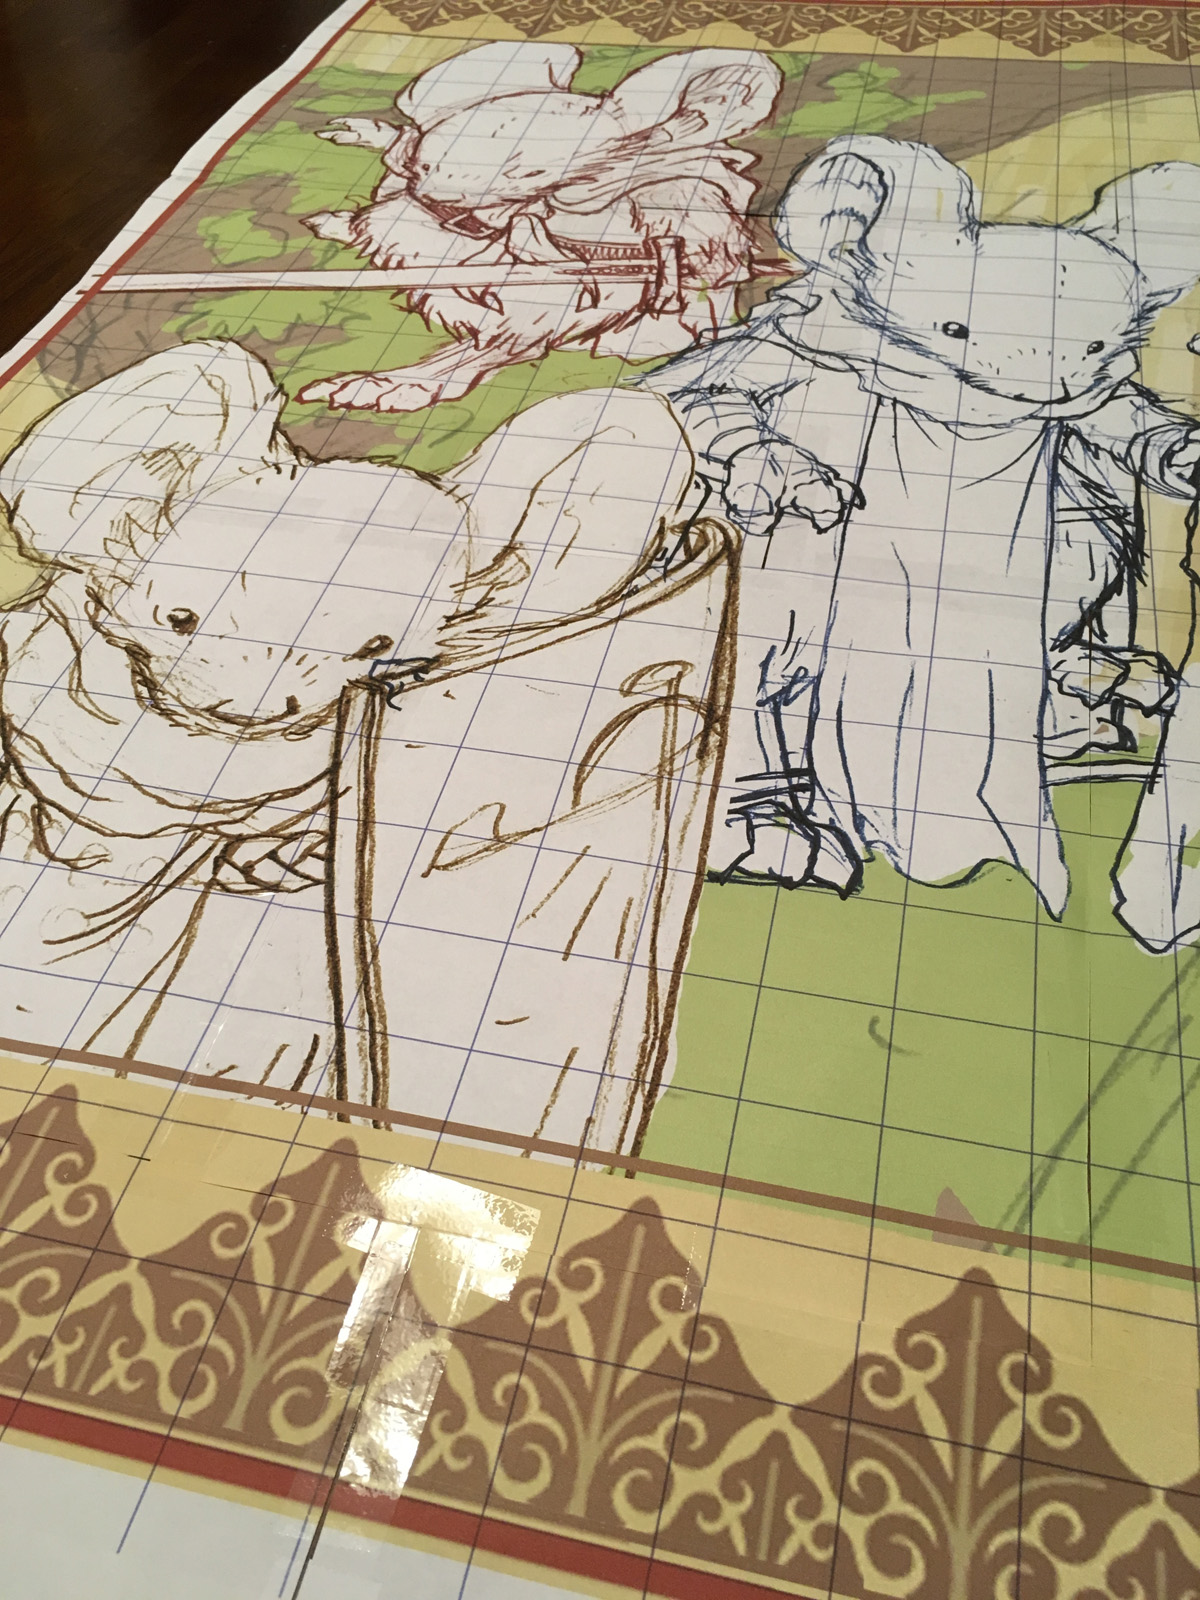 The layout is too big to print, so I break it up into single copy paper sheet segments and print those. The grid is to help align & register the 9 pieces of paper back into one image.
 Close-up of the printed layout.
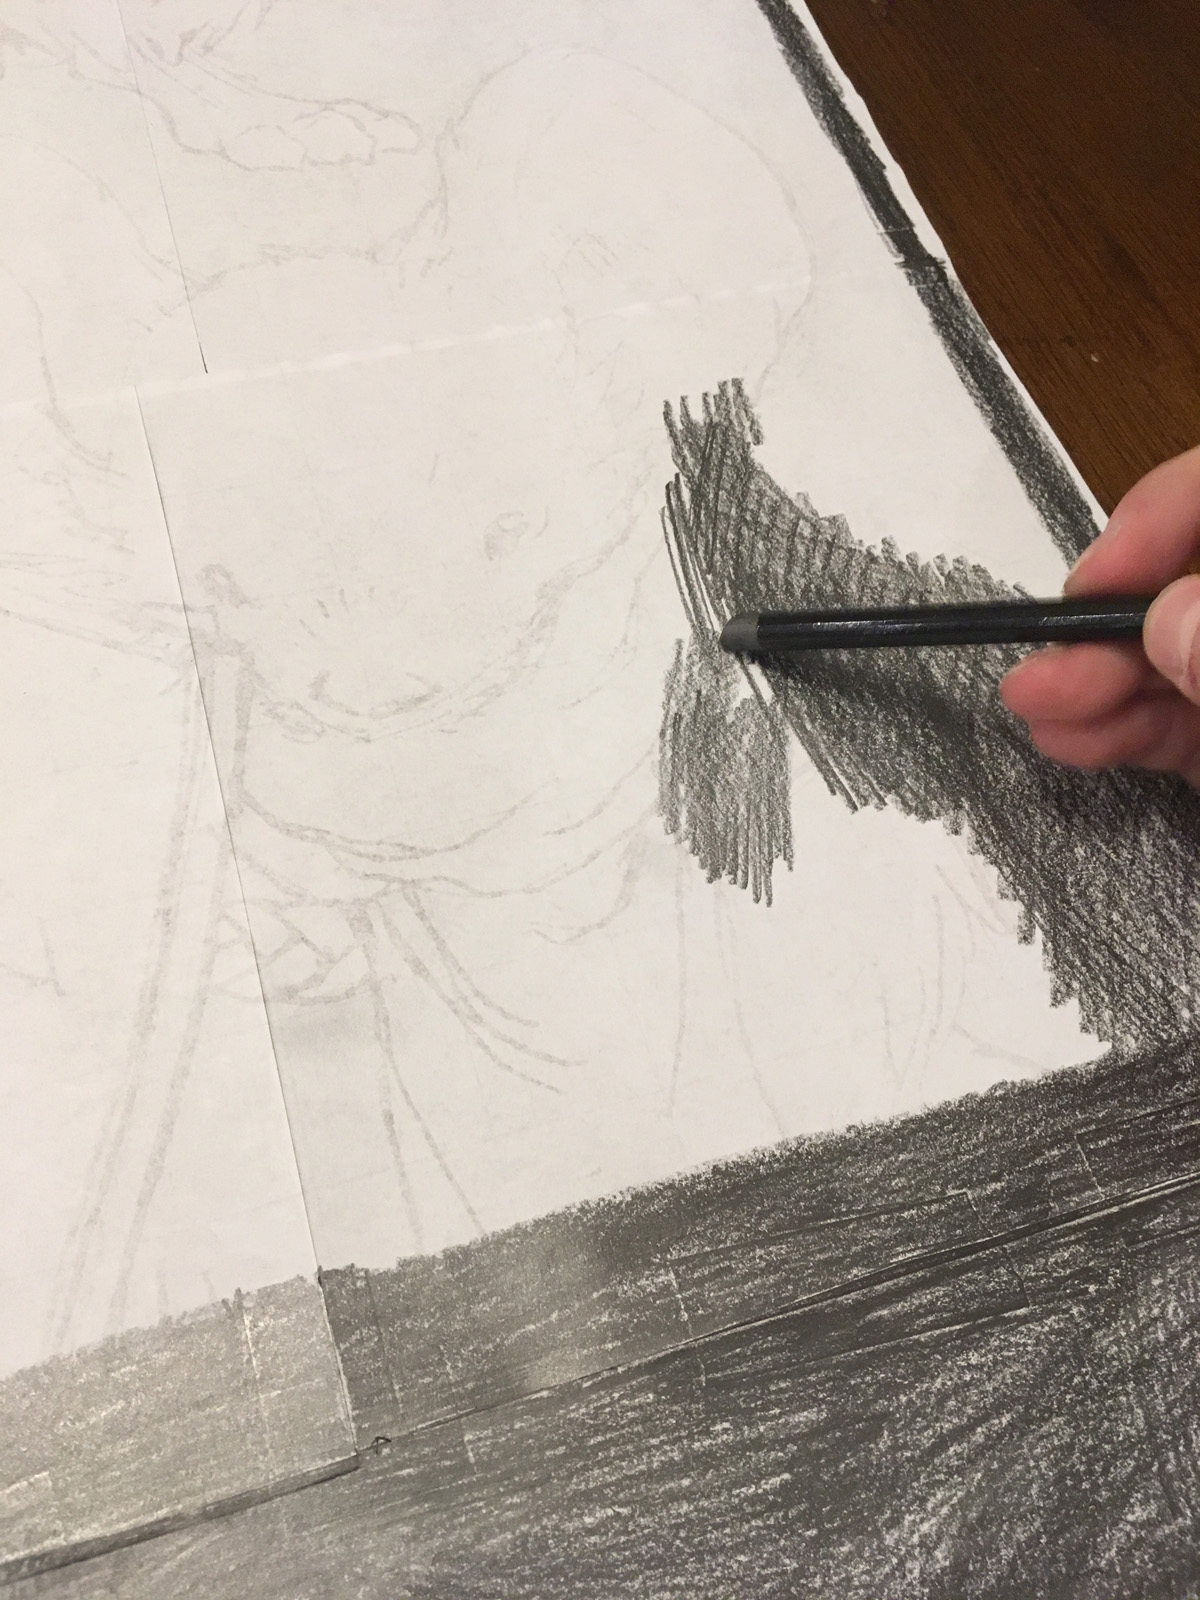 The final painting will be on mat board, so to transfer the drawing to mat board, I start rubbing graphite all over the back side of the taped together layout...
 Mostly I just go over where all my drawn lines are, but there are so many close lines, tik marks, etc, that I end up coating most of the paper.
 Here is the paper coated and ready for transfer. It's a messy job.
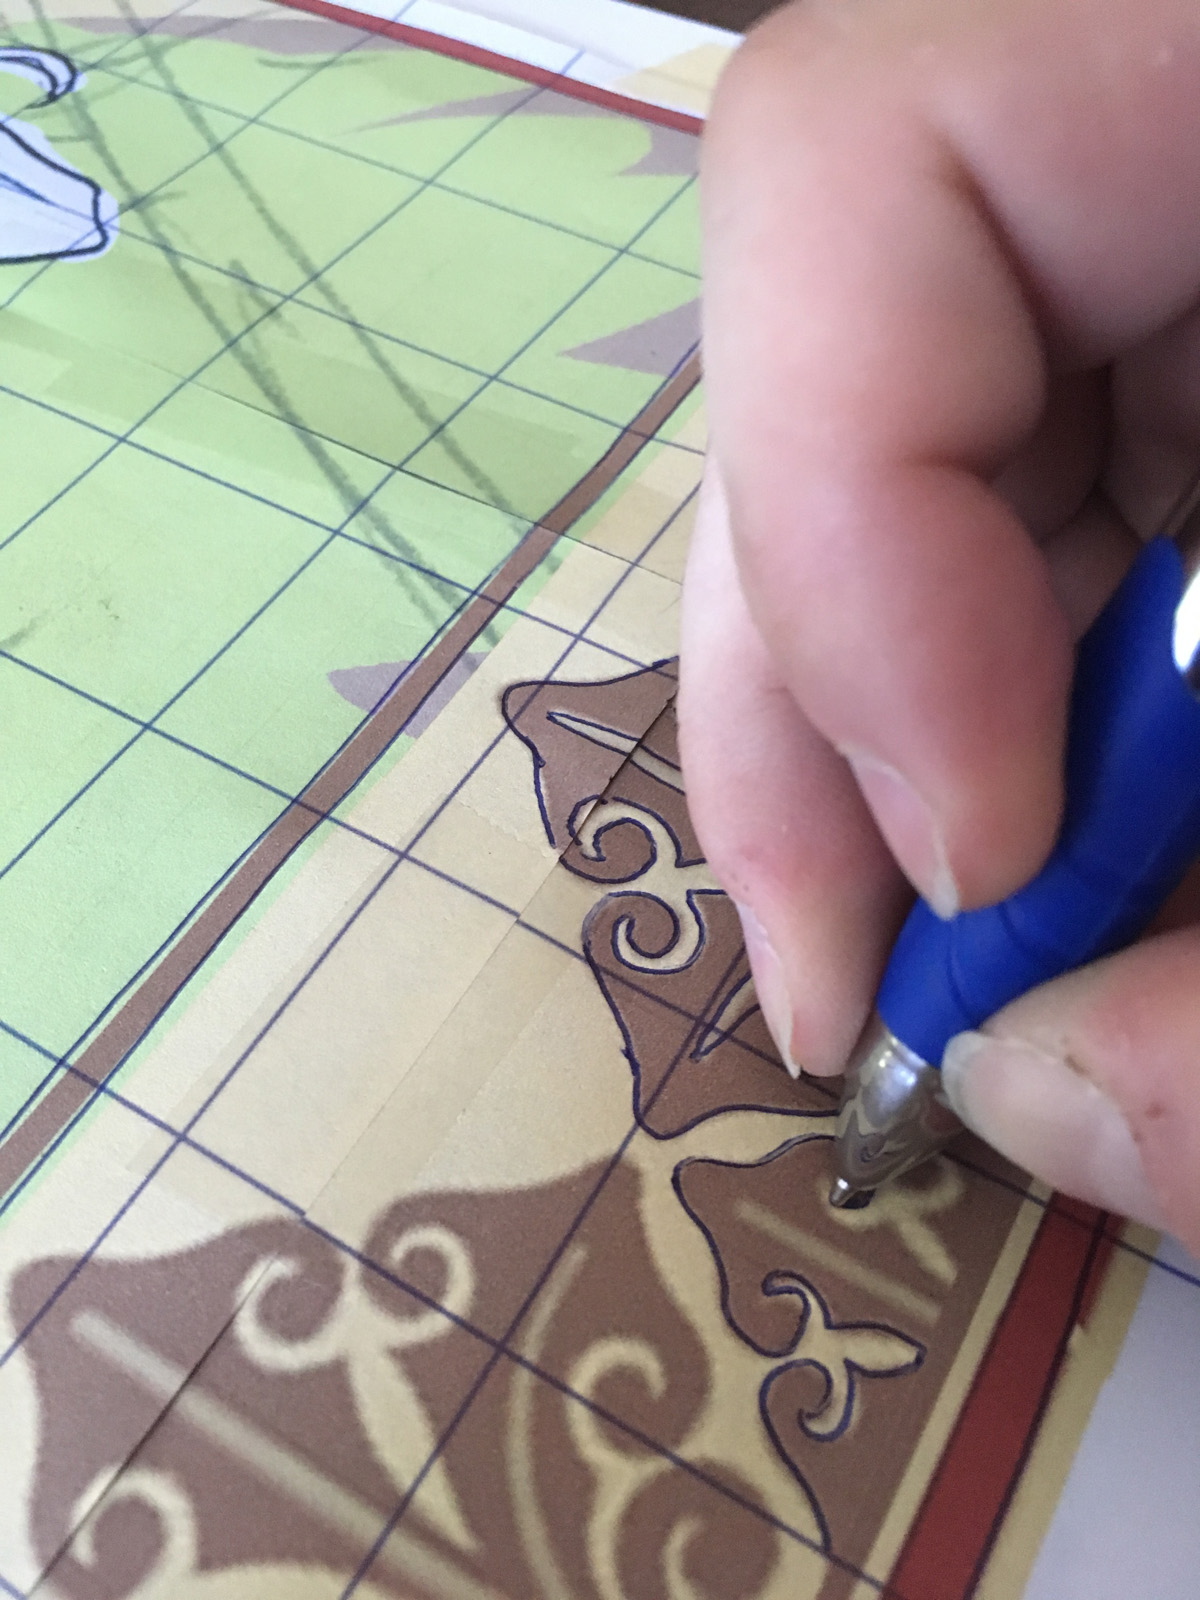 I then tape the layout down to the matboard and then trace over my drawing with a ball-point pen. Wherever I applied pressure the graphite on the back transfers off onto the mat board. This part is tedious.
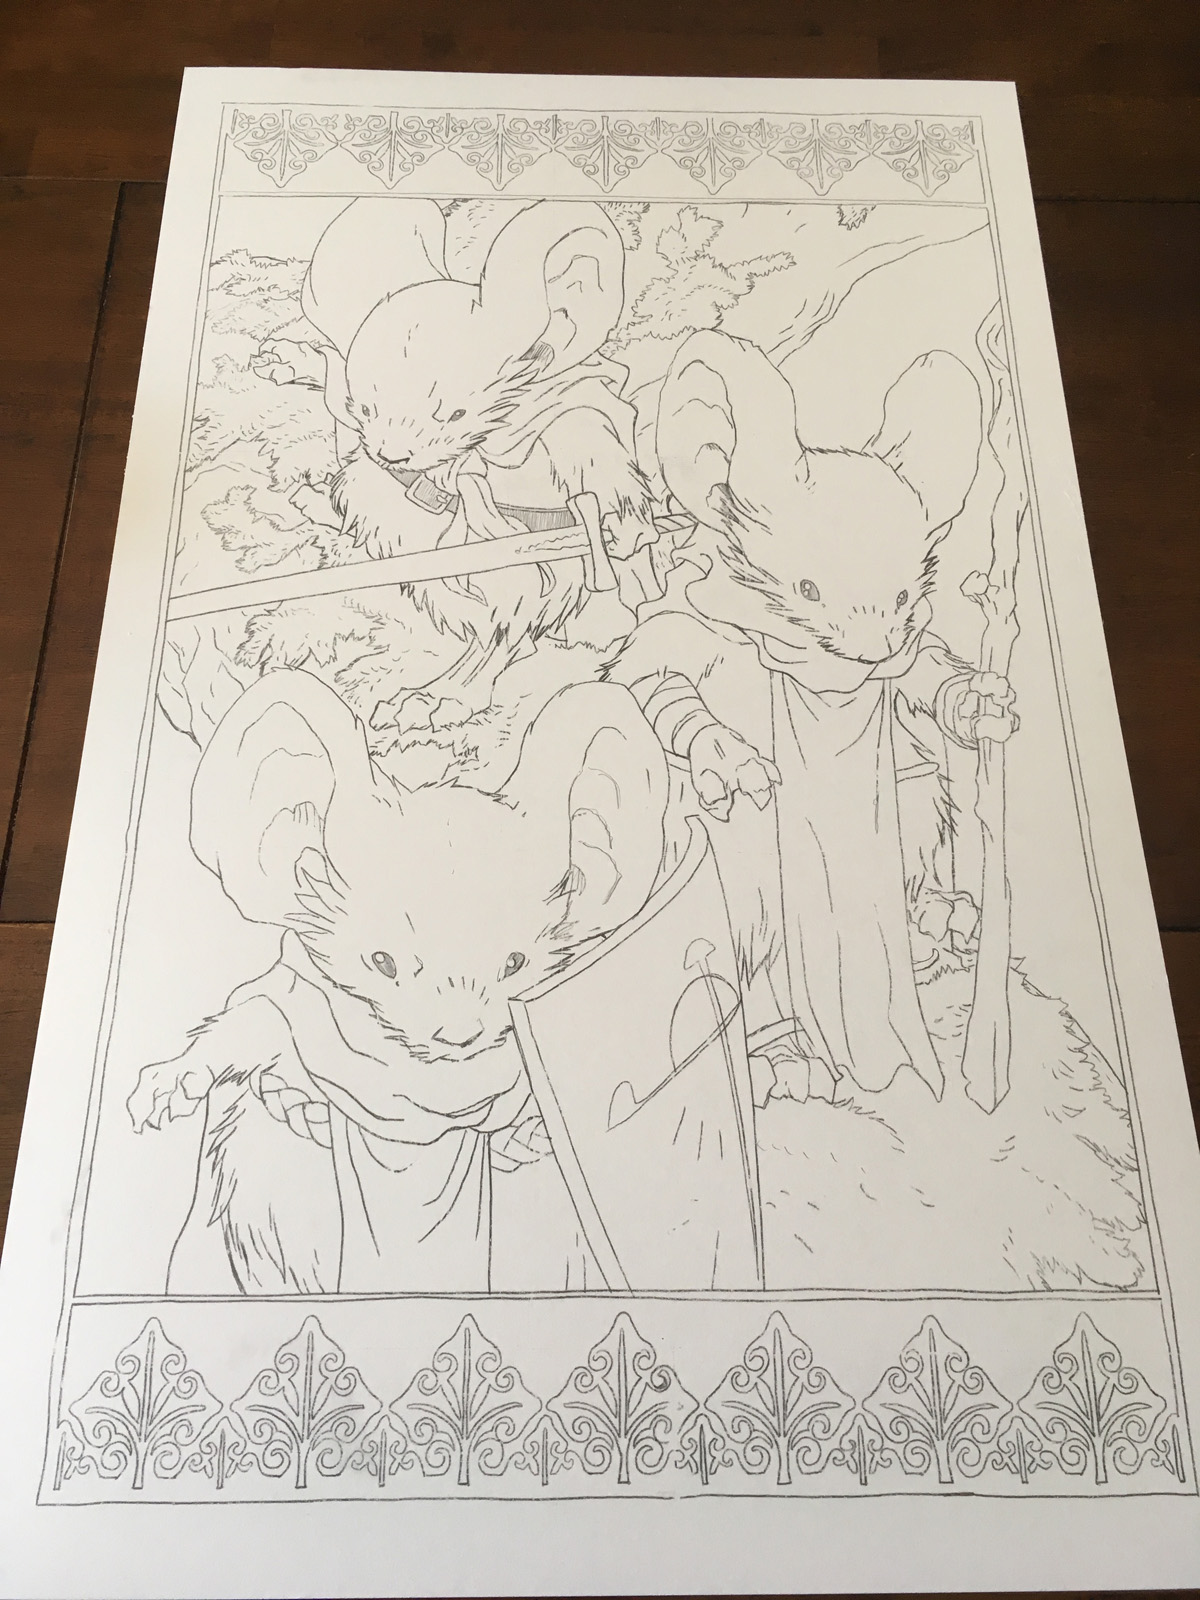 Here is the mat board with a successful transfer!
 I then started applying the lightest washes to the largest areas with watercolor.
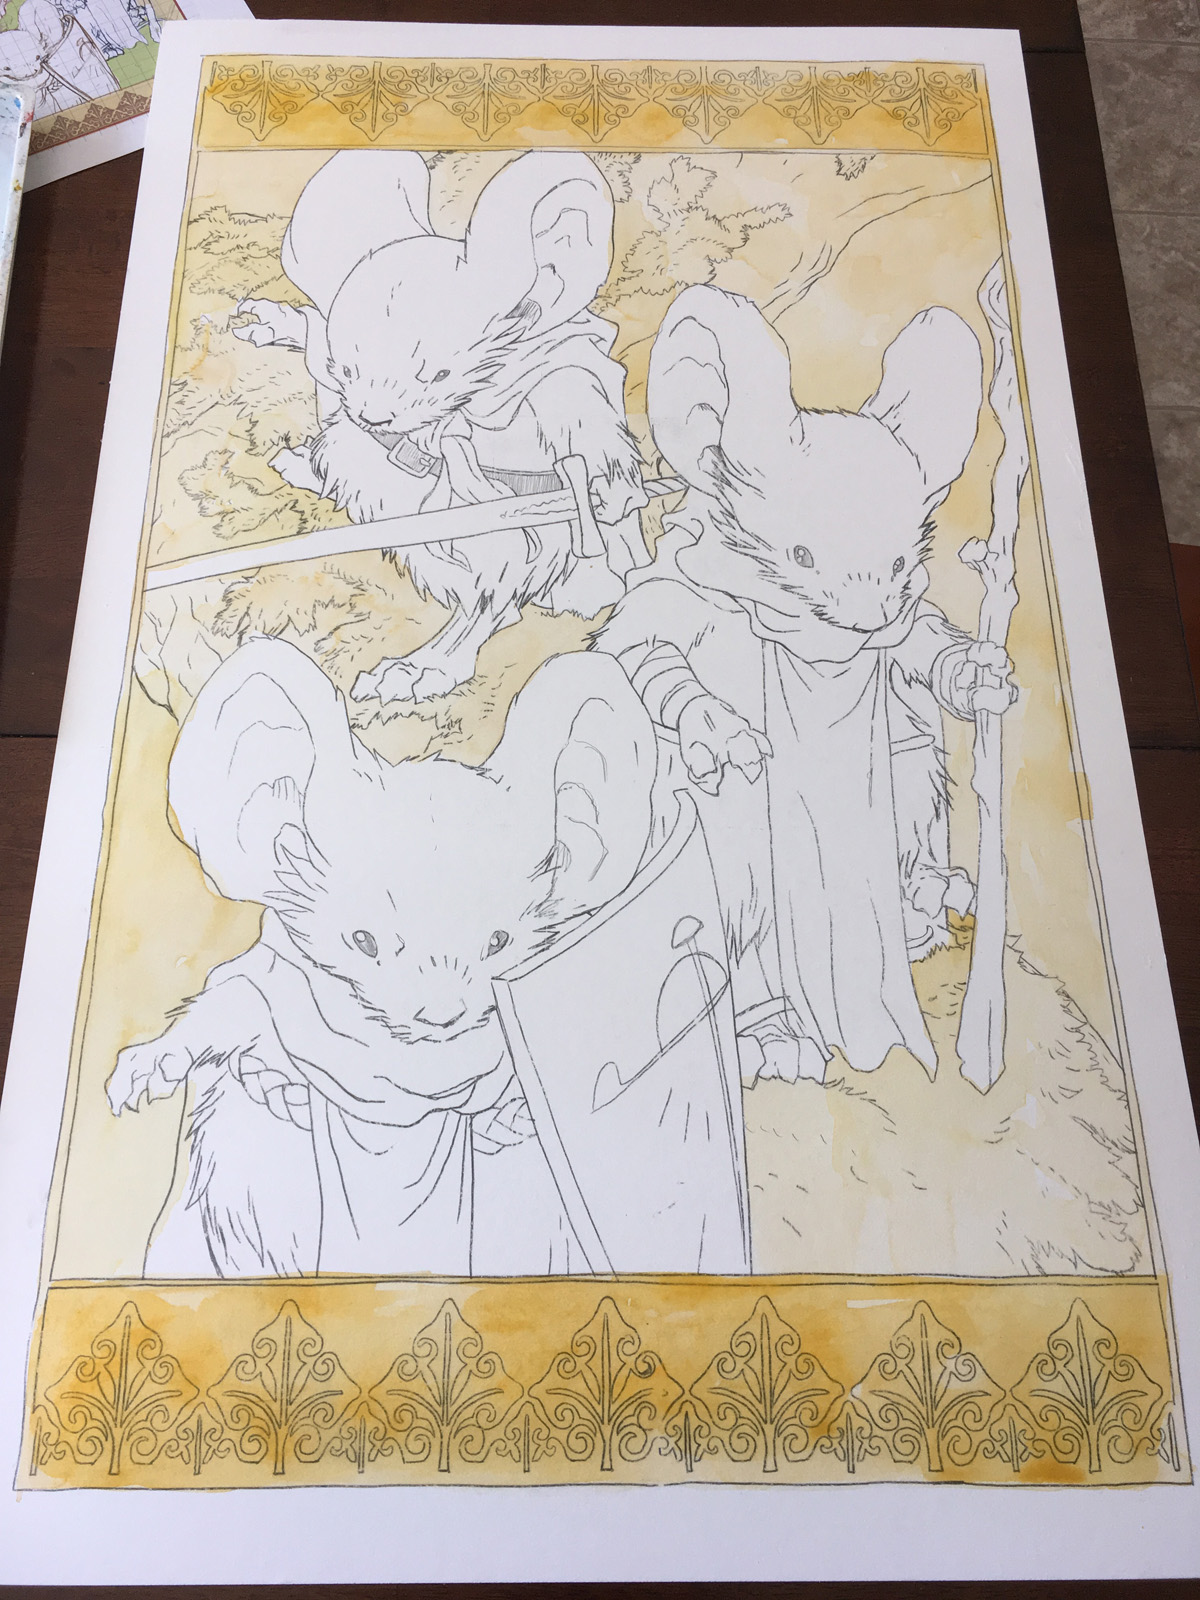 First washes done.
 Went into the mossy greens next....
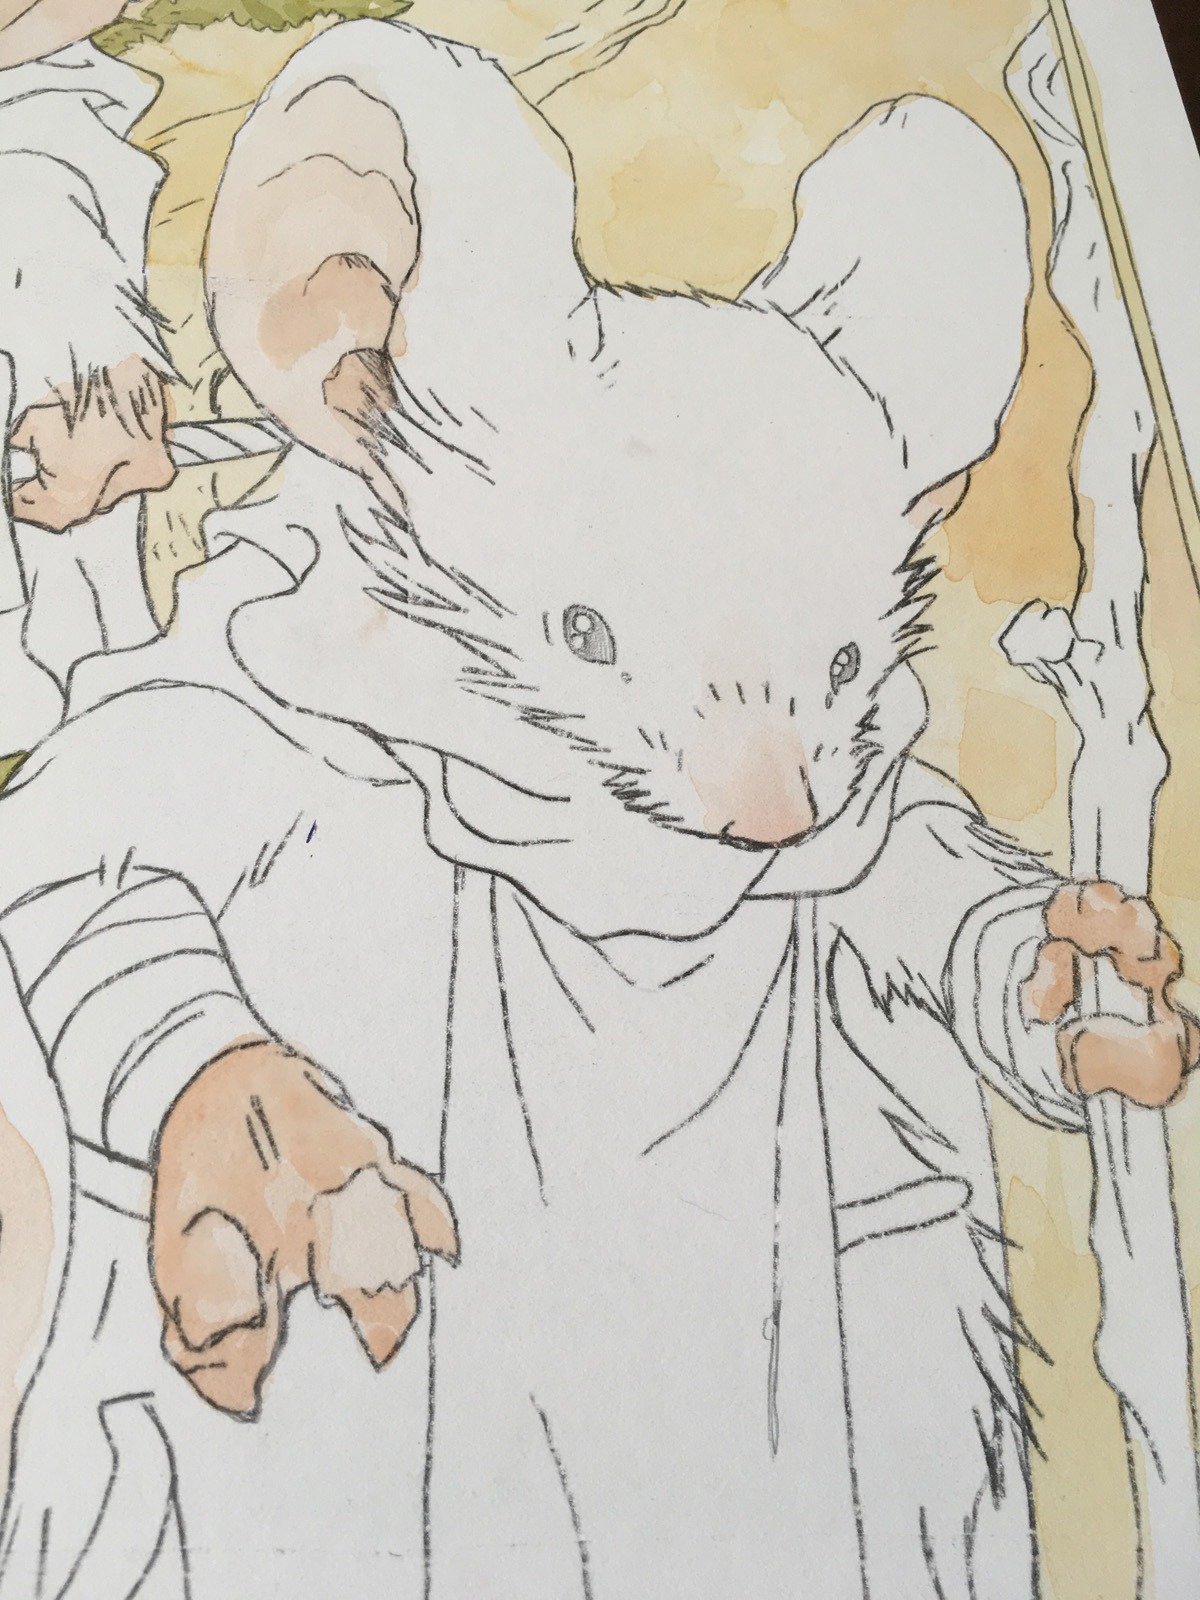 Then the pale fiddly fleshy subtle bits of mouse skin...
 and more mouse skin...
 Then time to cover some larger ground with the fur.
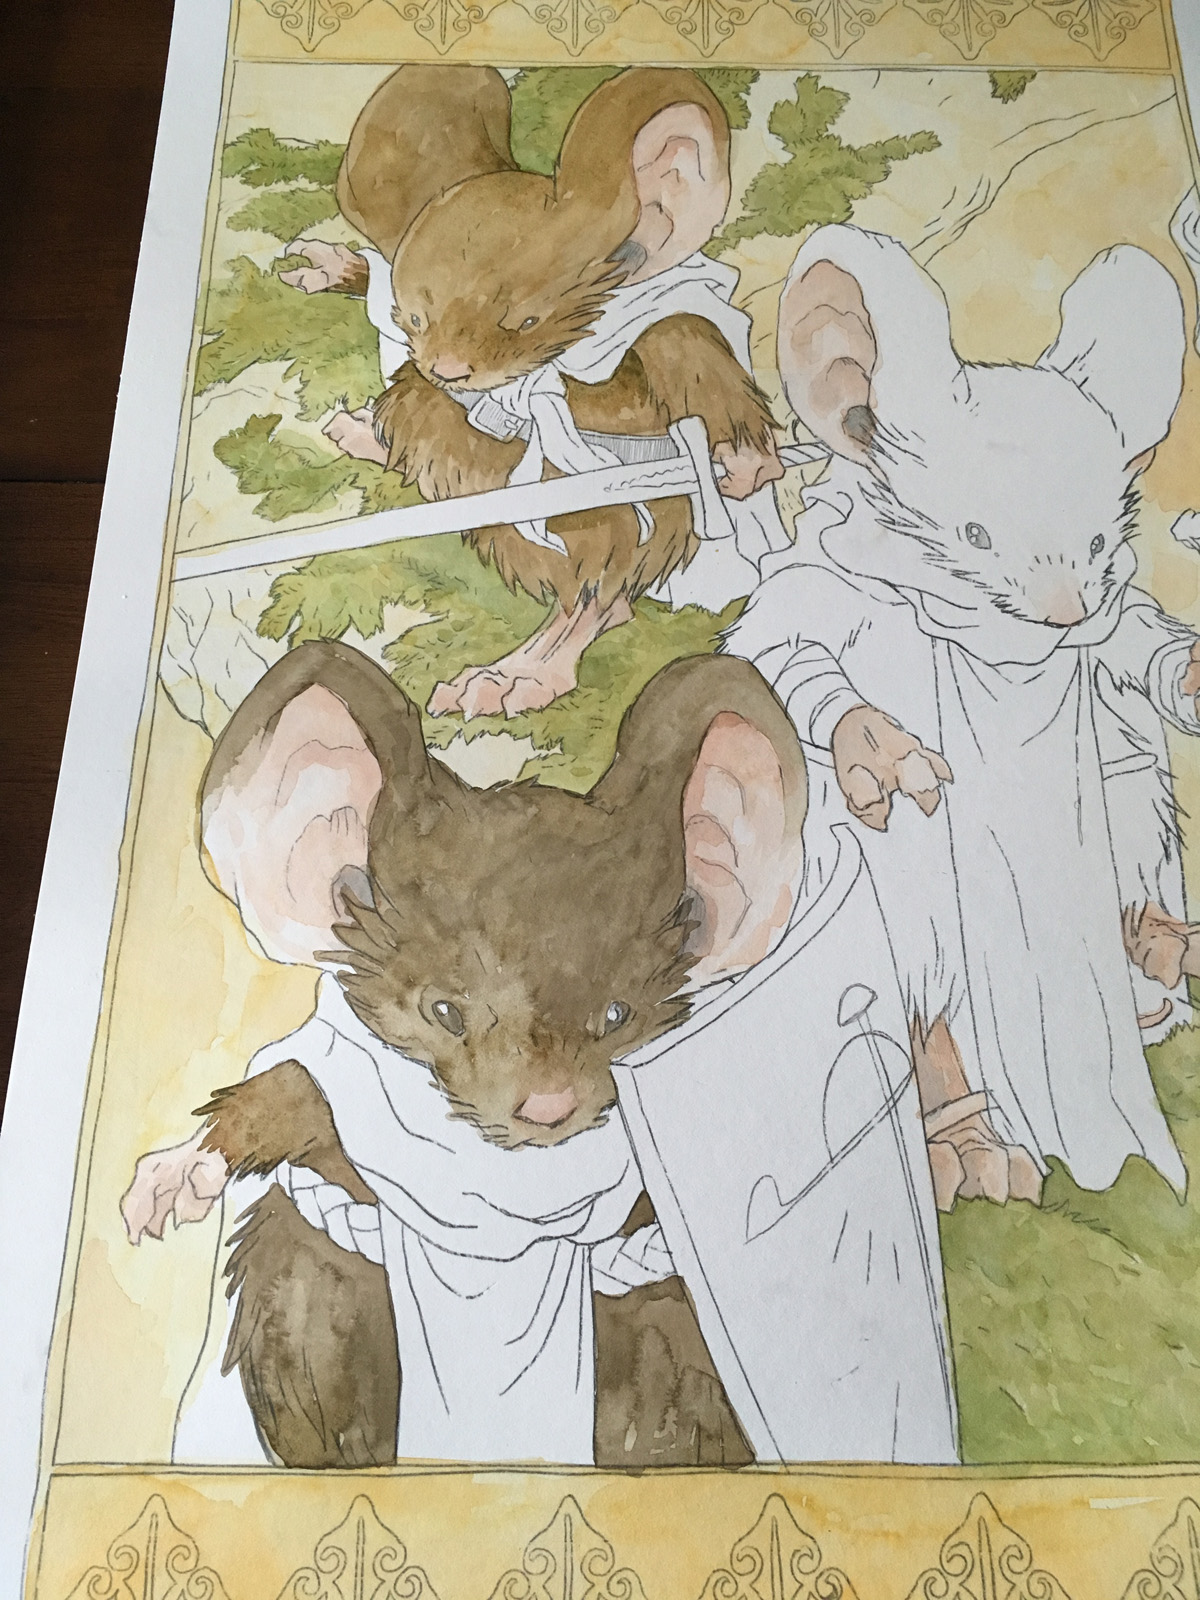 Saxon & Rand's fur built up a bit.
 All mouse fur done with the tree branch filled in.
 Cloaks were next...
 Primary color patrol cloaks blocked in with some rendering.
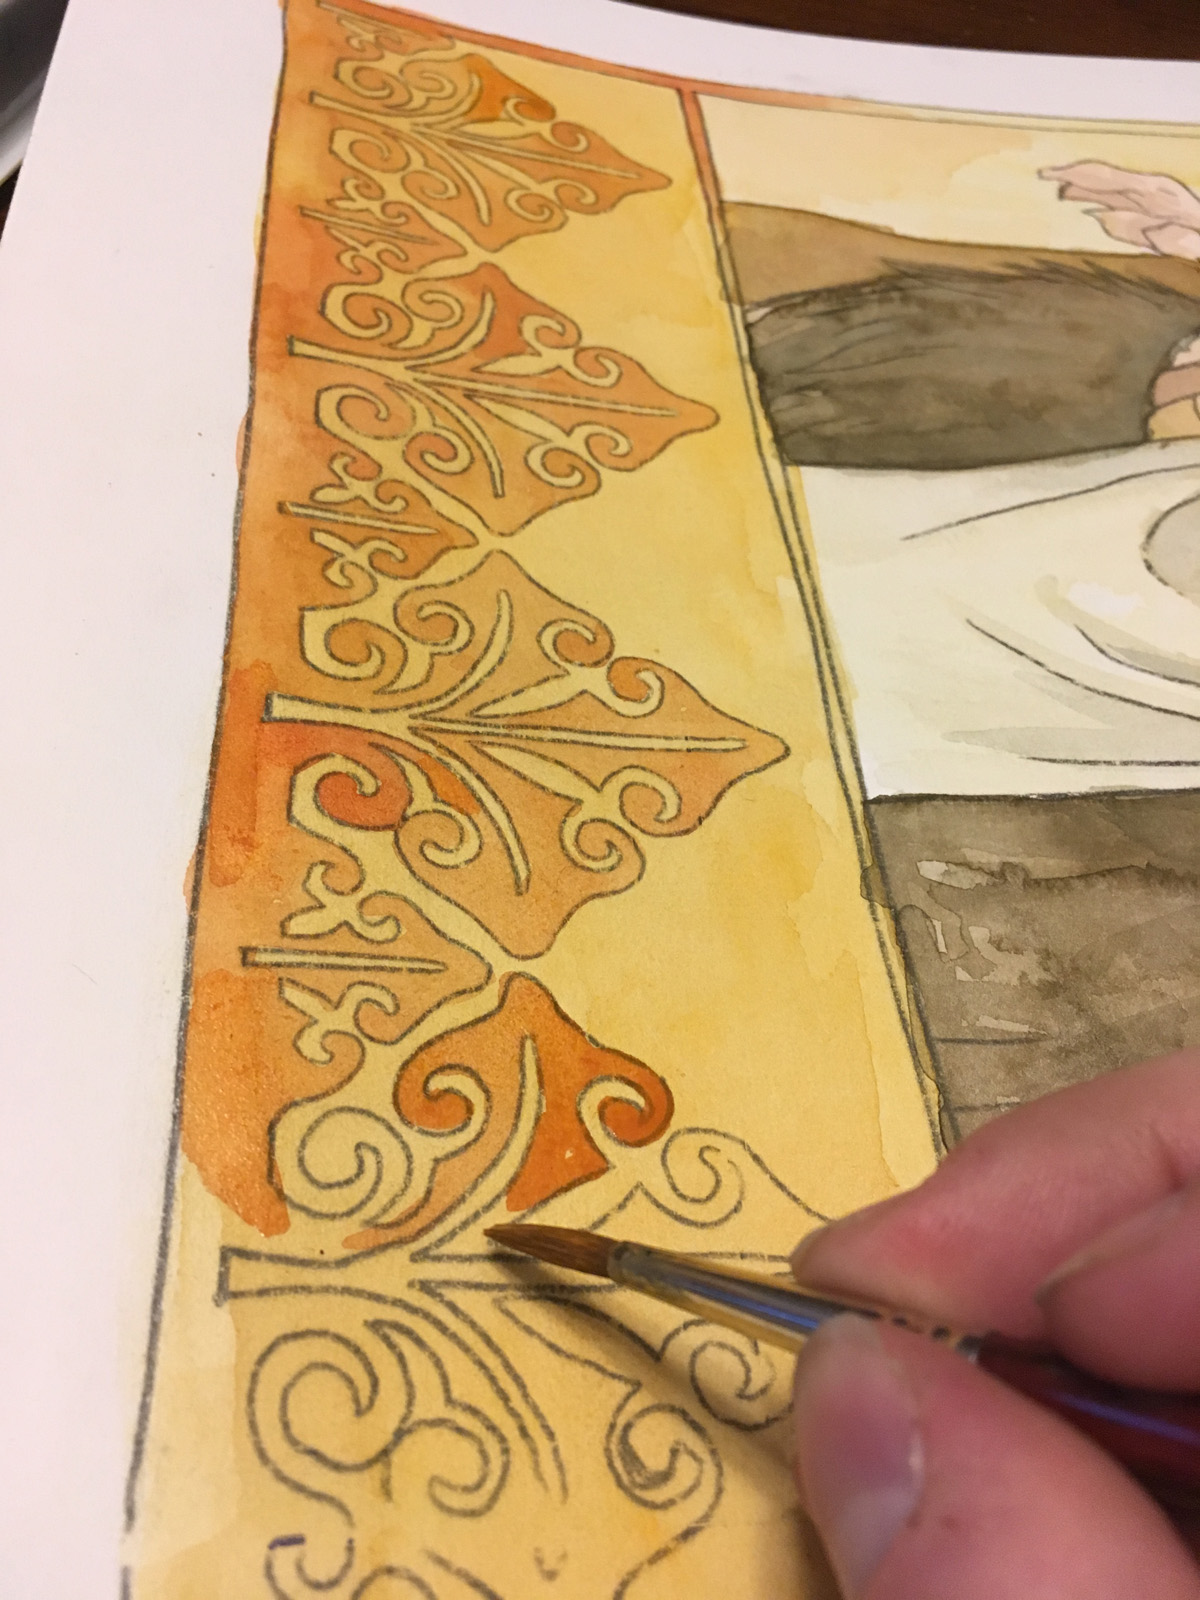 With a smaller brush I painted in the border detail.
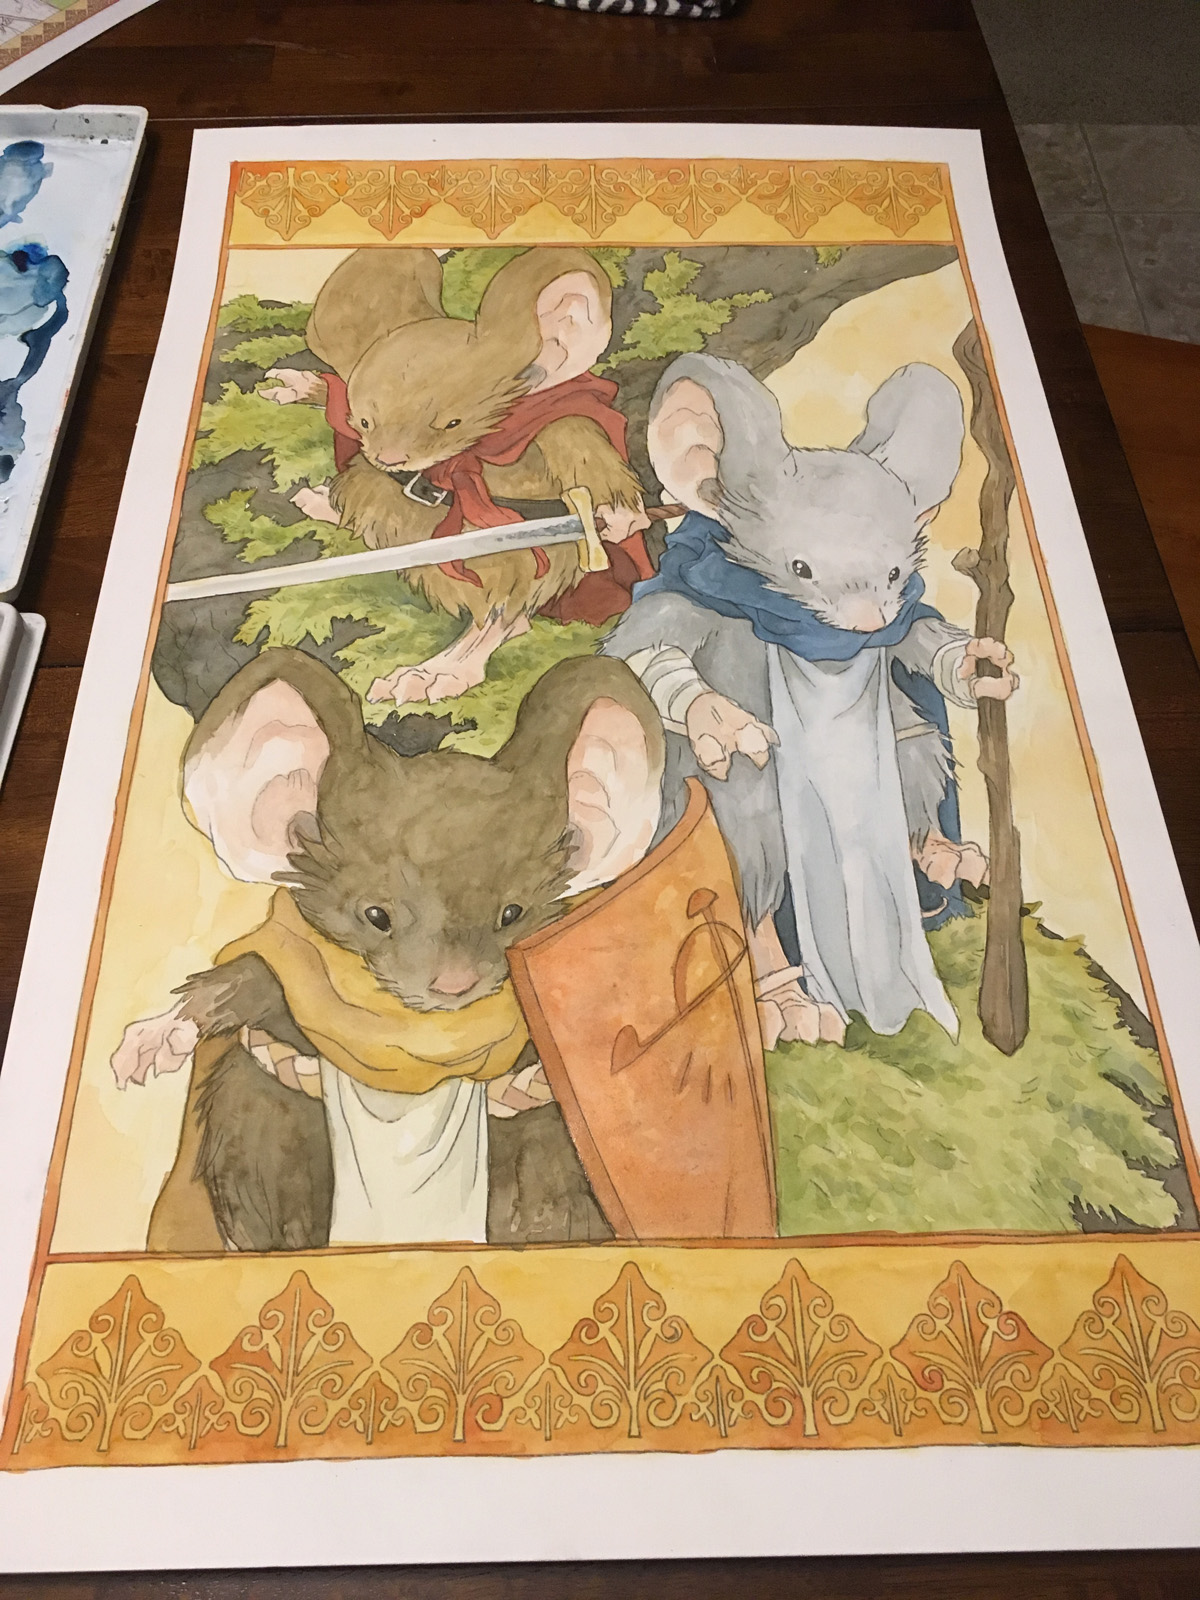 Weapons, and small misc completed means that the painting part of this piece is done!
 Here is my watercolor try at the end of the process (the watercolor tubes are a hodgepodge, but mostly Windsor Newtons)
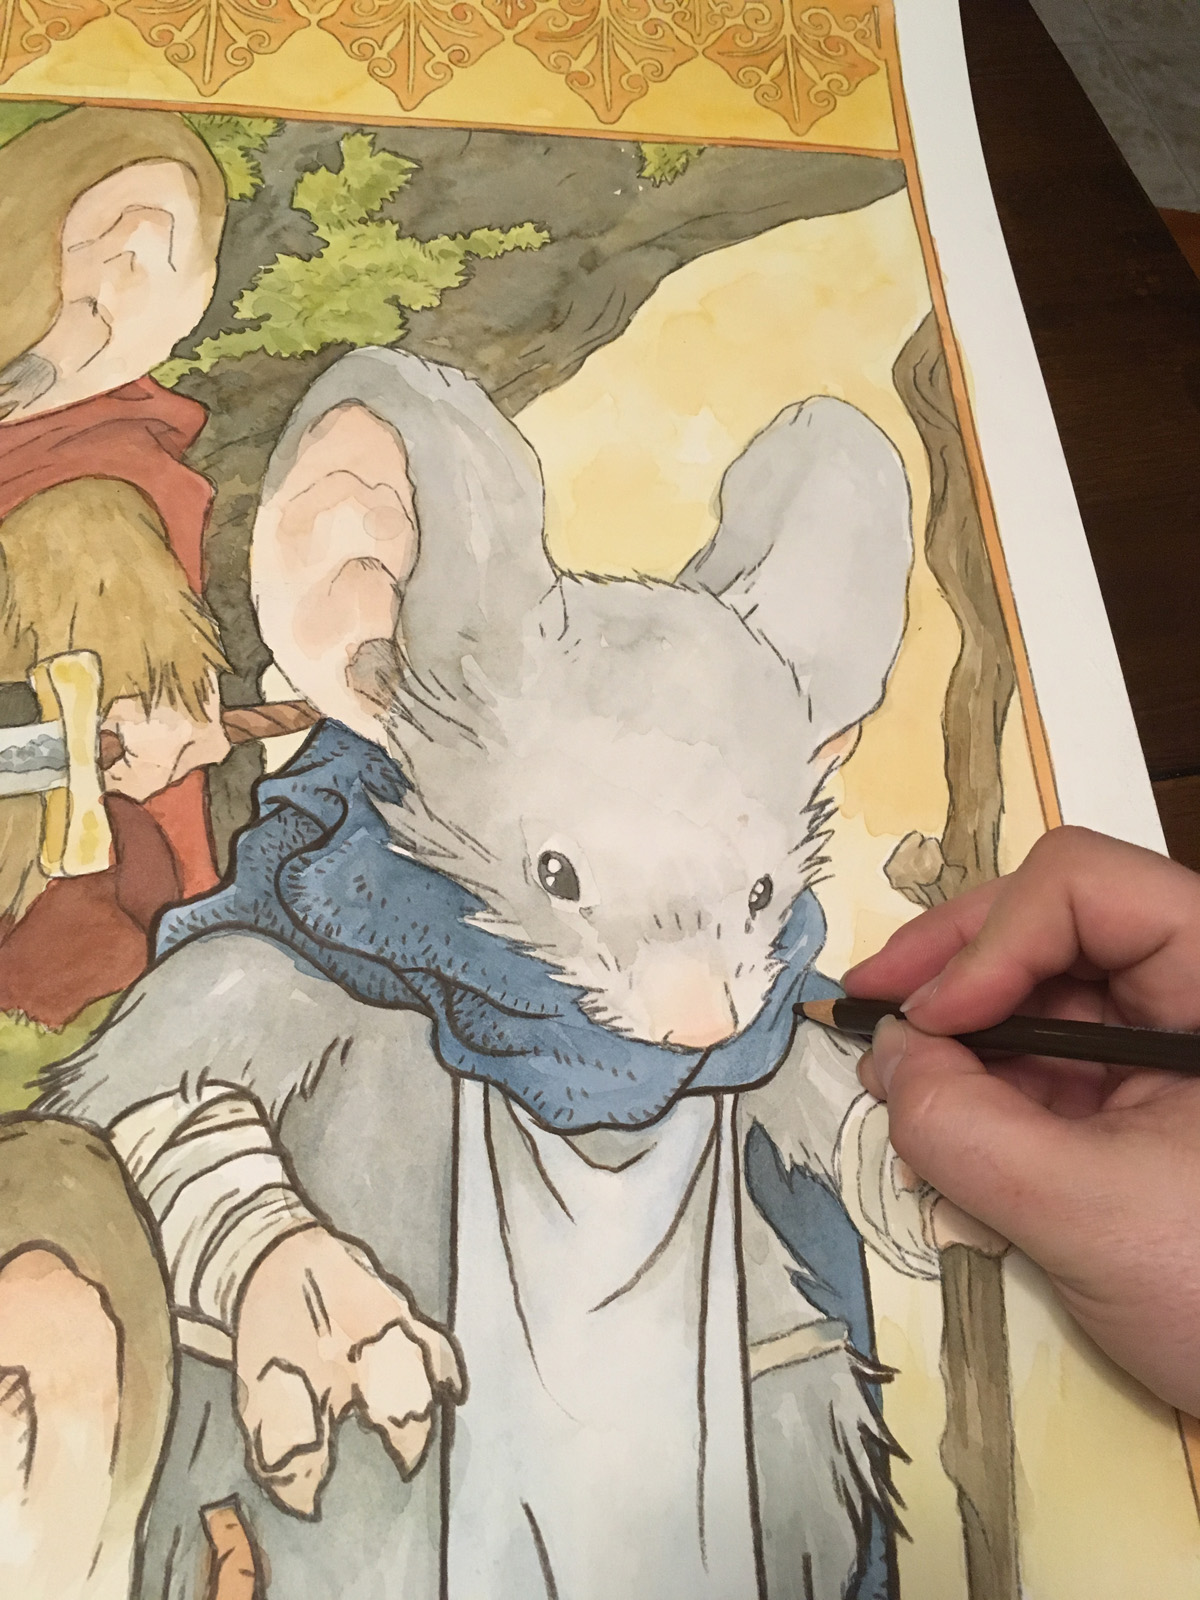 I feel like my watercolor work doesn't stand well on its own without a strong line. Instead of using ink (which would be too stark & bold) I "inked" the drawing with a dark brown color pencil.
 Here again is the final piece 20" x 32". It will be in the Saturday evening auction.I believe you must be present in Charlotte to bid, I'm looking forward to seeing this go to a good home.
PAST HEROES AUCTION PIECES:2015's Mouse v. Weasel2016's Mr. Toad
2017 Appearances: Heroes Con: Jun. 16-18San Diego Comic Con: July 19-23Baltimore Comic Con: Sept. 22-24New York Comic Con: Oct. 5-8
June 6, 2017
Toned Paper Commissions
Here are some more recent Toned Paper Commissions from Emerald City, C2E2, & my livestreams. I will be taking commissions like these at HEROES-CON later this month for $200. First-come/first served.
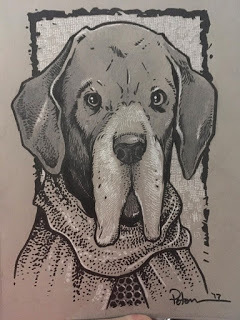 "Nelly" a fan's dog
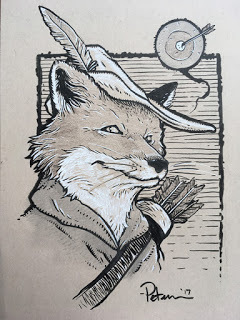 Robin Hood
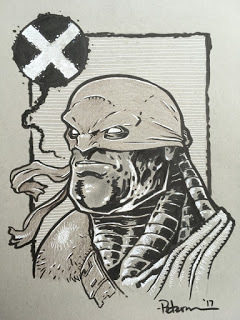 AOA Colossus
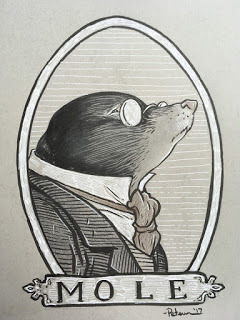 Mr. Mole
 Kenzie
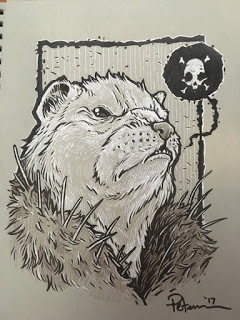
 Armored Cat
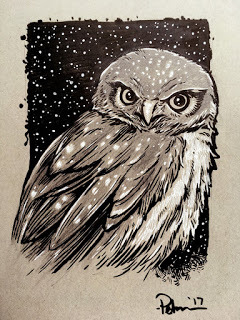 Northern Saw-Whet Owl
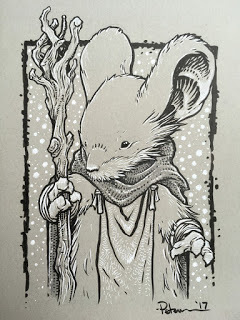
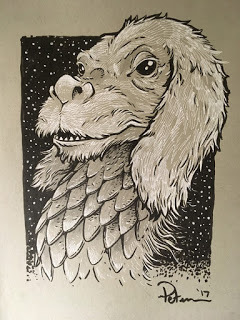 Falcor
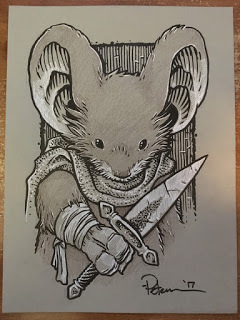
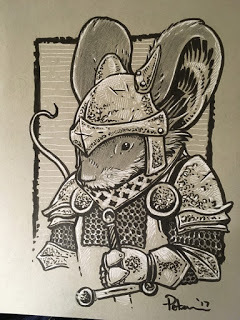 Armored Mouse
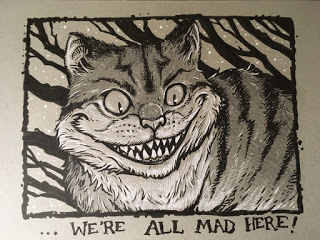 Cheshire Cat
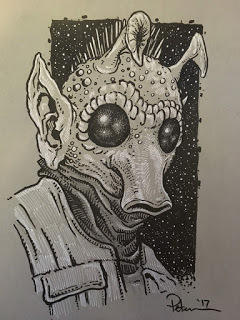 Greedo
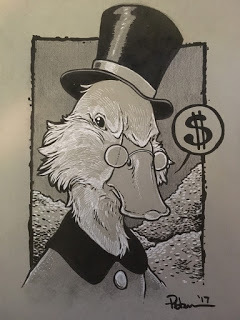 Scrooge McDuck
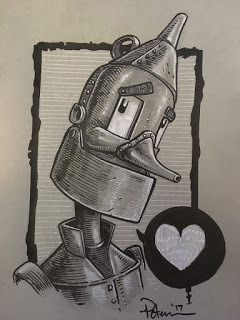 Tin Woodsman
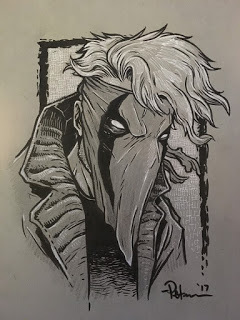 Grifter
 Guardmouse
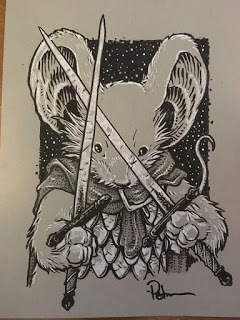 Guardmouse
 Weasel Warlord
 Guardmouse
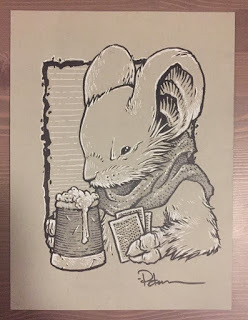 Tavern Mouse
 Hogwarts Owl
2017 Appearances: Heroes Con: Jun. 16-18San Diego Comic Con: July 19-23Baltimore Comic Con: Sept. 22-24New York Comic Con: Oct. 5-8
 "Nelly" a fan's dog
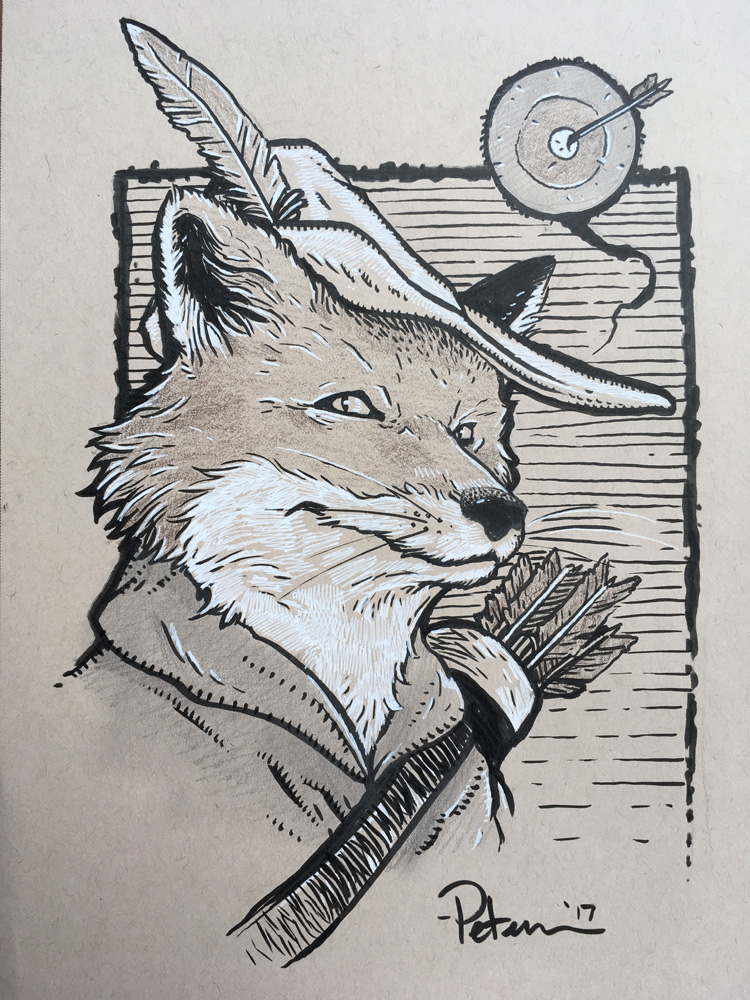 Robin Hood
 AOA Colossus
 Mr. Mole
 Kenzie
 Armored Cat
 Northern Saw-Whet Owl
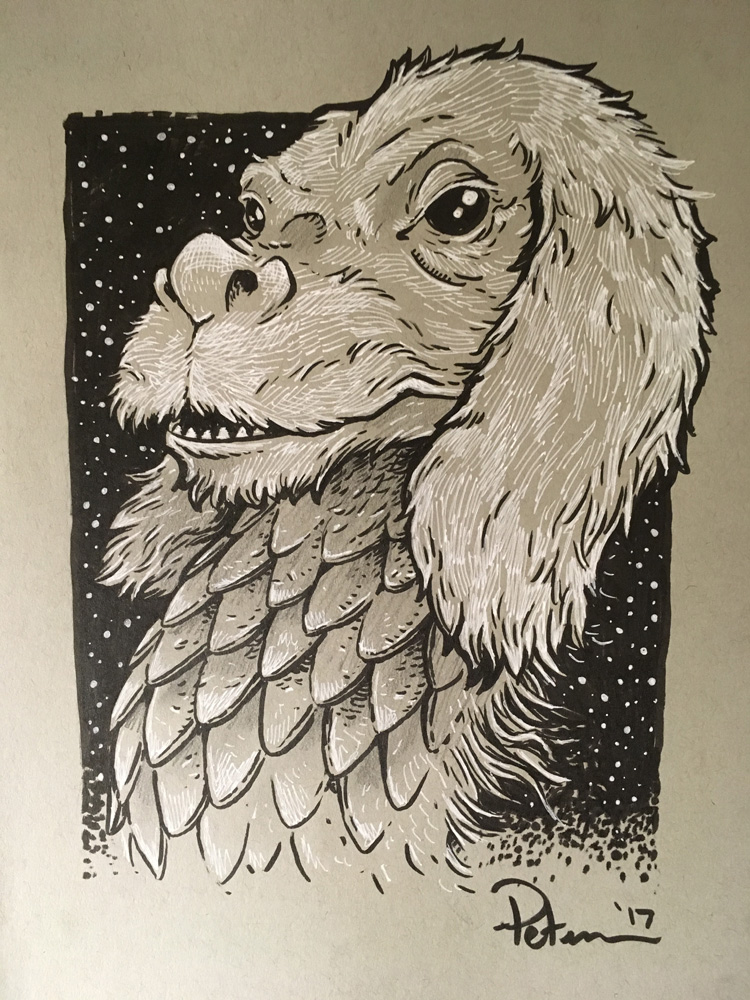 Falcor
 Armored Mouse
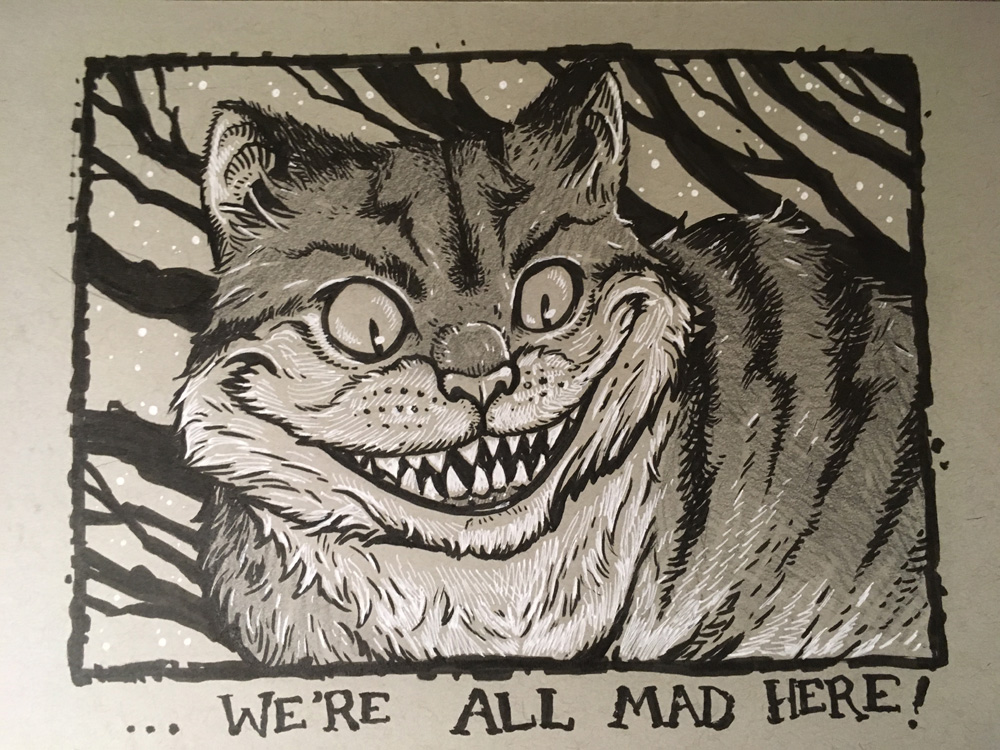 Cheshire Cat
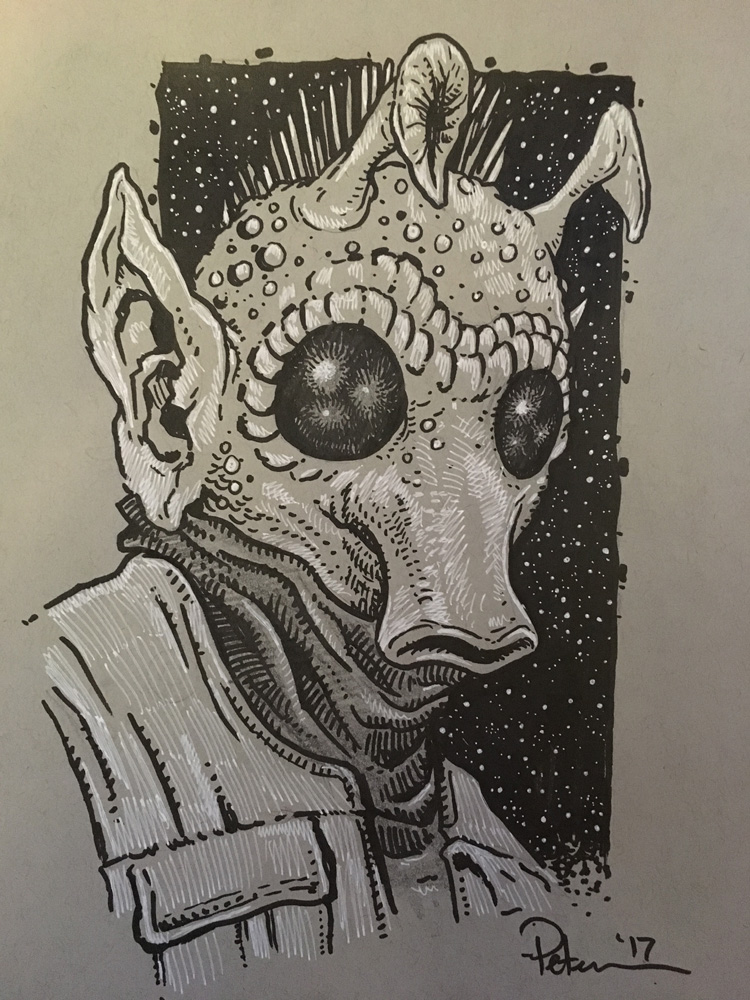 Greedo
 Scrooge McDuck
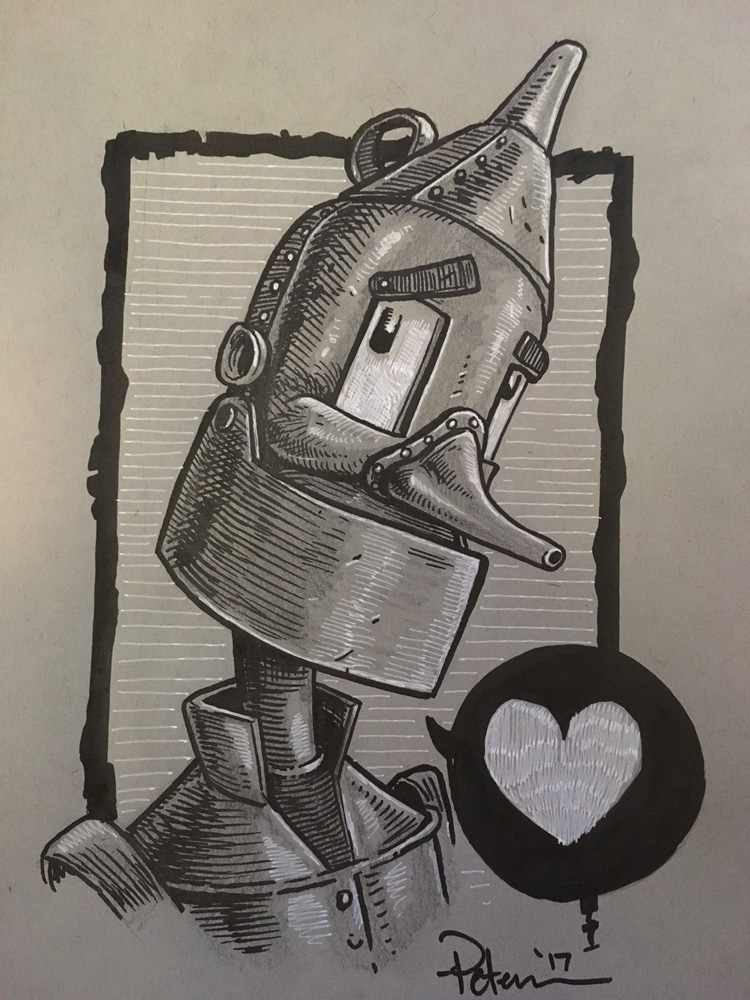 Tin Woodsman
 Grifter
 Guardmouse
 Guardmouse
 Weasel Warlord
 Guardmouse
 Tavern Mouse
 Hogwarts Owl
2017 Appearances: Heroes Con: Jun. 16-18San Diego Comic Con: July 19-23Baltimore Comic Con: Sept. 22-24New York Comic Con: Oct. 5-8
May 30, 2017
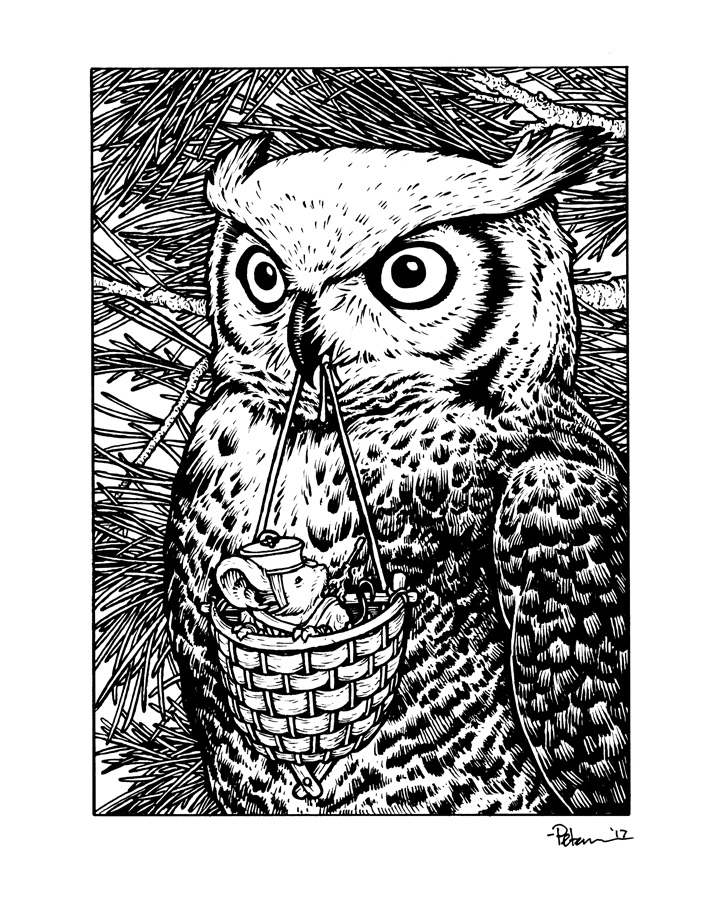
Owl 5x7 Print Process
 For 2017 I'll be introducing a lot of new 5"x7" matted prints to my convention appearances and in my online store. Fans have been enjoying the Saxon, Gwendolyn, Sadie, and Kenzie prints in the same format, so in addition to adding more guardmouse characters for 2017, I'm also adding more animals/scenes.
In this post, I'll be sharing the process of creating the owl and mouse artwork to the left from concept to finished colors.
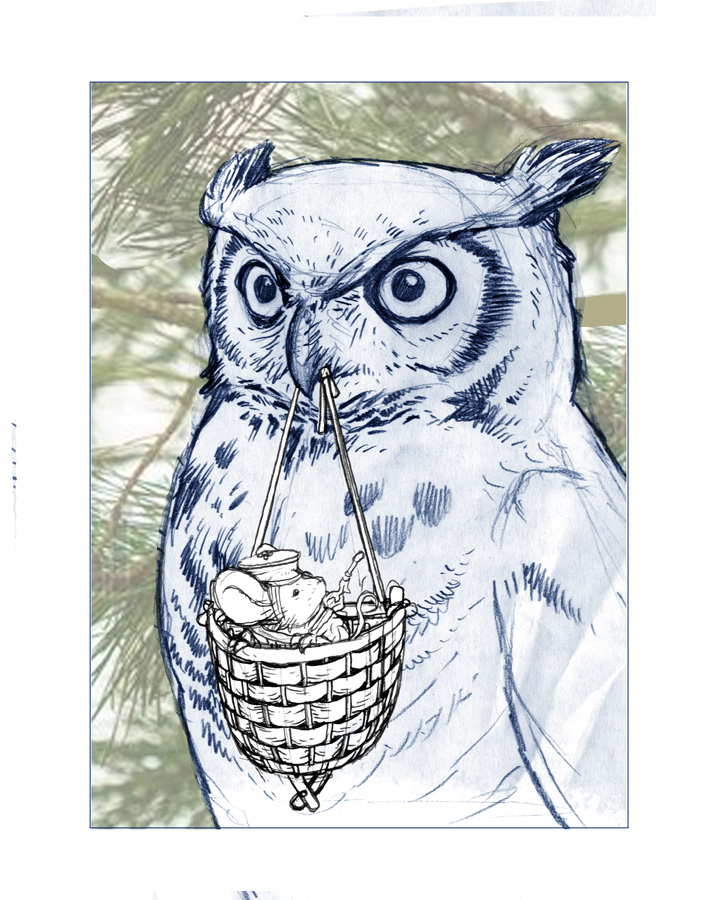
I started by drawing the owl on a sheet of copy paper. Then to make sure I could easily adjust the layout and proportions, I drew the mouse & basket separately. The mouse is the same mouse from my 2016 limited print "Juniper". Instead of a contentious relationship with an owl like the Guardmice had in Winter 1152, I opted to have this be co-operative. After I assembled the two drawings in photoshop (tinting them both to help my eye see where one ended and the other began) I dropped in a stock photo of a close up of a pine branch.
I printed out the photoshop assembled layout and taped it to the back of a sheet of Strathmore 300 series bristol and inked on a lightpad. I use a Huion lightpad that allows me to see the printout through the surface of the bristol. This means that on the surface of the bristol will only be my inks, no pencil lines to erase (though sometimes, I do tighten up the pencils a bit as I work if the layout sketch is too loose). For pens I used Copic Multiliners, the 0.7 & 0.3 nibs. I used the stock photo as a guide for masses rather than directly copying the specific forms of needles and branches.

Once the inks are scanned, I start the process of flatting the piece for color. This means laying in flat color (no concerns with shading or texture) to establish that areas like the owl's feathers will be different from its eyes, the branch's needles, the basket, etc.
Once the flat colors are in I start rendering each area using the dodge and burn tools (lighten and darken) with a textured brush. I had to do some color tinting and painting to get the owl's feathers to have the variety of tone & hue you see in the finished print.
Here again is the finished colored artwork. This print and many more will be available at any of my convention appearances this year was well as in my online store.
For process posts on previous prints:http://davidpetersen.blogspot.com/search/label/Print
2017 Appearances: C2E2: April 21-23Heroes Con: Jun. 16-18San Diego Comic Con: July 19-23Baltimore Comic Con: Sept. 22-24New York Comic Con: Oct. 5-8
May 23, 2017
Rand 5x7 Print Process

Rand, the yellow cloaked shield-bearer will be more prominently featured in the upcoming Weasel War of 1149 series. I've been trying to offer up more of the 5" x 7" matted prints at conventions and in my online store. With a Saxon, Sadie, Gwendolyn, and Kenzie prints already available, I wanted to include that lesser know mouse of defense to the lineup. Even though Rand has barely been in the Mouse Guard series so-far, he has diehard fans who love him and tell me they already know he'll be their favorite. In today's blogpost I'll share the process for creating the image for this print.
Layout:
 Unlike many of my process posts, in this case I didn't have multiple drawings to merge together for my layout. I did one drawing of Rand with the background drawn right in there...on the some sheet of copy paper and everything! I've gotten in the habit of using dandelions as a visual cue/symbology for Rand. I don't know if I have specific cause for this, but it's cropped up with other drawings of him or places connected to him. All that was left to do after I scanned the pencils was to resize it to make sure it fit nicely inside the format for the print. I also added a quick digital circle to the dandelion puff-ball because I noticed my sketch was a bit oblong.
 Inks:
Inks: I printed out the above layout and taped it to the back of a sheet of Strathmore 300 series bristol. On a light pad (I really like the Huion brand of these) I can see through the surface of the Bristol and ink using the printout as my 'pencils' to guide me. I used Copic Multiliners (the 0.7 & 0.3 nibs). I opted to ink the edge of the puffball and the cascading seed-tufts very boldly and dark. In this inked stage, that means they look a bit odd, not fluffy and light. But I knew that I'd use a color hold when coloring it that would reverse that sensation.
Color Flats:
 After scanning in the inked piece (and adjusting the levels and cleaning up any dirt, dust, etc from the scan) the first step to coloring is Flatting in colors. This means, like any good coloring book user, you color spaces inside the lines. But when flatting, you don't need to worry at all about shading, lighting effects, or even if you are going to use the real colors (here I stuck close to what I knew the palate was for the final piece). Unlike some colorists, I like to use new Photoshop layers for new areas of color. This allows me to not have to 'cut in' precisely when I butt up against an area I've already colored.
Final Colors:
After scanning in the inked piece (and adjusting the levels and cleaning up any dirt, dust, etc from the scan) the first step to coloring is Flatting in colors. This means, like any good coloring book user, you color spaces inside the lines. But when flatting, you don't need to worry at all about shading, lighting effects, or even if you are going to use the real colors (here I stuck close to what I knew the palate was for the final piece). Unlike some colorists, I like to use new Photoshop layers for new areas of color. This allows me to not have to 'cut in' precisely when I butt up against an area I've already colored.
Final Colors:After the areas of color are isolated by flat colors, I went in an rendered each part using the Dodge & Burn tools in Photoshop. I have my settings on Range: Highlights and 1% exposure most of the time and I use a textured brush. I tweaked color balances with leaves and subtle areas like Rand's nose. At this stage, I also played up all the color holds on the shield and puffs.
I broadcast LIVE on Facebook as I colored this piece. You can watch that video here:
Part 1: https://www.facebook.com/david.petersen.777/videos/10155727207764778/
Part 2: https://www.facebook.com/david.petersen.777/videos/10155727588574778/
The final 5" x 7" matted print will be available at my 2017 convention appearances and in my online store.
More of the 5x7" Mouse Guard character print process Blogposts:
Saxon Print: http://davidpetersen.blogspot.com/2015/04/5x7-saxon-print-process.html
Sadie Print: http://davidpetersen.blogspot.com/2016/04/sadie-5x7-print.html
Gwendolyn Print: http://davidpetersen.blogspot.com/2016/05/gwendolyn-print.html
Kenzie Print: http://davidpetersen.blogspot.com/2017/02/kenzie-5-x-7-print-process.html
2017 Appearances: Heroes Con: Jun. 16-18San Diego Comic Con: July 19-23Baltimore Comic Con: Sept. 22-24New York Comic Con: Oct. 5-8
May 16, 2017
Mouse Guard Model Video: Quail Cart
 For the cover of Legends of the Guard Volume 2 Hardcover collection, I built an architectural model of a Quail Cart. With the fan excitement over the video of Adam Savage talking to me about my models on Tested.com I wanted to do some videos where I talk about a specific model, how I built it, what the materials were, and why I built it in the first place.
Below you can watch as I explain why knowing where the quail hitches makes a better illustration:
For a Full Blogpost on the art process for the cover of Legends of the Guard Vol.2 Hardcover: http://davidpetersen.blogspot.com/2013/08/legends-of-guard-vol2-hardcover-cover.html
[image error]
2017 Appearances: Heroes Con: Jun. 16-18San Diego Comic Con: July 19-23Baltimore Comic Con: Sept. 22-24New York Comic Con: Oct. 5-8
May 9, 2017
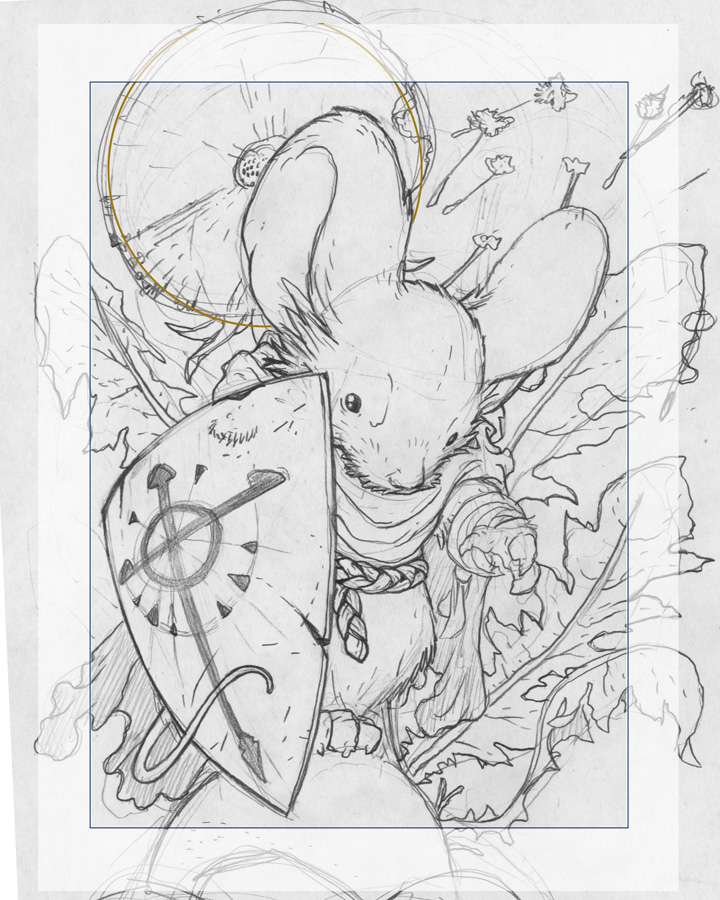
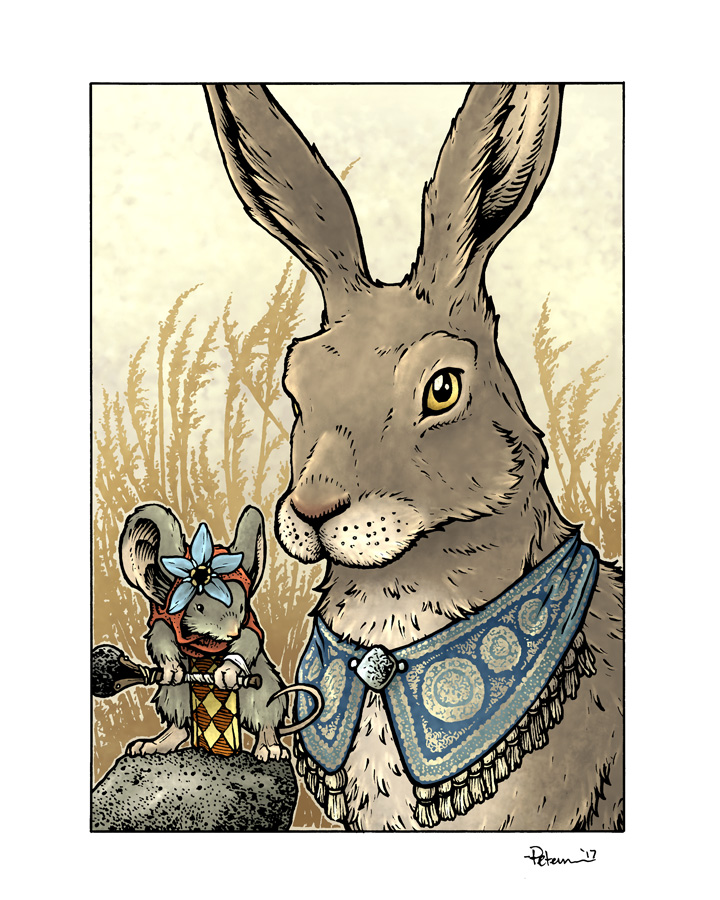
Hare 5x7 Print Process
 For 2017 I'll be introducing a lot of new 5"x7" matted prints to my convention appearances and in my online store. Fans have been enjoying the Saxon, Gwendolyn, Sadie, and Kenzie prints in the same format, so in addition to adding more guardmouse characters for 2017, I'm also adding more animals/scenes.
In this post, I'll be sharing the process of creating the Hare & Piper-mouse artwork to the left from concept to finished colors.

I started by drawing the hare on a sheet of copy paper. Then to make sure I could easily adjust the layout and proportions, I drew the mouse separately. The mouse is Piper from the 2016 FCBD story "Piper the Listener". After I'd started assembling the two drawings in photoshop (tinting them both to help my eye see where one ended and the other began) and then I decided that the hare needed some kind of clothing. I only showed the hares in Winter 1152 with mouse-made saddles and harnesses for riding, no apparent clothing of their own. I dunno if I'll stick to this new fashion forward hare-look, but for the print, I thought it needed it.

I printed out the photoshop assembled layout and taped it to the back of a sheet of Strathmore 300 series bristol and inked on a lightpad. I use a Huion lightpad that allows me to see the printout through the surface of the bristol. This means that on the surface of the bristol will only be my inks, no pencil lines to erase (though sometimes, I do tighten up the pencils a bit as I work if the layout sketch is too loose). For pens I used Copic Multiliners, the 0.7 & 0.3 nibs. I fudged in the grassy silhouette while looking at photos of various grasses gone to seed.

Once the inks are scanned, I start the process of flatting the piece for color. This means laying in flat color (no concerns with shading or texture) to establish that areas like the hare's fur will be different from the collar, its eye, the rock, etc.
Once the flat colors are in I start rendering each area using the dodge and burn tools (lighten and darken) with a textured brush. I also added some color holds on the hare's collar embroidery and the grassy background.
Here again is the finished colored artwork. This print and many more will be available at any of my convention appearances this year was well as in my online store.
For process posts on previous prints:http://davidpetersen.blogspot.com/search/label/Print
2017 Appearances: Heroes Con: Jun. 16-18San Diego Comic Con: July 19-23Baltimore Comic Con: Sept. 22-24New York Comic Con: Oct. 5-8
May 2, 2017
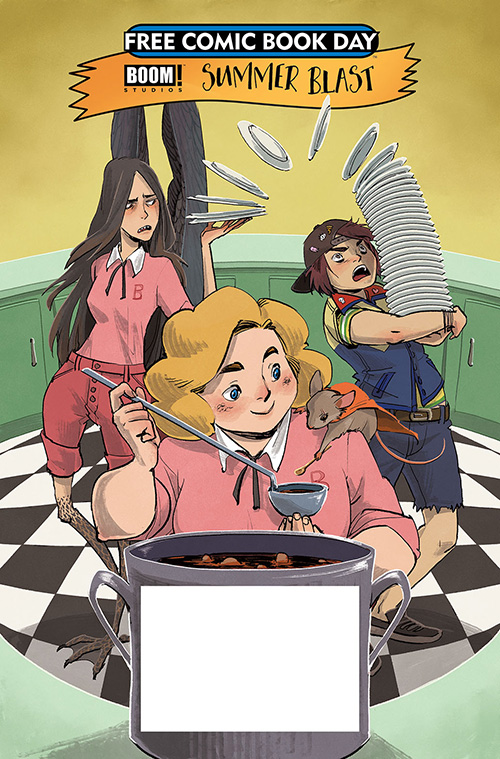
Free Comic Book Day 2017
 Free Comic Book Day is THIS SATURDAY!
In case you are unfamiliar with FCBD, on the first Saturday in May, you and everyone you know, can go to your local comic shop and they will have a selection of comics that are FREE (most stores limit how many each person gets). The comic shops buy these comics, specially printed (and in some cases with content created specifically for) FCBD at print cost and then use it to spread goodwill about the artform of telling stories with words AND pictures panel by panel.
I have a new Mouse Guard short story in the BOOM! Summer Blast issue.
 This story is 8 pages long, and like my past 6 years of FCBD stories, features a folk-tale/parable that ties into a lesson a member of the Mouse Guard learned. This year's offering is titled "The Tale of the Wild Wolf" and you can see some teaser panels to the right.
I don't want to say much more about the story, because I don't want to spoil anything, but eagle-eyed fans may catch a few clues in these panels that tells them which Guardmouse is featured...
 While stores nation-wide will have the BOOM! Summer Blast book with my new Mouse Guard story inside, I will specifically be at ISOTOPE: The Comic Book Lounge in San Francisco, CA signing books (anything a fan places in front of me that I've worked on) and in the afternoon delivering a talk about Mouse Guard. That evening ISOTOPE will host a Mouse Guard cocktail hour. So if you are in the SF area, please come out for what is sure to be a great event celebrating the artform of comics.
If you already know about FCBD and have people in your life that DON'T read comics, take them to your local store's event and help them find something they might like. I truly believe that there is a comic out there for every person regardless of age, gender, interests, etc. Also, please consider purchasing something from the store you visit in addition to picking up some free issues. Something for yourself you'd already planned to get, something for that non-comic reader that fits their tastes, or something you already enjoy but plan to donate to your local library.

2017 Appearances: Heroes Con: Jun. 16-18San Diego Comic Con: July 19-23Baltimore Comic Con: Sept. 22-24New York Comic Con: Oct. 5-8
April 25, 2017
Rose Limited Edition Print Process
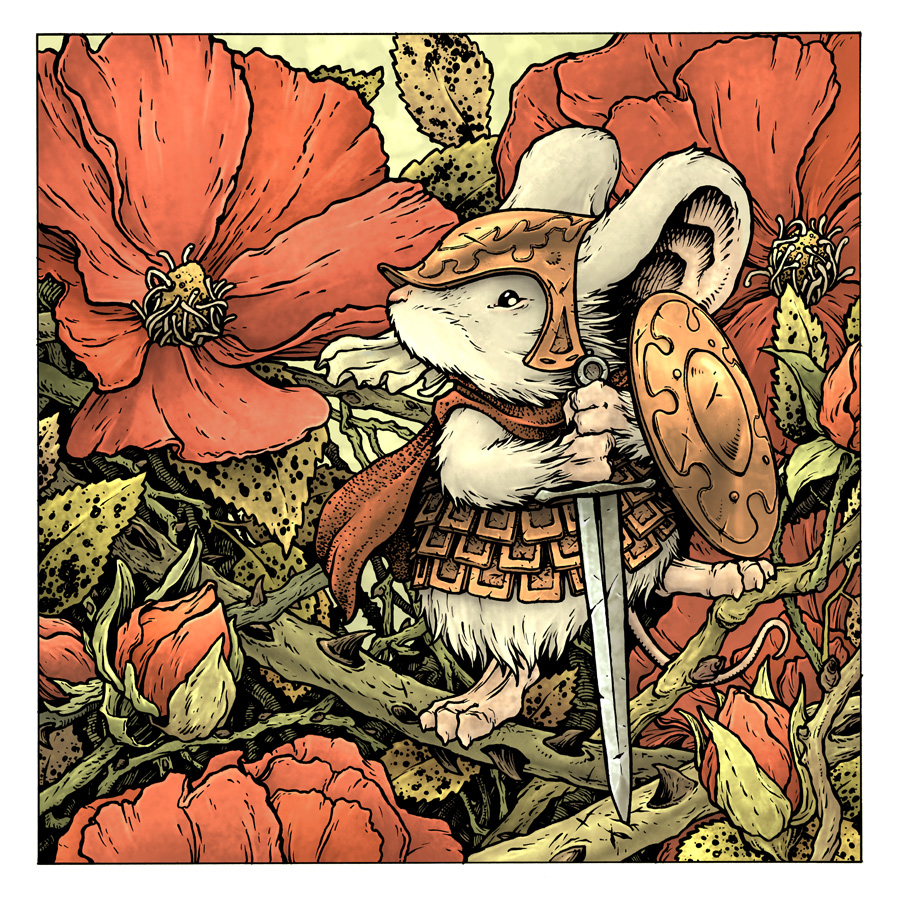 Since 2012 I've released a new 11" x 11" limited edition print every year. Past year's pieces have been titled "Peacock", "Raspberry","Moonflower", "Lavender", and "Juniper". Julia requested that these prints be pretty and not just a mouse doing battle, but more aesthetically feminine. To the left is the finished artwork for this year's "Rose" and below I'll show the full process.
The print is available in my online store and at my convention appearances until the print sells out
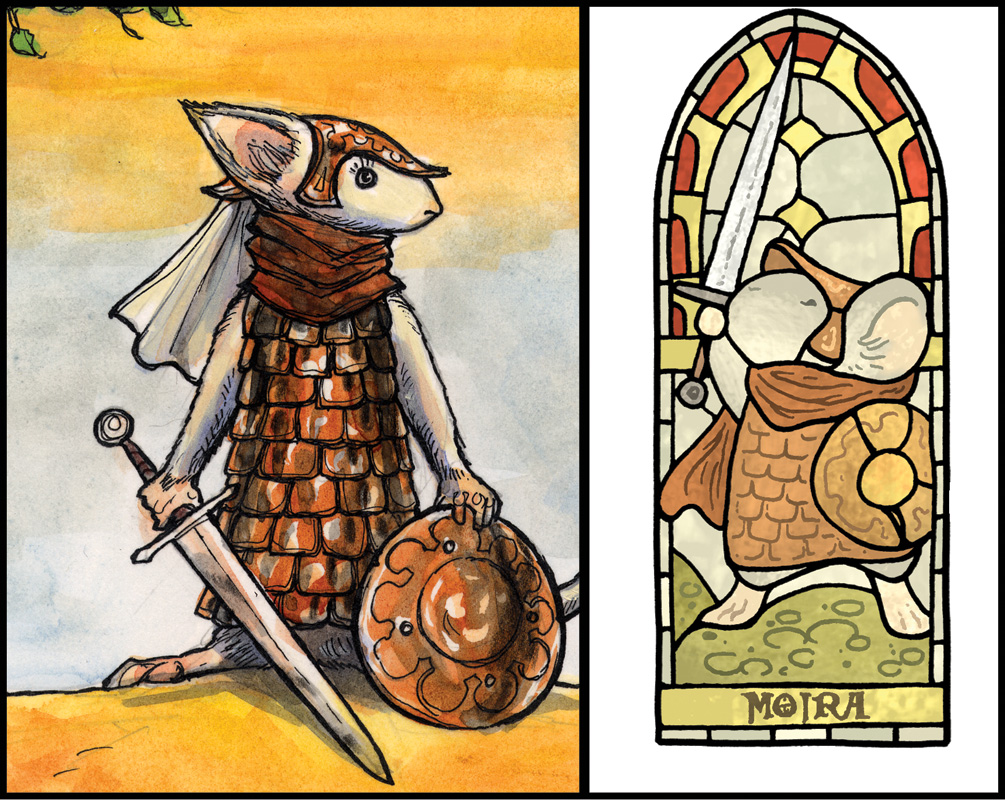 For this year's print, "Rose" I chose to focus on a character from Mark Smylie's Legends of the Guard story "Crown of Silver, Crown of Gold". In that story a mouse named Moria from Rosestone who avenged her beloved warrior mouse after he was slain due to treachery from the king. In the last panel (shown to the right) she takes up his armor and weapons and becomes a well-known guardmouse. In Black Axe, I went further than that and showed (via a stained glass tribute) that she became one of the most celebrated of Matriarchs of the Guard)
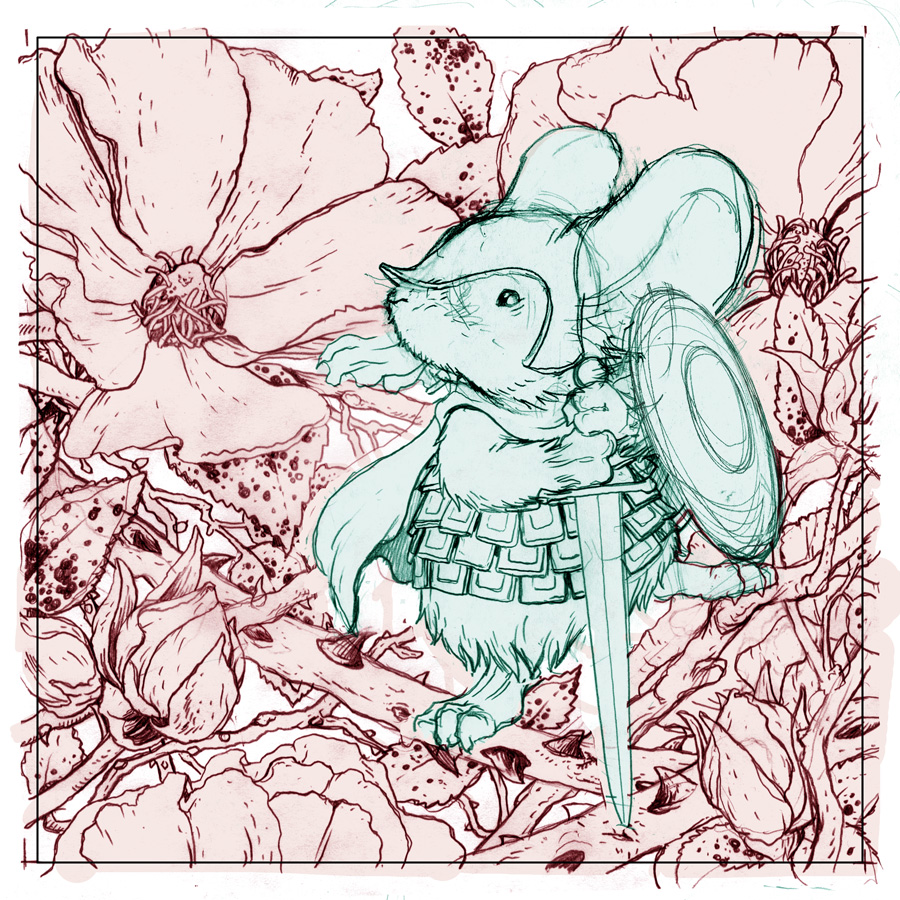 I started with the figure of Moria drawing her out on copy paper. I tried a few variations and ended up merging the two (the head from one and the body/pose of the other). Then I placed a printout of my merged drawing on my light pad and on a new sheet of paper over top, I drew out a series of wild roses making sure to have intersection points for her feet to touch. After scanning those two drawings in to photoshop, tinting them different colors to help me visualize, resizing them, and making some placement tweaks, I had a layout for this print ready.
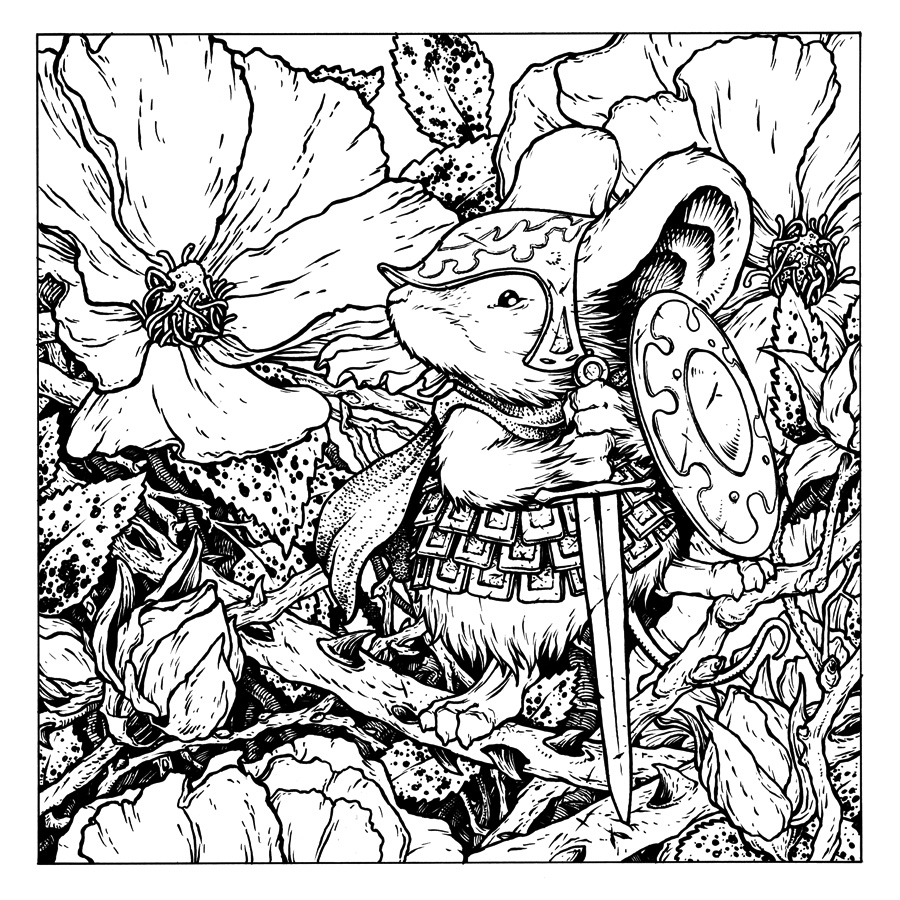 I printed the composite layout onto two sheets of legal copy paper (being 11" square, the layout wouldn't fit across one sheet, so I had to print the top and bottom separately and then puzzle them back together). Using my light pad, I was able to see through a sheet of bristol to the printout of my layout below. I taped the layout to my bristol to make sure I didn't lose registration as I inked. To the right you can see the finished ink (this was inked all with Copic Multiliner SP pens (the 0.7 & 0.3 nibs).
 Once the inking was done, I started coloring the piece. This process starts with a job called 'flatting' where you simply lay in flat colors to establish which parts are which colors. With Moria's copper armor and shield, red cloak, and the color of the roses, I knew this was going to be a warm-toned piece. So even my greens are falling into a yellow-brown zone. I looked at varieties of wild roses to get a sense of the color palates, but shifted everything a bit more red/magenta to create the color unity I wanted...though that would mean being careful to get all the various 'greens' to read as different shapes without being able to adjust their overall hue too far away from the base color.
The final step was to render the image. This means going in and adding depth and texture with shadow, and highlights. I do this using the Dodge and Burn tools in Photoshop (and a textured stock brush). Making sure to give the armor the right amount of rendering so it looks metallic while also dialing it back on the flowers so they don't look plastic took some self control and fiddling to get right.
Once the inking was done, I started coloring the piece. This process starts with a job called 'flatting' where you simply lay in flat colors to establish which parts are which colors. With Moria's copper armor and shield, red cloak, and the color of the roses, I knew this was going to be a warm-toned piece. So even my greens are falling into a yellow-brown zone. I looked at varieties of wild roses to get a sense of the color palates, but shifted everything a bit more red/magenta to create the color unity I wanted...though that would mean being careful to get all the various 'greens' to read as different shapes without being able to adjust their overall hue too far away from the base color.
The final step was to render the image. This means going in and adding depth and texture with shadow, and highlights. I do this using the Dodge and Burn tools in Photoshop (and a textured stock brush). Making sure to give the armor the right amount of rendering so it looks metallic while also dialing it back on the flowers so they don't look plastic took some self control and fiddling to get right.Again, the print is available in my online store and at my convention appearances until all 300 are sold out.
2017 Appearances: Heroes Con: Jun. 16-18San Diego Comic Con: July 19-23Baltimore Comic Con: Sept. 22-24New York Comic Con: Oct. 5-8
David Petersen's Blog

- David Petersen's profile
- 339 followers
David Petersen isn't a Goodreads Author
(yet),
but they
do have a blog,
so here are some recent posts imported from
their feed.


![[image error]](https://2.bp.blogspot.com/-zOkL8ctGFhY/WBlKivZYozI/AAAAAAAAJE4/UvkYbt5tq-Ib_kWZbu5kUx2G1rytQ6-KgCLcB/s1600/legends%2Bhc.jpg)