Serein Choo's Blog, page 19
October 16, 2023
Ebook Upload 3
The steps are the same as those in the children book for uploading to KDP/Amazon for eBook. However, I noticed there’s less issues (since there are less images) – as long as you passed the test in Kindle Create (preview), it was a breeze for me when I upload the details to KDP.
*Sorry that it says completed below as I forgot to document the steps the first time and I went back to get the screenshots for this post.
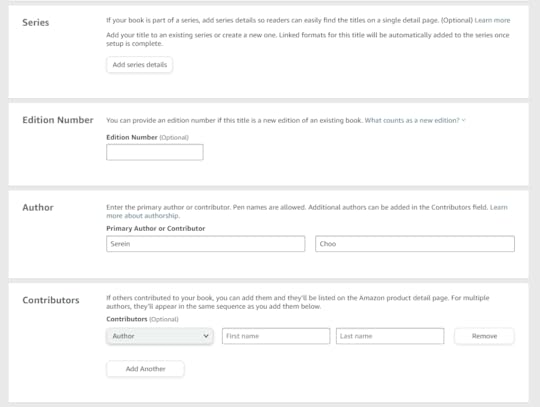
Key in the language and enter the Book Title as per below.

if there’s a series then you will have to fill in the details here but since Empty Crown is just a single/solo book, I just ignore that part and the edition as well since this is the first edition.
You will key in your author name as well as filled in any contributors of the books (where you filled in your co-authors).
Key your descriptions (I added my book blurb here – try to key in some SEO (Search Engine Optimization) words) and also ticked your publishing rights.
Fill in the details under ‘Primary Audience’ as well. Since my book is relatively targeted to readers 18-25 so I set the min. age to 18.

Selecting your primary marketplace and also selecting your categories and inputting keywords (Keywords, I tried to keep it simple, hope it’s helps with the promotion).

I key in as below for the category. One general and another one with more specification. You can still add one more for the category placement (as you can see below screenshot, I have only used 2/3 of the placement).

At this point, you can either select ready to release or select pre-order.

KDP will ask you to upload the kpf. file – get it ready as I will see you in the next post!
.
You can also follow what is stated through their website for further information/clarity .
Source : https://kdp.amazon.com/en_US/help/topic/G200641240
.


October 13, 2023
Ebook Upload 2
The wording, font, headers are done, how to include a cover or any related images to your eBook? Look no further, let’s do it today.
So first step, go to the ‘+’ sign with ‘insert’. Click on that sign and select ‘Image’
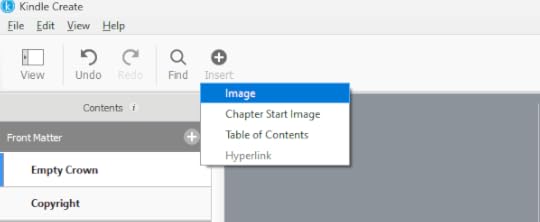
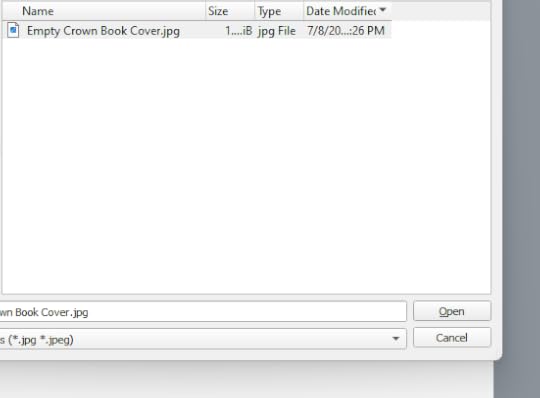
Select your image (I am using a jpg/jpeg image file) and the select ‘Open’.
Remember to input the ‘Alt Text’, it’s compulsory. I choose ‘Full’ and the bleed for the book, both options ‘Place within margin’ nor ‘Place to edge’ cannot be selected.
For large – no options
For either Small/Medium – you can choose the position of the image (left, middle or right).

Your book cover will appear.
To delete image – just click on the image and either select ‘delete’ or ‘replace’ image.
.
I will cover book cover only, since I am not using any other images for this eBook/book.
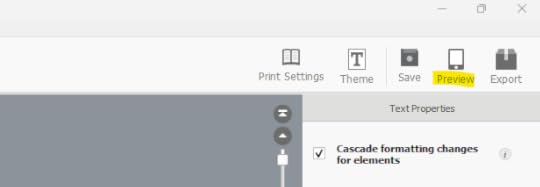
To do a final check (repeating). After you are done rearranging all the headers and you are satisfied with the editing, you can use the second last button ‘Preview’ to have a look at your document before, using the ‘Export’ button to save the file as an eBook. There are two version to choose from.

*Do note, however that tables, footnotes, endnotes are not supported by Kindle Create.
You can also follow what is stated through their website for further information/clarity
Source : https://kdp.amazon.com/en_US/help/topic/G7R2L7V5X6SJH948#toc
.
That’s all from using Kindle Create – now I need to login to Amazon and upload the eBook.
For the current version, I am still missing the eBook ISBN, so I will be getting that first from the Amazon, update the eBook before it’s consider finalized.
October 11, 2023
Ebook Upload 1
Since all the formatting and layout is done. We can finally move to the upload. Before we start, remember to download Kindle Create so that you can use the software to easily upload your work and create your eBook to be posted on Amazon. Follow the steps as per below.
This is the first page after the program launched itself, go to “Create New’ since we are starting from scratch.

Select ‘Choose File (.doc, .docx)

A pop up will appear, click on your file and then click open then you will be prompt to the next page. (It takes less than 5 mins for me).
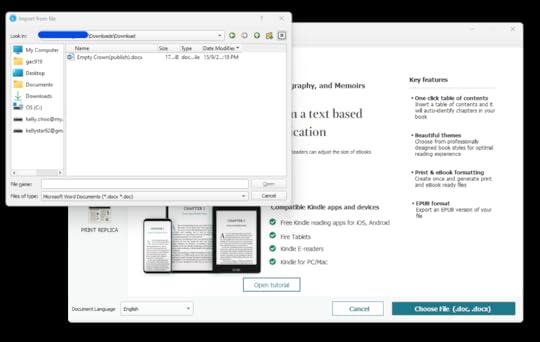
The below will now show in your screen where it will state that your document is successfully imported into the program. Click ‘Continue’ to start working.

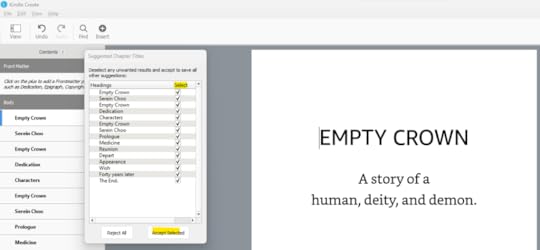
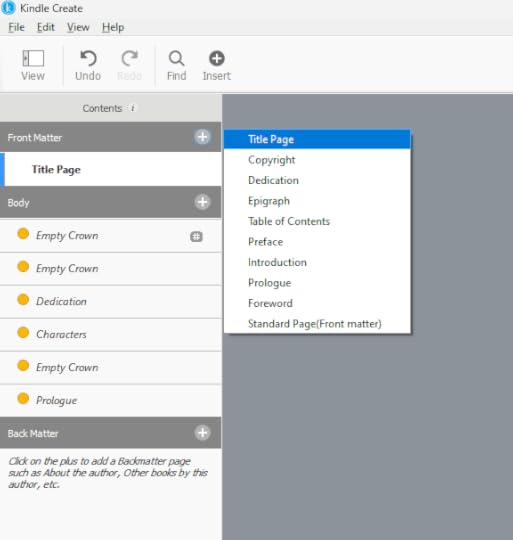
It will auto prompt to create a Table of Contents for you as shown. However, not all the Chapters are captured correctly and the pages that you made previously like the title page, copyright etc, you can exclude those manually by clicking in ‘Select’ column and tick and untick the specific boxes that you want. After you are done, select ‘Accept Selected’. If you clicked on ‘Reject All’, you will have to manually create the Table of Contents, thus I advise it’s better if you allow the program to auto create then you choose which one you want to remain and continued (don’t worry, after creating it you can still edit the table of content to your liking).
*If you notice the font is automatically changed to the default one by the program – it’s because, if you use the default, it allows the readers to select the font they like to read instead of the one that you chosen for your book. (I prefer to have my own font but I don’t know how to set it so at this point, I continue with the default font).
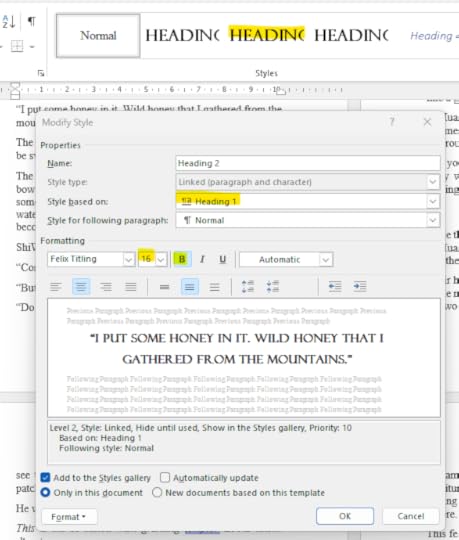
*One more thing, if you didn’t see all your headers appearing – you can change the formatting at the doc./docx. (change all your Headings 2/3 formatting to Heading 1 (same size/font etc., see below on how to change)) (click onto Heading 2 and then click modify : go to ‘Style based on:’ change from Normal to ‘Heading 1’. When everything is set the same as Heading 1, select ‘Ok’. I want all my headers to appear in the eBook for easy access as compared to the paperback i.e. one chapter, multiple sub chapters within that chapter. However for eBook all the chapters/sub chapters will become a header here so that the reader can easily go back to the previous chapter that they wanted to reread.
Okay let’s go back to the main topic.
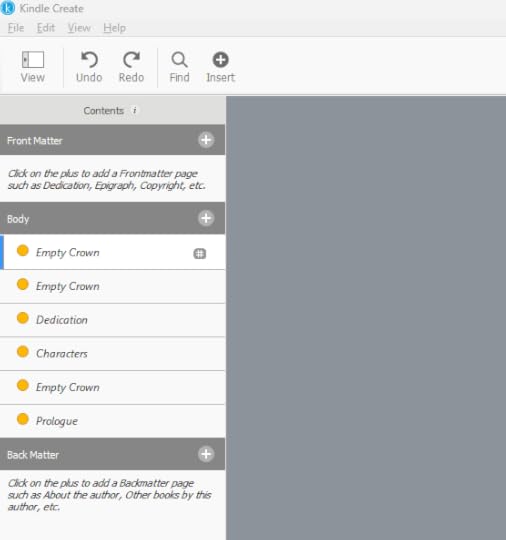
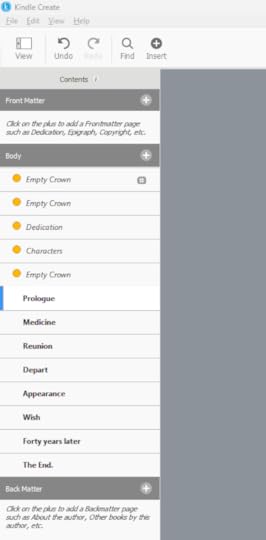
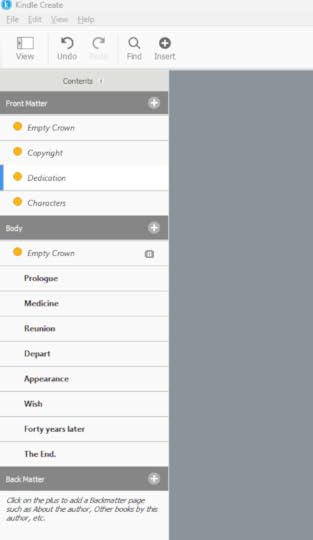
The previous headings you created will be under ‘Body” and shown below. There’s Front, Body and Back Matter.
I tried using the ‘Front Matter’, to create a title page, dedication but it looks weird so in the end I leave out the ‘Front Matter’ as it seems and felt strange to me.
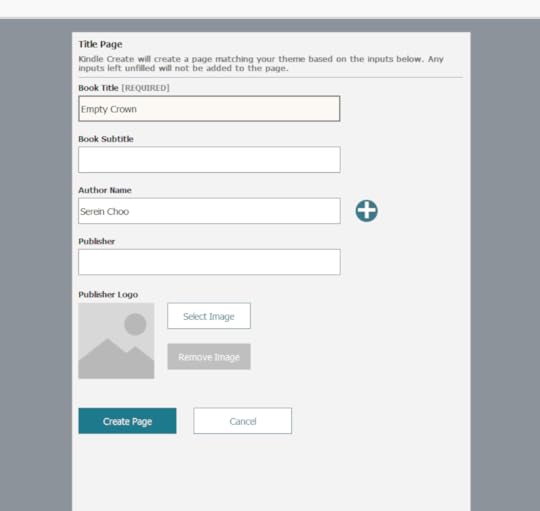
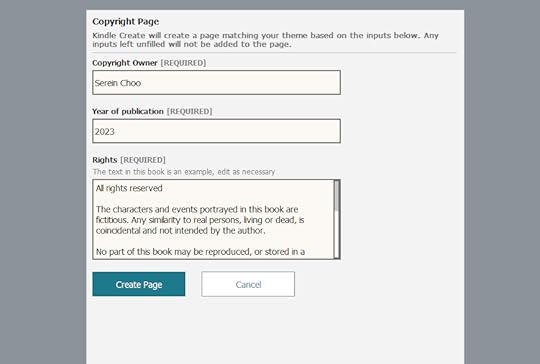
However, I find some parts if you haven’t already done it yourself, you can try using the ‘Front Matter’ layout to create them – like the ‘Copyright Page’. You only need to fill some specific details and it will be generated for you (but do read over, if there’s anything you need to add yourself so that no necessary information are left out).


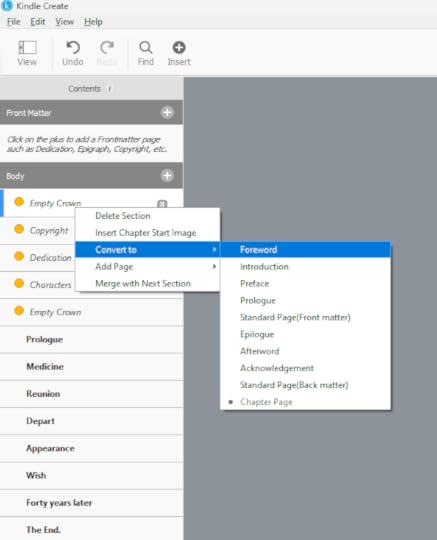
You can also use the existing headers to change the nature of it, right-click on the header and then go to ‘Convert to’ and select the type that you want.
It’s a plus point for me to be able to generate the table but I did notice that the Heading 2/3 in my Word doc is not pickup by the program so I have to manually added them back in as shown below. All the Heading 1 are listed down with the front pages that I created before hand (left bar in program)
*(Scroll above, to know how to change all your Heading2/3 into Heading 1 before using Kindle Create). This here shows the manual steps to change them in Kindle Create. If there’s isn’t a lot, I don’t mind to change a few but when 80% of the headers are missing, I went back to the Word doc to fix it before continuing Kindle Create.
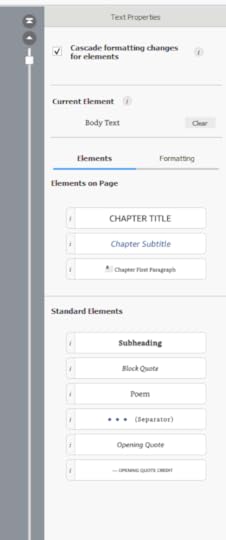
Select the words of your Heading 2 and then go to your right sidebar and then select ‘Chapter Subtitle’ to change it.
Using the convert to button, I change the the previous headers like “Empty Crown”, “Copyright” etc to the Front Matter. Did it matter where I put them (Front Matter or Body)? When I was previewing, I didn’t see any difference. As long as there’s an orange circle on the left, it wouldn’t be consider as part of the Table of Content. I just did it for my own satisfaction.
After you are done rearranging all the headers, you can use the second last button ‘Preview’ to have a look at your document before, using the ‘Export’ button to save the file as an eBook. There are two version to choose from.
See you next time, as I explained on adding images to the eBook.
.
You can also follow what is stated through their website for further information/clarity
Source : https://kdp.amazon.com/en_US/help/topic/G7R2L7V5X6SJH948#toc
October 9, 2023
Formatting Tips
Summary of the previous post for formatting:
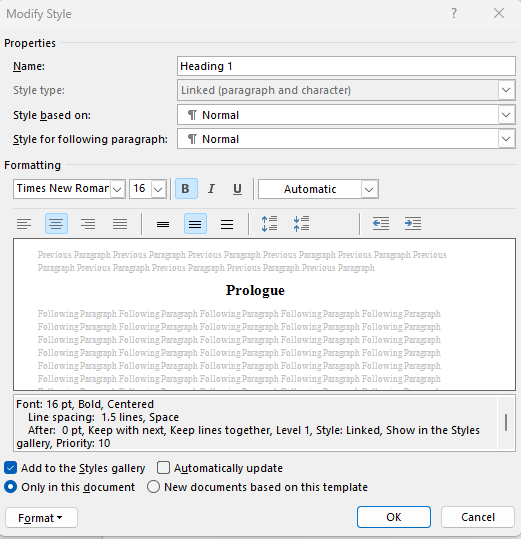
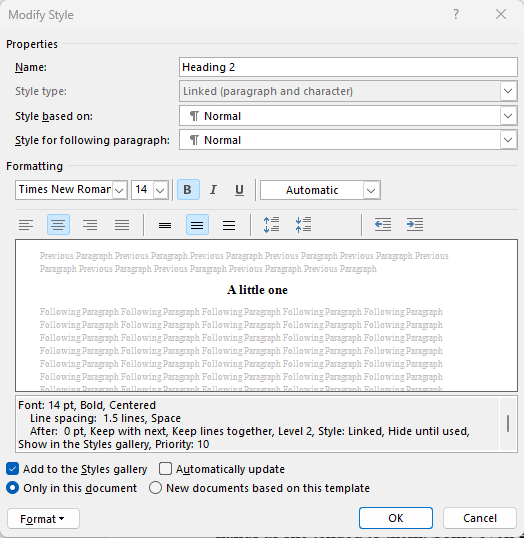
Opt for Simplicity and Legibility: On their website I didn’t see Amazon stating specific font type but still advisable to employing straightforward fonts like Arial, Calibri, or Verdana for your eBook main body. These ensure readability and minimize formatting glitches. [I am using Times New Romans (TNR), as I think that is the most standard format. It’s still acceptable to use it, no worries].Size Matters: Maintain a font size of no less than 12 points for your ebook’s main text. This promotes comfortable reading across various devices and screen dimensions.Structured Navigation: Utilize clear headings and subheadings to compartmentalize your eBook into coherent segments. I recommend using heading fonts of 16 points and subheading fonts of 14 points and ensure to use the Styles guide mentioned in the previous post so that you can modify easily if you needed to change anything.Margins for Space: Employ a margin of at least 0.75 inches/2.54cm (standard margin layout) around each page to guarantee both a reader-friendly layout and a professional aesthetic.Breathing Room for Clarity: Apply proper paragraph spacing to enhance visual appeal and readability. Allow a spacing of 1.5 times the font size between paragraphs. I use zero before and after indent as I already set the 1.5 spacing beforehand. If I added any extra points eg. 6 pt to the Headings, it will have to much empty space. (However, this is just my personal preference).Following these guidelines ensures your work appears professional and ensures an enjoyable reading experience for your audience.
And here’s the formatting that I use currently for my work.
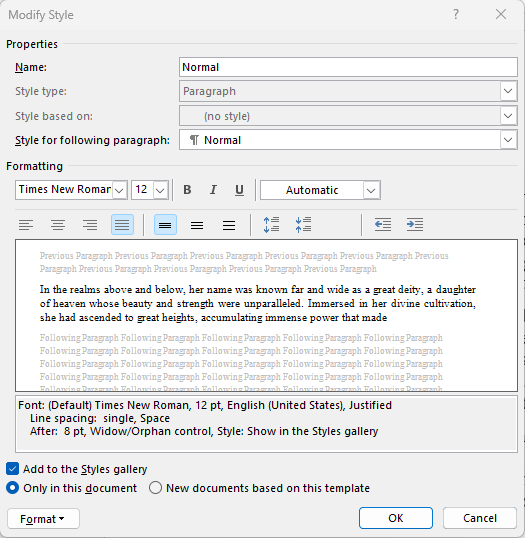
Style : Normal
Style : Heading 1
Style : Heading 2
The above is for your general formatting purpose. For Amazon, the same applies as well (at least when I upload as eBook there’s no issue). If you are still unsure, you can check out also the eBook guides for Amazon. Link: https://kdp.amazon.com/en_US/help/topic/G200645680#How4
See you in the next post, as I detailed about the overall layout of the book contents; preface, copyright, acknowledgement, table of contents etc.
October 7, 2023
Pre Work 3.1
The samples which I took from other published books. Click here to go back to the previous post.
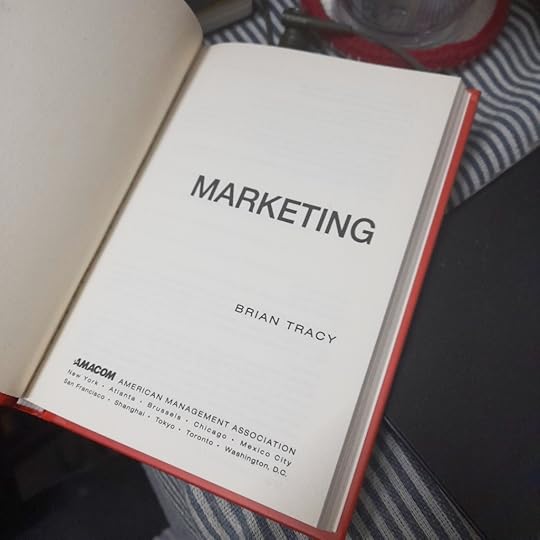
Title Page with the author name, including the publisher.
(Marketing by Brian Tracy)
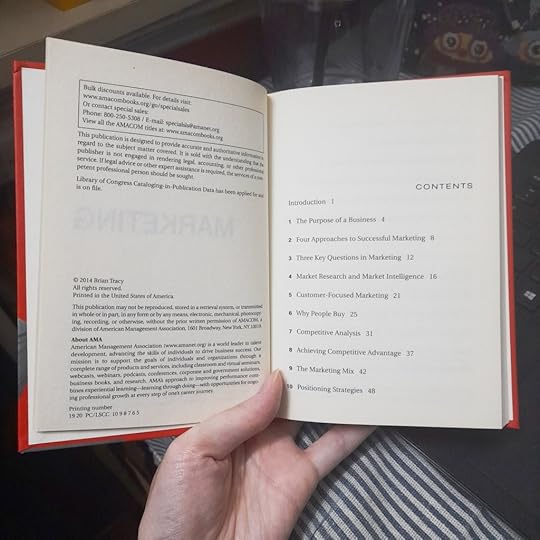
Copy Right Page (left) and Table of contents (right)
(Marketing by Brian Tracy)
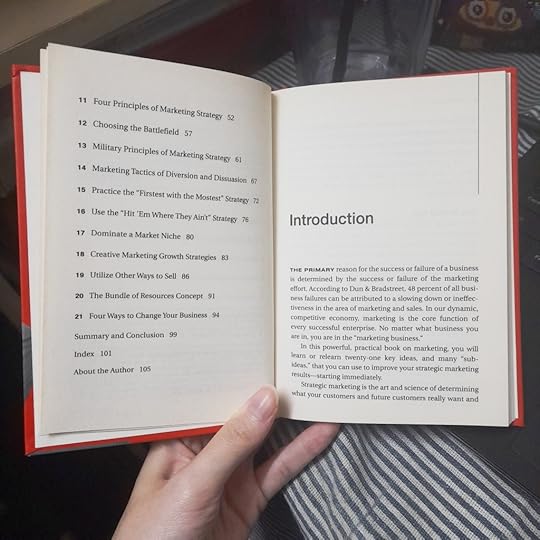
Introduction (right)
(Marketing by Brian Tracy)
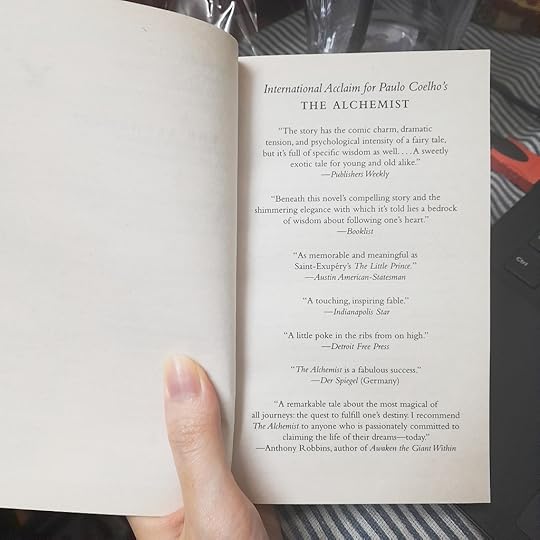
You can also insert a list of reviews for your book (optional)
(The Alchemist by Paulo Coelho)
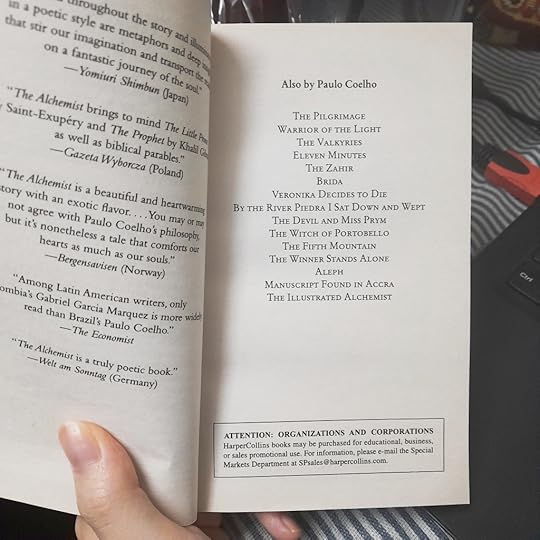
Other Books written by you (if none, leave blank)
(The Alchemist by Paulo Coelho)
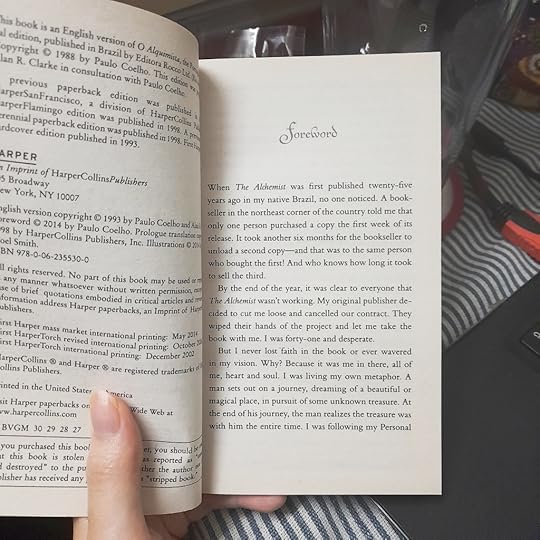
Foreword – Like an introduction (Optional)
(The Alchemist by Paulo Coelho)

Foreword – by the author Jean Sasson (written by the author)
(Princess More Tears to Cry)
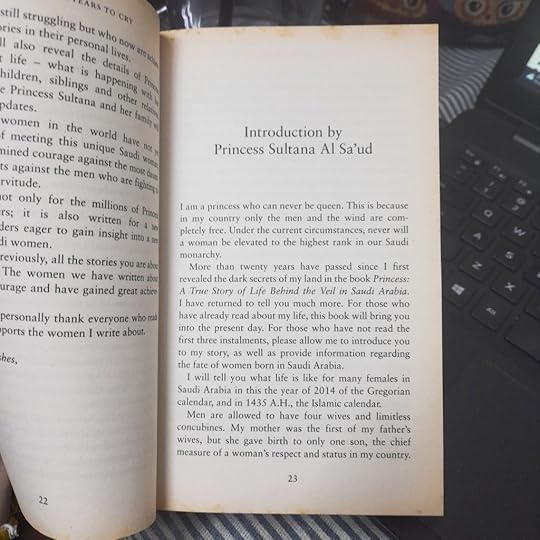
Introduction – by Princess Sultana (Which isn’t written by the author)
(Princess More Tears to Cry)
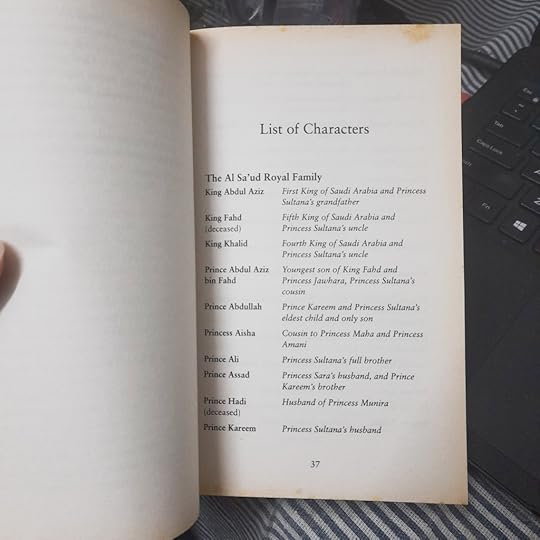
List of Characters (If you have a lot, it would be wise to include it in your book for reader’s reference)
(Princess More Tears to Cry)
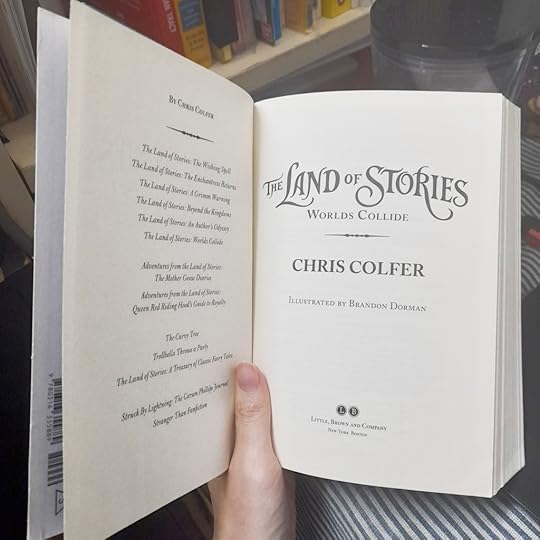
List of books that you written (left) and the title page (right)
(Land of Stories, Worlds Collide by Chris Colfer)
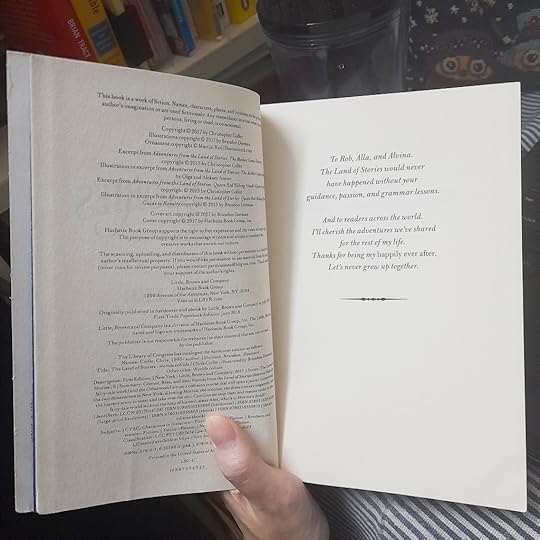
Dedication Page
(Land of Stories, Worlds Collide by Chris Colfer)

Epigraph
(Land of Stories, Worlds Collide by Chris Colfer)

Prologue
(Land of Stories, Worlds Collide by Chris Colfer)
October 6, 2023
Pre Work 3
So I just scratch the surface of formatting, there’s more which is the layout of the overall book in general/eBook.
Make sure that you have the following in your book (some are optional while some are compulsory) as stated below:
Page templates : –UsageRequire?Title PageContains the book title, subtitle, author name and a publisher logo.YesCopyrightIncludes information such as copyrights, editions, and publisher.YesDedicationWhere you write a short paragraph dedicating your book to a person or people with explanation why.Yes (Of course)EpigraphA quote that complements your book’s subject matter along with the quote attribution.OptionalTOC pageA Table of Contents that lists of the major sections of the book along with the corresponding page number.OptionalForewordPiece of writing at the beginning of a book, typically an introduction written by someone else.OptionalIntroductionA section to add introductory text for readers. Typically used for nonfiction books.OptionalPrefaceIntroduction to the book written by the author that provides context for the book or current edition.(Comes after foreword, and before introduction)OptionalPrologueShow a preceding event to your story that sets the scene. Typically used for fiction.OptionalStandard pageA blank page that can be used to generate any custom type of front matter content.Optional
Here are some samples, that I saw in some books. I took pictures for references. Click Link.
While researching this topic, I’ve come to noticed that every single book has a combination of the above but not all. Therefore, there’s no strict requirement to include everything. You, as the author, should have the best understanding of your book and what is essential to offer your readers for a deeper comprehension of your narrative. Elements like maps and character lists can be beneficial but aren’t mandatory, and their necessity may also vary depending on the genre, whether it’s non-fiction or fiction etc.
Interestingly, I’ve noticed that fantasy books often exclude table of contents, except in cases of short story compilations (I think it’s because including the table of content, may facilitate easier reference, allowing readers to swiftly locate and read the specific story/chapter that they want to read).
As I compiling this list, I thought that foreword, introduction and preface feel and was similar things but after researching a bit, foreword is written by the someone other than the author, while preface is written by the author. Foreword are usually written by an expert – think of it as an ultimate book recommendation by another. Whereas preface, is like a page to sell yourself as dear authors for dear readers – a little introduction, using your charm to tell your dear readers why they should read your book, your rep page. While an introduction might be used by the subject of the story (e.g. like a letter or a speech by the subject).
References:
DISTINGUISHING BETWEEN A FOREWORD, A PREFACE, AND AN INTRODUCTION
Preface vs Foreword vs Introduction: What’s The Difference?
October 4, 2023
Pre Work 2
After making sure that all your work is without any further issues, it’s time to talk about formatting. I use Word. I think it’s the easiest thing to use. No unnecessary fuss and simple to go about (I will be explaining all the steps in Word which I used so if you are using a different writing application, maybe you can skip the steps).
After researching on the internet and asking Mr. Google about publishing. I think everyone is using the standard margin on 0.25inch/2.54 cm.
How to set this, follow the steps below:
Go to Tab ‘Layout’ and click on the first icon on the left, titled ‘Margin’.
Select Normal margin (if it’s 0.25 inch/2.54cm then just select this one) or Custom margin (if you want to set your own).


Remember to set it throughout the whole document, not just one page (Apply to: Whole document). Click ‘OK’.
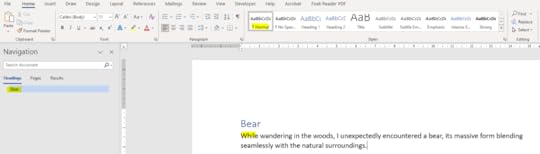
Next, we have target the Heading and writing formatting. Go to ‘Home’ and use ‘Styles’ it will help you a lot when you want to change formatting. Whatever you want to change, it will be applied throughout the whole document which you have previously selected as Heading 1/Normal. Rule of thumb, ‘Normal’ for writing and select ‘Heading 1’ when you starting a new title/chapter. Example: Select the words ‘Bear’ and click onto ‘Heading 1’ and the paragraph below select ‘Normal’. Another good thing when you are selecting these style is that when you can see on the left, Word will have show the list of headings in your work/book.

Before you start, right click on the square of ‘Heading 1’ and then you select ‘Modify’.

Below will show. Change it to the formatting you want for your book. My Formatting/What I like to use (Heading 1) :
Font: Times New Roman
Text Alignment: Justify
Text Colour : Black/Automatic (Black as well).
You can set it for only this document or if you want to use it for other similar documents, you can select at the bottom ‘New documents based on this template’ before clicking on ‘OK’.
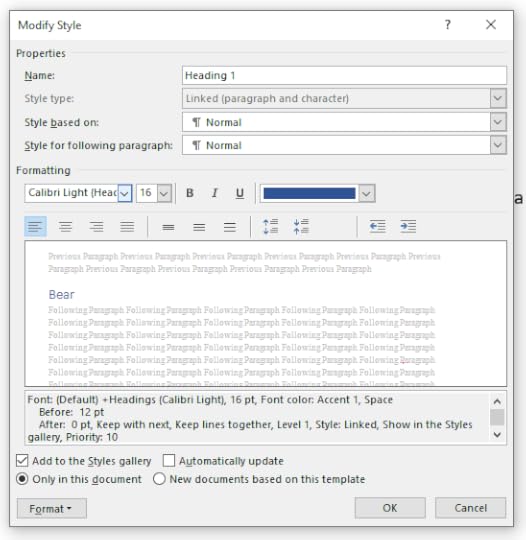
Don’t worry too much. If you change your mind later, you can always come back to modify your formatting.
One note, if you don’t select the ‘Style’ then your work will remain in the default formatting and the navigation too will not work.
Example below where I started another new paragraph without selecting any styles.

You can see after I select, the words, apply ‘Heading 1’ style. Now ‘Wolf’ has appear on the navigation bar.

The most commonly used font is Times New Romans, Size 12 point (Heading 1, I just increase the size to Size 16 point) unless your editor/publisher/query agent request a different font/font size, I think it’s best to use this formatting since it’s the standard for most work. However, this is just a guideline, doesn’t mean that you can’t try out other fonts that might be more suitable for your genre/story. I also like Garamond font which looks very beautiful as well (a comparison below).

More on formatting in the next post. See you soon!
October 2, 2023
Pre Work 1
Hello you, who is reading this right now. I am starting this page to detailed my journey to self publishing my first novel: Empty Crown. If you wanted to help me and
Publish (refers to self publishing here)
Editor, proofreading
can skip for children book – look for family and friends for help
But please do not skip for your novella/novel.
Imagine this and compare the two sentence below.
Original: “I saw the bear in the woods.”
Spelling Error: “I saw the beer in the woods.”
Summary
I cannot stress the importance of making sure your work is :
Accurate – without grammar errors,
Free from mistakes – without spelling errors; and has,
Correct use of punctuations i.e, full stop, commas, and others (I have read enough other people’s works to stress this out).
Of course, I can’t say that it will be totally free of error after you did all the above, but at least we have done our best and make sure that the whole thing has been checked over and over again until you can confidentially state that you have done your best (and you are sick of all the editing, rereading your work that you say that it is your limit).
October 1, 2023
Some Halloween Prompts
Hello, it’s October, and you know what that means – Halloween is just around the corner! Wishing you a spooktacular month ahead. Here are some Halloween prompts that might pique your interest:
It’s the day before Halloween and you find an envelope sitting on the kitchen table with your name on it. You discover that it’s an invitation to the Grand Halloween Ball at Edinburgh Castle. As you begin to enjoy your time at the castle, you come to a sudden realization that something is very, very wrong.
From AmbassadorsUK (Wattpad)
I think I will be joining this, writing a short story (500-5000 words) to celebrate the month.
Check out the other prompts from Wattpad:
https://www.wattpad.com/1382658927-mayhem-on-halloween-2023-ghoul-time-ahead-prompts
September 28, 2023
Chinese Myth: Mooncake
 Drawing/Picture by Serein Choo.
Mooncake the sweet sweet dessert which I love a lot. Like every year, I bought a lot of them since it’s available only once a year. The sweet fillings, which includes traditional flavors like White Lotus/Lotus paste, Red Bean, Wu Ren (Five Nuts) and Jin Hua Ham (Golden Ham with Assorted Nuts) Mooncakes, not to mention the Avant Garde flavors that are coming out each year (I covered this in the previous post). But seriously if you haven’t try one, I do suggest you to get and try it.
However, that’s not the only thing that interesting on this special day. The story behind this day is just as interesting as the mooncake themselves. There are many versions of it but overall it’s related to the moon, Chang E and HouYi, the jade rabbits on the moon and of mooncakes and there’s also a story which it relates how mooncakes are used to transfer message.
It depends which version you fancy more, as there’s not one which fully define the day.
The first story is how it is used to Overthrow of the Mongols. Mooncakes played a pivotal role in the liberation of Yuan China (1206–1341 CE) from the Mongols during the 14th century. Despite strict prohibitions against large gatherings, rebel leader Zhu Yuan Zhang managed to incite a rebellion by concealing secret messages within mooncakes by hollowing out the eye yolk and use it to store the secret messages. This uprising coincided with the Mid-Autumn Festival, forever imbuing the festival and the tradition of eating mooncakes with a new and significant meaning.
The second one relates to a bit more romantic story of Chang E and Hou Yi. Once upon a time, there was ten suns in the sky and all living beings life on Earth was living a very hard life due to the heat from the suns as the heat of the suns ruined all the crops, creating a horrible drought. As food became scarce and the kingdom grew hungry, Hou Yi, a young but courageous archer, embarked on a daring mission. He climbed to the highest peak of the highest mountain and, one by one, shot down nine suns scorching the earth. Upon his descent, he was hailed as a hero and held dear by the grateful kingdom.
He was granted with an elixir which granted him immortal life, and he gave it to his wife, Chang E for safekeeping. However, Feng Meng, tried to force Chang E to give it to him. To prevent this, Chang-E swallowed the elixir, and was separated from Hou Yi forever as her body grew light and she floated up to the moon. Since they are now separated, on the day when the moon was brightest and closest, Hou Yi would lit a lantern and offered her fruits and cakes, to convey his love and longing for her. This tradition persisted over the years, with people continuing to offer fruits and cakes to the moon.
Accompanying the Goddess Chang E is the Jade Rabbit, who has its own story as well. In a tranquil forest resided three creatures: a clever fox, a swift rabbit, and a playful monkey. One day, the Emperor of Heaven decided to assess their virtues. Disguised as an elderly man, he ventured to Earth. Addressing the trio, he said, “I have heard of your close friendship and have traveled a great distance to meet you. I find myself terribly hungry. What can you offer me?”
The three friends responded in unison, ‘Please wait here, kind sir. We shall return shortly with food for you.’ With these words, they embarked on their individual quests for sustenance.
The sly fox deftly snared a fish from a nearby river, while the nimble monkey gathered ripe fruits from the bountiful forest. However, the gentle rabbit, facing an empty-handed search.
When questioned again by the old man, the rabbit made a profound sacrifice. Without hesitation, it leaped into the crackling flames, offering itself as a meal for the hungry traveler. Touched by this act of selflessness, the Jade Emperor resurrected the rabbit and, as a gesture of honor, sent it to dwell on the moon, forever admired by all.”
Unlike the tale of the cowherd and the weaver girl, the origins of the Mid-Autumn Festival have several versions. Nevertheless, I appreciate each of them for the unique perspective they bring to the story. I am grateful for this day as it brings about much joy and happiness. As a child, I cherished strolling through our neighborhood with my family, each of us carrying a lit lantern. Sometimes, neighborhood kids would join our walk, transforming the activity into a lively and enjoyable tradition, akin to Halloween celebrations in Western cultures. However, our festivities were far from spooky, Haha.
Sitting around the swing at my grandmother’s house as we feel the gentle breeze, and appreciating the moon (shang yue) while we chatted and ate surrounded with brightly lit lanterns.
It remains as a cherished memory from my childhood, a warm and comforting recollection.
P.s Picture is drawn personally by me (Serein Choo) Please do not use without permission.
Sources :
https://www.chinahighlights.com/festivals/mid-autumn-festival-story.htm
https://eresources.nlb.gov.sg/infopedia/articles/SIP_804_2005-01-13.html
https://macaulifestyle.com/culture/heritage/lovers-revolutions-stories-mooncake/