Rachael Ray's Blog, page 98
April 20, 2012
Toffee Squares - a quick cookie alternative
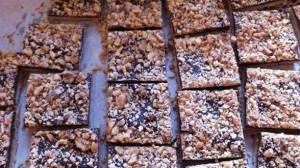
I volunteered to bring in cookies the other day but was short on time (what’s new). I made these toffee squares which were equally delicious but took a fraction of the time. They remind me of a favorite dessert from my high school lunch room - “chocolate squares” - which is actually a good thing. My high school randomly had amazing food: fresh baked bread every day, amazing french toast, grilled bagels with fresh cream cheese. Holy carbs. Chocolate squares were the main course of many a high school lunch. Anyway, these toffee squares are quick and easy - highly recommended.
Toffee Squares (adapted from a recipe from thepioneerwoman.com) (click here for printable recipe)
Ingredients:
2 sticks butter, softened
1 cup packed brown sugar
1 egg
2 teaspoons vanilla
2 cups flour
1/2 teaspoon kosher salt
2 cups chocolate chips
3/4 cups finely chopped toasted pecans or walnuts
Directions:
Preheat oven to 350 degrees.
Cream butter and brown sugar until fluffy. Add egg, vanilla, salt and flour and mix until combined. Spread on cookie sheet lined with parchment paper with an offset spatula until thin. Bake for 15 minutes, or until golden. Remove pan from oven and sprinkle on chocolate chips. Return to oven for 1 minute. Remove from oven and spread chocolate thinly over the cookie layer.
Sprinkle with chopped pecans. Let set and cut into squares.
April 11, 2012
When To Replace Herbs and Spices
Have you ever heard that you're supposed to replace your dried herbs and spices after one year? Well, that's what the experts say, but who goes through spices that quickly? The bottom line is that there are some dried seasonings that last longer than others, and there are ways to extend the shelf life of all of your herbs and spices.
First off, ground spices have a longer shelf life than herbs. Spices are the dried berries, seeds, bark, and root of a plant, while herbs are the leaves or flowers. Ground spices are meant to last a few years, as opposed to the yearlong lifespan of herbs. If you want really fresh spices, it's best to buy whole spices, such as coriander, cumin, and, nutmeg, and grind or grate them as needed. Whole spices stay fresh and retain a strong flavor for many years.
With herbs, you may notice after a year or so that they aren't as pungent, and their color has faded. Just because they've faded doesn't mean their flavor is gone, but they probably don't pack the punch of a younger herb. To find out whether they're still good, smell and taste them. Do they have any scent or flavor? If they're not as strong as they once were, but they're still usable, you can keep them for one more year, but after that they should be discarded.
If your herbs-or spices, for that matter-smell and taste bland, cook up a big pot of tomato sauce or chili, or something that calls for lots of seasoning, and use up old herbs by cooking instead of throwing them away. Then you'll be all ready to go get fresh ones.
Here are some tips on preserving the integrity of your dried herbs and spices:
As a general rule, buy seasoning in small amounts. If you only use cumin a few times a year when you get a craving for Indian food, for example, a small amount will suffice. If you're addicted to hot and spicy tastes and you put chile flakes on everything (I speak from experience), then make an exception and buy chile flakes in bulk.
Keep herbs and spices away from heat, light, and moisture. Don't store them by a hot stove or by a window where sunlight, rain, and drafts can get in, but store them somewhere that's dark with a cool, steady room temperature.
Keep herbs and spices in dark or opaque containers, as light fades their color. If you really like using glass storage containers (I do), store a small amount in glass, but leave the bulk of your dried seasonings tightly sealed in a dark place.
Choose whole spices over ground spices, and grind a small batch as needed. The spices will stay fresher much longer, and retain a powerful flavor. You'll need to invest in a spice grinder, and there are several different kinds on the market. You can use an electric coffee grinder, a mortar and pestle, or a simple hand-powered pepper mill-style grinder like the one pictured above. Here's an electric grinder that Rachael likes.
Now that you have some guidelines, take a few hours one afternoon and do some spring-cleaning in your spice rack. You may find your food suddenly has a whole lot more flavor!
Louisa Shafia is a cook with a passion for healthy eating. She recently penned Lucid Food: Cooking for an Eco-Conscious Life, a collection of seasonal recipes and eco-friendly advice on food. To watch her cooking videos, see her recipes, and find out about her cooking classes, go to lucidfood.com.
April 10, 2012
Pesach Flanken For the Ultimate Jew and the Ultimate Gentile
Passover, the holiday of my people, doesn't usually present much in the way of excitement. A few family arguments, some overcooked lamb, maybe a whiff of identity politics. It's basically Jewish Thanksgiving. This year, though, I thought that I might try to cook something good. And I did. All it needed was a french cookware company, a Southern chef, some Spanish wine, and a bag of aged Italian barley.
The cookware was Le Creuset; I had gotten a large enameled, cast-iron braiser, something I'd always wanted, although I couldn't say exactly why. I mean, I could have made this in my dutch oven. It would have been just as good. But then, my old Kenneth Cole watch keeps time just as well as the 1966 Rolex Oyster that is now my most prized possession. Go figure. Anyway, the pan is broad and shallow, and ideal for making things that aren't very tall. Things like short ribs, which are close in spirit to the brisket that frequently appears on passover tables.
Now this is where the story getes complicated (to just get the recipe, scroll down.) I had been wanting to make short ribs in the very classical method prescribed by John Besh in his book, My Family Table. If you think of all things that American Jewish guys want to be, but aren't, you come up with John Besh. A combat veteran, a skilled hunter, a southern patriarch from Country Club, Louisiana: I mean, really? The guy is truly the all-American male we wall grow up wishing we could be. At least, I do. Besh's book is a treasury of images of a life I'll never have: I'll never make jambalaya for my adoring children, any more than I will be the chef of the best restaurant in New Orleans, or inspire sighs of longing from blonde Magnolia Queens. But that's OK. I'm happy to be Josh Ozersky. I really am. I can't be John Besh. I understand that. But I can make his short ribs.
Naturally, though I had to change them. Part of Besh's authority as a cook comes from the way he effortlessly inhabits the traditions into which he was born. It's his birthright, after all, his to depart from or modify as he sees fit, which is infrequently. (It's Besh's special genius to be able to elevate one of the stodgiest schools of American cooking without anyone being exactly sure how.) As for me, lacking any blood connection to braised short ribs, I felt free to monkey around with the recipe. Besh's people have been skinning rabbits and thickening roux for generations; my relatives rarely went beyond opening two cans of Campbell's Beef Broth into a Crock Pot decorated with little blue flowers on it — sometimes pausing only to drop a packet of Lipton's Onion Soup Mix in before turning it on and going off to watch Match Game.
So I combined my tradition to Besh's; or at least I tried. I browned off the meat in the gorgeous enamel of the pan, and then browned the mirapoix just like Besh said in the book, even adding in the amount of tomato paste he prescribed. But then I started riffing. I swapped in a very fruity, very alcoholic Spanish Jumilla wine, along with a big glopping pour of demi glace, and, yes, Campbell's onion soup mix. What can I tell you? Onions go good with flanken. Meanwhile, I reserved some of the vegetables for a small pot of, yes, Campbell's beef broth (enriched by more demi-glace). To this I added about a cup of aged Italian barley, which they say is harder and better than the regular kind. When it got semi-soft I added it to the braise. The little kernels never stopped sopping up that broth, and became a kind of risotto bed on which the boulders of soft brown beef could nestle. The whole thing was unnaturally good, a product of hybrid vigor, and did credit to both myself and Besh. It wasn't very traditional as a Passover meal. But it was one of the most American dishes I can remember making.
Pesach Flanken a la Besh
3 lbs short ribs, as marbled as you can get.
1 brisket deckle tip (about 2 lbs)
3 carrots
1 big onion
three stalks of celery
5 cloves garlic
1 can Campbell's beef broth
1 can Campbell's French onion soup
Half a bottle of strong Jumilla wine
½ cup veal demi-glace
2/3 cup Italian barley (orzo)
2 bay leaves
2 tbsp tomato paste
kosher salt
coarse pepper
1. Cut all the vegetables up into little pieces.
2. Rain kosher salt on all sides of all the meat pieces. Brown them in good olive oil without crowding the pan. Put them aside.
3. Cook the carrots and celery and half the garlic in the pan. pour a little broth or water in to get them softening and to help deglaze the crusties off the bottom of the pan. Add the onions and work them around the same way for another 10 minutes. Try to get them brown. This is all on medium-high heat, by the way. Toward the end add a big spoon of tomato paste in. Work it around so it's all over all the vegetables.
4. In a separate pan, put some beef broth, the barley, and a few spoons of the caramalized vegetables. Cover it, turn it down low, and forget about it for a while.
5. Put the meat back in the main pot. Add a can of onion soup mix, the rest of the meat broth, and the demi-glace. Pour the wine in too. It shoudn't cover the meat. You are braising, not boiling. Get it almost boiling though, and then turn it way down and cover it. Put it in a 300 oven. Note the time. Now Forget about this too.
6. Go watch TV or listen to records.
7. In thirty or forty minutes check on the barley. If it's edible add it to the braise. Put it back in the oven. Forget about it again. Eat some crackers or something. Have a glass of wine, since the bottle's open.
8. In an hour, take out the pot. The meat should be tender, but still have enough collagen left that it's not just stringy muscle held together by spite. It should feel like a cross between roast beef and a jello shot.
9. Allow it to cool uncovered for a good hour. Serve or refrigerate.
April 9, 2012
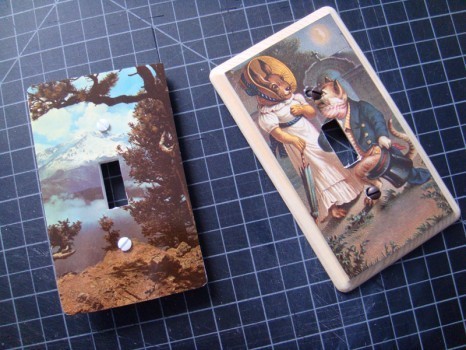
Vintage Postcard Light Switch Covers!!!!
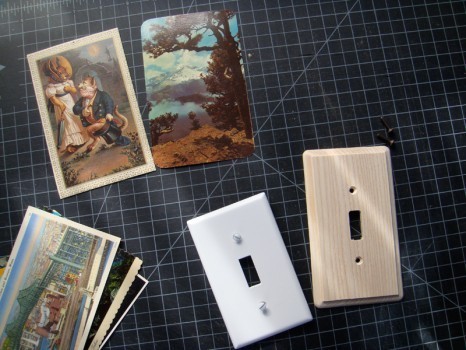
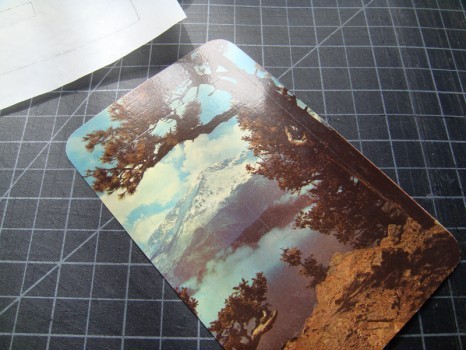
I was recently at a flea market in New York City. One of the vendors had a box of postcards labeled "FREE." I couldn't resist and picked out a few. As luck would have it, a couple postcards had a vertical layout, and I thought they would be really nice light switch covers.
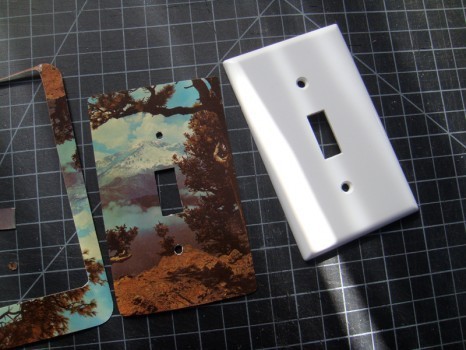
I decided to make two versions: one with a plastic switch cover which cost me 49¢ and one with a wooden switch cover which cost $4.99. Both are inexpensive, but in comparison, the 49¢ version seemed like a steal.
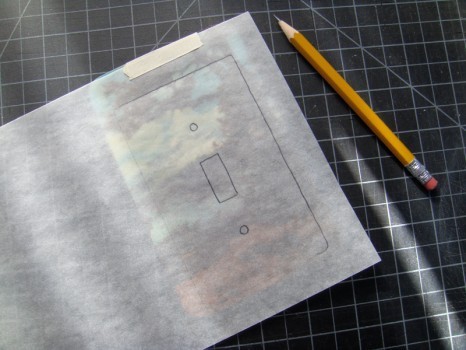
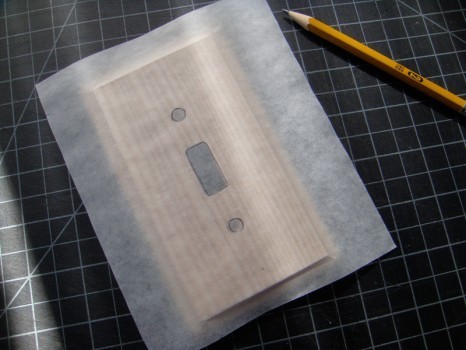
To make the plastic version, trace the light switch cover using a pencil and a piece of tracing paper.
Flip the tracing paper over so the tracing is facing the front of the postcard. Figure out where you want to make your cuts, tape the tracing paper to the postcard and retrace the outline of the light switch cover.
The tracing paper and the original drawing will act like carbon paper.
Cut the postcard to fit your light switch cover.
If you want to use an adhesive on the back of the postcard to secure it to the cover you're more than welcome to. I just let the screws hold it in place because the postcard paper is stiff enough to keep it in place.
Screw the light switch cover into place. This is such a simple (and cheap) update, I may have to do it all over the house.
Since the wooden light switch cover has a bevel I thought it would be best to attach the postcard to the flat part and leave the bevel exposed. Place the tracing paper on top of the cover and run a finger around the edge of the flat surface to make an imprint.
Trace the screw holes and opening for the switch. Then use a straight edge to draw the imprinted area (the outline of the flat part of the cover).
Using the same "carbon paper" technique as the plastic cover, retrace the outline onto the postcard and cut to fit the light switch cover.
Since the edges of the light switch cover will be exposed, you can paint them. I decided to add a little varnish to keep the wood look, but keep the wood clean.
Once the varnish or paint is dry, paint an adhesive on the light switch cover. I used acrylic gel medium because it's great for decoupage. However, most glues that are appropriate for paper should work fine. I like to use a brush to keep the adhesive even, and to make sure the glue goes all the way to the edge without oozing.
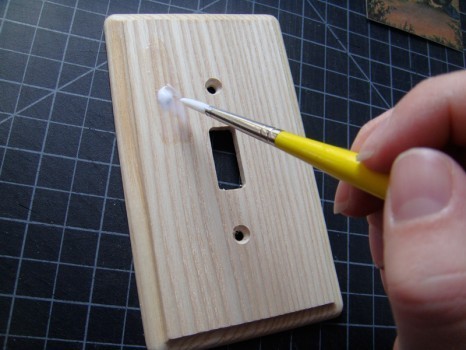
Glue the postcard to the light switch cover.
Attach the light switch cover. This version should stand up to use better than the plastic cover version, so I would recommend springing for the more expensive cover in places where the switch is used frequently.
Whatever version you decide to make, these light switch covers are an inexpensive way to add a cute detail to any room.
April 7, 2012
How to Safely Prepare And Eat Easter/Passover Eggs. Plus, 5 Delicious Recipes For Leftover Hard Boiled Eggs.
How many of us end up with WAY too many hard boiled eggs after Easter and Passover?
It's kind of insane to waste them when there are so many delicious ways to use them up. But before you do, make sure you follow some food safety rules so you can enjoy your leftovers safely.
Egg Safety:
According to the U.S. Department of Agriculture hard-boiled eggs spoil faster than uncooked eggs because their protective outer coating is washed away during preparation. As a good rule of thumb, remember that hiding and hunting eggs should not exceed two hours. Any longer than that and the egg should be discarded.
1. After hard-boiling eggs, dye them and refrigerate within two hours.
2.NEVER eat an egg with a cracked shell. All cracked eggs must be thrown out.
3. When dying eggs you plan to eat, always be sure to use food-safe dyes.
4. Do not leave hard boiled eggs sitting out after the Easter egg hunt. Eggs must be refrigerated right away (within two hours) if you plan on eating them.
5. If you are making/eating Easter bread that contains cooked eggs, serve or refrigerate the bread within two hours and eat it within three to four days.
5 Ways To Use Up Leftover Easter/Passover Hard Boiled Eggs:
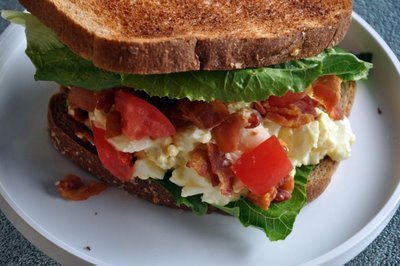
1. Egg Salad- Seems like an obvious choice, right? I like to throw a spin on it and make a more decadent version of the classic BLT. Simply add some crunchy bacon, lettuce and tomato to a tried and true egg salad recipe (like the one below) and you've got yourself one heck of a sandwich.
2. Salad-Eggs are so delicious chopped up and tossed over a simple pinach salad. The tang in most salad dressings compliments the creaminess of the egg yolk beautifully. If you feel like fancying it up a bit, try a Salad Nicoise and in particular, Rachael's Salmon Salad Nicoise. Delicious!!!
3. Meatloaf: My Sicilian mother in law loves to bake whole hard-boiled eggs into her meatloaf. Meatloaf isn't generally all that attractive, but this version is gorgeous. When you slice it up, the ground meat is flecked with beautiful slices of hard boiled egg. All you have to do is make your favorite meatloaf recipe (or try this one or this one), pat half of the mixture into a loaf pan, press two or three whole hard boiled eggs into the meat, then top it with remaining mixture, making sure to pat the meat down to completely cover the eggs. Bake as you normally would and allow to cool for a few minutes before slicing. This also makes a killer sandwich the next day!!
4. Breakfast Quesadilla- Brush one large tortilla with olive oil and place into a skillet over medium heat. Top tortilla with, 1/3 cup shredded cheddar cheese, 1 chopped hard boiled egg, 2 pieces of crumbled bacon and 1 scallion that has been thinly sliced, sprinkle over another 1/3 cup of cheese and top with another tortilla. Brush the top tortilla with a little oil. Press tortilla down to melt cheese. Once cheese is slightly melted, gently flip tortilla over to brown the second side. Cut into wedges and serve with salsa or sour cream.
5. Potato Salad- Who doesn't love potato salad, right? Adding in some hard-boiled eggs makes it so much more creamier and delicious. This recipe from Julia child is tops!
BLT&E Sandwich
Serves 4
Ingredients:
8 hard boiled eggs, chopped (I swear by this method)
4 slices of bacon, cut into 1/2 inc pieces
3/4 c mayonnaise
salt and pepper to taste
1 tsp dried mustard you can use dijon or regular mustard in place of the dried)
4 pieces of whole wheat bread, toasted
4 pieces of romaine lettuce, cut in half
1 large tomato, diced
Instructions:
1.Hard boil your eggs according to this method.
2. In a medium frying pan over medium heat cook bacon for 6-8 minutes or until crisp. Allow to drain on paper towel.
3. In a medium bowl combine, chopped eggs, mayonnaise, salt, pepper and mustard.
4. Place a romaine leaf on each of the 4 slices of toast and distribute egg salad evenly. Sprinkle each with bacon and chopped tomato. Top with the remaining romaine leaves and toast slices.
Christina Stanley-Salerno is a mama, recipe developer, food stylist, photographer and blogger atTakeBackYourTable.com. She loves cooking for and with her family. Life is hectic, but Christina is passionate about mealtime because she believes that family meals are the glue that holds everyone together. Creating simple, quick and healthy meals is her specialty and her trick to keeping the family meal a reality, even on busy weeknights.
Follow her on Twitter @TakeBackTablesEnjoy!
April 6, 2012
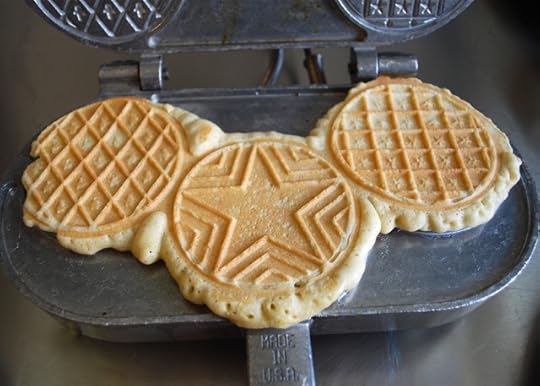
Make Pizzelles!
A pizzelle is an Italian wafer cookie that's usually flavored with anise, like many Italian cookies. Pizzelles can be eaten with a cup of coffee or tea, smeared with jam, dipped in chocolate, or sandwiched around a scoop of ice cream to make a crisp and light ice cream sandwich.
I just got a pizzelle maker so I've been making them non-stop. It's so fun! I got a great old-fashioned machine that plugs in and heats up in about fifteen minutes. Here's a pizzelle maker that Rachael recommends.
You can flavor the pizzelle batter with whatever you like. Try vanilla extract, orange flower water, cocoa powder, ground cardamom, cinnamon, anise, or almond extract. Go easy on flavoring, because a little goes a long way.
Here's a simple recipe for pizzelles that are not too sweet, and have no added flavoring. Try one of the flavor ideas above, or come up something new. I recommend starting with half a teaspoon of an extract, and/or a teaspoon of a dried spice. Make a few pizzelles and see what you think of the flavor, you can always add more to the batter.
I got 28 pizzelles out of this recipe using a 3-inch sized pizzelle mold. If you use the one that Rachael recommends, which is a little bigger, you'll get somewhere around 20 pizzelles. For crispier pizzelles, substitute vegetable oil for the butter, add 2 more tablespoons flour, and cook them a little longer.
Basic Pizzelle Recipe
Ingredients
2 eggs
1/4 cup sugar
1/4 teaspoon salt
1/4 cup butter, melted
1 cup flour
3/4 teaspoon baking powder
Oil for pizzelle maker
Instructions
Blend all of the ingredients in a blender until smooth, to make a very thick batter. The batter will be very thick.
Heat your pizzelle maker according to the manufacturer's instructions. Brush the hot pizzelle maker with a little oil, and drop the batter onto the pizzelle molds by the tablespoonful. Close the lid and cook for 45 seconds to 2 minutes. Lift the pizzelles off with your fingers or a heat-proof rubber spatula and cool on a plate.
Your pizzelles will have ragged edges. You can leave them with a "rustic' look, or simply trim the excess with scissors.
April 5, 2012
Easter Egg Dyeing - The Easy Way!
There are endless ways to decorate Easter eggs, but here are some basics that make it easy for any member of the family to create beautiful eggs.
First, prepare the eggs. I like to boil mine because it's easier than blowing out the eggs' insides. Plus, the eggs become an instant snack that can be eaten at any time.
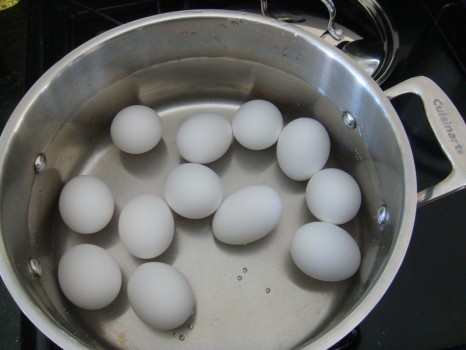
The best way to make hard boiled eggs is to put them in a big pot and cover them with cool water, so the water is about an inch over the eggs. Cover the pot and bring the water to a boil. Once the water is boiling, turn the temperature down to a slow simmer and cook for 15 to 20 minutes covered.
As soon as the eggs are done, submerge them in cold water so the yolks don't become discolored.
I like to dry the eggs on a towel and place them back into the carton. That way, I can put them in the refrigerator while preparing the dyes.
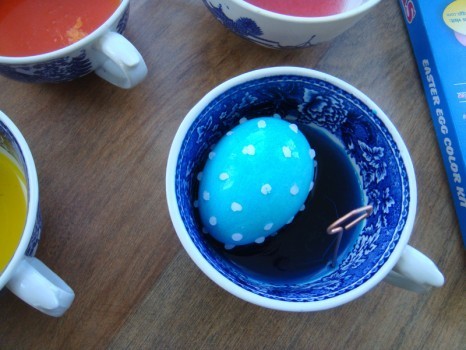
Use any Easter egg dye you like and prepare the dyes according to the package instructions.
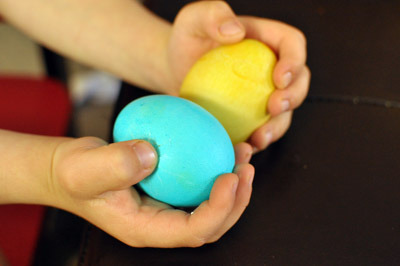
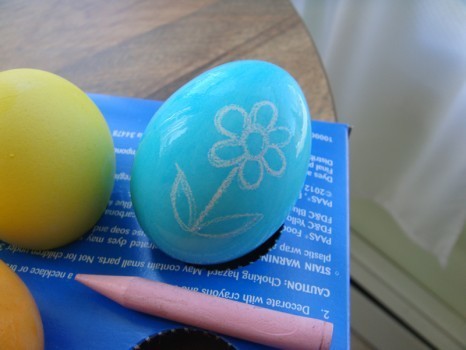
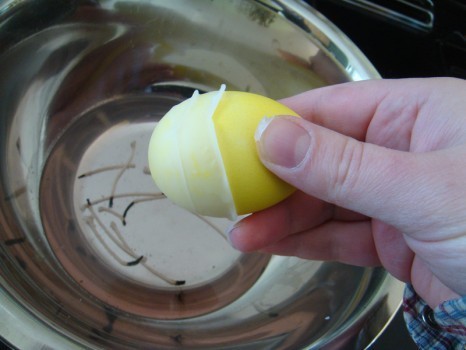
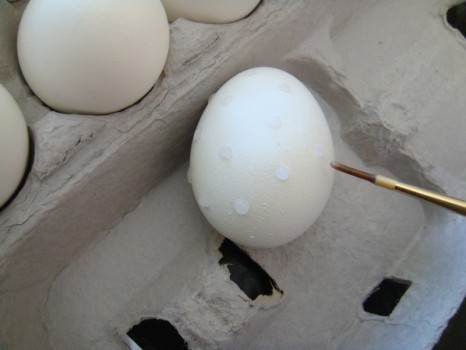
An easy way to embellish the eggs is to draw a design using a wax crayon. Drop the egg in the dye. The wax will displace the dye and reveal the design. This works best when using a light colored crayon and a dark dye.
You can also use melted wax to create designs. Melt a bunch of used candle stumps in a double boiler.
Dip the egg into the wax, or apply the wax with a brush.
Then dye your egg. The wax can be removed by placing the eggs in a 250-degree oven for a few minutes and then wiping the wet wax with a cloth.
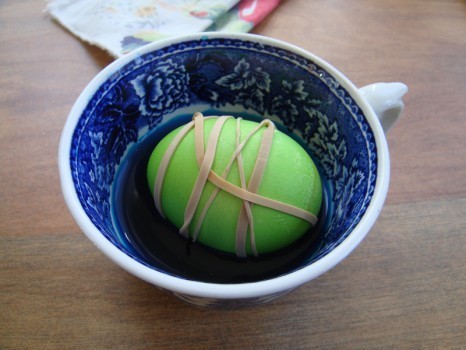
Wrap a rubber band around an already dyed egg and then place in another color dye.
This works best when the original dye is lighter than the second dye.
For a multi-colored egg, just dip the ends in dye. Then, dye the whole thing in a lighter color.
If you want to get really fancy, use tissue paper and decoupage glue or acrylic gel medium to decorate your eggs. Just cut or tear the paper into any shape and paint the glue or medium on top. Keep in mind, you may not be able to eat these eggs because the dyes in the paper or glue may be toxic. However, if you make the effort to blow the insides of the egg out, this is a great technique.
While your eggs are drying, make an easy bird's nest to display them in.
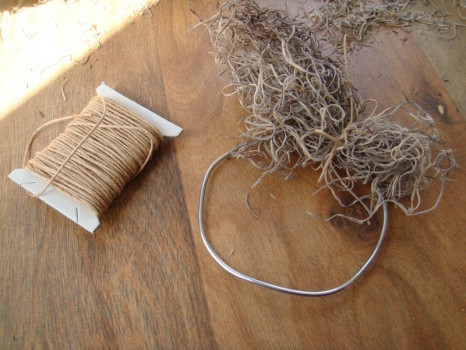
Make a small loop using any wire.
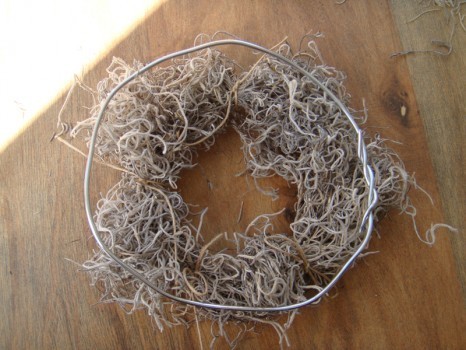
Wrap Spanish moss around the wire using a natural string like jute. The moss clumps together, so you only need to tie it in a few places.
Once the wire is covered, make another wire loop a little bigger than the first one.
Follow the same procedure, but leave the ends of the string long, so the two moss wreaths can be tied together.
Tie the wreaths together, so the smaller one is on the bottom. Then, adjust the moss to hide any exposed wire and fill in the center.
Fill the nest with Easter eggs for a nice centerpiece.
No matter how you decorate them, it's always fun to make Easter eggs. Have a great holiday!
Easter Egg Dying- The Easy Way!
There are endless ways to decorate Easter eggs, but here are some basics that make it easy for any member of the family to create beautiful eggs.
First, prepare the eggs. I like to boil mine because it's easier than blowing out the eggs' insides. Plus, the eggs become an instant snack that can be eaten at any time.
The best way to make hard boiled eggs is to put them in a big pot and cover them with cool water, so the water is about an inch over the eggs. Cover the pot and bring the water to a boil. Once the water is boiling, turn the temperature down to a slow simmer and cook for 15 to 20 minutes covered.
As soon as the eggs are done, submerge them in cold water so the yolks don't become discolored.
I like to dry the eggs on a towel and place them back into the carton. That way, I can put them in the refrigerator while preparing the dyes.
Use any Easter egg dye you like and prepare the dyes according to the package instructions.
An easy way to embellish the eggs is to draw a design using a wax crayon. Drop the egg in the dye. The wax will displace the dye and reveal the design. This works best when using a light colored crayon and a dark dye.
You can also use melted wax to create designs. Melt a bunch of used candle stumps in a double boiler.
Dip the egg into the wax, or apply the wax with a brush.
Then dye your egg. The wax can be removed by placing the eggs in a 250-degree oven for a few minutes and then wiping the wet wax with a cloth.
Wrap a rubber band around an already dyed egg and then place in another color dye.
This works best when the original dye is lighter than the second dye.
For a multi-colored egg, just dip the ends in dye. Then, dye the whole thing in a lighter color.
If you want to get really fancy, use tissue paper and decoupage glue or acrylic gel medium to decorate your eggs. Just cut or tear the paper into any shape and paint the glue or medium on top. Keep in mind, you may not be able to eat these eggs because the dyes in the paper or glue may be toxic. However, if you make the effort to blow the insides of the egg out, this is a great technique.
While your eggs are drying, make an easy bird's nest to display them in.
Make a small loop using any wire.
Wrap Spanish moss around the wire using a natural string like jute. The moss clumps together, so you only need to tie it in a few places.
Once the wire is covered, make another wire loop a little bigger than the first one.
Follow the same procedure, but leave the ends of the string long, so the two moss wreaths can be tied together.
Tie the wreaths together, so the smaller one is on the bottom. Then, adjust the moss to hide any exposed wire and fill in the center.
Fill the nest with Easter eggs for a nice centerpiece.
No matter how you decorate them, it's always fun to make Easter eggs. Have a great holiday!
Rachael Ray partners with the ASPCA to help homeless pets!
Exciting news - Earlier this year we told you that Rachael Ray and the ASPCA have partnered together for the 2012 ASPCA Rachael Ray $100K Challenge!
The $100K Challenge is a groundbreaking competition that inspires animal shelters across the country to get more cats and dogs out of shelters and into the loving homes they deserve.
Watch Rachael's video and learn more about the $100K Challenge, and how you can help!
You can vote once a day for your favorite shelter at http://www.votetosavelives.org
About 20 Minutes North of Chicago
Half the fun of discovering a new restaurant is sharing it with people you know will enjoy it. As Rachael Ray's resident restaurant guru, here's an inside look at what I report back to Rach about some of my favorite restaurant finds and food experiences!
From: Kappy
To: RR
Sent: Wednesday, January 18, 2012 8:10pm
Subject: 2nd Street Bistro in Highland Park, IL
Hey RR - I went to high school with this guy Michael Gottlieb and now he's the chef at a new'ish restaurant in Highland Park, a suburb just north of Chicago. I haven't seen him in a while but people seem to be digging his food (not to mention the no corkage fee) at his new BYOB spot, so I stopped in a few weeks back with Katy and another friend and tried a bunch of dishes on the menu. He served us a fantastic Crispy Pork Belly with Cranberry Sauce, shallot marmalade and some local turnips- then brought out a taste of a Cauliflower Soup with truffle oil that he's known for.  I was kind of over the Brussels sprouts craze this past fall/winter, but his version looked so good that we tried them: Shaved Brussels Sprouts with Golden Raisin Vinaigrette (pictured above). Good call on our part - they were pretty darn good! We snacked on some Shrimp and Corn Fritters (good) and a pot of mussels (excellent). Katy had a unique Quinoa Pasta, made from quinoa flour. I'd never seen it before, but it was pretty tasty - he served it with an herb pesto. Meanwhile, I had a thick cut skirt steak with mashed potatoes that was awesome. We capped off the meal with Pretzel Bread Pudding and the Chocolate Cremeux with Caramelized Banana - we should have saved more room for dessert!

2nd Street Bistro
1825 2nd Street
Highland Park, IL 60035
(847) 433-3400
www.2ndstreetbistrohp.com
And that's what's on my plate!
- Kappy
Andrew "Kappy" Kaplan loves food. A professionally trained chef, by day he runs Yum-o!, Rachael Ray's charity focused on kids and cooking, and keeps special projects running smoothly for her. By night he hops course to course, place to place, all across the country. He's Rach's own personal dining guide! You can also follow Kappy on Twitter to see what's On Kappy's Plate in real-time!
Rachael Ray's Blog
- Rachael Ray's profile
- 296 followers


