Rachael Ray's Blog, page 97
April 27, 2012
Fridge Raider: 5-Minute, 5-Ingredient Feta Dip
I love to entertain. I’ll totally own it. I get such pleasure from opening my home (and a bottle of wine or three) up to great people for a mellow evening in on the couch. Sure dining out at a fancy restaurant is fun, but when was the last time you could do that under your favorite blanket with no shoes on? My point exactly.

Since the backbone of entertaining is to enjoy your company, I think it an essential part of my exercise as “host” to keep the food as fuss-free as possible. Until the much-anticipated day comes when my new dream kitchen is fabulous enough to spend the whole night in, I’d rather be in our comfy living room where all the action is. It goes without saying, then, that I keep a cache of easy-breezy nosh recipes up my sleeve.

One such fave is this amazing 5-minute, 5-ingredient feta dip that frequents my entertaining roster. Plattered up with some crackers or sliced veggies it’s a near-instant crowd pleaser and great way to enjoy cheese in a new way; it also pairs really well with most any wine or cocktail. You can even make it ahead of time (I know, the convenience is jaw-dropping). While my husband & I love the sharp saltiness that feta brings to this dip, if that’s not your thing then try out goat cheese or even cream cheese. Any leftovers even double as a great sandwich spread the next day. Look how much fancier you just got!
5-Minute, 5-Ingredient Feta Dip
1/2 cup honey
4 sprigs thyme, leaves removed and chopped
1/2 teaspoon red pepper flakes (more if you like it spicier)
1 8-ounce block feta, drained if in water, crumbled
2-4 tablespoons heavy cream or half-and-half
In a small pot over medium heat, combine the honey, thyme, and red pepper flakes. Bring the honey up to a boil and then remove from the heat and cover. Let infuse for at least 5 minutes and up to 2 hours.
While the honey is heating up, in the bowl of a food processor combine the feta with 2 tablespoons of the cream or half-and-half. Puree for 30 seconds until very smooth. If the mixture is dry, add some more cream a small splash at a time until it has a whipped, spreadable consistency.
Transfer the feta to a serving bowl and spoon the infused honey over top. Serve with your favorite crackers or sliced veggies.

Patrick W. Decker’s life revolves around food. Always has. Probably always will. As a graduate of The Culinary Institute of America and past member of the culinary team on Rachael’s daytime talk show, he now works as a food stylist and producer in NYC by day, and a food writer and recipe developer at his home in New York’s Hudson Valley by night. You can see what he’s up to by following his latest twEATs on Twitter at@patrickwdecker or visiting his website at patrickwdecker.com.
April 25, 2012
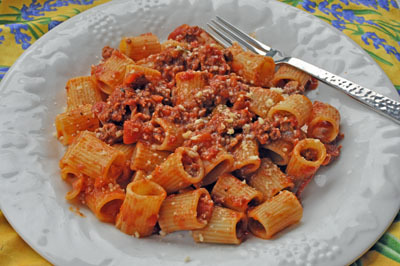
Stretch A Buck And Feed Your Family Well: Chock Full-O-Veggies Beef Bolognese
I’m a mama of two boys ages three and one and I’m just starting to see glimpses of just how much boys eat. It’s only just the beginning, I know, but I can definitely see where this is heading and I am definitely a little afraid. Feeding a growing family can be costly, especially if you want to add more organics to your diet. Not many of us can afford to buy everything organic but I try and pick and choose what’s most important and buy what I can.
One of the things I always try to buy organic is ground beef. We don’t eat much red meat in our house so when we do, we splurge in this area and go for the organic from places like Trader Joe’s who have good prices on organic meats. On top of that I try and cut costs by preparing it in a way that stretches my meat and my dollar at the same time and one of my favorite ways to do this is with Bolognese. With just 1 pound of ground beef I can feed my family of four plus, have extras to freeze for another night’s meal. So, in a sense I’m getting two meals out of one pound of beef and (even cooler) out of one dinner preparation.
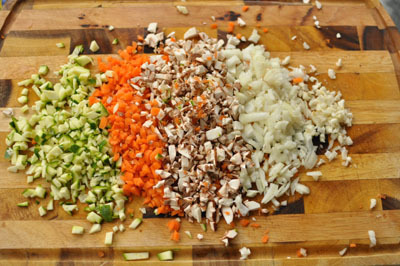
Bolognese all on it’s own is a great way to make ground beef (or chicken or turkey) go a long way, but what I also like to do is add in a ton of finely chopped fresh veggies to my sauce. This not only makes it more filling, but also ups the nutritional value (more veggies into the kids—yay!). I love that it’s a one dish meal that provides my family with carbs, protein and veggies in one deliciously—easy and affordable meal. The leftover sauce freezes beautifully and is a saving grace sitting in my freezer for those nights when I just don’t feel like cooking. The beauty of this dish is that it can be made with any ground meat and veggies you have on hand. And even cooler it’s FAST! After you chop the veggies, the sauce comes together in literally the same time it takes to boil water and cook your pasta.
Heads Up Vegetarians!!: Swap out the ground beef for your favorite veggie crumble/meat substitute or just use all veggies and still have one rockin’ meal. All you have to do is finely chop 3-4 cups of your favorite veggies and follow the recipe as written.
Chock Full-O-Veggies Beef Bolognese
Serves 6
Ingredients:
2 tablespoons olive oil
1 small zucchini, finely chopped
1 small onion, finely chopped
1 medium carrot, finely chopped
3 mushrooms, finely chopped
2 cloves garlic, minced
2 tablespoons tomato paste
1 lb ground beef
1/2 teaspoon salt
1/2 teaspoon black pepper
1 (15 ounce) can crushed tomatoes
1 lb mezzi rigatoni or your favorite cut of pasta
Instructions:
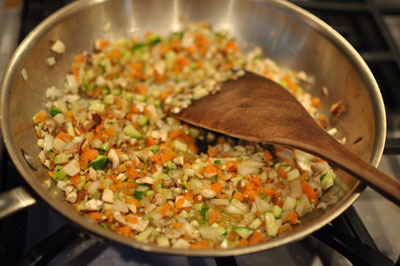
1. Heat olive oil in a large skillet over medium heat. Add in zucchini, onion, carrot, mushrooms and garlic. Sauté until vegetables begin to get soft, about 5 minutes.
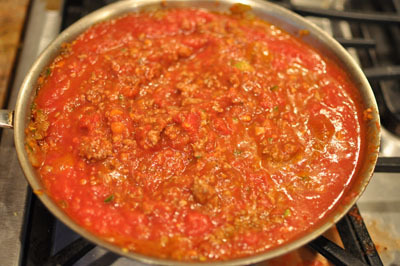
Stir in tomato paste. Add the ground beef and use a wooden spoon to break it up. Cook beef about 6-8 minutes or until it begins to brown.
Season with salt and pepper and stir in tomato sauce. Reduce heat to low and allow sauce to simmer for 10-12 minutes while pasta is cooking.
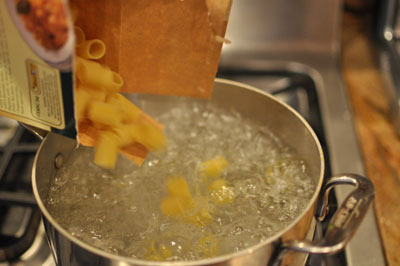
Bring a large pot of salted water to a boil. Cook pasta until al dente, approximately 8 minutes or according to your package directions. Drain pasta and toss with 2-3 cups of the sauce. Freeze the remaining sauce in an airtight container for up to three months.
Christina Stanley-Salerno is a mama, recipe developer, food stylist, photographer and blogger atTakeBackYourTable.com. She loves cooking for and with her family. Life is hectic, but Christina is passionate about mealtime because she believes that family meals are the glue that holds everyone together. Creating simple, quick and healthy meals is her specialty and her trick to keeping the family meal a reality, even on busy weeknights.
Follow her on Twitter @TakeBackTables
Manchurian Cauliflower
Please don’t look at the word cauliflower and turn your nose up. Come on, that’s just not fair. Just because you had a jaded childhood with this member of the Brassica Oleracea family, it doesn’t mean you should give up on it!
We eat a lot of cauliflower at our house, perhaps even once a week. It is either sauteed, broiled or flash fried. Thankfully these prepping methods take care of that sulfurous contribution this flower otherwise makes (ironic that this should be called a flower at all).
One of my favorite ways to serve cauliflower is a la ‘Manchurian’. Manchuria is in in North East China, but it is suffice to say that more people reference its name in India than anywhere else in the world (including China). Manchurian cuisine is very popular in India and perhaps, deviating from Manchurian ways, it is in fact the Indian spin on Chinese food. The dishes will sound familiar to the layman, but the flavors are kissed by the omnipresence of a tantric culture. Noodles, chicken, vegetables all have the same common denominator - a ton of spice, a generous hit of acid and an element of sweetness.
Some people even go as far as adding spices that are specific to Indian cuisine, such as cumin, coriander seeds and garam masala. Personally, I draw the line at that point as it kills any hint of Manchuria left in the dish and all you are left with is ‘confused-Desi’ (A.K.A. Indian) food.
Manchurian cauliflower is part of every Indo-Chinese menu and it is always summoned to the table. Once you have tried this dish, the reasons for its popularity will become abundantly clear. It is crisp, sticky, sweet and very spicy and will leave your palate yearning for more. Despite the heat, even kids enjoy this dish and you may at the very least succeed in altering their relationship to this veggie.
Crunchy florets of cauliflower tossed in a zesty sauce and finished with a sprinkle of more chili, cilantro and scallions, works really well as an appetizer or an entrée.
Manchurian Cauliflower
Ingredients
1 head of cauliflower, broken in to florets
3 eggs
¾ cup of corn starch and 1 tsp. salt for seasoning
1 tsp. ground ginger
1 tsp. ground garlic
1 cup ketchup
1 tbsp. sriracha or cayenne pepper to taste
1 tbsp. vinegar
1 onion, rough large dice
3 garlic cloves, roughly chopped
1 tbsp. ginger, chunkily chopped
Canola oil for frying
1 large red chili, finely sliced
Handful of cilantro
Salt and pepper to taste
Method
1) Heat a heavy bottomed pan with 4″ of oil to reach a temperature of 350 degrees
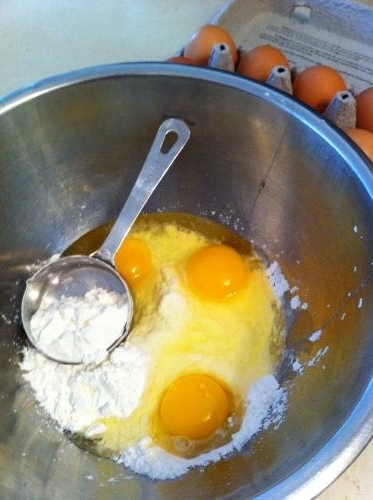
2) Batter: Combine the eggs, flour, salt, pepper, ground ginger and garlic
3) Coat the cauliflower in the batter and fry in batches in the hot oil
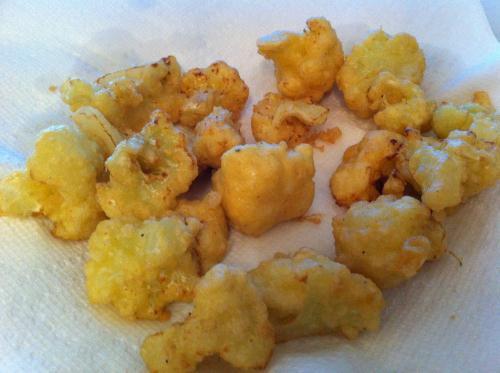
4) Drain on paper towels
5) Sauce: In a separate pan, sauté the onion, ginger and garlic pieces. Once onions begin to soften (a couple of minutes), add the ketchup, cayenne or sriracha, vinegar and season with salt and pepper. After a few minutes, the sauce will begin to thicken.
6) Toss cauliflower in sauce and serve hot garnished with sliced red chili and cilantro
To make this dish ahead of time, fry the cauliflower and make the sauce - store separately. Reheat cauliflower in the oven and toss in the reheated sauce once hot.
Saira Malhotra is a classically trained French chef and graduate from the French Culinary Institute. A British born Punjabi, Saira has grown up around food with her family pizza business where she helped spreading tomato sauce and smuggling cheese for her own little stash. Having studied in France and Italy and living in the Big Apple for the past 12 years, Saira has brought her European, Asian and American influences together via the palate and communicated through her food blog: www.passportpantry.com
Back by popular demand - the perfect hard boiled egg
Hi Rachael -
Thank you for your tv show. Please teach me how to make successful hard boiled eggs with shells that don’t stick to the eggs.
Once again thank you,
Emerald Lee
Dear Emerald -
We get asked this question a lot - here you go!
1. Place the eggs in a pot, cover with water and bring to full boil.
2. Turn off the heat, cover the pot and let stand for 10 minutes.
3. Drain, then crack the eggs by shaking the pot and running them under cold water until cool enough to handle.
4. Peel the eggs and enjoy!
Here are some of Rach’s favorite hard boiled egg recipes:
April 24, 2012
Hallway overrun with shoes? Shoe clutter solutions.
Shoes shoes shoes. When I walk into my house I am often greeted by a pile - or sea- of shoes. Amazingly, this doesn’t seem to bother the other four humans (or two dogs) with whom I share my home. Grrrr. And not shoes lined up neatly but here a shoe, there a shoe. Upside down, separated from their mates, blocking the stairs. Sound familiar? A custom-built mud room with a locker or cubby for each family member (a girl can dream, right), would be nice, and I have whiled away many an hour on Pinterest drooling over mudrooms nicer than the finest room in my house. Someday. Sigh.
In the meantime, here are some real world solutions to cut down on shoe clutter:
Shoe rack. I ordered this inexpensive shoe rack from Amazon this fall (above) and it has helped a bit. It is basically one shelf but you can also put shoes underneath and up top so essentially three rows of shoes/boots. I seem to be the only one who uses it, but the price was right and it has helped to tidy my back hall.
Bins for each family member. I have heard of people placing a bin for each family member near the door way, and all personal items - shoes, mittens, hats, etc., are placed in them - and periodically emptied.
Shoe basket. One big shoe basket works as well (if you have a big family, make that a huge shoe basket). This is also handy when you are having company - you can just pick up one big basket and hide it in a closet. If you are a no-shoes-in-the-house family, you can also leave a basket of slippers by the door so family members can take off outdoor shoes and “slip” into something more comfy.
Organize shoes in bedroom closets too. A key to controlling this downstairs clutter is to encourage all family members to move their shoes upstairs to their respective rooms. All of our bedroom closets have the over-the-closet-door shoe pocket organizers that work well and free up closet space too. I also use the pockets for scarves and belts.
Cut down on shoes in the rotation and in general. How many times have you come across flip flops in your in-season shoe area in the middle of winter? If you are vigilant in cleaning out shoes by season - and in those not worn or too worn out to wear - clutter automatically takes a hit. One or two pairs of shoes tops per family member per season for everyday wear is doable.
April 23, 2012
Learning to Like…Liver
Recently my doctor told me that my iron count is low, and that it was time to do something about it. She said that I could either take iron pills, which have the unpleasant side effect of making one “stopped up,” or I could start eating liver. Being an adventurous eater, I chose the latter.
There are many iron-rich foods, including leafy greens, beans, and shellfish, but liver is in a class by itself. Eating a 3.5-ounce portion (that’s less than half a cup, or a little less than 1/4-pound) gives you 70 percent of the necessary iron intake for one day. For women, who are a lot more at risk of iron deficiency than men, this is good news.
At my pricey neighborhood butcher shop, that sells only locally raised, hormone-free meat, I noticed that the cost of chicken liver is only $2.50 per pound. That’s much less than the other meats. I guess it’s because it’s not very popular, but it sure is affordable! I asked my butcher for advice on how to prepare it, and he said that garlic and cumin work wonders with liver.
I bought my 1/4-pound of liver and tried not to look at it too closely. I whipped up a marinade of minced garlic, ground cumin, and olive oil, tossed the liver in this delicious smelling concoction along with a dash of salt, and stuck it in the refrigerator to soak up flavor overnight.
The next day, I seared it in a hot pan in a little canola oil, for just a few minutes on each side. You don’t want to overcook liver or the texture can turn tough. It should still be a little pink on the inside when you finish cooking. I tucked the liver into flatbread, seasoned it with salt and pepper and drenched it in lemon juice, and stuffed the little sandwich with fresh herbs. Notice how I tried hard to disguise the flavor and texture? Well, it worked! Actually it was really tasty, and I can’t wait to eat it again. I think I’m well on my way to upping my iron level.
Pan Seared Chicken Liver with Cumin and Garlic
Makes 1-2 servings
Ingredients
2 cloves garlic
2 teaspoons ground cumin
1 tablespoon olive oil, plus extra
1/4 lb liver
2 tablespoons canola oil
Flatbread
1 bunch fresh herbs like basil, parsley, or cilantro, washed and stemmed
1 lemon, quartered
Salt and pepper
Instructions
Mince the garlic with 1 teaspoon salt. In a medium-sized bowl, mix the garlic with the cumin, 1 tablespoon of the olive oil, and a few grinds of black pepper. Add the liver and stir to coat. Cover and marinate in the refrigerator for 12-24 hours.
Heat a skillet over high heat, and brush lightly with canola oil. Place the liver in the hot skillet, and season generously with salt and pepper. Cook for 3-4 minutes on each side, until the outside is lightly browned but the meat is pink on the inside.
Tear off a piece of bread and stuff it with fresh herbs. Place a couple of pieces of warm liver on the herbs, and squeeze the lemon juice over the top. Drizzle with olive oil. Season with more salt and pepper. Fold and eat.
It’s Spring, and Time For A Grilled Breakfast “Banh Meat” Sandwich
After a long and cloudy winter, spring has broken across my Alphabet City neighborhood and granted me the gorgeous morning I had been waiting so long for. It was bright and clear and when I woke up I knew that the first thing I wanted to do was to befoul it with smoke.
Now don’t get me wrong. I wasn’t polluting out of sheer perversity. My carbon footprint was child-sized, and temporary at best. I just wanted to start grilling.
Of course, in the morning, you are limited as to what you can make. It’s too early for hamburgers, and barbecue burritos take far to long to cook; by the time they were done it would be lunch, and that would mean hamburgers. No, the only thing for it was to make a Breakfast Ban-Meat. What is a ban meat, you ask? Obviously, it’s a banh mi but with a lot more meat. In this case, breakfast meats.
I walked across the street to my unimaginably crappy C-Town supermarket, and took stock of what they had by way of banh mi fillings. Cilantro, no; daikon, no? Pork pate - well, yes, they had that in the form of Underwood Deviled Ham, and I grabbed it at the last moment. And while I was in that aisle, I grabbed some Spam, as well. But you need a lot of meats for a job like this, so I also got bacon, Brown n Serve sausage, and some Hebrew National beef salami. Some butter, some eggs, a package of Kraft Deli Deluxe American cheese and a long french bread later, and I had all I needed for my first grill of spring.
One thing I didn’t bring, though, was a heavy coarse brush of the kind that regular people use to clean their grills with. Mine, predictcably, had been left uncleaned after the last boozy barbecue of fall, and, having never had any actual grilling tools of my own to speak of, I had no choice but to just attempt to burn off the gunk, hitting the grill like a blacksmith banging his anvil. When the fire was hot enough, I put on a heavy pan, melted some butter in it, and pressed the split french bread in it. I then put the pan aside, grilled the bread, and cooked some scrambled eggs in the butter. When they were halfway done, I moved the pan onto the roof ledge; the pan’s residual heat was used up in cooking them, and what was left after that kept them warm. Then the spam, sausage, and salami, dry meats that don’t flare up; and lastly, bacon, because it does. I laid a base of grilled spam slices across the bottom, the followed with a layer of cheese, sausages, eggs, bacon, more cheese, and some deviled ham on top. Just because you can’t have too much meat in a bahn meat.
Grilling season is back!
Bridal shower for 30 at home? No problem with these make ahead recipes.
I have offered to host a bridal shower for my sister at my house and I would like to have a casual lunch on a Saturday or Sunday, but I don’t want to spend the whole time in the kitchen. Plus, I’m on budget. Do you have any recipes that are economical, you can make ahead, and that feed a crowd of 30 or so? Oh, and they should taste good too:-).
Thanks!
Cindy S.
Dear Cindy S.:
You are absolutely right, the last thing you want to be doing when you are hosting a party is to spend time away from your guests, plus you end up missing out on most of the fun. Here are three salad recipes sure to please, all of which can be made the night before - you can prep the chopped salad and dressing the night before but will have to assemble just prior to serving. No need for a fussy dessert - make a few easy yet classic cookie recipes the afternoon before (you can even make and freeze the cookies up to two weeks before - just pull them out of the freezer to defrost that morning) to pass some assorted cookie trays (we like chocolate chip cookies, lace cookies, and lemon squares - recipes below), and warm up some store-bought Naan bread and you’re in business. Good luck!
Sweet and Spicy Black Bean Salad (from Simply Classic: The Junior League of Seattle cookbook)
serves 30 as a side
Ingredients:
(6) 15-ounce cans black beans, drained and rinsed
4 1/2 cups corn, fresh or frozen, thawed
3 cups celery, diced
3 red peppers, diced
3 fresh jalapeno peppers, seeded and minced
1 1/2 cups fresh cilantro, minced
For the dressing:
1/2 cup fresh lime juice
1/2 cup canola oil
4 tablespoons brown sugar
2 tablespoons Dijon mustard
1 teaspoon kosher salt (plus more to taste)
1 teaspoon pepper (plus more to taste)
Directions:
For the dressing:
Combine lime juice through pepper in a jar with a lid and shake until well-blended. Set aside.
For the salad:
Mix beans through cilantro in a shallow bowl. Reserve 1/4 cup of the dressing. Pour remaining dressing over bean mixture and toss to coat. Add salt and pepper as needed. Cover and chill at least one hour and up to one day. Remove from refrigerator 30 minutes prior to serving and taste again for seasonings - add more salt and pepper if needed. Add remaining dressing if needed.
Couscous Chicken Salad (from Simply Classic: The Junior League of Seattle cookbook)
Serves 30 as a side dish
Ingredients:
12 boneless, skinless chicken breasts, cooked and cut into bite-sized pieces
8 cups chicken stock
4 cups couscous
2 tomatoes, chopped
6 scallions, thinly sliced
(2) 15-ounce cans garbanzo beans, drained
1 red pepper, diced
1 yellow pepper, diced
1 cup dried currants
1/2 cup parsley, minced
For the dressing:
1 cup fresh lemon juice
3/4 cup olive oil
3 cloves garlic, minced
1 teaspoon cumin
1/2 teaspoon curry powder
1/2 teaspoon Tabasco
salt and pepper
1 cup toasted pine nuts or nuts of your choice (I actually used pistachios because the pine nuts were too expensive)
Directions:
Cook couscous according to package directions, using chicken stock instead of water for the cooking liquid. At end of cooking time, fluff couscous with a fork and spread couscous on a baking sheet to cool. Place chopped chicken in a bowl with tomato through parsley. For the dressing, place lemon juice through tabasco in a jar and shake to blend. Season with salt and pepper.
Add dressing to couscous mixture and toss well - don’t pour it all on at once but dress to your liking - you will have dressing left over. Refrigerate at least one hour and up to one day. When ready to serve, take salad out of fridge 30 minutes to one hour prior to serving. Recheck for seasonings and dressing, and sprinkle with nuts just prior to serving.
Chop Chop Salad (from Simply Classic: The Junior League of Seattle cookbook)
Serves 30 as a side dish
Ingredients:
3 hearts of romaine lettuce, chopped
10 plum tomatoes, seeded and chopped
1 red pepper, chopped
1 yellow pepper, chopped
2 cups each diced salami, mozzarella cheese, and smoked turkey breast
2 cups canned garbanzo beans, drained and rinsed
1 cup scallions, thinly sliced
For the dressing:
1 cup red wine vinegar
4 tablespoons fresh lemon juice
2 tablespoons Dijon mustard
6 cloves minced garlic
4 teaspoons dried oregano
2 teaspoons pepper
1 teaspoon Kosher salt
1 teaspoon sugar
3/4 cup olive oil
Directions:
Make the dressing: Place vinegar through sugar in a blender or food processor and blend for 30 seconds. Slowly drizzle in olive oil, blending until emulsified. Set dressing aside.
Combine salad ingredients in a large bowl (or bowls) and toss to mix. Toss with dressing to taste just prior to serving. Serve immediately.
A Sicilian feast
I had the pleasure of having some friends over for dinner on Sunday afternoon. This included three professional chefs and one food writer, plus their partners, my boyfriend and my children. Two of the chefs and the writer are meat experts and the other chef is a pastry chef. I thought about all of these recipes I had been wanting to try, but then realized that I might mess up if I tried something new, offend them because it was mundane, or worse, what if I accidentally chose a recipe that I learned from them?
I decided the only thing I could do is to cook what I know-the food of my people. I grabbed my boyfriend, a fellow Sicilian, and we set off for Arthur Ave in the Bronx to get some of the freshest ingredients that I would use for my recipes.
When Sunday came, I greeted people with La Tavola Siciliana! This spread was like nothing I’ve ever seen before. I really worked hard to create an impressive array of authentic appetizers.Here’s what I made:
Bacalao
Three days before, I started soaking the salt cod in water (or milk) and I changed the water twice a day. Saturday night, I drained the fish and put it in a heavy pot, covered it with water and let it simmer for an hour to get soft, yet firm. Then I let it cool and dry while I started on the onions I sauteed 2 chopped white and red onions until they became soft. I then added about 3/4 cup of black Sicilian olives (not kalamatas) and 1 6 or 7 ounce can of tomato paste. I stirred that for a while and then, using the empty paste can, I filled it three times with water and added it to the onions. I let that simmer while meanwhile I dredged the fish in flour and fried it in a pan until lightly browned on all sides. I added the fish to the onion mix and let the whole thing simmer for another 30-45 minutes, stirring now and again. I broke up the fish into small pieces with a wooden spoon so no one would get a huge mouthful. I added fresh oregano and parsley, but that dish was done and ready to wait overnight. Thoughts for next time-adding Pimenton?
Caponata
How could I not make Caponata? I did and it was delish. My way is different than most-I do not use sugar or vinegar or raisins. I chop the eggplant into small cubes and let sit in a colander, sprinkled with salt, for about 1/2 hour or so.
When ready, I saute the eggplant in olive oil for a good long while, until really cooked through. This takes me around 20 minutes or so. Meanwhile, in another large pot, I saute chopped onions, garlic and celery and let cook until soft. I add a can of chopped tomatoes, or I chop fresh ones if I have them. I let this all cook for a while then I add the eggplant, about 3/4 of a cup of chopped green olives and about 1/4-1/2 cup of capers, rinsed clean. I let this cook for another 15 minutes and adjust my salt, pepper, basil, oregano seasonings. I then usually toast some pignoli and fold in, but I had just toasted some almonds so I topped the Caponata with those instead.
On Arthur, I had bought some fresh ricotta cheese from Calandra’s Cheese so I put that out in a dish with just a drizzle of raw honey, salt and pepper. Of course I had to get a ball of fresh mozz from Casa della Mozzarella, a pinch of heaven on earth (I have to try my hand at making both of these cheeses).
Panelle
Rather than just serving bread, I thought I’d serve panelle and let people spread the Bacalao, the fresh ricotta and/or the Caponata on it. This was so easy, I don’t know why I don’t do it more. On the streets of Palermo, and at Ferdinando’s in Brooklyn, they serve this sandwiched inside of bread. The possibilities are endless and what a great source of vegetarian protein!
I took 1 1/2 cups of chick pea flour and whisked it in a pan with 2 cups of water (I think I’ll try stock next time). You whisk steadily so there are no lumps, until it pulls away from the pan and is pretty thick and pasty. It’s almost like making quick cooking polenta. You then spread it while it’s hot into a pan to let it cool. Once cool. cut into squares and fry in olive oil. Sprinkle with salt and pepper and let it brown nicely but don’t burn it or it will dry out. You could throw some freshly chopped parsley on it when it is done.
Olive Salad
In my family, no table is complete without the Olive Salad. It couldn’t be easier. I chop Sicilian green olives in half (make sure you remove the pits) and toss in a bowl with chopped celery stalks (with leaves) and sliced red onion. Toss with olive oil and lemon juice, salt, pepper and fresh oregano. Easy and delish!
I’m skipping the amazing breads, cheeses and dried sausages we had, because you can imagine what those look like and I didn’t prepare any of it, although it does make a table look that much more full. I served Grana Padano and Pecorino cheeses alongside a sweet and a hot dried sausage. I also served pickled artichokes, which I bought, but I could have easily made myself. To round it out, I served two kinds of anchovies-one in vinegar and one in oil, both delicious.
For the main course, I made Sauce. Not my classic tomato and meatball sauce, but this time I decided, given all of the other food, that I would just stick pork ribs, beef ribs and braciole into the sauce and let it simmer for hours. This would mean less work for me and less overkill on meat. I knew my friend Seamus was bringing Iberico Ribs for us all to try. So what I did was start with a normal sauce base-saute onions and garlic and added both kinds of ribs which I had browned separately. Then I added jars (or cans if you don’t jar your tomatoes) of chopped or crushed tomatoes, about a cup of red wine, 2 cups of chicken stock, until the sauce covered the ribs completely. I added crushed red pepper, salt and pepper and tons of basil and garlic and let simmer for a few hours. Meanwhile I made the braciole. I mixed in a bowl toasted pignoli, chopped garlic, onion, breadcrumbs, grated parmigiano reggiano cheese, fresh herbs and chopped kale. I sauteed this all until the crumbs were toasted and the kale was soft. I rolled this up inside the braciole meat and secured it with toothpicks. I browned this all over and stuck it in the sauce too. After about 5 hours, the sauce was done. When I served it, I had first made a batch of Severino rigatoni and tossed it in a bowl with the leftover fresh ricotta and the hot sauce. The meat was pulled out of the sauce and served separately on a big platter, Sunday style. Here’s a good recipe from Rach for Braciole and sauce, which is similar.
But first….those Iberico Ribs.
The Iberian Pig, which can only be found in Spain and Portugal, eats an acorn-only diet and roams free so the meat is absolutely met-in-your-mouth delicious! All we did was salt and pepper them and grill them over natural coals. Wow, amazing!
Once we polished those off, I served the sauce, which was delicious, but in a Sunday sauce kinda way. To be honest, I missed the meatballs. Never again. I don’t think the sauce was as good, and I love a good meatball (who doesn’t?). Of course I served this with Broccoli Rabe, sauteed with garlic and red pepper flakes.
To finish it off, I made a cherry pie and a lemon icebox pie. My friend Heather, a pastry chef, made an Almond Torte, which was off the hook! I had to serve Torroni, because what table would be complete without it (even though I think this is a Napoletano dessert). I am a sucker for this soft nougat.
Two notes on the pies-to experiment with the Cherry Pie I did a few things. First, I used half cherries and half blueberries. I added cinnamon, lemon zest and vanilla. I also added a few sprigs of fresh mint, chopped. It was really a good combo of flavors. If I had almond extract in the house, I would have tried that too.To learn how to make the Ice Box Pie, read a previous post of mine. It is so good. This time I brought the lemon juice down to just over a cup and I thought it was perfect.
As you can see, I took a break from my diet. However, much of what I put on the table was healthy. I think a balance is key-if you are going to serve lots of meats and cheeses, have tons of veggies, olives, nuts and other choices so people don’t feel they are just eating heavy food all day long. In the end, with the copious amounts of wine we drank, the meal was a success and I think I impressed even my professional friends as they were happy to have a seat at the table with great company. If one or two things were off, they didn’t complain, they seemed perfectly content to take the night off for once. Bravo!
Rosemary Maggiore is our Last Minute Lady. A single mom of two kids plus a full time job (she runs this website!) keep her busy and usually pushing things to the last minute. Somehow she manages to keep her cool and her sanity while she enjoys good food, wine, friends and most importantly, family.
For more Ro, see:
Follow me on Twitter at @lastminutelady
April 20, 2012
Make Your Own Curtain Rods
I have a closet without a door, so I thought it might be nice to make a curtain in lieu of a door. I figured a large panel of fabric might add more interest to the small bedroom versus having a wooden or mirrored door because fabric comes in so many colors and patterns. The problem I was having: I couldn’t find a curtain rod I really liked. The fancy, expensive ones were too big and clunky, and the cheap ones didn’t have the styling I wanted. I decided to take matters into my own hands and just make one myself.
Materials:
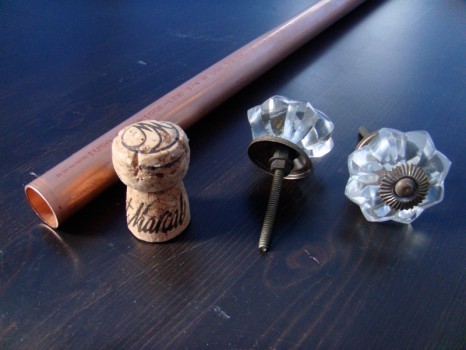
3/4″ copper pipe long enough to span the doorway plus molding (mine was just under 5′)
2 drawer pulls
2 champagne corks
Utility knife
Mallet
Drill
Copper pipe isn’t cheap (mine was around $4 per foot), so this isn’t necessarily a project that helps to save money. Between the pipe, the drawer pulls and the brackets I spent about $30 (and that doesn’t include the two bottles of wine plus the fabric for the curtain), but in the end I had a custom rod that I really liked, so I felt it was worth it.
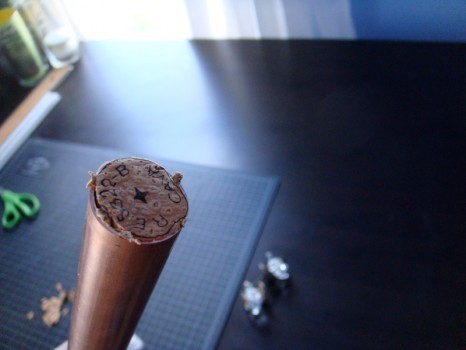
I used champagne corks versus regular wine corks because they were in tact; they didn’t have damage from a cork screw. Plus, they tend to be wider. Using a utility knife, remove the top, rounded part. One of the corks I used fit beautifully. I just jammed it into the end of the pipe and tapped it with a mallet. The cork really needs to be snug, so it’s a good thing when it’s a little difficult to get in the pipe. The other cork I used was way too wide, so I had to shave the sides to make it fit.
Wedge the cork into the pipe so it’s almost flush with the end of the pipe.
Using a really small drill bit (e.g. 1/16″) make a hole in the center of the cork. Screw in the drawer pull. Again, you want it to be snug, so you will have to apply pressure while turning.
Repeat on the other end of the pipe being carful not to damage the drawer pull on the other side.
Attach to the wall with brackets. I couldn’t find copper brackets, so I used brass brackets for a 3/4″ cafe rod. I like the way the two types of metal look together.
I made an easy rod-pocket panel out of some adorable fabric, and now the closet is complete!
Find me on Facebook!
Rachael Ray's Blog
- Rachael Ray's profile
- 296 followers


