Rachael Ray's Blog, page 100
March 23, 2012
Braids, Buns and Bangs!
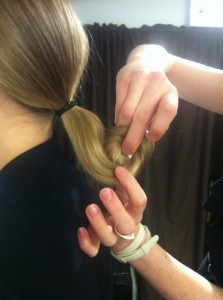
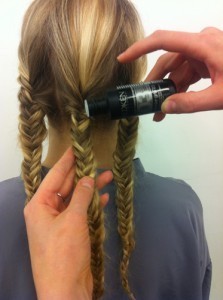
Braids, variations of buns and bangs were the creative thread for fashion week. Here's a step by step on our Tadashi show where we rolled the hair upwards rather than under, the perfect red carpet look and/or an evening of glamor. For Michael Kors we creatively layered braids on top of braids (looking more complicated than it actually was) which worked in unison with their safari collection adding a touch of raw beauty.
TADASHI
Prep the hair with Redken Rootful, create a low side part and blow dry smooth using flat brush.
Secure the hair into a pony tail create a soft bend with medium sized curling iron on the pony tail.
Roll the hair tightly in an upward motion and secure with hair pins.
Opposite the side part, lightly back comb the hair with a brush at the roots creating a disheveled look.
Finish, with Redken Fashion Works hair spray.
MICHAEL KORS
Rough dry the hair with Redken Rootful, create a center part and finish drying, straight or wavy is sufficient.
Starting at the nape of the hair separate the hair into three parts.
Create three individual fish tail braids. A fish tail braid is created by splitting the hair into two sections and taking one small section from outside and overlap it to opposite side. Secure at the bottom and repeat on the other two braids.
Once the braids are secured add Redken Powder Grip into each braid (this will help create a rough secured texture) and lightly loosen the braids with your fingers.
Taking the three fishtail braids create a traditional (three strand) braid and secure at the bottom.
Layer more Redken Powder Grip (if necessary). Finish the look by lightly loosening the braid and roll the ends into itself and pin.
Finish, with Redken Fashion Works hair spray.
6 Swap-Outs That Will Save You in a Pinch
We've all been there before. That sinking feeling that strikes when you're knee-deep in putting together a cake and open the cupboard to find that you're out of brown sugar. Or when company is 20 minutes away and, because you're all out of it, your buttermilk mashed potatoes will be reduced to simply "mashed potatoes".
I think we're all in agreement that using the real thing 100% of the time is the best way to go. But sometimes, life just doesn't work out that way. That's why keeping a cache of "swap-outs" in your back pocket can turn potential culinary ruin into a quick fix that keeps everyone none-the-wiser. Check these out:

BUTTERMILK
Buttermilk's origins are just as its name says - it was originally the milk that was leftover after butter was churned. While you can still find it made that way occasionally nowadays, more common labels read "cultured buttermilk", as whole or low fat milk is treated with lactic acid and allowed to ferment slightly, creating the tangy yogurt-like flavor that adds such delicious richness to things like mashed potatoes or biscuits. You can make a quickie buttermilk at home by stirring together 1 cup of milk with 1 tablespoon of white vinegar. Allow the mixture to sit at room temperature for 5 minutes and you'll have yourself some "in a pinch" buttermilk.

ALLSPICE
I always equate allspice with one of those exotic, "used once or twice a year" spices that ends up finding a cozy home under dust in the back corner of my pantry. Don't get me wrong - it's delicious! It's just one of those things that only pops up in a recipe occasionally. If you find yourself fresh out of it next time you're whipping up an apple dessert or spice cake, mix together equal parts ground cinnamon and ground cloves with a dash of nutmeg and you'll have "all the spice" you'll need.

CHILI POWDER
Rach and I are for sure in agreement that chili powder is one those magic spices that just makes everything better. Rubbed on meats before cooking or added to biscuits and cornbread before baking, this guy knows no boundaries. While everyone has their favorite variety - hot or sweet or smokey - if you're all out (or even want to experiment with making your own), stir together 2 parts ground cumin, 1 part cayenne pepper or smoked paprika (depending on your preference of hot vs. smokey sweet), 1 part dried oregano, and 1 part garlic powder. This will get you through that next pot of chili and maybe even open the door for you to create your own perfect homemade "secret recipe" chili powder.

THICKENERS
While this tip isn't for one ingredient in particular, many recipes like gravies and stir fry sauces use a thickener like cornstarch or flour to get that perfect "saucy" consistency. While each of them thickens a little differently and may appear in different recipes for different reasons, know that 1 tablespoon of cornstarch = 2 tablespoons of tapioca starch = 2 tablespoons of all-purpose flour = 2 1/2 teaspoons of arrowroot starch. You can swap these out for another, just make sure that you're still following the recipe method exactly, as some of these (the starches in particular) need to be dissolved in a liquid before stirring them into a sauce base.

CREAM OF TARTAR
Cream of tartar, in my book, plots a course similar to that of allspice. It's very effective when used in cooking preparations but not commonly found in many recipes. Cream of tartar is based with tartaric acid, which is actually what develops on the inside of wine barrels as wine is fermenting. It's used mostly in baking applications when whipping eggs or egg whites, as the tartaric acid relaxes the proteins in the eggs, allowing them to be whipped to a greater volume. Should you find yourself in the throws of a lemon meringue pie with no cream of tartar for your meringue, swap out 1/2 teaspoon of cream of tartar with 1 1/2 teaspoons of lemon juice or vinegar.

BROWN SUGAR
Brown sugar is one of my favorite things to use in both sweet and savory applications. Being that it's white sugar that has been mixed with molasses, it retains the moisture in baked goods, keeping them tender for longer. When added to savory dishes like salad dressings or chili, it adds a bit of sweetness while highlighting the deep flavors that already makes those recipes so delicious. If you're fresh out of brown sugar (or you've left your box in the pantry so long that it has hardened on you), use 1 cup of white sugar and add 1 tablespoon of molasses for "light" or 2 tablespoons for "dark".
Patrick W. Decker's life revolves around food. Always has. Probably always will. As a graduate of The Culinary Institute of America and past member of the culinary team on Rachael's daytime talk show, he now works as a food stylist and producer in NYC by day, and a food writer and recipe developer at his home in New York's Hudson Valley by night. You can see what he's up to by following his latest twEATs on Twitter at @patrickwdecker or visiting his website at patrickwdecker.com.
March 22, 2012
Baby shower cupcakes
There was a baby shower for my cousin's wife a few weeks ago and I though t would be cute to do mini cupcakes that were in the baby theme. I made mini yellow cupcakes with buttercream frosting and then used ribbon, lollipop sticks, (from Michael's), gel frosting and m and ms to decorate. My kids helped me and they turned out very cute - I was shooting for baby rattles, but they look more like lollipops. They weren't perfect but adorable in any case. Check out www.partycupcakeideas.com for tons of cute cupcake decorating ideas.
Homemade hot fudge sauce - easier than heating up a jar!
My daughter's 10th birthday was a few weeks ago. We survived her first slumber party unscathed (kiddie hangovers all around) but I can't say I will be jumping up and down to have 8 girls in my house for 18 hours any time soon (the volume!). She had fun, which of course is the most important thing. The next day was her actual birthday and she cried at least ten times due to sheer exhaustion. The day was capped with her telling me it was "the worst day ever." You gotta love the roller coaster emotions of a 10 year old girl.
Her birthday cake request this year was not a cake at all, but brownie waffles (I used my normal brownie recipe and just cooked it in the waffle iron but you can also use Rachael's recipe which is even easier - she uses a mix which is delicious) with ice cream, hot fudge and whipped cream. I had a jar of hot fudge sauce in my cabinet but realized it had expired when it was too late to go to the store so I made my own. It was just as easy as heating up a jar and tasted much better!
Homemade Hot Fudge Sauce
Ingredients
1 cup heavy cream
1/3 cup light corn syrup
12 ounces bittersweet chocolate chips (I use Ghirardelli)
Directions
Combine the heavy cream and corn syrup in a small saucepan over medium high heat. Stir, cover, and bring to a boil. Remove the pan from the heat and add the chocolate chips. Whisk until the chocolate is melted and serve. Can be cooled and refrigerated and reheated when ready to serve as well. Makes 2 cups.
March 18, 2012
Breakfast! It's What's For Dinner!
How many of us love breakfast for dinner? Not sure what it is, but there's something so comforting and fun about having breakfast for dinner. And the kids just LOVE it which means I know I won't have to struggle with picky eater issues and turned up noses because, let's face it, who doesn't love a good pancake?
The other night I was just burned out and I just couldn't even think about dinner. This is usually when breakfast for dinner comes in most handy because most breakfast foods are easy and quick. I knew I wanted to make chocolate chip pancakes because they are a big hit with the kids but I wanted to get a veggie in them as well so I decided to use some butternut squash puree I had sitting in my fridge. They turned out so light and fluffy and delicious that I think I'll make them part of my usual breakfast repertoire. The best thing is, you can make up a batch and freeze the extras. Place each pancake between sheets of waxed paper or parchment, wrap the stack in foil and seal in a freezer bag to keep them from getting freezer burn. Re-heat them in the microwave for 15 seconds and they are just as delicious as when you first made them and perfect for those days when you don't have the time or energy to cook.
To make the butternut squash puree simply peel, de-seed and cut the squash into 1-inch cubes. Cook squash in boiling water until fork tender, about 20 minutes. Puree in a food processor with a splash of water until creamy. Allow puree to cool and store in the fridge in an airtight container for up to 4 days or freeze for a longer lifespan. I use the puree to mix into the kids yogurt or oatmeal or bake it into muffins. If you are short on time, you can just as easily substitute canned pumpkin puree for the squash with equally excellent results.
What are some of your favorite "Breakfast For DInner" meals?
Butternut Squash CHocolate Chip Pancakes
Makes 24 silver dollar pancakes
Ingredients:
1 1/3 cups all-purpose flour
2 tablespoons granulated sugar
2 teaspoons baking powder
1 teaspoon ground cinnamon
1/4 teaspoon fine salt
1 cup milk
1/2 cup butternut squash puree
2 tablespoons unsalted butter, melted and cooled, plus more for greasing pan
1 large egg, lightly beaten
3/4 cups semi-sweet chocolate chips
Instructions:
1. In a large bowl, whisk together flour, sugar, baking soda, salt and cinnamon and set aside. In a separate bowl, stir together milk, squash puree, butter and egg. Slowly stir wet ingredients into dry ingredient but do not over mix. Add in chocolate chips.
2. Melt a tablespoon of butter in a non-stick skillet or griddle pan over medium heat. To make silver dollar sized pancakes: pour 1 1/2 tablespoons of batter onto greased skillet for each pancake. Cook about a minute on each side.
TIP:
I found that those Chinese soup spoons make excellent batter distributors for silver dollar sized pancakes because they are easy to handle and hold just the right amount.
Christina Stanley-Salerno is a mama, recipe developer, food stylist, photographer and blogger atTakeBackYourTable.com. She loves cooking for and with her family. Life is hectic, but Christina is passionate about mealtime because she believes that family meals are the glue that holds everyone together. Creating simple, quick and healthy meals is her specialty and her trick to keeping the family meal a reality, even on busy weeknights.
Follow her on Twitter @TakeBackTables
Clean Your Room! Easy Chalkboard Signs
I am always looking for ways to reduce my consumption and waste. Even though it seems small, I hate using a fresh piece of paper every time I need to write a quick note. That's why I love these little chalkboard notepads. Not only are they reusable, but they are just so darned cute!
To make them you'll need a small piece of wood. I bought 6″x6″x1/8″ wood panels at an art supply store. Generally, these are used by painters to make art, so you can find them with the canvases and other art boards.
Drill the holes on the front (the chalkboard side) of the board. I used a 3/16″ bit.
Wait for the primer to completely dry. Then apply chalkboard paint with a brush or roller. I found that you need about four coats.
On another chalkboard I used brass fasteners found in an office supply store. Wait until the paint is completely dry and you've finished the backside before attaching.
Using the hole punch that came with my grommets I made holes in the appropriate places. If you don't have a grommet maker, just make a slit in the fabric using scissors or a utility knife.
Then, place the fabric on top and paint again. The fabric may stretch a little, so once it's dry you can trim the edges.
On the board with brass fasteners I used two pieces of ribbon so the ends would be open.
The style with the loop can be hung on anything protruding. This one is used on the dishwasher.
The board with the open ended ribbon can be hung just about anywhere. Put your shopping list right on the refrigerator door.
Once you make these chalkboards they can be used again and again. Plus, they just make a nice decoration!
Find me on Facebook!
March 15, 2012
St. Patrick's Day Special: Colcannon
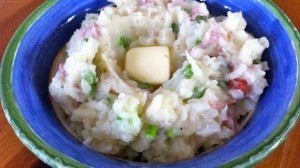
My sister did a stint in Ireland a few years back and I had a hilarious whirlwind visit with her and my parents. We did some ridiculously scary driving from town to town, enjoying pints of Guinness and Irish fare along the way. Holy potatoes. Shepherd's pie, stew with mashed potatoes, meatloaf with mashed potatoes. Comfort food heaven, but good thing I brought some elastic waist pants for this trip. I loved the colcannon - a traditional Irish dish of mashed potatoes with cabbage or kale, boiled ham or bacon, and scallions. Talk about a one-pot meal! I decided to make my own version in honor of St. Patrick's Day this weekend - it is a hearty and satisfying meal.
Colcannon
Ingredients
3 pounds russet potatoes
1 1/2 sticks butter
1 1/4 cups hot milk
salt and pepper
1 head cabbage, cored and shredded
(1) 1-pound piece of ham, cooked
4 scallions, finely chopped
Directions:
Make the mashed potatoes: Peel and chop potatoes and cook in boiling salted water until tender - 15-20 minutes. Drain and mash potatoes. Add 1 stick of butter, chopped into pieces, and mash to combine. Add the hot milk and mash, and add salt and pepper to taste.
For the ham: Place the ham in a saucepan and cover with water. Bring to a boil and simmer 45 minutes. Drain and chop into small pieces.
Cook the cabbage: Boil the cabbage in unsalted water until tender - 30 or so minutes. In the final two minutes of cooking, add two tablespoons of butter and cover with the lid for 2 minutes - this tenderizes the cabbage. Drain the cabbage and chop into smaller pieces if desired.
Add the ham, cabbage and scallions to the mashed potatoes and gently combine. Adjust seasonings to taste. Serve the colcannon in individual bowls - make a well in the top of each one and place a pat of butter in each well. Serves 6-8 as a main course.
March 13, 2012
Quick and Easy Irish Soda Bread
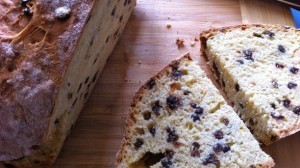
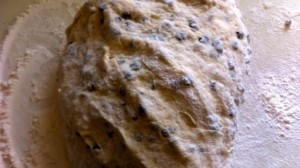
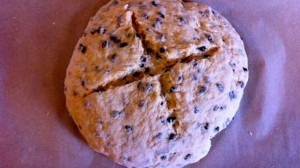
Ireland is not necessarily known for the food but one standout worth making for St. Patrick's Day (or anytime) is this delicious - and easy - Irish Soda Bread. No yeast, and therefore rising, required, and I whipped the dough up in about 5 minutes, then it bakes in the oven for 45 minutes. This bread has a delicious soft texture with a crusty exterior, and is lightly sweetened with orange zest and currants. I ate 2 pieces right out of the oven with butter, so to restrain myself I immediately sliced it and threw it in a zip-lock into the freezer. It should make delicious toast.
Quick and Easy Irish Soda Bread (from a recipe by Ina Garten) (click here for printable recipe)
4 cups flour, plus extra for currants, board and hands for kneading
4 tablespoons sugar
1 teaspoon baking soda
1 1/2 teaspoons kosher salt
4 tablespoons (1/2 stick) cold butter, cut into 1/2-inch dice
1 3/4 cups cold buttermilk, shaken (or use buttermilk substitute - 1 tablespoon fresh lemon juice, then fill measuring cup with milk to 1 3/4)
1 extra-large egg, lightly beaten
1 teaspoon grated orange zest (I used the zest of 2 clementine oranges)
1 cup dried currants
Directions:
Preheat the oven to 375 degrees F. Line a sheet pan with parchment paper.
Combine the flour, sugar, baking soda, and salt in the bowl of an electric mixer fitted with the paddle attachment. Add the butter and mix on low speed until the butter is mixed into the flour.
With a fork, lightly beat the buttermilk, egg, and orange zest together in a measuring cup. With the mixer on low speed, slowly add the buttermilk mixture to the flour mixture. Combine the currants with 1 tablespoon of flour and mix into the dough. It will be very wet.
Dump the dough onto a well-floured board and knead it a few times into a round loaf. Flour your hands generously as well - you may have to re-flour a few times. The dough will come together quickly with the extra flour - be sure not to over-knead.
Place the loaf on the prepared sheet pan and lightly cut an X into the top of the bread with a serrated knife.
Bake for 45 to 5o minutes, or until a cake tester comes out clean. When you tap the loaf, it will have a hollow sound.
Cool on a baking rack. Serve warm or at room temperature.
Plan B Mom is a mostly-stay-at-home mom of 3 who works from home but sees her main job as managing her family. When she is not taking care of her 11-year old and 9-year old girls, 8- year old son, two yellow labs, and husband - she is baking, running, carpooling, or helping with homework. She tries to stay organized to keep life running smoothly - or at least catastrophies at bay. Follow her on Twitter at @PlanBMom.
March 12, 2012
Lemon Cheesecake Squares
I love love cheesecake but shockingly have trouble putting away a whole piece. Maybe not while I am eating it, but I never feel good after the fact. Cheesecake it a perfect example of a little goes a long way, which is why these cheesecake squares are the perfect size - one square is a one- or two-biter. Not overly sweet, there is a generous amount of lemon in this recipe so if you're not crazy about citrus, cut the amount of lemon zest and juice in half.
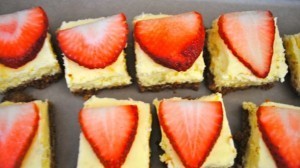
Cheesecake can be tough to slice - dip a sharp (non-serrated) knife into warm water before slicing for neater cuts. The thin slice of strawberry on the top hides any imperfections! I have made these twice recently for parties and they were well received.
Lemon Cheesecake Squares (click here for printable recipe)
Ingredients:
For the crust:
2 tablespoons sugar
1/4 teaspoon ground cinnamon
9 graham cracker sheets
1/2 stick (4 tablespoons) melted butter
For the filling:
16 ounces cream cheese, room temperature
2 eggs
1 lemon, zested and juiced
3/4 cup sugar
5 strawberries, thinly sliced
Directions:
Preheat oven to 325 degrees F. Grease the bottom of a 9 by 9-inch baking pan with butter. Then place parchment paper over the top, pressing down at the corners. In a food processor, process the sugar, cinammon and graham crackers until you have fine crumbs. Add the melted butter and pulse a couple of times to fully incorporate. Pour into the lined baking pan and gently pat down with the base of a glass. Bake in the oven for 10 minutes until golden. When done set aside to cool.
Make the filling: Add cream cheese, eggs, lemon zest, lemon juice and sugar to the food processor and mix until well combined. It should have a smooth consistency. Pour onto the cooled base and bake in the oven for 30-40 minutes or until the center only slightly jiggles. Remove from the oven and cool completely before refrigerating for at least 3 hours. Once set, remove from pan using the parchment lining and slice into 16 squares, topping each square with a strawberrie slice. Store in refrigerator.
Grades for Pay?
Or is it pay for grades? I think I have written about this topic before but it's worth bringing up again, as a friend of mine was recently recounting how she and her husband have adopted this policy to great success with her two boys who are in 7th and 5th grade. They established a pay scale according to the report card grade - ie, an A earns $10, a B+ $5, a B $5, and down the line. I don't think a C garners any dollars, but I am not sure.
I personally think kids should do well in school because that's what is expected of them, and as my dad used to say, when you are in school, your only job is to do well in school. That's it. Although when you are a kid, that sounds much easier than the reality. On the other hand, if you have a child who is motivated by money yet not motivated by school, this incentive could definitely help.
The other situation you can run into as a parent - which I actually have in the past - is when your child has tried their very best, yet their very best is a C+. How do you reward effort when the grade doesn't necessarily reflect that effort, especially if you have more than one child? I guarantee you will run into a chorus of "That's not fair!"s from siblings. Last year, when my older daughter was in 5th grade, her grades started to slip for the first time in her school career, meaning she wasn't pulling straight A's because school was challenging for the first time. She got a few B's on her report card, so I somewhat casually threw out a "If you get all A's we will go to dinner and a movie," or some kind of reward. She immediately burst into tears - what if she just couldn't get all A's? She was beside herself for the evening, even after I explained, over and over, that I was really just looking for her best effort, it wasn't the grade that was the most important thing.
So I think I will continue my policy of no pay for grades (I think that's the correct term), but a couple of at-ta boys when the good grades we expect come home, and some discussion and re-focusing when they don't. What do you think - is monetary rewarding of good grades a good idea?
Rachael Ray's Blog
- Rachael Ray's profile
- 296 followers


