
Melissa Clark's Blog, page 3
February 24, 2012
SPICES of Life (Whee! I Organized My Spices!)

My kitchen just received the second half of a subtle, but seriously major upgrade.
First, it was my pantry, whose deep shelves were so full that to access anything at the back required either a delicate dance of bottles or a deep excavation. Andy Rigg of Brooklyn Bilt installed some hefty, load-bearing pull-out shelves and suddently, everything is different. All my ingredients, from all-purpose flour to an obscure bottle of pekmez I lugged home from Istanbul now regularly see the light of day.
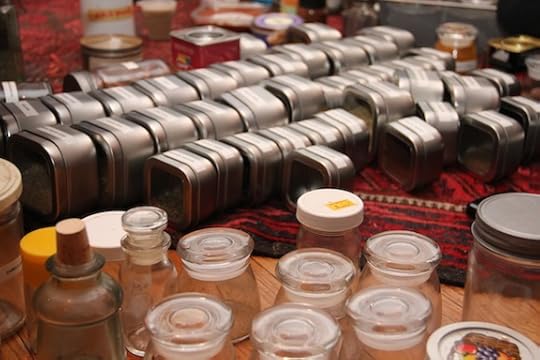
Equally revelatory, but a bit more complicated, was solving the problem of my spice cabinet. Like my pantry, it was a scary, unchartered place, stuffed to over-brimming. The kind of place that was perilous to stand under, lest the jar of Sicilian chili flakes fall on your head. There were things in the far reaches and the dark corners that were totally inaccessible, and they so langished for years (this is no joke). And to top it all off, the cabinet was dreadfully close to my stove, hovering far too close to the heat. (Any self-respecting kitchen packrat like myself should know better than to endanger their precious hoard with unnecessary exposure to high temperatures.) I wanted it all for my spices—ease, visibility, and safety. Not so much to ask.
[image error]
(Frightening image, isn't it?)
And boy did I get it…in abundance. I hadn't really imagined how my lofty dreams might materialize, but Andy had the brilliant idea of crafting a series of shallow drawers in a space that was occupied by one large, deep drawer. I immediately loved the idea, and so did Daniel though we were temporarily scuttled when we discovered our cheapy line of Ikea cabinetry had been discontinued. But a quick ebay search turned up exactly the components we needed, and a few clicks later we were back on track.
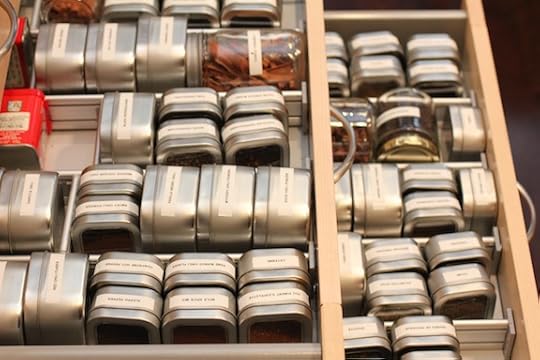
With the drawers installed (seamlessly, I might add) the next step was clear—choosing uniform and handy containers. My original spice cabinet had a hodge podge of jars, boxes, tins, bottles, bags, matchboxes, handkerchiefs, you name it.
At the opposite end of the spectrum, after much diddling around on the internet -- I mean studious research -- I found these. Square tins, with little clear lids, were an ideal solution. They don't roll! They don't turn! They don't fall on their sides! In short, square tins make use of the real estate deeded to them with elegance and economy.
Tins chosen and drawers in place, next came The Great Spice Reckoning.
It was time to look my spice cabinet squarely in the eye, and come face to face with the sweet or spicy or savory ghosts lingering within. I piled everything into boxes and gradually went through them, one by one, jettisoning the bare minimum (hey, I said it already…I'm a kitchen packrat) with the gentle but firm encouragement of those around me. Daniel, Sunny, Sarah and Dahlia were my own personal SHA support group (that would be Spice Hoarders Anonymous).
Naturally, I found some sentimental gems that I couldn't bear to part with. Mahleb, the tiny little stones from an ancient fertile crescent cherry known as St Lucie have been imparting their subtle almondy-fruitiness to baked goods for centuries—my stash has only been around for a couple of years. Black cardamom pods are so smoky and earthy they almost smell like bacon. And those Thai long pepper corns never fail to intrigue me with their floral and piney heat.
Dahlia came home from school to find me on the floor, surrounded by the mess, and declared in all her three year-old wisdom that "something smelled funny". And indeed, after sniffing many a mystery packet, I was a sneezy mess. (A tin actually got labeled "Mystery Chili Powder"—I'm open to ideas of what to do with it!)
Slowly but surely, order started to dominate the chaos. And then the moment finally came—cue the Rocky theme song. I put all my newly labeled tins into their new home, arranging them in my own biographical sort of way (chilis and sweet spices in the top drawer, herbs, seeds and everything else below). The satisfaction was extreme.
At last count I had over 28 different types of chili products, not including the 5 different paprikas. (Believe me, even I am amazed.) Everything is readily available, handy, and oh-so organized. I pull a handle to reveal the ground up goodness of many a nation, lined up in friendly phalanxes. The drawers almost feel like little libraries, and as I pull them out to browse, I'm looking over the recipes, trials and errors, and old familiar friends of my home-cooking life. Really fun stuff.


February 16, 2012
Wee Almond Layer Cake with Cherry Jam and Chocolate Honey Glaze
[image error]
I never need an excuse to eat chocolate, or really, to bake a cake (this is one of the many upsides of being a culinary professional - it's my duty to give into cake-baking urges in the name of....um, my job. Right.)
But when a holiday like Valentine's Day rolls around, the pressure is on, not just to make any old chocolate dessert, but to come up with something truly special.
A petite 6-inch layer cake fills the bill. It's large enough for you and your sweetie to gorge on for Valentine's Day dinner with leftovers for breakfast the next day (or two). But it's also small enough NOT to share. And it's downright adorable - like a miniature birthday cake, which it could be if you stuck a few candles in the top.
The only potentially sticking point to this recipe is getting (and then storing) the 6-inch cake pans. They are easy enough to order online, but you do need to plan ahead (be sure to check out the brand name on these.)
Then all you have to do is halve your faovrite layer cake recipe (one that will yield two 9-inch layers), and bake that halved amount of batter in the two small pans. (You could also bake the batter in one 8 or 9-inch pan, but then you lose the cuteness and celebratory quality of a layer cake; a flat cake just isn't as special, even if you do try and pass it off as a torte.)
You can of course bake any flavor cake you like. But Valentine's Day is all about chocolate, so I think it should feature prominently. (For a whole tour of easy chocolate goodness, check out my videos I recently made for the NY Times.) This said, I don't love chocolate-on-chocolate-on-chocolate confections. I like something to break up all that bittersweet monotony. So if I'm baking a chocolate cake, I'll mix up a contrasting icing—maybe a boozy rum buttercream, or an airy raspberry whipped cream. But if I'm baking a white cake, nut cake or fruit cake, that's when I pull out the big chocolate guns, and this fudgy glaze, sweetened with honey, packs some major choco-ammo for a very minimal amount of work.
This recipe is for a moist, fragrant almond cake, and it's pretty much my go-to layer cake recipe. The best part is that it's really quick to bake, which was essential on Valentine's Day. You see, even though Daniel knew that I would be baking something for dessert, I wanted the actual cake to be a surprise. Which meant I had to bake and then hide the whole thing while he was out on a run. Luckily he's in marathon training mode, which meant I had a good 12 or so miles to work with. The only thing that threatened to foil my dastardly secret was the olfactory evidence; as this cake baked, the house was filled with the heady, warm aromas of almonds and butter. (Fortunately, Daniel actually zipped upstairs when he got home, distracted with concealing his own secret surprise, a Valentine's Day bouquet.)
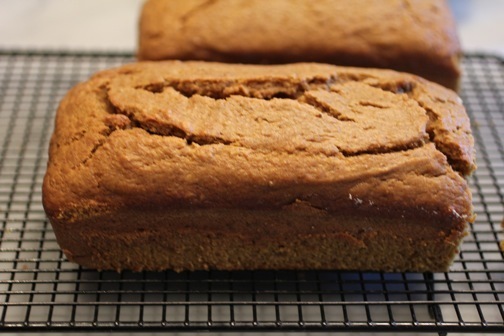
A note about this recipe (and cake recipes in general). If your cake layers come out with peaked domes on top, just lop them off with a knife (and eat the trimmings, that's the cook's priviledge for goodness sake). You can see that I did that in the photo, below. In fact even if the top isn't so very domed, sometimes I like to trim the top off anyway. Just to maintain quality control of course.
[image error]
As for a filling, there is enough frosting to spread it between the layers. But instead I opted for a quick smear of tart cherry jam because cherries seem so red and Valentinesy. Then I iced the whole tower with chocolate honey glaze as my giddy three-year-old watched on (she got to lick the spatula). By the way, icing a cake is a cinch. I promise.
After the efforts I went to making and hiding the cake, I kept the rest of the meal simple. I splurged on a gorgeous rib eye that we paired with some perfectly, deliciously uncomplicated duck fat fried potatoes (boil fingerlings in salted water, drain, smash, fry in duck fat) and a pile of lemon and olive oil dressed watercress. And we opened a stupendous '75 Grand Cru Pauillac, 'cuz, you know, we had one in the basement (thanks Dad!).
I have to admit that the cake, as lovely and special as it was, did lose out a bit to the hoopla of the perfect, gorgeous, leathery-cherry-spicy-earthy wine. At least it did that night. But I can tell you it rocked for breakfast. And by then the wine was long gone. But not forgotten.
Wee Almond Layer Cake with Cherry Jam and Chocolate Honey Glaze
For the cake:
1 stick unsalted butter, at room temperature; more for greasing pans
2 large eggs
1/2 cup sour cream or use a combo of plain yogurt and heavy cream
1 teaspoon vanilla extract
1 1/4 cups cake flour
1/4 cup finely ground almonds
3/4 cup sugar
3/8 teaspoon baking powder
3/8 teaspoon baking soda
3/8 teaspoon salt
Cherry jam
For the glaze:
1/4 cup heavy cream
1/4 cup honey
5 ounces bittersweet chocolate, chopped
1. Preheat oven to 350 degrees. Grease two 6-inch cake pans and line bottoms with parchment or waxed paper. Grease the paper. In a bowl, beat together the eggs, 1/4 of the sour cream, and vanilla.
2. In bowl of an electric mixer, whisk together the all purpose flour, ground almonds, sugar, baking powder, baking soda and salt. Beat in butter and remaining 1/4 cup sour cream until light and fluffy, 1 to 2 minutes. Slowly beat in the egg mixture until fully combined.
3. Scrape batter into prepared pans. Bake for about 30 minutes, or until a toothpick inserted in center of a cake layer comes out clean. Let cake layers cool in pans on wire racks for 15 minutes, then invert onto racks and peel off paper. Let cool completely on racks.
4. While cakes cool, make the glaze. Bring cream and honey to simmer in medium saucepan. Remove from heat. Add chocolate and whisk until melted and smooth. If all the chocolate doesn't quite melt, put the saucepan back on the heat and whisk constantly until it does.
6. To frost cake, place 1 layer on a cake plate, rounded side down, trimming if necessary so it lies flat (eat the trimmings, they are the best party). Spread cheery jam between layers, then glaze with chocolate.
...A gratuitous (and entirely adorable) photo of said three year-old, pre-spatula lick...
[image error]
February 9, 2012
Kitchen Hip Tip: The Easiest Homemade Breadcrumbs

We are a household of bread-heads. Dahlia loves sweet little jam and cream cheese sandwiches in her school lunches. Daniel, a marathon runner, is always in search of good, sturdy carbs. And I couldn't live without my buttered toast with whatever (anchovies, tomatoes, inch-thick pillows of salted butter, avocado) on top.
So any day of the week, you'll find several kinds of loaves on our counter in various states of freshness. Which is a good thing—since different types of bread all mixed together makes for especially great breadcrumbs.
I keep a big Mason jar full of homemade breadcrumbs, always at the ready in my now well-organized and beautiful new pantry. (Thanks Andy!) If I'm on top of things, I'll slice up the remaining heels of bread while they are still manageably soft into slim slices, and spread them out on a sheet tray. I then dry them out totally in a 300° F oven. The time can vary depending on the type of bread and how dried out it was to begin with. After twenty minutes I'll check the slices for any signs of "give", and if they yield to the touch at all they go right back in for another ten, or until they're dry and crisp as can be.
Here's where today's Kitchen Hip Tip comes in…for years, to make my breadcrumbs, I've always pulsed the dried out slices in my food processor, using the standard blade. It was a real chore. It would take forever, my trusty old machine would overheat, and I'd have to go in there every so often to manually unclog chunks of bread that would collect on the blade.
When putting away something in the same drawer where I store my other food processor blades and attachments, I saw the grater disc and had a revelation. What if I dropped slices through the feeder tube and "grated" the dried bread instead? And you know what? It worked. Marvelously. Easily. But not quietly (tell your preschooler to cover her ears). However you wind up with really nice breadcrumbs, and there's a bit of variety in the size and texture (if you're looking for really uniform, fine breadcrumbs, simply slip the blade in after everything is grated and whirl them up).
Store-bought breadcrumbs are always there in the grocery aisle if you need them, but homemade are so much better. In everything. I love big coarse breadcrumbs in place of croutons sprinkled over a salad (fry them first in a little butter or olive oil to crisp them)—you're more likely to get a bit of crunch in every bite. Homemade breadcrumbs are great for coating a chicken breast, or for stuffing vegetables (and as artichoke season is approaching, I might be needing an extra Mason jar). And I LOVE breadcrumbs over a simple pasta, particularly after I've fried them in olive oil with some anchovy and garlic (and maybe even some chili flakes).
Now that making breadcrumbs is a much less cumbersome task, I will never be without them thanks to my burly grater disk. Give your lovely loaves a delicious second life.
January 31, 2012
Sunday Soups--Red Lentil, Parsnip, and Meyer Lemon

There are two things I rarely do when it comes to cooking: follow a recipe (especially one of my own) and make the same thing twice. I'm a improvisational cook and generally end up whipping things together with whatever I've got around.
This said, the one recipe I always follow to the letter is my Red Lentil Soup (from a column that I wrote a few years back for the Times). It's a soup that fits my tastes perfectly - full of heady flavor, smooth, velvety, spiced with cumin and lemon. Almost every time I make it, I look up my recipe and then I follow it.
Except, you know, when I don't. As in, last Sunday. I planned to make my red lentil soup, but then, at the last minute, decided to change to accommodate some wilty parsnips that really needed a home. So I added them to the soup in place of the carrot.
Though they lacked the pleasing color that the carrots lent to the soup, the parsnips did contribute a lovely, nutty sweetness. And since Meyer lemon season is in full swing (and when it is, I almost always have some on hand), I stirred in some bright but mellow juice right before serving.
Red lentils cook up so quickly (since they're without a husk), but because of this they also don't tend to hold their shape very well. Which makes them an ideal candidate for pureeing. Parsnips too love a good turn through the blender.
As a final garnish, I often sprinkle my lentil soup with some chili for a prickly heat, but a pinch of good sweet or smoky paprika is delicious too. On this particular night, I floated a big, home-made crouton in everyone's bowl for a crunchy contrast. Humans have been eating lentils for a very, very long time and it's no wonder—they're easy to store, easy to cook, and super satisfying.
Red Lentil, Parsnip, and Meyer Lemon Soup
2 tablespoons extra-virgin olive oil, plus more to taste
1 yellow onion, diced
2 fat garlic cloves, minced
1 tablespoon tomato paste
1 teaspoon ground cumin
1/2 teaspoon kosher salt, more to taste
3 small parsnips, peeled and diced
2 celery stalks, sliced
1 cup red lentils
1 quart stock - any kind. I used turkey
2 cups water
Juice from 1/2 Meyer lemon, plus more to taste
1/4 cup chopped cilantro, plus sprigs for garnish
ground chili, cayenne, or paprika to taste
1. In a large pot over medium-high heat, warm olive oil. Add onions and sauté until translucent, five minutes. Stir in garlic and continue cooking another two minutes. Stir in tomato paste, ground cumin, and kosher salt and continue cooking until tomato paste begins to brown, another two minutes.
2. Add parsnips, celery, and lentils then stir in stock and water and bring to a simmer. Cover pot, reduce heat to low, and cook until lentils are tender, about 30 minutes.
3. With an immersion blender, puree soup until smooth (or to desired consistency, chunky is nice too). Alternatively, puree soup in a blender or food processor, working in batches.
4. Stir in juice of 1/2 Meyer lemon, and adjust seasoning to taste, adding more lemon if desired. Stir in cilantro.
5. Ladle soup into individual bowls and finish each with a generous drizzle of olive oil, a few sprigs of cilantro, and a sprinkle of salt and chili or paprika.
January 25, 2012
Sweet and Simple Scampi

I know, I should have posted this last week. But that's how it goes, life gets in the way. Because now, when I write about that modernist dinner party article I had in the Times last week, it's seriously old news. What story? Nathan who?
As a quick reminder, a few weeks ago I had Nathan Myhrvold over to my house to show me some easy modernist cooking techniques that could make my traditionalist home cooking taste better -- without me having to buy any new equipment or weird ingredients. Then, I threw a dinner party and used said techniques to prepare the meal. You can read the whole thing here.
One tidbit that didn't make it into the article was the utterly classic hors d'oeuvres I served along with the celery stick bloody Marys: shrimp and scallop scampi. I sauteed a whole bunch of sweet Maine shrimp (still in the shell) and bay scallops with garlic, butter, lemon and chili. Soul-satisfying, hearty, good food, rustic as hell, and as basic as cooking gets as long as you can find good shrimp and scallops. We all inhaled this standing up in around the kitchen island, gobbling the shrimp shells and all (think of them like soft shell crabs), garlic butter sauce dripping down our chins.
It was a kind of gratuitous to serve the scampi. We didn't need it, the steak and salmon et al would have been plentiful enough. But I was a little anxious that I might botch one of the modernist recipes. So by offering up the surefire scampi first, I knew for sure my guests wouldn't go hungry, and would get something tasty to eat.
Some guests thought it was the best dish of the night, the kind of thing, one said, that Ferran Adria (of El Bulli) might eat on his night off. Exactly.

Sweet Shrimp and Bay Scallop Scampi
Serves 10 guests as an hors d'oeuvres, or 4 as a proper appetizer. Or 2 for dinner.
6 tablespoons unsalted butter
3 garlic cloves, finely chopped
Pinch red pepper flakes
1/2 pound Sweet Maine shrimp, head and shell on (or you can use regular peeled shrimp)
1/2 pound Nantucket Bay scallops (farmed bay scallops are fine too)
Juice of 1/2 lemon, or more to taste
Fine sea salt, to taste
Chopped parsley, for garnish
Crusty Bread, for serving
Melt butter in a large skillet. Add garlic and red pepper flakes, cook until fragrant, about 1 minute. Add shrimp and cook, tossing occasionally, until just beginning to turn opaque 2 to 3 minutes; toss in scallops and cook 1 to 2 minutes more. Remove from heat and season with lemon juice and salt. Turn out seafood and pan juices into a large heated serving dish. Sprinkle with parsley and serve, with crusty bread for soaking up the buttery juices.
January 18, 2012
Pumpkin Bread with Brown Butter and Bourbon
When my husband Daniel was a child, his mom made pumpkin bread for the holidays every year. He's often reminisced about it, waxing poetic about how simple and delicious it was -- no nuts, no chocolate chips, just a smooth, moist loaf cake imbued with autumnal spices. At some point he had an index card with the recipe written on it, but it disappeared, and his mother no longer remembers how she made it.
For years, I've been meaning to try and approximate the recipe. Food and love and memory…right up my alley.
Finally, a little too late for Christmas, I made the cake, and I can tell you that although the ingredients scream Thanksgiving, it's a lovely cake that I'd welcome on my plate anytime of the year (okay maybe not in the summer, but anytime when the weather is cold).
A confession: since I made this the weekend of New Year's, after all the cooking from the weeks before, I took the easy route and used canned pumpkin puree. I did however pick up an organic brand and it was actually better than the standard Libby's—it was brighter and fresher-tasting.
Any chance to use brown butter is a chance I'll take, but after all the holiday baking my fridge was a bit low on butter. So I used a half cup of brown butter, and a half cup of olive oil. But any liquid fat will do—you need one cup and could use all olive oil, or canola oil, or all melted butter, or all brown butter.
And about all that yummy butter. Let's not deceive ourselves. This recipe is for Pumpkin "Bread" but it's really a cake. A delicious, loaf-shaped cake that would also make perfect "muffins" (aka, cupcakes…with perhaps some yummy cream-cheese frosting). Pumpkin is full of fiber and good nutrition, true, but here it's used in what is best described as a dessert. Or at least a sweet afternoon snack with a nice cup of strong tea.
According to Daniel, his mom used to cut the sugar back every year when she made the bread, and it was always good, so feel free to cut back on some of the sugar if you like.
And as for Daniel, he adored it. And as I watched him cut himself a thick slice, smear it with salty, soft butter, and take his first bite, I felt a warm surge of happiness. I knew I could never replicate his mother's Pumpkin Bread (even if I did have the recipe), but creating a version for him was my way of including his past in our family's future. I'll certainly be making this again.
Pumpkin Bread with Brown Butter and Bourbon
1/2 cup butter
1/4 cup bourbon (or water or apple cider)
1 tablespoon vanilla
1 3/4 cups pumpkin puree, homemade or canned (a 15 ounce can)
4 eggs
1/2 cup olive or other oil (canola for example)
2 cups all purpose flour
1 3/4 cups brown sugar
1 cup whole-wheat flour
1 1/2 teaspoons baking soda
1 teaspoon fine sea salt
1 teaspoon ground cinnamon
1/2 teaspoon ground ginger
1/2 teaspoon ground cardamom
1. Preheat oven to 350º F, and arrange a rack in the center. Grease the inside of two 8-inch loaf pans with butter.
2. In a large skillet, melt the butter over medium-high heat. Reduce the heat to medium and cook until the frothy white milk solids sink to the bottom of the pan and turn a fragrant, nutty brown, 5 to 7 minutes. Brown butter can burn quickly, so watch it carefully. Another tip: when the frantic sound of bubbling begins to die down, that is when you know your brown butter is almost ready, so use your ears as well as your eyes and nose for this one.
3. In a glass liquid measuring cup, combine bourbon and vanilla and add water until you reach the 2/3 cup mark. In a large bowl, whisk together bourbon, vanilla, water, pumpkin puree, eggs, and olive oil. With a spatula, scrape all the brown butter from the skillet into the pumpkin mixture and stir to combine.
4. In another large bowl, whisk together, all purpose flour, brown sugar, whole-wheat flour, baking soda, salt, cinnamon, ginger, and cardamom. Pour liquid ingredients into the dry ingredients and stir to combine.
5. Divide batter into the two greased loaf pans. Set pans onto a rimmed baking sheet and place in oven. Bake for 50 to 60 minutes or until a tester or toothpick inserted into the center of the loaf comes out clean.
6. Allow bread to cool completely before removing from pan.
NOTE: I also made this exact recipe with applesauce instead of pumpkin puree, and used all brown butter and no oil, and left out the spices and doubled the vanilla and it was lovely. In case you happen to have lots of applesauce in the fridge as I did this week.
January 11, 2012
Kitchen Hip Tip: Cheater's Blanched Kale

Kale's been getting a lot of love these days. And with good reason. Kale's deep green goodness is endlessly versatile and adaptable. Raw, baked (crunchy kale chips!), sautéed, simmered…there's no end to the,ways you can use it in your kitchen. And it really brightens up a winter meal, especially a pasta-based one, whose heavy starchiness needs a little chlorophyll lift.
One way to make a pasta sauce with kale is to simply saute some kale with garlic and red pepper and what have you to make a sauce. But raw kale shrinks down considerably once it's wilted, so you'll need a mighty big pan if you want an adequate amount of greens with your pasta. And winter kale can run the gamut from papery tender to leathery tough. In other words, it can cook quickly, in a few minutes, or sometimes take 15 or 20 minutes to become supple and soft.
So what I like to do for making winter kale pasta is to give my kale a quick blanch. That way, I won't have to wait for it to wilt while struggling with all those huge raw handfuls.
This super-simple, super-quick blanching method will save you loads of time and unnecessary work. Grasp your whole kale leaves by their stems, and simply dunk them into your big pot of boiling water before you toss your pasta in. Have a plate nearby, and just give each leaf a quick 5-second swirl and then let them rest on the plate. No ice-bath necessary—by "cooking" them for such a brief period of time, there's no harm in letting them sit. Then, simply slice the leaves away from the stems, chop them up, and throw them into your pasta and sauce (or saute them very quickly with garlic and oil). Now you have no excuse not to eat your greens.
January 5, 2012
Sunday Soups: Navy Bean and Collard Greens
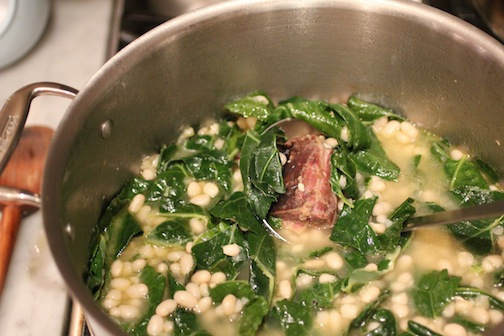
First off, a confession—I made this soup last Monday. But as it was the Monday after New Year's Day, it still sorta felt like Sunday. The temperature outside finally dropped to freezing, and I wanted a starchy, comforting soup full of dark greens.
This recipe is somewhat inspired by Caldo Verde, a Portugese soup consisting of potatoes, kale, and sausage. In place of the potatoes, I opted for dense, satisfying navy beans. I eat so much kale as it is, I wanted something a little different so I went with collard greens instead. I left the sausage out, but did drop in a chunk of smoked turkey neck while everything simmered just to get some of that rich, meaty flavor into the beans. You could also toss in a ham hock, or sauté some diced bacon along with the onions if you don't have a hunk of smoked turkey neck in the freezer like I did (though how it got there is anyone's guess). Or just swap out half the water with stock of any kind. And go for broke with the garlic — beans can carry loads of flavor on their little beany-backs, so why not?
I started soaking my navy beans Monday morning, and as they were newly harvested last season (I got them at the farmers' market), they cooked up nice and tender in about forty-five minutes. If yours take longer, that's fine too. Larger white beans, such as cannellini, might need more time. To be on the safe side, soaking beans overnight (if you can remember to) is always a good idea. You sleep, they soak. (My kind of cooking.)
Dahlia asked for her soup sans greens and I was happy to oblige — more collards for me, and the beans alone are immensely nutritious. I finished Daniel's and my bowls off with a generous pour of grassy olive oil and a fresh squeeze of lemon. Soups this good, this simple, and this satisfying seem to draw people closer together…what better way to start off a new year?
Navy Bean and Collard Greens Soup
Serves 6 to 8
1 pound dried Navy Beans (about 2 heaping cups)
3 tablespoons extra-virgin olive oil, more for serving
1 small onion, diced
8 cloves garlic, minced
2 teaspoons kosher salt, more to taste
1 small hunk (about 2 inches long) smoked turkey neck or a wing (optional)
1 small bunch collard greens, leaves torn into bite-size pieces (about 8 cups, discard the ribs)
lemon wedges for serving
Flaky sea salt, for serving
1. In a large bowl, soak beans overnight (or at least 6 hours) in plenty of water to cover. Drain beans.
2. In a large pot or Dutch oven over medium heat, warm 3 tablespoons of olive oil. Add onion and cook, about 5 minutes. Season onion with 1 teaspoon of salt, add garlic and cook, about 2 minutes. Add turkey neck, beans, and 10 cups of water and bring to a simmer.
3. Reduce heat to low and cover pot. Simmer for about 45 minutes to 1 1/2 hours, or until beans are tender. if the pot looks dry, add some more water.
4. When beans are about 10 minutes away from cooked, stir in the remaining teaspoon of salt and collard greens. Replace lid and continue simmering until beans are tender and the collards collapsed.
5. Serve soup with a drizzle of olive oil, a generous squeeze of fresh lemon, and a sprinkle of flaky sea salt. A dash of hot sauce is nice here, too.
December 28, 2011
Sunday Soups: Roasted Butternut Squash and Rutabaga Puree

If you've never had rutabaga, or, if the last time you had rutabaga was so long ago that you can't quite remember if you like it, try this soup. It's a gentle way to get to know this vegetable, which I always think of as a cross between a turnip and a butternut squash. Or, make this with all butternut squash (you'll need one large one, about 2 1/4 pounds), or substitute sweet potato.
But in any case, this is a restorative soup, the kind of thing to simmer together if you're feeling permanently cold, as if the winter has settled into your spine and isn't planning to leave. Or perhaps you're feeling worn out, under-the-weather, fatigued by holiday cheer, or just down right blah. This soup will heal you. (Then again, you should make it if you're feeling perfectly well and chipper because it's mighty tasty beyond all its curative properties.)
In any case, you'll be rewarded with a creamy, deeply-flavored, slightly sweet puree that will warm your bones and fill your belly.
Those who like things spicy might want to spike this with chili powder. But I left it out to play up the sweetness of the butternut squash. The spinach isn't strictly necessary; I always like to stir greens into my winter soups so I can eat my soup and salad at the same time. But you can skip it. Make sure to use some fresh lemon juice at the end. It really brightens and rounds out the flavors. Balsamic would accomplish the same thing if you prefer it. But it isn't as sunny as lemon. And in winter sunny counts for a lot.
Roasted Butternut Squash and Rutabaga Puree with Spinach
Serves 6 to 8
1 small (1 1/4 pounds) butternut squash, peeled, seeded and cut into 1-inch chunks
1 pound rutabaga, peeled and cut into 1-inch chunks
5 tablespoons extra-virgin olive oil, plus more to finish
2 1/2 teaspoons kosher salt, plus more to taste
1/2 teaspoon freshly ground black pepper
2 large (or 4 small) leeks, halved lengthwise, rinsed, and sliced (white and pale green parts only)
2 shallots, chopped
4 fat cloves garlic, chopped
1 large russet potato (or 2 medium Yukon gold potatoes), peeled and cut into 1/2-inch chunks
2 cups any kind of stock (I used duck stock, made in the wake of this video)
2 sprigs fresh thyme
3 sprigs fresh sage
3 sprigs fresh parsley
1 (5-ounce) package washed baby spinach
1 meyer or regular lemon, sliced into wedges, seeds removed
1. Preheat oven to 450ºF. On a large rimmed baking sheet, toss squash and rutabaga with 3 tablespoons of olive oil, 2 teaspoons of kosher salt, and a few good turns of freshly ground black pepper. Spread squash and rutabaga in a single layer and roast for about 30 minutes, or until there's some solid browning all over.
2. Meanwhile, in a soup pot, warm 2 tablespoons of olive oil over medium-high heat. Add leeks, shallots, garlic, and 1/2 teaspoon of kosher salt and sauté. Stir frequently until lightly golden, about 5 minutes.
3. Add potato, roasted squash and rutabaga, and 1/2 teaspoon of black pepper to pot, and stir it around a bit.
4. Using kitchen string, the thyme, sage, and parsley in a little bundle and add to pot (if you don't have kitchen string, you could stuff the herbs into a tea ball). Add 4 cups of water and the 2 cups of stock to pot and bring to a simmer. Reduce heat, and continue simmering for 30 minutes.
5. Remove herb bundle from soup. With an immersion blender, puree soup to desired consistency (or puree in batches in a blender or food processor, then return to pot) and adjust seasoning with additional salt and pepper if needed.
6. Stir baby spinach into soup and bring to a simmer. Once spinach is silky and wilted, ladle into bowls.
7. Drizzle the soup with a little good olive oil and serve with wedges of meyer or regular lemon.
December 22, 2011
Flaming Spiced Pork Cake: YUM!

I owe everything about this cake to my dear friends Karen & Dave. Karen got me the recipe, a highly spiced Victorian stunner that she clipped from a magazine. Dave (Wondrich, the famous cocktail writer and author) taught me how to set things on fire, safely that is. So together, they spawned this lovely recipe, whether they meant to or not.
First of all, about the cake. Although it is supremely delicious, you do not need to make a pork cake in order to set something on fire. Any old cake will do. Fruit cake works nicely but even chocolate bundt cake will fill the bill.

However, if you're at all interested in attempting this old-fashioned recipe, it's a good one. A little like a fruit cake, a little like gingerbread. It's sort of like the porky, soft counterpart to a crisp beef suet-filled mincemeat pie. The pork needs to contain a good amount of fat - there is no other shortening in the recipe. Pork works well because not only is it naturally fatty, it's also relatively bland, which is what you want in this case. Do not substiute ground turkey. Really, you will be sad.

If you've never flambeed your food, there are a few rules to which you must adhere. The first is to use high-proof (aka overproof) spirits. They flame up more easily than regular proof. Just ask at your liquor store. Dave recommends Lemon Hart rum (151 proof) but I used a 120 proof rum from Jamaica and it was fine (as evidenced from the photos, below).

Ideally the rum should be a bit warm, which helps it flame up. Room temperature is fine but don't store the rum in your fridge (or freezer) and then try to use it directly out of the cold.
Do I need to tell you to keep your face, dangling hair, small children and pets away from the flame? Probably not, you know that. But what you might not consider after some holiday cheer is to remember that although this cake is dessert, you should flame it amidst the oohs and aahs at the beginning of the meal, before the cocktail hour. Don't try it at the end of an evening of toasts. You want to be sober when playing with fire. Then, when the flames die down well, pop the cork and pour forth your libation of choice. And Happy Holidays to you all!

Flaming Spiced Pork Cake
Serves 8 to 10
1 pound ground pork (not too lean)
1 1/4 cups raisins
1 1/4 cups chopped dried apricots
1 1/4 cups chopped candied lemon peel
2 cups sugar
1 cup molasses
1 teaspoon baking soda
2 3/4 cup all-purpose flour
1 tablespoon cinnamon
1 tablespoon nutmeg
1 teaspoon fine sea salt
1/2 teaspoon cloves
Hig- proof (aka overproof) rum, as needed (at room temperature or even a little warm)
Whipped cream, for serving, optional
1. Preheat the oven to 300° F. Grease a 10-inch bundt pan.
2. In a large bowl, combine the pork and 1 cup boiling water. Stir in the raisins, apricot, candied lemon, sugar, and sugar. Dissolve the baking soda in a splash of water and stir into the mixture. In a small bowl, whisk together the flour, cinnamon, nutmeg, salt, and clove. Stir the dry mixture into the pork mixture until just combined. Pour the batter into the prepared pan. Bake until the top is golden brown and the cake begins to pull away from the sides of the pan, about 1 hour 40 minutes.
3. Cool the cake on a wire rack. Unmold and place the cake back on the rack. Place the cake on the rack on a rimmed baking sheet (to contain the flames, this keeps them from spreading). Pour some rum all over the cake until the cake is moistened. Pour some rum into a ladle. Dim the lights. Fill a bowl with water and keep it nearby, just in case. Light the rum in the ladle on fire. carefully pour it all over the cake. The flames will ignite the rum on the cake, and also any drips on the baking sheet so be prepared for this. If things get out of control douse with water. But don't panic, the flames die down on their own in seconds.
4. Eat the cake! It's good with whipped cream.
Melissa Clark's Blog

- Melissa Clark's profile
- 130 followers

