
Melissa Clark's Blog, page 2
July 11, 2012
Summer Beet Salad with Pickled Beet Stems
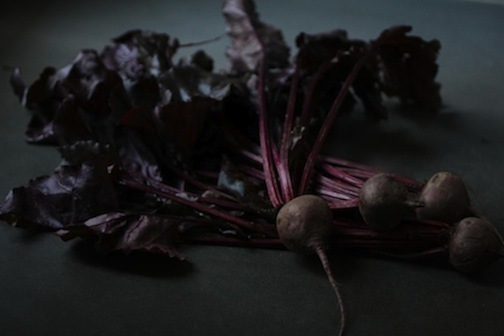
(This photo was taken sans Instagram. Beets are just that moody.)
Beets are divisive. Beets are controversial. Beets are polemical. Some people love them (me!) and some people are....lukewarm (you know who you are...) And I spend a good chunk of my cooking life (which is a good chunk of my entire life) trying to convert the beet-haters out there.
I say: “have you REALLY had a good beet? Maybe you've just had bad, old, poorly cooked beets."
I tell them how good beets taste, how good they are for a body.
Beets are lusty things, full of deep pigment, they are wild in color and very, very nutritious.
The only thing I don’t adore about beets is roasting them in the sultry heat of a Brooklyn summer. A big beet can take over an hour to roast all the way through, and when it’s 95 degrees outside (as it pretty much has been for the last week,) roasting beets are about the last thing on my mind.
But cold, sliced beets, marinated with olive oil and vinegar are some of the best summer eating their is.
I received some devastatingly beautiful beets this week, in their lively entirety, from my CSA. So I skipped roasting them and steamed/poached them on the stovetop instead. They took 20 minutes. They didn't heat up the house. And they were fab.
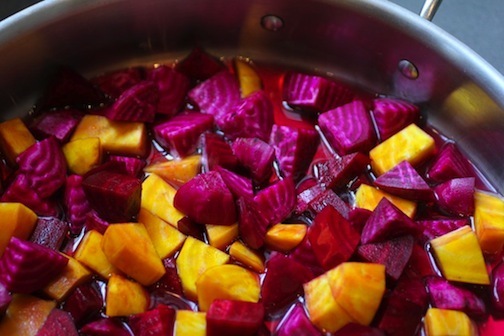
In addition to my CSA beets, I had some yellow beets in the fridge that I threw in the mix. This wonderful Technicolor display won’t last of course; red beets bleed onto everything they come into contact with. (If you cooked them separately, you could toss them together at the last minute to maintain the color contrast, at least for a little while, the red beets will inevitably win.)
Every part of the beet plant is edible. When I get them whole, I will often wash up the greens (which keep forever) and toss them into pasta as I do with other hearty leafy things. If the leaves taste slightly sweet and earthy, the stems, that much closer to the sweet beet itself, are somewhere in the middle flavor-wise. They’re crunchy and mild, but do indeed have a taste reminiscent of their subterranean counterparts. Beet stems are great sliced up and tossed into stews and soups but it’s far from soup weather these days, so I pickled them (I've been in a pickling mood, check out my recent bread and butter pickle recipe for the NY Times).
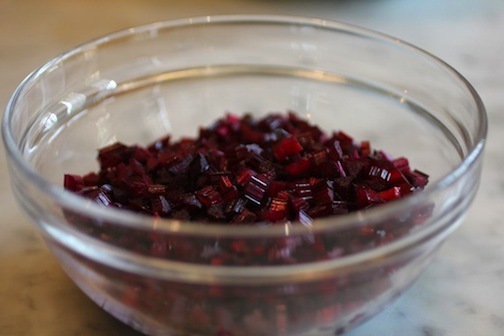
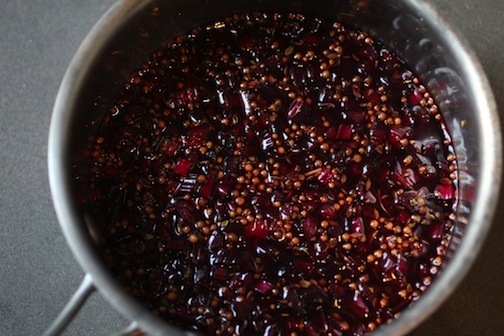
I sliced up my beet stems into what looked like sparkling little rubies. I’ve had some coconut sugar in my pantry for a little while, and I thought I'd try it out in place of regular sugar. It has a much deeper flavor than standard table sugar, with almost a molasses-like color when it’s dissolved. I used white wine vinegar, but cider vinegar could be delicious too. As a final addition to my quick-pickle, I plucked some lemon thyme from the deck and tossed it into the pot.
I decided, while I was at it, I’d try my hand at giving the surplus of radishes in the vegetable drawer the quick-pickle treatment too.
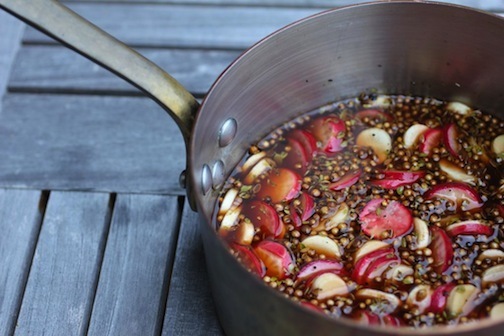
Once everything was cool, I tossed the beets in a bit of really good olive oil, and then added the beet stem and radish pickles to taste, along with some of the pickling liquid to season it up. I’d say I added about four heaping tablespoons (two of each.) But you should add it to taste.
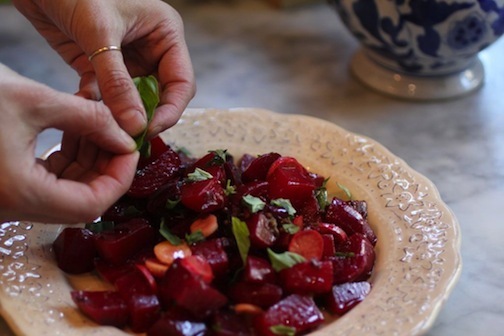
The simple, perfectly tender beets were made addictevely delicious by the complex flavor pops of the pickles (the coconut sugar rocked) and a showering of torn fresh basil. With lots of little pretty pickles leftover (they’ll keep for at least a month in the fridge,) I can already imagine they’ll be making appearances on hearty sandwiches, in cool salads, or maybe even as elegant finishes to bloody colored deviled eggs. Beets just make perfect sense in the summer.
You listening, beet-haters?
Summer Beet Salad with Pickled Beet Stems
4 cups peeled, cubed beets
2 Bay leaves
1 tablespoons plus 1/2 teaspoon salt
2/3 cup white wine vinegar
1/2 coconut sugar
2 smashed garlic cloves
1 tablespoon coriander seeds
1 teaspoon fresh lemon thyme leaves
1 teaspoon dill seed
1/2 teaspoon freshly ground black pepper
2 cups sliced beet stems
2 tablespoons extra-virgin olive oil
Fresh basil leaves
1. In a large skillet, add beets, bay leaves, 1/2 teaspoon salt, and enough water to completely cover the bottom of the skillet by about a 1/4 inch. Over high heat, bring to a boil and then reduce heat to medium-low and cover. Give beets a stir after about 10 minutes and check to make sure plenty of water remains—you don’t want all the water to evaporate. Continue cooking, covered, until beets are fork-tender and cooked through, about 7-10 more minutes. With a slotted spoon, transfer beets to a large bowl and allow to cool.
2. In a medium sauce pan over high heat, add vinegar, coconut sugar, garlic, coriander seed, salt, thyme leaves, dill seed, and black pepper and bring to a boil, stirring until coconut sugar and salt are completely dissolved. Remove from heat.
3. Add beet stems to sauce pan and stir. Let sit, uncovered, for about 1 hour.
4. Add olive oil to beets and toss to coat. Add about 4 tablespoons of pickled beet stems to beets and toss to incorporate. Finish with torn basil leaves before serving.
Store your pickled beet stems (or radishes, or _____?) in their pickling liquid in a covered jar in your fridge for up to a month.


July 4, 2012
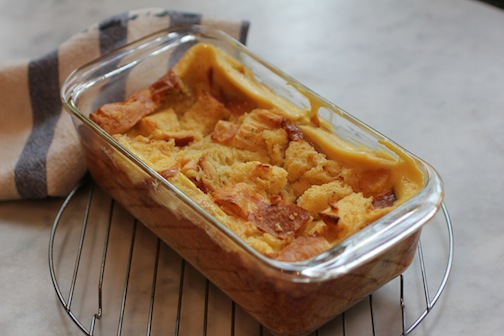
Custardy Bread Pudding with Ripe Berries and Rum

A sudden heat wave here in New York has rendered this post somewhat temporarily useless…none of us are turning our ovens on if we don’t have to. But, if you live somewhere where it’s mercifully less hot than it is here in this sweltering metropolis, by all means, get to baking. Summer berry season is in full swing, with stone fruits like peaches and cherries arriving in droves too. (This gadget helps indulge my cherry obsession.) I love showcasing perfectly ripe fruit by pairing it with a simple yet rich and buttery side-kick. Of course, almond cake is always a marvelous option. Or pound cake or shortcakes. But last week, I was in a brioche mood, and with a fridge full of lovely berries, a yummy, custardy bread pudding seemed just the thing.

Yes, it means turning your oven on in the summer…but only up to 325°ish. And good bread pudding is so darn versatile—it’s good hot, it’s good cold. Slice up the leftovers, and fry them a bit in butter for the best French toast ever. Drizzle your bread pudding with some hot chocolate sauce and sprinkle it with toasted chopped nuts. It’s the perfect thing for a weekend-rental-get-out-of-the-city-I-don’t-care-where-or-if-it’s-got-a-decent-kitchen sort of dessert. I’ve provided a recipe below, but it’s really something you could pretty much eye-ball, using a coffee cup if that’s all your charming country bungalow has to offer.
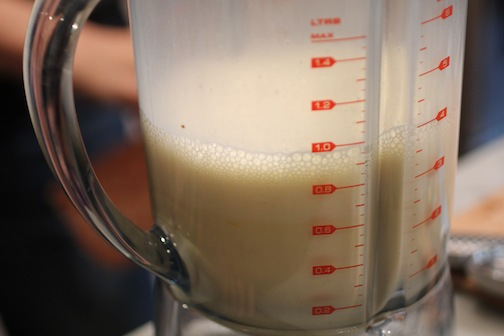
You basically want a minimum of two eggs for every cup of milk, and to have enough custard to cover the bread by about a quarter-inch. I’m always down to flavor desserts with booze, but the rum here is optional. The honey is a flavorful sweetener, and the cardamom gives the whole affair a touch of musky mystery, but cinnamon would work too, or any other baking spice you might be into or have on hand in your homey sea-side shack filled with ocean breezes. (Can you tell I need to get out of town?)
While everyone started tucking into their summer feast of grilled goodness and veggie bounty, you, in your airy linen dress, popped the bread pudding in the oven so it would be ready by the end of dinner. Twilight beckons, as do the crickets and fireflies (there are no mosquitos in my fantasy,) and you repair to your much-deserved seat on the coveted porch swing, a plate of rich bread pudding on your lap. A girl can dream...
In the meantime, there's bread pudding here in the city, too.
Bread Pudding
7 ounces of brioche or other tender, soft bread
1 1/2 cups whole milk
4 eggs at room temperature
1/4 cup honey
2 tablespoons dark rum
1 teaspoon vanilla extract
1/4 teaspoon cardamom
1/4 teaspoon salt
1. Pre-heat oven to 325° F. Slice bread into 1-inch cubes. Place bread cubes in a 9-inch loaf pan.
2. In a blender, combine whole milk, eggs, honey, rum, vanilla, cardamom, and salt and puree to combine. Or if you're at a country house, just whisk or use a fork to mix all these ingredients in a large bowl.
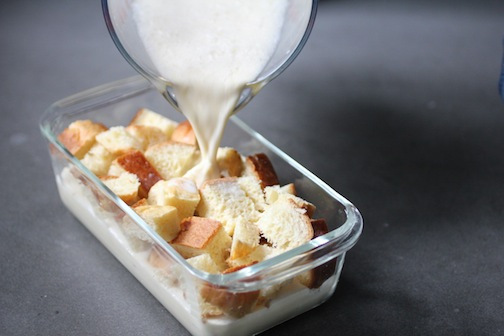
3. Pour custard over brioche cubes.
4. Place loaf pan on a sheet tray (in case of spill-over) and then place in oven, baking for about 50 minutes, until custard is mostly set (it should still be a bit soft in the center). Allow to cool before slicing if you want nice slices, or eat it warm by serving with a spoon.
5. Serve with fresh fruit and powdered sugar. Or whatever else you like.
June 8, 2012
Kitchen Hip Tip: Honey Jar Lemonade
If you’re anything like me, you have two or three jars of mostly-empty honey lingering in your kitchen. You keep saying you’re going to do something with them…maybe give them a hot water bath to soften those sweet remains. But there’s always something more important to do. So those jars bide their time, perfectly happy to take up valuable cabinet space.

My dear friend Olga Massov (who is about to get married…Congratulations Olga!) has a fantastic solution for those dilly-dallying honey dregs—honey simple syrup.
I went to a lovely event this week (an awards show for the Red Bull Theater Company) and the centerpieces on each table were bowls brimming with lemons. I was given persmission at the end of the event to fill my purse, so I did. (Don’t have to tell me twice!) Saddled with an abundance of really fragrant lemons, I made the juice into honeyed-lemonade concentrate.

Dahlia was my enthusiastic assistant, and as I had a few teaspoons of fresh ginger juice leftover from a Golden Bowl cocktail I was putting together for the Times we tossed that into the jar too. (Strictly optional, it doesn't need it).

The acid in the lemon juice will break down the honey all on its own if you let it sit for a while, but some agitation helps to speed up the process. Give it all a good shake and you’ll have tart-sweet lemonade concentrate in no time. Just add enough lemon juice to taste so everything is well balanced, and then when you're ready to drink, mix a little in a glass with a bit of water or club soda for super easy lemonade. Pantry cleaning, delicious over ice.

May 31, 2012
Small-Batch Homemade Hummus
Homemade hummus is a delicious, nutritious thing. My daughter Dahlia will wolf down a remarkable amount, radishes being her preferred delivery vehicle (well, after fingers that is, but I try to discourage this practice for politeness' sake even if I really couldn't care less).
For years, I made my hummus with canned chickpeas (the fancy, organic ones of course) boosted by loads of raw garlic, lemon, and cumin. And truthfully, the results were pretty good…certainly better than anything store-bought. But I knew I was cutting corners by not cooking my own chickpeas from scratch, and once I made the switch I really was rewarded with better (much better, as in worth the fuss better) hummus in the end.
The first few times I went full-monty, peeling each. And. Every. Chickpea. One by one. You can imagine how tedious a task that is—akin to peeling fava beans. A real labor of love that, I must admit, yields the most exceptionally silky, luscious hummus ever. Pureeing canned chickpeas is obviously the easiest route; peeling individual home-cooked chickpeas is hands-down the most arduous. I’ve come to a sort of middle ground—I split the difference, peeling until I basically get bored. Or not peeling at all. Homemade hummus with freshly cooked chickpeas is better whether you peel them or not - just to a different degree of yum.
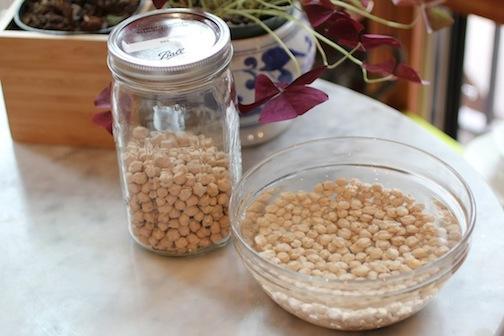
But now that I’ve got my own personal version of the process down, I’ve realized that I generally end up making too much homemade hummus for my household of three to finish. In fact, that’s often the case with me and dried beans—I get so excited about having perfectly creamy, starchy beans that I just dump the whole bag’s worth into the pot (they look so little when they’re uncooked.)
I needed to rethink my habitual tendency: instead of soaking and cooking a whole pound of dry chickpeas, why not just soak and cook a cup’s worth? With a smaller quantity of cooked chickpeas, I could puree them with my mini food processor…and I’m more likely to peel my way through a higher percentage of the lil’ legumes. And at the end of the whole hoopla, I have a perfect amount of homemade hummus—a generous, but totally finish-able portion.
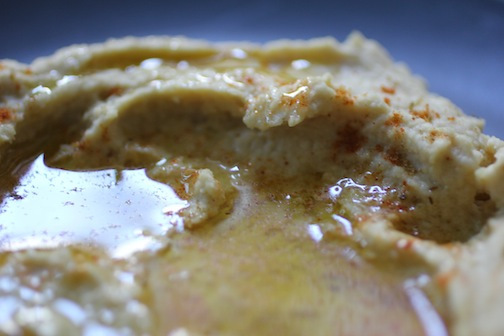
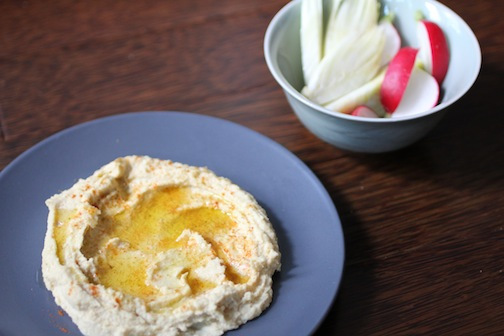
Hummus is a lovely summer-weekend-away goodie; of course it’s great with toasted pita and crunchy fresh veggies, but it’s also wonderful alongside that leg of lamb you might be planning on grilling. I’d even consider smearing it on my hamburger bun for something a little different. If you do serve it as a “dip”, be sure and go with the traditional presentation—instead of spooning it into a bowl, spread it on a plate so that you can get a well-seasoned bite every time. Don’t be tentative with the olive oil, and if you can take some kick, a good amount of cayenne is mouth-tinglingly delicious.
Whatever you decide to do with it, you’ll be amazed at how decadent a properly made homemade hummus can be.
Small-Batch Hummus
Makes about 2 cups
1 cup dry chickpeas, soaked overnight
1 bay leaf
1 teaspoon kosher salt, more as needed
1/3 cup extra-virgin olive oil, more as needed
3 tablespoons tahini
1 tablespoon lemon juice
1 garlic clove, finely chopped
1/8 teaspoon ground cumin, more as needed
Coarse sea salt, as needed
Cayenne, optional
Radishes, fennel, cucumbers, crisp pita bread, for dipping
1. Drain the chickpeas. Combine chickpeas, 6 cups water, bay leaf, and a very large pinch of salt. Simmer chickpeas, skimming off any foam from the surface, until they are very tender, about 1 hour. Drain, reserving cooking liquid. If you feel like peeling the chickpeas while they are still warm and feel good pressed in between your fingers, go ahead. Or skip it and don't bother. It's great either way.
2. In a food processor, combine chickpeas (try to do this while they are still warm, they will be grind into a smoother hummus if you do, or reheat before pureeing), 1/2 cup cooking liquid (also warm is good here), 1/3 cup oil, tahini, lemon juice, salt, garlic, and cumin until smooth. Add more cooking liquid if you like a thinner hummus.
3. Spread hummus on a plate. Drizzle liberally with oil and season with coarse salt, cumin, and cayenne, if desired. Serve with veggies or pita bread.
May 22, 2012
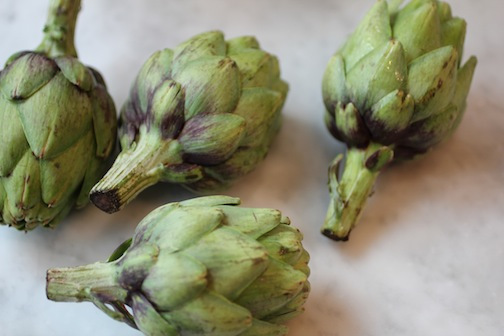
Baked Baby Artichokes and Ramps with Crunchy Breadcrumbs
Raining or not, I’ve got spring fever—asparagus, ramps, and artichokes, if I see them, I want them. That's the thing about spring. It’s fleeting. So I'm taking full advantage before summer comes around with all its flashy tomatoes and eggplants and what not.
Although they are not local (we don't get local artichokes here until June or July), I got ahold of some lovely baby artichokes recently. And I had what is probably one of the last bundles of ramps this year in my vegetable drawer, so lunch began to take shape.
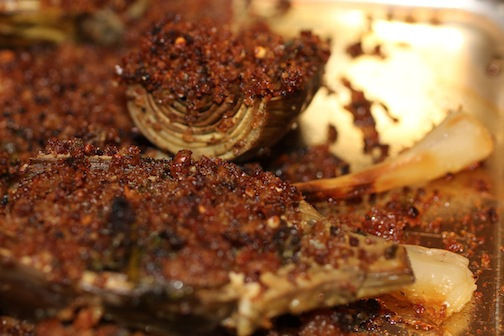
I decided that baking them would be the best way to keep things simple. As I’ve said before, I love stuffing artichokes with good, crunchy breadcrumbs and anything else I might be in the mood for (garlic, capers, pancetta, pecorino, etc.) Artichokes are generally a bit time-consuming to prepare; there’s no way around it. But boy are they worth it. And baby artichokes are considerably easier to prep than their bigger brothers and sisters—being choke free, they don’t need as much attention. After peeling the tougher outer leaves, and trimming the stem, I just sliced them in half and let them wait patiently in their lemon water bath. I was determined to pair them with my ramps. So, after separating the ramp bulbs from the more delicate leaves, I popped the bulbs into the roasting tray along with the halved baby artichokes, cut-side up.

I topped everything with a generous dusting of garlic-anchovy fried breadcrumbs (you can leave out the anchovy if you hate it). I added a touch of water to the tray, then covered it with foil. After about forty-five minutes, the artichokes were good and tender.
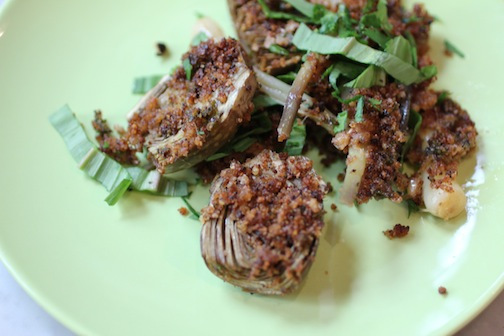
Then I cranked on my broiler, crisping everything up. It was heaven. The breadcrumbs were savory and crunchy, the artichokes were potently sweet, and the ramp bulbs were silky and luscious (you can use scallions if you can't find ramps). Thinly sliced, the bright green ramp leaves made for a perfect garnish. I put a solid portion on my plate, gave everything a quick squeeze of fresh lemon, and then promptly inhaled it. In order to save some for my husband Daniel, I actually had to cover his plate with a bowl to keep myself from picking away.
I was actually surprised by how well the breadcrumbs clung to the artichokes, and I couldn’t help but think that this recipe would make for great cocktail party fare. You could separate the ramps and the artichokes after baking and arrange them on the same plate—in my book, they could easily pass as finger food. (They certainly did today in my kitchen.) Wonderful hot, wonderful not.
Just wonderful in every way.
Baked Baby Artichokes with Ramps and Crunchy Breadcrumbs
1 whole lemon, halved
8 to 10 baby artichokes (about 2 pounds)
1 bunch ramps (about 6 ounces)
4 tablespoons extra-virgin olive oil
3 anchovy filets (optional)
3/4 cup plain dried breadcrumbs
2 garlic cloves, minced
2 tablespoons chopped fresh parsley, plus more for garnish
Sea salt
Freshly ground black pepper
Fresh lemon wedges, for serving
1. Arrange rack in the center of the oven and preheat to 350° F. Into a large bowl filled with water, give the two lemon halves a squeeze and then drop them into the water. Working one by one, peel, trim, and halve each artichoke and then place them immediately into the acidulated water.
2. Clean your ramps and trim the root bottoms. Separate the leaves from the bulbs.
3. In a skillet over medium heat, warm 2 tablespoons of olive oil. Add anchovy filets and sauté for about 2 minutes, breaking filets up with a fork until mostly dissolved. Add breadcrumbs and stir to coat. Continue cooking for 5 minutes, then add garlic, parsley, a good pinch of sea salt, and freshly ground black pepper. Cook for another minute then remove from heat.
4. In a baking dish or roasting pan arrange artichoke halves cut side up. Tuck ramp bulbs in between the artichokes, dispersing evenly. (I used a 9 by 13 roasting pan, which was a bit oversized, so I ended up corralling the artichokes and ramps together in a tight group in the center of the pan, a 10-inch pan qould have been perfect I think.)
5. Add enough water to the pan cover the entire bottom of the pan in a thin layer (I added about 1/2 cup). Cover artichokes and ramps with fried breadcrumbs, then drizzle with remaining 2 tablespoons of olive oil. Cover pan tightly with a sheet of foil and prick all over.
6. Bake for 45 minutes, then check that the artichokes are tender all the way through. If they aren't easily pierced by a fork, bake for an additional 5 minutes or until tender. Raise rack to highest position and broil the artichokes and ramps for 1 minute.
7. Sprinkle the artichokes and ramps with sliced ramp leaves and additional chopped parsley. Serve with lemon wedges.
May 1, 2012
Sunday Soups: Green, Spring Things Soup
[image error]
Last week was a doozy. It commenced with Dahlia getting scarlet fever. Apparently that 19th century malady -- the terror that blinded Mary in the Little House books, that dreaded disease of the Velveteen Rabbit -- is still with us, albeit in a milder form. The name itself would have scared the heck out of me if I hadn't seen that really, my kid was okay except for having a 102 fever and a ruby rash all over her body. Uncomfortable, yes. In life threatening peril, not so much. But she was down, and then I fell too with some awful sore throat thing that may or may not have been strep but was most definitely unpleasant.
What I needed was soup. Not chicken soup. Too wintery for the moment. I wanted a soothing soup that tasted like spring. Or at least, like the spring onions, spring garlic, ruffled cilantro, and spinach I took home from the greenmarket before I collapsed into a feverish heap. Something green and fortifying, and pureed so I would haven't to chew.
From the freezer, out came the last of my Thanksgiving turkey stock. (It is amazing to me just how much turkey stock tastes like turkey. It tastes more like turkey than turkey does.) I grabbed a couple of yellow potatoes from the bin and then simmered it all together, finishing the top with a squeeze of sunny lemon.
It was a green, cleansing, spring tonic of a soup. Just what I needed to make me well. Dahlia wouldn't touch it by the way (too green) but she got better nonetheless.
[image error]
Green, Spring Things Soup
Serves 4 ish
4 tablespoons unsalted butter or more (I used a stick, I'll admit it, but you don't need that much)
1 bunch spring onions, chopped (white and light green parts, about 2 cups), or use 2 bunces scallions
1 bulb green spring garlic, chopped (or use 3 regular garlic cloves)
1-2 teaspoons salt, more as needed (depending on your stock)
Freshly ground black pepper
1 quart stock (poultry or vegetable)
2 potatoes, peeled and cubed (I used 2 large Yukon golds)
1 bunch young spinach, chopped (about 1 quart)
1/2 cup chopped cilantro leaves, plus more for garnish
1 lemon, halved
1/2 cup chopped dark green spring onion or scallion tops, for garnish
1. In a large pot over medium-high heat melt butter and add spring onions and garlic. Cook for 5 minutes, stirring occasionally, until translucent and soft. Add green garlic, salt and pepper and continue cooking for 1-2 minutes.
2. Add stock and 1 quart of water and bring to a simmer. Add potatoes and reduce heat to medium-low. Continue simmering until potatoes are tender, about 15 to 20 minutes.
3. Add spinach and cilantro leaves and continue simmering for another 1-2 minutes until spinach is wilted and soft.
4. With an immersion blender, puree soup to desired consistency. Or puree soup in batches in a blender.
5. Just before serving, squeeze half the lemon into the soup, stirring it well and tasting as you squeeze. If it needs more, squeeze some from the other half. When it tastes right, stop with the lemon. Finish each serving with a sprinkling of cilantro and onion tops.
April 23, 2012
Kitchen Hip Tip: Roasted Broccoli Rabe
[image error]
Spring is here and I know what you're thinking: asparagus, peas, ramps, rhubarb.
All true, but let's not forget broccoli rabe.
I know, it's not what most people think of when they think spring, (it's also a fall crop) but it's here in abundance after being wintered over. Spring broccoli rabe is actually sweeter than the fall plants, and you can often find them sprouting pretty yellow blossoms that are a joy to eat.
For the most part, I've always sauteed my broccoli rabe with garlic, olive oil, and chili flakes. And it's delicious. But I recently learned that just like its domesticated cousin, broccoli rabe is wonderful roasted. (Keep your eyes peeled for my upcoming video I shot for the New York Times for an up-close look at the technique.).
I wouldn't have thought so, I'd have assumed the tender leaves would burn to a crisp before collasping into a mushy heap. But they don't if your oven is hot enough (500 degress) and you use plenty of oil. Instead, those leafy bits can get soft and wilty in spots, and delightfully charred in others. Plus, like any other roasted veg, it's easy to do. And perfect when you've got the oven on for something else.
Two tips here: make sure your oven is good and blazing (pre-heated to 500°), and don’t over-crowd the pan—the broccoli rabe needs some room to roast right. (If the pan is over-crowded, the veggies will steam each other as they release their water.) After about 5 to 7 minutes in your super-hot oven, you’ll have a tray of irresistible, char-edged goodness. Pile it high on crostini smeared with good ricotta or a slick of olive oil, serve it hot as a side dish with just about anything, or enjoy it cold, almost like a salad with big curls of Parmigiano Reggiano and a squeeze or two of fresh lemon.
But make this soon, before it gets too hot to crank up the oven. Though at that point, we'll all be on to more summery produce. How many more days until tomato season?
March 28, 2012
Coconut-Orange Muesli
[image error]
Muesli at the Andaz Hotel (note the fancy raisins)
Every year, my husband and I go on a "stay-cation" for our anniversary. That is to say, we stay here in New York City, but head to a swanky hotel for a night off in each other's company. It's a tradition of ours that I love -- it brings us back to our carefree (sort of) lives pre-child. Included in the evening is of course a dinner out somewhere easy (no thumping music or waitlists) and exceptional. For example, John Dory, where we had a fabulous seafood plateau.
In terms of hotels, this year, we stayed at the super-cool Andaz on Fifth Avenue, and had a beautiful view overlooking the New York Public Library. And of course, when we woke up (LATE!) we had breakfast in bed.
If I believed in heaven, it would include very good room service. I ordered a bowl of muesli because I wanted something soft and comforting. And that's what I got, a bowl full of sweet, soft oats topped with bananas and those exotic seeming stem-on raisins, which were so sweet they tasted like candy.
The muesli was so good, I decided to make my own version at home. I hadn't made muesli in years. Although I eat oatmeal and granola all the time, I just never think about extending my oat-love to muesli. Another motivation was that I really wanted to make some for Daniel , who doesn't eat milk or yogurt. So instead of using the usual dairy to soak the oats, I swapped in coconut milk. With a bit of fresh orange juice and zest for brightness and a grated apple for subtle sweetness, my muesli was off and running.
Here's a trick I learned about grating apples. Just slice big "cheeks" off the core and grate them against a box grater. The flesh will come away from the peel in a cinch, and the peel protects your hand. See?
[image error]
Finished with a sprinkling of toasted coconut chips, a bit of fresh fruit, and some really well-toasted whole almonds, my muesli was satisfying and almost as pretty as the Andaz's version (I couldn't find the stem-on raisins but honestly I didn't look very hard).
By the way, be sure to add the almonds at the last minute—you want them to retain their crunch.
And Daniel was delighted with his breakfast, even if I didn't serve it to him in bed.
[image error]
Coconut-Orange Muesli
Serves 3 to 4
2 cups rolled oats
½ cup coconut milk (more as needed)
1 orange, juiced and zested to yield about ¼ teaspoon of the zest (about half the orange)
2 teaspoons honey (optional)
Pinch of salt
1 apple, grated
½ cup dried cherries or other fruit
½ cup skin-on almonds, toasted and coarsely chopped
1/4 cup dried coconut chips, toasted (optional)
Fresh fruit, for serving (optional)
1. In a medium sized bowl, combine oats, coconut milk, orange juice and zest, honey if using, salt, grated apple, and cherries and stir to combine. If the mixture seems dry, stir in a little more coconut milk. Allow to soften in the refrigerator for at least 1 ½ hours or up to 3 days.
2. Serve muesli with a sprinkling of toasted chopped almonds and coconut, and fresh fruit if you like.
March 16, 2012
Calzones!
[image error]
I say ri-caw-tuh, some say ri-coata, which is stuffed in a Cal-zoan -- unless it's calt-zonay…(and then there's a ri-gut stuffed ca'zone but that's a whole other level of Brooklynese that brings me back to Junior High School...).
I'm digressing before I even start.
However you say it, a ricotta-stuffed calzone is a delicious thing, basically a big, beautiful grilled cheese sandwich oozing sweet milky ricotta and gooey mozzarella, sparked with plenty of pecorino or parmesan. I've loved them ever since I was a kid, and lately I've been eating a lot of them as "research" for an upcoming column and video I'm working on for the Times.
Of course I'd be remiss if my research didn't include a trip to Lucali's in Carroll Gardens. So I headed over there this week to pick up some tips and techniques from a calzone master, chef/owner Mark Iacono.
Some mighty gorgeous pies come out of Mark's brick oven, but the calzones are equally special. Tender and soft, the dough retains a lovely chew even with a touch of char from the super-hot oven, and just the right amount of cheese gets all melt-ey and ooze-ey. I took the remains of our practice home, and the calzones were even delicious cold. [image error]
(That's Lucali's oven, it can reach about 1000 degrees F.)
One thing I learned for sure—you want to use drier ingredients for a calzone than you might for a pizza. Since a calzone locks in moisture (unlike a pizza where much of the moisture evaporates and condenses), you want to keep wetness to a minimum so you get a properly and thoroughly baked shell with any dreaded sogginess. If you're using ricotta, give it a really good squeeze (or better yet, strain it in the fridge overnight). And as much as I love runny, fresh, buffalo mozzarella, the denser, cow's milk kind works much better in calzones (look for the stuff wrapped in cellophane rather than balls bobbing in water). Whatever cheeses you're using, be sure to season them aggressively (lots of black pepper) before sealing up your cheesy, doughy package.[image error]
Mark also makes an irresistible dessert calzone, with sweetend ricotta on the inside and swirls of melty nutella (the kind imported from Italy, of course) on the outside, seasoned with sea salt. I came home and made something similar with honeyed ricotta mixed with orange zest and cinnamon on the inside, and powdered sugar and honey on top. Heavenly (there it is, below).
Anyway look for more about calzones in a few weeks in the Times. In the meantime, I'll be trying out different filling combinations (broccoli rabe, olives and parmesan sounds like a good to me), and generally brushing up on my calzone technique -- and pronounciation.
[image error]
March 5, 2012
Spaghetti with Garlic and Chilies (oh and a few anchovies)

Some ingredient combinations are like alchemy. Toss together a few mundane things in the exact right way and you get a dish that's transcendent, brilliant, better than it should be for what went into it. And such was our dinner the other night of spaghetti with garlic, chilies, and a few anchovies. There wasn't much to it, yet it was sublime.
Of course the quality of the ingredients had something to do with it; I had lucked into some of the best garlic and chilies imaginable. But even so, it was a good reminder that even when there's nothing in the house for dinner, there usually is, even if the garlic and chilies came from the supermarket instead of, you know, London's amazing Borough Market.
That's right, I made an Italian pasta dish with ingredients from London in my Brooklyn kitchen. Not very authentic or local or what have you. But boy was it good.
It all started when a friend (who clearly knows me well) returned from a trip to London with some contraband Borough Market treats.
I'd been lamenting the disappearance of good garlic this time of year. All the farmers' market stuff is dry and dull and the first spring bulbs have yet to ripen. And you have to pick through a lot of supermarket garlic to avoid the soft and sprouty heads. I use garlic constantly nonetheless because that's how I am. But that doesn't stop me from complaining.
Kvetch and ye shall receive: my friend arrived at my house with a brown paper bag filled with gorgeous Lautrec garlic. And I am most grateful to my Garlic Smuggling Friend GSF (who shall remain nameless lest the US Customs and Border Protection agents hunt her down).
In case you didn't know, the little town of Lautrec in the south of France has been famous for its garlic for centuries (yes I just looked all this up...). It's serious business there. So serious that it was given the Certificat d'Identification Geograhique Protégée (certificate of protected geographical identification). It can only be called Lautrec garlic if it's grown in Lautrec. It comes streaked white and rose, with taut fat bulbs that are pink at the tip after peeling. The flavor at first seems sweet and floral, but keep chewing and a sharp, spicy bite hits the tongue, followed by an earthy quality. It is just spectacular garlic. Decidedly un-local, but spectacular.

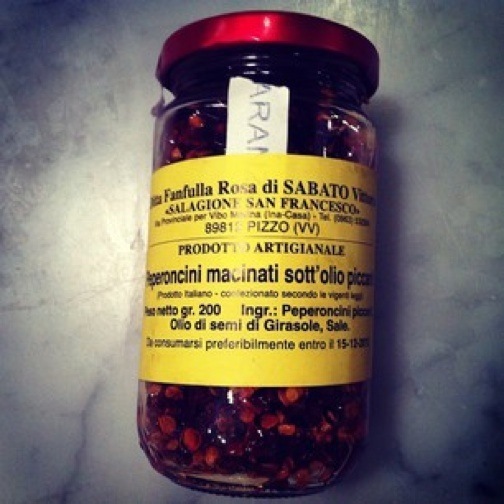
My GSF also brought me a curious little jar of Calabrian Chili. I'm all too familiar with the yummy salt/oil packed Tutto Calabria chilies that the Brooklyn Larder carries (they're a mainstay in my kitchen). But this jar from Borough Market was different. According to the Calabrian gent who sold them (and who allegedly sported an authentic and impressive mono-brow), a genuine Calabrian grandmother roasts the chili flakes till they're almost dry, then packs them in salt and oil. The flavor is searing hot, smoky, complex and very salty, with a crunchy, brittle texture. They were so addictive that I accidentally ate a small pinch flake by flake like potato chips, tears streaming down my face (in a good way).
As I looked at my new overseas goodies, dinner began to take a very clear shape.
I'd riff on the classic southern Italian pasta Aglio e Olio (garlic and oil), stirring in a spoonful of those crunchy chilies along with some anchovies and capers.
This kind of preparation is best paired with a long pasta shape—classically, spaghetti. And I had a lovely, Campania-made, fancy-pants Setaro spaghetti at the ready (sometimes I just can't stop myself from spending $12 on a pound of pasta, but it's a cheap shopping high, much more economical than, say, that $190 pair of jeans).
For the two of us for dinner (this dish was going to be far too spicy to share with our small child) I used three cloves of garlic, and wished I'd used more. For the sake of experiencing the garlic in many manifestations, I chopped 1 of the cloves, and left the other 2 whole after smashing and peeling them. The whole, smashed cloves get sweet when slowly cooked in oil while the minced one, which I added at the end, stayed bright and pungent. And the anchovies and capers added a salty briny depth.
The pasta was so good and so simple that I plan to make it again, even when my stash of fancy garlic and chilies is gone (and they are not long for this world, I think I'm making this dish again tonight). In which case, I'll just use the best, fattest, plumpest garic I can find, and some good crushed red chili flakes that I'll toast in oil for a minute or two with a pinch of salt to mimic that deep, browned flavor.
My friend's gift was more than just good garlic and chilies, it was a reminder that sometimes the simplest recipes are the best. And when late winter palate fatigue sets in, pasta with a little chili and a lot of garlic will set it right again.
By the way, if you're wondering why there isn't a mouth-watering photo of the finished dish it's because we inhaled the thing too quickly. I simply couldn't wait. Make this and I think you'll see why.
Spaghetti with Garlic and Chilies (and a few anchovies)
Serves 2
1/2 pound spaghetti or any long pasta shape
Salt
3 tablespoons good olive oil, more for drizzling
1/4 to 1/2 teaspoon red chili flakes (use the best stuff you can find, preferably of Italian origin)
3 or 4 fat garlic cloves, 2 or 3 smashed and peeled, 1 minced
3 tablespoons drained capers, patted dry with a paper towel to encourage browning
2 to 4 anchovy filets
Freshly ground black pepper
Squeeze of lemon, optional (the pasta was good with and without the lemon, so squeeze to taste)
1. Bring a heavily salted pot of water to a boil (about 1/4 cup salt for a loarge pot of water). Cook the spaghetti until al dente. Drain.
2. Meanwhile, heat the oil in a large skillet, the largest one you have. Add the chilies and a pinch of salt and toast until golden, 1- 2 minutes (skip this step if you are lucky enough to be using fancy toasted Calabrian chilies).
3. Add the smashed garlic, capers, and anchoviues and let cook until everything is well golden and the capers look crisp around the edges and the anchovies have dissolved into the oil (you can help this along by mashing them with a wooden spoon as they cook).
4. Add the remaining minced garlic to the pan and saute for 15 seconds, then add the drained pasta and toss well. Add more salt if necessary, and plenty of black pepper, and serve drizzled with more oil and a squeeze of lemon if the dish needs a lift. Cheese isn't necessary but if you like pecorino and have some on hand, feel free to shower it on top.
Melissa Clark's Blog

- Melissa Clark's profile
- 130 followers

