
Michelle Bruhn's Blog: Forks in the Dirt, page 5
September 28, 2023
Season Extension: Garden + Harvest into the Fall + Winter
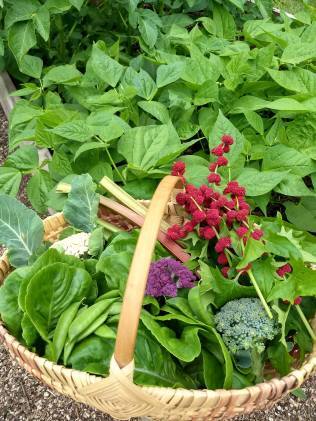
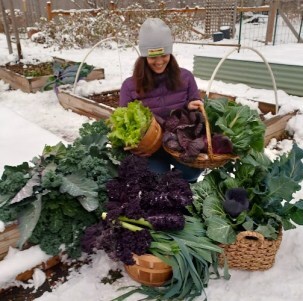 One last harvest deep into winter from all my veggies grown under cover
Fall temps can quite literally cool our northern garden jets once September hits its stride and apple season arrives. But for those of us that enjoy those frost sweetened crops and don’t mind gardening into the cool of autumn, Season Extension opens another mini-season of gardening and harvesting!
For those just getting started on season extension, you may be wondering why we bother with this extra work?
For me the reason is that by keeping plants alive in the ground, it allows them to hold onto their nutrients, compared to if we harvested at the first sign of frost. Food loses around 30% of its nutrients within three days of harvest.
Practicing season extension can add weeks or even months of harvesting FRESH FOOD from your garden. And isn’t harvesting healthy food one of our main goals?
*This post includes some links to products I have tested, and as an Amazon Associate I earn from qualifying purchases.*
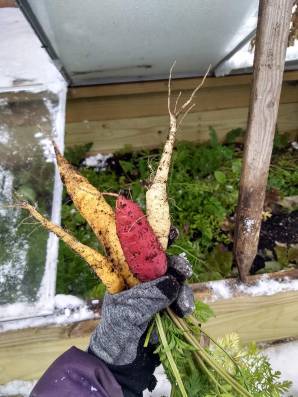
Season Extension Factors You can remove the plastic completely for easy harvesting, especially during the warmest part of the day.
Successfully extending the harvesting season depends on a few individual factors. Each one affecting the other; like the plant variety, weather, your growing zone, microclimates within your garden and if deciduous trees drop leaves and add a little more sunlight to an area that is shady during the summer months. But it all starts with the right plants!
Knowing which plants do well in cool weather is key to success. We’ve got a list of the 21 most common garden plants (everything from Arugula to Zucchini) and their germination temps and their low temperature threshold listed on page 46 of our book, Small-Scale Homesteading. You can also find most of this information online at whichever seed company you purchased your seeds from as well. Johnny’s Seeds and High Mowing are especially good at adding this info online. It can be surprising how much low temp threshold variation there can be between what we all typically think of as cool weather crops. So do your research and you’ll be ahead of the game!
Growing Under Coverage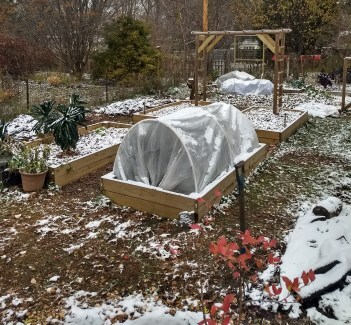
The next key to success is adding some physical cover over the plants. There are many ways to add a layer of protection over your plants, from simply setting a plastic bin over a few plants, or quick to set up and moveable low tunnels, to permanent cold frame structures. Even adding a layer of dry, shredded leaves will help protect many root crops for a few more weeks.
We pop up these kinds of covers for two different reasons.
To protect frost sensitive plantsTo hold cold-hardy plants in the garden longerThe first category of plants we cover up tend to be lettuce and other plants like broccoli and cauliflower that can typically handle down to 28F without damage. So, if we know a frost is coming, we’ll get the cover structure up *at least* a day or two before the temps dip. This allows the soil and air temps to gain a few degrees before they get to the critical low temperature.
Managing the temperatures inside low tunnels and cold frames is a bit of an art. The air temps under coverage will vary greatly depending on how sunny the days are. Even with air temps in the 20F’s outside, we’ve had air temps inside low tunnels above 70F (this happens both in the spring and the fall).
 Another way to add a little heat to low tunnels (especially on cloudy or very cold days) is to add warm water to milk jugs or buckets and add them under the plastic.Temperature Fluctuations
The thing to watch in adding a low tunnel to plants in the fall is that the sun still drastically warms the air. Sudden changes can cause plants stress because they have to quickly change up their internal metabolic processes. Even experiencing this one time can lead to a weakening of the plant’s overall vigor. This in turn makes it more susceptible to diseases and pests. If we’re using this practice at the end of the season for an annual plant, this weakening isn’t crucial for longevity. It is good to know both for spring low tunnel use – and because drastic air temperature fluctuations will affect the quality of produce you harvest.
 Nothing beats harvesting fresh food after other ground is frozen!
Depending on when the sun hits the low tunnel (or cold frame) temps can easily rise 10F every half an hour. And this is where plants can suffer from temperature shock.
In a typical Minnesota fall, temps can be down in the low 40’s overnight and back up to the 70’s in the afternoon- so it doesn’t make sense to say there’s a specific number of degrees plants can handle in a day. The issue is that under a plastic cover the temps increase more rapidly than in a natural setting, so the plants don’t have time to adjust their internal processes.
Opening up the end of the low tunnel in the morning, and closing back down early in the afternoon to keep temperatures as close to 50F is typically my goal.
DIY Low Tunnel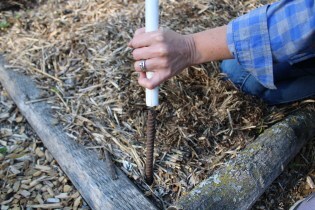 Sliding a piece of 1/2″ PVC over a 1/4″ piece of rebar to build a low tunnel.
Low Tunnels are easy to construct and move around to follow your crop rotations. Start by pounding in 2-foot lengths of rebar at your corners and along the edges every 2’ or so. Then slide some ½” PVC over the rebar. This creates an arch over the bed when you slide the PVC onto the rebar on the other side of the bed. Then add a stick of PVC the length of the bed. At the top of and perpendicular to the arches, to add strength to the structure. You can easily secure with zip ties.
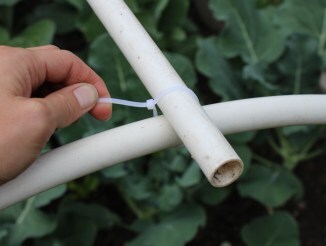 Using a zip tie to secure the cross piece and arch of the low tunnel structure.
Cover in plastic between 2-6 millimeters thick. Cut so you have enough to make good contact with the soil all the way around. You can use a longer piece of rebar or rocks, lumber etc… to weigh down the edges. Secure the plastic to the PVC with clips or clamps. This whole set up can cost as little as $40 and will last for years.
Know that you’ll be peeking in to check on temps often, so adding a soil thermometer and a regular small exterior thermometer where you can easily see it makes that step lots easier.
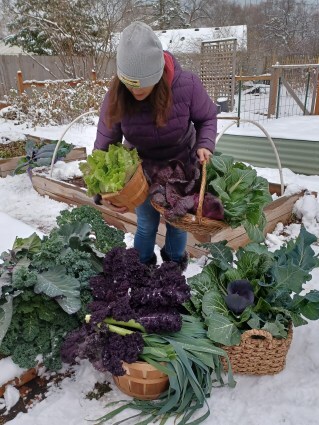 Here I am harvesting the last crops of the season in December. These are vegetables like kale, leeks, cabbages, spinach and lettuce grown under cover.
If you’re looking for an easy all in one option? I know garden friends who enjoy this combo of a structure and easily to install 3-Season Plant Protection Tent from Gardener’s Supply. (I am not affiliated with them).
Season Extension has added months of fresh harvests for my family over the years, and I hope it can do the same for you!
What questions do you still have about starting this process?
Let’s Dig In!
Michelle
The post Season Extension: Garden + Harvest into the Fall + Winter appeared first on Forks in the Dirt.


September 15, 2023
The Amazing Aronia Berry
If you love growing beautiful medicine, that also attracts the pollinators then let me introduce you to Aronia Berry, aka Chokeberry. Actually, you may have already met Aronia Berry while walking in the woods or edges of prairies in the Midwest of America.
Officially named Aronia melanocarpa this cold hardy North American native woody shrub is worth adding to your landscape for its adaptability, form, fall color and of course, its fruits!
Knowing + GrowingThe Aronia Berry tends to stay around 8 feet tall (depending on variety) and is much less picky about soil as it has deeper roots than the Elderberry. They are hardy to -40F or USDA Zone 3. They���re also don���t have any pest issues and are disease resistant.
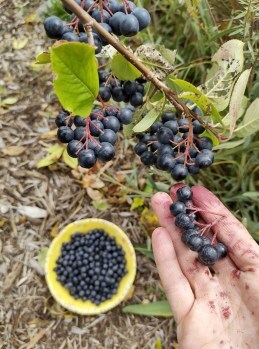
I���ve been successfully growing the common Viking variety for five years now in zone 4. We���re growing and harvesting berries from my front yard from 2 mature bushes. We get about 4 pounds of fruit total. This amount is more than enough to keep us in Aronia Berry immunity syrup heaven, and extras for smoothies too. We would likely get more of a harvest if I amend the sandy soil, maybe someday, ha! They produce beautiful clusters of the deepest dark purple (pretty much black) berries- which is where the anthocyanin comes in���
Powerful Plant ChemistryAnthocyanin gives the dark superfruits their super powers. The purple-black berries of both Aronia and Elderberries pretty much blow away other commonly revered superfoods with their antioxidant levels.
Antioxidant levels in food are measured by Oxygen Radical Absorbance Capacity (ORAC). ORAC measures the overall antioxidant power of a food or supplement. USDA research shows Aronia Berries has one of the highest antioxidant content of any fruits, according to the Aronia Berry Services of Northeast Iowa.

There���s quite the list of berries that grow in our Zone 4 Midwest region; Aronia Berry, Elderberry, Wild Blueberry, Blackberry, Raspberry, Strawberry and Cherry. Each of these contains elevated levels of antioxidants. Our local food system is providing for us, keeping us from needing to fly food halfway across the world to boost our immunity and up our antioxidants. Thank you, Mother Nature!
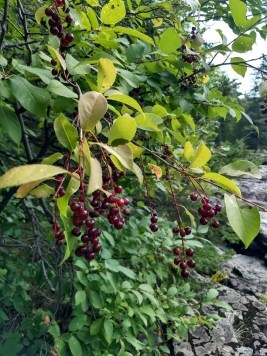 Chokecherry Tree with Ripe “cherries”Comparing Berries
Both Aronia and Elderberry grow to between 6 and 10 feet tall. And will produce better in full sun, but don���t mind a little afternoon shade. Elderberries prefer it wetter than Aronia. Aronia are self-fertile while Elderberry require another variety for pollination. Both will start producing more fruit about 2-3 years after planting.
Raw elderberries (the berries, leaves, bark and roots) contain both lectin and cyanide which can cause nausea, vomiting and diarrhea so ALWAYS cook elderberries before consuming! Aronia berries may be eaten raw, or frozen and to smoothies.
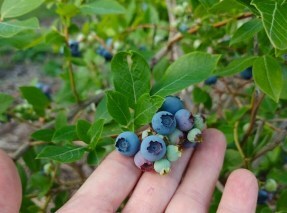 Partially ripe cluster of blueberries in hand.
I love a good blueberry but they do require a specific pH, so test your soil before planting, as changing soil pH is a very difficult task! Chokecherry (Prunus Virginiana) grows more like a tree up to 30 feet tall and 20 feet wide and produces smaller berries (like pin cherries) but are adored by birds and humans alike.
How to Use your Aronia BerriesAronia berries are the driest berries I���ve ever worked with, so they do lend themselves to dehydrating and adding to trail mix.
I really enjoy using frozen aronia berries in place of blueberries in my morning smoothies. I think the dairy (or oat/almond milk) really balances out the tart berries nicely. Adding greens and other fruits helps too.
I���ve also baked with them, making scones and muffins, although I compensated for the astringent berries with a sweeter than normal dough, they still weren���t my family���s favorite.
But for our family, we mostly use these in Immune Boosting Aroina Syrup recipe below. I especially love being able to add our home-grown ginger into his recipe. You can absolutely use a combination of elderberries and Aronia berries in this recipe.
 Aronia Syrup Recipe3 Cups aronia berries (fresh or frozen)�� Cup filtered water1 cinnamon stick1-2 tsp Cloves1-2 inches of ginger, sliced or grated1 cup + Honey (Raw + local if possible)
Simmer with lid on in a non-reactive pan for 15-20 minutes, adding water as needed to keep from scorching.
Cool, remove cinnamon stick and strain. I place the cooked pulp into a (very stained) jelly bag and squeeze out every last drop of juice by hand. You may want to wear rubber/latex gloves to avoid staining your hands (the stain wears off in a day or two).
Pour into a very clean glass jar.
Mix in honey to taste (I find we use less honey in aronia berry syrup than elderberry syrup)
Stores in refrigerator for 1 month. I prefer to make a small batch every month or so rather than a bigger batch that might spoil.
Dark Blue Deep Dive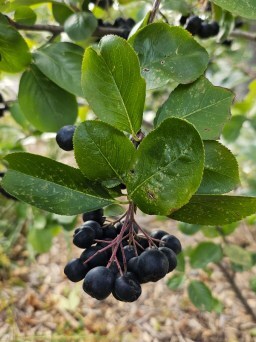
If you���re interested in adding more of these antioxidant rich plants to your landscape and diet, Honeyberry USA for a wide selection of high anthocyanin fruiting shrubs. Or consider connecting with the Blue Fruit Farm for a delivery of Minnesota grown berries, syrups jams and jellies in the Twin Cities. They also sell elderberry canes for those interested in growing out their own stock.
If you���re looking for the finished product at your local farmers market check out the fine ladies with Sailor Mercy.
Have I tempted you to grow more of your own medicine?
Let me know what you think!
Dig In,
Michelle
The post The Amazing Aronia Berry appeared first on Forks in the Dirt.
July 31, 2023
Zucchini Fritters Two Ways (but both Gluten Free)
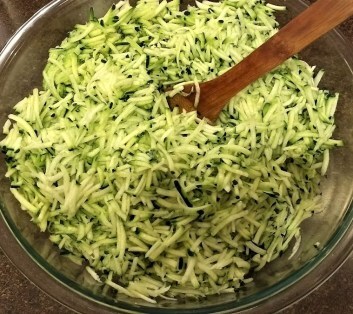
Zucchini Fritters are a healthy ‘fast food favorite’ in our home every summer! We all know how fast those zucchini can grow… so if you want a healthy + savory take on the good old pancake (and use up cups of shredded zucchini all at once)- Zucchini Fritters are for you!
I love the two different versions of this recipe equally, it just depends on what flavors I’m craving more, and if I happen to have some potatoes around as to which I make.
You can use a variety of zucchini in this recipe, and even summer squash too, just be aware of the different moisture content in each variety. Patty Pan are one of the ‘meatiest’ and dense/driest types, while Fordhook + Golden varieties tend to be wetter. If you shred the zucchini and can see extra water in the bowl, squeeze some out so you don’t have too thin of fritters.
More information on Growing Zucchini + More Ways to enjoy them on another post A Zillion Ways to Zucchini.
Either way the Zucchini Cornmeal Fritter, or the Zucchini Potato Fritter is delicious quick lunch, though shredding raw potato and cooking them takes a little longer. I do love a good potato pancake though, and the potato version are like a lighter, veggi-fied version of a potato pancake (I’ve also made them in the Swiss Rosti style-YUM!)
We almost always enjoy them with a fresh Tzatziki Sauce (Cucumber + Yogurt Dip) so I’ve included that recipe here as well- 3 recipes in one blog post- jeesh 
Try both and let me know which version you prefer!
 Zucchini Cornmeal Fritters2-2.5 Cups of shredded Zucchini (see note above))1 shallot1/3 Cup shredded Mozzarella1/3 Cup corn meal1 large egg1 tsp salt1 tsp paprika�� tsp garlic powderOil to saut��
Mix all ingredients together and let rest for 10 minutes so the cornmeal absorbs moisture. *This is when I make a quick tzatziki sauce. Turn heat to medium/medium-high. Heat enough oil (I prefer olive or avocado) to cover bottom of pan. Pour 1/3 cup circles of batter into pan, flip once halfway cooked usually around 3-4 minutes. Let drain on paper towels. Refrigerate leftovers, which stay good for 2 days.
 Zucchini + Potato FrittersIngredients:2+ pounds fresh zucchini, shredded (excess moisture squeezed out if needed)1 pound potato, shredded (can use sweet potato too-sooo good!)1 medium onion diced or shredded3 eggs2 tsp baking powder1 tsp salt1 T mixed spices like garlic, onion, paprika, black pepper, Up to 2 Tbsp hot sauce (or none)3/4 cup flour of your choice (I use ground oats)Oil to Saut��
 DIRECTIONS: Mix together all ingredients and let sit for 5-10 minutes to let oat flour absorb moisture. Form loose patties with wet hands. Heat enough oil (I prefer olive or avocado) to cover bottom of pan. Pour 1/3 cup circles of batter into pan, flip once halfway cooked usually around 6-8 minutes. Let drain on paper towels. Refrigerate leftovers, which stay good for 2 days.
Cucumber Lover���s Tzatziki SauceThis is our family’s favorite sauce to accompany our fritters so I had to share here too… PS-I do not peel my cucumbers for this- but do scoop out any large seeds.
 1 large English cucumber, Shredded (any cucumber will do, just scoop out any large seeds)1 tsp Kosher salt4+ garlic cloves, pressed or minced2 Cups Plain Greek Yogurt2+ TBSP chopped dill1 tsp lemon juice or white vinegarPinch of white pepper (black is a fine substitute)Olive oil ��� for drizzling on top
If you can let the sauce sit for 30 minutes the flavors will have a chance to mingle!
In the winter we���ll take out a pack of frozen shredded zucchini and whip these up with the warming spices of curry!
The fritters are also surprisingly delicious cold the next day.
…And if you need a sweet treat option for your Zucchini, try my Decadent GF Chocolate Zucchini Cake Recipe!
I hope you make at least one of these two versions of Zucchini Fritters- and let me know what you think!
Dig In!
Michelle
The post Zucchini Fritters Two Ways (but both Gluten Free) appeared first on Forks in the Dirt.
July 1, 2023
Harvesting from Your Garden
Harvesting from your garden is the moment we���ve all been waiting for!
You���ve probably heard it���s best to harvest from your garden in the morning. Maybe you���ve also heard not to harvest from your garden when wet��� These can seem contradictory especially on damp, dewy mornings. But there���s more behind the ���not wet and not wilted��� reasoning.
I���m sharing some best practices to harvest lots of delicious and nutritious food to make your garden healthier and more productive.
 Why Not When Wet?
We should generally hold off harvesting from our gardens until plants are dried off because when we open a wound on a plant from harvesting by cutting or breaking off we���re leaving an entrance on the plant for diseases.
Fungal and bacterial diseases (blight, powdery mildew, rust, etc.) multiply while the leaves are wet. So, the chance of them getting directly into a wound is greater with a wet plant as well. This timing also makes it harder for the plant to fend off the diseases in general.
When it rains, any ���germs��� a plant has on its surface are captured in rain drops. If a gardener were to go through while the plants are wet, the ���germy��� water from one plant is shared with neighboring plants as the gardener brushes the leaves and moves from one plant to the next.
Even though I love walking through a garden right after it rains (it feels so lush and primal doesn���t it!?) I try to remember to stay in the wide paths and not touch plants to minimize the spread of diseases.
When leaves are wet, their pores become much more open to their surroundings. A plant���s roots and leaves will take up the most water in the morning. Later in the heat of the day, the water-absorbing pores on the leaves tend to close up as a way to retain the moisture they have. This closing of the pores can make plants LOOK like they need water later in the afternoon, but it���s just the plant���s biology taking care of itself and holding onto water from the inside out. That’s why middle-of-the-day-watering is pretty much a waste of time and resources. You���re likely watering a plant that doesn���t need it and can���t really absorb it. Plus the heat will evaporate most of the water anyways. Remember, even water under the surface of soil turns to gas as it heats up. Another reason to mulch your gardens.
Avoid Harvesting from your Garden When Dry
Herbs are easy to grow, but do best when harvested during that not wet but not yet wilted stage. One exception to is if you���re just grabbing a handful to make Infused water. Herbs are at their best flavor when no extra water is present on any leaves. But also, you don���t want them heated up by the sun as this causes the plant���s essential oils to vaporize. You can generally tell when it���s too late in the day to harvest an herb if you can smell it before you get to the plants. All the oils you want to capture are already floating in the air.
Read my blog for detailed information on Harvesting, Preserving and Using Herbs
Harvesting TipsThink about the produce you���re picking. The thinner the skin the higher the respiration rate. We don���t usually think of plants as breathing but they���re continually respirating which is why food will eventually rot.
In general food with thicker skin (Winter Squash) respirate at a slower rate and can stay ���shelf stable��� for months. Berries in particular have incredibly thin skin and a high respiration rate. Berries picked in the rain will retain this moisture and start to rapidly mold.
*Using the same snips or knife to harvest at this time might also spread those same disease around. I try to always have some rubbing alcohol around (extra hand sanitizer works too) to spray and wipe down blades between pruning.
*Note ��� you may still want to water seeds and tiny seedlings in the middle of the day to keep that thin layer of soil where the plant is active sufficiently damp. Consider mulching shallow rooted plants as well.
*A few plants should be harvested while still wet- lettuce greens, and sweet corn.
 Tomatoes-
 Not only are tomatoes more susceptible to diseases if picked after a rain, but they also tend to split/crack open after a large rain event. So, if you���ve got some ���almost ripe��� tomatoes hanging on the vine- go ahead and pick them before that big storm rolls in. They can finish ripening inside. There���s nothing wrong with picking a tomato in the afternoon ��� especially if you���re going to eat it right away. Remember the thinner skin of tomatoes though, they���ve lost some of their water content from the heat of the day. But I think this can make their flavor even more intense- sun warmed tomatoes for the win!
Beans���Bacterial Bean Blight- causes light green or yellow spots to form on bean leaves. The blight eventually kills the leaf and weakens the plant, which may stop producing or die all together. The disease is more readily spread when you disturb wet plants during harvest. It is best to avoid picking beans from wet plants if they are still producing.
Cucumbers and Zucchini-
Pick them often and on the small side, the seeds will be smaller and the skin thinner on most varieties the earlier you pick them. Using a snips to cut cucumbers from the vine and a sharp (clean) knife to cut zucchini and summer squash off the vine will keep you from damaging the plant. These are known to get powdery mildew which can be spread by splashing water.
I hope this help you with harvesting from your garden and growing happier healthier plants!
Dig In!
Michelle
The post Harvesting from Your Garden appeared first on Forks in the Dirt.
June 23, 2023
Growing Joi Choi + Recipe
Let’s get you growing Joi Choi! This is the Pak Choi (aka Bak Choy) everyone can (and should) grow.
There are few veggies that bring me as much JOI in the garden and on my plate as this veggie, so I’m declaring myself a founding member of the Joi Choi Fan Club! She���s as delicious as she is beautiful!
This has consistently been one of the easiest veggies to grow. It is ready also one of the fastest maturing early spring veggies, ready to harvest within 30 days of transplanting in all but the coldest spring weather. This means I can usually get at least three successions of Joi Choi in each season in my zone 4 gardens.
Read more about Succession Planting HERE
It is way more heat tolerant than other Pak Choi I’ve tried. Meaning it keeps growing a lot longer, and therefore bigger before it bolts. I mean look at those Thick stalks! All that stem equals weights of close to 2 lbs. per average plant if harvested all at once. Last fall I harvested a single Joi Choi that was over 4 lbs heavy and still tender and crisp in October!
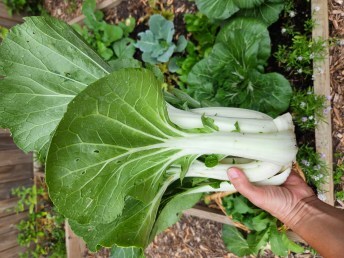
When growing Joi Choi forms a 12-15″ tall, broad, heavy plant with dark green leaves pure white stalks. Plants perfer a wide spacing of at least 1 foot. I plant three total across my 4′ wide beds.
I buy my seeds from Johnny’s and have had great germination rates and consistent harvests for years now.
Harvesting Joi ChoiI often just harvest the outer stems, treating this as a cut and come again veggie is possible because it can hold in the garden better than most other varieties of Pak choi. The leaves make great ‘wraps’ for lettuce wrapped meals.
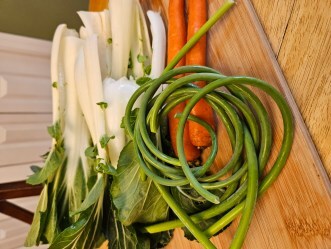
The leaves do tend to be a little more bitter than most folks enjoy, so they do need a little doctoring, but adding chopped stalks and leaves to stir fry etc. is a great way to use them and gain the nutritional benefits too!
The stems are so crisp, they even stand up to being sliced on a mandolin! I will shred raw like a coleslaw, chop for stir fry, or just add a little garlic (or some garlic scapes) for a simple side dish. I can succession sow these at least three times a year, and they are gorgeous in the garden as well. They also hold well in the fall garden, but do need protection if we drop down to the 30’s.
Read more on Garlic Scapes HERE
The following recipe is what I do when I end up harvesting a few at a time, usually when they start to bolt at the end of June.
I’m always so busy at this time of year so I crafted this super simple ferment from a zucchini and carrot ferment recipe from Stephanie at Minnesota From Scratch (my Small-Scale Homesteading Coauthor) I’d been making and boom- the flavor is something I look forward to each year!
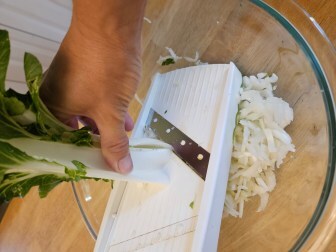
This recipe uses an old school mandolin to slice the Joi Choi. It is a slow process but I like the crisp edges to gives better then what a food processor does. But you do you! Also, I make this Kimchi Style Kraut with green cabbage that I love!
 Joi Choi Fermented Slaw Recipe
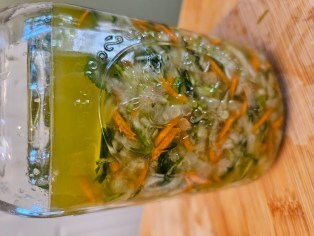 1.75 lbs sliced stalks (max 1/4 green leaves).5 lbs medium carrots- shredded.25 lbs garlic scapes minced (or diced in food processor) (can sub regular garlic for scapes)1 Tbsp Kosher Salt (iodine free, fine grain)
Prep all veggies by washing and shredding
Mix together with salt, massaging to make a brine
Pack into sterilized jar
Submerge veggies under brine, weighing down a with jar weight
Add lid of choice- either burpless or check daily
Depending on temperature where you’re fermenting, I leave my jar out to ferment for roughly 4-6 days. Warmer temps make for a faster ferment. Make sure to check daily, both to burp extra gasses and to check for ‘floaties’ these are the little bits and pieces that if on the surface can attract bad bacteria instead of the good kind to your fermented foods.
Here are some basics of fermentation from Harvard Medical School.
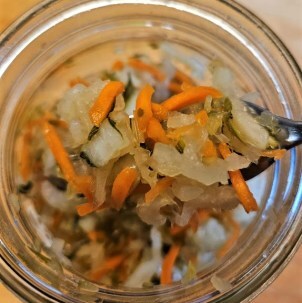
I love this on eggs both scrambled and hard boiled, mixed into stir fry, even on Asian spiced fish with rice. So versatile, and a fun way to savor two start of summer flavors together- Garlic Scapes and Joi Choi!
Have I tempted you to try growing Joi Choi now too?
Dig In,
Michelle
The post Growing Joi Choi + Recipe appeared first on Forks in the Dirt.
May 31, 2023
Growing Strawberries
Nothing ushers in summer like fresh picked strawberries and red stained fingers, shirts, faces… so let’s get you growing strawberries too!
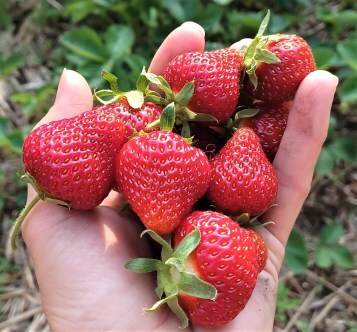
To save that fleeting, sweet taste of summer we’ve got tips and tricks and the reasons why growing homegrown or grabbing all the local berries you can is worth it. I promise, your winter self will thank your summer self.
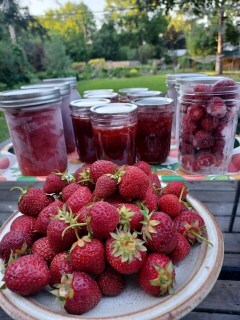
Strawberries are one of our little homestead���s most anticipated foods- by every member of our family. So, we spend some time prepping and loving on the gardens so they produce to their fullest.
Grow Great BerriesGrowing strawberries is as close to instant gratification as you can get with a perennial fruit. I recommend planting bare root plants, as you have more option for variety, the cost a fraction of potted plants and the plants do seem to do better in the long run. The catch is you want to plant them in late May, before the heat of summer comes on too strong. You���ll soak the roots for an hour or two before planting.�� The first growing season plan to pinch off the first few buds that form, but let the next rounds of flowers mature to pick fruit later in the season.
 We’ve got our strawberry plants under a spruce tree which keeps the soil a little more acidic.
Choose a sunny spot (6+ hours) with good drainage, as strawberries do not like wet feet. They enjoy slightly acidic soil. Plant 12-24��� apart. And as their name ���STRAWberry��� suggests, they like to be mulched with STRAW. There are different varieties that will do well in zones 3-8 making it a widely adaptable perennial fruit.
Note that once established, strawberry plants spread by runners and will need to be managed to keep from getting overgrown. Cutting and replanting or gifting the ���daughter��� plants is a great way to spread the strawberry love!
Main Varieties of StrawberriesJune Bearing: harvested in June and July here in Minnesota. The biggest producer in the shortest timeframe, best if you want a shorter harvest period, for preserving.
Ever Bearing: produce two main crops; summer and fall. Good for eating fresh.
Why Local MattersLocally grown berries are sweeter, smaller, more nutritious, and denser than berries that have traveled across the country to sit in the grocery store.
In our growing zone 4, strawberries make an appearance for about 2-4 weeks every year, from mid-June to early July. The window for picking these jewels is short, so make time for it as soon as you hear the buzz. Follow along on my social media accounts for local updates too.
If you can’t grow enough be sure to��get to a farm and pick your own (PYO in berry lingo). Our fabulous MN Grown has a directory of PYO farms!
I know this is a post all about Strawberries, but let’s give a shout out to the PYO Blueberry Farms that will be up in mid-July!

Both flavor and nutrition start to degrade soon after picking. The vitamin C content and the antioxidant amounts fade quickly. Strawberries are best within 24 hours of being picked, although some people have luck extending the life of their fresh berries by soaking them in one-part cider vinegar to one-part water for a few minutes before drying very thoroughly and refrigerating.
Super FoodStrawberries are one of the top sources of vitamin C, one of the many antioxidants that make strawberries such a healthy food. Antioxidants help prevent diseases, even heart disease! ��Did you know that just one cup provides more than the recommended daily allowance. Strawberries are also an excellent source of fiber (3 grams/cup), folate, and potassium, to name a few.
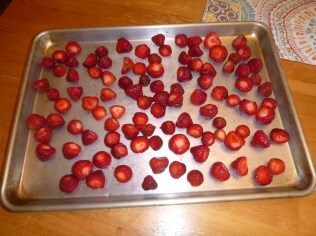
To get the most flavor and nutrition out of the fresh and local berries, make sure you eat as many as humanly possible (ha) right away and preserve the rest within 24-48 hours of harvesting them.
Preserving the berries is an excellent way to protect their flavor and nutrition. Plus, savoring those summer flavors deep in winter is downright magical!
Prior to preserving your berries- check out the University of Minnesota Extension Food Safety program���s mini-module on the basics of making jams and jellies.
I love making freezer jam, and follow the National Center for Home Food Preservation’s “Uncooked Berry Jam” recipe, or Pamona’s Freezer jam recipe.
Fresh strawberries are especially tasty on fresh local greens for a summer salad, or drizzled with aged balsamic vinegar, or served over vanilla ice cream. Frozen berries work well for desserts and sauces, or as a topping on your morning oatmeal. Strawberry jam is excellent mixed into plain Greek yogurt.
Really, there���s no wrong way to eat strawberries!
Have I convinced you to try growing strawberries too?
Dig In,
Michelle
The post Growing Strawberries appeared first on Forks in the Dirt.
April 25, 2023
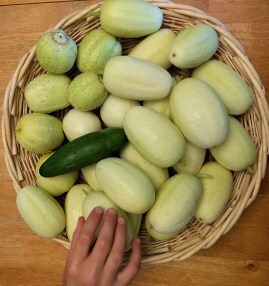
Cucumber Comparison
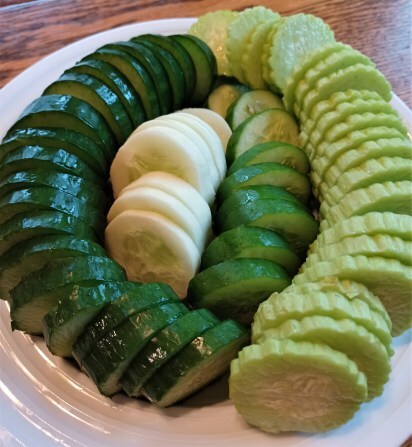 Taste testing tray- Left to Right: Telegraph, Dragon Egg, Mini Munch, Armenian
We love growing cucumbers! But there are many differences, so let’s do a cucumber comparison.
They’re a favorite of the vegetable garden and one of the homegrown treats my kids most impatiently look forward to munching fresh of the vine – as well as sliced (with ranch) – then fermented and pickled all winter long.
Needless to say, we grow a lot of cucumbers!
*This post includes affiliate links*
There are different cucumber varieties including slicing, English (burpless), pickling and then you can get into the specialty varieties that have been saved for their unique characters for centuries. These specialty varieties have a special place in my heart.
Planting BasicsIn general cucumbers prefer 5-8 hours of sunlight a day, and can benefit from a little afternoon shade. They do best with good drainage in slightly acidic yet fertile soil.
 I grow Nasturtium as a companion plant with Cucumbers
This is one of those plants that gardeners debate over whether to start indoors or direct sow. If you do start indoors wait until just 2-4 weeks before the last frost dates, as these plants grow quickly. If direct seeding into the garden, wait until the soil is around 70��F for best germination. I love my Soil Thermometer. Adding floating row cover can help raise the soil temps at that time of year.
In general cucumbers produce best in a mild temperature range, with soil at least 70��F and 75-85��F air temperatures. They kind of shut down flowering below 50��F and over 95��F. I���ve also had great results heavily mulching or planting another ground cover/companion crop at the base to keep roots in the happy temperature zone. Deep watering is key.
Space out individual cucumber plants 8-12 inches apart. They love to climb so plan to grow where a trellis makes sense.
Common Problems Growing CucumbersIf you���re seeing more leaves than fruits I will suggest you stay away from a typical all purpose fertilizer here and focus on using a fertilizer with a higher Phosphorus number. Phosphorus is the middle number in the N-P-K ratio.
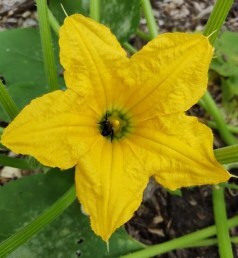
Cucumbers do require pollinators, so if you���re short on bees you may be short on fruit. You can hand pollinate in a few different ways. Female flowers will have a slight bulge at the base while male flowers have no bulge.
Take a male flower and touch central flower stalk (the anther) to a female flower center (the stigma).Take a little paint brush and go from male flower pollen to female flower center to hand pollinate.Pest info below from the University of Minnesota Extension website
 Pests:
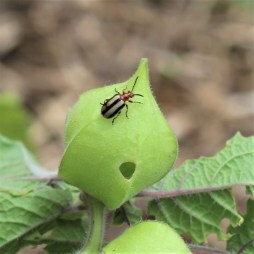
Striped cucumber beetles damage plants by eating leaves as well as flowers, stems, and fruit. They may also help cause bacterial wilt . Spotted cucumber beetles migrate to Minnesota every year, and once here they feed on all above-ground parts of the plant.During periods of hot, dry weather, spider mites can feed on leaves, giving them a bleached or bronzed appearance.
Photo Below Includes:
Top Middle: 3 little pickle bush cucumbers, Upper Right: 1 Poona Kheera
Middle: 3 large Telegraph Improved, Bottom: 1 Armenian
1 tiny mini-muncher below and 1 above 3 Dragon’s Eggs
 A Cucumber Comparison of Varieties I���ve GrownArmenian (Cucumis melo)
50-75 Days, Heirloom + Open Pollinated, 12-24��� fruits
Burpless, crunchy flesh, lots of seeds (but soft and edible + easy to scoop out if desired) on the sweeter side. Skins range from pale green to striped, with Painted Serpent a variety with pronounced stripes. Still produces well in hot weather.
–Seed Savers Exchange
50-60 Days, Heirloom + Open Pollinated, 2��� gherkins, 4��� slicers.
Classic pickling cucumber since 1888! Dark green skin with spines. Long season of production, especially if fruits are taken when still small. Resistant to scab and cucumber mosaic virus.
Experimental Farm Network (offering a “Dual Purpose Grex”this year)
 Lemon, Dragon Egg + 1 Mini MuncherDragon���s Egg
(Cucumis sativus)
Lemon, Dragon Egg + 1 Mini MuncherDragon���s Egg
(Cucumis sativus)
50-70 Days, Heirloom + Open Pollinated, 3-4��� ovals, from Croatia.
These really do look like eggs! Thin skins, VERY prolific (especially if well-mulched) early producers, mild flavor. Seeds do get tough if left on the vine too long. My kids eat them like apples in the garden. Best eaten within a few days, not the best for pickling- but makes great cucumber lemonade!
 Bet you can guess the lemon cucumber…Lemon Cucumbers
(Cucumis sativus)
60-70 days, Heirloom, + Open Pollinated, 2.5���-3.5��� round yellow skin.
A specialty variety with strikingly bright yellow skin, with many spines. Crisp white flesh, lots of seeds. Never bitter burpless variety. Not my favorite as the spines are hard to remove and the seeds get tough before the fruits get fully yellow.
–Territorial Seed Company
(Cucumis sativus)
65 Days, Open pollinated, 8-9��� fruits
Classic slicing cucumber with dark green bumpy skin and good flavor. These can get long fast, expect to peel skin if over 10��� long. Once it starts producing it goes strong. Resistant to powdery mildew.
–High Mowing Organic Seeds
50-55 Days, 4��� paler green fruits on a 2��� long vine
This is my favorite space-saving variety for growing in containers. Early yielding, lots of fruits (they grow in pairs- so cute!) at once so you could pickle a few jars from just two plants. I���ve only grown the Burpee seeds for this.
–
50 Days, Heirloom, + Open Pollinated, 4-6��� blunt ended fruits
The Indian cucumber that looks like a potato- these go from yellow-green to full on russet colored as they mature! These weird looking fruits are a new family favorite, super crisp (almost apple-ish) white flesh, almost salty not sweet- but also never bitter.
–High Mowing Organic Seeds
 Mini Munchers on the Vine, the largest one had tough seeds at over 6″ long!Mini Muncher F1
55-60 days, Hybrid, 3-4��� long fruits
These are similar to the fancy little cucumbers your get in the store. Basically seedless when picked under 4��� with a barely there skin. Sets fruit in cooler temps, and keeps on producing late into the season. These resisted powdery mildew the longest of my cucumbers last season too!
–Territorial Seed Company
60 Days, Heirloom, 10-18��� fruits, English slicer
Burpless, and mild overall, thin and shiny skinned with soft seeds. These plants will grow up to 8 feet, so get a sturdy trellis! These will also set fruit without pollination as they were developed back in the 1800���s for greenhouse growers but have been a home gardener favorite ever since.
–Botanical Interests
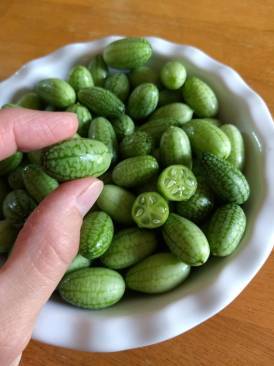 Cucamelons, aka Sour Gherkin, aka Mexican Gherkin, aka Mouse Melons
70 days, Heirloom and Open Pollinated, 1��� fruits
Grown as much for the novelty as anything else, the mini-watermelon looking fruits have a crisp, sour-lemon flavor and are the cutest things coming out of the garden in August. One plant can easily take over a trellis, as they climb over 8 feet even in our shorter Minnesota growing season. Start these indoors as they are slow to germinate and get growing. We mostly eat them fresh, and area fun addition to fruit salads.
–Botanical Interests
And since I always love trying something new, I’m trialing Suyo Long this summer. Follow along for my results…
 Left to Right: Armenian, Poona Kheera, Dragon Egg, Mini MuncherEating (and drinking) All Those Cucumbers!
We do eat a lot of cucumbers sitting in the garden- or if they make it inside- simply sliced, in salads or fermented as pickles…
And since I discovered Cucumber Lemonade we never let any cucumbers go to waste! Just peel, scoop seeds if tough and puree, then strain out pulp if desired, add fresh squeezed lemon juice, some honey and sip away!
We also just found Freezer Pickles thanks to Crystal’s book, Freeze Fresh. These are so easy to use up that one or two extra cucumbers- so now I’m never worried about growing too many cucumbers!
Has this cucumber comparison inspired you to try this season?
Dig In!
-Michelle
The post Cucumber Comparison appeared first on Forks in the Dirt.
March 1, 2023
Corn Chowder

This soup is such a perfect blend of sweet corn nostalgia and winter comfort that I can get a craving for this soup just about any season��� but it feels especially fitting during that ���hungry gap��� when many of the frozen veggies are gone and we���re down to sprouting potatoes and mason jars from the pantry.
This recipe can skew simple or a little more involved depending on how you’re feeling, but on way or another, make this while it is still soup season!

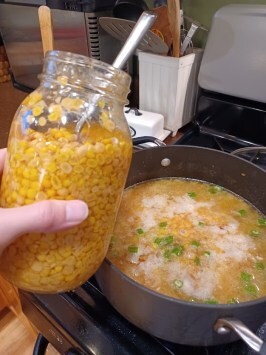
My latest version included the last of a batch of ‘corn and vegetable stock’ from the summer. This simple seeming stock is rather magical in my opinion. You make it from the leftover cobs after canning the sweet corn this past summer. This just pulls all the deliciousness out of every cob of corn.
After you cut off the corn kernels off the cob, just toss cobs, and onion peelings, celery leaves, carrots (or just their peelings), garlic and a bay leaf into a pot and simmer for at least 4 hours, strain off the stock and either freeze (leaving a good inch of headroom in the jar) or pressure can with the cans of corn.
Like all my recipes, especially soups, there is a lot of leeway to use up veggies and ingredients that you have on hand. If you have zucchini but not celery, go for it- or parsnips instead of carrots- OK! Make this recipe yours, you are in control in hte kitchen!
Corn Chowder Recipe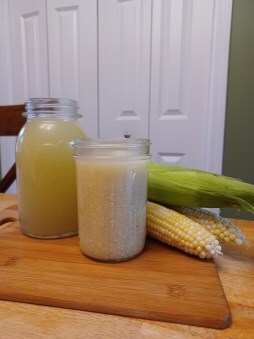 Ingredients
�� lb Bacon cooked, drained, crumbled1 yellow onion, diced
1-3 garlic cloves, minced
2-3 medium carrots, shredded or diced
2 stalks of celery finely diced (using frozen is fine)
1 tsp Thyme
1 Bay Leaf
*Optional Pepper (see note below)
4-6 cups vegetable or chicken stock
(or the amazing corn cob and veggie stock)
�� lb potatoes, chopped into bite size pieces (Yukon Gold or whatever least starchy potatoes you have)
1 quart of canned sweet corn (or roughly 8 fresh ears)
Note: If you have any creamed corn you can sub in up to half of that for the corn kernels.
Salt And White Pepper to Taste
 Directions
Cook bacon, reserving 3 tablespoons of fat (at least) in the pan. Set bacon aside and crumble once cooled.
Saut�� onions, garlic, carrots, celery in bacon fat until onion is translucent.
Add in thyme and bay leaf.
*You can also add in some heat with a ���hot��� pepper such as; jalapeno, poblano, black Hungarian or even a milder Alma Paprika. I often use frozen peppers in soups and love their flavors. This can add a nice depth of flavor. Leave whole and add in with spices, saut��ing just enough to release the oils before adding the stock. Be sure to scoop pepper out of soup before serving.
Add in potatoes and stock, simmer roughly 20 minutes.
Take off heat.
Using your stick blender, puree about half of the contents of the pot. Stir in and take off heat. (If you like a chunkier soup, skip this step).
Add whole milk, half and half or a little cream and taste test.
Confession: I have started liking to finish this soup off with both butter and lemon juice… Hear me out!

The butter at the end is a chef secret, thanks to Chef Matt of Browns + Blues, and the lemon juice adds a layer of brightness and might be needed depending on just how ���sweet��� your sweet corn is.
And then of course, add those bacon crumbles, some nice cheddar, and if you happen to have any green onion or chives- they freshen up the whole bowl as well. Nothing beats a crusty loaf of sourdough to accompany this soup.
This is such a perfect example of simple foods becoming elevated when together.
I really hope you give it a try.
…And of course let me know what you think!
Dig In,
Michelle
The post Corn Chowder appeared first on Forks in the Dirt.
February 14, 2023
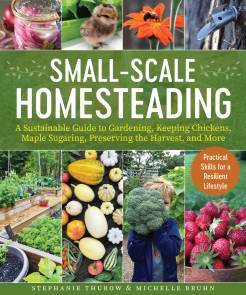
Small-Scale Homesteading Book
There���s so much information in the pages of our book, Small-Scale Homesteading we know it will both inspire and educate you!
Stephanie and my collective knowledge has been distilled down to what we wished we���d known when we started down this homesteading road.
…And I know that���s said about a lot of books by a lot of authors, and I understand why- we write what we know. We end up knowing a lot about what we love.
And we love homesteading, in all it���s beautiful forms.
The twist with this book is that these pages hold BOTH of our combined experiences and the different ways we���ve settled into doing different homesteading skills. We���re obviously big believers in there being more than one way to do just about everything.
How our Book Took Root From the first time we met in person!
Stephanie had written her second cookbook and I was planning another Winter Farmers Markets in White Bear Lake. I was expanding the event to include classes during the markets. I asked Stephanie to teach one of her fermentation classes at a market. We hit it off right away. But living on opposite sides of the city with busy lives during a pandemic kept us acquaintances over the next few years.
Jump to the spring of 2021 at my monthly book club. I was sharing a rhubarb shrub cocktail with my gals and they all loved it so much they wanted the recipe, and urged me to write a blog on it. I knew Stephanie had a recipe for this specific shrub in her book, Weck Small Batch Preserving and so I asked if she wanted to collaborate on the blog…

We used Stephanie’s recipe in the Rhubarb Shrub Love blog and we even did a book giveaway. While talking details and chatting about that project Stephanie mentioned that she���d recently pitched and gotten the go ahead on another book idea to her publisher. But she was feeling hesitant to tackle all the writing for a book on homesteading. She asked if I���d be interested in doing something like that together��� and it lit a fire under both of us!
���Instead of self-sufficiency, how about communal abundance?���
Quote from Michelle’s intro
 In Michelle’s garden right after signing the book contractPlanning The Book
So we presented our updated outline to her publisher at Skyhorse, they accepted, we negotiated and started flushing out ideas and projects, taking photos and having lots of conversations about what we wanted this book to feel like.
The rest is captured within the pages of our beautiful love letter to urban and suburban homesteading!
We both knew we wanted reading it to feel like hanging out with some friends who happen to be experts (but not the snotty kind ) sharing information and a cup of tea (or coffee, kombucha or maybe a cocktail) and feeling like you can accomplish any project you read about- but without feeling like you had to do it all. But that���s a pretty long title, so after LOTS of title changes we ended up settling on a final. ���Small-Scale Homesteading: A Sustainable Guide to Gardening, Keeping Chickens, Maple Sugaring, Preserving the Harvest, and More��� ��� which isn���t much shorter- ha!
And what a fun ride it has been writing my first book. I got to dig deeper in so many of my favorite topics; from my obsession with soil life to the way pollinators are welcomed to our gardens, favorite recipes and chicken keeping hacks. We even get to share some truly inspirational stories of others in our homesteading community. There are amazing people doing amazing things in cities across America.

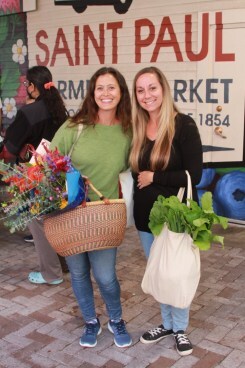
 Jenny of @TheHappyHerban and Audrey of Egg|Plant Urban Farm Supply are two Highlights
We believe any home can be a homestead, and any person can be a homesteader. A core belief of ours is that many of us making ‘small changes’ will have a larger impact than a few of us making ‘all the changes’ ever could. So, we break down some of the basics and how to get started in the book!
 Community at the Core
This is also why we include community in the book. As urban/suburban homesteaders, we���re not working with acres of land. But we do have access to amazing neighbors with varying talents and interests.
We encourage you to draw on those talents and skills so we each get to do more of what we love, while giving others the chance to share what they love.
 From a trip to the St. Paul Farmers Market
 (Hi Farmer Jesse of Edgie’s Veggies)
Together we���ll create a more thriving community, plus it is just more fun!
We can’t wait for you to get our book dirty with seed starting and kitchen projects.
In case you haven’t ordered you book yet, here’s the LINK to get your own copy.
Cheers to your own journey of Small-Scale Homesteading!
-In Community
Michelle + Stephanie
The post Small-Scale Homesteading Book appeared first on Forks in the Dirt.
January 30, 2023
Winter Squash Lasagna
This vegetarian squash lasagna is comfort food and pantry cooking combined! Using large, thin slices of squash as noodles creates a hearty, satisfying lasagna without the carbs. Did you know that pasta has about SEVEN TIMES the carbs as squash! There’s also something that happens with the baked squash and cheese that makes it’s own sauce, so no need for extra cream here.
Fancy enough to impress guests but cozy for a small family meal – and it makes great leftovers. Hello “Meatless Monday���!
We use the old stand-by winter vegetables of butternut squash, potatoes, kale and red onion with a few tweaks. This recipe can also both work as vegan if you sub in some vegan cheese.
Squash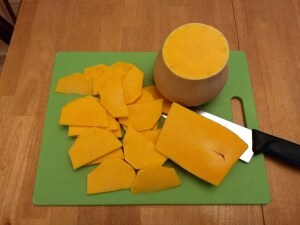
Using the top solid part of a butternut squash (or slices of Delicata, Autumn Frost or Kabocha) for this lasagna recipe will help it hold together better. You can use the bottom part that you scrape the seeds out of for the smaller chopped pieces for roasting, even adding to a warm winter salad.
You do have to start this process with a sharp knife, but the slicing effort pays off in the end.
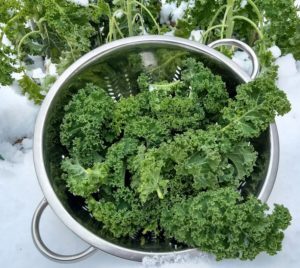 My last harvest of curly kale, last week…Kale
Another start ingredient in the recipe is kale. Yes, I���m obsessed; eating kale makes me feel good, so I���m not going to stop anytime soon- but my northern garden has stopped producing it now. While I still have one bag of the fresh stuff left, I have many bags (and pucks) of frozen kale just waiting for me. This recipe works well with either frozen or fresh kale.�� I like options… lots of kale options
In the interest of keeping this recipe more local, you can try the hot house grown ���Bushel Boys��� during MN winters, Grown in Owatana- which is just around 19,000 miles closer than California, the largest producer of tomatoes in the US.�� I think the greenhouse grown versions are not great for eating raw but they are perfect for this recipe. Unless you have whole frozen or canned tomatoes waiting for you…
Let’s get cooking!
Winter Squash Lasagna��Recipe Ingredients:
1/2 butternut squash
1/2 medium Red Onion
1 small bunch kale
2 medium Yukon gold potatoes,
6-8 oz. provolone cheese
2 small tomatoes
1/2 C grated Parmesan
*Optional – thin sliced ham or bacon
EVOO, S&P
Heat oven to 425F

Get all the ingredients prepped:
Peel and slice the butternut, (I like half circles)
Slice potatoes into rounds
Slice red onion into rounds,
remove stems and shred or chop kale into bite size pieces
Slice provolone
Slice tomatoes
EVOO in bottom of pan and start layering:

Squash, then onion, then kale
(optional meat)
drizzle EVOO S&P
Then Potatoes and half the provolone
Then more kale, more EVOO S&P
Then onion, tomatoes
Top with rest of the squash and last of provolone
Bake for 30 minutes covered.

Drop temp to 400, and add parmesan to top. Bake uncovered for another 10-15 minutes until potatoes are cooked through.
This is a new favorites- Let me know what you think! I always love to hear when people substitute ingredients too!
Dig In to this cozy comfort food and let me know what you think!
Michelle
Let cool for 10-15 minutes before serving.
Dig In to this cozy comfort food and let me know what you think!
Michelle
The post Winter Squash Lasagna appeared first on Forks in the Dirt.
Forks in the Dirt

- Michelle Bruhn's profile
- 4 followers

