
Michelle Bruhn's Blog: Forks in the Dirt, page 3
November 4, 2024
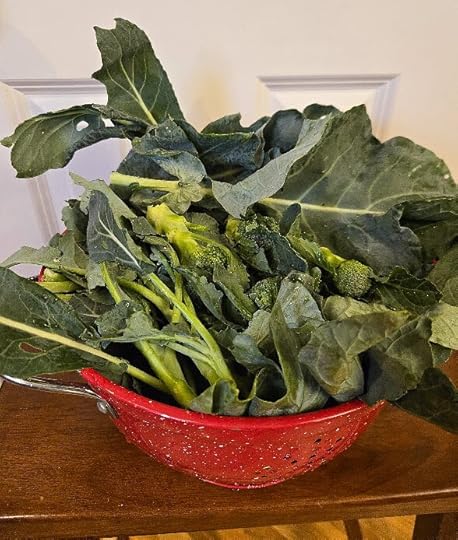
Broccoli Leaf Soup
Making something from nothing seems so magical! Cooking up a steaming bowl of hearty soup from what we typically see as ‘extra’ – or at the best something to compost, makes you feel like a real homesteader.
And anyone who has grown broccoli knows, there’s a LOT of extra leaves on those plants! Plus there are so many nutrients – AND so much flavor in the leaves we often toss onto the compost heap.
But this recipe gives you an option for making a delicious, hearty soup with humble beginnings. The broccoli leaves act a lot like collards, and you can use any broccoli leaf that’s still green and not dried out. PS- my boys actually enjoy de-stemming the leaves, which is the only real prep work to this one pot soup!

This varies in ingredients and final texture from my Best Broccoli Soup recipe, as the leaves give it a different depth of flavor.
Broccoli Leaf Soup RecipeIngredients

1 Tbsp Olive oil + Butter (each)
1 large yellow onion
3 cloves Garlic
½ pound broccoli leaves (de-stemmed)
A few extra broccoli stems and florets is you have them
1 tbsp thyme
1 tbsp parsley
1 15oz can chickpeas
(OR)
2 medium potatoes (Yukon gold work well)
1 quart Chicken Broth
½ cup of half and half (or whatever milk or cream you have)
2-3 tbsp cream cheese

Directions
Sautee Onion, garlic and herbs, then add broccoli leaves and wilt for a few minutes. Add in chicken stock and simmer for 20 minutes. Really cook those greens down.
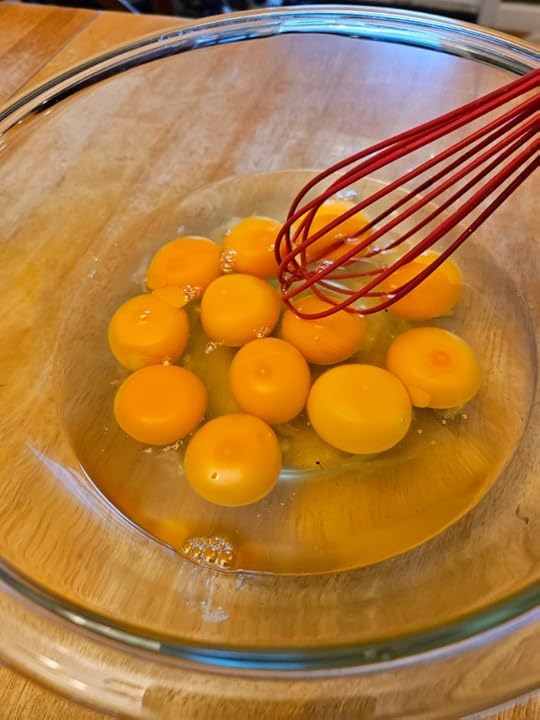
Remove from heat and add (in two phases if needed) to blender along with milk/cream and cream cheese.
Puree well – it will take time. It never gets truly silky, but there is something so satisfying about the texture.
Enjoy your Soup!
You can add more protein and another layer of flavor with ham or bacon, but it isn’t necessary. With the beans it has enough protein and is really filling. Of course you can always add some cheese (a sharp cheddar is our favorite) or even microgreens to dress it up a bit.
If you’re looking for more soup ideas, I’ve got a whole lot more listed on my Homestead Recipes Page.
Happy Slurping!
-Michelle
The post Broccoli Leaf Soup appeared first on Forks in the Dirt.


September 3, 2024
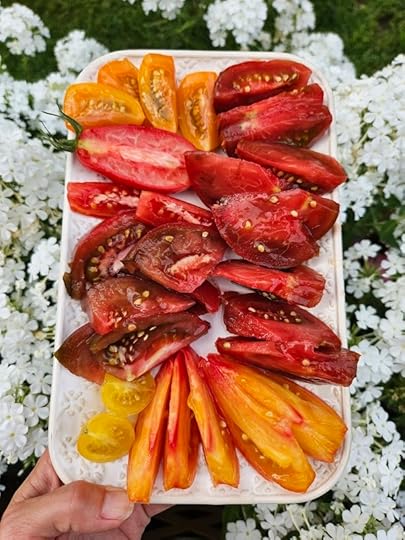
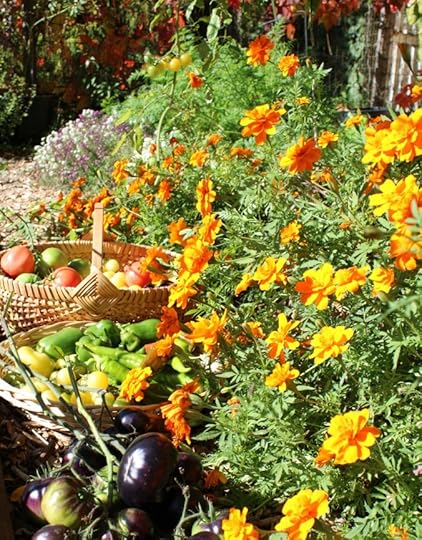
Comparing 12 Tomato Varieties

Find your new favorite by comparing twelve tomato varieties with me.
Did you know that tomatoes have been bred for different purposes for centuries?
Some are perfect for popping in your mouth, like cherry tomatoes. Some are meant to balance out that bacon on a BLT, like the huge heirloom slicers. And some are best for making sauce, like the thick and meaty paste tomatoes. And then there’s a million variations in between!
With over 10,000 known tomato varieties this is of course a very limited list, but also based on my nearly 20 years of growing tomatoes in the north.
Just like so much of the produce in my suburban homestead gardens- a whole new world of flavor opened up when I took a little control and started growing my own.
If you like comparisons, check out my Cucumber Comparison post comparing 10 different cucumbers.
Remember tomatoes do best in full sun, with well draining and fertile soil. Plants often benefit from a midseason application of an organic fertilizer. For a basic guide to growing tomatoes, the Minnesota Extension Service does a great job explaining.
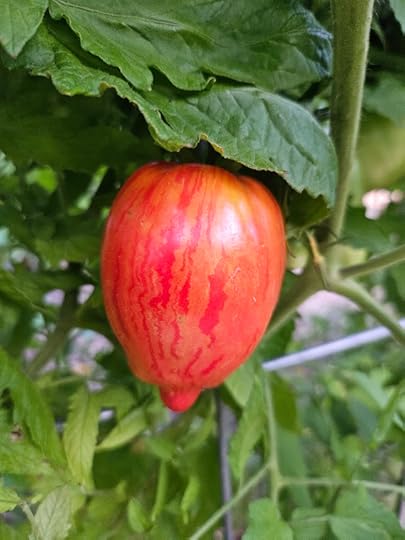
The Tomatoes: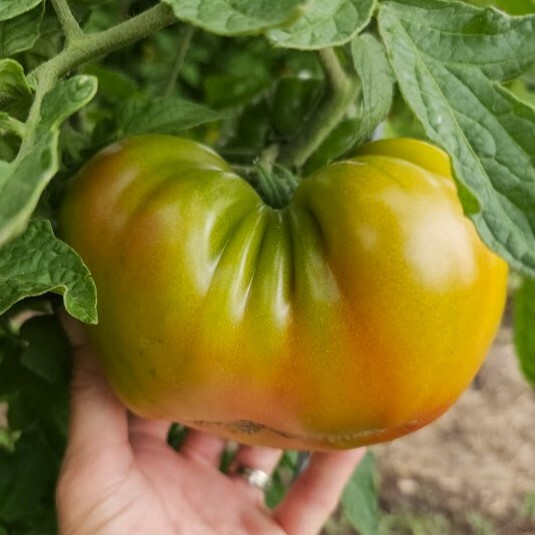 Ananas Noire on the vine.Ananas Noire – Heirloom Slicer
They are absolutely gorgeous – inside, and one of the largest and heaviest I’m growing this year. Hearty plants. They’re not especially beautiful on the vine, but their flavor (smoky and a little citrus) makes up for that in the end!
Indeterminate.
From Carmella Bella Farm.
 Aurora Blue – “collector’s” Slicer
Beautiful blue shoulders that turn darker when fully ripe. A sweeter variety and dense flesh for a blue. Lots of tomatoes, with lots of ridges and cat facing on my slightly shaded plant.
Indeterminate.
From Carmella Bella Farm.
Big Rainbow – Heirloom Slicer
Golden yellow and red streaked skin that follows into the firm flesh. Mild and sweet, well-balanced flavor more juice and seeds than some- but I love growing this variety for its brightness inside and out. Healthy, sprawling vines.
Indeterminate.
From my Seed Library.
Black Krim – Hybrid of Beef Steak and Cherokee Purple- SlicerThese are super dark red almost purple fruits that have a super deep rich tomato flavor, somehow classic but better. And perfectly juicy. Sturdy plants.
Indeterminate.
Saved Seeds.
Cherokee Purple – Heirloom Slicer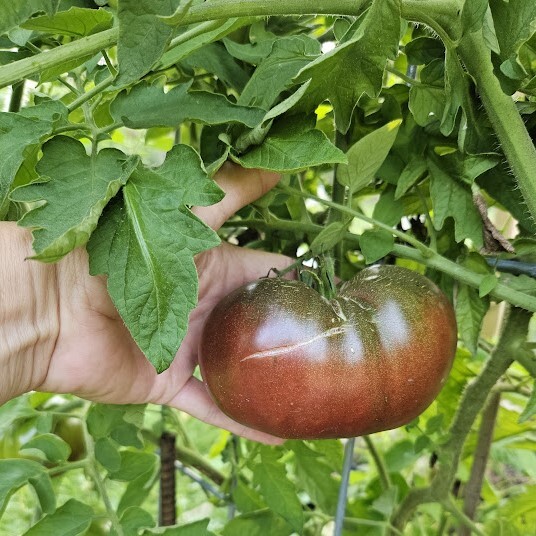 Cherokee Purple
Large slicing beauties, with dusky rose flesh that can stay greenish even when ripe. Super sweet and smoky flavor, yet wonderfully acidic. These are my go to for BLT’s. Super hearty plants and an easier plant to start from seed. The fruits are often 12oz plus, which makes up for it being not the most prolific.
Indeterminate.
My Own Saved Seeds.
Milka’s Yugo Oxheart – Heirloom Sauce Milka’s Oxheart Tomato cluster on the vine.
Large oxheart variety, a little light, but super dense flesh. Pretty pink coloring, classic, balanced tomato flavor. The plants were a little slow to get going but are finishing strong now. A little lighter in weight than other paste tomatoes, but still meaty with little juice.
Indeterminate.
From Experimental Farm Network.
Jaune Flamme – Salad Tomato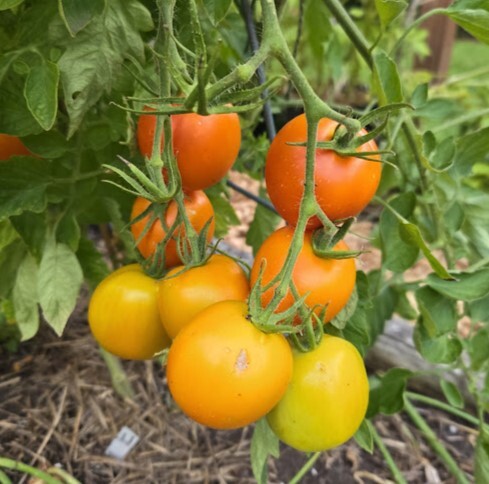 Jaunne Flamme
Name means “Yellow Flame” in French- and these lit flavor bombs fir sure. Earlier maturing, and consistently producing high yields of round, orange colored flavor bombs set along long trusses. These are a little fruity and are delicious fresh eating, and make excellent roasted + dehydrated tomatoes for adding to pizzas etc. Slightly thicker skins, which also makes them crack resistant. Some disease resistance as well.
Indeterminate
From Seed Savers Exchange
Paul Robeson – All Around Overachiever Paul Robeson
These brick red fruits are never the largest, but always consistently 10+ oz. These are hearty easy to grow plants that have one of my absolute favorite tomato flavors- being balanced but with an extra deep earthy/smoky intensity. Usually still has green shoulders even when ripe, that dark red flesh inside is perfection!
Indeterminate.
Paste Tomatoes San MarzanoSan Marzano – Heirloom Paste
This is the classic Italian paste tomato- likely what most of today’s paste tomatoes were bred from. Very high yields, lots of 6-7 fruit clusters. Very little juice, dense flesh, classic flavor. I can not overstate how much these can produce given the right growing space!
Indeterminate but not usually more than 6-7 feet.
From Botanical Interests
 Striped RomanStriped Roman – Heirloom plum/Roma/paste
My all-time favorite plum/roma/paste type tomato. So many paste tomatoes aren’t very flavorful, but these stand on their own in a salad or sandwich. They also have next to no seeds and so much meaty flesh, at least twice the size of most paste tomatoes too. Really gorgeous yellow stripes on deep red skins. I tend to have trouble growing the plants from seed, so always start a few extra, they really take off once in the ground.
Indeterminate.
From Seed Savers Exchange.
Cherry Tomatoes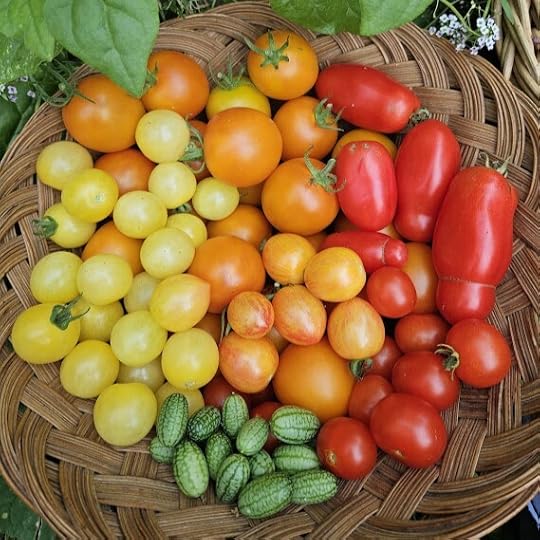 Yellows are White Cherry, oranges are Jaune Flamme, Striped are Sunrise Bumblebee, some Romas and Super Sweet 100’s. Plus a few green cucamellons. White Cherry – Heirloom Cherry
 White Cherry
We fell in love with these tomatoes when my boys were little and can’t imagine not growing them. We think they’re maybe even better than Sungold (gasp). They can split after heavy rains but are worth harvesting early. So prolific I freeze these separately and make a yellow tomato soup every year. Best for fresh or freezing.
Indeterminate.
From Seed Savers Exchange.
Sunrise Bumblebee – CherrySuper pretty striped cherry that rivals sungold flavoring, but larger and every bit as prolific. These seem to ripen early but hold on the vine for a while as well. A kid favorite.
Indeterminate.
From Carmella Bella Farm.
 Tomato Preserving
I freeze most of my tomatoes over the summer and make sauce and can them in the fall. Just let them defrost and slip the skins off, then simmer away. I usually go for condensing at least by half. Follow the National Center for Home Food Preservation’s guidelines for canning whole tomatoes and sauce.
I also make tomato paste in my crock pot and freeze into individual ice cube sizes. This is and such a great way to thicken up sauces or make pizza sauce base!
For a basic guide on preserving all kinds of garden produce, see my guide- “Preserve You Harvest”.
That is a lot of tomato talk- but I hope you find a new favorite in this list… I love growing a few ‘new to me’ tomato varieties every year, along with some of my tired and true favorites.
I’m sure I’ll keep adding to the list as I try new varieties… so tell me, what is your favorite and is it listed here?
Dig In,
Michelle
The post Comparing 12 Tomato Varieties appeared first on Forks in the Dirt.
August 1, 2024
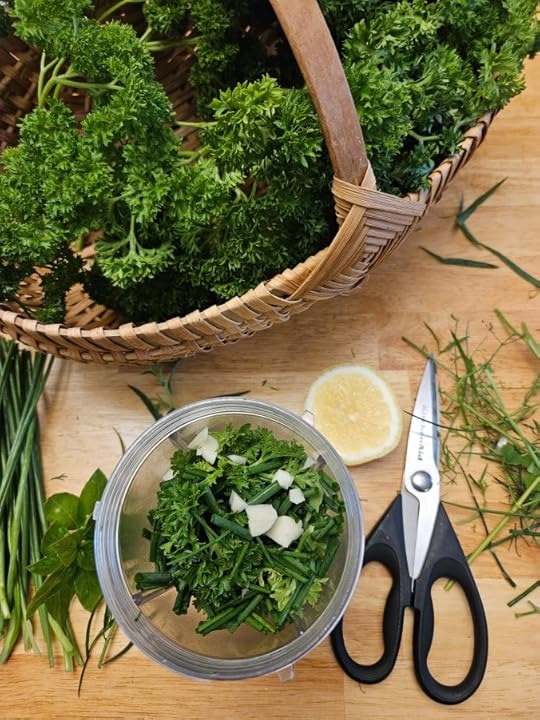
Green Goddess Dressing

Nothing says fresh summer flavors more than Green Goddess dressing!
Grabbing handfuls of all the herbs and creating a magically delicious while nutrient dense topping for things from salads, to chips and sweet potato fries couldn’t be easier. It is literally dump, blend, and pour (or dip).
I like mine to present ‘parsley forward’. But a combo of any of these herbs , and in descending amounts will give you serious bang for your herbs: parsley, dill, cilantro, basil, mint and up to a ¼ of that can be chives (or garlic chives). Tender stems are ok as they will break down in the blender/food processor. Some recipes call for anchovies or capers, and I’ve made it with them, but don’t really miss it wtithout.
I love the flexibility of this dressing as well, making it your own is half the fun!
If you’re looking for more ways to preserve summer flavors, check out my articles on Preserving Your Harvest, and on Harvesting, Using + Preserving Herbs.
Green Goddess Dressing Recipe1 cup Plain Greek Yogurt (full fat if possible)1+ Cup of lightly packed herbs (parsley, dill, cilantro, basil, mint, chives)1 Clove of garlicup to 1/2 lemon juice½ tsp sea saltFresh ground pepper to taste*Optional 1-2 Tbsp of capers + 1-2 Tbsp Olive Oil (to thin out)
Blend well, and scrape every last ounce of deliciousness into your mouth – I mean container.
This keeps well in the refrigerator for at least a week. Shake if separates.
*I love the fresh bright flavors, but some like it spicy, and I’ve added jalapeño to a batch or two as well.
That’s really it. Enjoy, and use those herbs!
Michelle
The post Green Goddess Dressing appeared first on Forks in the Dirt.
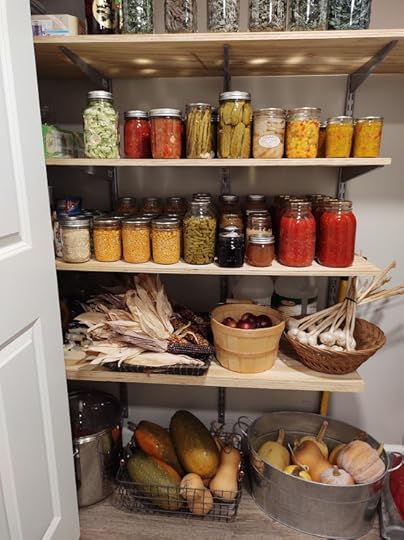
Preserve Your Harvest
Let’s make it easy to preserve your harvest! Harvesting and eating from our garden is what we work so hard for. And there’s nothing like those sun warmed tomatoes, or is there? What about homemade tomato soup in February, or strawberry jam in January?
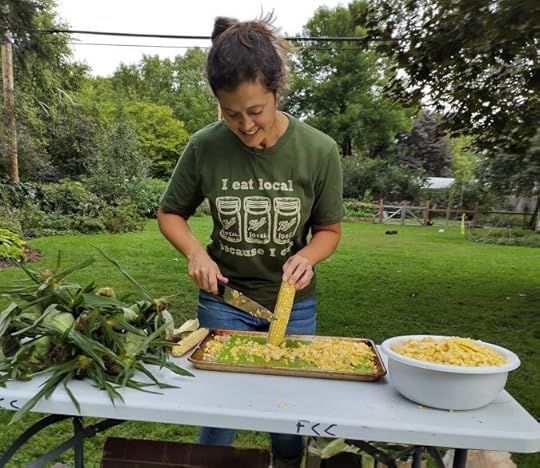 Michelle prepping corn for canning
Being able to preserve your harvests to enjoy longer somehow tastes + feels even better. It also feels like the step between being a gardener and a modern day homesteader. Let’s get you capturing those flavors to savor throughout the seasons!
Many of us are getting back into preserving our own food for so many reasons- the better nutrition, reducing food waste and our carbon foot print, more control of ingredients. Not to mention most of these ways are easy and a great way to feel more connected to our food!
So let’s work on preserving those flavors and nutrients easily and quickly so we can make the most out of our gardens for months to come!
*This post contains affiliate links, which means I may get a small commission if you purchase through these links.*
The basic ways we preserve food:
Cold Storage, Freezing, Drying, Fermenting, Water Bath Canning and Pressure Canning.

*We go over each of these methods more in depth in our chapter on Preserving the Harvest in our book, Small-Scale Homesteading.
Regardless of the way we preserve food, ALWAYS start with fresh, unblemished food. Those bruised or limp veggies aren’t going to get any better after preserving…
Also, as a safety net for myself. This article is intended to inform and educate, but is not meant to teach how to steps for pressure canning. There are so many shady resources out there. Please stick with trusted resources like the National Center for Home Food Preservation at the University of Georgia.
Cold StorageI was amazed at how much longer and fresher my greens and other veggies stayed when I started paying attention to exactly how and when I harvested plus a few things in my refrigerator.
Refrigerator Tips:
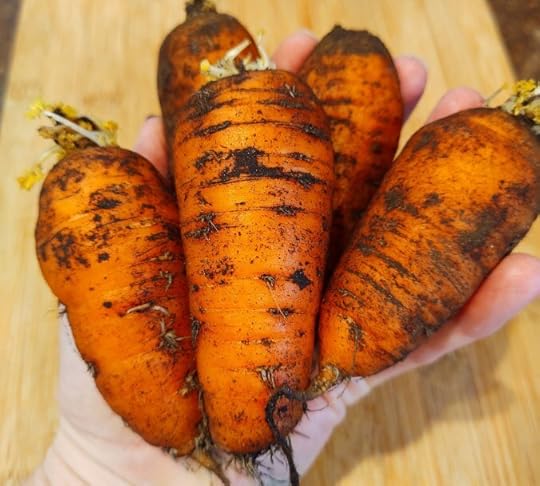 Home grown Carrots after storing for 4 months in damp sand.
*Use those humidity controls.
*Re-use those plastic bags.
*Learn your refrigerators warm and cold zones
Food keeps on respiring (think breathing) after it is harvested. This exchange of oxygen is what eventually decomposes those beautiful tomatoes into compost. To slow the process, and keep food fresher longer – we want to keep it cool, and keep the humidity levels up.
For some best practices on harvesting from your garden check out my Article HERE. The basics are to harvest when at it’s peak, cool quickly after harvesting, and to stay away from picking things (accept root veggies or things you’re taking the entire plant) when wet. And… not washing things like carrots or potatoes.
Even a basement closet will keep squash and garlic well into winter. If you want to get a little creative there are so many ways to keep your homegrown food longer! For the root cellar bible, check out this book, Root Cellaring, by Mike and Nancy Bubel.
I love getting as close as possible to root cellaring in my modern-day home. We’ve got a crawl space that stays quite damp and cool, that works great. We also keep carrots over winter in a bucket of damp sand.
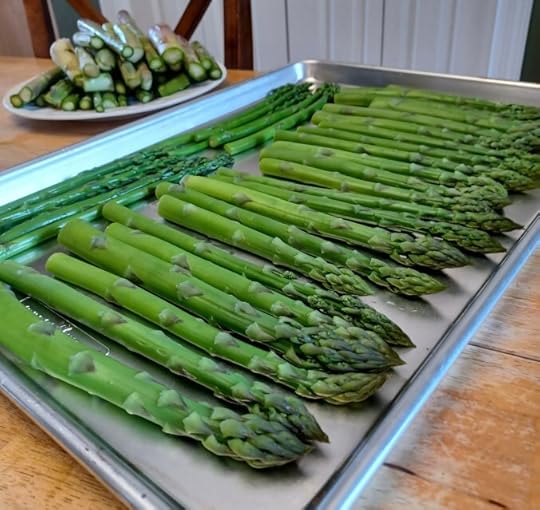 Asparagus after blanching, ready for flash freezing.Freezing
This is a great, well-known way to quickly and safely preserve so many of our favorite garden fruits and veggies.
I freeze everything from asparagus to zucchini. But some things require blanching before freezing. Blanching is simply adding the produce you’re going to freeze to a pot of steaming/boiling water for a few minutes (time depends of produce) and then removing and quickly cooling – often in an ice-bath.
**Produce I blanche before freezing: Kale, collards, green beans, edamame, asparagus, broccoli
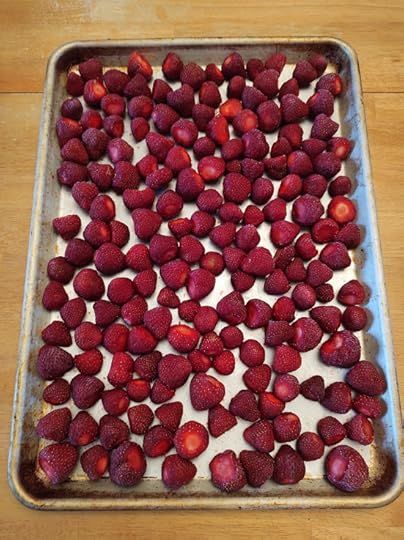
**Produce I don’t blanche before freezing: berries, tomatoes (because I’m usually freezing them for a short time before making sauce), peppers, zucchini shreds, herbs.
Flash Freezing– also called IQF, or Individual Quick Freezing
This is when you lay out a single layer of produce on a pan and freeze until frozen solid (usually 8-10 hours). Then put these individually frozen pieces into another freezer safe container or freezer bag.
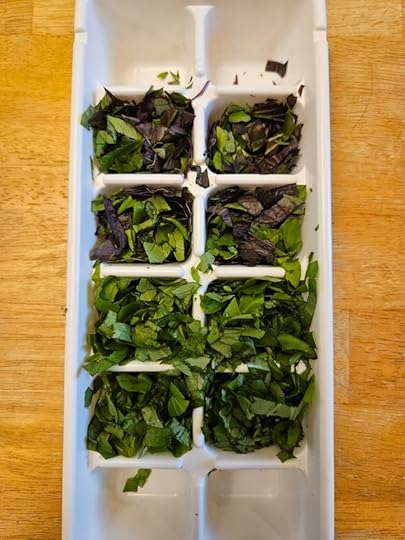
I also love making frozen ‘herb cubes’. I’ll chop fresh herbs, and pack them into ice cube trays and drizzle olive oil over the tops, freeze solid and pop out into a freezer bag for the freshest soup and sauce starters all winter long. I have been loving these freezer containers, but will happily re-use those Ziploc bags too.
Someday I may invest in a ‘food saver’ freezer storage system, but for now, as long as I’m using my frozen goods within a year, I haven’t had any freezer burn (knock on wood). And using regular freezer bags helps me preserve my garden harvests.
If you are looking for next level freezing recipes – check out Crystal’s book, Freeze Fresh!
Drying/Dehydrating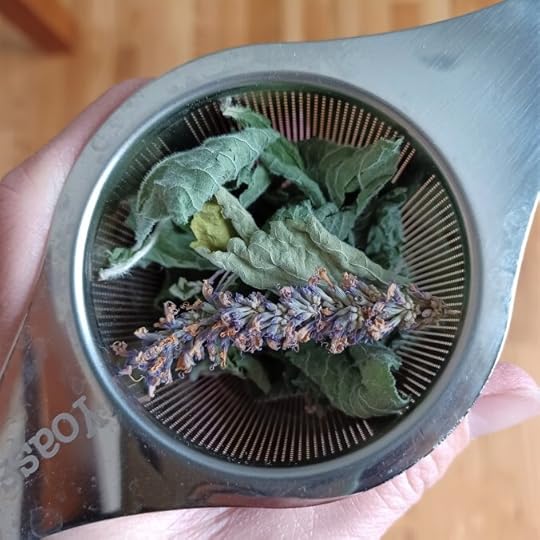
Most of us think herbs when we start to think of drying- and this is such an easy way star! You’ll end up making endless jars of homegrown herbal tea, and slowly stock up a pantry’s worth of bottled spices!
If you only ever dry herbs and spices you’ll still be so ahead of the game! Think about how expensive those bottles of organic herbs are at the store… easily $6-10 per jar. And now think about how easy it is to snip that basil, oregano or thyme plant a few times a summer and either hang or lay them out to dry… or if you’re committed, going ahead and purchasing a dehydrator is a great investment! I love THIS ONE.
If you love herbs as much as I do- read THIS ARTICLE for more ways to preserve and use them!
 Here’s my collection of homegrown herbs, spices + ground powders.
 I’ve also experimented with drying garlic, onions and beets for long term storage and to grind into seasonings and powders. Air drying shell beans and popcorn are other easy family favorites. Dehydrating is a simple, age-old, shelf-stable way of preserving the color, flavor and nutrients.
 These are jars with fermenting kimchi and daikon + carrot ferment- all with “pickle pipe’ topsFermenting
So many people fear fermenting, but when you realize so many of the things we’re already eating are fermented- like yogurt, kombucha, pickles- it should feel much safer. Plus, fermenting makes food healthier by producing and easier for our bodies to digest and use the nutrients. When we ferment, we allow the existing good bacteria to grow while keeping the bad bacteria at bay. This creates those beneficial pro-biotics. We aid natural fermentation by adding enough salt or salt water solution (brine) to our raw vegetables and covering it so that no bacteria can get in, but gas that forms while fermenting can get out.
The flavors you get with a good fermented pickle, kimchi or sauerkraut are some of my favorites on the planet!
 Here’s a jar of my Midwest Kimchi just starting to ferment.
Fermenting is kind of magical- as all you need is the produce you’re going to ferment and some salt, or a saltwater brine – and time. The trick to fermenting (although it’s not really a trick) is to keep everything in the fermenting jar below the brine level. We can add weights or cover with large cabbage leaves and watch the brine levels.
*For added crisp + crunch, add a grape leaf to the brine of pickles*
More Preserving Recipes like Midwest kimchi and carrot + Daikon pickles found HERE.
My co author on Small-Scale Homesteading has these other cookbooks all about fermenting and canning, Can It & Ferment It, Weck Small-Batch Preserving + Weck Home Preserving.
 Water Bath Canning
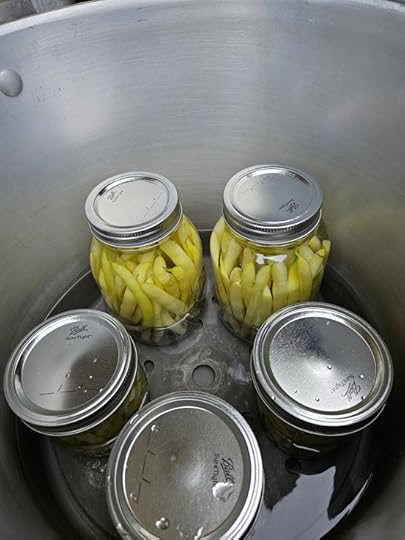
Well, this is where I may lose some of you. But let me assure you that all the things you’d be water bath canning (canning in a pot of boiling water) are going to be safe as long as you follow a trusted + tested recipes. Plus this is away to preserve your harvests, shelf-stable, for over year. Canning in a water bath is used for foods with a pH of 4.6 or lower. Think jams, jellies, chutneys, and vinegar pickles, along with my all-time favorite- the Crispy Crunchy Dilly Bean.
This process requires some preparation and a little learning curve, but is well worth that first time, because after that it gets so much easier. You need a very large stock pot to let the boiling water roll over the jars. Things like a ‘jar lifter’ (see picture) and canning funnel will make things much easier. Always start with clean (sterilized) jars and rings. You’ll need to use new lids each time if using the standard two-part metal system. A candy thermometer can help with those first-time jitters, although a ‘roiling boil’ which is what most recipes require is self-evident.
 Look at that pink apple sauce!
I love making apple sauce (and apple butter, apple jelly…) and go over all those recipes in this article.
Pressure CanningNow we’re bringing out the big guns… but really this process is simple and easy to follow along. It does help to have someone there who has done it before with you as you’re working with a steaming, pressurized pot that has to reach 240F. Yes, that’s the temperature that botulism can be successfully killed at, and certain foods require staying at that temperature for a certain amount of time.
I prefer to do pressure canning outside on my grill burner, because it throws so much heat while it is coming to temperature and cooling back down. This method is used for low acid foods, like sweet corn, beans, soups and meat. You’ll end up preserving your harvests with a shelf stable product that will last up to 2 years.

We love canning our own corn, and we grab 2 or 3 boxes at a time and have a family day peeling and prepping the corn, then we’re set for the year.

*A note on preserving eggs- many of us backyard homesteaders have a small flock of hens too. Lucky us! If you get that influx of eggs around midsummer, you might want to consider preserving some for later. I cover the methods in this blog.
I hope I’ve inspired you to try a new method or recipe to preserve your harvest. Maybe got you thinking about growing a little more of something to freeze, dry, can or ferment something of your own…
Dig In,
Michelle
The post Preserve Your Harvest appeared first on Forks in the Dirt.
July 2, 2024
Preserving Eggs: Water Glassing vs. Freezing Eggs

We finally hit a new milestone at our suburban homestead last summer- preserving eggs! When we couldn’t keep up with the eggs our hens were laying we had to make some decisions.
What a wonderful problem to have. But I also wanted to make the most of our surplus for those winter months when the eggs dwindle. Especially because I knew that most of my girls were in for their first serious molting (usually happens around 18 months old) and so we’d be short on eggs come winter.
So, I did what most modern day first generation homesteaders do- I took to the internet and started researching…

I found some conflicting information from some of my own trusted resources, but enough research to try a few different options- because I have learned the hard way, “Don’t put all your eggs in one basket (or mason jar).”
So I chose to Both Freeze and Water Glass my eggs. I had only frozen a few eggs before and it worked well, but I wanted to try both and do a side-by-side comparison of preserving eggs for our family – and for you all.
The most important thing to remember here is that you do what feels right for your family!
READ THIS if you’re thinking about starting your own flock.
Here’s our ‘Eggsperience’…
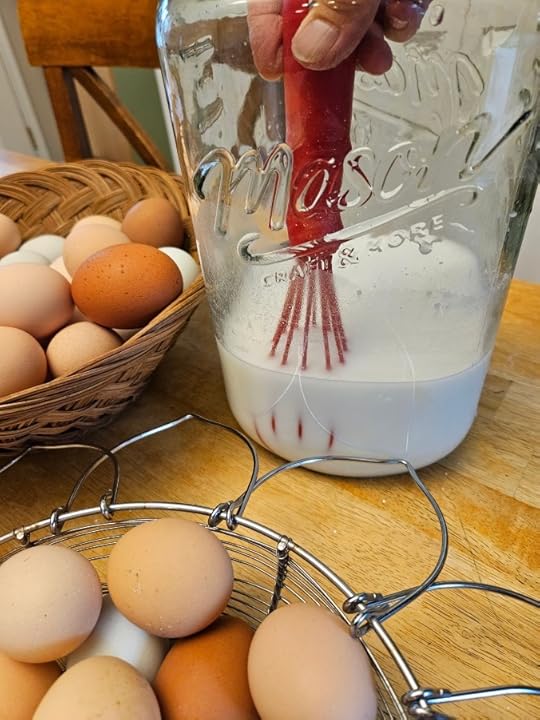
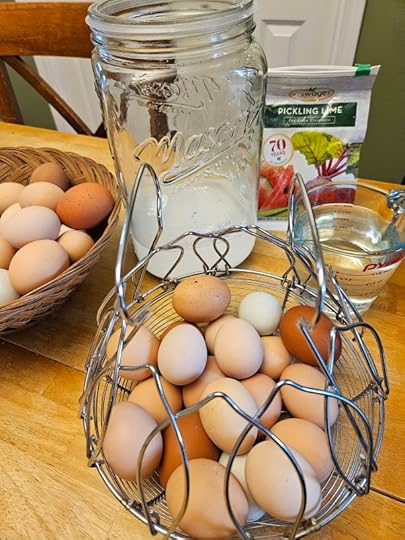 Water Glassing Eggs
Water glassing is a process where you essentially overload the egg shell with pickling lime to nearly completely stop the exchange of air between outside and inside the egg. You’re trying to plug the microscopic air holes that allow a baby chick to breath, in order to keep the egg in ‘suspended animation’. Old school homesteaders did this as a way to hold eggs without the need for refrigeration. This method is used to get homesteaders through the lean egg time- over the winter when hens slow down laying because of the decrease in sunlight.
For preserving eggs this way they need to be PERFECTLY clean, with a full bloom still intact. Getting some poop into the lime water solution will allow any contaminants to enter the eggshell before it is sealed up.
 Water Glassing Recipe:
1 ounce pickling lime
1 Quart waterMeasure 1 ounce of pickling lime, add the lime to a sterilized half gallon jar (or ½ the recipe for a quart size jar).
Mix lime powder into water well, it doesn’t really dissolve.SLOWLY add eggs, trying to get pointy side downAdd airtight lidStore in a cool dark place- for up to a year.Can add more eggs and water as you get them.
Pros –
Shelf Stable (in a cool, dark location)Can last over a yearSimple Process- mix Pickling Lime + Filtered water, set eggs insideCons –
If there is any chicken poop or dirt it can enter the egg via the shell and you can get sick (salmonella not death).The eggs become more watery the longer they sit.Your kids can easily crack an egg shell and the rest of the batch is ruined (ask me how I know Freezing Eggs
This method for storing eggs is as simple as it sounds. It is also more familiar to most of us as a way to preserve, but that doesn’t automatically make it better.

The only trick is that you crack and scramble the eggs before freezing, and have to use a freezer safe container.
The eggs thicken after thawing so I use two to three times as much water and/or milk to thin them out before making into an omelet or scramble. They work great for baking as is or thinned out a little too. They do take up space, but my 2 cup square freezer containers hold roughly 8 eggs, perfect for my family of 4. The containers measure 4”x4”x2” – about the same size as a single large muffin. You can also use large silicone ice cube trays and freeze in smaller portions. The typical ratio is 1 scrambled egg = ¼ cup.
Pros –
Comfortable process and pretty foolproof as long as your freezer stays frozen.Easy to use, almost end up with more egg ‘mass’ after freezing.Cons –
Take Freezer space and energy to preserveIt’s best to take time to defrost them. DO NOT microwave these to defrost, you will be disappointed. Set in a water bath or take out the night before and place in the fridge to thaw.Storing Fresh Eggs
You can store eggs fresh, unwashed from your backyard (or farmer) on your counter for 2 weeks. We have a rotating rack that helps us keep fresh eggs on the top and easily accessible.
You can store eggs in the refrigerator for up to 6 months, but the quality diminishes after a month or so- which is why we preserve them in other ways.
Refrigerate: Store eggs in the coldest part of the refrigerator, away from the door and pungent foods, at a temperature of 40°F or slightly below. The temperature on an inside shelf is more consistent than the door, which is opened and closed frequently. Eggs can last about three months or more in the refrigerator, but unwashed eggs can last about two weeks unrefrigerated.Hard-boiled eggs: Hard-boiled eggs can be stored in the refrigerator for up to a week.My Preserving Eggs ‘Take Aways’
I will hopefully always have enough extras to be preserving eggs. But we’ll likely only water glass a few eggs, as we run out of plastic freezer containers. It was pretty heartbreaking (and stinky) to throw away 16 or so eggs in the middle of winter when I realized that something was wrong…
Also, if you want to try this- use more and smaller containers- because, even though I should know better, I put too many eggs in one 2 gallon mason jar…
You can also dehydrate scrambled eggs and freeze dry them if you have the right tools and patience. I might try and dehydrate some this summer as well… but freezing has worked best for us so far.
Also, there’s lots of ways to use those eggs during the summer! We hard boil about a dozen a week, and even make lemon curd (recipe is in our book, Small-Scale Homesteading.)
Would you try water glassing to preserve your eggs?
Have you frozen eggs before?
Dig In,
Michelle
The post Preserving Eggs: Water Glassing vs. Freezing Eggs appeared first on Forks in the Dirt.
June 4, 2024
Organic Garden Pest Control
The number and diversity of bugs that want to eat what you grow is truly staggering.

With new ones coming into our gardens every season (thanks climate change) it can seem like a losing battle. But looking at each insect as part of a larger ecosystem can calm fears and get us into the right mindset when finding yet another new bug eating our plants.
Spending time in your garden with an insect identification book (like the Audubon Society Field Guide to North American Insects & Spiders) will give you quite an education. And if you find an infestation of insects, take a minute to learn more about them by asking some questions like:
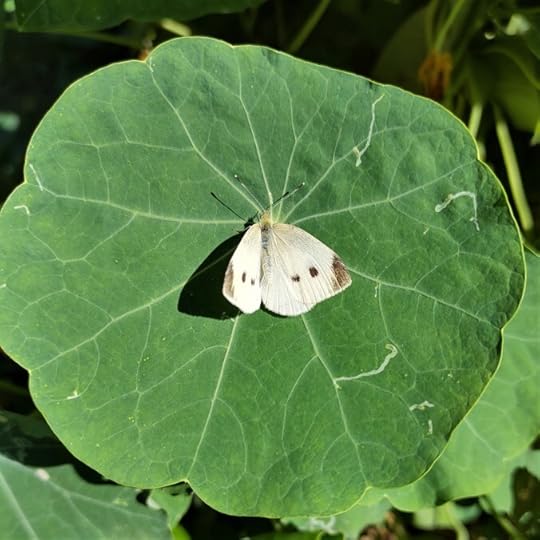 Imported Cabbage ButterflyIs this their larval or adult stage?How long do they stay in certain stages?What do they ultimately turn into?Where do they go at night?Where do they overwinter?How do they reproduce?What do they eat?
Asking these questions can really help you plan your attack. Because say there’s a caterpillar eating your dill, but you find out it’s a swallow tail butterfly and you love those. You might choose to plant more dill rather than remove the caterpillars, a practice based on the “Appropriate/Inappropriate Landing theory. For more info on that and other ways to balance your garden, read my Companion planting article for tips on pollen and nectar rich flowers to attract beneficial insects helps curb these infestations! I’ve also got a free 5 page Companion Planting Guide to download.
Integrated Pest ManagementDid you know I have FREE Monthly Emails with tips, links and ‘to do’ lists?
Let’s dig in together, Michelle
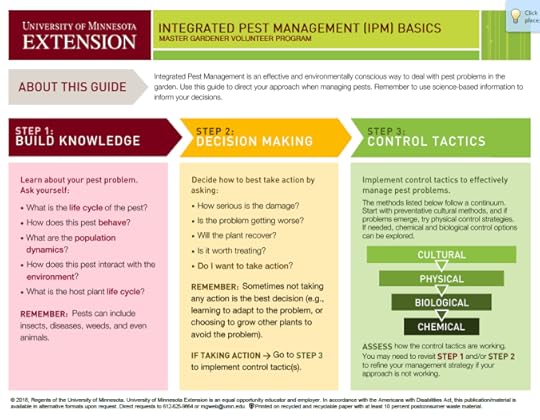
This introduces the idea of Integrated Pest Management (IPM). IPM gives us a framework to asses and choose options that are less harmful to the overall ecosystem, yet effective at stopping the spread of insects and plant diseases. For a good overview of IPM and how to implement it check out the U of MN Extension Services page on Preventing pests in your yard and garden
The Usual SuspectsWhen searching for information on a pest or disease in your garden, try adding “.edu or .extension” and look for information near your area to find researched information.
Pro Tip
Imported Cabbage Worms:
Eggs are oval and start white but turn a tinted yellow and are found on both sides of leaves. These are the bright green, and velvety soft to the touch caterpillars. You’ll often have to look very closely as the tend to blend into the broccoli, cabbage and cauliflower leaves that they eat. The adults are the white butterflies with a black dot. The best way to manage these are hand picking or capturing the butterflies before they lay eggs as one butterfly can lay 300 or more eggs! Floating row cover helps deter. Planting early to get plants well established before they arrive en-masse helps too. You can confuse the butterfly egg laying by interplanting different herbs (like dill) that have very different leaf structure from typical brassicas. Parasitic wasps will lay eggs inside the caterpillars ending the lifecycle.
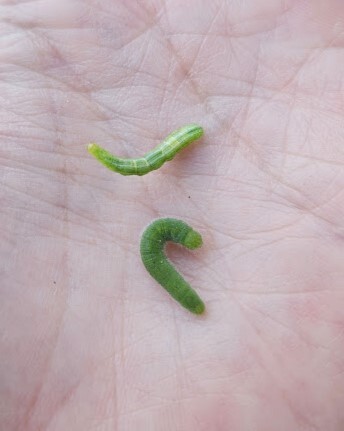 Cabbage Looper larva at the top and Imported Cabbage Moth larva at the bottom
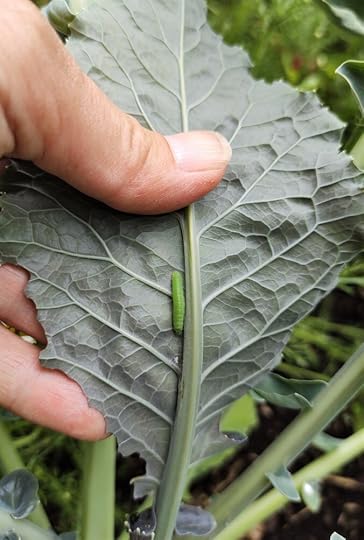 Imported Cabbage Moth on underside of broccoli leaf
Cabbage Loopers:
The eggs are tiny, white and laid on the underside of the plant leaves. The caterpillars move like inch worms. They look more segmented with more pronounced ‘legs’. The adults are gray-brown moths. Hand picking and floating row cover work to deter, as does early planting. You can confuse the moth egg laying by interplanting different herbs (like dill) that have very different leaf structure from typical brassicas. Parasitic wasps will lay eggs inside the caterpillars ending the lifecycle.
Cucumber Beetles: Striped Cucumber Beetle
You can discourage egg laying (they lay by burrowing into the soil) by heavily mulching around newly planted cucurbits, or by add floating row cover early in the season- but remove in time to aid in pollination. Hand pick beetles early in the season, I’ve found having soapy water to drop them into helps- good luck, they’re fast! Plant a trap crop like a Blue Hubbard squash nearby as the beetles are drawn to the plant’s higher level of cucurbitacin. Larva cannot overwinter in Zone 4 or colder but migrate from the south each spring.
Colorado Potato Beetles:Look for clusters of orange eggs on the underside of leaves and are easily squished. Larva are deep red and eat the most leaves compared to other stages, they are easy to hand pick. But these are seriously one of the grossest bugs for me- so I wear gloves). The adults can fly in from other gardens so stay watchful, especially as the tubers are bulking up which is right after flowering. There’s been some luck with capturing beetles in plastic lined trenches set in the midst of a potato bed. Check daily and remove. If infestations persist, consider taking a year off from growing potatoes. Or see if another gardener can grow those for you, while you grow something else for them.
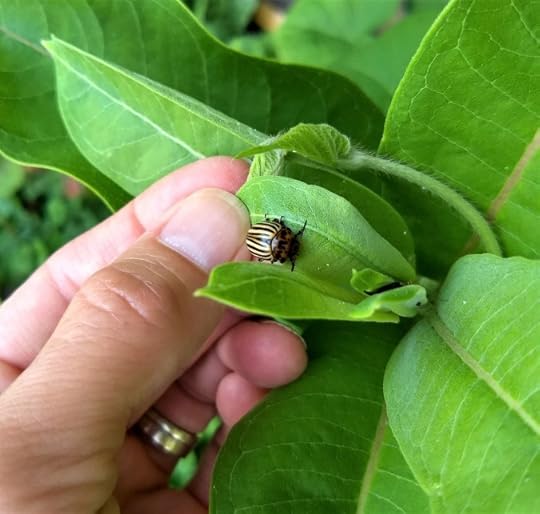 Potato Bug Beetle
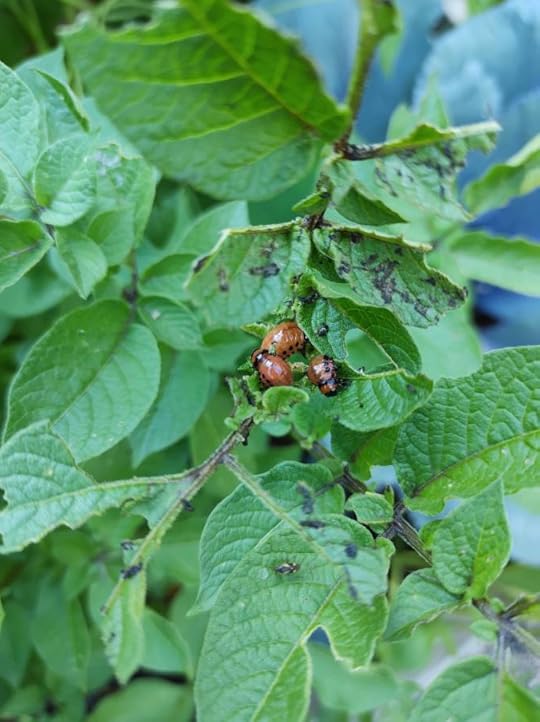 Potato Bug Larvae
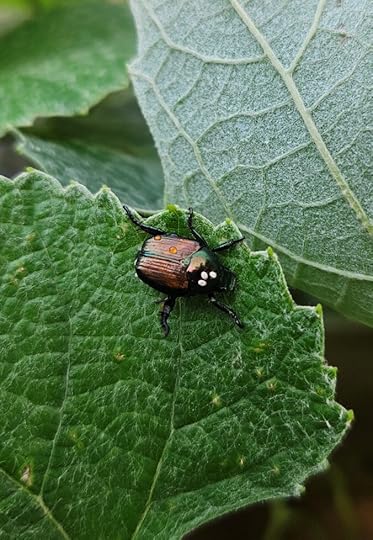 Japanese Beetle with three white Winsome Fly eggsJapanese Beetles:
Eggs are laid underground and become white grubs which feed on the roots under the soil. They emerge as flying beetles to eat all the things, they eat well over 300 types of plants! Thankfully they don’t usually spread much disease, just devour leaves. The plants usually survive, but repeated stripping of leaves can eventually stunt or kill plants, shrubs and trees. Start picking off bugs as soon as possible, the more damage, the more beetles will come. Netting can be added as a physical barrier but needs to be removed if pollination is required.
GOOD JAPANESE BEETLE NEWS!
A parasitic tachinid fly, the Winsome Fly, has finally followed the Japanese beetle north! This unassuming looking fly lays white eggs on the thorax of the Japanese beetles. So if you see Japanese beetles with the tell tale white dots on them- do not kill them, let nature take its course. The beetles will burrow underground within a few days where the eggs will hatch and bore into the beetle and kill them from the inside out. Making more Winsome flies and less Japanese beetles!Winsome Fly are attracted to marigolds, calendula and nasturtium
nature is neat
 Squash Vine Borer MothSquash Vine Borers:
The adult squash vine borer moth is bright orange and black with two long antennae. They’re also very fast and can fly in from neighboring yards so be aware through the end of July. They lay eggs at the base of your squash and cucumber plants and the larvae bore into the base of the vine and feed from inside. Careful inspection of plants is the best defense.
Wilted plants, especially in the morning, is a sign of squash vine borer. Look for the entry wound at the base of the vine. Slice the vine open where you see the entry point until you find the grub. Then remove and then cover the wound with the soil. If caught soon enough many plants survive. Plant a trap crop like a Blue Hubbard squash nearby as the beetles are drawn to the plant’s higher level of cucurbitacin. Also, planting resistant alternatives like butternut, ‘Cocozella Di Napoli’ and ‘Costata Romanesco’ helps.
PS- All Hand Picked Pests = Chicken Approved Treats
We haven’t covered slugs, pill bugs, cut worms, jumping worms or tomato horn worms… A great place to start digging deeper into the world of garden pests is Jessica Walliser’s book, “Good Bug, Bad Bug”.
Recipe for Organic Garden Pest Control Spray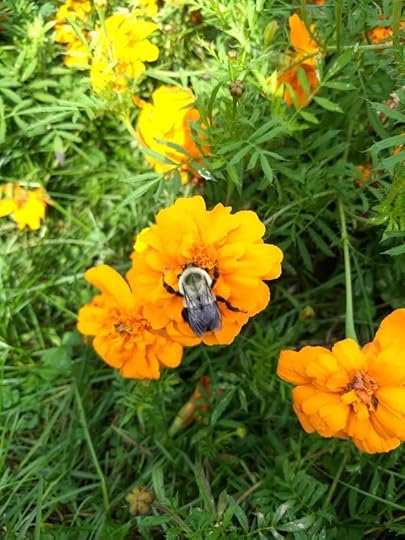 Bumblebee on Marigold
Sometimes the bugs become too much, and you need a solution. This simple, organic garden pest control spray works great on any soft bodied larvae like cabbage worms and potato bugs, as well as aphids, leafhoppers, thrips, and mealy bugs. This spray will not hurt pollinators like the bumblebee!
Use a 1 quart bottleAdd ¼ Cup Olive Oil (or another organic vegetable oil)Add 1 tablespoon of castile soapFill the rest of the way with water.Swirl the contents to mix (shaking creates too many bubbles) before each use.Spray directly onto pests in the morning or evening, avoiding spraying in full sun. As with all natural remedies, this will have to be reapplied more often. But this spray is quite effective in quickly suffocating the larvae by coating their skin. It lasts an entire season.
Quick Tips:TP/Paper Towel collars placed into the soil around newly emerged seedlings will fend off cutworms.Place short pieces of 2×4 lumber or corrugated cardboard in the garden to lure in earwigs and Roly-polies/Pill bugs over night and remove in the mornings.Adding sound ‘scare’ tactics can work, if used infrequently, so save for right before a harvest for racoons, even a talk radio station can work!Place copper strips in the soil to fend off slugs, it makes their slime sizzle!Apple Maggots are lured in by red balls hung in trees, so coat with a non-drying glue and you’ve got a non-toxic trap.Molasses and water mixed together lures in flies, ants and grasshoppers, which will often drown in the mixture.**One trap I avoid are the pheromone traps to lure in Japanese beetles etc. I find they just bring in more trouble than they kill.**
 Organic Garden Pest Control
For more ideas on organic garden pest control, check out my companion planting article and free companion planting guide. On the other side of this topic, is how we create habitat for wildlife to help balance out our garden spaces naturally.
Hopefully this helps ready you to deal with the common pests that every gardener deals with. Is there a specific pest you have trouble with that I didn’t mention? Have you found a new organic solution to pest control? Let me know in the comments below.
Dig In,
Michelle
The post Organic Garden Pest Control appeared first on Forks in the Dirt.
Common Garden Pests and Organic Management
The number and diversity of bugs is truly staggering. With new ones coming into our gardens every season (thanks climate change) it can seem like a losing battle. But looking at each insect as part of a larger ecosystem can calm fears and get us into the right mind set when finding yet another new bug eating our plants.
Spending time in your garden with an insect identification book will give you quite an education. And if you find an infestation of insects, take a minute to learn more about them by asking some questions like:
Imported Cabbage ButterflyIs this their larval or adult stage?How long do they stay in certain stages?What do they ultimately turn into?Where do they go at night?Where do they overwinter?How do they reproduce?What do they eat?Asking these questions can really help you plan your attack. Because say there’s a caterpillar eating your dill, but you find out it’s a swallow tail butterfly and you love those. You might choose to plant more dill rather than remove the caterpillars, a practice based on the “Appropriate/Inappropriate Landing theory. For more info on that and other ways to balance your garden, read my Companion planting article for tips on pollen and nectar rich flowers to attract beneficial insects helps curb these infestations! I’ve also got a free 5 page Companion Planting Guide to download.
Integrated Pest ManagementThis introduces the idea of Integrated Pest Management (IPM). IPM gives us a framework to asses and choose options that are less harmful to the overall ecosystem, yet effective at stopping the spread of insects and plant diseases. For a good overview of IPM and how to implement it check out the U of MN Extension Services page on Preventing pests in your yard and garden
The Usual SuspectsWhen searching for information on a pest or disease in your garden, try adding “.edu or .extension” and look for information near your area to find researched information.
Pro Tip
Imported Cabbage Worms:
Eggs are oval and start white but turn a tinted yellow and are found on both sides of leaves. These are the bright green, and velvety soft to the touch caterpillars. You’ll often have to look very closely as the tend to blend into the broccoli, cabbage and cauliflower leaves that they eat. The adults are the white butterflies with a black dot. The best way to manage these are hand picking or capturing the butterflies before they lay eggs as one butterfly can lay 300 or more eggs! Floating row cover helps deter. Planting early to get plants well established before they arrive en masse helps too. You can confuse the butterfly egg laying by interplanting different herbs (like dill) that have very different leaf structure from typical brassicas. Parasitic wasps will lay eggs inside the caterpillars ending the lifecycle.
Cabbage Looper larva at the top and Imported Cabbage Moth larva at the bottomImported Cabbage Moth on underside of broccoli leafCabbage Loopers:
The eggs are tiny, white and laid on the underside of the plant leaves. The caterpillars move like inch worms. They look more segmented with more pronounced ‘legs’. The adults are gray-brown moths. Hand picking and floating row cover work to deter, as does early planting. You can confuse the moth egg laying by interplanting different herbs (like dill) that have very different leaf structure from typical brassicas. Parasitic wasps will lay eggs inside the caterpillars ending the lifecycle.
Cucumber Beetles:Striped Cucumber BeetleYou can discourage egg laying (they lay by burrowing into the soil) by heavily mulching around newly planted cucurbits, or by add floating row cover early in the season- but remove in time to aid in pollination. Hand pick beetles early in the season, I’ve found having soapy water to drop them into helps- good luck, they’re fast! Plant a trap crop like a Blue Hubbard squash nearby as the beetles are drawn to the plant’s higher level of cucurbitacin. Larva cannot overwinter in Zone 4 or colder but migrate from the south each spring.
Potato Bugs:Look for clusters of orange eggs on the underside of leaves and are easily squished. Larva are deep red and eat the most leaves compared to other stages, they are easy to hand pick. But these are seriously one of the grossest bugs for me- so I wear gloves). The adults can fly in from other gardens so stay watchful, especially as the tubers are bulking up which is right after flowering. There’s been some luck with capturing beetles in plastic lined trenches set in the midst of a potato bed. Check daily and remove. If infestations persist, consider taking a year off from growing potatoes. Or see if another gardener can grow those for you, while you grow something else for them.
Potato Bug BeetlePotato Bug LarvaeJapanese Beetle with three white Winsome Fly eggsJapanese Beetles:Eggs are laid underground and become white grubs which feed on the roots under the soil. They emerge as flying beetles to eat all the things, they eat well over 300 types of plants! Thankfully they don’t usually spread much disease, just devour leaves. The plants usually survive, but repeated stripping of leaves can eventually stunt or kill plants, shrubs and trees. Start picking off bugs as soon as possible, the more damage, the more beetles will come. Netting can be added as a physical barrier but needs to be removed if pollination is required.
GOOD JAPANESE BEETLE NEWS!
A parasitic tachinid fly, the Winsome Fly, has finally followed the Japanese beetle north! This unassuming looking fly lays white eggs on the thorax of the Japanese beetles. So if you see Japanese beetles with the tell tale white dots on them- do not kill them, let nature take its course. The beetles will burrow underground within a few days where the eggs will hatch and bore into the beetle and kill them from the inside out. Making more Winsome flies and less Japanese beetles!Winsome Fly are attracted to marigolds, calendula and nasturtium
nature is neat
Squash Vine Borer MothSquash Vine Borers:The adult squash vine borer moth is bright orange and black with two long antennae. They’re also very fast and can fly in from neighboring yards so be aware through the end of July. They lay eggs at the base of your squash and cucumber plants and the larvae bore into the base of the vine and feed from inside. Careful inspection of plants is the best defense.
Wilted plants, especially in the morning, is a sign of squash vine borer. Look for the entry wound at the base of the vine. Slice the vine open where you see the entry point until you find the grub. Then remove and then cover the wound with the soil. If caught soon enough many plants survive. Plant a trap crop like a Blue Hubbard squash nearby as the beetles are drawn to the plant’s higher level of cucurbitacin. Also, planting resistant alternatives like butternut, ‘Cocozella Di Napoli’ and ‘Costata Romanesco’ helps.
PS- All Hand Picked Pests = Chicken Approved Treats
We haven’t covered slugs, pill bugs, cut worms, jumping worms or tomato horn worms… A great place to start digging deeper into the world of garden pests is Jessica Walliser’s book, “Good Bug, Bad Bug”.
Organic Pest Spray RecipeBumblebee on MarigoldSometimes the bugs become too much, and you need a solution. This simple pest spray works great on any soft bodied larvae like cabbage worms and potato bugs, as well as aphids, leafhoppers, thrips, and mealy bugs. This spray will not hurt pollinators like the bumblebee!
Use a 1 quart bottleAdd ¼ Cup Olive Oil (or another organic vegetable oil)Add 1 tablespoon of castile soapFill the rest of the way with water.Swirl the contents to mix (shaking creates too many bubbles) before each use.Spray directly onto pests in the morning or evening, avoiding spraying in full sun. As with all natural remedies, this will have to be reapplied more often. But this spray is quite effective in quickly suffocating the larvae by coating their skin. It lasts an entire season.
Organic Pest ManagementFor more ideas check out my companion planting article and free companion planting guide. On the other side of this topic, is how we create habitat for wildlife to help balance out our garden spaces naturally.
Hopefully this helps ready you to deal with the common pests that every gardener deals with. Is there a specific pest you have trouble with that I didn’t mention? Have you found a new organic solution to pest management? Let me know in the comments below.
Dig In,
Michelle
The post Common Garden Pests and Organic Management appeared first on Forks in the Dirt.
May 13, 2024
Rhubarb Leaf Bird Bath
We love bird baths AND we love our huge Rhubarb leaves – so we decided to combine them into this easy DIY Cement Rhubarb leaf bird bath!
We also had gigantic leaves and a partial bag of concrete at the same time as a broken bird bath bowl… so this was a project begging to be done!
This is truly easy DIY project that is easy enough for the kids to help with. There’s a little prep, some fast action while pouring the cement onto the leaf, then patience while waiting to dry- and then the only fussy part is removing any stuck leaf material by scrubbing off the cement after it has set. Start to finish ours took a few days.
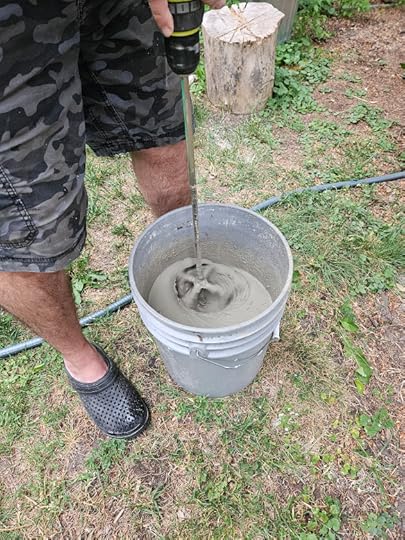
We opted for quick set cement, mostly because we had a partial bag of it laying around .
 Rhubarb Leaf Bird Bath Project:
Find a perfect (or perfectly imperfect) Rhubarb leaf. If you want to know how to grow great rhubarb, check out my article HERE.
*Note that this is also fun with Elephant Ear and other large leaves.
You can then lay the leaf out upside down on some newspaper or old plastic (we used an old piece of landscape fabric) and trace the outline of the leaf.
 thankful for my always handy hubby and his tools!
Then pour, shape and mound the sand/dirt inside the outline to create the ‘bowl’. I opted for to go thicker than suggested 1 inch thick- averaging about 1.5 inches thick. This bird bath is “substantial”- (read heavy) but will likely hold up to the random footballs and soccer balls that were the demise of our previous bird bath (fingers crossed anyway).
Remember that this will be the exact shape so take you time smoothing out and making easy to land on edges for the birds!
Then lay the leaf back on the mound of sand/dirt.
Mix your quick set concrete (or regular concrete if you have more patience than I do) and pour over the mounded leaf, smoothing out as you go. Take extra care around the edges, rounding those by pulling up on the newspaper or plastic.
 The upside down phase, you can see some of the leaf edges sticking out.
Depending on the kind of concrete you used and the weather it will be dry in 2 to 48 hours.
Then gently lift the concrete away from the form, taking time to ohh and ahh!
Using a hose and scrub brush work away any leaf material that doesn’t pull away from the concrete.
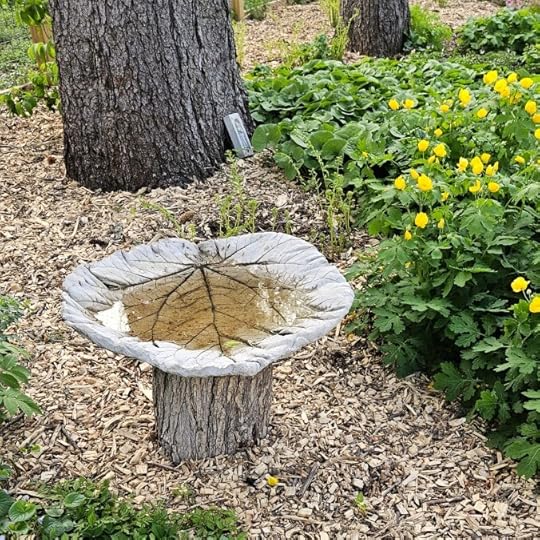
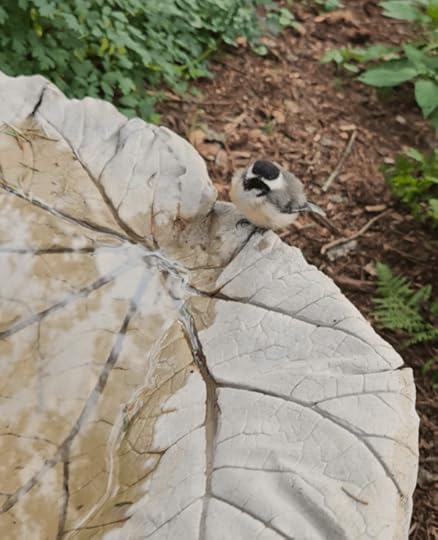
Our results were awesome, a bird bath with a deep middle for really exuberant bird bathing- and gently sloping edges to allow baby birds to nap and insects to drink– I mean is there anything better?!?!
One of the unexpected fun parts of this project was how excited my youngest was to find a log that looked just right to serve as the bird bath pedestal.
Bird baths can be part of Creating Wildlife Habitat in your garden.
Bird baths are a great addition to any garden- as they not only help birds hydrate, but help them keep clean feathers and attract birds that might not eat from your feeders- and they attract other pollinators too! Adding a water source is a good ecological practice no matter what it looks like!
Let me know if you make this project, and what you think of it!
Dig in,
Michelle
The post Rhubarb Leaf Bird Bath appeared first on Forks in the Dirt.
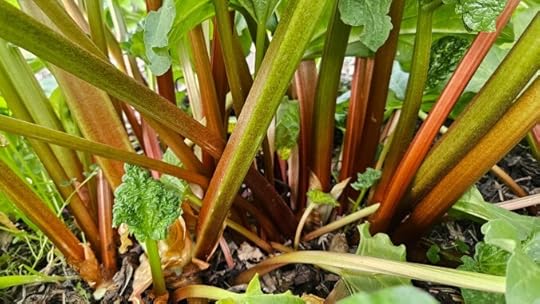
Growing Rhubarb: Plus my Favorite Rhubarb Recipes

Rhubarb combines some serious garden nostalgia with punchy modern takes on how we eat it. There’s so much to love about this perennial plant, so let’s dig right in!
First off, rhubarb is a vegetable, not a fruit, even though we treat it like one.Second, it was originally cultivated in the far east over 2,000 years ago and used medicinally, for cleansing the body, stomach issues and reducing fever.Thirdly, only eat the stalk. The leaves are toxic and contain oxalic acid, which can build up in the kidneys and cause kidney stones and even failure.So, why the heck do we grow this plant?
Because it tastes like spring at grandma’s kitchen table.Because it is a crazy hardy perennial that is easy to grow without pest issues.Because it is one of the earliest cultivated plants to produce a harvest on northern homesteads each season.Because it is truly beautiful in the garden. My rhubarb patch grows where the soil warms the earliest, giving me the earliest possible harvests!Growing Rhubarb
You want to get the placement right for this perennial as it will possibly outlive you (officially 15 years, but I know plants that have been growing for over 40) so you want to make sure to take care when planting.
Since this is an early spring plant, I like to plant where spring sunshine hits and warms the soil early, for an even earlier harvest.
Finding your own garden’s microclimates is a good practice anyway. My early spring perennial patch, situated right where the sun warms the soil earliest, is one of my favorite places in my backyard come April.
I plant rhubarb with chives, garlic chives, Egyptian walking onions, lemon balm and asparagus for a burst of spring growth while the rest of the garden slowly wakes up.
*You can also plant rhubarb right into a perennial border as it is gorgeous and holds up well until frost when harvested.
While rhubarb doesn’t require anything extra special to grow wells, it does best in well-draining loamy soil. When planting I add a healthy amount of compost to the hole. After that it is making sure to keep the area weeded and giving extra water during the first season.
Planting Your Rhubarb
Try to shoot for as early I spring as you can for planting or more likely transplanting rhubarb crowns. The longer you wait (especially if digging up an existing plant) the more shock the plant will likely experience. Dig down as deep as that huge chunky tap root needs to sit down into the soil so the top of the crown sits just an inch or so below the soil surface. Fill the hole with lots of good compost, water in well, and add a layer of straw or leaf mulch around the base. A general rule is to leave about 3 feet between rhubarb plants.
 You can see the rhubarb flower stalk here, cut off at the base.Pro Tip: Remove those flower stalks!
Removing the round hollow flower will help keep energy going into growing great leaf stalks- and get you more to harvest.
Harvesting RhubarbAfter planting, a plant should be left to establish without harvesting for the first season, you can harvest lightly the second season and go gangbuster from the third season on.

In my zone 4/5 garden in Minnesota I harvest from early to mid-May through early July. You can stop harvesting when you’ve had enough, or when you notice the plant starting to produce thinner stalks. You’ll want to grab the stalk and twist it out of the ground – or you can cut it away at the base- I’ve done both and both work without hurting the plant!
Red doesn’t necessarily mean ripe. Some varieties are just redder or greener than others. But… Crimson Cherry and Canada Red are some of the reddest rhubarb varieties. If you’re like many people who have inherited unknown varieties from friends or neighbors, just know that when the stalks get big it’s time to harvest

Rhubarb Leaf Bird Bath
The most practical way to enjoy your rhubarb leaves all season long. Read how to DIY your own bird bath from a leaf and some concrete.
Check out the full DIY article + Project HERE.
Eating all that Rhubarb!If you grew up with like I did, you’ll have a soft spot in your heart for all things rhubarb.
 Strawberry Rhubarb Pie
This is a pie that you have to make at least once in your life because it is such a gorgeous treat. My kids (and husband) still talk about this. The lattice top is a little finicky for me, but oh there’s something super nostalgic about breaking into that flaky crust! I follow this recipe.
Rhubarb Sauce RecipeThe simplest, and maybe purest way to use up rhubarb is the humble rhubarb sauce, so good on ice cream and pancakes, over granola and yogurt… So simple this isn’t really a recipe but:
Chop rhubarb into 1″ bits, and some honey or maple syrup to taste and cook until the fibers break down. You can mash with a potato masher or blend with a stick blender if desired- we like ours a little chunky. You can make extra thick with a cornstarch slurry. And we like adding vanilla once off the heat. Stores in fridge for up to a week. Easy (and worth it) to make in small batches.
 Rhubarb Shrub Recipe
If you haven’t made a shrub yet, let me introduce you to this sipping vinegar and wonderful addition to mocktails and cocktails in my article on Rhubarb Shrub Love! Thanks to Stephanie of Minnesota From Scratch for sharing this recipe!
‘ABC’ Rhubarb Crisp RecipeI Call this ABC crisp because I routinely change up the ‘other’ fruit with rhubarb between Apple, Blueberry and Cherry (A,B, or C). I have used all three together and it is also delicious!

*Easy to make Gluten Free by using GF flours
(I prefer Bob’s Red Mill 1 to 1 GF Flour)
Prepare a 9X9″ baking dish with coconut oil, preheat oven to 350F.
Crisp Filling
2 cups chopped rhubarb
2 cups frozen blueberries (or cherries!)
1 tbsp. flour
1/3 cup brown sugar
1/4 tsp. salt
1/2 tsp. cinnamon
1/4 cup melted butter
(mix in 1 tsp of vanilla into melted butter)

Mix together and spread into bottom of prepared backing dish.
Topping
3/4 cup flour
1/2 cup old fashioned oats
1/2 tsp. cinnamon
1/3 cup brown sugar
¼ cup finely chopped walnuts, pecans or hazelnuts (optional)
1/4 tsp. salt
1/4 cup melted butter
Mix crumble ingredients together and spread evenly on top of fruit.
Bake on middle rack for 40-45 minutes, until fruit is fork tender and top is browned.
And yes, whipped cream or ice cream, or vanilla yogurt make this treat extra scrumptious!
Another family favorite is Stephanie Hansen’s Rhubarb Custard Bars from her True North cookbook!
I hope this inspires you to get growing rhubarb in your own yard!
Dig in,
Michelle
The post Growing Rhubarb: Plus my Favorite Rhubarb Recipes appeared first on Forks in the Dirt.
April 29, 2024
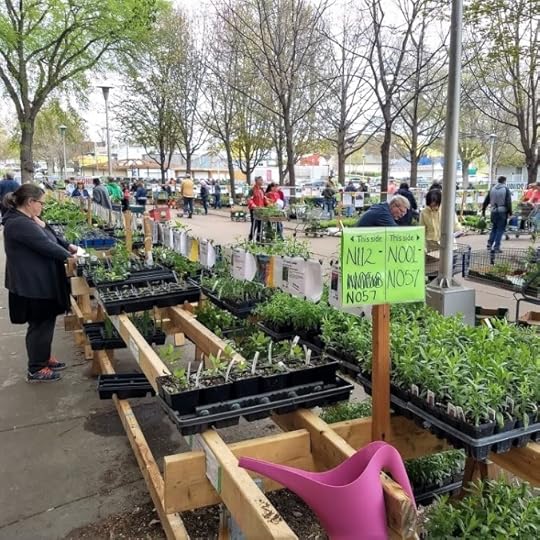
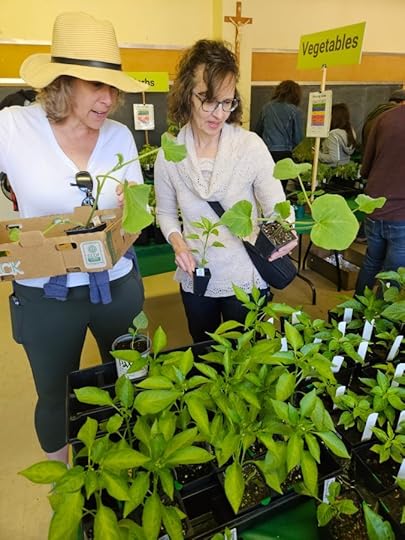
Local Plant Sales for 2024

These local plant sales will start your garden off right! Good for your garden, the pollinators, your harvests and the community.
Plants grown for these sales are not treated with Neonicotinoid pesticides, are non-GMO, locally raised by experts- and the sales directly benefit some great gardening programs.
Listed in Chronological order- ladies and gentlemen, save these dates!
Local Plant SalesAFSA School Plant Sale
May 9th-11th, at the AFSA High School (Vadnais Heights)
Held in the School’s greenhouse, plants (mostly annuals) are all grown by AFSA students and supports a variety of FFA activities at the school.
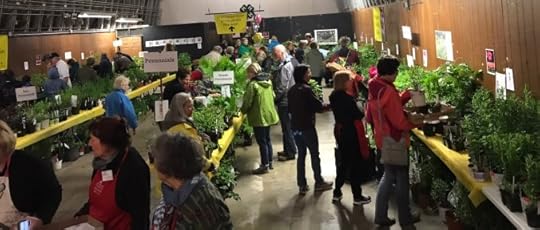
Friends School Plant Sale
May 10th-12th, at the State Fair Grounds
With 1,000’s of plant varieties this may be the largest single plant sale in the U.S. It is a fundraising event for the Friends School of Minnesota, a small Quaker K-8 school in St. Paul. Plants are grown as naturally as possible, 80% from local growers.
Anoka County Master Gardener Sale
May 14 + 15 at the Anoka County Fairgrounds
Ramsey County Master Gardeners Plant Sale
May 18th, 2022 – 9 a.m. to 2 p.m. – Aldrich Arena
Over 300 varieties of plants grown by local master gardeners, neonic free and grown in sterile potting soil to stop the spread of jumping worms. The proceeds from this sale benefit the University of Minnesota Extension Master Gardener programs in Ramsey County. Master Gardeners on hand (LIKE ME- wink wink) to answer questions.
Landscape Revival Plant Sale + Expo
June 1st Rockpoint Church Lake Elmo
This sale focuses on locally grown NATIVE plants for pollinators grown by local growers without any systemic insecticides. Also, no cultivars sold, so straight native plants.
Wild Ones Plant Sale Pick Up Near Mounds View High School
Order by: May 15th
Pick Up Dates: June 8th + 9th
The “Big River, Big Woods” chapter of Wild Ones is again holding their annual plant sale of native wildflowers, ferns, sedges, grasses available in many sizes from Glacial Ridge and Outback Nurseries- two local and trusted native plant specialists.
Farmers Markets – Shop you local farmers market for locally grown vegetable + native plant starts. Find your local market at MNGROWN

All Good Organics – Lino Lakes, MN
Limited but healthy variety of organic vegetable starts between Mother’s Day and Father’s Day available at their on site farm store.
MN Native Landscapes – Otsego, MN
Variety of MN native seeds, plants and ecological services offered. Shop online here.
*I planted one of their “Pocket Prairies” years ago and love how it has grown over the years!
Outback Nursery – Hastings, MN
Sells Minnesota native perennials, shrubs, vines and trees.
Prairie Moon Nursery– Winona, MN
Hundreds of varieties of native seeds, plants both potted and bare root. You can visit or order online here.
Prairie Restorations – Princeton, Scandia and Cloquet, MN
Wide variety of Minnesota Native plants in all sizes, plus single species and wildflower seed mixes. Shop online here.
Of course you can always look for neighborhood seed and plant swaps, check your local seed library and- you’d be amazed at how many plants you can still start yourself from seed. Learn what you can still succession plant and how to start seeds with me. I even have a pre-recorded Seed Starting Class available.
I hope this gives you more REAL LIFE options for growing your best garden yet!
Dig In,
Michelle
The post Local Plant Sales for 2024 appeared first on Forks in the Dirt.
Forks in the Dirt

- Michelle Bruhn's profile
- 4 followers

