
Michelle Bruhn's Blog: Forks in the Dirt, page 2
April 22, 2025
Happy Earth Day + Happy 8 years to Forks in the Dirt!
I truly can’t believe I’ve been sharing garden, homestead, farmer and food stories with you all for eight years now.
Thanks for being part of the movement to heal our earth one garden, homestead and meal at a time.
In those 8 years lots has changed and much has stayed the same. Locavore is a known word. Farmers markets have exploded. We’re inching towards Victory Garden era numbers of people gardening (but not quantity yet). Climate news has gotten scarier, but many people are doing more.
There are so many reasons to love the earth; she is our home, our shared environment and, “when we protect nature, we are nature protecting itself” as Greta Thunberg said a few years ago.
Or, as Alan Watts puts it, “you didn’t come into this world, you came out of it. Like a wave from the ocean.”
Let that truth roll over you.
Yet our existential debates over coming ‘into’ or ‘out of’ can quickly fade when faced with our current environmental crisis. But then we realize that until we get our relationship with nature is at the center of our striving we’ll continue to fight against rather than with nature. There’s power in those prepositions.
There are so many proven ways (thank to the Indigenous peoples of the world) to work with nature to help tend the soil, grow food we need, raise the animals, and nourish ourselves.

Our current food system is broken, and we’ve known it for decades. Agriculture and land use, as well as the larger global food system, are among the biggest contributors to climate chaos (23-30%). And, as a result, changing these systems would be a leap towards climate solutions.
It starts with eating closer to home. If we could shift an additional half of our food purchases to locally or regionally sourced (instead of the average 1,500 miles it takes foods to get to our home pantries) we could turn the tide.
Read more on Eating Local.
When we decentralize crops and livestock we put the power back into the hands of smaller farmers rather than corporations. And small farmers take better care of the land. In the United States there’s about 2% of the population that farms. That means 98% of us don’t.
So, as a small-scale homesteader, I love doing my part, tending to the tiny slice of the planet I can, and I give a huge nod to our local farmers for all they do. I thank a Farmer three times a day.
But Earth day is wonderfully timed to be seated in the time of Spring Hope- and as a gardener, I am full of that rosy-glassed longing for sun warmed tomatoes that burst in your mouth. Just don’t remind me of the mosquitos quite yet 
Here are some of my go-to resources for feeling hopeful about the climate.
Daily Climate
Minnesota Farmers Union
Project Drawdown
Robin Wall Kimmerer’s Books
What are some places you go to for hope for the future our big blue-green planet?
And thanks for letting me dig into local food with you for 8 years.
Cheers to at least 8 more!
Michelle
The post Happy Earth Day + Happy 8 years to Forks in the Dirt! appeared first on Forks in the Dirt.


March 5, 2025
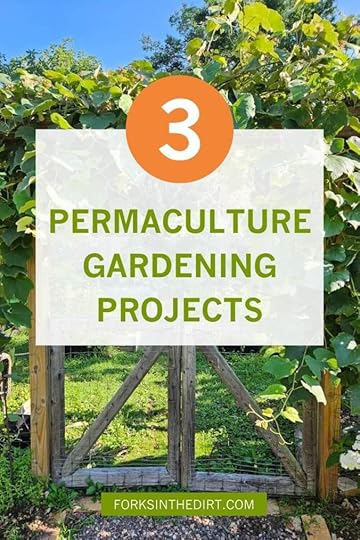
3 Permaculture Garden Projects to Get You Started!
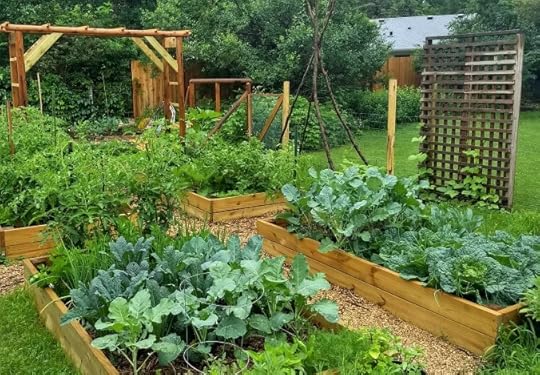
Imagine buying less compost, growing more food and flowers while lowering water use, all by setting up our gardens to mimic the way nature multitasks... Here are three permaculture garden projects you can start today!
 A grapevine adds shade, habitat (a robin nests in the vines), and food for our family!
Permaculture offers exciting and common-sense ways to take environmental action in our own yards by working with nature. We can be part of the climate solution; one plant, compost pile, or rain barrel at a time.
The idea of permaculture has been around since the dawn of time, but the term was coined in the 1970s when two Australians joined the concepts of ‘permanent’ and ‘agriculture’. Since then, it has evolved to include the central ideas of earth care, human care, and fair share, supported by a dozen principles.
Permaculture Defined: The harmonious integration of landscape and people, and a framework for creating self-sustaining agricultural ecosystems.
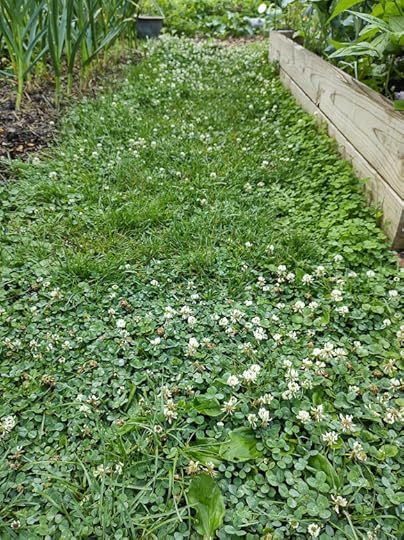 Adding clover to the vegetable garden or lawn increases biodiversity, nectar, and drought tolerance all while fixing nitrogen.
As you practice permaculture, you’ll start seeing your land and the things living on it as interconnected resources working together to sustain each other. You’ll notice how each plant, insect, and rain drop serves multiple functions. In an undisturbed forest, this kind of system has slowly matured over hundreds of years. Today we can help recreate nature’s self-sustaining systems by designing with existing resources to benefit the whole.
Permaculture functions best as a whole system’s approach. To get us started, we’re highlighting a few practices while acknowledging that as we work on getting better techniques, plants, and soil in place—it is the relationships between these elements that make permaculture so powerful.
Stacking Functions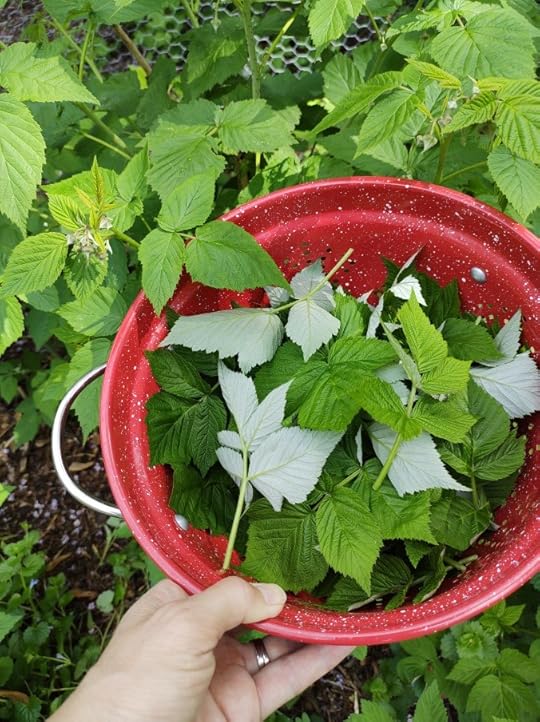
Stacking Functions is a central concept in permaculture. Learning the plants’ functions will help us place the plant into our design.
Examples of multiple functions:
Raspberries: Growing berries, leaves for tea, attracting pollinators, and conserving soil structure as a perennial.
Yarrow: Dynamic nutrient accumulator (phosphorus, potassium and copper), attracts beneficial insects, repels pests, breaks up compacted soil.
Clover: Nitrogen fixer, conserves soil, drought tolerant, attracts beneficial insects.
Permaculture suggests that garden designs flow from observing your yard and learning from it; where is your yard sunniest, driest, windiest, wettest? As we explain the following projects, consider how these would best fit into your space with your lifestyle and garden goals.
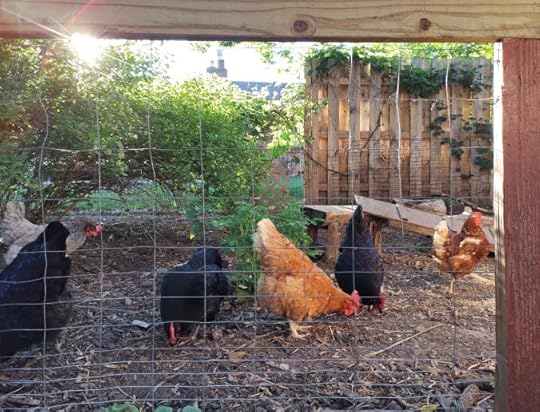 Consider adding chickens to your backyard to increase your permaculture impact!Permaculture Garden EthicsEarth Care
People Care
Fair Share
Principles of PermacultureObserve and InteractCatch and Store EnergyObtain a YieldApply Self-regulation and Accept FeedbackUse and Value Renewable Resources and ServicesProduce No WasteDesign from Patterns and DetailsIntegrate Rather than SegregateUse Small and Slow SolutionsUse and Value DiversityUse Edges and Value the MarginsCreatively Use and Respond to Change1. Compost Options
As author Toby Hemenway says, “start with the soil” in his book, Gaia’s Garden: A Guide to Home-Scale Permaculture. Composting is one of the best ways to continually build and replenish soil. It’s also one of the only ways to replenish trace elements like magnesium and copper, etc. (which plant roots pull from the soil) back into the soil. But did you know there are many ways to compost?
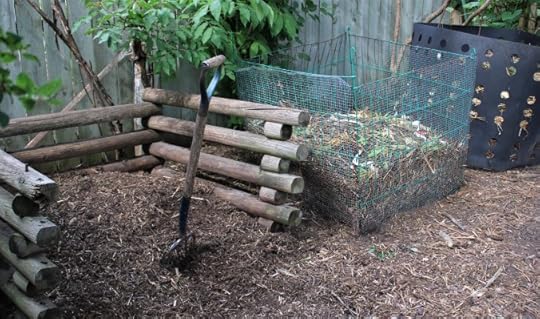 Compost areas can be made with what you have!
You can set up traditional compost piles in your yard. You could vermicompost, which uses worms to decompose food scraps within a closed bin, to keep composting indoors during winter in northern climates. There are also self-contained units that make composting an option for those without much outdoor space.
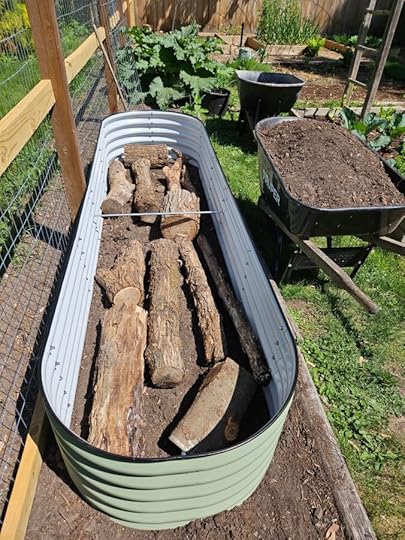 Filling a bed the Hugelkultur way.
As we learn more about the soil food web, more people are starting No Dig gardening. This style of gardening minimizes soil disturbance and composts in place. This can look like ‘chop + drop’, where you cut down non-diseased plant material and let it first act as mulch and then slowly decompose in the garden where it grew.
Or try Hügelkultur gardening, which uses organic materials found on your property to build soil health. Start with larger pieces of dead wood at the base, then branches. Top with layers of organic materials, same as what you’d add to a compost pile, but right in the garden. This applies the permaculture principle of using the ‘available services’ of the insect and microorganism world that are already present, while skipping the step of hauling and turning compost.
2. Planting Perennial GuildsCommunal Composting
If you really can’t or don’t want to compost yourself, remember, most cities also have yard waste drop-off sites and many have started “Organics Recycling” options.
 Fruit trees make excellent Permaculture additions.
Planting edible landscapes is a great way to add function, biodiversity, and healthier plant communities to your permaculture garden. Interplanting and companion planting might be more familiar terms to gardeners and are similar to plant guilds. Think the “Three Sisters” Indigenous way of planting, but make it perennial. Choosing perennial instead of annual edibles also helps the garden develop deeper soil food web relationships.
Many cold-climate edible perennials make wonderful guild plant options. These include herbs like chives, clary sage, horseradish, oregano, and thyme, to vegetables like asparagus, perennial kale, ramps, rhubarb, sorrel, walking onions, and fruits like blueberries, currants, grapes, raspberries, rhubarb, and strawberries. Fruit- and nut-producing trees add another layer of food and height to the landscape. A food forest might seem unattainable—but we can imitate nature’s way of growing by starting with a tree or two. Perennial ground covers, herbs, shrubs, vines, dwarf and full-size trees can all be interplanted.
A typical fruit tree guild will have a ring of bulbs at the outer drip line, with mulch producing, insectary, and nutrient accumulating plants under the canopy. The exact plant choices would take into consideration resource sharing for root depth, nutrients needed, etc.
 Apple Tree Guild in action
APPLE TREE GUILD
Semi-Dwarf Apple TreeComfreyYarrowWhite CloverFeverfewAnise HyssopMonardaChives/OnionsWhile these mini ecosystems take longer to mature and require more upfront planning, in the long run they’ll reduce the need for care, fertilizer, and pest management. They’ll end up supporting themselves, a permaculture garden goal. By adding plant diversity, you’re also growing more overall resilience.
3. Water Collection Mature oak trees can cycle (absorb and transpire) around 100 gallons of water daily.
As gardeners living through climate chaos, we understand the value of rainwater as a resource. There are ways to make the most of this resource and collect water that go beyond planting rain gardens.
A smart place to store water is the soil, and we can do this by designing swales. Swales function best on sloping land. They’re made by digging shallow trenches and adding berms on the lower side to slow run-off and let water percolate down into the soil. This creates an underground ‘lense’ of water as a reserve that deeper plant roots can access.
Capturing water from rooftops into rain barrels is an easy way for smaller and flatter properties to collect water. You run water from gutters down a spout and directly into a barrel for holding until needed. Place your barrel in an easy to access spot, and make sure to keep a filter secured to the intake area to catch debris before entering the barrel.
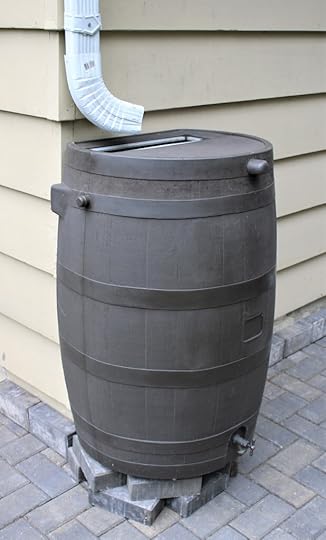 Simple water barrels gather at least a small amount of run off from rooftops.
There’s been ample research into whether chemicals from petroleum-based shingles leech into the water collected. Findings continue to be within a safe range. Rain barrel water is usually slightly acidic, which is excellent for nutrient uptake by plants. In general, harvested rainwater is best applied at the soil level.
As an extra safety precaution, you can wait to harvest produce watered with rainwater a full day after watering to benefit from the sun’s ultraviolet light disinfection of any possible contaminants. More information is available under on the EPA’s website.
Permaculture Gardening in PracticeAt its heart, permaculture is a commonsense approach to welcoming sustainable gardening practices into our lives. It also puts us in the mindset to react to our ever-changing environment with adaptive, fun, and imaginative solutions. It reminds us that everything, even us gardeners, are part of nature. Let’s get out there and harness our existing resources!
Have I inspired you to Dig Into Permaculture?
I originally wrote this article for Northern Gardener magazine. It appeared in a shorter form in the Spring 2024 issue.
Michelle
The post 3 Permaculture Garden Projects to Get You Started! appeared first on Forks in the Dirt.
3 Permaculture Projects to Get You Started!
Imagine buying less compost, growing more food and flowers while lowering water use, all by setting up our gardens to mimic the way nature multitasks...
A grapevine adds shade, habitat (a robin nests in the vines) and food for our family!Permaculture offers exciting and common-sense ways to take environmental action in our own yards by working with nature. We can be part of the climate solution; one plant, compost pile or rain barrel at a time.
The idea of permaculture has been around since the dawn of time, but the term was coined in the 1970’s when two Australians joined the concepts of ‘permanent’ and ‘agriculture’. Since then, its evolved to include the central ideas of earth care, human care, and fair share, supported by a dozen principles.
Permaculture Defined: the harmonious integration of landscape and people, and a framework for creating self-sustaining agricultural ecosystems.
Adding clover to the vegetable garden or lawn increases biodiversity, nectar and drought tolerance all while fixing nitrogen.As you practice permaculture, you’ll start seeing your land and the things living on it as interconnected resources working together to sustain each other. You’ll notice how each plant, insect and rain drop serves multiple functions. In an undisturbed forest, this kind of system has slowly matured over hundreds of years. Today we can help recreate nature’s self-sustaining systems by designing with existing resources to benefit the whole.
Permaculture functions best as a whole system’s approach. To get us started, we’re highlighting a few practices while acknowledging that as we work on getting better techniques, plants, and soil in place – it is the relationships between these elements that make permaculture so powerful.
Stacking FunctionsStacking Functions is a central concept in Permaculture. Learning the plants functions will help us place the plant into our design.
Examples of multiple functions:
Raspberries: Growing berries, leaves for tea, attracting pollinators and conserve soil structure as a perennial.
Yarrow: Dynamic nutrient accumulator (phosphorus, potassium and copper), attracts beneficial insects, repels pests, breaks up compacted soil.
Clover: Nitrogen fixer, conserves soil, drought tolerant, attracts beneficial insects.
Permaculture suggests that garden designs flow from observing your yard and learning from it; where is your yard sunniest, driest, windiest, wettest? As we explain the following projects, consider how these would best fit into your space with your lifestyle and garden goals.
Consider adding chickens to your backyard to increase your permaculture impact!Permaculture EthicsEarth CarePeople Care
Fair Share
Principles of PermacultureObserve and InteractCatch and Store EnergyObtain a YieldApply Self-regulation and Accept FeedbackUse and Value Renewable Resources and ServicesProduce No WasteDesign from Patterns and DetailsIntegrate rather than SegregateUse Small and Slow SolutionsUse and Value DiversityUse Edges and Value the MarginsCreatively Use and Respond to ChangeCompost Options
As author Toby Hemenway says, “start with the soil” in his book, Gaia’s Garden: A Guide to Home-Scale Permaculture. [MB1] Composting is one of the best ways to continually build and replenish soil. It’s also one of the only ways to replenish trace elements like magnesium and copper, etc. (which plant roots pull from the soil) back into the soil. But did you know there are many ways to compost?
Compost areas can be made with what you have!You can set up traditional compost piles in your yard. You could vermicompost, which uses worms to within a closed bin, to keep composting indoors during winter in northern climates. There are also self-contained units that make composting an option for those without much outdoor space.
Filling a bed the Hugelkultur way.As we learn more about the soil food web, more people are starting No Dig gardening. This style of gardening minimizes soil disturbance and composts in place. This can look like ‘chop + drop’, where you cut down non-diseased plant material and let it first act as mulch and then slowly decompose in the garden where it grew.
Planting Perennial GuildsCommunal Composting
If you really can’t or don’t want to compost yourself, remember most cities also have yard waste drop off sites and many have started “Organics Recycling” options.
Fruit trees make excellent Permaculture additions.Planting edible landscapes is a great way to add function, biodiversity, and healthier plant communities to our gardens. Interplanting and companion planting might be more familiar terms to gardeners and are similar to plant guilds. Think the “Three Sisters” Indigenous way of planting but make it perennial. Choosing perennial instead of annual edibles also helps the garden develop deeper soil food web relationships.
Many cold-climate edible perennials make wonderful guild plant options. From herbs like chives, clary sage, horseradish, oregano, and thyme, to vegetables like asparagus, perennial kale, ramps, rhubarb, sorrel, walking onions and fruits like blueberries, currants, grapes, raspberries, rhubarb, and strawberries. Fruit and nut producing trees add another layer of food and height to the landscape. A food forest might seem unattainable – but we can imitate nature’s way of growing by starting with a tree or two. Perennial ground covers, herbs, shrubs, vines, dwarf and full-size trees can all be interplanted.
A typical fruit tree guild will have a ring of bulbs at the outer drip line, with mulch producing, insectary and nutrient accumulating plants under the canopy. The exact plant choices would take into consideration resource sharing for root depth, nutrients needed etc.
Apple Tree Guild in actionAPPLE TREE GUILD
Semi-Dwarf Apple TreeComfreyYarrowWhite CloverFeverfewAnise HyssopMonardaChives/OnionsWhile these mini ecosystems take longer to mature and require more upfront planning, in the long run they’ll reduce the need for care, fertilizer, and pest management. They’ll end up supporting themselves, a permaculture goal. By adding plant diversity, you’re also growing more overall resilience.
Water CollectionMature Oak trees can cycle (absorb and transpire) around 100 gallons of water daily.As gardeners living through climate chaos, we understand the value of rainwater as a resource. There are ways to make the most of this resource and collect water that go beyond planting rain gardens.
A smart place to store water is the soil, and we can do this by designing swales. Swales function best on sloping land. They’re made by digging shallow trenches and adding berms on the lower side to slow run-off and let water percolate down into the soil. This creates an underground ‘lense’ of water as a reserve that deeper plant roots can access.
Capturing water from rooftops into rain barrels is an easy way for smaller and flatter properties to collect water. You run water from gutters down a spout and directly into a barrel for holding until needed. Place your barrel in an easy to access spot, and make sure to keep a filter secured to the intake area to catch debris before entering the barrel.
Simple water barrels gather at least a small amount of run off from rooftops.There’s been ample research into whether chemicals from petroleum-based shingles leech into the water collected. Findings continue to be within a safe range. Rain barrel water is usually slightly acidic which is excellent for nutrient uptake by plants. In general, harvested rainwater is best applied at the soil level.
As an extra safety precaution, you can wait to harvest produce watered with rainwater a full day after watering to benefit from the sun’s ultraviolet light disinfection of any possible contaminants. More information is available under “soak up the rain” on the EPA’s website.
Permaculture In PracticeAt its heart permaculture is a commonsense approach to welcoming sustainable gardening practices into our lives. It also puts us in the mindset to react to our ever-changing environment with adaptive, fun, and imaginative solutions. It reminds us that everything, even us gardeners, are part of nature. Let’s get out there and harness our existing resources!
Have I inspired you to Dig Into Permaculture?
I originally wrote this article for Northern Gardener magazine, it appeared in a shorter form in the Spring 2024 issue.
Michelle
The post 3 Permaculture Projects to Get You Started! appeared first on Forks in the Dirt.
February 28, 2025
Growing Spinach All Season Long
With early planting and adding a few varieties, we can get you growing spinach all season long!
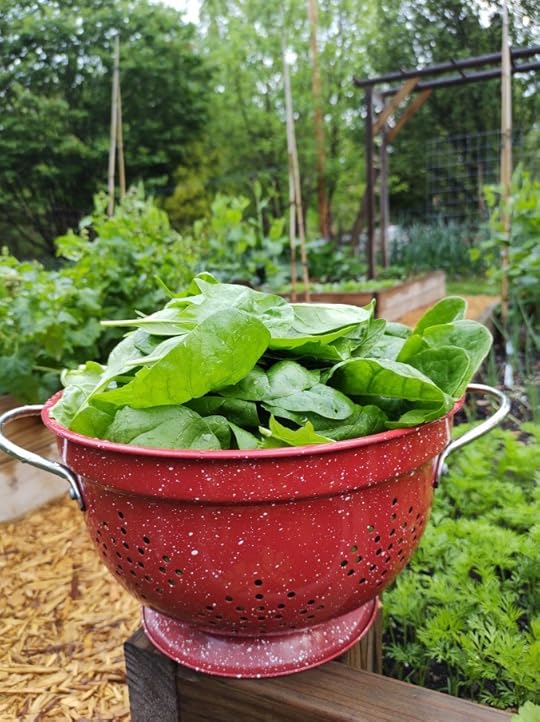
A few tweaks and tricks can strengthen our spinach growing skills and save us from buying those – very expensive and oh so wasteful – plastic bags of half-wilted greens shipped across the country.
Not to mention the multiple recalls for listeria and E.coli outbreaks…
And, as we know that produce loses around 30% of its nutritional value within days of harvesting, growing our own makes sense both to our personal health and the health of the planet.
Plus, crunching sweet spinach leaves is one of the joys of an early season garden.
Growing SpinachBut if you’ve grown spinach, you may have also felt frustrated with plants bolting from an early season heatwave. By starting seeds earlier and exploring different strains and species of what people around the world use as ‘spinach’ we can enjoy these slightly finicky, nutrient packed greens in our gardens – and salads, all season long.
Start Your Spinach EARLYBolting is when a plant changes its focus from growth to seed production. This will quickly make plants taste bitter, tough and in general inedible.
 Harvesting Overwintered Spinach on April 25, 2024
Spinach is a cool weather crop, with optimum growing temperatures between 50⁰F – 60⁰F. So, starting plants extra early will ensure you’re harvesting baskets of spinach before the first heatwave hits. Or try planting in the fall to overwinter, Giant Winter Spinach grows well this way.
Spinach seeds germinate well in 40-55⁰F soil. I usually find these soil temperatures in my Zone 4b/5a covered gardens by mid-March. Seeds, planted ½” deep, take a week or two to germinate though, so remain patient. Once sprouted, seedlings are truly cold hardy, tolerating temperatures as low as 15⁰F.
Plant up to nine seedlings per square foot if intensively planting, or 6” for traditional spacing. Most plants get 6-10” high and almost as wide. Keep the soil consistently moist and switch to a shade cloth when temperatures warm over 80⁰F to prolong harvests.
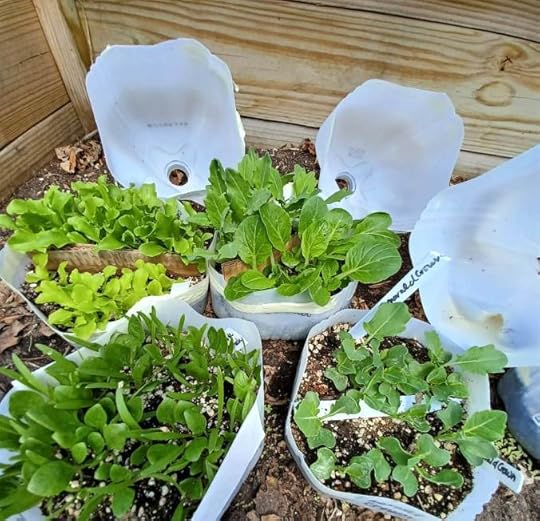 Winter Sown Spring Veggies
Spinach prefers to do most of its growing in our (rapidly diminishing) shoulder seasons, but simultaneously likes a lot of sun, making spinach a great choice for winter sowing.
More on Winter Sowing Vegetables HERE
I also love starting seeds in late summer for a fall harvest, the trick is keeping the seedlings happy in the heat, adding a layer of grass clippings helps.
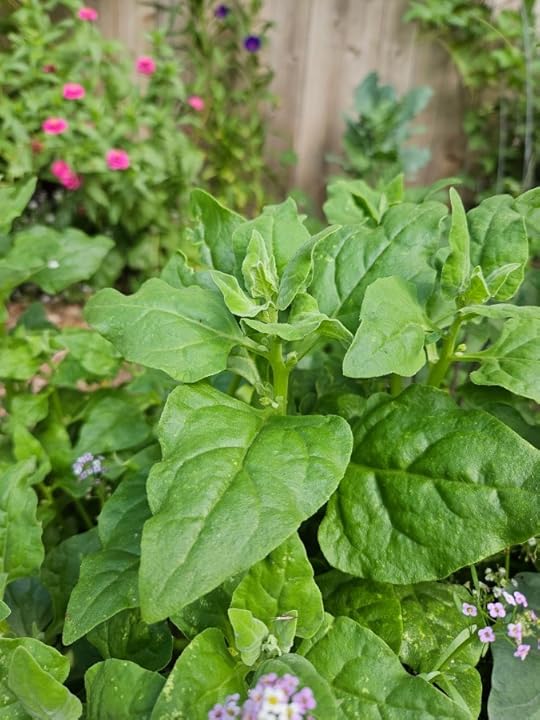
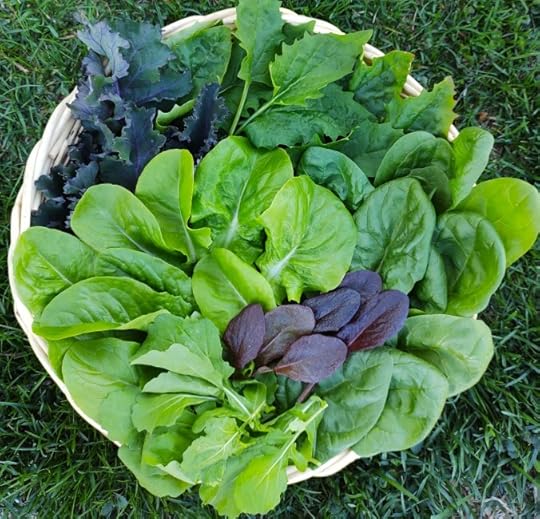 Nothing beats a basket full of fresh spring greens; Arugula, Kale, Red Leaf, Romaine, Bloomsdale + Strawberry SpinachSo Many Spinach Varieties!
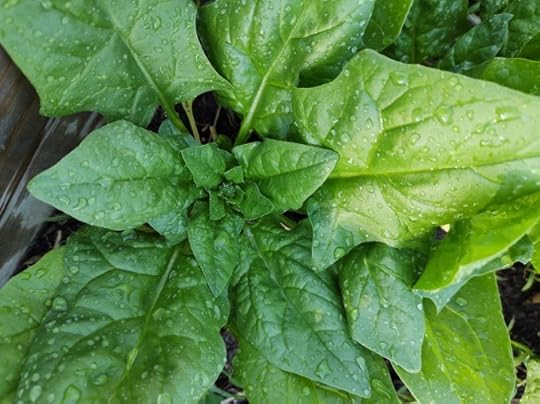 Bloomsdale Longstanding in July starts to get the ‘goosefoot’ look and looses density.
Here’s a list of varieties I’ve grown and what I’ve thought of them.
Bloomsdale
Spinacia oleracea
40-50 days
This variety is a garden staple, and for good reason. It has loads of fresh flavor in its big, crinkly leaves. This open pollinated heirloom variety was bred from a single monoecious plant (most spinach is dioecious). The “Longstanding” Bloomsdale variety holds off on bolting better than most and grows a little larger to 10” tall.
Space F1
Spinacia oleracea
25-50 days
This variety boasts more resistance to downy mildew. It also matures quickly, but holds off on bolting while staying sweet a little longer. Deep dark green, smoother leaves grow from an upright stem.
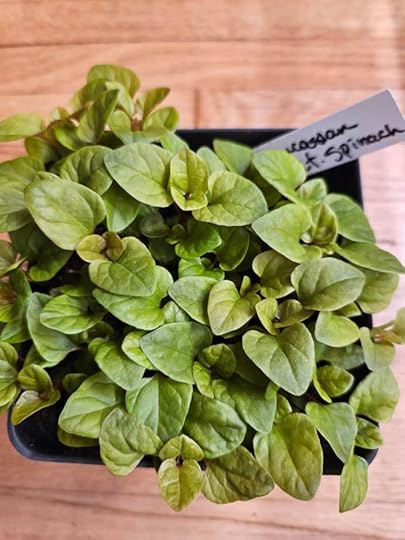 Caucasian Mountain Spinach
Caucasian Mountain Spinach
Hablitzia tamnoides
45-55 days
This perennial (to zone 3) variety produces tasty shoots in early spring. Often described as earthy flavored, the heart-shaped leaves follow typical patterns of being most tender when smaller, with more mature leaves doing best in pesto or cooked.
If given full sun, established plants will vine from six to nine feet long, making a green edible screen. The seeds should be cold-stratified. Note that growth is slow the first year, but vines after.
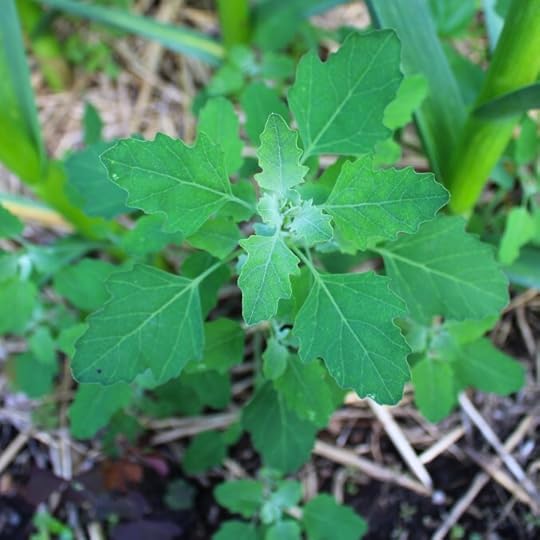 Lamb’s Quarters
Lamb’s Quarter’s
Chenopodium album – Wild Spinach, Goosefoot
50 days
This sun loving variety is cultivated in much of the world as an edible but seen as a weed in America. It is an aggressive plant, but a fun way to forage for your salad as you weed. Harvest long before the plant reaches its three foot height. It also contains more vitamins and minerals than any cultivated spinach.
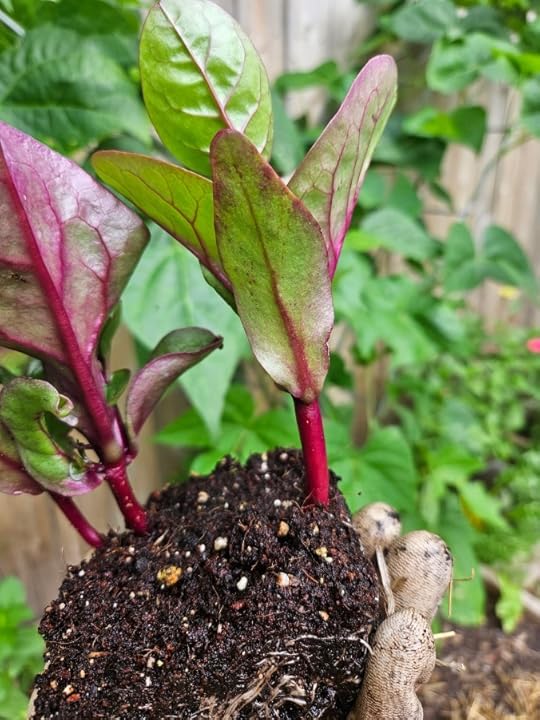 Red malabar Spinach seedling ready for transplant
Malabar Spinach
Basella rubra (red stems) alba (green stems) – Ceylon and Vine Spinach
70-80 days
Malabar makes a great warm-season alternative to spinach as it thrives in heat and humidity. The vines grow to eight feet, making for gorgeous edible trellises. The leaves, which taste like baby beet greens are edible both raw and cooked, though typically used as a stir fry or soup ingredient.
Start seeds inside four to six weeks before last frost, waiting to transplant until well after chance of frost.
 New Zealand Spinach
New Zealand Spinach
Tetragonia tetragonioides
55-70 days
New Zealand spinach is a unique warm-season spinach alternative. While New Zealand spinach is drought tolerant, it tastes best harvested young after consistent watering. It really gets quite bitter after midsummer.
Harvesting the tips often encourages new growth. High oxalate content is reduced with cooking. Start seeds inside three to four weeks prior to the last frost. Soak seeds in water for 24 hours for better germination. Transplant seedlings well after chance of frost.
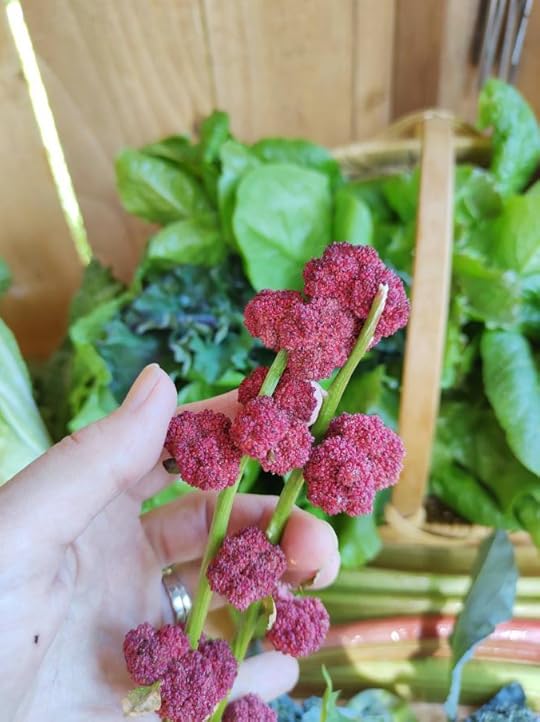 Clusters of Strawberry Spinach’s pink seed ‘berries’.
Strawberry Spinach
Blitum capitatum Strawberry Goosefoot, Indian Paint
40 days leaves – 90 days seeds
This funky native edible is usually the first harvestable green from my garden. The real bonus of growing these are the bright pink to red seed heads that give the plant its name. The ripe seeds are slightly sweet and juicy and really do look like berries. They’re a great addition to salads, and one of my favorite ‘in the garden’ snacks. As a native, beware it wants to self-seed.
All varieties can be harvested as a cut and come again green. Harvest often and in the morning. You can also blanche and freeze all varieties of spinach. I hope you’ll add a few more shades of spinach to your spring garden this year!
Stretching the Seasons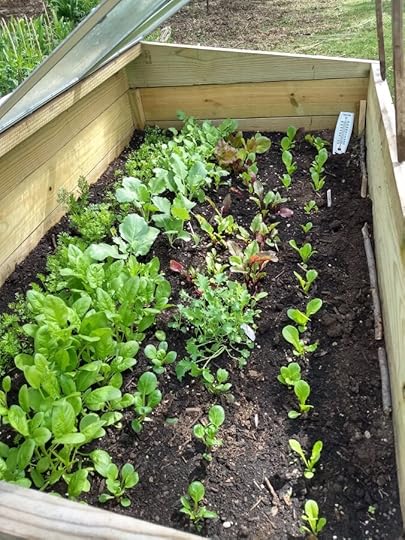 My Cold Frame in early spring with direct sown greens.
I love playing with growing under cover and Elliot Coleman introduced the concept of ‘Double Coverage’. On a much smaller scale than his market farm, I have been placing winter sowing jugs inside my cold frames and low tunnels – using ‘Double Coverage’ – to get an even earlier start. Coleman estimates this practice moves your garden a thousand miles south.
Salty Spinach?Have you noticed an almost gritty feeling on your homegrown spinach leaves? Congratulations, you’ve found where the plant has deposited extra mineral salts from the soil. Finding these salts on leaves is an indicator of mineral-rich soil – and freshly harvested greens!
So which new spinach varieties do you want to try?
*A version of this article first appeared in the Spring 2024 issue of Northern Gardener*
Dig In,
Michelle
The post Growing Spinach All Season Long appeared first on Forks in the Dirt.
January 31, 2025
Growing Great Leeks
I started growing leeks about 8 years ago and now can’t imagine the end of a harvest season without them!
Plus- leek powder is a must in my spice rack now (more on that later)!
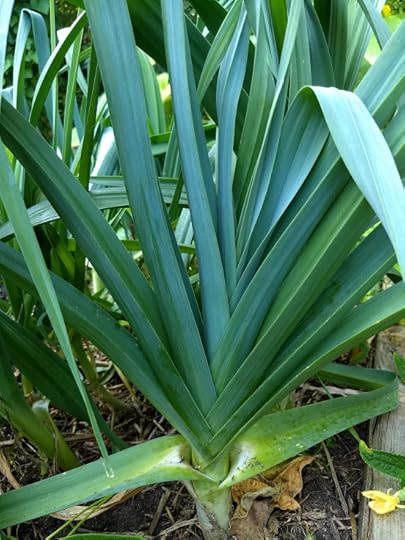
Leeks are like the cosmopolitan older cousin to onions- graceful lines compared to round and squat stature, more sophisticated flavors; and yet somehow easier to grow for me!
Growing LeeksLeeks are easy to start from seed, though you do need to give them good lead time, about 10-12 weeks prior to transplanting, just like other onions. Most leeks need between 110-150 days of growth to fully mature. For me in Minnesota, on the edge of zones 4b-5a, this means I start seeds under lights by mid-February. I grow these in 5” deep pots.
As they grow it is good practice to trim the tops, I trim to 3 inches or so. This trimming will help them add more layers and get ‘fatter’ stalks and helps them not flop over when you transplant. The same trimming information applies with growing onions. So, bonus, you get to enjoy little ‘leek microgreen’ nibbles as they grow indoors.
I’ll be trying a little experiment with starting some inside vs winter sowing some and keeping track of the harvests as well, as I’m always looking for ways to make things easier!
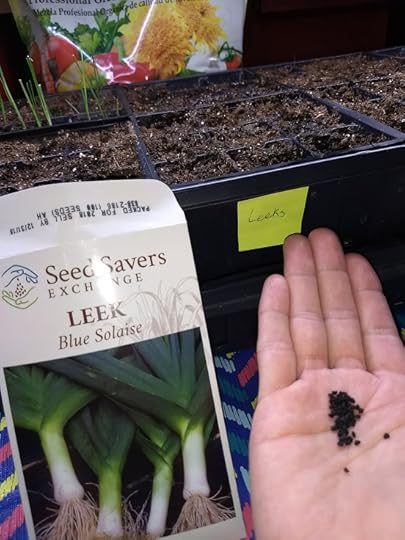
My Favorite Varieties:
Chinook
-Earliest and best disease resistance
King Richard
-Largest (by a hair over Chinook)
Blue Solaise
-Heirloom, Good flavor but short and squat

You can transplant leeks out a little earlier than onions as they’re not as affected by cold temps, usually by early May. Leeks (like all onions) prefer the sunniest spots in your garden, at least 8-10. They also do best in nitrogen rich, well-draining soils, so if you have a dense clay type of soil you may want to grow these in raised beds. I’ll often soak the seedlings in water to loosen the roots (they have been growing in these deep pots for almost 3 months after all).
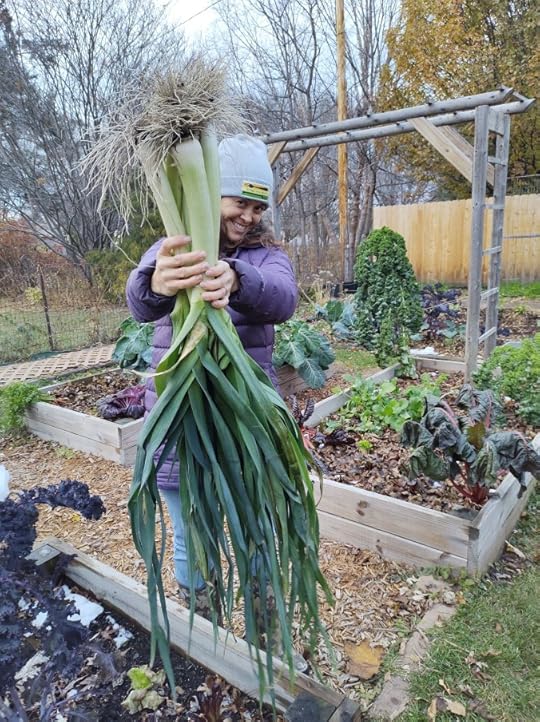
And you can trim the tops at transplanting as well, making it easier for them to establish without tipping over. I add a little slow-release fertilizer (my blend is in our book) as I transplant, or you could just add a side dressing of well-rotted compost. I also mulch with a light layer of straw right away to help keep dirt out from between the tight layers. They slowly grow throughout the season and are such a perfect late season treat to harvest- even taking temps down into the 10’s, though harvesting in the 20’sF is usually recommended.
If you want to experiment with growing your own leek seed, there’s a trick at harvest time. Cut the leek an inch or so above the soil level and leave the roots intact. This practice has proven to regrow plants the next year for me- three years in a row. This works because leeks, like all onions, are biennials and will seed after a second year of growing. The leeks themselves tend to be tough, but the seeds are worth it!
*Also, at harvest time there’s something SO satisfying about peeling off those few outer tough layers to reveal the fresh white-green stalks underneath!
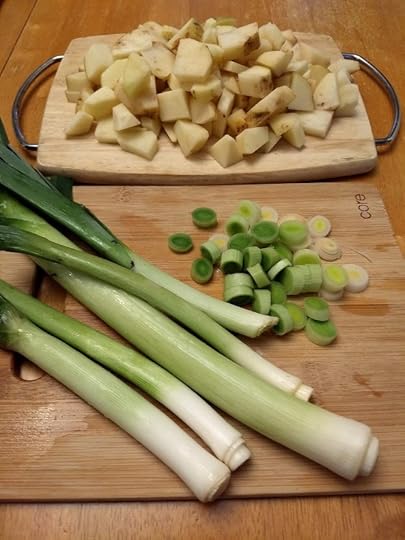 Cooking with Leeks
I use leeks in place of onions for most things when I bring in the main harvest. I think they pair so well with most of our fall favorites, like turkey stuffing, potato leek soup and any squash recipes.
Leeks are high in vitamin A (one cup offers 30% of your daily requirement). They’re a decent source of vitamin C, vitamin K, and vitamin B6, as well as the minerals iron and manganese.
Leeks pair especially well with:
 Eggs
Eggs – I’m going to say it, leeks pair better with eggs than onions!Potatoes
– Caramelized leeks > caramelized onions.Squash
– Something about the mild sweetness in leeks lets squash really shine.Carrots
– Pan roasting sliced carrots + leeks is scrumptious.Soups
– Adds an amazing depth to broth, go ahead and add in onions, garlic and leeks and see how happy that broth makes you.Leek Powder
I love being able to grow a plant for multiple years, to get to ‘know’ it and how it plays best with your family. This idea came to me after recipe after recipe told me to toss the dark green tops. But as a gardener, I kept thinking, I grew that- and that gorgeous dark green must be good for something… and it was, and LEEK POWDER was born!
To make the most out of these gorgeous plants, first I remove any tough and dried outer leaf tops. Then chop the leek down to where I would normally use it in a recipe, because the green parts are more fibrous and tend not to cook down very well. Which gives me a good few inches of green leeks to work with from every plant. Chop the green tops into thin strips.

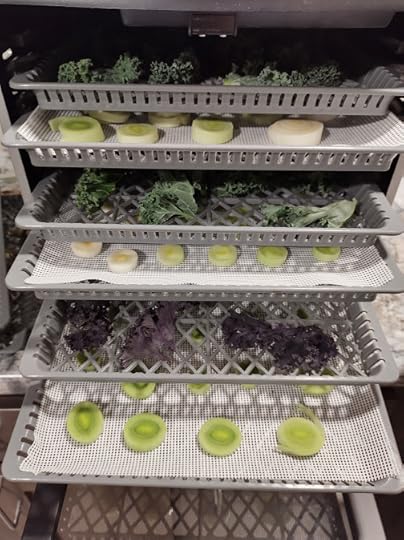
Dehydrate for at least a day at 95F, leeks are over 80% water after all. Once crispy dry, I toss into my blender and pulverize into a powder that is so packed with flavor you’ll wonder how you ever survived without it.
Keeping the powder in an airtight container out of direct light is key to being able to use it all year long.
SO, have I convinced you to give leeks a try this year?
I’m currently getting my seed starting area set to start these earliest of seeds and cannot wait!
Di In,
Michelle
The post Growing Great Leeks appeared first on Forks in the Dirt.
January 28, 2025
Spring Gardening + Homesteading Classes
with Michelle of Forks in the Dirt
This is the spring to dig deeper into your gardening and homesteading skills!
I am so excited to have public, in person classes available and now open for registration!
Feb 12th 6:30-8pm– Herbal Salve Making
Anchor Coffee House
Feb 27th – 6-8pm Intro to Small-Scale Homesteading
(with Stephanie Thurow + Starter Kits provided))
Richfield Community Center
March 2nd – 9:30am-3pm Practical Permaculture to Get You Started
(with Elaina Moss)
Women’s Environmental Institute
March 19th -6:30-8pm – Vegetable Garden Design
Anchor Coffee House
April 16th –6:30-8pm – Seed Starting + Winter Sowing
Anchor Coffee House
The post Spring Gardening + Homesteading Classes appeared first on Forks in the Dirt.
January 2, 2025
DIY Board Butter Recipe
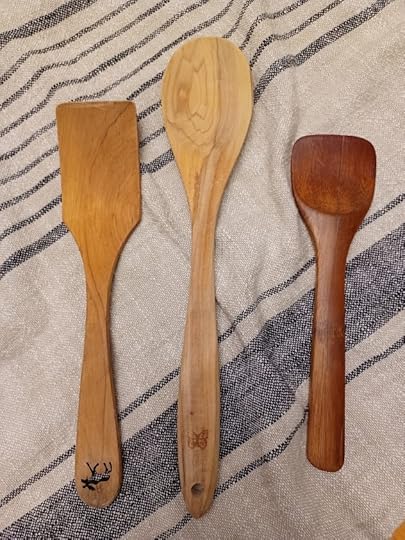
Board butter is a must-have wood care solution for protecting and nourishing your wooden kitchen items.
I see you buying heirloom pieces instead of cheap plastic, and I am so proud of you!
I also want to help you make the most out of those new (usually more expensive) pieces. So, while we’re happily using our wooden kitchen utensils while we cook from scratch, let’s make sure we’re taking good care of them with a simple recipe for “Board Butter.”
*This is also called spoon butter, board balm, and lots of other things depending on the part of the country you’re from. I’m up in Minnesota, so board butter it is.
Wood naturally dries out over time, so we need to do something to keep it from over-drying and cracking.
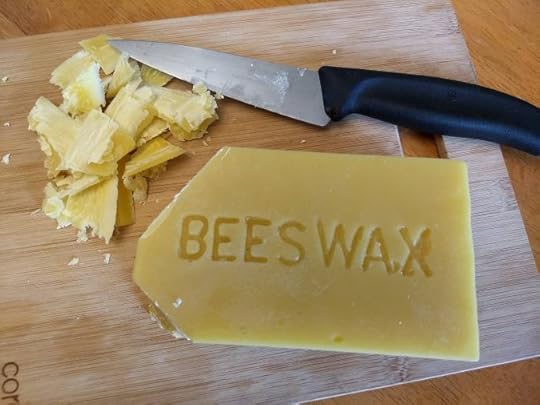
Enter board butter; a basic mixture of oil and beeswax to help condition and seal our wooden kitchen tools and cutting boards. While this recipe has just two ingredients, both of those ingredients should be top quality to help seal the wood.
Wax:I love using local beeswax for this, and usually have some extra around for making herbal salves and body butters.
Beeswax is such a gift! On its own it’s an inert substance without specific benefits when consumed directly. The way beeswax is made creates an anti-bacterial, adhesive substance that’s the perfect thickener for so many safe and healthy homemade products.
You can also use carnauba wax if you want to keep a vegan kitchen. Carnauba wax come from the carnauba palm (Copernicia prunifera). The carnauba palm is native to Brazil and is also known as the “Tree of Life.” Just make sure it is pure wax with no additives.
Oil:If you’re having fun melting and mixing, try making my Calendula Salve!
There are a few different oils that do well as wood conditioners. The main thing is to keep them 100% pure and organic. Stay away from mineral oils as they tend to be processed in a way that can ooze toxins over time.
I have used both coconut and sunflower oil for this recipe. I prefer coconut oil for the smell and way it leaves the spoons and cutting boards. I have also seen flaxseed oil recommended for this project. *Remember to look for unrefined options*
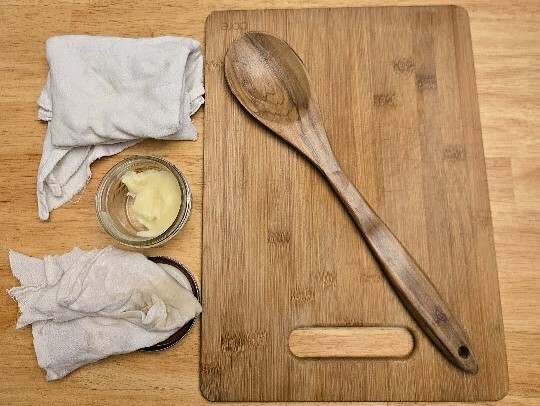 Board Butter Recipe
*1 part beeswax
*3 parts coconut oil -or 2.5 parts sunflower oil.
(Yup, that’s it.)
Use proportions that make sense for how much wood you want to protect.
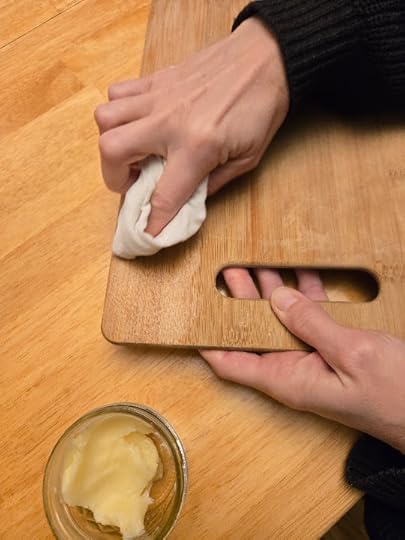
Heat the beeswax and coconut oil in a double boiler until melted. I make my double boiler from a pyrex measuring cup hung over the edge of a pot, making sure at least half the measuring cup is under water to heat evenly. Keeping the melting process low and slow helps keep the intrinsic benefits of the raw beeswax.
Once warmed and melted, mix well. This recipe will cool to a thick paste-like consistency. Wait until fully cooled to place the lid on to avoid any condensation forming on the bottom of the lid.
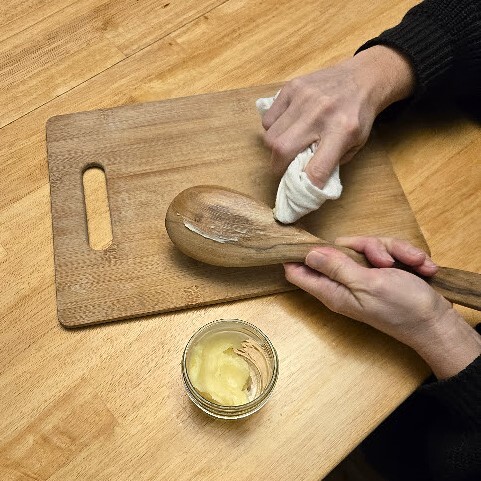
You can slather on a thick layer to your favorite wooden kitchen utensils and let set overnight, wiping off any excess in the morning, or just go for it all at once. I have found a little warming helps it really soak into the wood as well.
I keep my jar of board butter handy to use on utensils as needed. But I also try and condition all my wood pieces at least once every winter, as that’s when it is driest in my home and I’m spending more time in my kitchen than in the garden.
Store the jar of spoon butter in a cool, dark place (I keep mine in my pantry) and it will last 12+ months.
I love being able to use this natural product to keep my homestead kitchen running smoothly.
Let me know if you try this Board Butter Recipe in your kitchen!
Dig In,
Michelle
The post DIY Board Butter Recipe appeared first on Forks in the Dirt.
DIY Board Butter Recipe:
For taking care of your wooden kitchen items.
I see you buying heirloom pieces instead of cheap plastic, and I am so proud of you!
I also want to help you make the most out of those new (usually more expensive) pieces. So, while we’re happily using our wooden kitchen utensils while we cook from scratch- let’s make sure we’re taking good care of them with a simple recipe for “Board Butter”.
*This is also called spoon butter, board balm and lots of other things depending on the part of the country you’re coming from. I’m up in Minnesota, so board butter it is.
Wood naturally dries out over time, so we need do something to keep it from over-drying and cracking.
Enter board butter; a basic mixture of oil and beeswax to help condition and seal our wooden kitchen tools and cutting boards. While this recipe has just two ingredients, both of those ingredients should be top quality to help seal the wood.
Wax:I love using local beeswax for this, and usually have some extra around for making herbal salves and body butters.
Beeswax is such a gift! On its own it’s an inert substance without specific benefits when consumed directly. The way beeswax is made creates an anti-bacterial, adhesive substance that’s the perfect thickener for so many safe and healthy homemade products.
You can also use carnauba wax if you want to keep a vegan kitchen. Carnauba wax come from the carnauba palm (Copernicia prunifera). The carnauba palm is native to Brazil and is also known as the “Tree of Life”. Just make sure it is pure wax with no additives.
Oil:If you’re having fun melting and mixing, try making my Calendula Salve!
There are a few different oils that do well as wood conditioners. The main thing is to keep them 100% pure and organic. Stay away from mineral oils as they tend to be processed in a way that can ooze toxins over time.
I have used both coconut and sunflower oil for this recipe. I prefer coconut oil for the smell and way it leaves the spoons and cutting boards. I have also seen flaxseed oil recommended for this project. *Remember to look for unrefined options*
Board Butter Recipe
*1 part beeswax
*3 parts coconut oil -or 2.5 parts sunflower oil.
(Yup, that’s it.)
Use proportions that make sense for how much wood you want to protect.
Heat the beeswax and coconut oil in a double boiler until melted. I make my double boiler from a pyrex measuring cup hung over the edge of a pot, making sure at least half the measuring cup is under water to heat evenly. Keeping the melting process low and slow helps keep the intrinsic benefits of the raw beeswax.
Once warmed and melted, mix well. This recipe will cool to a thick paste-like consistency. Wait until fully cooled to place the lid on to avoid any condensation forming on the bottom of the lid.
You can slather on a thick layer to your favorite wooden kitchen utensils and let set overnight, wiping off any excess in the morning, or just go for it all at once. I have found a little warming helps it really soak into the wood as well.
I keep my jar of board butter handy to use on utensils as needed. But I also try and condition all my wood pieces at least once every winter, as that’s when it is driest in my home and I’m spending more time in my kitchen than in the garden.
Store the jar of spoon butter in a cool, dark place (I keep mine in my pantry) and it will last 12+ months.
I love being able to use this natural product to keep my homestead kitchen running smoothly.
Let me know if you try this Board Butter Recipe in your kitchen!
Dig In,
Michelle
The post DIY Board Butter Recipe: appeared first on Forks in the Dirt.
January 1, 2025
Holding onto Joy + Other Accomplishments from My Homestead Garden
What plant brought you the most GARDEN JOY in growing – harvesting – eating – giving away?
What garden memories keep you smiling the longest?
What part of gardening brought you the most JOY:
Food,
Flowers,
Bumblebees,
Friends?
For me, and maybe most of us, it’s an intricately interwoven patchwork of all of the above. As gardening teaches us so well- everything is connected.
But since it is also fun to name a special memory or two…
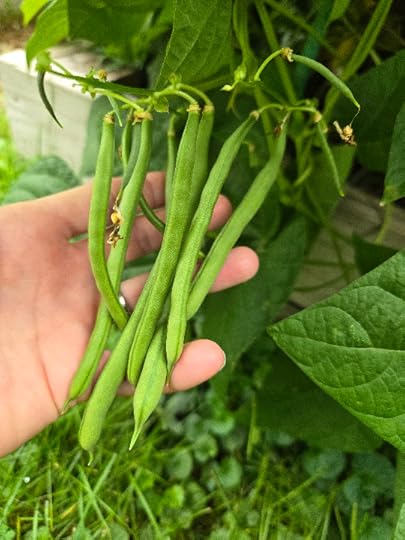
My favorite plant of 2024: Blue Lake 7 pole beans that took over an arch FAST even though I planted them LATE.
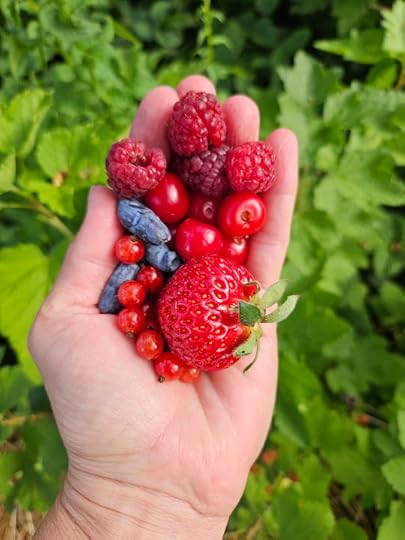
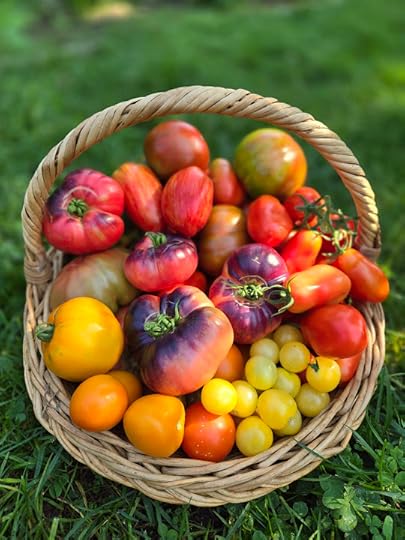
My favorite harvest of 2024: the handful of cherries from our new Mesabi Cherry tree. Pictured below with homegrown currants, strawberry, raspberries and honeyberries.
Between the pounds of food harvested and preserved, the herbal teas, spices and freezer full of veggies (and eggs)- I am proud of my quantifiable accomplishments – but the lasting JOY my garden provides me, that comes from the moments lost in my garden, revering nature.
And I can’t wait to share more ways to grow that JOY – along with really great food, in 2025!
But right now… I wanted to take an extra moment to share this life changing ‘neuro-info’.
Staying PositiveThere are so many memories of being in my garden that bring me joy. They all seem to be from when I took time to STOP, DROP + REST.
Turns Out: we need to consciously savor good moments for a minimum of 15 seconds for our brains to bother storing them as ‘positive emotions’. If they don’t get that much time, they just dissolve into nothing.
This is all part of brain bias where we tend to focus on negative situations- with those negative moments getting stored instantly compared to having to consciously hold our attention on a positive experience for 15 seconds.
Being aware of this 15 second concept gave me the freedom to relish more moments in the garden – I mean we’re spending endless hours starting seeds, weeding, hauling compost and squishing bugs…
We might as well take 15 seconds a day to find garden joy that will improve our mental state as well!
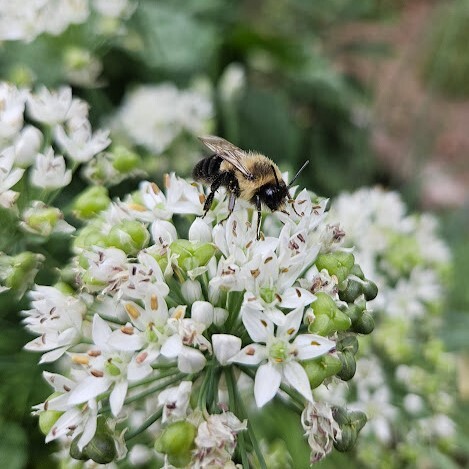
For me this 15 seconds often looks like tilting my head up to the sun, closing my eyes and breathing in the smells, or sitting down to marvel at bumblebees, sweat bees or butterflies, digging into the compost pile and being overwhelmed by the life from decay phenomenon.
What could it look like for you?
I wish to give us all a happier healthier 2025, and building in time to savor the good is so important!
Equally important is taking time to acknowledge our accomplishments. And while 2024 was a year of ups and downs, there was so much good that came out of it.
2024 Moments I Savor
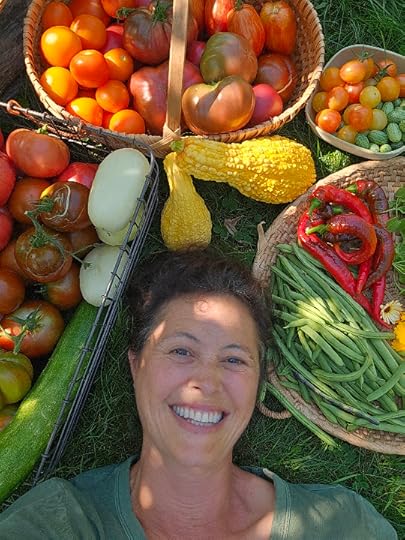
 3rd printing of our book, Small-Scale HomesteadingSpoke at the Minneapolis Spring Home and Garden Show, Keynote at ‘Garden Fever’ Rice County Master Gardener Days, and taught Seed Starting at Patagonia, all with my coauthor Stephanie ThurowKeynote speaker at the Carver-Scott County Master Gardeners day, Spoke at the Eagan Garden Club, St. Anthony Park Garden Club, the White Bear Lake Library, the MN State Fair, and taught multiple in person and online classes with MN State Horticultural SocietyVolunteered on a variety of community garden projects with the Ramsey County Master Gardeners (and made more friends!)Wrote 5 articles and 2 blogs for Northern Gardener Magazine, 2 articles and 2 blogs for Hobby Farms Magazine, 2 articles for Edible MN Magazine, and 13 articles for my Forks in the Dirt websiteMy Instagram Account @forksintehdirt was awarded the Golden Laurel for 2024 by Garden Communicators International.Continued as Market manager for the 8th season of the WBL Winter Farmers Markets (over 2,000 shoppers attending in 2024)Grew 668 pounds of food from just over 100 varieties of plants in my suburban gardenPreserved 128 jars of foodShot 2 wild turkey with my crossbowRecorded 12 different gardening classes (9 for MN Horticultural Society + 3 on my own)Countless new garden friends made along the way!


Of course I am still voraciously reading through soil science, nature, permaculture and root cellaring books…. and those seed catalogs are calling my name!
I hope each of you can find something that brings you as much garden joy- so much that you get lost for well over the required 15 seconds- and the sense of hope that growing food brings to me.
Peas and Light.
Dig In,
Michelle
The post Holding onto Joy + Other Accomplishments from My Homestead Garden appeared first on Forks in the Dirt.
November 29, 2024
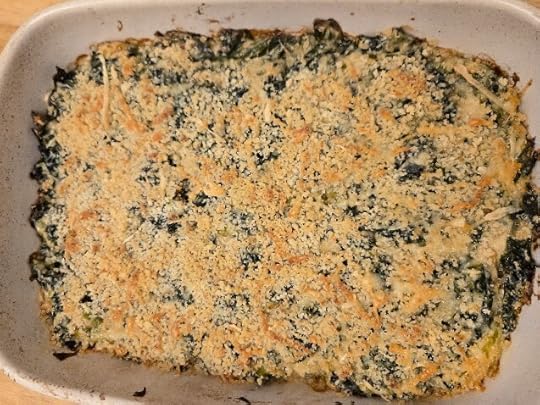
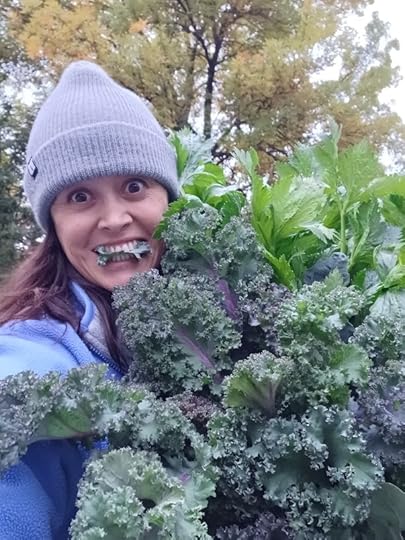
Kale + Collard Gratin
If you want to make a recipe that will turn ‘kale no’ into ‘KALE YEAH’ – here it is.
This is the perfect balance of healthy kale hiding in creamy cheesy perfection, finished with a crispy topping. This has become a holiday family meal favorite- and that’s saying somethings with all those kale haters out there 
Bacon fat is an amazing addition but not necessary for this recipe. And as with all my recipes there’s room for making them different each time, or just to make them your own. Sometimes I’ll add in the bacon, or if my family ate all the bacon, I’ll just use the bacon fat to sauté the leeks and onions… a bit of pancetta or even smoked ham would be delicious too. If you like it spicy, add in the hot pepper flakes or even some dashes of hot sauce. If you don’t use bacon fat, taste test and add salt as needed.
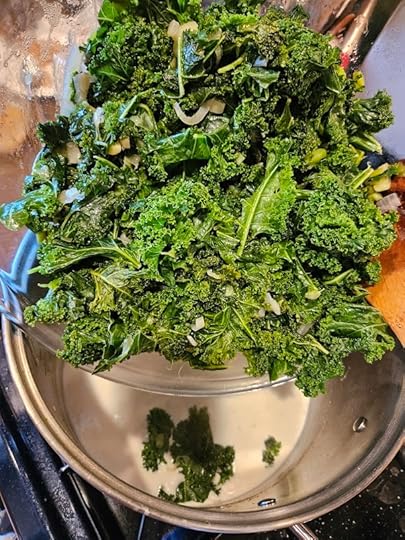
I love kale and have many recipes and articles devoted to this favorite of fall veggies. You can use multiple kinds of kale in this recipe and even add in some collards because of the steaming and baking. A favorite combo is about half curly kale and half perennial kale, as the perennial kale I grow has slightly thicker but very tender leaves. I also really like collard greens (up to half) in this recipe.
I’m usually attempting to keep my family recipes on the healthy side and have tried to get less fat with this one too. But when I tried making this with milk instead of half and half, the fat ratio must not have been quite high enough because you’ll get the ‘curdling’ for lack of a better word in the dish rather than a nice thick creamy cheese sauce. That said, this recipe uses roughly half the cream and cheese of other recipes I perused while perfecting this one… so be warned, while creamy, this is still a kale forward recipe!
I love kale so much I have another blog devoted to this veggie, Read KALE YEAH! for all the details on growing and eating the best kale!
I love the flavor leeks add to this, but shallots, onions or even more garlic to onion ratio is all delicious. Also, this is definitely a recipe you can (and should) taste test before baking to make sure it’s got enough of everything!
A Note on Au Gratin VS Gratin:‘Au Gratin’ refers to a specific dish made with sliced potatoes and a creamy sauce. But ‘Gratin’ is a general technique where you bake or broil a dish with a creamy cheesy sauce topped with something to crisp it up on top, usually breadcrumbs. The ‘insides’ don’t matter for a gratin- it’s all about the sauce and crispy topping.

I like this kale gratin in a 9X13 pan so there’s lots of crispy tops and edges to enjoy.
Kale Gratin Recipe
Ingredients
½ Lb. bacon (optional)¼ cup bacon fat and/or butter3 Tbsp Olive oilUp to 1 Lb. Kale (up to half collards) shredded/chopped into bite size pieces (8 cups of pieces)2 Cups total: Chopped leeks, onion + garlic(I like mostly leeks, 1 small onion or shallots and a few cloves of garlic- but use what you have!)¼ cup flour (GF subs *pretty* well)Salt + Pepper to taste (depending on if using bacon fat or other oil)¼ tsp nutmeg1-2 tsp pepper flakes (optional)1 cup half and half6 oz shredded gruyere cheese1 cup panko breadcrumbs
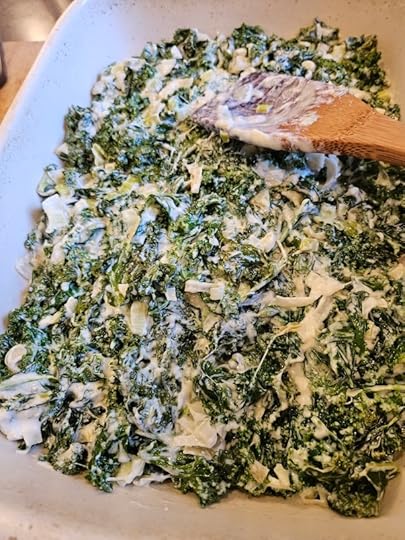
Instructions
Grease a 9X13 pan with 1 tablespoon olive oil.
Cook bacon if using in recipe, or just save bacon fat from last batch to use.
In a large stock pot, heat 2 tablespoons of fat of your choice until shimmering. Sauté leeks/onions/shallots mixture for a few minutes, then add garlic and cook for another minute or two. Add the kale shreds a few handfuls at a time, replacing lid to keep water content inside the pot. You can add a few spoons of water as you go, essentially steaming them for roughly 10 minutes. Remove the kale mixture from the pot.
Add the remaining ¼ cup of fat and add ¼ cup of flour and cook for 5-7 minutes until browned and thickened. Add the rest of the spices and stir until combined. Slowly add the half and half and let simmer and thicken for a few minutes. Add 3 oz gruyere and stir until just melted, then add the kale and onion mixture back into the pot until well combined. Spoon into the greased baking dish, leaving peaks of kale to get crispy.
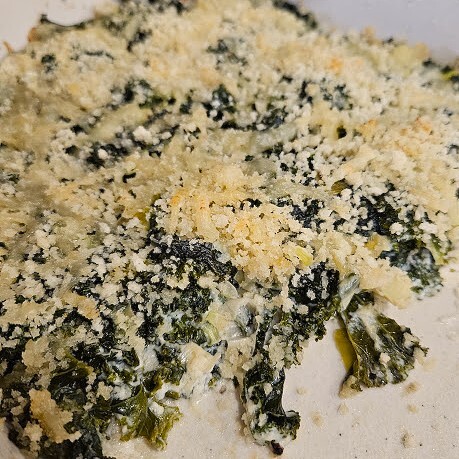
Mix the remaining 1 oz of gruyere and panko together with the rest of the olive oil and sprinkle on top.
Bake Kale Gratin at 350 for 40- 45 minutes until golden brown on top.
Let cool for 10 minutes before serving.
This goes really well with Turkey, Ham, Pork and stuffed squash with wild rice…
Cheers to Hearty Holiday Eating!
Dig In,
Michelle
The post Kale + Collard Gratin appeared first on Forks in the Dirt.
Forks in the Dirt

- Michelle Bruhn's profile
- 4 followers

