
Vickie Howell's Blog: Vickie Howell's Website, page 20
July 13, 2020
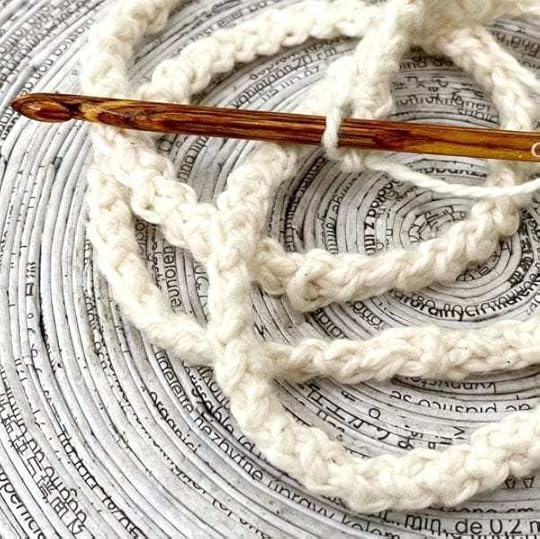
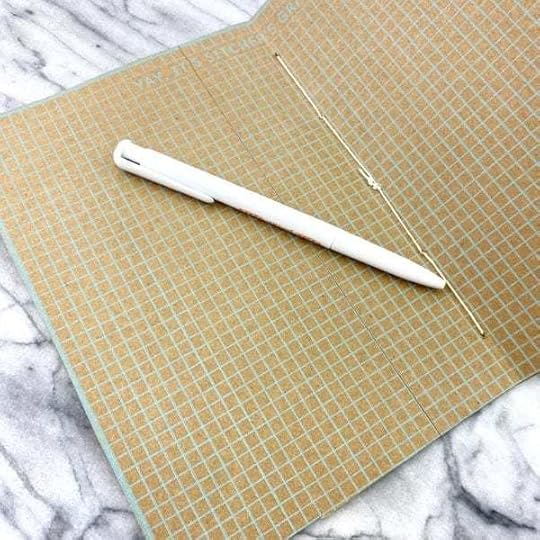
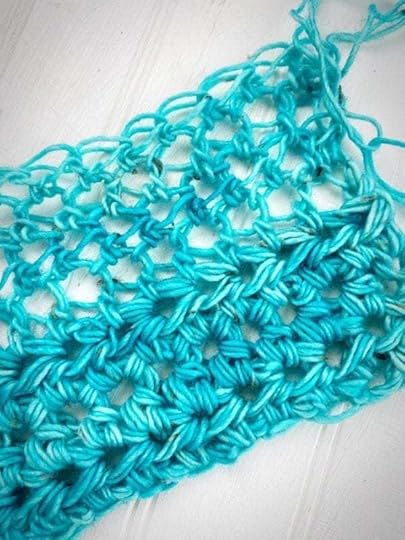
Knit and Crochet Net Stitches
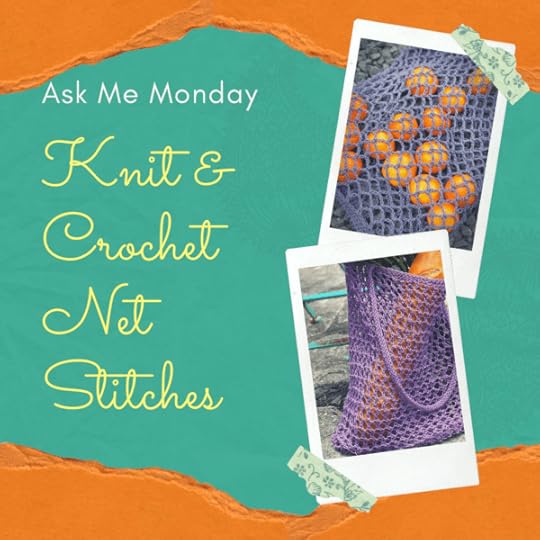
Knit and Crochet Net Stitches
This week on Ask Me Monday (live on Facebook on Mondays at 12pmCT) I show how to knit and crochet the net stitch, a great choice for summer tops, swimsuit cover-ups, and market bags like those featured in the July YarnYAY! pack. Give the episode a watch, then put your skills to work with the practice swatches below. Enjoy!

This episode of Ask Me Monday is sponsored by Knitter’s Pride/ KnitPro
See more KP products during “Vic’s Tips” segments of The Knit Show!
Featured Knitter’s Pride Products: Aluminum Crochet Hooks, Ginger Circular Needles
Knit Net Stitch

Worked in multiples of 2.
WORKED FLAT:
Row 1: *YO, k2tog; rep from * to end.
Row 2: Purl.
Row 3: *K2tog, YO; rep from * to end
Row 4: Knit.
Repeat these 4 rows for pattern stitch.
WORKED IN-THE-ROUND:
Rnd 1: *YO, k2tog; rep from * to end.
Rnd 2: Knit.
Rnd 3: *K2tog, YO; rep from * to end
Rnd 4: Purl.
Repeat these 4 rnds for pattern stitch.
Practice Swatch
CO 20 sts.
Rows 1-2: Knit.
Row 3: K2, *YO, k2tog; rep from * to last 2 sts, k2.
Row 4: K2, p to last 2 sts, k2.
Row 5: *K2tog, YO; rep from * to end
Row 6: Knit.
Repeat Rows 3-6until piece measures 4″ (or until you’ve got the hang of it).
Last 2 Rows: Knit.
BO.
Crochet Net Stitch

Worked in multiples of 4 + 5 for foundation ch.
Row 1: Sc in 9th ch from hook, *ch 5, sk 3, sc in next ch; rep from * to end. Turn.
Row 2: *Ch 5, sc in next ch-5 sp; rep from * to end. Turn.
Note: Directions are essentially the same for this pattern stitch, worked in-the-round. The only difference would be that you would join the round OR work in spiral.
Practice Swatch
Ch 21.
Row 1: Sc in 2nd ch from hook, and to end. Turn. — 20 sts.
Row 2: Ch 1 (doesn’t count as sc), sc in same st, and envery st to end.
Row 3: *Ch 5, sc in next ch-5 sp; rep from * to end. Turn.
Repeat Row 3 until piece measures 4″ (or until you’ve got the hang of it).
Last 2 Rows: Ch 1, sc in every st to end.
Fasten off.

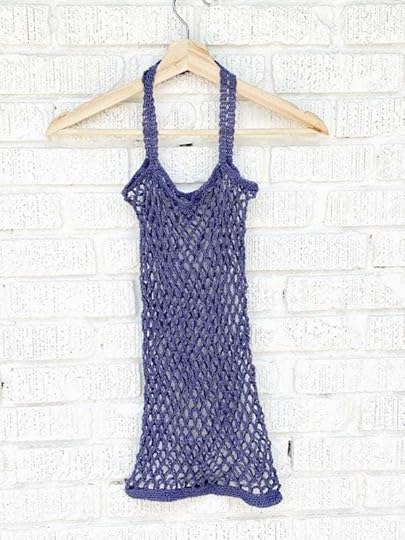
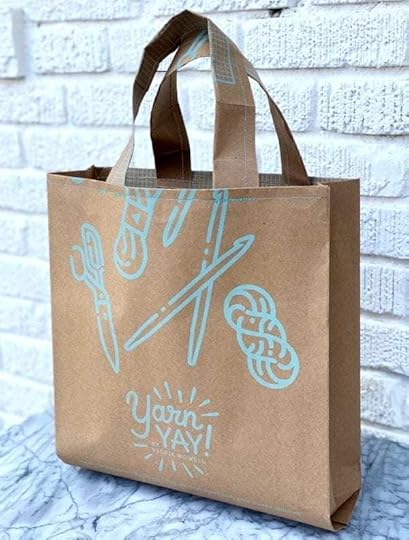
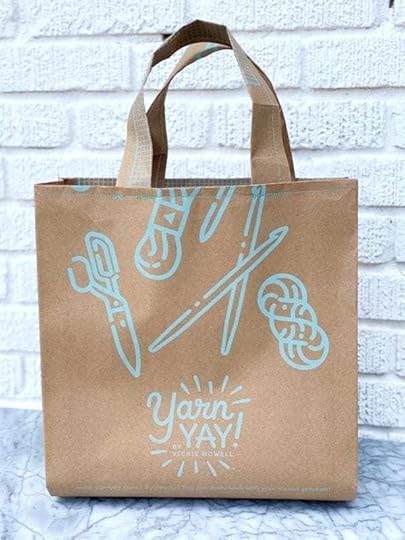
Market Share Bag by Vickie Howell for YarnYAY! (Included in the July ’20 Pack)

The post Knit and Crochet Net Stitches appeared first on Vickie Howell.


July 3, 2020
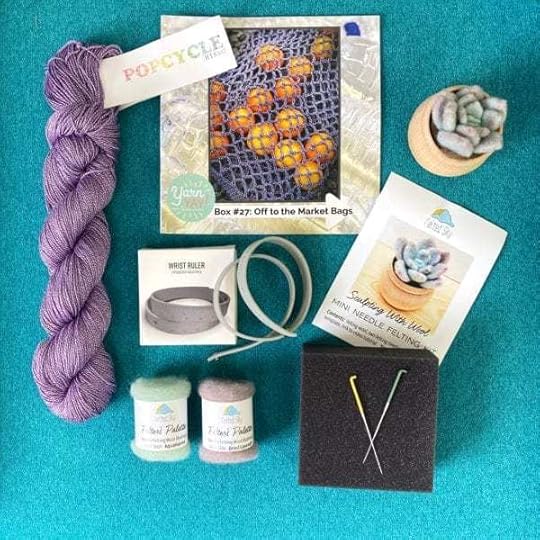
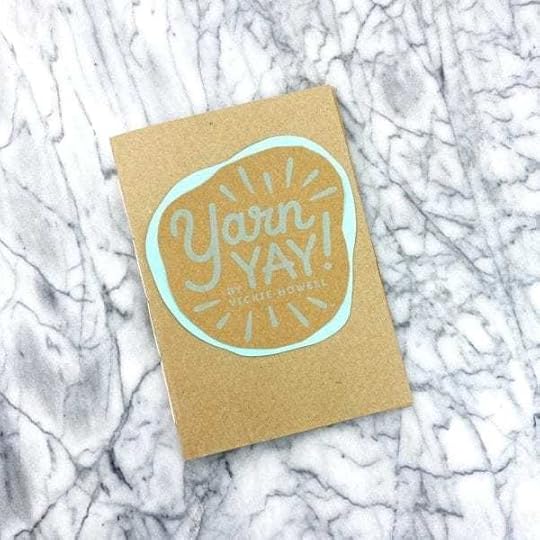
YarnYAY! July Subscription Pack

YarnYAY! July Subscription Club
During a period in history when time has no meaning, it’s hard to believe that it’s actually July already. The upside: that means the YarnYAY! July Subscription Club Pack is now available!

This month we’re exploring sustainable fibers, learning a new skill and getting a cool tool. Here’s the scoop!

HIKOO POPCYCLE | SKACEL
This month, we’re working with a yarn that’s as innovative as it is silky and drapey! Popcycle is made from 50% bamboo and 50% polyester from recycled plastic bottles. Each subtle tweed hank (of which you’ll get a pop-color from the palette at random) recycles TWO plastic bottles! Cool, eh?
Skacel Knitting, perhaps known best for being responsible for bringing Addi Needles to us, is a women-founded-and-run business in Kent, Washington.

Market Share Bag Knitting Print & Digital Pattern Included
MARKET SHARE BAG | VICKIE HOWELL
This month we’re getting netty with it. We’re combining the strength of the Popcycle yarn with open-weave knit or crochet stitches (you choose!) to create net bags perfect for carrying produce and more from the market. The knit version combines a series of yarn-overs and knit-two-togethers to form an eyelet fabric.
MARKETING BAG | VICKIE HOWELL
The crochet version links chains together to form an ever-expanding mesh.
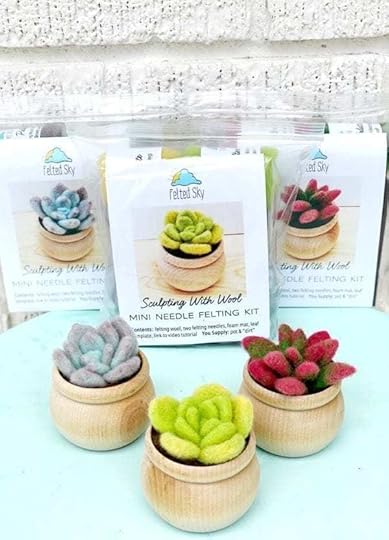
SUCCULENT MINI NEEDLE FELTING KIT | FELTED SKY
We’re so excited to, for the first time, offer a needle felting project and lesson which will result in the cutest little felt succulent you ever did see!
Felted Sky is a family-run business owned by Elizabeth Whitton and based in Ann Arbor, Michigan. To see more of their AMAZING needle felting kits or buy a pot for your wee plant, go HERE.

WRIST RULER | CROSSOVER INDUSTRIES
We love an accessory with a purpose, and the Wrist Ruler fits the bill! Made with silicon, it’s easy to clean and wear. Need a measuring tape? Look to your wrist!
Crossover Industries was founded by Avik & Rich, two buddies who met in architecture school. They run this company, along with ILOVEHANDLES and Walrus toys, out of their space in Portland, OR.
The post YarnYAY! July Subscription Pack appeared first on Vickie Howell.
June 29, 2020
Face Mask Neck Cord | How to Crochet Romanian Cord

Face Mask Neck Cord | How to Crochet Romanian Cord
This week on Ask Me Monday I solve an issue I never thought would be one, where to put your ear loop, elastic face mask when you’re temporarily not wearing it (ie. in the car). Think, glasses-chain for your face mask!
We’ll learn how to crochet a Romanian Cord, which can be used for any number of projects, from drawstrings to purse handles, but we’ll turn into a face mask neck cord. Here’s the scoop!
This episode of Ask Me Monday is sponsored by Knitter’s Pride/ KnitPro
See more KP products during “Vic’s Tips” segments of The Knit Show!
Featured Knitter’s Pride Products: Ginger Crochet Hooks
See Crochet Abbreviations & US to UK translation Chart HERE.
Romanian Cord | How to Crochet
Ch 3.
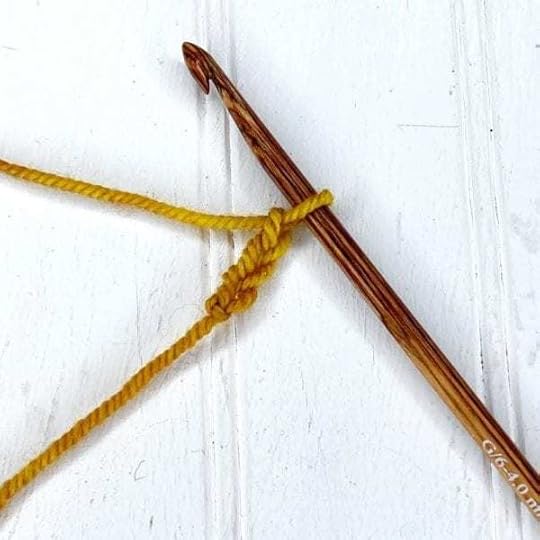
Set-Up:
Insert hook in 2nd and 3rd ch from hook. You’ll now have 3 loops on the hook (shown).

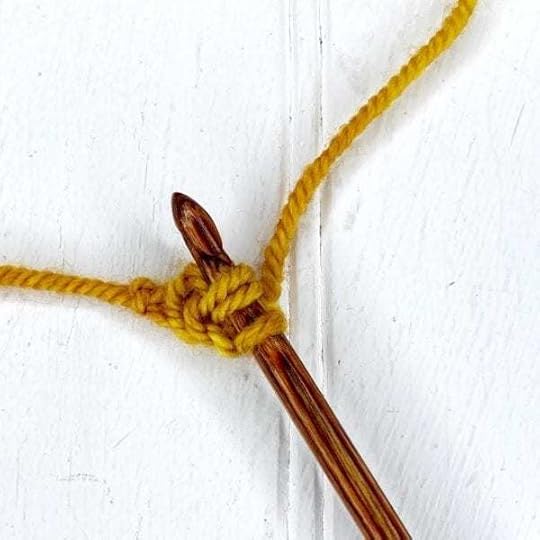
YO, pull loop through the first 2 loops. You’ll now have 2 loops on the hook. YO pull through 2 loops. Stitch finished, you’ll now have 1 loop on the hook.
Turn hook clock-wise so you see the top of the stitch, which will have one bar, nestled under it like a scarf (see below.)

Insert hook, from right to left, into the bar; pull through first loop. You’ll now have 2 loops on the hook. YO, pull through both loops.
Ok, now you’re set up and ready to go!
* Main:
Turn hook clock-wise so you see what will now look like a scarf that’s been wrapped twice. In other words, there will now be 2 bars. Insert hook, from right to left, into the 2 bars. You’ll now have 3 loops on hook (shown).
YO, pull through first 2 loops. YO pull through last 2 loops.
Repeat from * until cord is desired length. BO.
Face Mask Neck Cord
MATERIALS
Small amount of DK-weight yarn
Size U.S. G/4.5 mm crochet hook (I recommend Knitter’s Pride Ginger’s for this project, because of their point tip.)
Sharp, tapestry needle
2, Lanyard clips
2, O-rings
DIRECTIONS
Leaving a 6″/15 cm tail, work Romanian Cord (see above and video tutorial) until piece measures 26″/66 cm (without tail) OR 2″/5 cm shorter than the desired length.
Fasten off, leaving a 6″/15 cm tail.
FINISHING
Assemble neck cord:
Slide o-ring onto lanyard clip. Repeat for the second set.
Slide one end of the cord, about 1″/2.5 cm, through o-ring and fold into the loop.
Feel tail through a tapestry needle. Make a couple of tack stitches to secure.
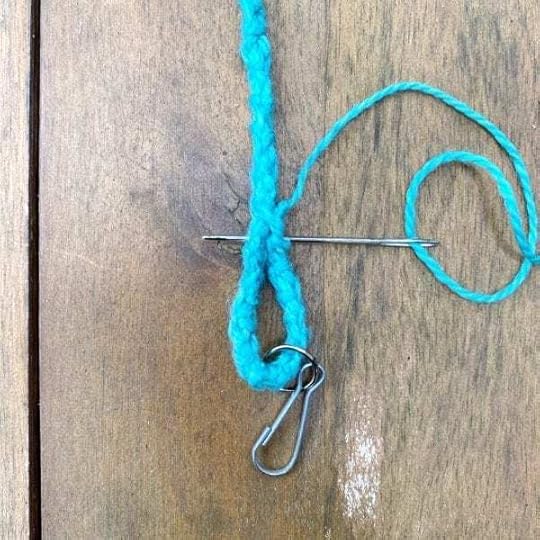
Wrap tail multiple times around both widths of the loop. Knot and trim.
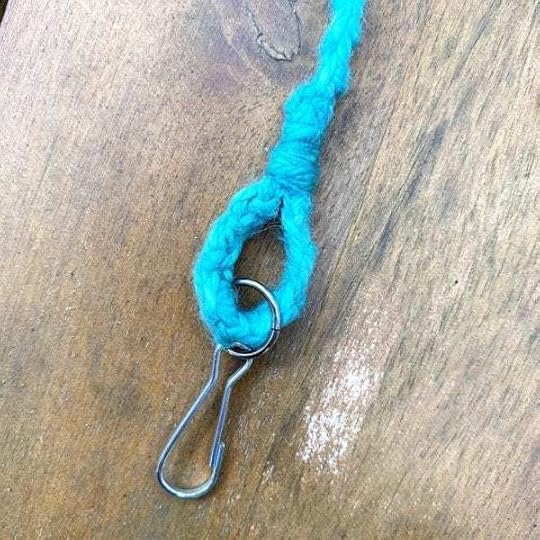
Repeat for the opposite side.
Clip the face mask neck cord to the elastic ear loops on your mask. You’re done!

Looking for cloth face mask tutorials? Check out my round-up here!

[image error]
The post Face Mask Neck Cord | How to Crochet Romanian Cord appeared first on Vickie Howell.
June 15, 2020
3 Great Bind-Offs for Shawls & Shawlettes
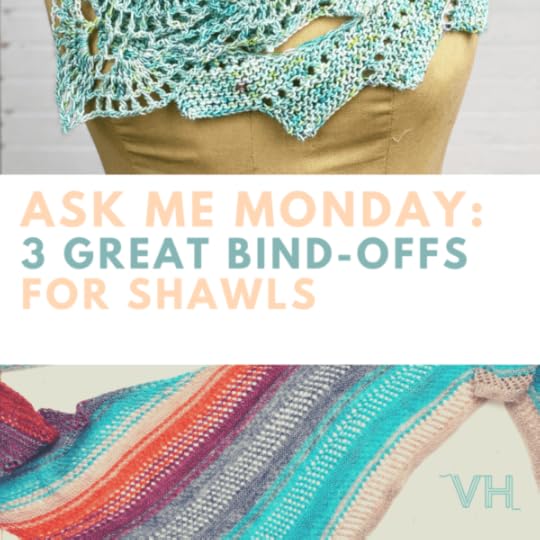
Bind-Offs for Shawls
Whether your knitting a lacy neckpiece for spring or heavy-wrap for winter, it’s good to have a few bind-offs in your skill arsenal to bring your project to finishing success. This week on Ask Me Monday I show 3 great bind-offs for shawls and shawlettes: the Yarn-Over Bund-Off, Stretchy K2tog tbl Bind-Off, and the Picot Bind-off. Let’s get to it!
This episode of Ask Me Monday is sponsored by Knitter’s Pride/ KnitPro
See more KP products during “Vic’s Tips” segments of The Knit Show!
Featured Knitter’s Pride Products: SmartStix Circular Needles, Ginger Double-Pointed Needles
Yarn-Over Bind-Off
Step 1: K2, slip 2nd stitch on right-hand needle over the 1st one, and let it drop off (as for a traditional BO).
Step 2: Insert right-hand needle, from left to right, into the stitch on the left-hand needle; YO; lift the stitch over the YO and let it drop off of the needle.
Step 3: K1, slip 2nd stitch on right-hand needle over the 1st one, and let it drop off.
Repeat Steps 2-3 until all sts are bound off.
Stretchy K2tog tbl Bind-Off
K1, *slip 1 stitch back to the left needle, k2tog tbl; rep from * until 1 st remains. Cut yarn and pull through last stitch to secure.
Picot Bind-off
K2, bind-off 1, *slip stitch on RH needle back onto LH needle, e-wrap cast-on 2 stitches, bind-off 4 stitches; repeat from * to end.
Find knitting abbreviations HERE!

The post 3 Great Bind-Offs for Shawls & Shawlettes appeared first on Vickie Howell.
June 8, 2020
5 Ways to Upcycle YarnYAY! Shipping Envelopes
Upcycle Shipping Envelopes
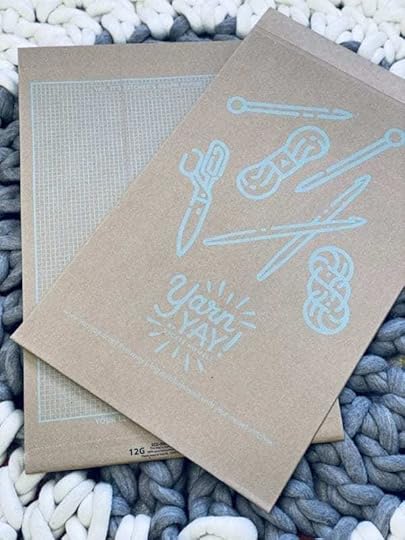
Recently we decided to (literally) think outside of the box when it came to shipment packaging for my subscription “box” club, YarnYAY! As much as I love the aqua boxes that my monthly, curated goodies had been shipping in for a year-and-a-half, it bothered me how much labor went into assembling boxes and even more so, how much waste was involved in filling them with protective crinkle paper. So, my team and I decided to experiment with lessening our carbon (and wo/man-hour) footprint by sending out our subscription “packs” in heavy-duty, 100% recyclable, biodegradable & compostable kraft envelopes, made from 90% post-consumer materials and printed with water-based dyes. The result: packaging with a purpose! Not only are we able to fold the generously-sized envelopes to accommodate whatever yarns and notions we’re shipping that month, but we also printed graph paper — perfect for knitters and crocheters to chart out designs and schematics — on the back of each pack.
That all sounds pretty good, right? I mean, how can one not feel good about doing at least a little bit better for our gal, planet earth? Why, though, stop there? Now we know that we can recycle our packs, but hows-about we stir those creative juices with a few projects in which we upcycle the shipping envelopes into something completely new? Fun, yeah? Let’s do this!
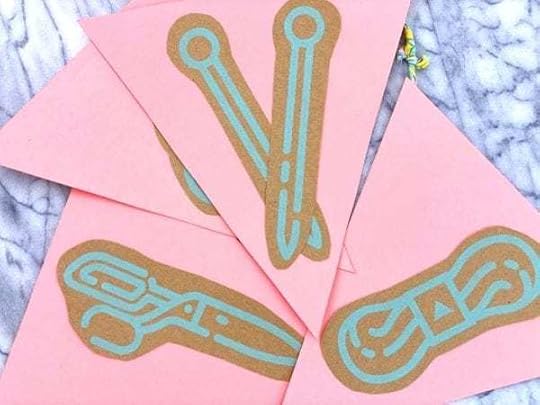
5 Ways to Upcycle YarnYAY! Shipping Envelopes

#1 FESTIVE GARLAND
Add a little happy to your craft-space!
Other Materials:
Scrapbook Paper
Scissors
Glue Stick
Washi Tape
Ribbon or twine
How-To:
Cut 8″ x 8 ¼” triangle flags out of scrapbook paper.
Cut out the crafty elements from the kraft envelope.
Glue kraft envelope elements onto front-sides of triangles.
Using washi tape, attach ribbon or twine to back of flags.
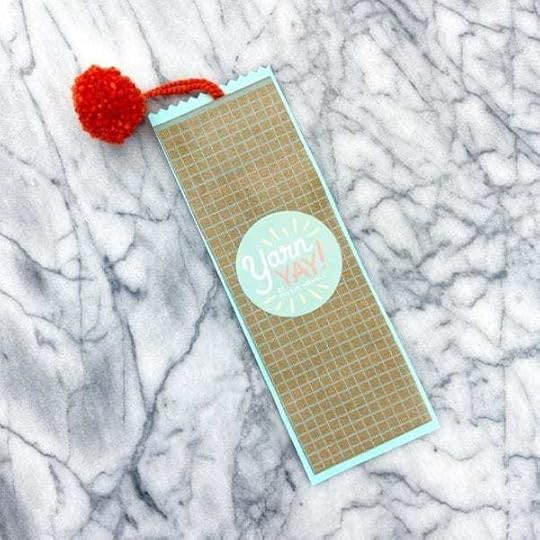
#2 BE-POMMED BOOKMARK
Other Materials:
Scrapbook Paper
Scissors
Glue Stick
Yarn + Pompom Maker
How-To:
Cut out a 2 ½” x 7″ strip of kraft envelope, and a slightly larger strip of scrapbook paper.
Using desired method, make a small (appx. 1 ½”) pompom, leaving 3″ tails.
Sandwich the pompom tails, with about 1″ exposed, in between the kraft envelope and scrapbook paper layers. Adhere layers together using a glue stick.
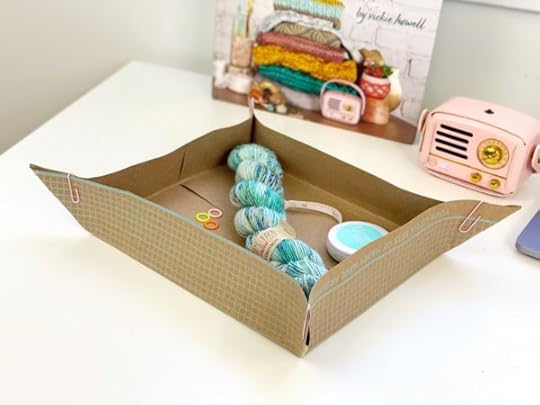
#3 DESK CATCH-ALL VALET
Great for crafty notions!
Other Materials:
Scissors
4 paperclips OR Hot Glue Gun
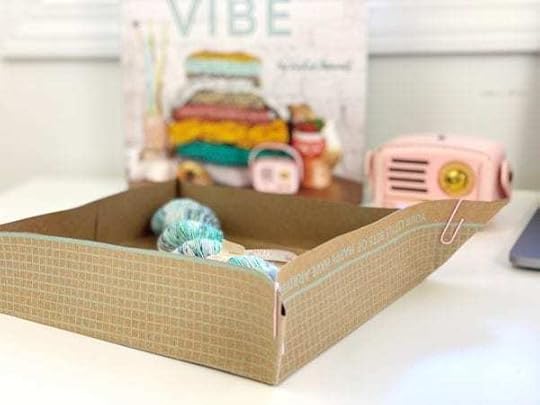
How-To:
Cut a large rectangle (mine is 13″ x 11″) out of the kraft envelope.
Fold and make a crease 2″ in from each side and end.
Pinch corner and hold together with a paperclip or a dab of hot glue on the WS of the pinched portion. Repeat for 3 other corners.
#4 GRAPH NOTEBOOK
Chart out that design inspiration for your next project.
Other Materials:
Scissors
Ruler
Sharp Tapestry Needle
Bookbinding Thread or Embroidery Floss
How-To:
Cut out two, 8″ x 11″ pieces of the graph side of the YarnYAY! kraft envelope.
Note: if you’re using another type of kraft envelope, use the same method to make a sketchbook instead of a graph notebook!
Layer the sheets of kraft paper together; fold in half width-wise.
Using the ruler and tapestry needle, poke 5 holes equidistant from each other along the fold (aka “spine”).
Using tapestry needle and thread or floss and the Pamphlet Stitch, bind pages together.
#5 PROJECT TOTE BAG
Wait, what? You can turn the envelope your yarn came in, into the project bag you carry your knitting or crochet project in? Mind. Blown.
Other Materials:
Scissors
Sewing Machine & Thread OR
Hot Glue Gun
How-To:
Cut top 3″-4″ off of top of kraft envelope. Cut that piece into 2, even strips (mine are about 3″ x 16″ each). These will be your strap pieces.
Fold strap piece in half width-wise and glue together OR sew together using a ¼” seam allowance. Set aside.
Fold bag top down about 1 ¼” for hem; glue down OR sew using a ¼” seam allowance.
Sew or glue strap onto the WS of the front of the bag, spacing each end evenly from each side. Repeat for the second strap on the back of the bag.
The post 5 Ways to Upcycle YarnYAY! Shipping Envelopes appeared first on Vickie Howell.
June 3, 2020
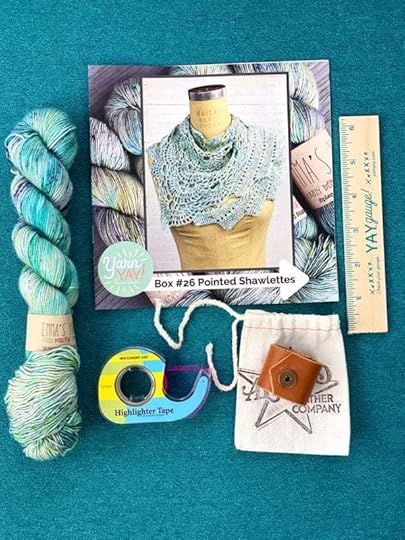
YarnYAY! June Subscription Pack

YarnYAY! June Pack Reveal
It’s my favorite time of this month, and every month, when I get to reveal the knitting and crochet goodies I’ve selected for the latest YarnYAY! subscription pack. Let’s do this!
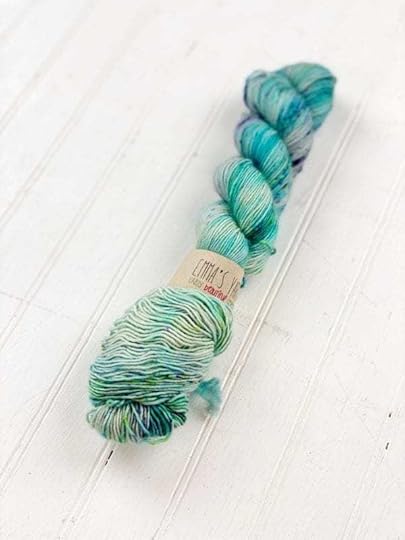
SPLENDID SINGLES | BY EMMA’S YARNS
This month’s selection is a special, mini hank (200 yds/50 gr) of single-ply fingering weight superwash merino wool, which shows its colors beautifully and feels incredibly soft. Colors appear even more tonal than normal and the effect is gorgeous, especially in our chosen shade: Iguana.
Emma’s Yarn was started by Emma, a then-15-year-old home-schooled student who was simply completing a math lesson on ratios when she fell in love with dyeing yarn. She, in partnership with her sister Aspen, turned that passion into a thriving business.
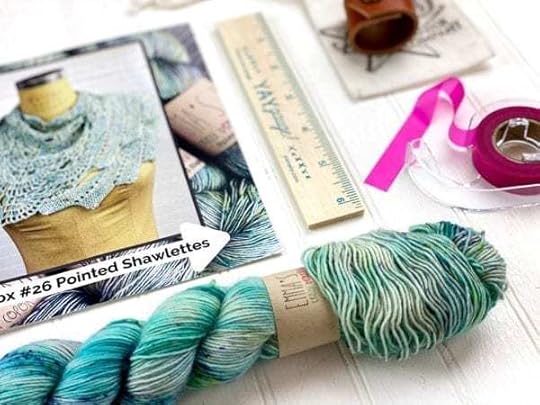
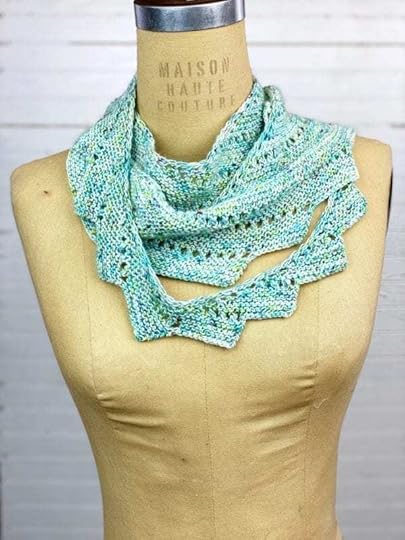
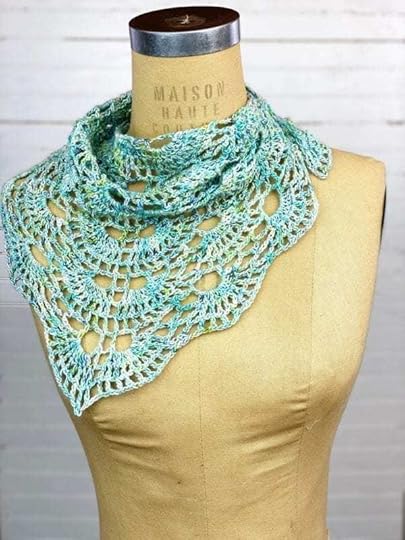
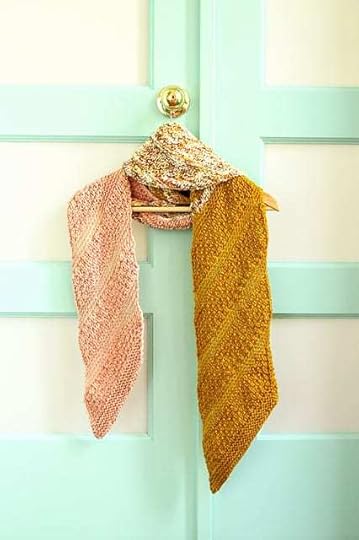
POINTED SCARF/SHAWLETTE |BY CHRIS BAHLS AND VICKIE HOWELL
This month we’re getting to the point with our stitching. The crochet shawlette by Vickie is lacy, drapey, and works as both kerchief, or, made larger, as a shawl. YarnYAY!’s own Chris Bahls designed the knit version in an unexpected dragon’s tail shape, that can start as a scarf and grow wider to shawlette. For more from Chris, go to: leftcoastdyeworks.com
To the Point Shawlette by Chris Bahls
On Point Shawlette by Vickie Howell
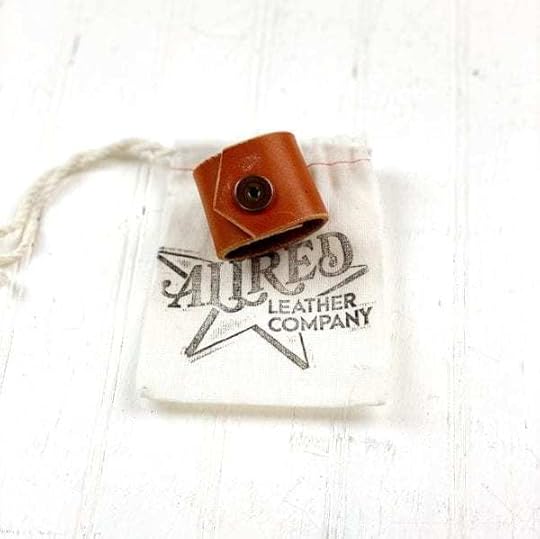
LEATHER SHAWL CUFF | BY ALLRED LEATHER COMPANY
This handmade leather cuff will keep your scarves, shawlettes, and shawls from falling off, while adding an unexpected layer to your favorite knit or crochet accessory!
Allred Leather company is owned by Vickie’s dear friend and leather tooling artist, Dian Allred. See more of her amazing work at: allredleathercompany.com
HIGHLIGHTER TAPE | ECONO
Highlighter tape will help you keep your place in that knit or crochet pattern. It highlights the row you’re on, then is easily removed and replaced as your project progresses!
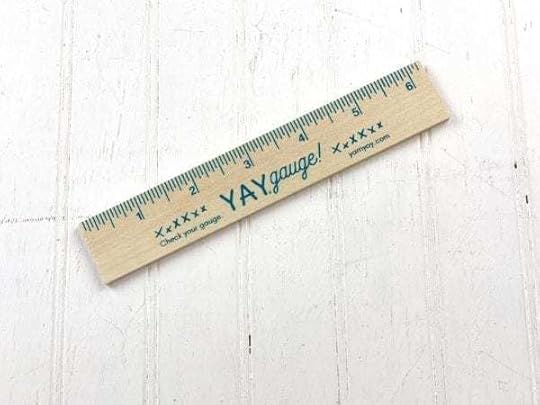
YAY, GAUGE! RULER
Getting the right gauge can make or break a project, especially when it’s supposed to fit an exact size. This wee, wooden ruler is an old-school gauge-check reminder and cheeky cheerleader. Yaaaay, gauge! For more fun novelty goodies check out our Shop at: yarnyay.com
The post YarnYAY! June Subscription Pack appeared first on Vickie Howell.
June 1, 2020
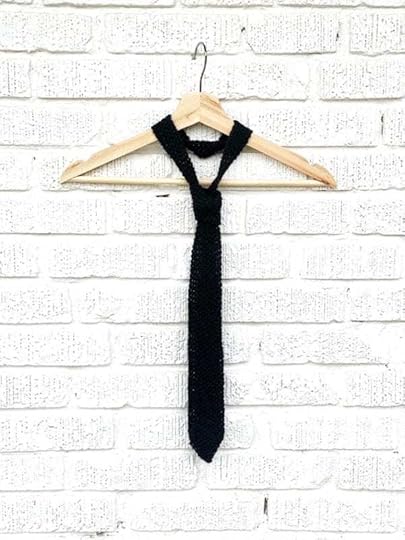
Knit a Necktie
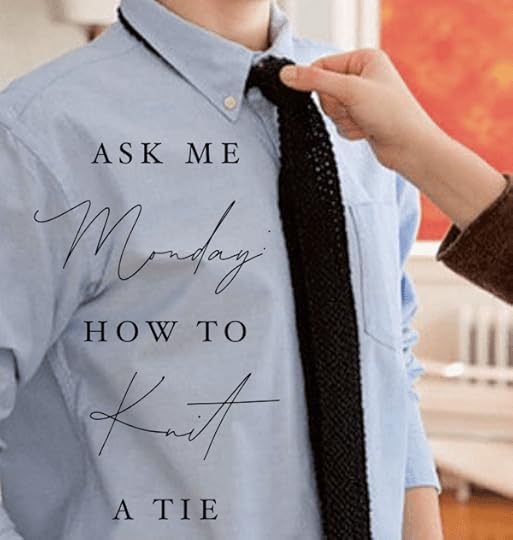
Knit a Necktie
This week on Ask Me Monday, I revisit an oldie, classic design from my 2009 AwareKnits (co-written with Adrienne Armstrong) while showing how to knit a necktie. This project is a great make for dad for Father’s Day, but let’s be honest, what he/she/them doesn’t look cool in a skinny tie?
Give the episode a watch and knit your own — oh, and don’t forget to tag @vickiehowell on social with your knit necktie FOs!
This episode of Ask Me Monday is sponsored by Knitter’s Pride/ KnitPro
See more KP products during “Vic’s Tips” segments of The Knit Show!
Featured Knitter’s Pride Products: SmartStix Circular Needles, Ginger Double-Pointed Needles
Don’t know how to knit, but want to learn? Check out one of my e-courses!
How to Knit Necktie
MATERIALS
Approx. 109 yds worsted-weight yarn (Hemp, Linen, Cotton, and Bamboo blends are great for this project!)
Size U.S. 7/4.5 mm needles
FINISHED MEASUREMENTS
2 1/2″ x 55 1/2″/ 6 x 141 cm
Tapestry needle
GAUGE
20 sts x 28 rows = 4″/10 cm
DIRECTIONS
CO 2 sts.
Row 2 (and all WS rows): Work p sts in all of the k sts, and k in all of the p sts.
These two rows create Seed Stitch.
Row 3: [P1, k1 in same stitch] twice. — 4 sts
Row 5: (K1, p1 in same st), k1, p1 to last st, (k1, p1 in same st.) — 6sts
Row 7: (P1, k1 in same st), p1, k1 to last st, (p1, k1 in same st.) — 8 sts
Row 9: (K1, p1 in same st), k1, p1 to last st, (k1, p1 in same st) — 10 sts
Row 11: (P1, k1 in same st), p1, k1 to last st, (p1, k1 in same st.) — 12 sts
Work in plain Seed Stitch, without increasing any further, until piece measures 21″/53 cm from the tip, ending with a WS row.
Next Row (RS): Ssk, work in seed st to last 2 sts, k2tog. — 10 sts
Work in plain Seed Stitch until piece measures 54 1/2″/138 cm, ending with a WS row.
Next Row (RS): Ssk, work in Seed Stitch to last 2 sts, k2tog. –8 sts.
Next Row: Work in Seed Stitch.
Repeat last 2 rows twice more. –4 sts
FINISHING
Weave in ends. Block if necessary.
Knit and crochet with me every month! Join the YarnYAY! Subscription Club.
The post Knit a Necktie appeared first on Vickie Howell.
May 25, 2020
Chain Plying
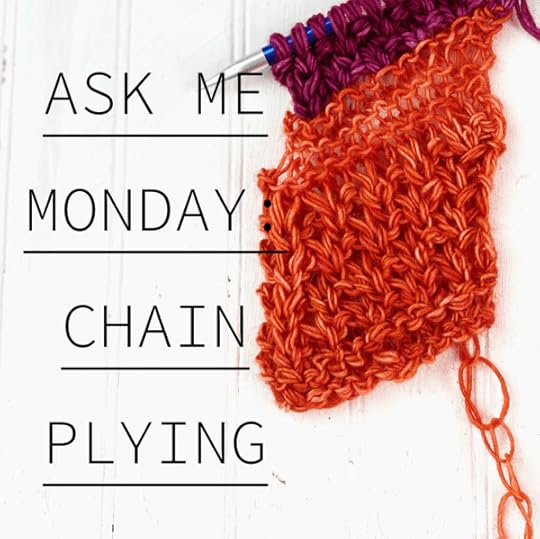
Chain Plying
This week on Ask Me Monday we revisit Chain Plying, a technique for triple plying yarn, as you knit or crochet, to create a thicker, more textured fabric. This method is particularly cool for manipulating those gorgeous, hand-dyed sock-weight yarns by our favorite dyers into a more versatile worsted or Aran weight.
This episode of Ask Me Monday is sponsored by Knitter’s Pride/ KnitPro
See more KP products during “Vic’s Tips” segments of The Knit Show!
Featured Knitter’s Pride Products: Ginger Crochet Hooks, SmartStix Circular Needles, Ginger Circular Needles
Why Chain Ply?
There are two reasons I recommend adding Chain Plying to your yarn-craft skills repertoire:
Versatility (aka making do). Chain Plying is particularly cool for manipulating those gorgeous, hand-dyed sock-weight yarns by our favorite dyers into a more versatile worsted or Chunky Aran weight. Using what we already have is always a good thing, for both budget and the. environment, but especially right now when just popping into your favorite LYS isn’t always realistic, this method reinvents the lace, fingering, and sock weight yarns you may already own.
Texture and interest. Your yarn will seem like a textural paint of sorts when you play with combining chain plying and single plying in one garment. Have fun watching the drape and weave fluctuate as you switch back and forth!
Chain Plying: Practice Swatch
MATERIALS
Fingering or sock-weight yarn (I used Tosh Merino Light in Vickie Howell for Mad Tosh color: Peace Fingers)
Size US Knitter’s Pride Ginger 10 1/2 needles
DIRECTIONS
Chain Ply and CO 16 sts.
Note: Continue to Chain Ply as you go, as need be.
Row 1: *K1, p1, rep from to end.
Row 2: *P1, k1; rep from * to end.
Repeat Rows 1-2, until piece is square.
BO.
Unply to weave in ends.
Chain Plying & Single Plying: Knitting on the Bias Practice Swatch
MATERIALS
Fingering or sock-weight yarn (I used Tosh Merino Light in Vickie Howell for Mad Tosh color: Peace Fingers)
Size US Knitter’s Pride Smart Sticks 10 1/2 needles
DIRECTIONS
Chain Ply and CO 12 sts.
Note: Continue to Chain Ply as you go, when instructed.
Chain Knit Section:
Rows 1-2: With Chain Plied strand of A, knit.
Row 3: Kf&b, k8, k2tog, k1.
Row 4: *K1, p1; rep from * to end.
Rows 5-10: Repeat Rows 3-4.
Traditional Knit Section:
Revert to single ply.
Row 11: Kf&b, k8, k2tog, k1.
Row 12: Knit.
Rows 13-16: Rep Rows 11-12
Repeat Rows 3-10, once more.
Repeat Rows 1-2.
BO.
Unply to weave in ends.
Chain Plying & Single Plying: Crochet Practice Swatch
Chain Ply and ch 14 sts.
Note: Continue to Chain Ply as you go, when instructed.
Chain Ply Crochet Section:
Row 1: With chain plied strands, hdc in the 3rd ch from hook, and in every ch to end.
Row 2-4: Ch 2, hdc in next st and every st to end.
Traditional Crochet Section:
Revert to single ply.
Rows 5-8: Ch 2, hdc in next st and every st to end.
Chain Ply Crochet Section:
Rows 9-12: With chain plied strands, ch 2, hdc in next st and every st to end.
Fasten off.
Unply to weave in ends.
Put those chain ply + knitting skills to work, make the You Might Be Biased Scarf.
The post Chain Plying appeared first on Vickie Howell.
May 18, 2020
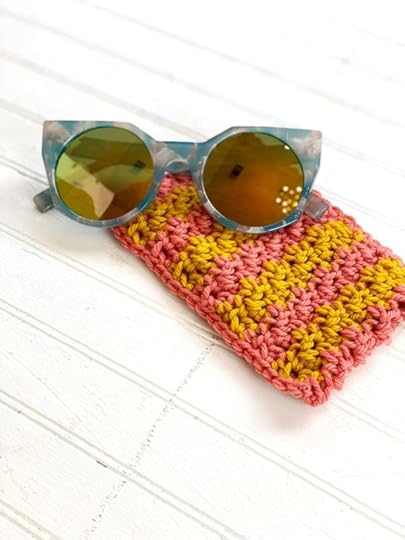
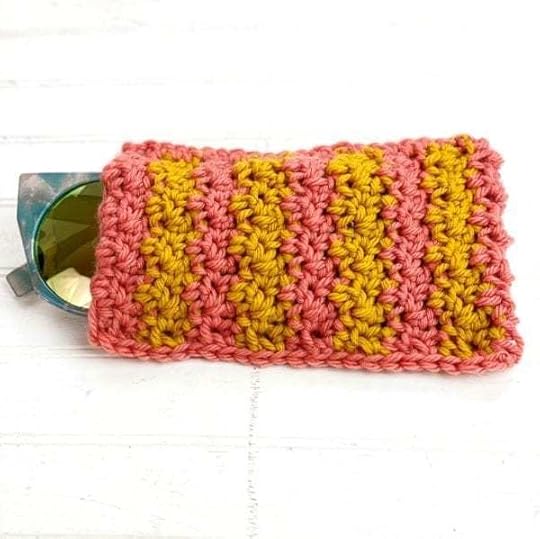
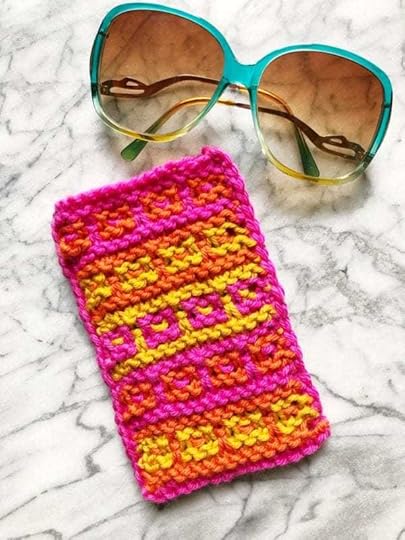
Lemon Peel Stitch Sunglass Case

Lemon Peel Stitch
This week on Ask Me Monday, I show how to crochet the Lemon Peel Stitch, a simple, textural stitch that’s great for really, any type of project. Give it a watch, then practice the technique while making an adorable sunglass case.
Have fun!
This episode of Ask Me Monday is sponsored by Knitter’s Pride/ KnitPro
See more KP products during “Vic’s Tips” segments of The Knit Show!
Featured Knitter’s Pride Products: Waves , Ginger, and Aluminum Crochet Hooks
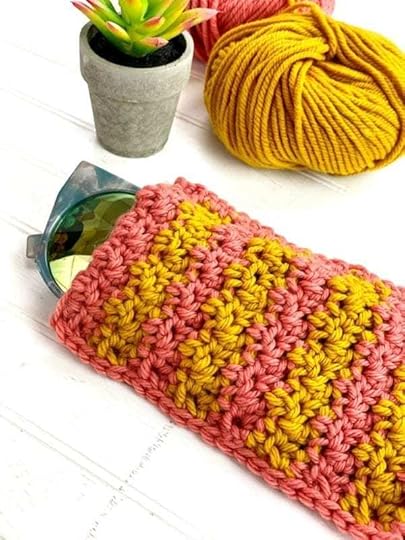
Lemon Peel Stitch Sunglass Case
MATERIALS
Valley Yarns Valley Superwash Worsted (100% Extra Fine Superwash Merino Wool; 97 yds), colors by Vickie Howell, in: (A) 1 ball Coral Corale, and (B) 1 ball Golden Girls
Size US 8/5mm Knitter’s Pride Ginger Hook
FINISHED MEASUREMENTS
4″/10 cm wide
6″/15 cm tall
GAUGE
12.5 sts x 12 rows = 4″/10 cm in Lemon Peel Stitch
ABBREVIATIONS & US to UK CONVERSIONS
DIRECTIONS
With A, ch 14.
Row 1: Sc in 4th ch from hook, dc in next st, *sc, dc; rep from * to end. Turn. –11 sts
Row 2: Ch 1, (doesn’t count as st), sc in same st, *dc, sc; rep from * to end. Turn.
Join B. (Note: carry unused color along side edge as you work.)
Row 3: With B, Ch 3 (counts as dc), *sc, dc; rep from * to end. Turn.
Row 4: With B, rep Row 2.
Row 5: With A, rep Row 3.
Row 6: With A, rep. Row 2.
Rep Rows 3-6 until piece measures 12″ from edge.
Fasten off.
FINISHING
Fold piece in half length-wise. Rejoin A, sc through both layers of piece, evenly down one side. Repeat for the opposite side.
Weave in ends.
Want another project Lemon Peel Stitch? Try the High-Five Fingerless Mitts, featured in May 2020’s YarnYAY! subscription pack!
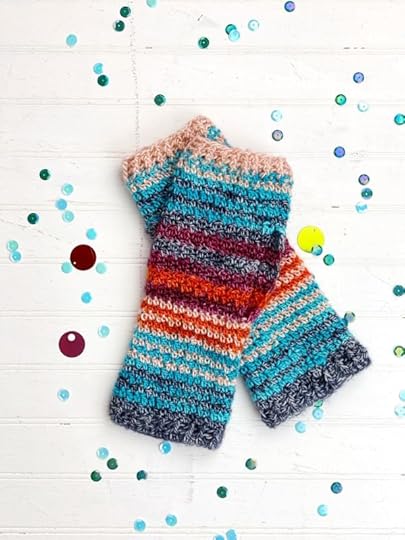
High-Five Crochet Mitts: Shown in Vickie Howell for Mad|Tosh Colors Snaps, Spirit Fingers, Heart Hands, Peace Fingers, and Pinky Swear
More Sunglass Case Projects
Mosaic Stitch Sunglasses Case
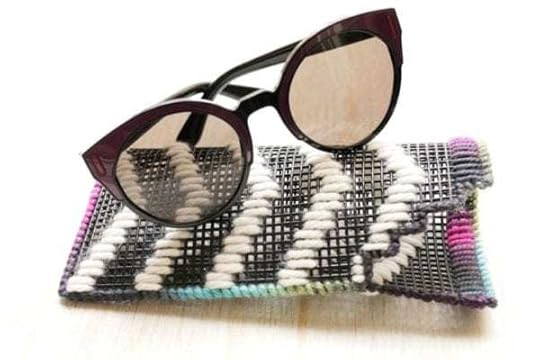
Plastic Canvas Sunglass Case
The post Lemon Peel Stitch Sunglass Case appeared first on Vickie Howell.
May 11, 2020
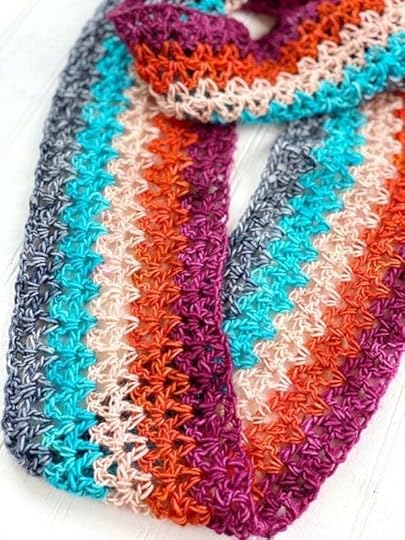
Singles Summer Scarf
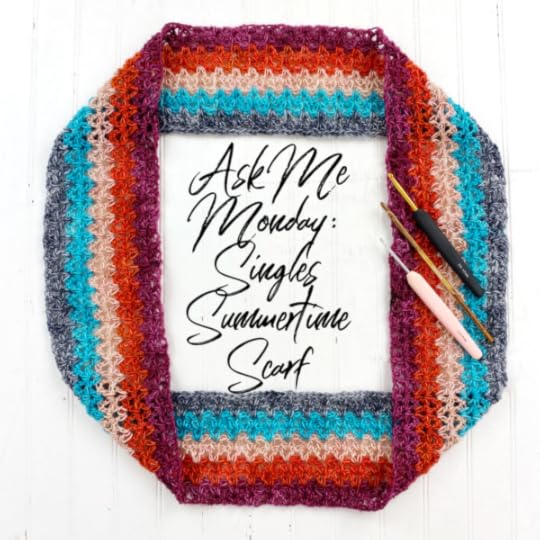
Singles Summertime Scarf: A Crochet Project for those fingering yarn singles.
mini hanks.
This week on Ask Me Monday I show how to crochet the Singles Summertime Scarf, the perfect project for using those fingering yarn singles mini-hanks that we’ve all collected from our favorite LYS. This project is great for beginners, a quick-make (I made this one in an evening) for more advanced stitchers, and a bright, happy addition to our warmer-weather wardrobes.
Watch the video, scroll down for the pattern, then tag @vickiehowell with your finished projects. Enjoy!
This episode of Ask Me Monday is sponsored by Knitter’s Pride/ KnitPro
See more KP products during “Vic’s Tips” segments of The Knit Show!
Featured Knitter’s Pride Products: Waves Crochet Hooks, Ginger, and Aluminum Crochet Hooks
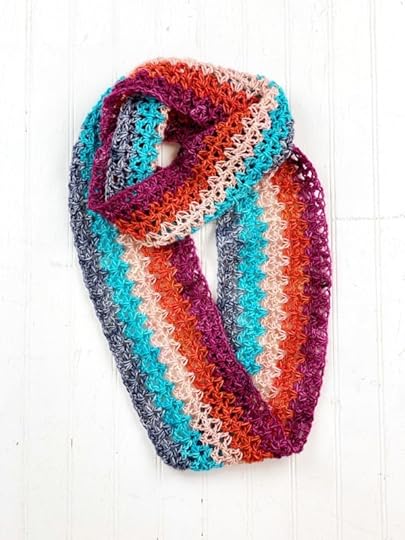
Singles Summertime Scarf
MATERIALS
Vickie Howell for Mad|Tosh Tosh Merino Light or Tosh Tweed Unicorn Tails (100% merino wool; 52 yd/17 gr), in colors: A) 1 hank Pinky Swear, B) 1 hank Peace Fingers, C) Heart Hands, D) 1 hank Spirit Fingers, and E) Snaps, or any fingering weight singles mini-hanks, in 5 different colors.
Size U.S. G/4.5 mm Knitter’s Pride Aluminum Crochet Hook
Knitter’s Pride Wool Needle, or equivalent tapestry needle.
FINISHED MEASUREMENTS
50″/127 cm circumference
4″/10 cm wide
GAUGE
20 stitches x 10 rows = 4″/10 cm in V Stitch
SPECIAL STITCH
“V” Stitch: Double crochet (dc), chain 1 (ch 1), double crochet (dc) in the same stitch.
DIRECTIONS
With A, ch 240.
Row 1: “V” stitch in 4th ch from hook, *sk 2, “V” stitch in next ch; rep from * to end. Turn.
Row 2: Ch 3 (doesn’t count as dc), *“V” stitch in ch-1 sp; rep from * to last st, dc in top of 3rd of beg ch. Turn.
Cut A; join B.
Rows 3-4: With B, rep Row 2.
Cut B; join C.
Rows 5-6: With C, rep Row 2.
Cut C; join D.
Rows 7-8: With D, rep Row 2.
Cut D; join E.
Rows 9-10: With E, rep Row 2.
Fasten off, leaving a long tail for seaming.
FINISHING
Weave in ends.
Using a wool needle and tail, stitch short ends together.
Block, if necessary.
Love this colorway? Get the High-Five Bundle, Mini-Hank Singles of My Colors of Mad|Tosh Yarn!
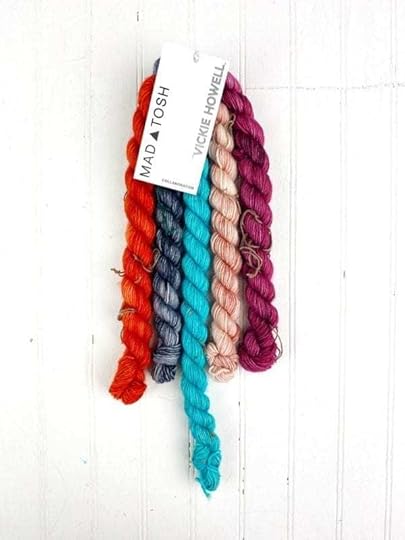
Vickie Howell for Mad|Tosh High-Five Bundle
The post Singles Summer Scarf appeared first on Vickie Howell.


