
April Davila's Blog, page 32
September 20, 2019
Lava Beds of California
 This post is part of an extended series I’m writing about California.
 You can find out more on my Why California page.
In the far northeast corner of California the terrain takes on an otherworldly appearance. Tall cinder cones and deep craters mark the land. Underfoot, hundreds of tunnels wind through the earth providing temperate and moist microclimates for local wildlife.
This is the land of the Medicine Lake volcano, 7900 feet tall and covering 700 square miles of land. Unlike volcanoes with a single opening at the top, Medicine Lake volcano is thought to have nearly 200 distinct vents.
During eruptions, the last of which occurred about 900 years ago, different accumulations of pressure under ground combined with the varied chemical content of the molten rock and create the diverse rock formations that characterize the region.
Before the arrival of Europeans, this area was home to the Modoc people and their ancestors, who are thought to have followed a localized yearly migration in the area for 11,000 years. In certain spots along the way, these early inhabitants left unusual, geometric petroglyphs carved into the cliff sides of volcanic tuff.
Unfortunately the Modoc war of 1872-73 dispersed the tribe before much was known about them, leaving the meaning of the ancient images a mystery.


September 18, 2019
Make It Easy On Yourself
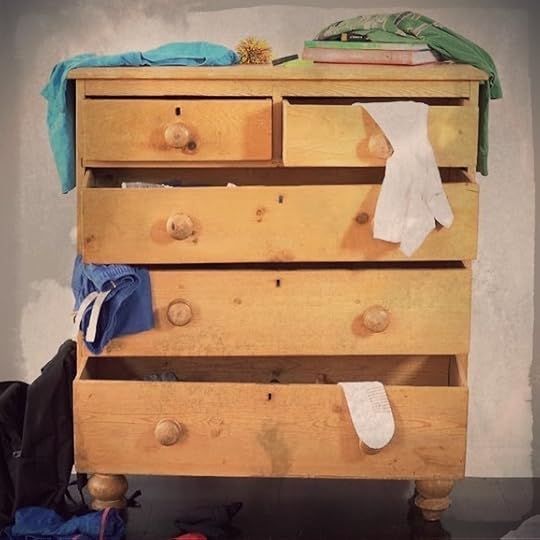
Years ago, I read in some magazine in some doctor’s office somewhere, an article about how to be less of slob. In particular, I was drawn to the section on how to keep my closet in order, because I have no patience for closets.
Anyway, there was one piece of advice that really stuck with me. The author talked about fixing all the little things that annoy you about a task. For instance, she recommended fixing or replacing any drawers that stick or catch, getting rid of broken hangers, etc. The idea was that little annoyances, which seem like nothing, actually build up in our heads creating aversion and if we deal with them, the work at hand actually feels less daunting. And you know what – it totally worked.
Clear Away The Annoyances
Since then, I’ve applied the principal to my writing and it works just as well at my desk as it does in my closet.
Here are 4 ways I have discovered to remove tiny annoyances that can build up in my brain and make me avoid my writing.
Stop writing before you’re out of ideas. It’s a great way to deal with the anxiety that comes from not knowing where to start. I’ve even heard some writers say they stop mid-sentence, so that the task of getting started the next day is a non-issue. They know right where to start. Find a writing software that works for you. If you’ve followed the blog for any length of time, you know I’m a big fan of Scrivener, but it’s certainly not the only thing out there. Find some software that you like, even if it requires spending a little money. As writers, we don’t have a lot of expenses, and a good writing program is worth every penny. Get comfortable. If your writing space hurts your back, there’s going to be a part of you (your back) that doesn’t want to sit down when it’s time to write. Doesn’t matter where you write. I wrote on the couch every morning for years. Just make sure it’s somewhere you want to sit. Have supplies handy. It could be a pen you like, a cup of coffee, tissues, or a candle that you light to summon the creativity muse. Whatever. I used to keep a pair of fingerless gloves handy for cold mornings. These days, I keep nail clippers handy because I can’t stand it if my nails click against the keyboard. You get the idea. If it’s something you might want to get up to retrieve, go ahead and put it where you plan to write. It will make the space that much more inviting.
Don’t Be Too Precious About It
All that said, you can’t be a princess either. There will be times when you suddenly find you have an hour to kill and you want to write, but all you have is a ball point pen and a few old receipts to scribble on. Go for it.
You absolutely don’t need a comfy space and good writing software to get the words down, but when you’re looking to build a routine, to make a regular practice of writing, dealing with the little things can make all the difference.
Happy writing.
September 17, 2019
Writing Tip Tuesday: Quotation Marks
 Welcome to Writing Tip Tuesday, the Quotation Marks edition. This is the seventh in a series of posts pulled from my free guide “On Not Writing Badly.” You can download the whole thing by filling out this form, or, if you’d rather not subscribe to my email list, you can simply check back here over the next several Tuesdays for a regular dose of word nerdery.
Quotation Marks
Rule 1: Quotation marks are used to denote that something was said.
Example: Drake told the jury that the defendant was “guilty of murder” and should be held accountable.
Rule 2: Punctuation almost always goes inside quotation marks (for American English).
Example: “I’m planning to take some time off,” she said, “once I finish this project.”
Example: He said, “Hang on tight!” Then he hit the gas and the car launched onto the highway.
EXCEPTION: When the quote itself is not the question.
Example: Who said, “It is better to have loved and lost”?
Rule 3: If the words before a quote are any version of “to say,” you need a comma
before the quote.
Example: As Franklin advised, “Plough deep while sluggards sleep.”
Rule 4: Quotation marks should not be used to add emphasis.
Please, please, please don’t use quotation marks for emphasis. If you learn only one thing from me ever, let it be this. Every time I see a sign that says EVERYTHING IN THE STORE IS “50% OFF” I wonder if maybe someone just said it was 50% off, but really it’s not.
September 16, 2019
Scrivener Snapshots
We’re continuing the #52WeeksOfScrivener series today by working our way through the Inspector window. Last week we talked about the different things that can be done with Meta-Data. Today: Snapshots.
As writers, we are forced to make decisions every day. Which characters will live, which will fall in love, which will be successful in their adventures… We make choices, we write, and sometimes, we realize we were wrong.
A Jumble of Files
This kind of haphazard decision making has happened to me enough that I pretty much assume any decision I make could be a wrong move. But I don’t let it slow me down. I simply save my working draft under a new name and push forward.
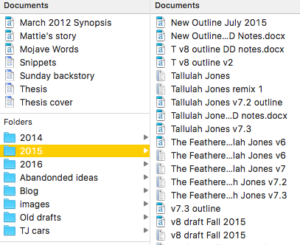
As a result I used to end up with files and files of slightly different versions of my story. Over the years, it got difficult to find anything I once had. My file folders fill up with similarly named docs, and frankly, if I ever need to find anything, it was a total headache.
Scrivener to the Rescue
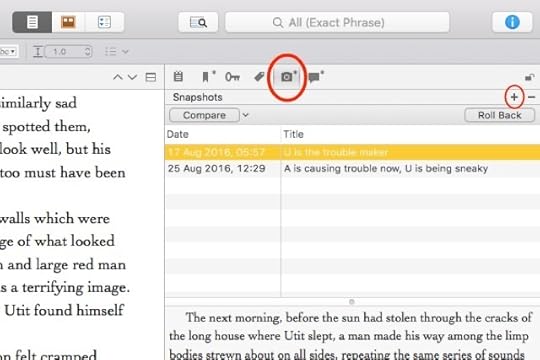
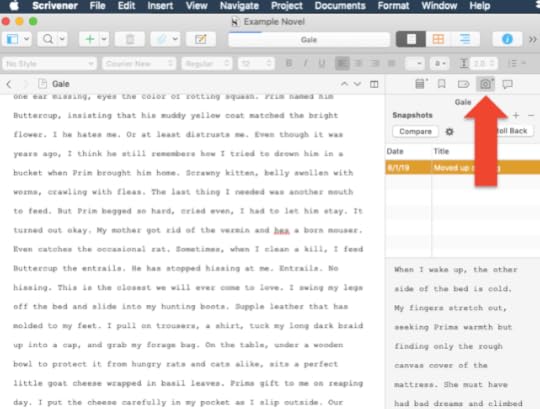
So I was SUPER excited to discover Scrivener Snapshots. It’s that little camera icon in your Inspector window (see image below). If you click on it, your side bar will display your snapshots.
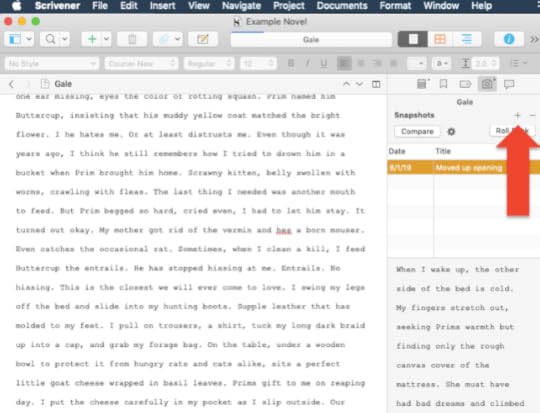
And what’s a snapshot? Well, if you click that little + icon, you can save exactly what you have written, in this version, and give it a short description. Then you can go ahead and jump into editing, knowing that, at any point, you can pull up the old draft in the side bar, or even revert back to what you had, with the click of a button (specifically, that button that says “Roll Back”).
You can even use snapshots to compare drafts. I haven’t had cause to use this little trick just yet, but if you’re interested, you can check out this snapshots instructional video by Scrivener explaining all the juicy details.
One Important Note
The one thing I didn’t realize when I started was that, when you take a snapshot, you are only grabbing what has been written in the section you are actively working on. For instance, if you are working in composite mode and you take a snapshot, you are not capturing the entire composited folder. You will only capture the pages you are working on.
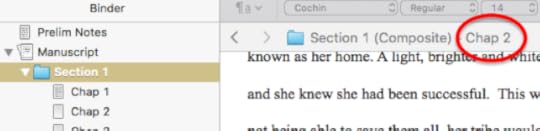
In the example shown here, if I take a snapshot, I will capture Chapter 2 in its entirety, not Section 1 in its entirety. If you tend to have a lot of chapters in each section (like I do), it’s an important distinction.
For the Win
I started using snapshots a few months ago and have absolutely loved not having to hunt around in my files for old versions when I want to see what I had on a different day.
If you’re feeling nervous about it, go ahead and save your entire project with a backup name. Experiment a little on a test draft, but once you’re comfortable with the fact that you know what you’re doing, let go of the hundreds of back-up copies. Your life will be simpler and your writing will be easier.
Next Week
Next Monday we will explore the last item in the Inspector, the Comments & Footnotes. Stay tuned, follow on Twitter with #52WeeksOfScrivener, or sign up for my newsletter to get a weekly digest of all my posts.
September 13, 2019
California Cuisine
 This post is part of an extended series I’m writing about California.
 You can find out more on my Why California page.
Generally credited as the creator of California Cuisine, Alice Waters opened her restaurant Chez Panisse in Berkeley in 1971.
Focusing on high quality, local, and seasonal ingredients, her style of cooking is characterized by a light touch. Artichokes, strawberries, squash or snap peas, the specific ingredients are not as important as the fact that they come direct from the farm and are prepared in a way that preserves their natural flavors.
Sauces and dressings are kept to a minimum. Olive oil is favored. Cheeses and breads are made by local artisans. While meat is usually on the menu, the fine print often tells where and how the animal was raised.
Thanks to the region’s many micro-climates, an incredible variety of food can be had throughout the year and the best Chefs pride themselves on maintaining close relationships with local, organic, and family run farms.
California cuisine is about the culture of fresh, delicious food. From the farmer to the dinner plate, it embraces the best of what Northern California has to offer.
September 11, 2019
The Big Box of ARC

Guess what I found on my doorstep last week?

A whole box of Advanced Reader Copies!
For anyone still learning the ropes in this crazy publishing business, the ARC (Advanced Reader Copy) is an early version of the book that gets sent out, way ahead of the publication date, to reviewers, news outlets, bloggers, etc. Basically, they’re for getting early press and reviews online and in print. So exciting.
After gazing lovingly at them for a few minutes I rushed to my computer to email my publisher something like “what do I do with them?”
He responded (and can I just take a moment to say how awesome it is to have an editor who responds to my emails within minutes?) that they were mine to send out.
To which I responded: is this the only box I get?
In short: yes.
I started stressing because I thought: 24 copies isn’t enough! I mean, I haven’t actually created a list of people that I thought should get ARCs, but I figured, when I got around to it, there would be more than 24 people on the list.
Then I (thankfully) had a moment of clarity. See, I can get kind of in my head on these things and start thinking I have to do everything myself. But the whole reason I decided to go the traditional publishing route was to take advantage of the resources that publishers have at their disposal.
So I emailed the woman in charge of PR for my book and asked if she could send me a list of people they plan to send ARCs to, so we don’t duplicate efforts and the response floored me.
She sent me a spreadsheet with 214 names on it noting that the list doesn’t include trade publications, bookstores or bookstagramers. Those are all on another spreadsheet.
Granted, I have no frame of reference, but the thought that my book is going out to so many people is really exciting. And it makes my 24 copies feel like exactly what they should be: copies that I can share with readers that I have a personal connection with.
So I’ve started making my list, focusing on the readers in my life, people who will leave an honest review on Goodreads or Amazon in exchange for the book. If that’s you, leave a comment and I’ll send you a book. Offer good as long as they last.
Cheers!
September 10, 2019
Writing Tip Tuesday: Dashes & Hyphens
Welcome to Writing Tip Tuesday, the Dashes & Hyphens edition. This is the sixth in a series of posts pulled from my free guide “On Not Writing Badly.” You can download the whole thing by filling out this form, or, if you’d rather not subscribe to my email list, you can simply check back here over the next several Tuesdays for a regular dose of word nerdery.
Dashes & Hyphens
En-dashes
Joins numbers in a range. The en-dash should not be confused with the em-dash, which is slightly longer.
Example: Contestants with numbers 4-12 were called to the next round.
Minus Signs
Used to demonstrate a mathematical equation. It looks the same as an en-dash, but has spaces on either side.
Example: 5 – 3 = 2
Em-dashes
Used like parentheses to pull out an independent phrase, but reserved for phrases of more importance. In most word processing programs, they are a special character. Note that they are about twice as wide as an en-dash.
Example: The group consisted of three men—Jack, Abe, and Zach—who worked in local government.
Note: The em-dash tends to emphasize material, whereas parentheses de-emphasize.
Hyphens
Rule 1: Used to join two or more words that come before the noun they are intended to modify.
Example: An off-campus apartment (use hyphen)
Example: The apartment was off campus. (no hyphen)
Rule 2: Used to tell the ages of people or things when the age is given before the noun.
Example: A two-month-old baby (use hyphen)
Example: The baby was two months old. (no hyphen)
Rule 3: Used to write out numbers under 100 and fractions
Example: Two-thirds
Example: Thirty-six
Words That Should Always Be Hyphenated
Any words using the prefix “ex”: ex-wife, ex-employee, ex-husband
Any words using the prefix “self”: self-doubt, self-evident
Any words using the prefix “all”: all-inclusive, all-around
Any words using the prefix “anti” where the second word starts with an “i”: anti-inflammatory
Any hyphenate where the second word must be capitalized: un-American, non-English
September 9, 2019
The Scrivener Inspector: Meta-Data
We’re continuing the #52WeeksOfScrivener series today by working our way through the Inspector window. Last week we talked about the different things that can be done with Bookmarks. Today: Meta-Data.
Okay, so, if you cringed a little bit when you read the term meta-data, don’t worry. It’s not quite all so scary as it might sound. In fact, using meta-data in Scrivener 3.0 is WAY easier than it was in v2.
In short, meta-data is just information about data. In practical terms, meta-data allows you to make notes about the parts of your project, and the fact that Scrivener allows you to set it up however you want means you have endless flexibility in how you use it. Here’s how it works.
Open the Custom Meta-Data Window
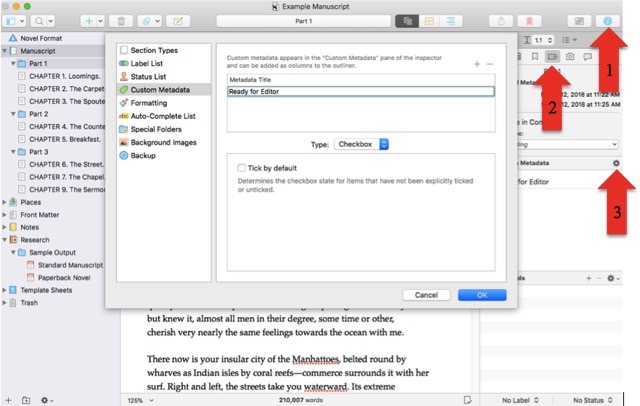
1) Make sure your Inspector Window is open
2) Click the little tag icon
3) Click the settings wheel next the section heading for Custom Meta-data
You’ll get a pop-up window that looks like this:
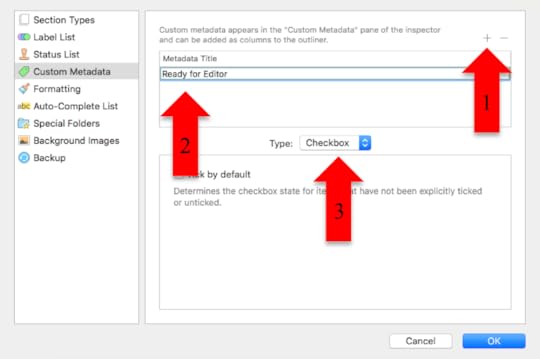
Create Some Meta-Data
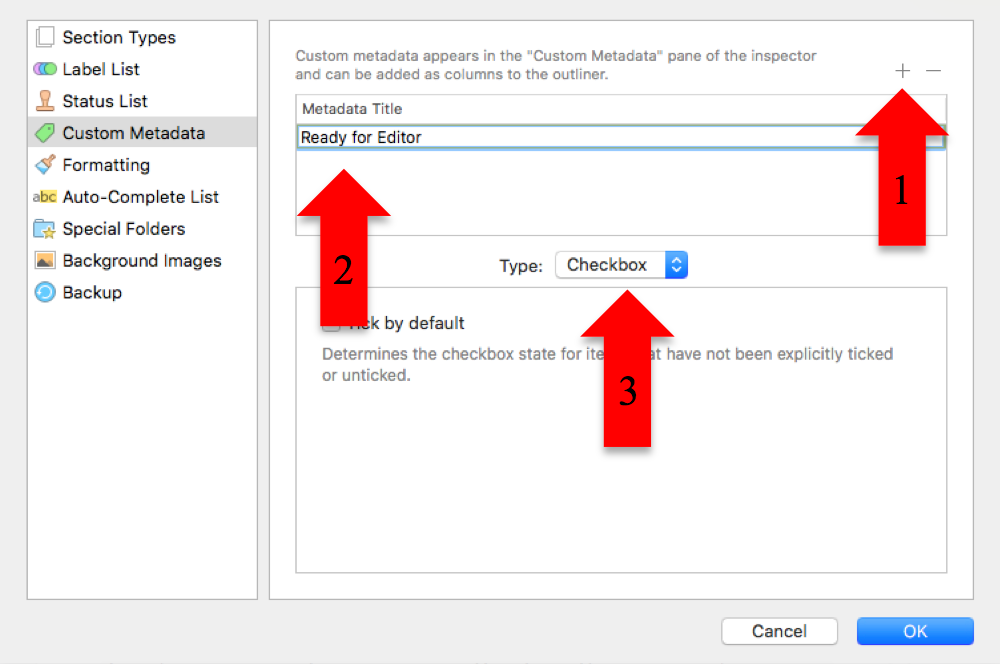
1) Click the little plus sign at the top to get a blank space where it says “meta-data title”
2) Enter a title. For this example I’m using “Ready for Editor”
3) Right below that window is a drop down box for “Type.” Choose “Checkbox.” (For this example, I decided to go with the checkbox option, because it’s nice and simple, but once you’re comfortable with it, you can play around with the other options, using lists, dates and text.)
4) Click “Okay”
Use Your Meta-Data
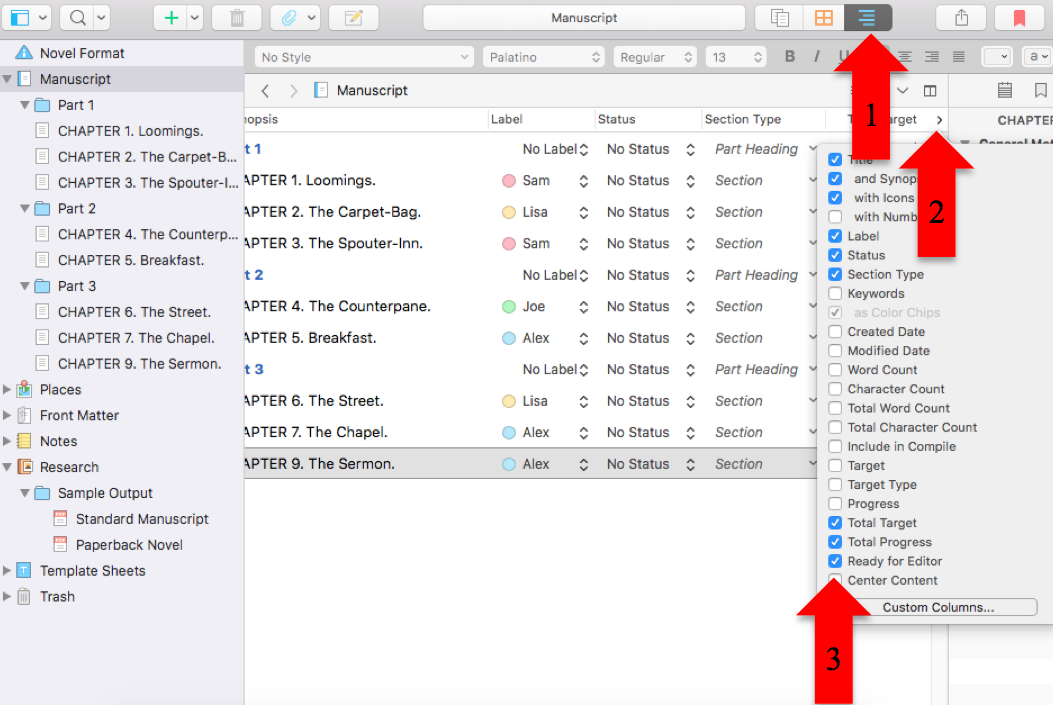
Okay, so now you’ve created meta-data. So what?
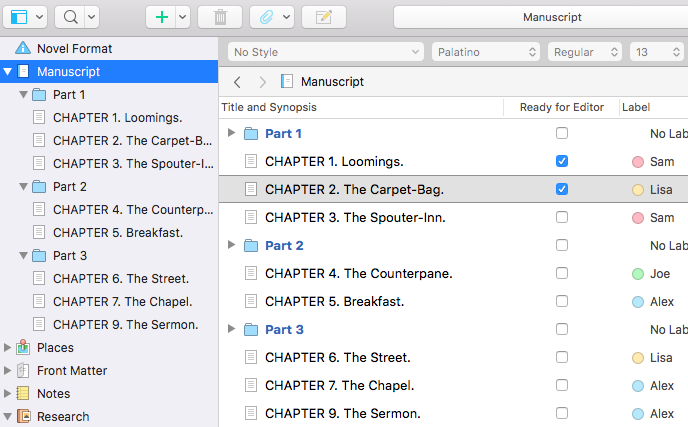
1) Click to view your project in outline mode.
2) Find the little greater-than symbol and click there to get a drop down of all available meta-data.
3) Find the check-box for the meta data you just created and check it.
Now your new header of “Ready for Editor” will show as a column header in your outline view. Click and drag it to move it left, and you get something like this:
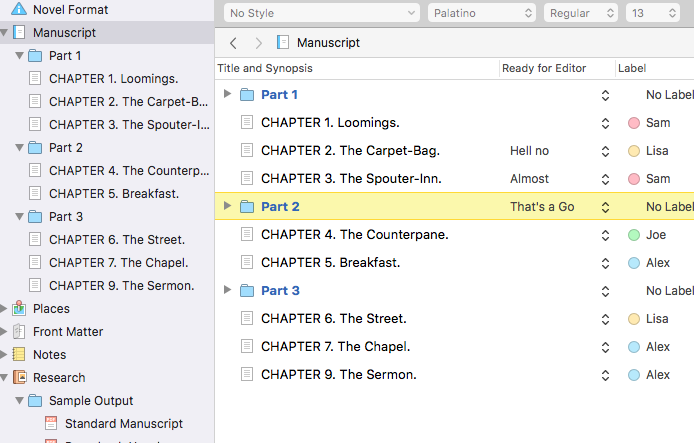
Here’s what it would look like if I had set it up as a list of options instead of check box:
Custom Field Love
With that last example you can start to see the benefit of being able to set things up yourself. Because maybe you’re not interested in tracking whether each chapter is editor-ready. Maybe you are more concerned with mentioning Taylor Swift in every chapter. Or maybe you want to make sure your main character gets naked in every other scene. You could set up some meta-data headings like this:
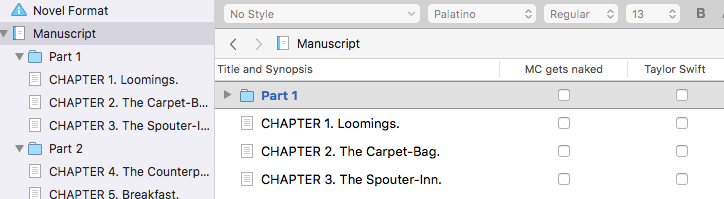
There’s frankly no way Scrivener could predict all the possible meta-data tags we, as writers, might want. So it’s kind of awesome that they make it possible for us to create our own.
Have you played around with your meta-data at all? If you’ve devised any cool tricks, lay ’em on us. I always love to see how people make this software work for them.
Next Week
Next Monday we will explore Snapshots, that little icon in the Inspector right next to the Meta-data, the Snapshot. Stay tuned, follow on Twitter with #52WeeksOfScrivener, or sign up for my newsletter to get a weekly digest of all my posts.


